SORCERERS LAIR TABLE GUIDE BY SHORYUKENTOTHECHIN - PAGE 1 OF 30
←
→
Page content transcription
If your browser does not render page correctly, please read the page content below
Page 1 of 30

    Sorcerers Lair Table Guide
     By ShoryukenToTheChin

7

                     8

             5
                 6

          4

         3                   10

                         9

     1
          2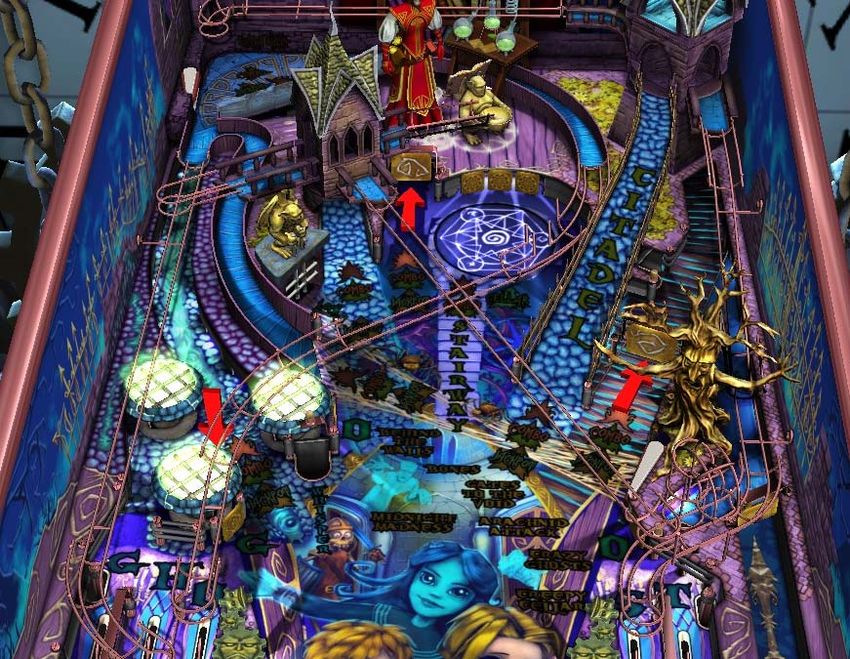
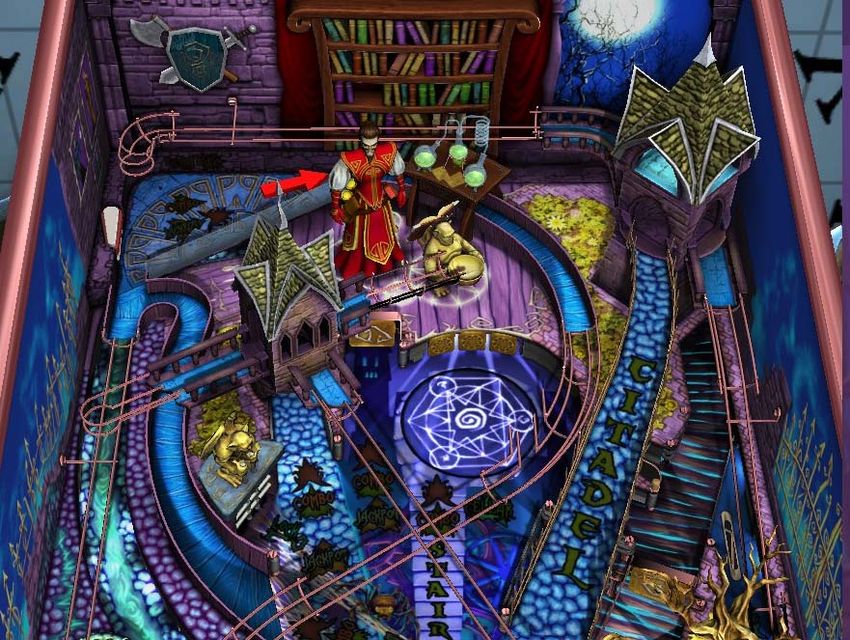
Page 2 of 30

Key to Table Overhead Image –

   1. Left Orbit
   2. Whisper Sink Hole
   3. Ghost Ramp
   4. Gargoyle Multiball Target/Sink Hole
   5. Tower Ramp
   6. Tower Mini - Orbit
   7. Extra Ball Ramp
   8. Mission Runes
   9. Citadel Ramp
   10. Right Orbit

In this guide when I mention a Ramp, Lane, Hole etc. I will put a number in brackets which will correspond
to the above Key, so that you know where on the Table that feature is located.
Page 3 of 30
TABLE SPECIFICS
Notice: This Guide is based off of the Zen Pinball 2 (PS4/PS3/Vita) version of the Table on default
controls. Some of the controls will be different on the other versions (Pinball FX 2, etc...), but everything
else in the Guide remains the same.
INTRODUCTION
This Table is great; I like to think of it as Nightmare Mansion 2 so to speak or its spiritual successor if that
makes any sense. The theme of the Table down to its BGM (Back Ground Music) give that important sense
of creepiness which a Table like this requires. The flow of the Table is nice and you feel like you are truly
embarking on an epic journey through the Sorcerers Lair.
Overall the Team once again have done such an amazing job they are truly reinventing Digital Pinball with
every new Table they push out. May this long continue
I hope my Guide will help you understand the Table better.
Page 4 of 30

Obsidians Stones *Note – This is one of the most important aspects of the
Table*
These are awarded when you complete certain tasks which I will point out and explain in further detail later
in this Guide; these acts more of a Nitro Boost to your score when you tackle the Wizard Mode (Final
Mission), called Midnight Madness of the Table. So, whatever you score is at the end of Midnight Madness,
will be multiplied in accordance to how many Obsidians Stones you have attained to that point.

The calculation is as follows:

If you have no stones your score is multiplied by 1. For each Stone you have collected (to a max of 13) your
score is multiplied by an additional half (.5). If you complete it with 13 Stones you also get an additional
bonus of 50 Million Points, but all the Stones will then reset to 0 again.

Here is an example: If you score 36 Million Points during Midnight Madness and you have collected all 13
Stones prior to it you score will be multiplied by 7.5 (1 + 6.5) for an end wizard score of 270 Million Points.
You also get an extra bonus of 50 Million Points for completing it with all 13 Stones. For each Mission, you
can only achieve 2 Obsidian Stones before you get to 13 and for each of the other tasks you can only achieve
one Obsidian Stone. You first need to complete Midnight Madness with 13 Obsidian Stones before the
Table resets and you will be able to earn further Obsidian Stones again.
Page 5 of 30

Skill Shots -
Skill Evade - *300,000 Points*

To successfully acquire a Skill Shot you should launch the Ball using Manual Launch mechanic, you will
see that the Spring on the Launch will move down. You will need to have the Spring at this point; this can
be seen in the image below from the Mini Camera view –

                                                                               This is how the Blue
                                                                                Tank should look.

                                                                                       This is how far the
                                                                                       Spring should be.

Super Skill Shot - *1 Million Points*

Once you successfully achieve a Skill Shot, the Ball is then received to the Right Flipper, but make sure to
be careful as it won’t be slow enough to hold onto. You then need to hit the Ball up the Tower Ramp (5)
within a strict time limit of about maybe 5 seconds. For completing that shot you will be awarded with a
Super Skill Shot.
Page 6 of 30

Kick Back & Ball Save
Kickback -

Both the Left & Right Kickbacks (Secret Passages) are activated by lighting the letters which spell out
‘GHOST’. Once successfully lit the Left Kickback is activated, repeat the above for Right Kickback. Shown
below you can see where these are located –

             ‘G’          ‘H’        ‘O’                                     ‘S’        ‘T’

                   *Note – Any Kickbacks activated will be wont reset upon the Ball draining. *
Page 7 of 30
Ball Save
Ball Save is activated by shooting the Ball up the Citadel Ramp (9). Now the Citadel Ramp (9) alternates
between going to the Top Left of the Table (This is where you want it to go) or to the Top Right of the
Table. This essentially means that on every other hit the Ball will go to where you need it to go, which is a
sort of Mini – Playfield where the Top Left Flipper is located. When the Ball enters this Playfield, you must
time your hit of the Ball with the Top Left Flipper so that the Ball ends up going on the Extra Ball Ramp (7).
After you do this once you will notice on the Dot – Matrix that it will say 3 more to light Ball Saver, so you
need to repeat the above a further 3 times to activate the Ball Saver.
Another 2 ways to light Ball Save –
Locking a Ball into the Tower Ramp (5) (every third shot).
Locking a Ball into the Gargoyle Multiball Target/Sink Hole (4).
*Note - This Table doesn’t remember the successful hits to the Extra Ball Ramp (7) if you drain the Ball.
For example, you need 2 more to get Ball Saver, now if you lose the Ball that counter resets to requiring 4
hits*
*Note – This Ball Save will expire once its 30 Second timer expires or you drain the Ball, whichever
comes first. *
Page 8 of 30
Extra Balls
There are 5 Ways to achieve an Extra Ball;
Collect the Extra Balls by hitting the Ball at the Extra Ball Ramp (7).
Method 1: Make a 6-way combo; Try to find a system with which you hit a series of Ramps etc.
you are comfortable with*Once you have achieved the 6-way combo you are rewarded with 300,000
Points for each further shot of that combo run. At some point during the game (which I don’t know
yet how it is triggered) each further shot can reward you with 1 Million Points!
*Note - Although you can get more than one combo Extra Ball in a game, you must first go
through Midnight Madness (Wizard Mode/Final Mission) if you have already scored and extra
ball that way before you will be able to light it again!!!*
Method 2: Random gift from Whisper; View the “Whisper Rewards” Section of this Guide.
Method 3: Reach 10x Multiplier; View the “Raising the Multipliers” Section of this Guide below
this page.
Method 4: Make 10 Elusion Mastery Combo's; View “Elusion Mastery Combo” Section later in
this Guide.
*Note – I have noticed that the easiest Extra Ball to gain is the 6-way combo one, that is usually the first
thing I do when beginning a game. The second Extra Ball I go for is the Random gift from Whisper.
Each Extra Ball can only be earned once per ball*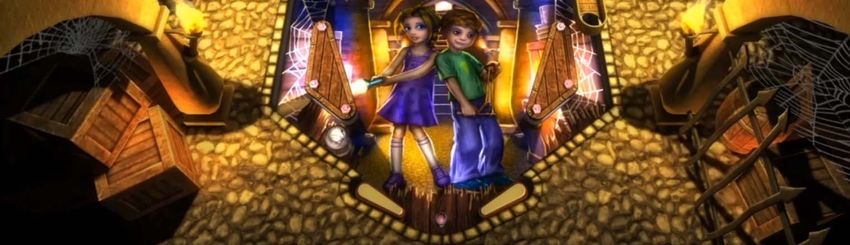
Page 9 of 30

Raising the Multiplier
To raise the Bonus Multiplier, you will need to hit the 3 “GOO” Rune Targets. Upon doing so the Multiplier
will be raised to 2x times. Repeat this process to raise it again to 4x times, each time it will raise by 2x
times, until it maxes out at 10x times.

Below shows you where those Runes are located –
                                                                   ‘O’

                ‘G’                        ‘O’

                         *Note – Multiplier Level resets upon draining the Ball.*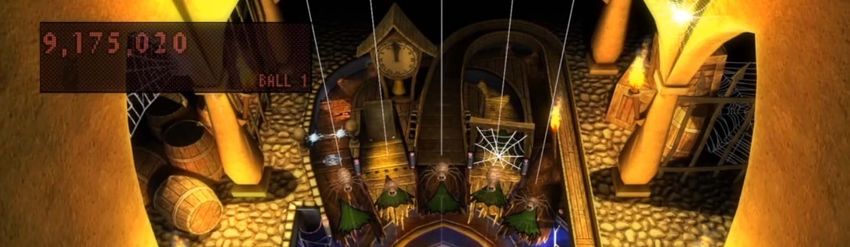
Page 10 of 30
Whisper Rewards
To acquire a Whisper Reward, you must hit the Whisper Sink Hole (2) a total of 4 times, you will then be
awarded one of the following Random Awards -
100,000, 200,000 or 300,000 Point scores.
Kickback (Secret Passage) is activated.
Extra Ball.
Hold Bonus; Multipliers won’t reset upon Ball draining.
Crazy Bumpers.
Crazy Spinners.
Crazy Combo (?).
Stairway is collapsing; To complete this Mode, you will need to shoot the ball three times in a row
into the Stairway ramp. You have a relatively short time of around 10 seconds between shots with
your potential score counting down the whole time. The max I have scored for these three shot
modes is around 9 Million Points.
*Note – One of the most dangerous areas on this Table for a ball drain is around the Whisper hole so
your safest bet is to only go for the Whisper hole if you have ball save activated. Don’t say I didn’t warn
you! *Page 11 of 30 Elusion Mastery Combo To achieve such a combo, you must first hit the Ball around the Left Orbit (1) After, as the Ball is coming around the Orbit and exiting the Right Orbit (10) entrance, you must then hit the Ghost Ramp (3) with the Top Right Flipper. This will then award you with an Illusion Mastery Combo. Now if you repeat this a further 4 times, you will then be awarded with the Rank of Elusion Expert and you are awarded an Obsidian Stone.
Page 12 of 30

Tower Crawler Combo
To be able to perform this sort of combo you must first hit all 3 of the Mission Runes (8). This in turn will
allow the Stairway to raise and become accessible to you, as shown below–

             Stairs Ramp (You Need to hit this,
                  ignore the one beside it)

Once you hit this you will then have to hit a series of Ramps to achieve a Tower Crawler Combo. This first
of which is you need to hit the Citadel Ramp (9).
Page 13 of 30
Once the above Ramp is hit, you will need to hit the Tower Ramp (5),
Finally, you need to hit the Ball back up the Stairs Ramp (the same Ramp you used to start this combo).
After you have hit that you will then be awarded with some points but more importantly an Obsidian Stone.
*Note – As I explained earlier in the Guide these are important for when you tackle the Midnight
Madness Wizard Mode, as they multiply your score achieved.*
You can continue the combo for as long as you can to amass loads of points.
Ghost Ramp
Each time you hit the Ghost Ramp (3) during the game you are awarded with a score. The first time you hit
it, the score is 50,000 Points but for each subsequent hit with that same ball the score increases with 25,000
Points. Initially it is insignificant but eventually, after 40 hits with the same ball you are awarded with the
maximum of 1 Million Points for each subsequent hit. If you lose the ball the score amount is reset to 50,000
Points again.Page 14 of 30
Hurry Up Modes
Freaky Forest
Activation –
To start this Mini-Game you must perform 6 Forest Loops, a Forest Loop is achieved by hitting the Left
Orbit (1) or Right Orbit (10).
After you have done the above a further 5 times, the Freaky Forest Mini Game will begin.
Completion *Timed – 30 Seconds or so* –
You will have a set time limit to hit the Tree by hitting the Citadel Ramp’s (9) entrance. Repeat this a further
2 times to complete this Mini Game and obtain an Obsidian Stone.
Shown below is how the Mini Game looks when active on the Table –
To Hit the Tree, hit the Ball towards the Citadel Ramp (9).Page 15 of 30
Multiball Modes
There are 3 Multiball Modes available on this Table;
*Note – The Jackpot value is increased by hitting the Bumpers at any time during the game. It is though
not permanently increased and will reset to the base of 1 Million Points each time you achieve a
Jackpot.*
Gargoyle Multiball Mode *3 Balls*
Activation –
To activate this Multiball Mode you must lock 3 Balls in the Gargoyle Multiball Target/Sink hole (4); now
that Sink Hole is closed but to open it up you must hit the Tower Mini – Orbit (6).
As the Ball is exiting the Right Orbit (10) entrance, you must then hit the Ball with the Top Right Flipper so
that the Ball goes into the Gargoyle Multiball Target/Sink hole (4).
This is kind of awkward and if you fail to hit the Ball into the Gargoyle Multiball Target/Sink hole (4) you
must then hit the Tower Mini – Orbit (6) again as the Gargoyle Multiball Target/Sink hole (4) closes if you
fail to hit it first time. Once you have locked 3 Balls, the Multiball Mode will start.Page 16 of 30 Mode itself - The 3 Ball Multiball will then begin: You must hit these ramps to collect the Jackpot - Left Orbit (1) Ghost Ramp (3) Tower Ramp (5) Tower Mini – Orbit (6) Citadel Ramp (9) Right Orbit (10) Once you have hit all the above, you are then able to collect the Super Jackpot, which is collected by hitting the Extra Ball Ramp (7). Also, note once you collected the Super Jackpot you are awarded with an Obsidian Stone. Note that once you have done the Super Jackpot shot once and were awarded with an Obsidian Stone, you can’t get another one. The Multiball Mode will continue as long as you have more than a single Ball alive on the Playfield. Otherwise the Mode will end, and you will need to repeat the above activation process to re-enter this Mode.
Page 17 of 30 Sorcerer Multiball Mode *3 Balls* Activation – To activate this Multiball Mode you must lock 3 Balls in to the Tower Ramp (5), now the locking process is only available on the 3rd Shot up the Tower Ramp (5). When you achieve the 3rd shot the Ball is locked and another is launched, repeat the above process a further 2 times to activate Sorcerers Multiball. Mode itself - Once this mode is active, you will be given 3 Balls your objective here is to send a Ball – Left Orbit (1) Stairway Ramp *Note – View Tower Crawler Combo section if you don’t know yet where this is* Citadel Ramp (10) Once you have hit those 3 you are then tasked with locking the remaining Balls by hitting the Tower Ramp (5), when you are down to 1 Ball after locking at least 1 Ball. A timer will engage which you will need to lock the final Ball in the Tower Ramp (5) failure to do so will end the Multiball mode. If you manage to lock all 3 Balls, you will be rewarded with some points along with an Obsidian Stone. The Multiball Mode will continue as long as you have more than a single Ball alive on the Playfield. Otherwise the Mode will end, and you will need to repeat the above activation process to re-enter this Mode.
Page 18 of 30 Whisper Multiball Mode *2 Balls* Activation – To activate this Multiball Mode you must hit the Citadel Ramp (9) 7 times, each time you hit the Ramp successfully you gain a letter towards spelling Citadel. Once you have lit all the Citadel letters the Multiball mode will begin. Mode itself - This is a 2 Ball Multiball, now all you need to do is hit whatever Ramp/Orbit that Whisper hovers over, these include – Ghost Ramp (3) Tower Ramp (5) Tower Mini – Orbit (6) Right Orbit (10) After 5 successful Jackpots you need to hit one of the Balls up the Citadel Ramp (9) and into the Extra Ball Ramp (1) to achieve the modes goal. At that point the currently selected Main Mission will be automatically completed and if you have not already scored 2 Obsidian Stones with that Mission (before having to go through a 13 Stone Midnight Madness to reset the count) it will also be awarded. Otherwise, this mode will continue forever from my experience as long as you keep both Balls in Play, you get about a Million Points every successful hit.
Page 19 of 30

                                   Main Missions
This Table has 6 Main Missions. Note - starting all 6 Main Missions at least once will allow access to the
Wizard Mode.

To begin the Main Mission activation process. You must first hit all 3 of the Mission Runes (8).

This in turn will allow the rotating disc to raise the Stairway Ramp and Mission Activation Sink Hole, as
shown below. To start a Main Mission, you will need to hit the Ball into the Mission Activation Sink Hole.

The Mission that will start when you hit the Mission Activation Sink Hole is the one that is highlighted at
that moment (seen just above the Flipper area of the Playfield). Each time you hit the Bumpers the
highlighted Mission moves to the next of the remaining Missions

   *Note – You only need to start and do not need to complete any of the Main Mission for it to count
     towards your Midnight Madness activation progress but only when you complete the Mission
   successfully, are you awarded with an Obsidian Stone which will multiple your Midnight Madness
                                                score.*
Page 20 of 30 “Gates of the Void” *Timed – 40 Seconds* When this Mission begins, you will notice that 4 Portals will appear at the entrance of 4 Ramps/Orbits, these are as follows – Ghost Ramp (3) Tower Ramp (5) Tower Mini – Orbit (6) Citadel Ramp (9) The objective here is to hit the Ball at those Portals so that they close, but wouldn’t you agree the Ball needs maybe something extra to achieve this…. You would be right of course! Before you hit the Ball at the Portals or Gates whatever they are called, you must first hit the Whisper Sinkhole (2) this will transform the Ball with the help of our lil’ friendly Ghost, Whisper.
Page 21 of 30

After this you will notice the Ball is bright Blue, be very careful because the Balls physics are altered in this
state.

Now hit those 4 Portals within the Time Limit, you will be rewarded with points and more importantly an
Obsidian Stone.
Page 22 of 30 “Bones” *Timed – 40 Seconds* To complete this Mission, you need to escape from the clutches of the Skeletons, to do this you must hit the Spinners and Bumpers etc. The Spinners are located – Left Orbit (1) Tower Mini – Orbit (6) Right Orbit (10) The Bumpers are of course located just inside the entrance of the Left Orbit (1). To complete this Mission, I tend to just keep hitting the Tower Mini – Orbit (6) & Right Orbit (10), if you get the timing right it can be done within a Combo. After about 3 or so successful hits the Mission is completed, you will be rewarded with points and more importantly an Obsidian Stone.
Page 23 of 30

“Arachnid Attack” *Non ‐ Timed*
I find this very fun as you are taken to a hidden Mini-Playfield, so you get that sense of going into a secret
passage way. To complete this Mission, you basically need to hit all the Spiders which are located on the 5
Ramps/Orbits on this Playfield.

  *Note – The centre drain of this Playfield has a little Peg in the Middle this will sometimes bounce the
 Ball back into to play, so try to keep your cool if it’s going down the Middle as it might be bounced back
                                                      up. *

Below I have attached a screenshot of this Mission –

                                                                          After you defeat all the Spiders, you
  The Peg that will bounce the Ball back                                  must exit through this Ramp/Orbit to
              up if it hits it.                                                  Complete the Mission.

Once you have defeated all the Spiders, you must exit through this Ramp/Orbit to Complete the Mission.
You will be rewarded with points and more importantly an Obsidian Stone.
Page 24 of 30
“Behind the Walls” *Non ‐ Timed*
Now at the start of this Mission you are again taken to a Playfield within the Main Playfield. I have included
a screenshot to show you how the Missions Playfield looks –
This Mission is best explained in 2 parts –
1. The 1st part as you can see is on the Right side of the Playfield which consists of a number of Gears.
The Ball will be dropped onto the first Gear; you must then use the Left Flipper Button to change the
rotation of the mechanism. Now you will need to keep alternating Left (Left Flipper Button) & Right
(Right Flipper Button) till you reach the bottom of the Playfield. As soon as the Ball is about to hit
the bottom of the Playfield you must immediately change the rotation of the Ball before it touches
the next Gear which resembles a long Belt. *Note – If the Ball gets stuck between any of the Gears,
the Mission fails. *Page 25 of 30
2. Now for the 2nd part which is located on the Left side of the Playfield, you are required to tilt the
platforms so that you can safely Guide your Ball towards the exit.
*Note – Try to balance the Ball on the first platform, this will allow you to get the feel of the Ball.
The Left Flipper Button tilts the platforms to the Left, and the Right Flipper Button of course does
the opposite - tilts them towards the Right. *
Exit (Get the Ball safely here to complete the
Mission).
The Mission is won upon you reaching the “Exit” with the Ball; you will then be rewarded with points and
more importantly an Obsidian Stone.
*Note – Be careful not to drain your ball when it comes back onto the main playfield through the right
in-lane because Table bump doesn’t work immediately following the game. You might think it won’t
happen to you, but if this is your last mission before Midnight Madness it comes naturally to attempt a
flipper pass and start the Wizard mode as soon as possible from the Left flipper!*Page 26 of 30 “Crazy Ghosts” *Timed – 40 Seconds* Upon starting this Mission, 6 Ghosts will appear at the entrances of various Ramps/Orbits. These are as follows – Left Orbit (1) Ghost Ramp (3) Tower Ramp (5) Tower Mini – Orbit (6) Citadel Ramp (9) Right Orbit (10) All you need to do is hit all the Ghosts by going up the respective Ramps/Orbits, Time is added on each successfully hit but it’s nothing great so try to defeat them as fast as possible. *Note – After a while the Ghosts will reappear so completing this as fast as possible is very important. * Upon hitting the last Ghost; The Mission is completed; you will then be rewarded with points and more importantly an Obsidian Stone.
Page 27 of 30

“Creepy Cellar” *Non ‐ Timed*
This Mission you are again taken to a Mini-Playfield. This is the same Playfield in which you played on the
Arachnid Attack Mission. I have included a Screenshot to show you how it looks –

                                                                         After you hit the required number
                                                                         of Ramps/Orbits, exit through this
    The Peg that will bounce the Ball back
                                                                            Ramp/Orbit to Complete the
                up if it hits it.
                                                                                       Mission.

This Mission requires you to hit the 5 Ramps/Orbits in a specific order to clear the Obstacles. After about 5
successful hits the exit will open, you must exit through this Ramp/Orbit to Complete the Mission. You will
be rewarded with points and more importantly an Obsidian Stone.
Page 28 of 30
Wizard Mode – “Midnight Madness” *4
Ball Multiball*
This Wizard Mode will be available to start, once you have at least started up all 6 of the Main Missions.
*Note – Once you have activated the Wizard Mode once without completing all of the Main Missions. The
next time will require you to complete them all to gain access to the Wizard Mode (in the same game). *
Wizard Mode itself –
To start-up the Wizard Mode, you will need to hit the Ball into Mission Target/Sink Hole (1).
The Wizard Mode, Midnight Madness becomes available after you have successfully activated the 6 Main
Missions
*Note – You do not need to complete any of the Main Mission to active it, but when you complete each of
the Mission you are awarded with a completion bonus score and an Obsidian Stone which will multiple
your score for Midnight Madness, so completing the Main Missions is more of a bonus than a formality.*
The spinning disc will open up automatically after the completion or end of the 6 Main Missions. You just
need to hit the Ball into the Mission activation hole to begin the Wizard Mode –
Wizard Mode activation hole (You Need to hit
this, ignore the one beside it)Page 29 of 30
Midnight Madness
This is kind of a 2 part Wizard mode –
1. The 1st part requires you to try and save Whisper from the Sorcerer. Whisper will begin to move up
the Ghost Ramp (3) towards the Upper Playfield where the Extra Ball Ramp (7) is located and will
then from there move down the Extra Ball Ramp (7) towards the Sorcerer. Although it’s possible to
save Whisper already on the Ghost Ramp (3) it is easier to position you Ball on the Left Flipper and
wait till Whisper is near the Top Left Flipper when you then immediately hit the Citadel Ramp (9).
This should divert the Ball to the Upper Playfield where you then need to time your Shot with the
Top Left Flipper to make the Ball go into the Extra Ball Ramp (7) and through Whisper. If you have
done this in time (I think it needs to be done in about 25 seconds), you will hit Whisper and the
rescue is completed. Upon saving Whisper you will be rewarded with an Obsidian Stone and some
points.
*Note – You do not need to save Whisper, this is more of a chance to gain another Obsidian Stone.
The 2nd part of the Wizard Mode will start up regardless.*
When the timer runs out or you save Whisper, the Flippers will go limp and the Ball will drain.
Don’t worry as this is part of the Mode.
2. The 2nd part of the Wizard Mode begins. This is in fact the Midnight Madness part of the Wizard
Mode. This is a 3 Ball Multiball, which you have infinite Ball Save for about 40 seconds. You need
to hit as many Ramps/Orbits as you can within that time limit to amass as many points as possible.
Near everything is lit up like a Christmas Tree so just go Nuts! After the timer runs out, the Flippers
will again go limp and the Balls will drain, don’t worry this is still part of the Mode.
*Note – this is like a Bonus Mode it’s just to make as much points as possible with no real
objective other than that.*
Upon that you will have completed the Midnight Madness, YAY!!! You feel good now that you have
completed a Wizard Mode don’t you?
Now whatever you have earned with the Mode will be multiplied by a factor based on the amount of
Obsidian Stones you have collected over you epic quest in getting to this point (As explained earlier in this
Guide, under the Obsidian Stones section). So in essence this is how you can rack up big points by
completing Missions and getting to this stage more than once in a single game.
After it has calculated how much you earned and by how much it must be multiplied, the Table resets and
you can begin the process of getting back here once again with as many Obsidian Stones in tow as possible.
*Note – If you saved Whisper during the first part of the Wizard mode, you will also be awarded with a
Whisper Award at the end of Midnight Madness… so don’t be surprised if Extra Ball is suddenly lit!*
*FINAL MISSION IS COMPLETED AT THIS POINT*Page 30 of 30 Special Thanks to all the Zen Studios Forum Community! Members such as Cloda & Steviej. I couldn’t have completed the Guide without your help either directly or indirectly - you are all awesome!!! In closing I hope you enjoyed this Table; I certainly have and I hope by using this Guide it increases that Fun factor for you and everyone else who plays with you. Check out the other Tables available, they are all available to download on the Xbox Live Marketplace in Add-Ons section or download it straight from the PFX2 Platform itself. Zen Pinball 2 on PlayStation Network, Zen Pinball on the Apple AppStore, Zen Pinball 3D on Nintendo 3DS and Zen Pinball THD on Android Marketplace. Thanks for viewing my Guide; any feedback would be greatly appreciated - “Don’t be AFRAID!” Yours ShoryukenToTheChin
You can also read