Building Your Website - HTML & CSS
←
→
Page content transcription
If your browser does not render page correctly, please read the page content below
Building Your
Website
HTML & CSS

This guide is primarily aimed at people building their first web site and those who have tried
in the past but struggled with some of the technical terms and processes. It will not take you
from a beginner through to becoming an HTML & CSS guru, there are plenty of resources
online to help you do that (see the resources page). What is will do is introduce you to the
concepts behind building a web site for you to hopefully grab hold of and run with.
Deciding how you will build your site
Before you can start you will need to choose the software you are going to use to build
your web site. Depending on your level of experience and aspirations there are three
ways for you to build your website:
HTML editor
Web building software (aka WYSIWYG)
Web builder templates
Manually code your site using an HTML editor
Hand coding obviously requires at least a basic knowledge of HTML but benefits from
being by far the most flexible option. Although slower to get going than the other two
methods, the long term benefits include a greater understanding on how web pages
are built and the ability to apply that to your own.
Examples:
Adobe Dreamweaver
Microsoft Expression Web
Notepad++ (free)
Although you will be faced with a blank page when you first start that doesn’t mean
you have to create everything yourself from scratch. There are so many free resources
online (templates, images, scripts...) for you to use that the challenge will be going
through them all.
Use WYSIWYG software
What You See Is What You Get software uses the same principles as a desk top
publisher and allows you to build a website pointing and clicking with no coding
required. They work by generating the HTML/ CSS in line with your design on screen
with the added benefit of letting you then dip in and manually change the code.
Examples:
Serif WebPlus
Evrsoft.com
Website builder templates
A lot of web hosts provide these with shared hosting accounts or as standalone
products.
They require no coding knowledge (in fact most don’t let you make any manual changes
at all). The templates are preset and all you have to do is make some colour/ image
selections, add your content and click ‘publish’. Although very quick to start and finish
and finish a site, the quality of the results are questionable.
1Getting started with the code
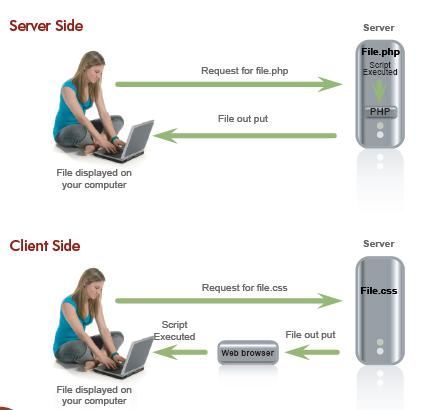
When a visitor arrives on your site and the web page is displayed on their browser quite
a lot has gone on behind the scenes to make this happen. A couple of terms you may
come across are ‘client side coding’ and ‘server side coding’.
Client side code (which covers HTML, CSS and JavaScript) is script executed by the
user’s web browser whereas server side coding (which covers PHP & MySQL, Perl and
ASP/ ASP.NET) is script first executed by the server before being shown to the visitor.
Client-side
A web page has three layers which you build up as the site progresses. First you start with
your content (HTML) which is essentially the website’s blue print. You then move on to
how it looks by adding components such as colour, images and spacing (CSS) and finally
you add interactive and behavioural elements to the page (JavaScript).
The 3 layers of a web page:
2Keep them all separate
Initially web developers put all of these scripts on to one page however they soon realized
how time consuming and labour intensive this approach was, especially when any changes
were required. Today best practice using HTML, CSS and JavaScript dictates you use
separate files for each.
Easier to re-use code across multiple pages or even sites
Reduces the amount of duplicate code
Easier to find and fix problems
Makes a site more accessible (e.g. browsers with JavaScript disabled can still show
the HTML/ CSS files)
This guide will focus on introducing you to HTML and CSS.
File structure
A web site is basically a collection of inter connected files kept within directories. Keeping
your files well structured and logically named helps you administer the site as it grows and
from an Search Engine Optimisation perspective.
File structure and SEO
Search engine optimisation is the process of increasing a websites organic
position in a search engine. Keyword analysis is a major part of a search
engine’s ranking factors, be it in the domain name, the tag, in the text
etc. This also goes for your file names which make up the page’s URL.
Bad: http://www.super-sport.com/range2/catgeorty4.html
Good: http://www.super-sport.com/trainers/basketball
Below is an example of a typical file structure for a site. Index (the home page), ‘about’,
‘FAQs’ and ‘products’ are all in the parent directory. ‘Apples’, ‘Oranges’ and ‘Pears’ are in
the ‘Products’ directory and ‘conference pears’ and ‘dessert pears’ are in the ‘Pears’
directory:
- Index
- About
- FAQs
- Products
+ Apples
+ Oranges
+ Pears
++ Conference Pears
++ Dessert Pears
3If I wanted to link to the ‘About’ page I would do the following
Text goes here
If I wanted to link to the ‘Oranges’ page I would do the following
Text goes here
If I wanted to link to the ‘Dessert Pears’ page I would do the following
Text goes here
A basic HTML page
To get started and have a play you can copy and paste this code in to your HTML editor:
Here is my first title
This is my first paragraph to help me test different
types of styles using CSS with my HTML
This is my second title
Here is a second paragraph to see how I can have
different styles for the same tag on the same page
List item 1
List item 2
List item 3
List item 4
Save the file as index.html (this is the name web browsers and search engines want to see
so they know which page is the home page)
What do they mean?
Tells the web browser to expect an HTML file
Tells it that the main body of the page is coming.
Important: Every HTML web page must have those two tags
(opened and closed).
The biggest heading
The 2nd biggest heading
A paragraph
An ordered list (e.g. 1,2,3 etc)
A list item for the ordered list
Creates a link.
4What is CSS?
Cascading Style Sheets are the second layer of a web page and deal with the
presentational side of the page (page layout, font size, font colour, margins, padding,
images...).
In the same vain as discussed above, there are a couple of approaches to using CSS;
placing the CSS in the HTML file or using an external CSS file.
Why use an external CSS file?
Quicker page load times
Share the same file across multiple pages
One update applies to all those pages
Style.css
Index.html About.html FAQ.html
This guide will focus on implementing CSS to your site using an external CSS file
5Creating your external CSS file
CSS syntax is made up of three parts:
Selector {
Property: Value;
}
Although it may seem complicated at first, once you get started it will all fall in to place.
All this means is that for each element (e.g. ) you determine how a certain aspect of
it (e.g. the font) should be presented (e.g. Arial). For example:
P {
Font-family: Arial;
}
h1 {
Font-size: 14pt;
Color: red;
li {
list-style: disc;
margin-left: 10px;
}
Here I have stated that any text within a tag should be displayed using the Arial font,
my headers should be 14pt and red, and any bullet lists items () should use a
filled in circle (called a ‘disc’) and there should be a 10px margin to the left.
Note: Your CSS won’t work without the curly brackets and a semi-colon to separate the
properties and their values, so don’t forget to add them
6Two paragraphs, two styles
In the example code above we have two paragraphs and at the moment they have the
same attributes. To mix things up we can give them different styles. We do this using the
‘class selector’.
In your CSS file we state that it is a ‘class’ by using a full stop and naming the class
whatever you want. It is best to describe what the class does rather than what is
currently is as this may change in time. E.g. name it ‘highlight’ rather than ‘green’, as in
the future you may want to use the colour red.
.highlight {
color: green;
}
Now when we want to highlight any text we can apply it to the HTML like this...
Here is my first title
This is my first paragraph to help me test
different types of styles using CSS with my
HTML
This is my second title
Here is a second paragraph to
see how I can have different styles for the same
tag on the same page
List item 1
List item 2
List item 3
List item 4
Class Vs id
There are two ways of specifying and naming attributes; ‘class’ and ‘id’.
The difference between the two is the id must be unique within the HTML document and a class
can be used as many times as you want. To create an id use a hash:
#highlight {
color: green;
}
7Quick tips:
You can group your selectors if you want them to carry a common value. A good example is
styling the colour of your headers.
h1, h2, h3, h4 {
Color: green;
}
Here the to tags will all be the same colour (green). If you want the same
property throughout the page without having to specify it for every selector (e.g. set the
page’s default font) use ‘body’:
body {
font-family: verdana;
}
You can style pretty much everything and anything on your site and the best way to learn is
to get stuck in and have a play. Once you have created your style sheet save your file as
something along the lines of ‘style.css’.
How to link to an external CSS
To let the web browser know which style sheet to reference for this page, in between the
tags place the following line (changing the highlighted file name to your own).
The tags should be opened after and closed before . Using the same
example as before we now get the following HTML:
Here is my first title
8Keeping your code ‘clean’
Well laid out and commented HTML and CSS files really pay off further down the line when
you need to make changes or review the impact of a change on other areas of the site.
Indented HTML
Indenting your HTML helps to keep your HTML neat and easy to review quickly when you
cast your eye over it.
A quick note about
The tag is used to group sections of an HTML file
Text 1 and format them with common styles.
Text 2
Text 3 This can be anything as basic as the font used all the
way up to determining the layout of the entire page.
Within the CSS file you use these in exactly the same
way as when we discussed the Class and id selectors
previously.
Nesting
Good practise dictates you should ‘nest’ tags within other tags so that they maintain the
same order by which they were opened.
Text goes here is used to
make a font bold.
is used to
apply italics
Commenting
It is easy to make a change and forget about what it does or why you did it in the following
weeks or months. Also, once a file become particularly large where elements such as a div
starts and ends or what an id or div in your CSS actually does can get confusing. Comments
are never shown on the web page.
They can follow two formats:
HTML:
A comment in your HTML file is started and ended with
Text goes here
CSS:
A comment in your CSS file is started and ended with /*...*/
h1 {
font-size: 16pt /*Comment no one will see but me*/
}
9The example below shows how, without a comment, you would have to scroll up and down
the page to work out which div was associated with the ordered list.
Text 1
Text 2
Text 3
Text 4
Text 5
Text 6
Uploading your site’s files
Once you are ready to see what your website looks like online, uploading the files to your
web space is really easy and is often as simple as clicking, dragging and dropping.
The method you will use to get your website online is called File Transfer Protocol (FTP).
Don’t be put off by the name, all this does is take the files from your computer and put
them on to the web host’s server for people to access. Simple!
In order to do this your web host may offer an upload function though your account with
them, but that means you have to log in every time.
A quicker alternative that most people use is FTP software. Some HTML editors come with
this built in (e.g. Dreamweaver & Microsoft Expression Web) but even if yours doesn’t there
is the industry standard stand alone (which is free) to download called FileZilla
10Free resources/ links
HTML editors
http://notepad-plus.sourceforge.net/uk/site.htm
http://www.coffeecup.com/free-editor/
Learning resources
http://www.w3schools.com
http://htmldog.com/
Free web site templates
http://www.free-css.com/
http://www.freecsstemplates.org/
http://www.opendesigns.org/
Free images
http://www.freefoto.com
http://www.sxc.hu/
Colour guide
http://html-color-codes.com/
CSS galleries
http://www.cssdrive.com/
http://www.csselite.com/
Firefox plug-in
Firebug: https://addons.mozilla.org/en-US/firefox/addon/1843
MeasureIt: https://addons.mozilla.org/en-US/firefox/addon/539
Web Developer: https://addons.mozilla.org/en-US/firefox/addon/60
11Common HTML tags
Tag What it does Example
Anchor text Text here
Line break Text goes here this line now is underneath
Specifies a section within the HTML doc
Emphasises the text e.g. Italics Some text goes here and we want to emphasise this
Header Page title here
List item
List item
Ordered list See example above
Unordered list (bullets)
List item
Paragraph Text goes here
Strong text e.g. bold Some text goes here and this text is bold
Start of a table See below
Cell of a table See below
Header cell of a table See below
Table row of a table See below
Table example:
Genre
Band
Pop
Spice Girls
12You can also read