Skype for Business - User Guide
←
→
Page content transcription
If your browser does not render page correctly, please read the page content below
Skype for Business – User Guide

Page 1
Contents
1 Client Overview ............................................................................................................................... 4
2 Presence .......................................................................................................................................... 4
2.1 The Presence Indicator – Contact Presence ........................................................................... 5
2.2 The Presence Indicator – Additional Settings ......................................................................... 5
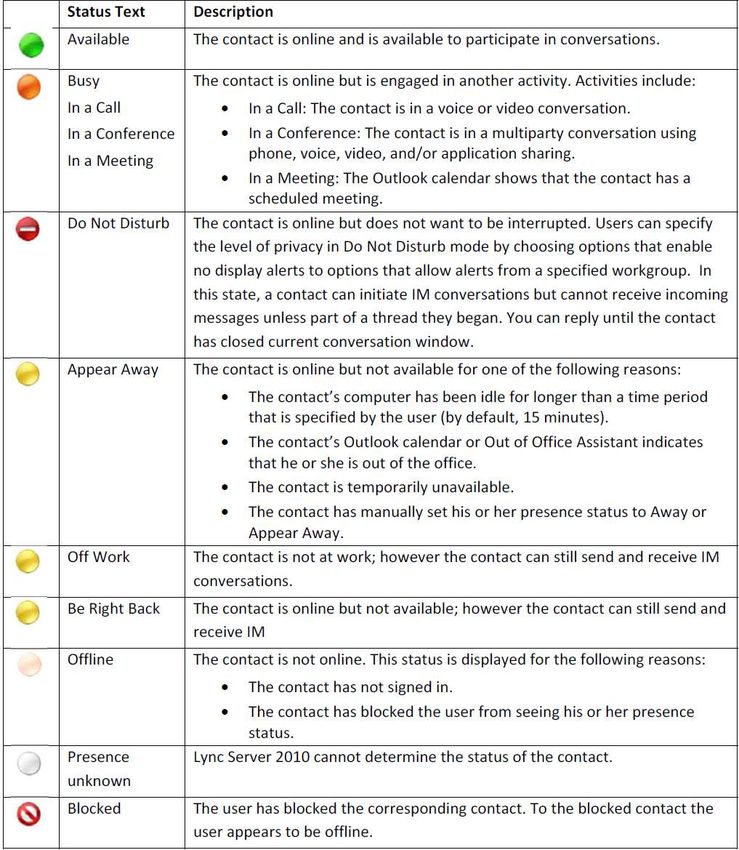
2.3 Presence Indicators Explained ................................................................................................ 6
2.4 Viewing a Contact Card ........................................................................................................... 6
3 Create and Manage Contacts.......................................................................................................... 7
3.1 Search for and add Contacts to your favourites ..................................................................... 7
3.2 Create a Contact Group .......................................................................................................... 7
3.3 Federated Contacts ................................................................................................................. 8
3.4 Change View ........................................................................................................................... 8
3.5 Managing Privacy .................................................................................................................... 9
4 Skype for Business Icons ................................................................................................................. 9
5 Instant Messaging ......................................................................................................................... 10
5.1 Add files to an IM conversation ............................................................................................ 10
5.2 IM a Group ............................................................................................................................ 11
5.3 Using IM from within Microsoft Outlook .............................................................................. 11
5.4 Sharing .................................................................................................................................. 12
5.5 Share your desktop during an active phone call ................................................................... 12
5.6 Present your PowerPoint slides ............................................................................................ 13
5.7 Share Programs ..................................................................................................................... 13
5.8 Share Control ........................................................................................................................ 13
6 How to make call........................................................................................................................... 14
6.1 Adding Video ......................................................................................................................... 14
6.2 Using Call Controls – during a call ......................................................................................... 15
6.2.1 Hold a call ..................................................................................................................... 15
6.2.2 Transferring Calls – Announced Transfer .................................................................... 15
6.2.3 Transferring Calls – Cold Transfer (aka Blind Transfer) ............................................... 16
7 Manage Call Handling Profiles ...................................................................................................... 16
7.1 Call Forwarding ..................................................................................................................... 16
7.2 Simultaneously Ring .............................................................................................................. 16
7.3 Team Call Groups .................................................................................................................. 17
7.4 Setting Delegates .................................................................................................................. 18
Page 2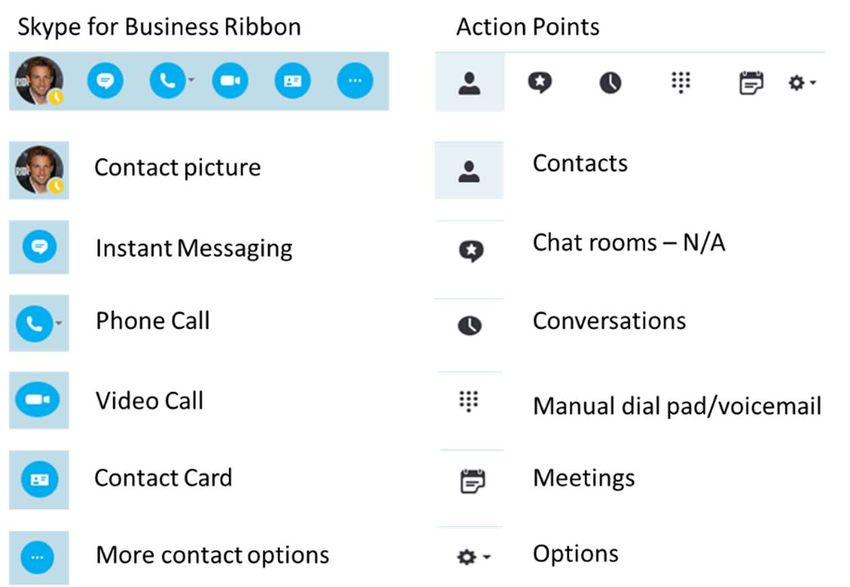
8      Voice Mail in Skype for Business & Outlook ................................................................................. 19
    8.1       Access Voicemail from Skype to Business............................................................................. 19
    8.2       Access Voicemail from Microsoft Outlook............................................................................ 20
    8.3       Access to Voicemail from another telephone....................................................................... 20
    8.4       Manage Settings (PIN, Greetings & Extended Absence)....................................................... 20
9      Video Conferencing and Presenting ............................................................................................. 22
    9.1       Options to join a Skype Meeting ........................................................................................... 22
    9.2       Adding Video ......................................................................................................................... 22
    9.3       Manage Participants ............................................................................................................. 23
    9.4       Collaborating ......................................................................................................................... 24
    9.5       Present Desktop .................................................................................................................... 25
    9.6       Present Programs .................................................................................................................. 25
10         Install Skype for Business for iOS .............................................................................................. 26
    Sign in to Skype for Business for the first time ................................................................................. 26
11         Install Skype for Business for Android ...................................................................................... 27
    11.1      Sign in to Skype for Business for the first time ..................................................................... 27

Page 3
1 Client Overview

2 Presence
By default, Skype for Business uses the Outlook calendar to show your availability. You can quickly
see from the icon next to each contact's name whether he or she is available for a conversation, busy,
or away.
You can also modify your own status manually. For example, if you are busy and do not want to be
contacted, you can set your status to Do Not Disturb.
You can also type a personal note that provides additional information about your status, if necessary.

    To override your Presence from the main client window
    • From the main Client window.
    • Select the drop down alongside your current Presence Status.
    • Choose your preferred Availability.

    To revert back to your automatic presence linked to your Microsoft Outlook
    • Select ‘Reset Status’ to reset Presence in both Skype for Business and Exchange

Page 4
2.1 The Presence Indicator – Contact Presence
Alongside the photo next to a contact's name in your contact list indicates their status.
If you do not use your computer for some time, your status changes automatically. You can change
the default period of time that must pass before your status automatically changes to Inactive
or Away.
Your status is indicated by the colour on the lower right-hand site of your profile photo; for example,
Away looks like this:

2.2 The Presence Indicator – Additional Settings
To change the length of time before you are shown as Away. Go to Options           from the main
Skype for Business Window.

In Skype for Business Options window, you can make changes to the settings ‘A’ and ‘B’ according to
your preference in minutes.

You may also want to choose whether you are shown as Do Not Disturb when Presenting your
Desktop or when your Monitor is Duplicated.

Once you have made the changes Click OK to save

Page 5
2.3 Presence Indicators Explained
It is good to have an understanding of the different types of Presence indicators.

This way you are able to assess prior to making contact with someone what the preferred method of
communication should be.
For Example, should a contact be showing as Busy, they may have time scheduled in their diary to
perform a task and therefore are still able to reply to an IM.

A contact showing as ‘In a Meeting’ has specifically been invited to attend a meeting which may
indicate that they have physically gone to attend a meeting.

2.4 Viewing a Contact Card
Should you require detailed information about a contact, you can view the Contact Card.
This may include a contact's job title, telephone numbers and company information, for example.

Hover your mouse over your contacts photo and select the Contact Card         from the Skype for
Business Ribbon. The contact Card will display the contacts availability based on their Calendar,
Activity, Telephone Numbers and Location.

Page 6
*Note that not all details may be available depending on the organisations configuration and privacy
policy.
3 Create and Manage Contacts
3.1 Search for and add Contacts to your favourites
Favourites can be a valuable tool, by selecting a contact as a favourite, it is placed in a group at the
top of all your groups.
In the Search box type the last name, first name or email address of the person you want to add as a
contact. As soon as you start typing the search will start to filter the results.
Search Results are then listed.
Then right-click on the contact name and choose ‘Add to Favourites’.
If you already have Contact Groups created you can allocate your new contact to any of your existing
groups.
3.2 Create a Contact Group
Many of users prefer to organise our contacts into Working Groups.
For example all your colleagues who work in the Finance Department should be associated with a
Group called ‘Finance Team’
To Create a New Group
From your client, click on Choose New Contact Group
Enter your Group Name.
To add contacts to your group, search for new contact using the search bar.
Right hand click on their name and select ‘add to Contacts List’, then select the appropriate
group
It’s useful to have groups created when you need to IM or Call a group of people at the same
time.
Page 7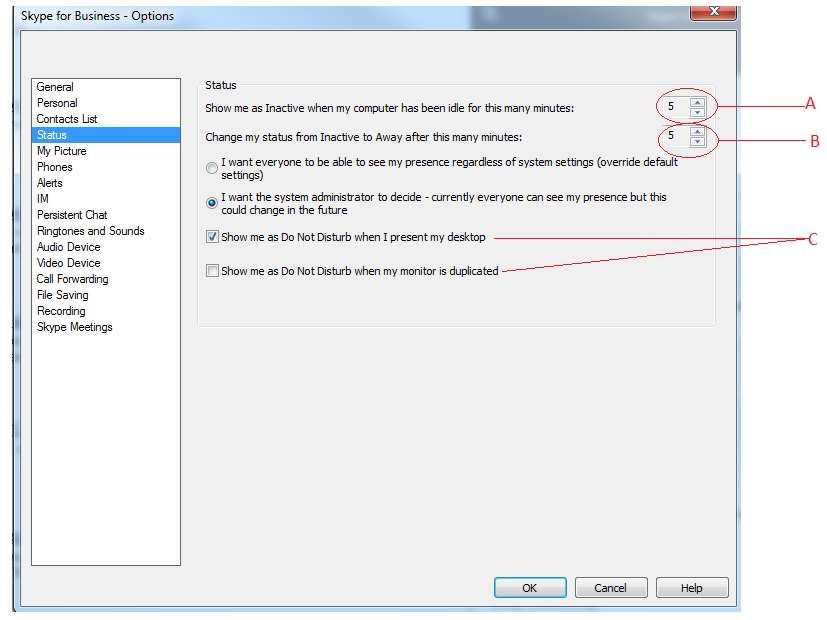
3.3 Federated Contacts
Your Organisation may decide to create a Federated Relationship with other organisations.
This means users in your organisation are allowed to communicate faster and more effectively with
others outside of your organisation such as partners, suppliers, customer or vendors.

When Federation is enabled it allows you to:

    •    Add users from other organisations to your Contact List
    •    Send instant messages your federated contacts
    •    Invite contacts to Skype audio calls, video calls or conferences
    •    Exchange presence information
    •    Escalate person to person instant messages to multi person conferences
    •    Connectivity with Skype Accounts

To use an external contact simply enter their email address into a contact search. If required, you
can right click on their name, and select add to favourites or contact list.
3.4 Change View
You can view your contact list in several different ways: by Groups, by Status, by Relationships, or by
New Contacts.

Click the preferred view for the contact list from the headings
    • GROUPS - Display by Groups
    •    STATUS - Displayed by Status e.g. Offline, Away, Online
    •    RELATIONSHIPS - Workgroup, External Contacts, Colleagues
    •    NEW - Contacts who have added you to their contact list

Page 8
3.5 Managing Privacy
When you add a new contact, you can also define your privacy relationship with that contact.

This defines the amount of your information which is available for that the contact to view and is
based upon the privacy relationship that you have granted to them.

For example, a contact to whom you have granted the Workgroup privacy relationship can contact
you in Do Not Disturb mode.

To View the Privacy Relationship of a contact, right click the contacts and select Change Privacy
Relationship the current privacy setting is indicated by the   icon.

4 Skype for Business Icons

Page 9

If you hover the mouse pointer over any of your contact’s picture, the Skype for Business ribbon
appears. From here you can select the desired icon to either send an instant message, start a phone
or video call, or display the contact card.

5 Instant Messaging
    To start an instant message, search for your contact:
    • Hold the mouse pointer over a contact's photo, once the Skype for Business ribbon appears

          click     to launch the IM dialogue or conversation window.
    •     Type the desired message.
    •     Press the Enter key to send.

    To reply to a message:
    • When the conversation notification pops up on your screen, click on it to accept.
    • Type a reply and press the Enter key.
    • If you do not reply to an IM, the message will be emailed to your Microsoft Outlook.

5.1 Add files to an IM conversation
There are several ways to send an attachment:

    1. Select         and browse to select your document.

    2. In the conversation window, click on the Present icon       .
       Click “Add Attachments…” browse to select file to attach.

Page 10
3. You can drag and drop your document into the text box directly
5.2 IM a Group
Send an instant message to a group.
• Right-click the desired group
• Choose Send an IM
• In the conversation window type the desired message.
• Press Enter key to send.
5.3 Using IM from within Microsoft Outlook
• In Outlook, hold the mouse pointer over the sender's photo or name.
• The Skype for Business ribbon will appear, click on
• In the conversation window that appears, type the text of your instant message.
• Press the Enter key.
Page 115.4 Sharing
Skype for Business lets you collaborate with participants during a conversation (whether Voice,
Video or Instant Message). To share your desktop from within your IM dialogue screen:
• Click on the Present button and select the options to share:
• Your desktop – and if you use multiple monitors, share one or both.
• Any specific program
• A PowerPoint presentation
• Content can be pre-loaded for when the meeting starts, if required.
There are additional options in more which include a Whiteboard, Poll and Q&A
5.5 Share your desktop during an active phone call
1. Click Present.
2. On the present menu, click Present Desktop.
3. You are shown a screen preview, to present select Present.
4. You are notified that you are sharing your screen.
Page 125.6 Present your PowerPoint slides
1. Click
2. Select
3. This will then take you to your list of documents to select from, once you have selected the
appropriate document and select ‘Open’ this will alert you that you are presenting your
PowerPoint.
5.7 Share Programs
1. Click Program on the Share menu.
2. Select the applications you want to share and click share.
NOTE: Only open applications are listed as available to share
5.8 Share Control
When you start sharing your desktop or an application, you can give control to any of the other
participants; to do this:
1. While sharing your desktop or an application, click “Give Control” on the sharing bar at the
top of the screen, then select the participant from the drop down list.
Page 132. To end control, click ‘Tack back control’
6 How to make call
• Using the search box, type in the full number you wish to dial and hit enter
• Search for your contact you wish to dial, using their first name or surname.
• Hover over the contacts picture to produce the Skype for business ribbon
• Select phone to call the last number you dialled or click the drop down arrow for more options
• Once you have clicked to dial a blue box will appear to show that you are now dialling out.
• To end a call by press
6.1 Adding Video
During a conversation you may want to escalate a voice call to a video call.
From the Conversation window click on the Video icon .
This will display your Video Preview of your camera view.
This provides an opportunity to position yourself or the camera correctly.
When ready select ‘Start My Video’.
Other Participants within the conversation will also need to ‘Start their Video’ for a full
video Conversation to take place.
You can ‘Stop My Video’ at any time to stop your video stream, it will not affect your
visibility of other participant’s videos.
Click on Video icon to end your video stream - the audio call remains active.
Page 146.2 Using Call Controls – during a call
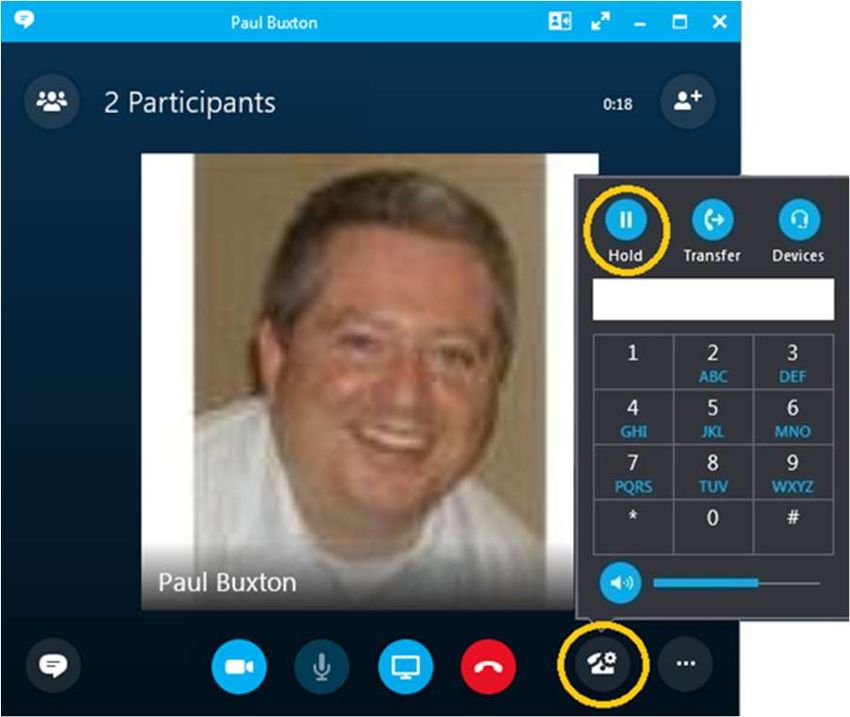
6.2.1 Hold a call
During a conversation, click on the Call Control icon , on the pane that appears, click on
the Hold Call icon.
To resume the call, in the notification click Resume Call.
You can also resume the call by clicking the button at the bottom of the call window.
6.2.2 Transferring Calls – Announced Transfer
In an active call, you can transfer calls to a third party by clicking . This will place your first
conversation on hold. When the third person answers you can announce the first call before
transferring the call. To do this:
Click , the active call is put on hold.
Call the third party to announce the call.
Hover over the Call Control Icon
Select Transfer Tab, your call will then be transferred ending your participation automatically.
If the third party is unable to take the call, simply end call, go back to the original call and take
them off hold.
Page 156.2.3 Transferring Calls – Cold Transfer (aka Blind Transfer)
To transfer the current call without informing the third party.
Click on the Call Control Audio Icon
In the pane which appears, select Tab
Type the name of the contact or number/extension to dial
If there are multiple names, select the appropriate contact
Click Transfer button to carry out the transfer
The call will be transferred and your part of the
conversation will end.
7 Manage Call Handling Profiles
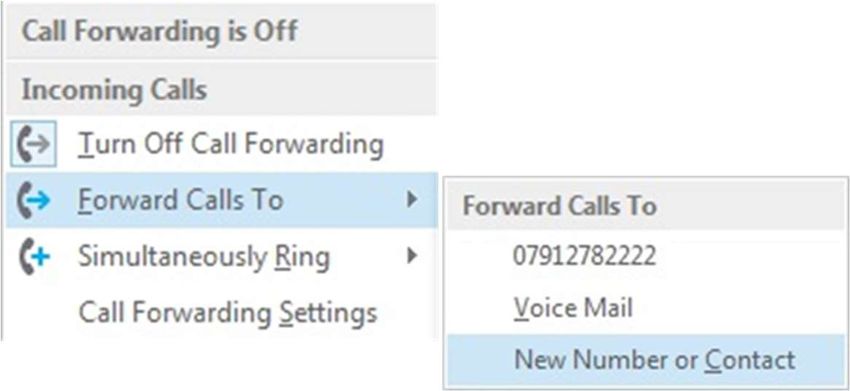
7.1 Call Forwarding
If you are unable to take calls, you can set all your calls to automatically forward to another person,
number or voicemail.
To Forward Calls, Click on at the bottom of your Skype for Business.
Choose ‘Forward Calls To’ here and select the desired option. To add another number,
Voicemail or contact select New Number or Contact
Once Call Forwarding is active you will see a notification on your Skype client.
To Turn Off Call Forwarding select ‘Turn Off’ in the information Bar.
7.2 Simultaneously Ring
If you would like your calls to ring another device you can enable Simultaneous Ringing.
This feature enables your calls to ring your PC, mobile phone or your Team phone at the same time.
To Activate Simultaneous Ringing, Click on
Page 16 Select ‘Simultaneous Ringing’ then choose the desired option.
To add another number or contact choose New Number or Contact
Once Simultaneous Ringing is active you will see a notification at the bottom of your Skype for
Business client
To Turn Off Click and choose ‘Turn Off Call Forwarding’
7.3 Team Call Groups
A Team-Call Group allows you to overflow calls or simultaneously ring a group of colleagues.
First, create your Team Call Group, Select the Call Forwarding option at the bottom of your
client and choose Call Forwarding Settings
Then select ‘Edit my team-call group members’.
To add a member, click Add, search for the contact to be added, select a name from the list,
and click OK.
To remove, select the specific contact and then select Remove.
To delay calls before it is forwarded to others in your team, select the drop-down list box next
to ‘Ring your team-call group after this many seconds’. Select the desired number of seconds
before the call is forwarded.
Click OK
Now that you have created your Team Call Group you need to set Simultaneous Ringing to that Group
to activate
Page 17 Select the Simultaneously ring option
Once Simultaneous Ringing is Active you will see a notification at the bottom of your Skype
client.
To Turn Off click and choose ‘Turn Off Call Forwarding’
7.4 Setting Delegates
You can create Delegates with permission to make and receive calls on your behalf.
Select the Call Forwarding option at the bottom of your Skype for Business client and choose
Call Forwarding Settings
Then select ‘Edit my Delegate Members’.
Click Add, select a name from the list, and click OK.
To modify existing delegates, highlight the delegate then click Remove.
Use Ring your Delegates after this many seconds: drop-down list to select the
desired number of seconds before calls are forwarded.
Click OK.
Now that you have created your Delegates, set Simultaneous Ringing to that Delegate Group
to activate
Page 18 Once Simultaneous Ringing is Active you will see a notification at the bottom of your Skype
client.
To Turn Off click and choose ‘Turn Off Call Forwarding’
8 Voice Mail in Skype for Business & Outlook
8.1 Access Voicemail from Skype to Business
Skype for Business client displays the number of new voicemails. To access voicemail:
• Click on the Dial Pad icon each voicemails is displayed under the Voice Mail section.
There are two ways of listening to your messages:
a. At the bottom right-hand corner, click then select Call Voice Mail. Follow the
audio prompts.
b. At the bottom of the window, hover over the contact’s picture and choose Play
There are options to pause, resume and play at a different speed.
To delete a voice mail message, right-click it and choose Delete Item.
Page 198.2 Access Voicemail from Microsoft Outlook
Voicemails are also delivered directly to your email account as a message attachment. You can access
directly from Outlook.
Selecting each message offers various options for playing, handling and responding to the mail:
8.3 Access to Voicemail from another telephone
Retrieve your voice mail from another telephone, mobile, or home phone; to do this:
• Dial the specific telephone number that has been assigned to dial in remotely to voicemail.
• When connected the system will ask you to enter your PIN followed by #
• Listen to the prompts carefully as you can access emails as well as voicemail if you wish too.
• For first time access, the system will guide you to set up your mailbox if it has not been done.
8.4 Manage Settings (PIN, Greetings & Extended Absence)
• In the Skype for Business client, click on the Dial Pad icon
• At the bottom right-hand corner, click .
• Choose Change Greetings.
You have two separate voicemail greetings for different situations: your standard greeting and your
extended absence greeting.
Page 20• Standard greeting will play to callers when you are busy or cannot answer the call.
• Extended absence greeting will play to callers when you are out of the office for a
longer period of time for example, if you are on holiday.
• In the Skype for Business client, click on the Dial Pad icon
• In the bottom right-hand corner, click (See Voice Mail Options).
• Choose Set Up Voice Mail.
• Outlook 365 sign-in page appears, type your email and password.
• Click Sign in.
• Click on Reset my voice mail PIN….
• On completion you will receive an email in Outlook
When you receive the email it will have new details of your pin number.
You can now dial back into the voicemail enter the password that was emailed to you and then the
system will ask you to change it.
Page 219 Video Conferencing and Presenting
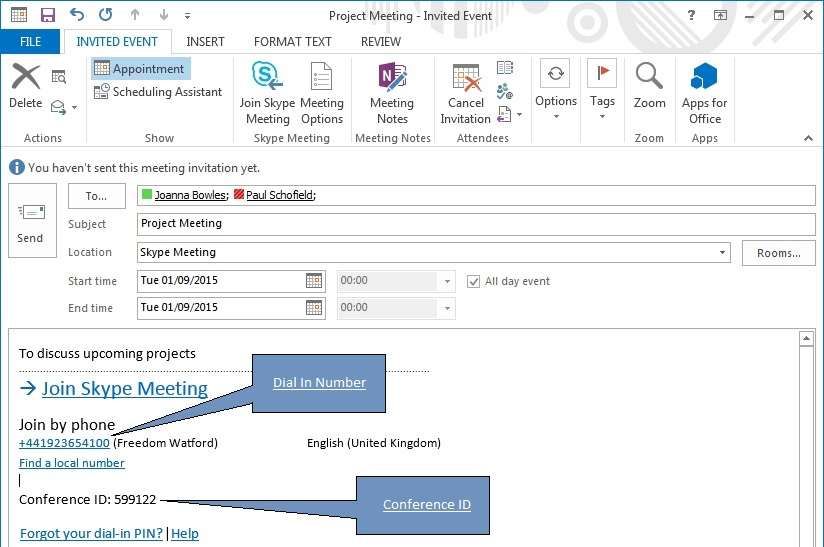
9.1 Options to join a Skype Meeting
A. The meeting invitation contains multiple ways to connect to Skype for Business Online
Meeting.
B. Join Skype Meeting connects you to the meeting through Skype for Business Online
allowing you to hear conference calls and see visual content and desktop sharing.
C. Join by Phone connects you to the conference call if you are using a home or mobile phone.
It connects you through Skype for Business Online if you are using Skype for Business Online
Phone Edition or the Skype for Business Dial pad.
A Conference ID is required when prompted.
Non-Skype for Business participant can partake in the conference via supplied dial-in number and
access code
Attendees to a meeting who join before the host caller will be held in individual lobby areas (with
hold-music), until the presenter joins.
9.2 Adding Video
Once you have initiated a phone conversation, you may want to enable Video. To do this use the
button to preview, then click start my video.
Page 22The view you get when the conference is underway varies depending on the systems used, how you have set this up in your video options, and the number of participants. An sample screen shot is shown below with a panoramic view of a meeting room and one user not on video. Your picture is shown smaller on the right. 9.3 Manage Participants Skype for Business offers a number of call management features available during meetings. Page 23
For instance the presenter can:
Mute Audience
Disable participants Video
These options (and more) are available in the participant tab of the Skype conversation window.
9.4 Collaborating
Skype for Business lets you collaborate with your participants during a meeting either by Voice,
Video or an Instant Message call.
• Click button and select the options to:
• Present Desktop – and if you use multiple monitors, share either or both.
• Present Programs running on your PC
• Present PowerPoint Files…
Select More… to present a Whiteboard, Poll or Q&A.
• Participants can be polled or take part in a Q&A session.
• Content can be pre-loaded for when the meeting starts, if required.
Page 249.5 Present Desktop
Share your desktop allows others to view the presenter’s desktop. If the presenter has more than
one monitor, they can select a single or all monitors. The presenter can give any participant control
of his screen to make changes and also take back control.
9.6 Present Programs
This option allows others to view specific applications or files that are opened on the
presenter’s desktop. This option is used when the presenter does not want others to see
anything else on the computer. The presenter can give any participant control of his screen to
make changes and also take back control.
Page 2510 Install Skype for Business for iOS
Skype for Business runs on iOS 8.0 and above.
From your iphone, click the to go to the App Store and search for Skype for Business.
Tap Free >Install.
Sign in to Skype for Business for the first time
On your iOS device, swipe each page of apps until you see the Skype for Business icon.
Tap the Skype for Business icon to open the app.
Enter your sign-in address (for example, user@rvc.ac.uk) and password, and then tap Sign
In.
You might be asked for both a user name and a sign-in address. The user name is what you use to
sign in to your Organisation’s network, either user@rvc.ac.uk or rvc_domainusername.
1.
Enter your mobile number with country and region codes. If you're an enterprise voice
customer and Skype for Business can't use a Wi-Fi or cellular data network to make an audio
or video call, you'll be called at this number and connected to the audio portion of the call.
Page 261.
Tap Next.
If applicable, choose whether to sign up for the Customer Experience Improvement Program
and click Next.
Accept the licensing agreement, and then click Done.
11 Install Skype for Business for Android
From your phone, click the to go to the Google Play Store, and search for Skype for
Business.
Tap Install.
11.1 Sign in to Skype for Business for the first time
Browse your apps until you find the Skype for Business icon ( ), and then tap the icon to
open the app.
Enter your sign-in address (for example, user@rvc.ac.uk) and password, and then tap the
Advance button ( ).
Page 271.
Enter your mobile number with country and region codes. If you're an enterprise voice
customer, when Skype for Business can't use a Wi-Fi or cellular data network to make an
audio or video call, you'll be called at this number and connected to the audio portion of the
call.
1.
Choose whether to sync your contacts, and then tap the Advance button ( ) to start
using Skype for Business.
Page 28You can also read