NHSmail User Guide For Outlook Web App - Vale of York CCG
←
→
Page content transcription
If your browser does not render page correctly, please read the page content below
NHSmail User Guide For Outlook Web App
Contents
NHSmail user guide

 Section            Title                                Page     Section           Title                                 Page
                                                         Number                                                           Number
 Before You Start   Before You Start                          3                     Adding a new contact                      15
 Individual         Signing in for the first time             4   Calendar          How to create a calendar                  16
 Account                                                                            appointment/ meeting
                    NHSmail home page                         7
                    Changing your password                    8                     How to share your calendar                17
                    Resetting a forgotten password            9                     How to manage who has access to           18
                                                                                    your calendar
                    Signing out of your account              10
                    How to apply for more individual         10   Switching to      How to forward emails from your old       19
                    accounts                                      NHSmail           account

 Shared Mailbox     The benefits of the shared mailbox       11   Advanced use of   Requesting a read receipt                 21
                                                                  NHSmail
                    Accessing the shared mailbox             11                     Marking emails as confidential or         22
                                                                                    important
                    Adding users to the shared               12
                                                                                    Creating a group email list               23
                    mailbox
                    Removing users from the shared           13                     Adding members to an existing             24
                    mailbox                                                         group

 Global Contact     Searching for people in the              14                     Giving another user access to your        25
 Directory          directory                                                       inbox
Before you start
NHSmail user guide

Outlook Web App                                                               are before continuing with this guide and refer back to the original form if
                                                                              you need to.
This guide is for accessing NHSmail
from the NHSmail website online
at www.nhs.net, through the
Outlook Web App.
                                                                                             CARE PROVIDER NHSMAIL SIGN UP FORM

                                                                                                                     Provider information – Please complete all fields below
Before you start                                                                              Organisation Type:                                   Social Care
                                                                                              Social Care Site name:

Before following this guide pleased ensure you have:                                          Name of Town: (Max 11 characters)
                                                                                              ODS Site Code:
                                                                                              https://odsportal.hscic.gov.uk/Organisation/Search
                                                                                                                                       User information
                                                                                                            Please complete the information below for 2 staff members in your service.

      • Your NHS email address
      • Your NHS email password                                                                                                                           Current/ personal
                                                                                                                                                                                Current/
                                                                                                                                                                                personal
                                                                                                                                                                                                 shared
                                                                                                                                                                                                mailbox
                                                                                                        First Name      Surname            Role                                                access type
                                                                                                                                                           e-mail address        mobile
      • Your shared mailbox email address                                                                                                                                       number
                                                                                                                                                                                               (member/
                                                                                                                                                                                                 owner)
                                                                                              Shared
                                                                                              Mailbox
                                                                                              Owner
                                                                                              User

All of these have been sent to you in a welcome email sent by
Care.mailer@nhs.net to the first named person’s email address you              If after reading this guide you are still having problems with using NHSmail
provided on your initial NHSmail Application Form.                             online through the Outlook Web App, then please click here for further
If you have not received this email or text message, please check your junk guidance.
folder.                                                                        For additional demonstration videos, please use the link below and select
If you still cannot find the email, please contact the National Administration the ‘How to’ options: https://www.digitalsocialcare.co.uk/covid-19-
Service at careadmin@nhs.net or by calling 0333 200 1133. If you contact guidance/covid-19-quick-access-to-nhsmail/
by email you will be given a reference number to keep track of your query. During Covid-19 pressures, additional set up and log in support is available
On the NHSmail Application Form you will have also chosen a ‘shared            from the Digital Social Care team on: 0208 133 3430 (Mon-Fri 9-5).
mailbox owner’ and a ‘member’. Make sure you know who these people
                                                                                                                                                                  CARE PROVIDER NHSMAIL SIGN UP FORM
Individual Account
Signing in to NHSmail for the first time
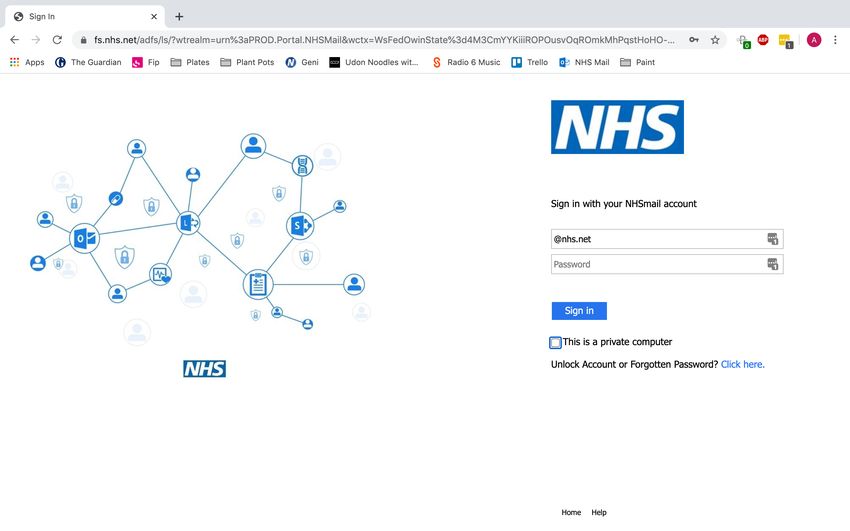
1. Type www.nhs.net into your internet browser. This will take you home computer.
to the NHS Mail portal, shown below. Select log in in the top
right hand corner. A computer in a public space such as a library or internet café is
not a private computer.
1 4. Ticking this box will allow you to open and download
attachments once you have logged in to NHSmail. Click ‘sign
in’.
2
4
2. You will be taken to the sign in page. Enter your NHS email and 3
the password that was texted to the mobile number you
provided. Make sure you enter the password accurately and
exactly as it appears in the text.
3. Tick ‘this is a private computer’ if you are using a work or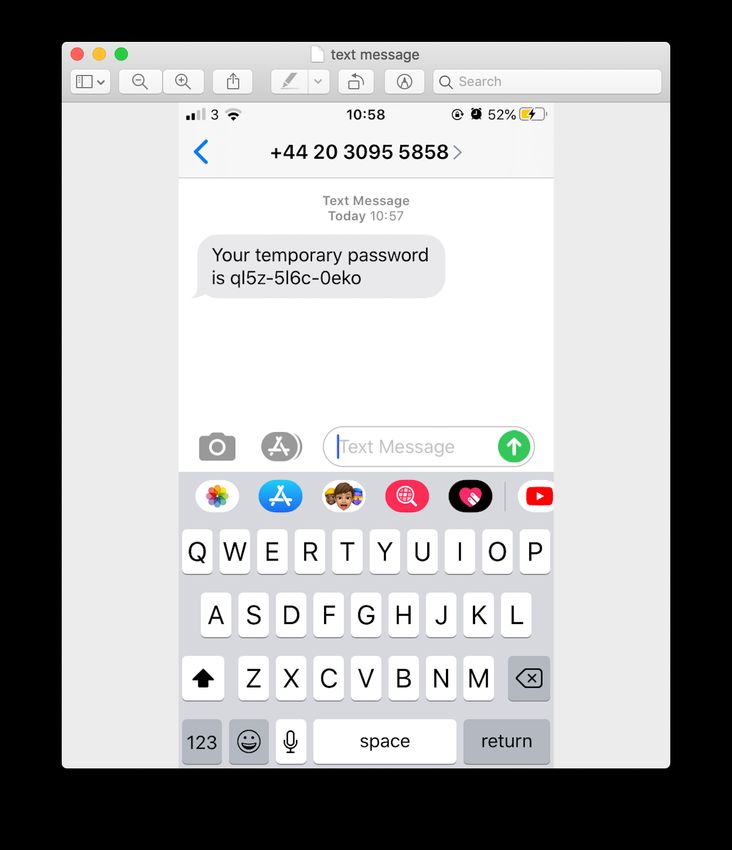
Individual Account
     Signing in to NHSmail for the first time

5.    You will now be asked to change your                                         9.   You will be taken back to the sign in page, where you
      password as the texted password will                                              should enter your nhs.net email address and your
      show as expired.                                                                  new password created. Click ‘sign in’ and ensure
6.    You will need to enter your nhs.net email             5                           the private computer box is ticked. Select ‘sign in’.
      address and the texted password again, and            6   Email Address
      then enter your new password identically in
      the last two boxes
7.    There are rules that you will have to follow for      8
      your password, which are explained on this
      screen. Passwords that do not follow these
      rules will be rejected.
                                                                                                       Email Address
8.    Click ‘submit’.
                                      7
                                                                                                                       9
       Password Requirements:
       Password must NOT include your username (pre-fix of your email
       address)
       It must contain a mix of three out of the following four character types:
       • uppercase letters (A-Z)
       • lowercase letters (a-z)                                                   10. You will be taken to the Acceptable Use Policy.
       • numbers (0-9) • symbols (!"£$%^&*)                                            Have a read through, scroll to the bottom of the page
       • It must be 8 or more characters long                                          and click ‘accept’ when you are ready.
       • It cannot be any of your four previous passwords
       • Spaces or commas cannot be used                                                Please note, if you do not accept the Acceptable Use
                                                                                        Policy, you will not be able to send or receive emails.
Individual Account
 Signing in to NHSmail for the first time

11.   You will be taken to your profile. Fill out the fields and check the   15.   Now fill out the security questions. Characters from these
      information is correct as this information is used to recover                answers will be used if you ever need to reset your password.
      passwords.                                                                   This includes spaces, as spaces are classed as characters,
                                                                                   therefore we would recommend using one word answers.
12.   The mobile number you provided will be pre-filled. Please do
      not delete this mobile number as it is used for password resets.       16.   They also need to satisfy certain conditions.
13.   If this is a personal number that you do not want to be visible on     17.   Click ‘save’.
      the central directory, ensure that ‘hide my mobile number’ is
      ticked. If this is a work phone or personal number that you
      would like people to be able to see, untick the ‘hide my mobile                                                              16
      number’ box.
14.   Click ‘next’.

                                          YOUR NAME
                                                      12                           15

                             13

      11

                                                                                                                      17

                                                                             18.   You will now automatically be signed out. Sign in again to
                                                                                   start using your NHS Mail account.
                                                  14
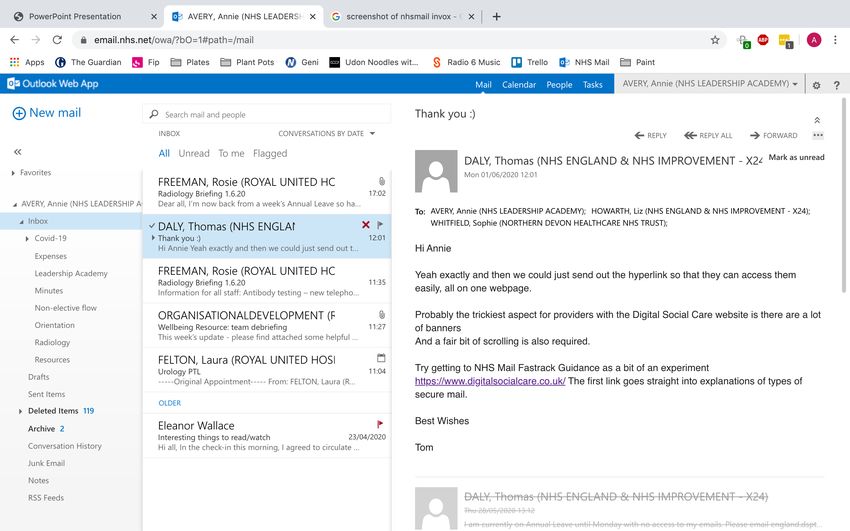
Individual Account                              The ‘Mail’ tab             The ‘Calendar’ tab opens your
    NHSmail home                                                               calendar and is where you can            This cog
                                                    is where all
                                                    your emails                create appointments and meetings         icon leads to
When you                                            are received               and view other people’s calendars        various
sign in to                                                                                                              settings
NHSmail it                                                                                    YOUR
                                                                                              YOUR NAME
                                                                                                   NAME

will                                                                                                                    You can click
                                                            Email
                                                            Email subject
automatically                                                     subject                                               your name to
open on the                                                                                                             update your
‘Mail’ tab                                                            Email
                                                                      Email sender
                                                                            sender                                      picture, open
where you                           Email sender
                                    Email subject
                                                                                                                        another
can see your     Your Name
                                    Email message                                                                       mailbox or
                                                               Email
                                                               Email recipient(s)
                                                                     recipient(s)
inbox. This is                      Email sender                                                                        sign out.
                                    Email subject
made up of         Email Folder 1
                                    Email message           Email
                                                            Email message
                                                                  message
different          Email Folder 2

                                    Email sender
                                                                                                                       Emails that
                   Email Folder 3
panels and         Email Folder 4
                                    Email subject
                                    Email message
                                                                                                                       you ‘flag’ will
headings           Email Folder 5
                                                                                                                       appear in the
                                    Email sender
                   Email Folder 6   Email subject                                                                      ‘Tasks’ tab
                                    Email message
                   Email Folder 7

The left hand      Email Folder 8   Email sender
                                    Email subject                                                                  The ‘People’ tab
panel shows                         Email message
                                                                                                                   refers to contacts.
you previews                                                                                                       It allows you to
of emails and                       Email sender                                                                   search in the
                                    Email subject                 This main panel is where emails are displayed
a breakdown                         Email message                                                                  global contact
of your inbox                                                                                                      directory, add
and                                                                                                                other contacts
                                                                       Email
                                                                       Email sender
                                                                             sender
associated                                                                                                         and view and
folders                                                                                                            manage groups.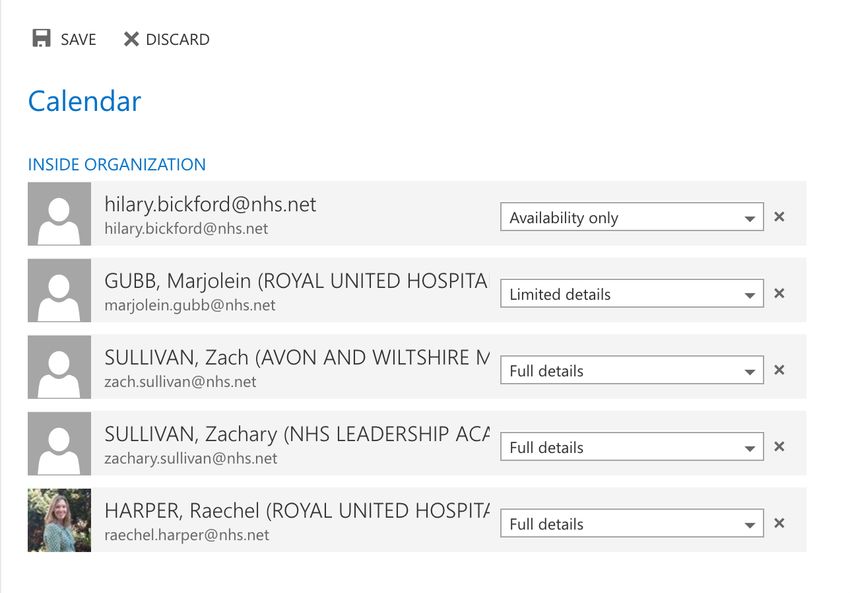
Individual Account
Changing your password

      It is a good idea to change your password regularly to keep your   4.   Select ‘change your password’ under ‘shortcuts to other
      account secure.                                          1
                                                                              things you can do’ on the right hand side of the page.
                                    YOUR NAME                            5.   A new menu will open. The domain\user name box will be
                                                                              pre-filled. You do not need to edit this.
      1.   Sign in to NHSmail. Select the cog                            6.   Enter your current password in the ‘current password’ box.
           next to your name in the top right                            7.   Then choose a new password, enter and click confirm in
           hand corner of your NHSmail home                                   the appropriate boxes.
           page.                                                         8.   Click ‘save’. Your password has now been changed.
      2.   Select ‘Options’ from the drop
           down list.                                   2

  3

                                                                              5

                                                        4                     6

                               YOUR NAME                                      7
                               YOUR EMAIL

                                                                                      8
      3.   Make sure ‘account’ is selected on the left hand panel.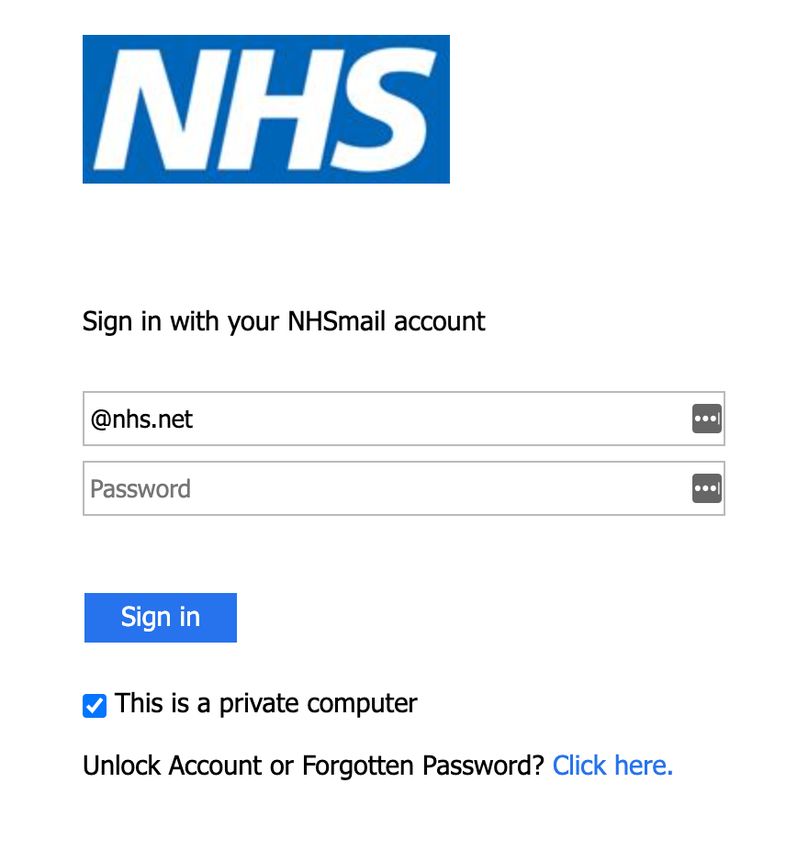
Individual Account
Resetting a forgotten password

If you try to log in and have forgotten your password, you will need
to reset it.
     1. Go to www.nhs.net. Click ‘unlock account or
        forgotten password’ below the sign in area.
                                                                                                             4

                                                                                               5

                                                                       6. A text message will be sent to your personal number
                                     2
                                                                          with your temporary password on it.

                             1
                                            3

                                                                                        6
     2. Enter your NHSmail email address and the last four
        digits of the mobile number listed on your account.
     3. Click ‘next’.
     4. It will now ask for individual characters of the answers
        to some of your security questions. (Please refer to           7. Return to the sign in screen by going to www.nhs.net.
        Page 6).                                                          Enter your NHSmail email address and the temporary
                                                                          password from the text message you received. Click
     5. Click ‘next’.
                                                                          ‘sign in’.
Individual Account
Resetting a forgotten password
                                                                                                                           2
                                                                                                    YOUR NAME

      8.   You will now be prompted to change your password. Your
           old password is the temporary password you just received                                 YOUR NAME
                                                                                                    YOUR EMAIL
           in a text message.
      9.   You will be also reminded of the password rules.

                                                                     9                          3

                                                                         How to apply for more individual accounts
 8                                                                       You can apply for a further 8 individual accounts linked to your
                                                                         site (making a total of 10). To do this you will need to send a
                                                                         request from your shared mailbox (in the body of the email,
                                                                         not as an attachment) to careadmin@nhs.net and state the:
     10

      10. When you have filled in the boxes, click ‘submit’. You can     • Current email address
          now log in with your new password.                             • Person or people’s full name
                                                                         • Personal mobile number
      Signing out of your account
      1. It is important when you have finished your day’s work to       Include the information above as well as the reason you are
          remember to sign out of your account.                          requesting additional accounts.
      2. Select your name in the top right-hand corner of the            When a new account is created, a confirmation email will be
          NHSmail home screen.                                           sent to the owner of the shared mailbox and a temporary text
      3. Click ‘sign out’, then close the window.                        password will be sent to the individual’s mobile number.
Shared Mailbox
Benefits of and how to access the shared mailbox
Benefits of the shared mailbox 1. Sign in to your individual NHSmail account. Click on your name
in the top right of the page
A shared mailbox can be accessed by multiple members of staff who
can send emails on behalf of one care provider. This is useful for 2. Click ‘Open another mailbox’.
1
multiple users who need to access confidential information . For YOUR NAME
example, if a team member is absent, emails they have sent from the
shared mailbox can still be managed effectively.
It is best practice for all care home staff to use the shared mailbox to
send emails relating to resident’s care because it keeps all this
information in one place where multiple people can access it. 2
Accessing the shared mailbox 3. Enter the email address of your shared mailbox. You can find this
on the Welcome to NHS Mail email you received from
Please note: only the Shared Mailbox Owner and Member detailed Care.mailer@nhs.net
on the NHSmail Application Form will be able to access the shared
mailbox. Refer to your form to see who these are and then follow 4. Then click ‘Open’.
these instructions.
You can find out how to add and remove people from the shared
mailbox on the next page of this guide. 3
4
5. You will now be directed to the shared mailbox account.Shared Mailbox
Adding users to the shared mailbox
1. Go to www.nhs.net and sign in to NHSMail. Select ‘Profile’.
2. Select ‘Shared Mailboxes’.
2
1 5
3. Type ‘care.’ into the search bar on the right hand side and click 6. Type the full email address of the person you want to add into the
the magnifying glass to search. This will bring up all the shared email box.
mailboxes you have authority over. 6
4. Double click on the name of the shared mailbox you wish to add a
user to. 7. Tick the checkbox by their name
8. Then click ‘select’.
3
4 7
8
5. Scroll to the bottom of the page where you can choose to add
someone as a ‘member’ or an ‘owner’. A member is a user of a 9. They have now been added to the mailbox. Click ‘update’ to save
shared mailbox. An owner can add and remove people. Click your changes. 9
‘Add’ to add someone.Shared Mailbox
Removing users from the shared mailbox
1. Go to www.nhs.net and sign in to NHSMail. Select ‘Profile’.
5. Scroll to the bottom of the page where you can see all members
and owners. A member is a user of a shared mailbox. An owner
1 can add and remove people. To remove someone click the ‘x’ by
their name
2. Select ‘Shared Mailboxes’.
2
5
3. Type ‘care.’ into the search bar on the right hand side and click
the magnifying glass to search. This will bring up all the shared
mailboxes you have authority over.
4. Double click on the name shared mailbox you wish to remove a
user from.
6
3
4
6. This person has now been removed from the mailbox. Click
‘update’ to save your changes.Global Contact Directory
Searching for people in the contact directory
One of the benefits of NHSmail is that it gives you access to the 3. Choose the right person from the list using details about where
Global Contact Directory, which is an online address book with contact they work and their role to find the right person.
details of Health and Social Care Providers. This means you can
easily communicate with GPs and other colleagues across the 4. You can also find people in the contact directory by creating a
healthcare system by searching for their name and organisation. new message, searching their name the ‘To’ field of a new email
and following the same process.
1. Sign in to NHSmail. Select the ‘People’ tab at the top of your
screen.
YOUR NAME 4
1
2. Type the name of the person you are looking for into the search
bar and press enter to search the directory.
2
2
YOUR NAME
3
3 (ORGANISATION)
(ORGANISATION)
(ORGANISATION)
ORGANISATION
(ORGANISATION)
ORGANISATION
(ORGANISATION)
ORGANISATION
(ORGANISATION)
ORGANISATION example@nhs.netGlobal Contact Directory
Adding a new contact
Sometimes you might want to add someone as a contact who does 4. Fill in their details in the appropriate boxes and fields.
not have an ‘@nhs.net' email and is not in the contact directory.
1. Click the ‘people’ tab at the top of your screen.
5
YOUR NAME
4
1
2. Click ‘new’ in the top left hand corner.
2
3. A window will appear. Click ‘create contact’.
3
5. Click ‘save’. The contact will now appear in your directory.Calendar
How to create a calendar appointment/ meeting
1. Sign in to NHSmail. Click ‘calendar’ along the top.
1
3. Fill in the details and click ‘send’.
YOUR NAME
3
2. Then click ‘new event’ in the top left hand corner of your screen. a
b
2 c
e
d
f
This will bring up an appointment where you can add:
a) The title of the event
g
b) Location
c) Attendees. The attendees section uses the directory so you
can search a person’s name and choose their contact in
order to invite them.
d) The date and time of the event h
e) The duration
f) A reminder
4. The meeting will now appear on your calendar and send an invite
g) You can select ‘repeat’ if the meeting happens on a regular to any attendees you choose on point c.
basis
h) A message to describe what the meeting is forCalendar
How to share your calendar
You can share your calendar with people if you would like them to will be sent to the individual confirming these changes have been
know when you are busy or free. There are different options for the applied.
level of detail you share.
6
1. Sign in to NHSmail. Click on the ‘Calendar’ tab at the top of the
screen.
4
1
2. On the left hand side under ‘My calendars’, right click on the
calendar you would like to share. (For example, if you have
access to a shared mailbox, the calendar for the shared mailbox
and your personal account would both appear here). 2
3
3. Select ‘Share calendar’.
4. A new window will pop up. Type the name of the person you
would like to share your calendar with in the ‘Share with’ box and
choose their name from the drop down search. You can choose NAME
5
more than one person here by searching multiple times. email@nhs.net
5. Use the drop down menu after the person’s name to choose the
level of detail you’d like to share.
6. Then select ‘send’ at the top of the message. An email notificationCalendar
How to manage who has access to your calendar
6
Over time, you may wish to change who can see details of your
calendar as people change roles, but retain their email addresses. You
can do this by following the instructions below.
1. Select the ‘Calendar’ tab at the top of the screen NAME
4
1 example@nhs.net
YOUR NAME
5
NAME
example@nhs.net
2. On the left hand pane, right click on NAME
example@nhs.net
the calendar you would like to
manage access for. NAME
example@nhs.net
3. Select ‘Permissions...’. This will open
NAME
up a window detailing all the people example@nhs.net
who have access to your calendar
and the level of detail.
Availability only - whether you’re 4. You can change the level of detail
free or busy using the drop down menu after each
Limited details – The title and person’s name.
location of your meeting 5. You can select ‘x’ to remove
Full details - Full details of the 2
that person’s access.
meeting 3
6. Remember to click ‘save’ at the top to save your changes.
Editor – Ability to edit
Delegate – Can do everything on
your behalfSwitching to NHSmail from your previous email
account
How to forward emails from your previous email account to NHSmail
In order to get the most out of NHSmail we recommend using it as
your primary source of communication. However, it can be difficult to
do this when lots of people have your previous email address. example@email.com
2
You can forward emails from your previous email address to your new 4
NHSmail email address. Whenever someone emails your old address,
it will automatically re-direct to your NHSmail account.
3 5
Please note: the instructions below apply to those previously using
Outlook for emails.
Forward emails from your previous email address to NHSmail
1. Go to https://outlook.live.com/owa/ and select ‘sign in’ in the top
right hand corner of the screen. 6. Select to cog icon in the top right hand
1
corner of your screen.
6
2. Enter your previous Outlook email address.
3. Click ‘next’.
4. Enter your password for your Outlook email. 7. In the drop down menu select
‘View all outlook settings’.
5. Click ‘sign in’. You will now be signed in to the online version of
your previous email account. 7Switching to NHSmail from your previous email
account
How to forward emails from your old email account to NHSmail
8. This will open a new window. Make sure email is selected on the 13. In ‘Add an action’ use the drop down menu to choose ‘Redirect
left hand menu. to’.
9. Click ‘rules’. 14. Enter your NHSmail email address in the box that appears.
10. Then click ‘add a new rule +’. 15. Select ‘Use this address’.
13 14
15
9
8
10
16. Click ‘save’. All emails received by your previous email address
11
will now be re-directed to your NHSmail email address.
11. Name the rule
‘Email forwarding’.
12. In ‘Add a condition’
use the drop down menu
to scroll to the bottom
and click ‘Apply to all
messages’. 16
12Advanced use of NHSmail
Requesting a read receipt
Requesting read receipts will help to ensure that you know when GPs, 4. Tick the box next to ‘Request a read receipt’.
pharmacists or other health workers have seen your message. This
could save time by limiting the number of follow up phone calls. 5. Click ‘OK’.
1. Sign in to NHSmail. Select ‘New Mail’ in the top left hand corner
of your screen.
1
2. Select the three dots ‘…’ on the top of the email.
3. Select ‘show message options’. 4
2
5
You will need to go through this process each time you want to
request a read receipt. You can also request a delivery receipt to
3
confirm your email has been delivered by selecting ‘Request a
delivery receipt’.Advanced use of NHSmail
Marking emails as confidential or important
All emails you send on NHSmail are secure and encrypted, meaning it
is a safe way to share confidential information. However, it is best 2
practice to mark an email that is important or those requiring further
action.
1. Select ‘New Mail’ 3
4
1
2. Select the three dots ‘…’ located on the top of your new email.
3. Select ‘set permissions’.
4. Choose from the list displayed to determine the notification that is
added to the top of your email.
a) For example, selecting ‘Company Confidential’ will add ‘This
message is marked Company Confidential: This message
5
contains proprietary information and should be handled
confidentially’ to the email.
5. To set the importance of an email follow steps 1-2 and then select
‘set importance’ and choose from the list displayed.Advanced use of NHSmail
Creating a group email list
Creating a group email list can help managers, head nurses or admin 5. Add the members that you would like to include by typing their
teams to send emails out to groups of staff in one go. As new names and selecting them from the list. You can also add a
members join the team or existing members leave, the email group description for the group if you wish.
can quickly be updated.
6. Select ‘save’. When you create a new email, you can type the
1. Sign in to NHSmail. Select the ‘People’ tab at the top of the name of the group to address it to all the people in that group.
screen, next to your name.
1 6
YOUR NAME
2. Select ‘New’ from the top left side of the page. 4
3. Select ‘Create group’ from the list of options that appear.
5
2
3
4. Enter a name for the group.Advanced use of NHSmail
Adding members to an existing group
1. Sign in to NHSmail. Select the ‘People’ tab at the top of the
screen, next to your name. 5
1
YOUR NAME
2. Select ‘Contacts’ on the left hand side
6. Under ‘Members’ type the names or email addresses of the
3. Then select ‘Groups’. people you want to add to the group.
4. Select the group you want to edit from the list. 7. To remove people, click the ‘x’ next to their name.
8. Select ‘save’.
3
8
2
4
6
5. The group information will appear on the right hand side of your
screen. Click ‘Edit’ on the right hand side of the group 7
NAME
information. email@nhs.net
Example Name
example@nhs.netAdvanced use of NHSmail
Giving another user access to your personal inbox
3
As a manager, it can be useful to give someone access to your
mailbox in case you are out of the office for a long period or over the
weekend. You can share your inbox with another member of staff and
they will be able to see emails coming into your account. They can
also access important information that does not come to the shared
mailbox, which may need to be shared with others in your absence. 4
Your inbox can be shared with your manager or another member of 5
staff to ensure any emails not in the shared mailbox can be monitored.
1. Sign in to NHSmail. Right click on
‘Inbox’ on the left-hand side of your 6. Choose details of the permissions you’d like to grant and use the
screen drop down menu to choose an option from the ‘Permission
Level’ list. Then click ‘OK’. Refer to the next page for an
1
2. Select ‘Permissions’ from explanation of the different permissions.
the list. 6
3. Select the ‘+’ icon at the top of the new
window
4. Enter the name/ email of the person you
would like to give access to and choose
the right person from the list.
2
5. Click ‘Add’.Advanced use of NHSmail Giving another user access to your personal inbox Explanation of permission levels: Owner – this person has full access to your mailbox Publishing Editor – this person has the same access as Owner, but are unable to create folders Editor – this person has the same access as Publishing Editor, but are unable to create subfolders Publishing Author – this person can read and write emails, but can only delete emails they own (have written) Author – this person is the same as Publishing Author but are unable to create subfolders. Non-editing Author - The user can create items (not folders), but cannot edit anything. They can delete items that they have created. Reviewer - The user can see folders, but not sub-folders. Contributor - The user can create items
You can also read