TeamViewer Tensor Remote Work Solution Script-Based Group and Device Assignment
←
→
Page content transcription
If your browser does not render page correctly, please read the page content below
SETUP GUIDE

 TeamViewer Tensor™
 Remote Work Solution

Script-Based Group and
  Device Assignment

   TeamViewer Tensor provides a secure, easy-to-use remote work
  infrastructure, so your teams can access company resources like
desktop computers, mobile devices, server systems and applications,
               or intranet sites from home or on the go.
SETUP GUIDE

                                     Table of Contents

I. Get Started                                                                                             3

Step 1: Activate your license.                                                                             4

Step 2: Create your company profile and a Master Account in the Management Console.                        5

Step 3: Create users.                                                                                      6

Step 4: Create a group for your new devices.                                                               7

Step 5: Add a new settings policy.                                                                         7

II. Deployment on Company Devices                                                                          9

Step 1: Create a deployment package for your TeamViewer Hosts.                                             9

Step 2: Deploy your TeamViewer Hosts.                                                                     10

Step 3: Open the CMD with admin privileges.                                                               11

Step 4: Execute the deployment command.                                                                   11

III. Execution of a customized script that allows employees to remotely access their company

   device(s) using unattended access                                                                      12

Step 1: Create an API token in the Management Console.                                                    12

Step 2: Create a CSV file as a preparation for the mapping.                                               14

Step 3: Run the script.                                                                                   14

Step 4: Make sure the execution of the script will be repeated automatically.                             15

Step 5: Connecting your remote workers.                                                                   15

IV. Questions or issues                                                                                   16

                                 Copyright © 2020 TeamViewer Germany GmbH. All rights reserved.                 2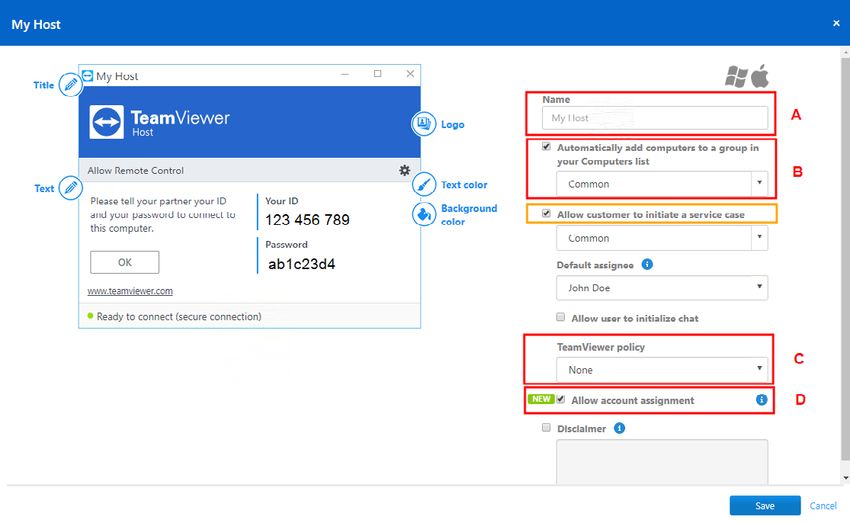
SETUP GUIDE

I. Get Started

 STEP 1     Activate your license.

Check your email for your TeamViewer Tensor™ order confirmation.

1.1 Open the email and click “Get me started”.

1.2 Activate your license on your TeamViewer account. You will be redirected to the account sign-in page:

A   If you have an existing TeamViewer account: Click “Get started with your existing TeamViewer account” and
    go to Step 2.

B   If you don’t have a TeamViewer account yet:

                                         B1: Click Create an account now.

                       B2: Enter your email address, your name, and create a password.
                            Read and accept the EULA and mark the captcha box.
                                                Click Sign up

                                     Copyright © 2020 TeamViewer Germany GmbH. All rights reserved.                 3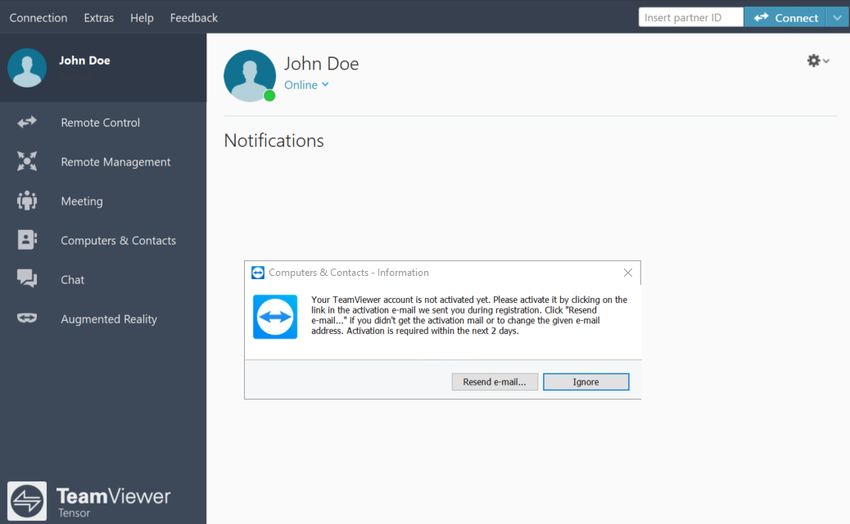
SETUP GUIDE

            You will be redirected to the Management Console
                     and see the confirmation screen.

B3: Sign in to your TeamViewer client with your account credentials.
A pop-up informs you that a confirmation email has been sent to you.

B4: Check the inbox of your email client and click the link in the email.

                Copyright © 2020 TeamViewer Germany GmbH. All rights reserved.                 4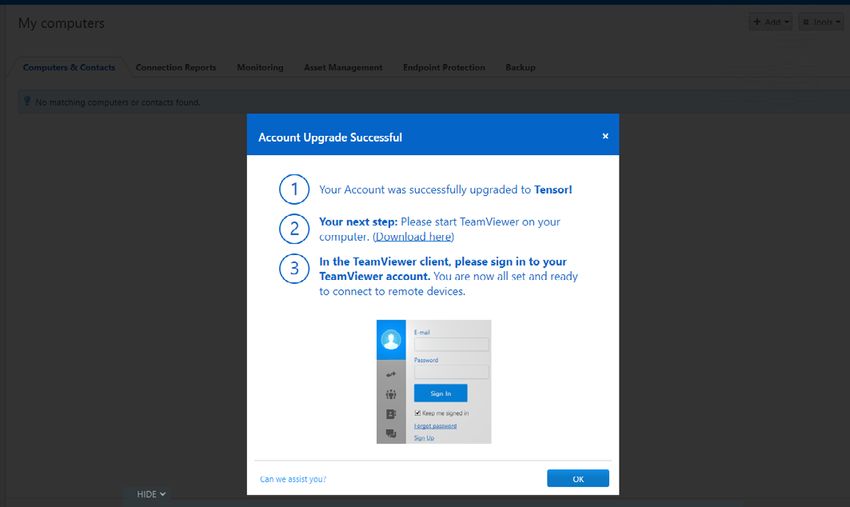
SETUP GUIDE
B5: You will be redirected to the
Management Console with the
following screen confirming your
successful license activation.
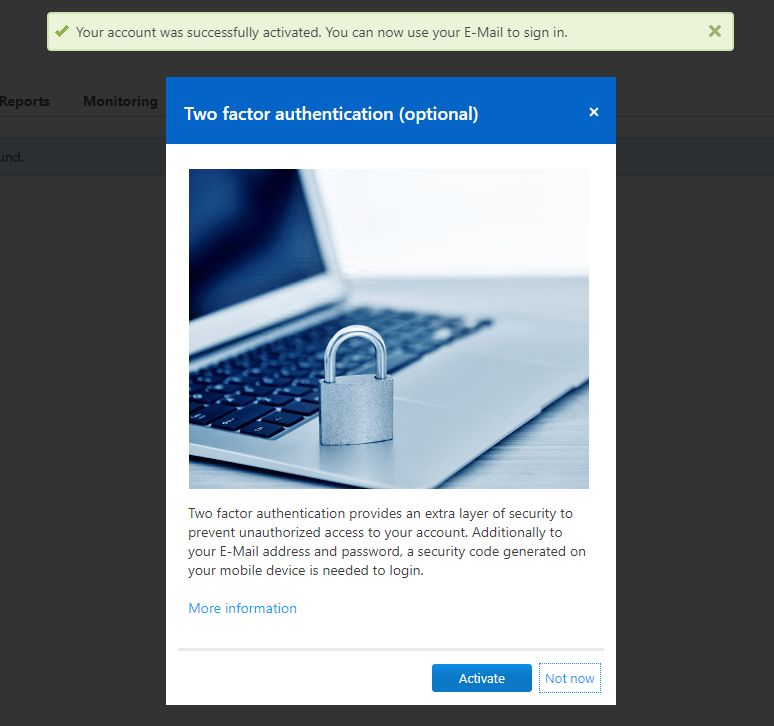
B6 (OPTIONAL): Follow the instructions for
two-factor authentication in our Knowledge
Base article “Two factor authentication -
Activation and Deactivation” to complete the
activation of your TeamViewer license.
If you want to skip this step, click "Not Now".
STEP 2 Create your company profile and a Master Account in the Management Console.
2.1 Create a company profile by following the instructions in the section Create your company profile.
2.2 Once your company profile is created, we highly recommend creating a Master Account, which will serve as
a generic administrative account.
Why create a Master Account?
Your company’s primary administrator(s) of TeamViewer will know the account credentials.
This account will be used for all future configuration steps, so administrative control and ownership are
not tied to one secific person.
TeamViewer administration won’t be disrupted, even if the original administrator leaves that role.
For more details, follow the steps in our Knowledge Base article Using a Master Account for the TeamViewer
Management Console.
Please note:
Make sure you do not create a Master Account with an e-mail distribution list (e.g., all@example.com),
but with a specific e-mail address.
The created account must have a valid email address that can receive the account activation email (i.e.,
either a mailbox or an email distribution list you have access to).
We recommend using a non-personal email address for the Master Account.
We highly recommend protecting your TeamViewer account with two-factor authentification. For details,
please refer to our Knowledge Base article Two-Factor Authentication - Activation and Deactivation.
Copyright © 2020 TeamViewer Germany GmbH. All rights reserved. 5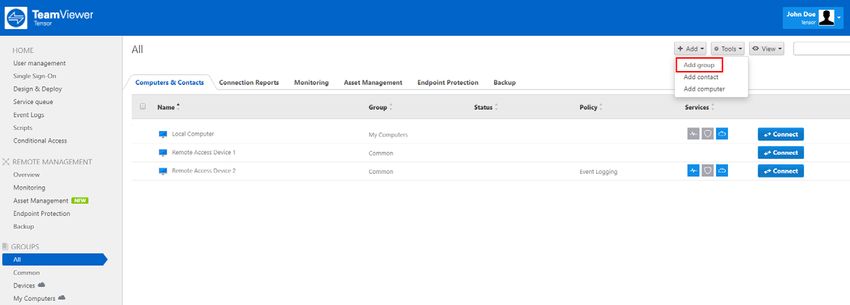
SETUP GUIDE
STEP 3 Create users.
Under “User management” in the left navigation panel of the Management Console, click “Add user” to add
people to your company profile that need to access their company devices remotely, along with every person
that needs to be set up for remote work.
Follow the detailed steps in our Knowledge Base article All about the TeamViewer company profile.
Please note:
All users will receive a
confirmation email for
account activation.
Users will have to log in in
order to activate their ac-
count and set a password.
TeamViewer Tensor allows
the use of single sign-on
(SSO). Please visit "Single
Sign-On (SSO)" for more
information.
With TeamViewer, you may want to use the following options down the road:
Local Active Directory using TeamViewer Active Directory (AD) Connection is described in our Knowledge
Base article Active Directory Connector (AD Connector).
Azure AD provisioning is described in SCIM Configuration for Azure Active Directory.
You can download the tool for bulk import via PowerShell from our TeamViewer website.
Activate SSO by following the instructions in our Knowledge Base article Single Sign-On (SSO).
Copyright © 2020 TeamViewer Germany GmbH. All rights reserved. 6
SETUP GUIDE

 STEP 4     Create a group for your new devices.

In the Management Console, click “All” in the left navigation panel.

Click “Add group” to create a group for your new devices. Later, the group for each company device will need to
be shared with your remote workers.

 STEP 5     Add a new settings policy.

The settings policy facilitates the management of your installed TeamViewer clients. You can centrally enforce
settings and options for them.

In the Management Console, click “Design & Deploy” in the left navigation panel and then click “Add policy”.

Follow the detailed steps in our Knowledge Base article How to add a new settings policy.

                                      Copyright © 2020 TeamViewer Germany GmbH. All rights reserved.                 7
SETUP GUIDE
Recommended policies for this scenario:
Blacklisting and whitelisting: Add your entire organization. Click the option “Allow access only for the
following partners” and then “Add”. In the following dialog, select the option with your company name.
With this option, all members of
“Your Company” will be whitelisted.
Note: All connection attempts from
others will be blocked, even if they know
the TeamViewer ID and the password of
the target computer.
Access control (incoming connections): Select “Full access”.
We recommend to use the following custom settings:
Connect and view my screen Allowed
Control this computer Allowed
Transfer files “Denied” (recommended)
Establish a VPN connection to this computer “Denied” (recommended)
Lock the local keyboard and mouse Choose your preferred option
Control the local TeamViewer Allowed Choose your preferred option
File transfer using the file box “Denied” (recommended)
Print on remote printer “Denied” (recommended)
Change sides allowed “Denied” (recommended)
Execute scripts “Denied” (recommended)
Start TeamViewer with Windows: Select “Enabled”.
Disable TeamViewer shutdown: If activated, TeamViewer cannot be shut down. This is useful, for
example, if the administrator wants to guarantee the continuous availability of a computer.
Prevent removing account assignment: Account assignment of the remote machine cannot be changed.
The only way to remove the account assignment is to disable the policy.
Copyright © 2020 TeamViewer Germany GmbH. All rights reserved. 8SETUP GUIDE
Recommended policies:
Password strength: Select “Disabled (no random password)”. Easy access will be granted to your remote
workers instead.
Report connections to this device: If activated, connections to this device will be reported and can be
viewed in the TeamViewer Management Console. For more information, see the manual for Management
Console, section 7.2 “Device reports”, page 56.
Changes require administrative rights on this computer: TeamViewer options can only be changed by
Windows user accounts with administrative rights.
Please note:
We recommend enforcing all policies.
Enforced policies can only be changed in the Management Console.
II. Deployment on Company Devices
STEP 1 Create a deployment package for your TeamViewer Hosts.
1.1 In the Management Console, click "Design & Deploy" in the left navigation panel and then click "Add Custom
module". Select the option "Host" in the drop-down menu.
1.2 Check or uncheck “Allow customer
to initiate a service case” depending on
if you want to allow customers to create
service cases. Visit Improve support in
teams with the Service Queue for more
information about this feature.
1.3 Use the editing options on the left side
to customize your Host. On the right side:
A: Enter a name.
B: Select the group you created in Step 4.
C: Select the policy you created in Step 5.
D: Activate "Allow account assignment".
Note: By assigning a device to your
Master Account, the device can be
remotely managed and monitored by
the Master Account at any time. The
assignment is mandatory if you want to
apply policies.
1.4 Click "Save".
Copyright © 2020 TeamViewer Germany GmbH. All rights reserved. 9SETUP GUIDE
STEP 2 Deploy your TeamViewer Hosts.
IMPORTANT
Before you start any deployment, make sure to check your company firewall configuration:
1. Firewall configurations for ports:
TCP/UDP PORT 5938:
For performance reasons, we recommend opening the TCP/UDP port 5938 (outgoing). On
networks that allow UDP protocols, TeamViewer attempts to get a peer-to-peer connection
(will be tried with udp.teamviewer.com). TeamViewer prefers making outbound TCP and UDP
connections over port 5938 — this is the primary port used for the best performance possible.
TCP PORT 443:
If TeamViewer can’t connect over port 5938, it will next try to connect over TCP port 443.
Note: Port 443 is also used by our custom modules which are created in the Management
Console. If you’re deploying a custom module (e.g., through group policy), then you need to en-
sure that port 443 is open on the computers to which you are deploying. Port 443 is also used
for a few other things, including TeamViewer update checks.
TCP PORT 80:
If TeamViewer cannot connect over port 5938 or 443, it will try using TCP port 80. The con-
nection speed over this port is slower and less reliable than ports 5938 or 443 due to the addi-
tional overhead used. There is no automatic reconnection if the connection is temporarily lost.
Therefore, port 80 is only used as a last resort.
2. Firewall configuration for URLs:
Allow these TeamViewer processes for antivirus purposes:
TeamViewer.exe
TeamViewer_Desktop.exe
TeamViewer_Service.exe
Allow the following URLs on proxy/firewall level:
*.teamviewer.com
The deployment of your Hosts on your remote workers' computers depends on the deployment method you use.
We recommend referring to the Knowledge Base article Mass deployment improvements for more information.
Copyright © 2020 TeamViewer Germany GmbH. All rights reserved. 10SETUP GUIDE
2.1 Copy the customization ID.
2.2 Copy the API token.
2.3 Download the deployment package
and save it to your computer. File name is
TeamViewer_Host_Setup.exe.
STEP 3 Open the CMD with admin privileges.
STEP 4 Execute the deployment command.
start /wait MSIEXEC.EXE /I "Path\To\TeamViewer_Host.msi" /qn CUSTOMCONFIGID=YOUR_CUSTOMCONFIG_
ID DESKTOPSHORTCUTS=0
choice /C X /T 30 /D X > nul
"C:\Program Files (x86)\TeamViewer\TeamViewer.exe" assign --api-token=YourToken --grant-easy-access --alias
%COMPUTERNAME% --group-id gXXXXXXXX --reassign --proxy ProxyUrl
Notes:
• The parameters in brackets are optional.
• The option "--grant-easy-access" must be included so that no password is required on the remote
machine when connecting to it.
• You can import TeamViewer options or settings during the installation process. For more information
please see the section "Apply TeamViewer options (recommended)" in our Knowledge Base.
Copyright © 2020 TeamViewer Germany GmbH. All rights reserved. 11SETUP GUIDE
III. Execution of a customized script that allows employees to remotely access their
company device(s) using unattended access
The script moves device entries from a common group to a shared group per user. If such a group doesn't
exist, it will attempt to create the group. Then it moves the device into that group and shares it with the
respective user. If the device is already present in the group or the group is already shared with the user, the
entry is skipped without doing any changes.
The caller needs to provide mapping data that maps a device to a user.
The data needs to be in CSV format and must have the following columns:
email: The e-mail address of the user to map the device to.
device: The alias of the device.
teamviewerid: The TeamViewer ID of the device.
To resolve a certain device, the script prefers the TeamViewer ID over the alias. If the TeamViewer ID is left
blank, the script will only try to resolve via the given device alias.
The created groups are named using the following pattern:
Devices of user@example.test (using the user's email address).
By default, this script writes log data to a file in the current working
directory using the following filename pattern:
TeamViewerGroupPerUserSync.2020-03-11_17:00:00.log
(using the date/time of the script invocation).
Download location of the script:
https://github.com/teamviewer/api-example-scripts/tree/master/Invoke-TeamViewerGroupPerUserSync
STEP 1 Create an API token in the Management Console.
1.1 Log in to the Management Console
and click "Edit profile".
Copyright © 2020 TeamViewer Germany GmbH. All rights reserved. 12SETUP GUIDE
1.2 In the section "Apps", click "Create
script token".
1.3 The token requires the following
access permissions:
1. User management: View users
2. Group management: View, create,
delete, edit and share groups
3. Computer & Contacts: View, add, edit
and delete entries
Copyright © 2020 TeamViewer Germany GmbH. All rights reserved. 13SETUP GUIDE
STEP 2 Create a CSV file as a preparation for the mapping.
The file needs to be in CSV format (using
"," comma delimiter) and must
provide the following 3 columns:
1. Email
2. Device
3. TeamViewerID
STEP 2 Run the script.
The script can be executed in 2 different modes:
a) Only devices contained in the admin group will be considered for the mapping.
b) All devices will be considered.
Once the script has run successfully, a group has been created for each user and the user has
been added as additional manager of thre group, granting him the same permissions as the
group owner (= admin), particularly Easy Access.
Example 1:
.\Invoke-TeamViewerGroupPerUserSync -ApiToken 'MyApiToken' -MappingFilePath
'MyMappings.csv' -SourceGroupName 'My Computers'
Example 2:
.\Invoke-TeamViewerGroupPerUserSync -ApiToken 'MyApiToken' -MappingFilePath
'MyMappings.csv' -IgnoreSourceGroup
Copyright © 2020 TeamViewer Germany GmbH. All rights reserved. 14SETUP GUIDE
STEP 4 Make sure the execution of the script will be repeated automatically.
Create a scheduled task that runs the script regularly.
This will make sure that devices that were offline during the first script execution will be configured for Easy
Access.
Example for a log file created by the script:
STEP 5 Connecting your remote workers.
Note: Please see our User Quickstart Guide
"How to Use TeamViewer to Access Your
Company Device from home" for detailed
instructions.
4.1: Ask your remote workers to download
and install TeamViewer on their computers.
4.2: After they log in their TeamViewer
accounts, they will find their company
computer in the Computers & Contacts list.
4.3: With a double-click on their company
device they are connected to their remote
computer.
Copyright © 2020 TeamViewer Germany GmbH. All rights reserved. 15SETUP GUIDE
IV. Questions or issues
If you have any question, please do not hesitate to Online resources
create a ticket or to call TeamViewer Help desk.
We speak your language! Visit the following pages to learn more
about the functions and possibilities
France provided by TeamViewer Tensor:
Monday to Friday from 08:30 to
18:00 (GMT): 09 75 18 01 38 • TeamViewer Community
• TeamViewer Knowledge Base
Spain • TeamViewer for developersvvvv
Monday to Friday from 08:30 to
18:00 (GMT): 09 14 19 77 50 Note: Some options might be blocked by your IT.
Italy
Monday to Friday from 08:30 to
18:00 (GMT): 05 1376 3017
United Kingdom
Monday to Friday from 07:00 to
17:00 (GMT): 020 8099 7265
USA
Monday to Friday 8:00 AM to 8:00
PM (EDT): 1 800 638 0253
Further countries: Copyright © 2020 TeamViewer Germany
www.teamviewer.com/en/support/contact/ GmbH and TeamViewer US. All rights reserved.
Copyright © 2020 TeamViewer Germany GmbH. All rights reserved. 16You can also read