Google Video in the Classroom
←
→
Page content transcription
If your browser does not render page correctly, please read the page content below
Google Video in the Classroom
If a picture speaks a thousand words, then, surely, video is able to transcend language. As an integral
component in the differentiated instruction framework, video allows educators to tailor their curriculum
to suit students’ varying learning styles and abilities. Given that students derive a great deal of their
information and cultural awareness from television and the Internet, the guided use of video in the
classroom makes it possible to present curricular content in a more accessible and relevant format for
all learners.

Increasingly, book publishers and video producers have begun streaming their educational videos over
the Internet in conjunction with, or in place of, traditional physical media, such as VHS tape and DVD.
These high-quality productions are available at the click of a button (or rather, hyperlink) for use in the
classroom or for viewing at home as an adjunct to classroom lessons.

In addition to the professionally produced videos most often used by educators in the classroom, there
are many user-generated educational videos available on video-hosting sites, such as Google Video and
LearnHub.1 Almost all of the videos hosted on these and similar sites can be downloaded in a portable
file format (e.g., MP4 or FLV), using media player applications such as iTunes and Miro, to be viewed at
leisure on a laptop or portable device.

The vast majority of videos available on the Internet, however, do not include captions for the deaf and
hard of hearing. According to the Described and Captioned Media Program's (DCMP) Caption it
Yourself™, or CIY, Web page: "Captioning is essential for children who are deaf and hard of hearing, can
be very beneficial to those learning English as a second language, can help those with reading and
literacy problems, and can help those who are learning to read." Unfortunately, educators often
overlook this essential learning tool as a way to promote reading in the classroom.

In addition to the accessibility and literacy benefits, captions provide a searchable and linkable text
transcript that, when indexed by Google Video’s search crawler, provides far more accurate and relevant
search results than those provided through keyword tagging alone. For example, searching for an
unusual phrase, such as “solving complex rational expressions” using the Google Video advanced search
feature, provides a link which takes you directly to the point in the video where those exact words are
spoken!2

As you can see, captioned videos are an integral part of the learning process and are able to provide
assistance for all types of viewers, including deaf and hard of hearing persons, students, and even
individuals searching for educational media on the Web. But captioning one’s own videos can seem like
a daunting task. While no single-click method exists for creating captions, Google Video makes the
process quite simple. As you will discover, creating, uploading, and captioning classroom videos can be
both entertaining and educational!

 1
     Look for the “Videos” section under the “Lessons” tab for each school or community to find the video lessons.
 2
   Once the Google Video search page opens, it may be necessary to select the “List View” button to see the
 "Start playing at search term" link in the search results. Select the option to “search only closed captioned videos” on
 the google.com domain to find captioned Google videos.
                                                                     1
                                                  Described and Captioned Media Program
                      VOICE 800-237-6213 | TTY 800-237-6819 | E-MAIL info@dcmp.org | WEB http://www.dcmp.org
                  Funding for the Described and Captioned Media Program is provided by the U.S. Department of Education.
                                                          Revised November 2008
The Creative Process
Producing videos in the classroom is a wonderful way to spark your students’ imaginations and draw out
their creativity. By uploading your videos to the Internet for others to enjoy, you will be able to share
your (and your students’) knowledge and creativity with others from around the world!

To get started, you will need a video camera or webcam and video-editing software for recording and
editing live presentations and lectures. For recording interactive sessions on a desktop or laptop
computer, you will need a graphics tablet and screencasting software. With the proper setup, you will
be able to record and share many different types of presentations, including:
        Student-led activities, such as skits, essays, and classroom discussions.
        Classroom lectures and chalkboard/SMART BoardTM presentations.
        Interactive lessons drawn on a laptop or desktop computer screen using screencasting software,
        such as CamStudioTM (Windows), Screenflow (Mac), or Screencast-O-Matic3 (Web-based).
In the following tutorial, Google-certified math teacher, Eric Marcos, will show you how to upload and
caption a video using a math lesson presentation on “GEMDAS” recorded by one of his students on a
tablet pc with screencasting software.

Uploading Your Video

        Log in to the Google Video Web site. (Note: If you do not already have a Google account, you
        can create one using your existing e-mail address or by creating a Google “@gmail.com” e-mail
        account.) After logging in, upload your video to Google’s server using the “Upload Video” link.

                  Image 1: Select the “Upload Video” button to begin the upload process.

3
 While some screencasting applications will allow you to export the video as an MP4 or AVI file for uploading to Google
Video, Screencast-O-Matic only exports to the MOV format, resulting in a slightly lower-quality video.
                                                                  2
                                               Described and Captioned Media Program
                   VOICE 800-237-6213 | TTY 800-237-6819 | E-MAIL info@dcmp.org | WEB http://www.dcmp.org
               Funding for the Described and Captioned Media Program is provided by the U.S. Department of Education.
                                                       Revised November 2008
Browse for your video file, and then fill in the appropriate fields on the Web-Based Uploader.4

                        Image 2: Fill in the appropriate fields and upload your video.

        After uploading your video, select the “Live” tab to see the video details. Select the “View” link
        to open your live video in a new window, then highlight and right-click (control-click on a Mac)
        the URL and select “Copy.” You will paste the URL in to the “Video URL Dialog” box in Step 6.

                                 Image 3: Select “View” to see the “Live” video.

4
  Google Video recommends that you upload the original video in the MPEG4 format for the highest video quality during
playback.
                                                                 3
                                              Described and Captioned Media Program
                  VOICE 800-237-6213 | TTY 800-237-6819 | E-MAIL info@dcmp.org | WEB http://www.dcmp.org
              Funding for the Described and Captioned Media Program is provided by the U.S. Department of Education.
                                                      Revised November 2008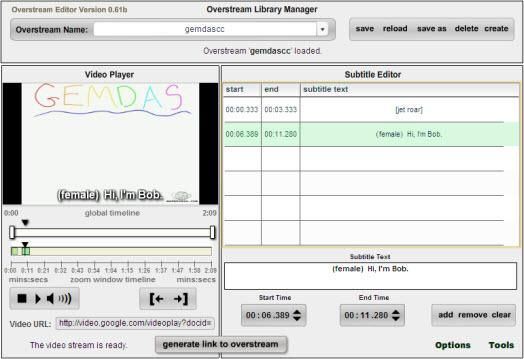
Captioning Your Video

        Before captioning the video it will be necessary to create a complete audio transcript of the
        sounds and dialogue. To do that, open both a plain-text document editor (e.g., Notepad or
        TextEdit) and your Web browser opened to the live Google video. Turn on the “Word Wrap”
        feature of your text editor to keep the sentences in plain view (if using Notepad, select
        “Format,” then “Word Wrap”). Click the “Play” button (right arrow) on the Google Video player
        to begin playing the video in your browser. Listen to the first few seconds of audio, and then hit
        the space bar on your keyboard to pause the video. Hit the Alt+Tab keys (Command+Alt on a
        Mac) to make the text editor window active, and then transcribe the audio from memory
        exactly as you heard it, including all dialogue and any other relevant sounds or information (e.g.,
        music, off-screen sounds, and speaker identification). Press the Alt+Tab keys to return to the
        browser window and then hit the space bar to play the next few seconds of video.5 Continue
        starting, pausing, and transcribing the video in this way until you have a completed text
        transcript.

        Next, as you watch the video from beginning to end, review the transcript for accuracy, and
        correct any spelling or grammar mistakes you may have made during the transcription process.
        (Note: Be sure to involve your students in the transcription- and caption-creation process to
        help improve their listening, typing, and grammar skills!)

                                 Image 4: Transcribe the video using a text editor.

5
 Alternately, if possible, continue transcribing the audio in real-time and pause only if you fall behind. The speaker and
sound identification information can be added during the actual captioning process (step 7).
                                                                  4
                                               Described and Captioned Media Program
                   VOICE 800-237-6213 | TTY 800-237-6819 | E-MAIL info@dcmp.org | WEB http://www.dcmp.org
               Funding for the Described and Captioned Media Program is provided by the U.S. Department of Education.
                                                       Revised November 2008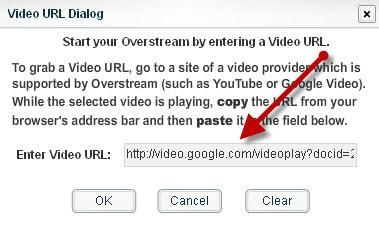
Now that you have a transcript of the audio, the next step is to create an SRT subtitle file.6 To do
        that, you will first need to create an account on www.overstream.net. (Note: The Overstream
        Web site provides a very simple interface, called the Overstream Editor, which you can use to
        create a “timed text” SRT file. This tool is free to use and runs in your Web browser as an
        Adobe® Flash application.) After logging in to Overstream, click on the “Create” button.

               Image 5: Click the “Create” button to create a new Overstream caption file.

        Paste the URL from your live Google video into the “Enter Video URL” dialog box and click “OK.”

                               Image 6: Paste the URL of your “Live” Google Video.

6
 The terms “caption” and “subtitle” are often used interchangeably. By adding text to identify important sound elements
contained in the soundtrack, you are creating “subtitles for the deaf and hard of hearing,” or SDH.
                                                                  5
                                               Described and Captioned Media Program
                   VOICE 800-237-6213 | TTY 800-237-6819 | E-MAIL info@dcmp.org | WEB http://www.dcmp.org
               Funding for the Described and Captioned Media Program is provided by the U.S. Department of Education.
                                                       Revised November 2008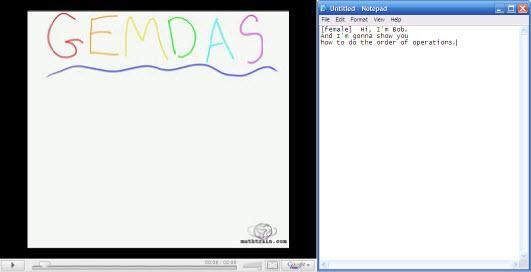
To create the Overstream caption file, simply copy and paste sections of text from your
transcript into the “Subtitle Text” box and then select the appropriate “Start Time” and “End
Time” values. You will obtain the start and end time values from the “global timeline.” (Note:
For readability, it is very important that the captions appear at the same time as the sounds and
dialogue and that no more than two lines of text appear on the video at any given time, with no
more than 32 characters per line. The start and end times will likely be between three-to-five
seconds per line of subtitle text, depending upon the amount and timed delivery of the audio.)

                      Image 7: Time the transcribed text with the audio.

Once you have finished captioning the video and saved your completed Overstream file, you will
need to export the Overstream as an SRT file for use with the Google Video player. To do that,
click on the “Tools” button in the Overstream Library Manager window and select “Export
Current Subtitles as SRT.” Select “Save to File,” and save the SRT file to your computer.

                    Image 8: Export the captions (subtitles) as an SRT file.

                                                        6
                                     Described and Captioned Media Program
         VOICE 800-237-6213 | TTY 800-237-6819 | E-MAIL info@dcmp.org | WEB http://www.dcmp.org
     Funding for the Described and Captioned Media Program is provided by the U.S. Department of Education.
                                             Revised November 2008
You can now log back in to your Google Video “Uploaded Videos” page and find your video
under the “Live Videos” tab.
Image 9: Select “Uploaded Videos” to view your video.
Click the “Captions/Subtitles: Add” button.
Image 10: Click the “Add” button to upload your SRT file.
Choose your language, give the caption file a name in the “Captions/Subtitles” field, and select the
“Browse” button to upload the exported SRT file.7 Click the “Add” button to add the caption file to
your video.
Image 11: Upload your SRT caption file and click “Add.”
7
It will be necessary to save the SRT file as “UTF-8 encoded” text before uploading it to Google Video. Most text editors provide an
option to choose the text encoding type under the “File > Save As” menu. If unsure, select the Add/Edit radio button, then open the
SRT file in your text editor, and copy and paste the text in to the Captions/Subtitles box.
7
Described and Captioned Media Program
VOICE 800-237-6213 | TTY 800-237-6819 | E-MAIL info@dcmp.org | WEB http://www.dcmp.org
Funding for the Described and Captioned Media Program is provided by the U.S. Department of Education.
Revised November 2008The video now displays a “CC” button, which can be used to turn the captions on or off. 8
Image 12: Click here to play the video.9
You can embed the Google video player in your own Web site or blog for others to see when they visit
your page by using the snippet of HTML code provided under the “Embed video” link on your live
video’s Web page.
Image 13: Cut and paste the HTML code to your Web site.
8
It may take a few minutes for the “CC” button to appear on the live video. If the “CC” button does not appear after approximately
15 minutes, then you may need to repair the SRT file using this tool and upload it again.
9
If the captions are difficult to see over the video, it may be necessary to click on the Google Video button in the bottom-right corner
of the video player and select “Double Size.”
8
Described and Captioned Media Program
VOICE 800-237-6213 | TTY 800-237-6819 | E-MAIL info@dcmp.org | WEB http://www.dcmp.org
Funding for the Described and Captioned Media Program is provided by the U.S. Department of Education.
Revised November 2008Conclusion
So start captioning your videos today! The accessibility and literacy benefits provided, in addition to the
searchable and linkable text, makes video captioning valuable for all learners!
Additional Resources
Visit http://www.dcmp.org/ciy to learn more about providing equal access in the classroom.
Find more “Google in the Classroom” tools and activities by visiting the Google for Educators Web site at
http://www.google.com/educators.
About the Authors
Kevin Jones
Kevin Jones is the former Information Technologist for the Described and Captioned Media Program. He holds
a bachelor of science in computer science, is a Microsoft Certified Professional, and has worked in systems
administration for over eight years. When he is not working on computers, he is spending time with his wife
and their three young children.
Eric Marcos
Eric Marcos is a Google-Certified sixth-grade mathematics teacher at Lincoln Middle School in Santa Monica,
CA. Eric integrates purposeful technology using a "kids teaching kids" model. Eric's students create math video
lessons, called “mathcasts,” on a Tablet PC, which are used in classroom instruction and for the class podcast
on iTunes.
He also created the Web site Mathtrain.com, where students actively collaborate online. Recently, he created
the global collaborative web site, Mathtrain.TV. This is a free, educational resource featuring student-created
math video lessons. Students and teachers world-wide are invited to contribute to Mathtrain.TV. Eric and his
students are in the process of closed captioning all of the content on this site.
Eric attended Boston College and earned his Master of Education degree in the MidCareer Math and Science
Program at the Harvard Graduate School of Education. He has taught in East Boston and San Diego public
middle schools. He can be reached at mathtrain@gmail.com.
9
Described and Captioned Media Program
VOICE 800-237-6213 | TTY 800-237-6819 | E-MAIL info@dcmp.org | WEB http://www.dcmp.org
Funding for the Described and Captioned Media Program is provided by the U.S. Department of Education.
Revised November 2008You can also read