PROTHELIS GMBH APP GUIDE (ANDROID / IOS) - PROTHELIS GMBH 24. APRIL 2019 - GPS-TRACKER GRETA VON ...
←
→
Page content transcription
If your browser does not render page correctly, please read the page content below
Prothelis GmbH
  App Guide
(Android / iOS)
  Prothelis GmbH

  24. April 2019
INHALTSVERZEICHNIS

Inhaltsverzeichnis
1   Glossary                                                                                                                                                                                       2

2 General                                                                                                                                                                                          3
  2.1 Requirements . . . . . . . . . . . . . . . . . . . . . . . . . . . . . . . . . . . . . . . . . . . . .                                                                                       3
  2.2 Permissions . . . . . . . . . . . . . . . . . . . . . . . . . . . . . . . . . . . . . . . . . . . . . . .                                                                                    3
  2.3 Communication with GRETA . . . . . . . . . . . . . . . . . . . . . . . . . . . . . . . . . . . . .                                                                                           4

3 The Native App                                                                                                                                                                                    5
  3.1 On-Boarding . . . . . . .        .   .   .   .   .   .   .   .   .   .   .   .   .   .   .   .   .   .   .   .   .   .   .   .   .   .   .   .   .   .   .   .   .   .   .   .   .   .   .    5
  3.2 Login . . . . . . . . . . . .    .   .   .   .   .   .   .   .   .   .   .   .   .   .   .   .   .   .   .   .   .   .   .   .   .   .   .   .   .   .   .   .   .   .   .   .   .   .   .    5
  3.3 Register . . . . . . . . . .     .   .   .   .   .   .   .   .   .   .   .   .   .   .   .   .   .   .   .   .   .   .   .   .   .   .   .   .   .   .   .   .   .   .   .   .   .   .   .    6
  3.4 Reset password . . . . .         .   .   .   .   .   .   .   .   .   .   .   .   .   .   .   .   .   .   .   .   .   .   .   .   .   .   .   .   .   .   .   .   .   .   .   .   .   .   .    7
  3.5 Overview . . . . . . . . .       .   .   .   .   .   .   .   .   .   .   .   .   .   .   .   .   .   .   .   .   .   .   .   .   .   .   .   .   .   .   .   .   .   .   .   .   .   .   .    7
  3.6 Menu . . . . . . . . . . . .     .   .   .   .   .   .   .   .   .   .   .   .   .   .   .   .   .   .   .   .   .   .   .   .   .   .   .   .   .   .   .   .   .   .   .   .   .   .   .    8
  3.7 Map . . . . . . . . . . . .      .   .   .   .   .   .   .   .   .   .   .   .   .   .   .   .   .   .   .   .   .   .   .   .   .   .   .   .   .   .   .   .   .   .   .   .   .   .   .   10
  3.8 Tracker - Liste . . . . . .      .   .   .   .   .   .   .   .   .   .   .   .   .   .   .   .   .   .   .   .   .   .   .   .   .   .   .   .   .   .   .   .   .   .   .   .   .   .   .   12
  3.9 Tracker - Detail Page . .        .   .   .   .   .   .   .   .   .   .   .   .   .   .   .   .   .   .   .   .   .   .   .   .   .   .   .   .   .   .   .   .   .   .   .   .   .   .   .   13
  3.10 Geofence - List . . . . . .     .   .   .   .   .   .   .   .   .   .   .   .   .   .   .   .   .   .   .   .   .   .   .   .   .   .   .   .   .   .   .   .   .   .   .   .   .   .   .   16
  3.11 Geofence - Detail Page .        .   .   .   .   .   .   .   .   .   .   .   .   .   .   .   .   .   .   .   .   .   .   .   .   .   .   .   .   .   .   .   .   .   .   .   .   .   .   .   17
  3.12 Nachrichten . . . . . . . .     .   .   .   .   .   .   .   .   .   .   .   .   .   .   .   .   .   .   .   .   .   .   .   .   .   .   .   .   .   .   .   .   .   .   .   .   .   .   .   18

                                                                                                                                                                                               Page 1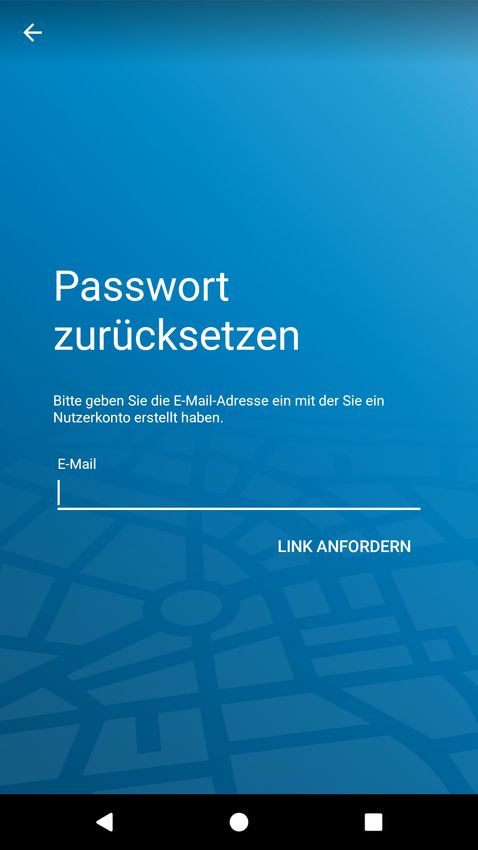
Glossary

1 Glossary
In the following section, some terms will be briefly explained to help you understand the compre-
hensibility of the remaining document.

Statusbar - The status bar is the top bar in the screen view of a smartphone. This usually contains
information about time, network connection, battery level, push notifications, etc ...
App Bar - The App Bar is, in an opened app, the bar below the status bar and usually contains the
back navigation, a title and possibly additional options or actions.
Bottom Bar - Navigation bar at the bottom of the screen to switch views faster.
Lite - In terms of setting up an account, this means having an account with a minimum of credentials,
but also limited usage rights.
Image - An image within this context means a copy of the operating system version installed on a
(mobile) device. In addition to the official images (from Android or Apple), there are also versions,
which are modified by the manufacturers.
Pull-to-Refresh - Pull-to-Refresh describes a common interaction in order to reload data. As the
name suggests, swiping from top to bottom of the screen initiates the data loading.
Root Rights - When an image is rooted, the user has unrestricted access to the system, and most
security mechanisms can be bypassed.
Swiping - Describes a common form of interaction as a gesture of a swipe over the display

                                                                                             Page 2
General

2 General

2.1 Requirements
The following section describes the requirements to use the app.

2.1.1 Android

   • Android version 4.1.2 and greater
   • general hardware requirements need to be fulfilled

               Info

          Google can exclude certain devices per their own criteria per se, so that the app despite
          general fulfillment of the requirements cannot be installed. Reason for this can be e.g. the
          country of production of the device, or which Android image on the device is installed.

2.1.2 iOS

   • iOS version 9 and greater

2.1.3   Operating systems with granted root rights

Users who install the app on a rooted device, do so at their own risk that other applications can read
saved data, and data transmitted during network communication.

2.1.4 Layout

Smartphones and tablets are each supported in portrait view.

2.2     Permissions
The app needs access to:

   • Location services

          – to calculate and display the distance to the tracker
          – to represent its own location on the map

   • Camera

          – to take profile photos for the tracker

   • Speicher

          – to save profile photos

   • Foto-Galerie

          – to select profile photos for the tracker

                                                                                                        Page 3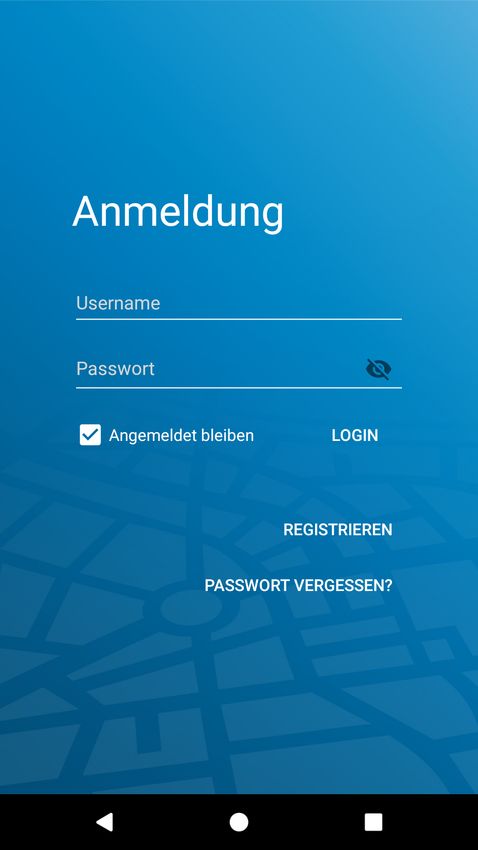
2.3   Communication with GRETA

Access is requested during use. For Android, this happens from version 6.0, for iOS as a general rule.
If access is denied, this can only be changed later via the app settings of the operating system, not
by the application itself.

2.3 Communication with GRETA
For a successful communication it is necessary that the tracker can build up a network connection.
That is, the tracker must not be in a radio hole.
The communication conditions are equivalent to those of a smartphone, which uses the mobile
traffic.
The communication of the tracker never takes place directly with the smartphone. The tracker com-
municates with a server, and the app retrieves the data from a server.
A communication between tracker and server, or the GPS positioning, cannot be enforced. If no
connection is possible then this is influenced by the current environmental conditions of the tracker.

                                                                                              Page 4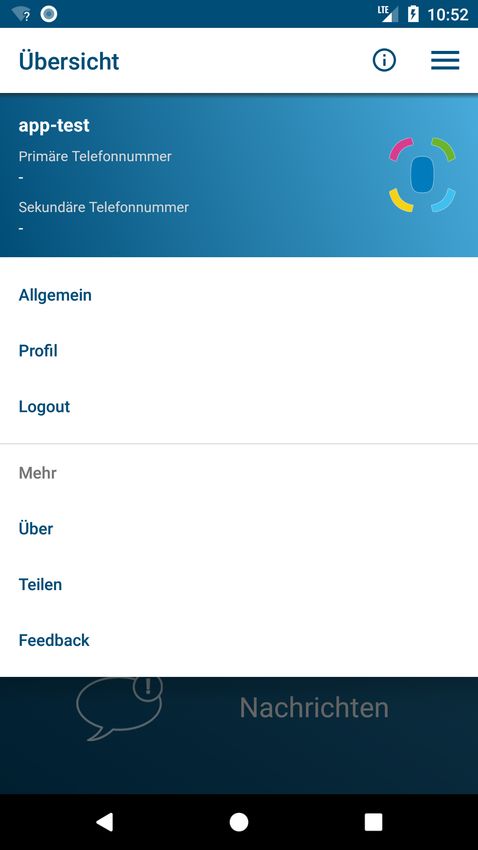
The Native App

3 The Native App
The next sections explain the different views within the app.
The screenshots shown views of the Android app on a smartphone. Views for Apple devices are
similar in appearance, but always have the same content as the Android Views.
Should it, nevertheless, be the case that the two apps differ in certain points, this is explicitly men-
tioned.

3.1 On-Boarding

                                 When the app is started for the first time, a so-called on-boarding
                                 is shown.
                                 The on-boarding explains a few key features in a nutshell.
                                 The views can be changed by swiping to the left or right.
                                 The button at the bottom lets you skip this view.

3.2 Login

                                 To login in the app enter your username and the corresponding
                                 password.
                                 If you tick the checkbox Keep logged in, credentials will be saved.
                                 This has the advantage of being logged in directly on next start of
                                 the application. The default setting is: activated.
                                           Info

                                     If the checkmark is not set and the app is terminated, it will
                                     logout itself for security reasons. This has the consequence
                                     that push messages cannot be received any longer.

                                                                                                 Page 5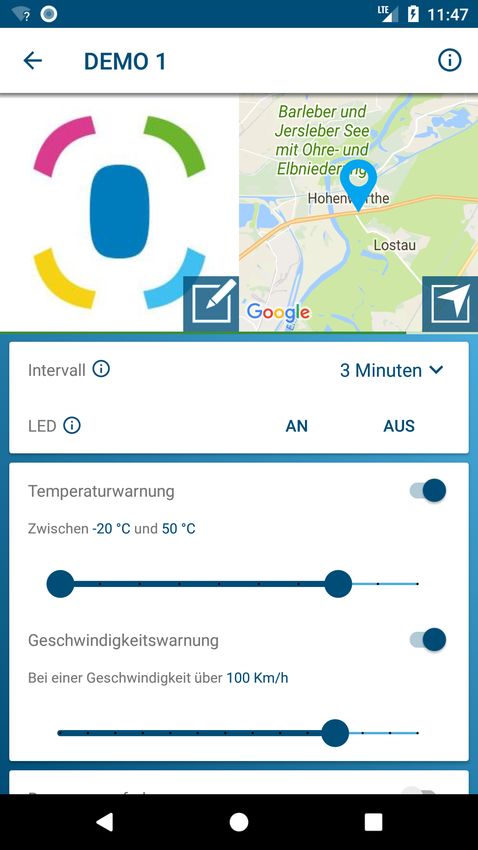
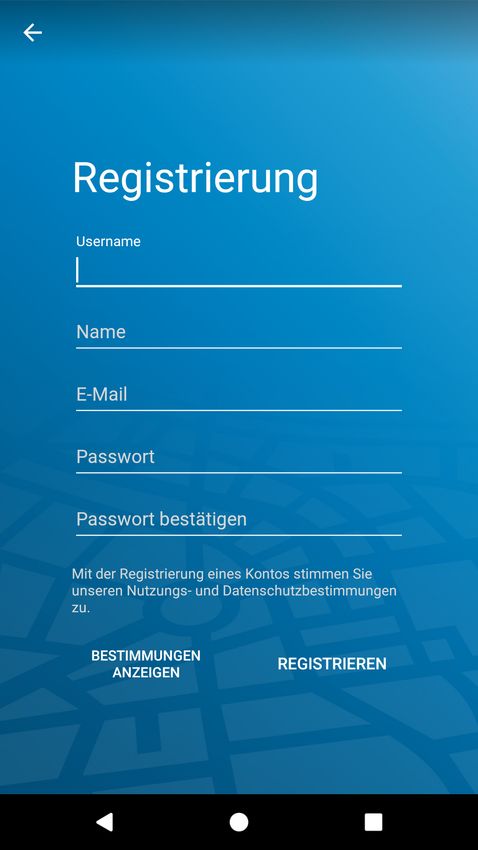
3.3    Register

                                    Via the app a user account can be created. Do you have already
                                    registered a tracker, it is no longer necessary register new user
                                    account.
                                    This is a Lite account. This account only grants access to the app;
                                    for example, to explore the application before the purchase of a
                                    GRETA tracker.
                                    The management of purchased trackers does not take place over
                                    the app. This is exclusively handled by the website https://
                                    my-prothelis.de/account.
                                    The app will point you to it at the appropriate places and forward
                                    you to the correct webpage.

3.3 Register
To create an account successfully, the following information is required:
Username, (full) name, e-mail address, password.
For the assignment of username and password there are restrictions for the used values:
Username

      • at least 6 characters
      • allowed characters:

          – lowercase letters
          – uppercase letters
          – numbers
          – special characters: + - . _

Password

      • at least 8 characters
      • at least one lowercase and one uppercase letter, and at least one number
      • allowed characters:

          – lowercase letters
          – uppercase letters
          – numbers
          – special characters: $ @ ! % * # ? &

                Info

          If you created an account in the app before registering a tracker, you must complete an
          additional form on first login at the account page. Do you have already registered a tracker,
          it is no longer necessary to create a new user account.

                                                                                                         Page 6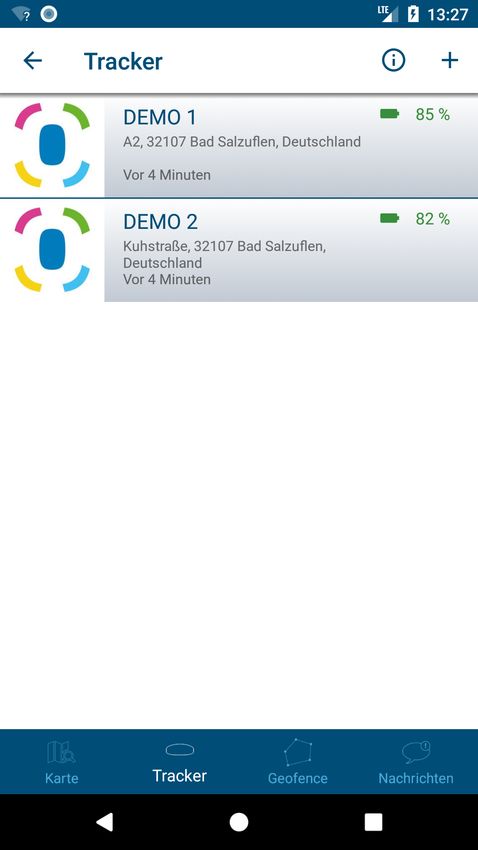
3.4 Reset password
3.4 Reset password
Should you not be able to remember your password, the app gives
you the opportunity to assign a new password.
For this purpose, an e-mail will be sent to the e-mail address which
was used during registration.
For security reasons, no other e-mail address will be accepted.
The email sent contains a link through which the password can be
reassigned. This link is valid for 24 hours.
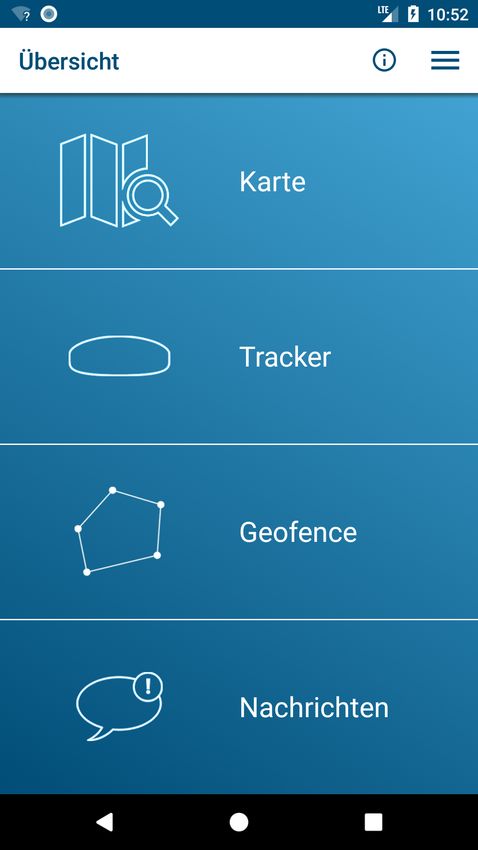
3.5 Overview
3.5.1 App Bar
Button: Info
Opens the info view, which contains additional information.
Button: Menu
Opens the main menu.
3.5.2 List
The view shows a list of the main sections of the app: Map, Tracker,
Geofence, Nofications.
3.5.3 On first Start
When the app is started for the first time or after the first login, the information view will automa-
tically be enabled.
Page 7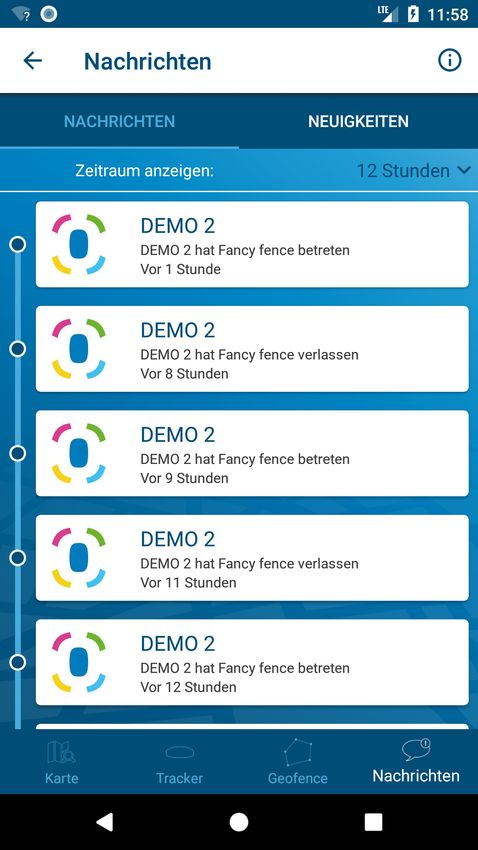
3.6 Menu

3.6 Menu

                                  The header of the menu displays the currently logged in user, and
                                  the stored phone numbers. Furthermore, the menu holds the fol-
                                  lowing options, which are explained in more detail below:

                                     • Settings
                                     • Profile
                                     • Logout
                                     • About
                                     • Share
                                     • Feedback

3.6.1 Settings

Language
This option lets you set the language of the app. By default, the language used is derived from the
system settings.
Automatic reload (Android only)
This option lets the user set which view automatically reloads data. Additionally, you can also define
the interval.

Map

POIs
Lets the user set whether points of interest should be displayed.

Position
Lets the user set whether the own position should be visible on the map.

Heat-map (Android only)
Lets the user set whether the history should be interpreted as a heat-map.

Cluster Trackers
Specifies whether closely spaced trackers should be grouped together on the map for better over-
view. The clustering will only take place if a certain distance and number of trackers is reached.

3.6.2   Push Service

Indicates whether the device you are using is registered with the push service. If not, a re-registration
can be made.

                                                                                                 Page 8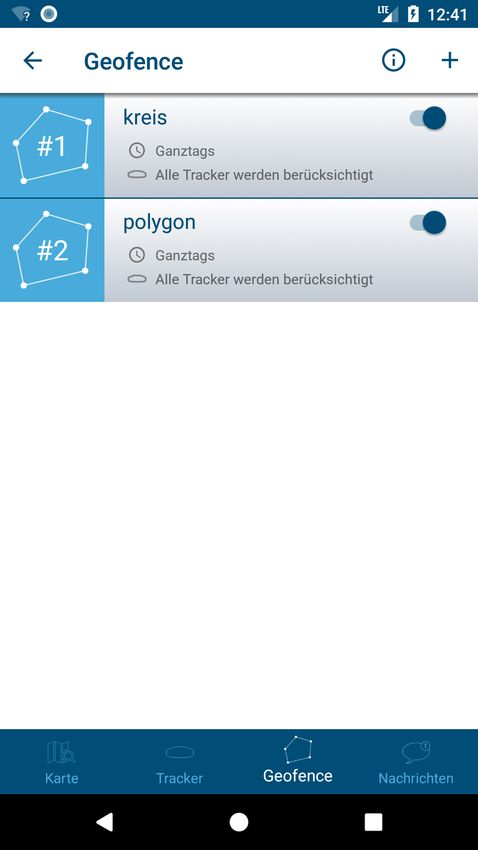
3.6 Menu

3.6.3   Statistics

Shows various statistics for the logged in account. In addition, settings for sending crash reports
and usage data can be set.
Android only: running a network connection check.

3.6.4 Profile

This view gives you the opportunity to view parts of your profile data.

Button: Edit
The button takes you to the account page, because only there profile data can be changed.

3.6.5   Logout

This option will log you out of the account and the system. After a withdrawal no more push mes-
sages will be received.

3.6.6 About

In this section you can find out about the current version of the app, the licenses of libraries used,
as well as usage guidelines and legal notice.

3.6.7 Share

This option allows you to share a short text to friends or acquaintances to share your experience
with GRETA.

3.6.8   Feedback

This option allows you to send feedback.

                                                                                             Page 9
3.7 Map
3.7 Map
3.7.1 Data
If automatic reloading is disabled, the data will not be updated and
thus correspond to the last known state. The data can be reloaded
via the Refresh button.
Automatic reload is enabled by default, but can be disabled any
time in the Android app via the menu (Settings > Automatic reload).
3.7.2 Permission: Location
The first time you use the app you will be asked for permission to use the location. In case of refusal
your own location will not be displayed and the distance calculation will not be executed later.
3.7.3 App Bar
Button: Info
Opens the info view, which contains additional information.
Button: Layer
Changes the map display style. The map style switches between street and satellite view.
Button: History
Starts the history for a tracker. Appears only when a tracker is selected. The history starts by default
for the current day.
Button: Refresh
Loads the necessary data (Tracker, Geofences) again. The button only appears if the auto reloading
is disabled.
3.7.4 Bottom Bar
Allows navigation between the main views.
3.7.5 Marker
Markers indicate the last known/loaded position of a tracker.
Page 103.7 Map
3.7.6 Cluster
Clusters group closely spaced trackers to a marker. The cluster marker contains the number of com-
bined markers. Default state for clustering is: inactive. This can be changed via the menu (General>
Map).
3.7.7 Tracker-Quick-Selection
The tracker-quick-selection can be opened via the following options:
• Tap on the triangle in the middle of the right edge of the screen
• Swipe from the right edge of the screen to the center of the screen
Selection of a Tracker
Selecting a tracker by tapping in the quick selection moves the map section to the last known/loaded
position of the tracker.
All Trackers
This option zooms/enlarges the map section so far that all trackers become visible.
My Position
This option focuses the map section on the last known position of the smartphone. The feature is
supported only if site permission is granted.
3.7.8 Tracker Information
If a marker is selected on the map, a dialog with additional information appears at the bottom. This
contains the name, last address, and time when the last position was reported.
If you have more than one tracker, you can swap it with swipes. By tapping on the title or the profile
picture takes you to the detail page of the tracker.
3.7.9 The History
If the history is active for a tracker, the information dialog changes to a history mode. The history
defaults to the period of the current.
By tapping on the dates, the time period can be redefined. First, the start time must be specified,
followed by the end time.
Touching the history button again will cancel the history mode. The mode is also cancelled when
the user swaps the tracker via swipes.
Page 113.8 Tracker - List
3.8 Tracker - List
3.8.1 App Bar
Button: Info
Opens the info view, which contains additional information.
Button: Plus (+)
The plus button allows new trackers to be added to the account.
Because this is not done within the app, you will be forwarded to
the account website at this point.
3.8.2 List Entry
The list includes all trackers that are linked to the logged-in account. A list entry includes
• the name of the tracker,
• the last known battery level„
• the last known address,
• the time when the position was last updated.
Swiping a list item to the left reveals additional options.
Navigation
This option lets you open an external navigation app to navigate to the last known location.
History
This option switches to the map view and starts the history mode for the selected tracker.
Page 123.9 Tracker - Detail Page
3.9 Tracker - Detail Page
3.9.1 App Bar
Button: Info
Opens the info view, which contains additional information.
3.9.2 Tiles
Profile Picture
The profile picture can be changed by tapping the button in the right corner. You will be provided
with the possibility to select a photo from the gallery, or to take a new photo using the camera.
The first time you use these functions, the system will ask you for permission to access the camera
and photo gallery.
Map
By tapping on the map, a dialogue opens up containing two options:
• Displaying the tracker in the map view
• Starting the external navigation
Tapping the icon in the lower right hand corner gives you the option to start the history mode for
the tracker.
3.9.3 List
Name of the Tracker
The name of the tracker can be edited via the edit button, or by tapping the name directly.
Marker Color
The horizontal slider is used to set the color of the marker on the map.
Info
It should be noted that this is currently not supported by the web app.
Last Position Data
The tile with the marker icon contains information about the last known/loaded position the tracker.
Page 133.9 Tracker - Detail Page
• The time when the last position was sent
• The address of the last position
• The distance to the tracker from the current location
The distance calculation is only performed if the authorization to use of location services is given.
Last Contact
The tile with the clock icon contains information about the last contact of the tracker. As a an update
sent from the tracker to the server does not necessarily contains a new position, the timestamps
may differ. Indicated are:
• Time of the last contact
• Last known battery status
• Last known temperature
Interval
The interval determines at what intervals the tracker should pick up a new position. In best case, it
will be sent to the server close in time so that the most up-to-date data is available. If the tracker
is not able to establish a network connection to send data to the server, the positions are buffered
internally and send with the next successful connection.
Possible intervals are:
• 10 sec.
• 1 min., 3 min., 10 min., 30 min.
• 1 hour, 3 hours, 6 hours, 12 hours, 24 hours
From an interval selection >= 6 hours, the user is asked for confirmation, since this is a long period
of time and changed settings are only updated after expiration of an interval.
LED
The LED function makes a tracker blink for a maximum of 10 minutes (in the color: cyan).
Info
It is important to know that there is no guarantee that the command will reach the tracker.
The tracker must be able to establish a network connection and connect to the server. When
that happens depends on the interval. The flashing LED increases energy consumption the
tracker.
Temperature Warning
The temperature warning lets you set an upper and lower limit to which the tracker acts. If the
temperature alert is enabled for a tracker, the you will receive a push message if a limit has been
exceeded.
Info
The temperature is measured within the tracker. And it does not necessarily need to be the
same like the external temperature.
Page 143.9 Tracker - Detail Page
Speed Warning
The speed alert lets you set an upper limit that the tracker reacts on. If the speed alert is activated,
the user will receive a push message as soon as the threshold is exceeded.
Motion Path
The motion path shows the last 5 positions of the tracker on the map and helps to understand the
tracker movement.
Flight Mode
This option enables/disables the automatic flight mode setting.
Page 153.10 Geofence - List
3.10 Geofence - List
3.10.1 App Bar
Button: Info
Opens the info view, which contains additional information.
Button: Plus (+)
A new geofence can be created via the plus button. To do this,
give a name and choose a shape of the geofence:
• Circle
• Polygon
Depending on the selected shape the options, when setting the
geofence on the detail page, differ.
3.10.2 List Entry
The list contains all geofences that are linked to the logged-in account. A list entry includes
• the name of the geofence,
• the period for which this is active,
• the trackers to which the geofence responds,
• the possibility to enable/disable the geofence.
Swiping a list item to the left displays additional options.
Show on Map
This option switches to the map view and focuses the selected geofence.
Delete
This option deletes the geofence. This is irrevocable.
Page 163.11 Geofence - Detail Page
3.11 Geofence - Detail Page
3.11.1 App Bar
Button: Info
Opens the info view, which contains additional information.
Button: Delete
This option deletes the geofence.
3.11.2 Map
Button: Map
This option switches to the map view and focuses the selected geofence.
Button: Edit
This button activates the edit mode for the geofence. The delete button removes all points of a
geofence.
Button: Save
The button with the floppy disk icon saves the current geofence. However, no empty geofences can
be saved. Markers can be moved by long-pressing and holding on a marker. It can then be moved
to adjust its position.
Create/Edit: Circle
Tapping on the map sets the center of the circle. Via the plus and minus buttons, the radius of the
circle can be changed. Minimum of the radius is 50 m, maximum 5000 m.
Create/Edit: Polygon
Tapping on the map sets the points to form a polygon. A polygon by definition must at least consist
of 3 points. The markers, once set, can be moved as described above.
3.11.3 List
Name of the Geofence
The name of the geofence can be adjusted via the edit button, or by tapping the name directly.
Color of the Geofence
The slider can be used to change the color of the geofence on the map.
Page 173.12 Notifications
Info
It should be noted that this is currently not supported by the web app.
Tracker
This button is used to select the trackers that should apply to the geofence.
Weekdays
This entry can be used to specify the days on which the geofence should be active.
Time of Day
You can set whether the geofence is active all day or only in a period of time.
Notifications
For a geofence, you can set whether you want to be notified when trackers enter or leave it.
Calls
Analogous to the notifications, you can also set calls for entering or leaving.
Info
For notifications and calls, it is generally the case that for trackers with short intervals they
will not be triggered directly. This is to prevent false notifications to be triggered if the tracker,
due to an insufficient number of visible satellites, jumps.
3.12 Notifications
3.12.1 App Bar
Button: Info
Opens the info view, which contains additional information.
3.12.2 Notifications
This section displays the latest messages from your trackers about geofences, speed and tempe-
rature alerts and other notifications. Depending on the settings, these messages could have been
previously received as push notifications.
Page 183.12 Notifications
Filter
The filter lets you choose how far back the messages should be displayed. Choices are:
• 12 hours
• 24 hours
• 48 hours
• one week
Page 19You can also read