Study Island Training Packet - www.studyisland.com Members Login Here: Username: Password
←
→
Page content transcription
If your browser does not render page correctly, please read the page content below
Study Island Training Packet
             www.studyisland.com

             Members Login Here:

       Username:

       Password:

1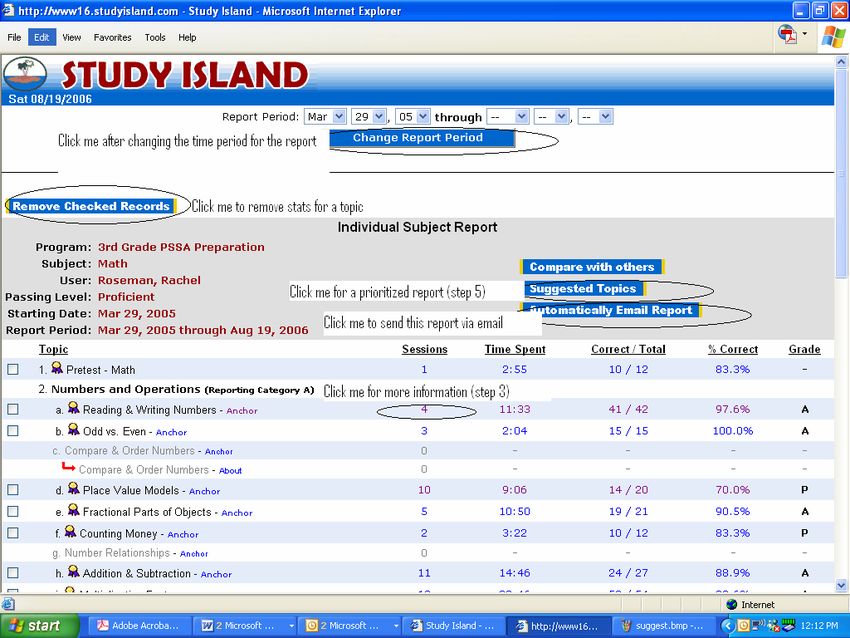
Understanding the basics of the student side of Study Island
     When I login as a teacher I always start at the School Stats Page.
     To become a student in Study Island, click the appropriate grade level link located under the programs
heading on the left-hand side.
     As a student, I must complete a ten question pretest first before working on any of the other topics (the
writing program does not have a pretest).
     Each Study Island topic is aligned to PSSA anchors (View Anchor Map) and contains a lesson with a series
of questions with explanations designed to help students master the concept.
     After completing the pretest, Study Island work can either be student centered or teacher directed.
     Student Centered:
    • Students practice the topic that is checked off in the program.
    • Students work at their own pace in any order practicing one topic at a time or multiple topics.
     Teacher Directed
    • Teachers use the message center to communicate their expectations to student(s).
    • Teachers use the class page and assignments feature to recommend assignments for student(s).
    • Teachers use the class page and assignments feature to restrict student work to assigned topics.
     Topic(s) are practiced by checking the box listed next to the topic and clicking start studying.
     Study Island questions can be presented in test mode, through interactive games, and in printable
worksheet form with a written response option.
     After finishing the test section, data is tracked in real time and all statistics are updated. The records
for a topic come in the form of a hyperlink which if clicked on contains information about date, time, type
of mode, and missed questions for the topic.
     To pass a Study Island topic, students must satisfy the passing requirements for the topic. These
requirements can be adjusted per student and per subject.
     After obtaining blue ribbons in each Study Island topic (click on the ribbons to print them), students
must pass a post test. [Remember students can continue to practice blue ribbon topics. There is a large
question bank to pull new questions from and also passing percentages can be adjusted at any time.]

                        Understanding the basics of the teacher side of Study Island
     The Class Manager link on the left side allows you to group students and create assignments. Students
can be in multiple classes and classes can be multi-grade.
     To manage my class, I use the class page and assignments feature to create a Study Island homepage for
students, assign them work (great for remedial work), and generate their results.
     To manage my class, I use the properties link to add/remove students from a class and also determine
the settings for games, remedial topics, and timer.
     To run reports on individual students or a class, I use the School Stats page.
     The Blue Ribbon report which I can run on my class is the springboard to student data.
    • Using the blue ribbon report, I can generate data on an individual student, get suggested topics,
          audit the account (remove sessions), and email it to parents.
    • Using the blue ribbon report, I can generate data on my entire class for any and all subjects, get
          suggested topics, hone in on a particular skill, and even configure the program to automatically
          email me this information on a weekly basis.
    • I can use this report to email a particular student or my entire class
     If I get stuck in Study Island, I can click Help, contact Study Island, or use the live support feature for
assistance.

If I am familiar with the concepts presented in the above boxes, I am Study Island literate.

Signed ______________________________________            Date ____________________________

2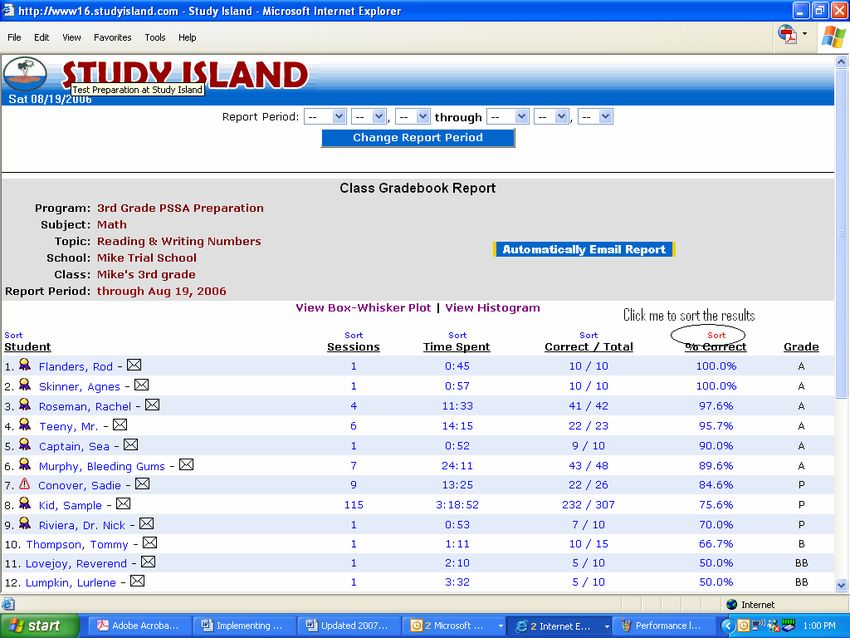
Study Island Basics: Student side

Step 1: Understanding how to get started with your students
       •   Students should go to www.studyisland.com in the web browser. (Some schools choose to
           provide a “shortcut” on the desktops of all students’ computers for easy access to the
           program.)

       •   Students enter their usernames and passwords.

       •   IF you have created a CLASS PAGE and have chosen to use it as the default page, it will come
           up as soon as your students’ login. Students will view all of the assignments that you have
           currently included. If you have opted to have your students do the PRETEST, they must do this
           FIRST as all other topics are “locked” until this is completed. IMPORTANT: Students will
           need to complete at least 10 questions in the pretest in order to move to the next topic.

       •   If you have not created a class page, students can click on the grade level, subject, and topic
           on which you want them to work; again, if the PRETEST has not been removed, students must
           begin with it. When students work from home, they will have access to all subjects and topics
           available UNLESS you have chosen to BLOCK OTHER MATERIAL. If you do not want to include
           the work from home with the students’ stats from school, you can remove the home sessions.

       •   Students will receive a BLUE RIBBON next to the topics they have passed, and a RED
           TRIANGLE (hazard symbol) next to the topics in which they need work.

                  In order to receive a BLUE RIBBON, students must pass each topic according to the
                  passing parameters. These parameters can be viewed on the topics page under the
                  column, “Passing Goal.” The “Your Results” column shows the score the students
                  currently have. Both columns show the number of questions or “items” they have done
                  in each topic and the corresponding “score.”

           Ribbons are awarded based on a student’s cumulative score for the topic. For example, if a
           student does multiple sessions in the same topic, his cumulative score is calculated as follows:

                  Session 1:            5 correct out of 10 attempted
                  Session 2:            3 correct out of 5 attempted
                  Session 3:            4 correct out of 5 attempted

           Cumulative Score =    12 out of 20 = 60%

           **Unanswered questions in a topic are disregarded. Students can end a session at any time by
           clicking DONE without a negative affect to their scores. They can return to that topic to
           complete the session, picking up where they left off. Each time a Blue Ribbon is earned,
           students can simply click on the ribbon to print it.

                  After all topics have been passed, students can move to the POST TEST.

3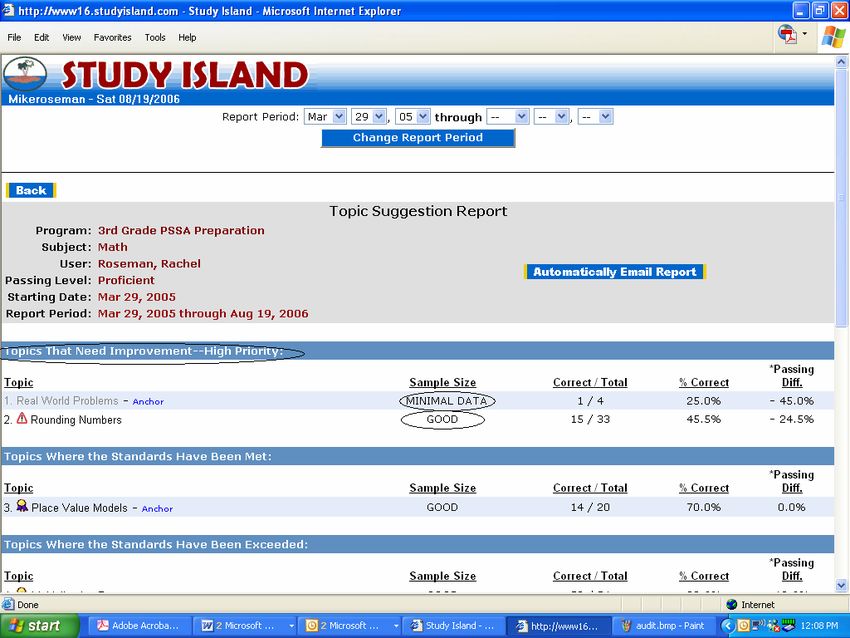
Step 2: Multiple Study Modes
            •   Test Mode – Standard multiple choice or short answer format. (By default, questions are in
                this mode. The number of questions will automatically default to the minimum number
                required to meet the passing parameter for that topic.) If you want this number changed,
                instruct your students to change it when they begin their work. This is information that could
                be added to the CLASS NOTES on the class page.

            •   Game Mode – There are 11 different games that your students can play. These games contain
                the same questions that are in the other modes. More games will be added as they are
                created. Java or Flash 8 are required to play the games. (These are a free download online.)
                The difficulty level does NOT pertain to the questions but rather to the level at which it is
                played. Remember: You have the option to control WHEN your students access game
                mode! Some teachers use this as a reward for reaching a certain percentage, at the end-
                of-the-week after topics have been reviewed, or as a choice for home.

            •   Printable worksheet – This allows you to create a custom, printable worksheet. You can
                choose one or multiple topics by putting a check mark next to the topics you want to include
                on your worksheet. You can choose to HIDE MULTIPLE CHOICE ANSWERS or OPEN IN
                MICROSOFT WORD (for editing) by clicking on these choices at the top of this screen. These
                can be used for homework, make-up work, tutorials, tests, reviews, transparencies,
                substitute plans, etc. The answers are at the bottom of the teacher copy. Students can print
                worksheets, but answers are not included!

                               Study Island Basics: Teacher side
Step 1: Creating Classes: Why would I want to create a class?
                1.   It   makes viewing student progress easier.
                2.   It   allows teachers to see class averages.
                3.   It   allows teachers to send messages to all students in the class.
                4.   It   allows teachers to make a CLASS PAGE and CLASS ASSIGNMENTS.

            •   Click on CLASS MANAGER in the upper-left screen.

            •   Type the name of the class in the CLASS TITLE box and click NEXT.

            •   Click on the dropdown box next to ADD USERS IN GRADE LEVEL and select the grade level of
                the students you wish to add. (This takes a few of seconds to display names.)

            •   Put checks next to the students you wish to add to the class.

            •   Scroll to the top or bottom of the screen and click SAVE AND EXIT.
                  Note: Classes are simply groupings. A student can be in more than one class
                 and, you can create as many classes as you want.

*To edit your class once it has been created, click Class Manager and under the My Existing Classes header
find the class you want to edit and click properties. This will bring up the list of students in the class with a drop
down at the bottom which lets you add more users from the same grade level or from another grade level.
4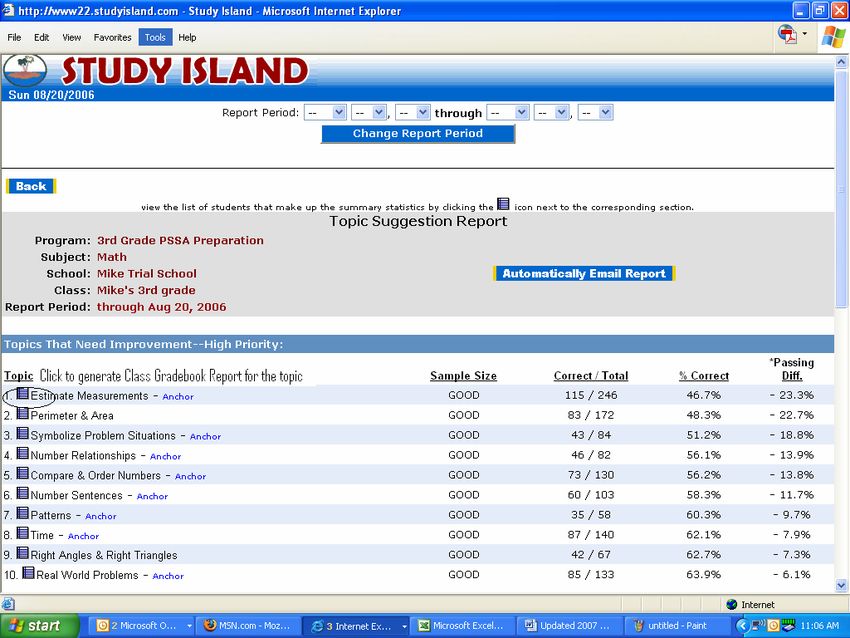
Step 2: Creating a Class Page: Optional
       •   You now have the option to create a CLASS PAGE with assignments.

       •   Class Assignments – This allows you to assign specific topics to students. This would assist with
           the teacher directed approach.

                  Click on CLASS PAGE & ASSIGNMENTS on the far right of the Class Manager page

                  Click the ADD ASSIGNMENTS button.

                  Date Assigned & Due Date are displayed for student information only. If the
                  assignment is activated, nothing will stop students from attempting it even before the
                  start date or after the due date. Adding a “due date” is optional.

                  Assignment Title - can be the name of the subject. (not optional)

                  Additional Information – optional but could include extra directions

                  *Class Assigned: This new feature allows teachers to create the same assignment and
                  apply it to multiple classes.

                  Click ADD TOPICS.

                  SELECT A PROGRAM (grade level) and SUBJECT – Use the drop-down box to select and
                  click NEXT.

                  Put a check mark next to all topics that you want to assign at this time. You can
                  choose from 1-10. Important: Students will be required to take the PRETEST before
                  attempting other topics unless they are working through an assignment page.

                  Scroll to the bottom of the screen and click on SELECT CHECKED TOPICS.

                  You will now see the assignments listed and can edit as needed. Choose activate from
                  the drop down underneath the topic title to activate your assignment immediately and
                  then click UPDATE ASSIGNMENT at the bottom of the page. Note: If you do not want
                  to activate the assignment right away, keep it deactivated before updating it. You
                  will notice that your assignment is “locked” or “grayed out.” Click on ACTIVATE to the
                  right of the word, “details” when you want students to see the assignment.

                  At the top of this screen, use the drop-down box to select YES in order to activate the
                  page for student viewing. Select YES to make the assignment page the default page.
                  (This means that the assignment page will come up for students when they login.)

                  Teachers now have the choice to BLOCK OTHER MATERIAL. Students will see ONLY
                  their assignments and this will prevent students from navigating through other subject
                  or grade level material. By using this feature, students will not be able to bypass the
                  CLASS PAGE and assignments. Important: If a student is included in more than one
                  teacher’s class pages, those teachers will need to determine whether or not to
                  BLOCK OTHER MATERIAL. One teacher cannot block while another does not!

5
No grade
levels for
navigating
to topics
are
available
when this is
BLOCKED.
CLASS NOTES – optional but you could add additional directions here
CLASS SCHEDULE – optional
CLASS LINKS – This feature allows you to add a URL for students to access. Students
who complete a topic early could go to the website listed here to do additional work.
Important: Be sure to use in front of the URL.
http://
Click PREVIEW to see what your student class page will look like.
When students have completed assignments, you can click on RESULTS which is to the
right of the assignment details on the class page. This will show the results of the
assignments they have done.
• Class Properties Tab – At the top of the screen, click this tab and use the drop-down arrow if
you wish to OVERRIDE SCHOOL PREFERENCES. You now have the option to turn the games,
timer, or remedial topics on/off. Click SAVE & EXIT. The SI Administrator must have allowed
teachers these preferences.
This has created a class page for ONE class. Follow the same directions to
create as many classes as you need.
6Step 3: School Stats
The SCHOOL STATS page can be used to view the progress of your students as they work through the
program. (When you login to Study Island, it will default automatically to this page.)
• Report Type: There are a variety of different reports from which to choose. This training
manual will cover the Blue Ribbon Report as it is the easiest to use. The reference
manual located within the HELP link on the website has information on all of the reports.
Blue Ribbon Report shows the accumulation of blue ribbons per student. I have
chosen to focus exclusively on this report because embedded within this report
is a wealth of information about an individual or a class that can be unearthed
by simply following the links.
Perhaps the #1 lesson to learn from the following 6 snapshots is to follow the
links in the reports. The level of detail conjures up images of Big Brother, and
this information can be critical to accurately assess student performance.
7Snapshot I: Generating an Individual Student Report
Click Rachel’s % on the Blue Ribbon Report to generate her individual report. This report includes the # of
sessions attempted per topic, time spent per topic, # of correct questions answered, % of correct questions
answered, and the grade per topic. Take note of the messages inserted in this report for further exploration.
Snapshot II: List of Sessions for each topic. Big Brother knows all!
Clicking on the statistics in blue from Snapshot I, yields additional information about student performance
including the date, time, type of mode, # of questions, % correct, and missed questions for each topic.
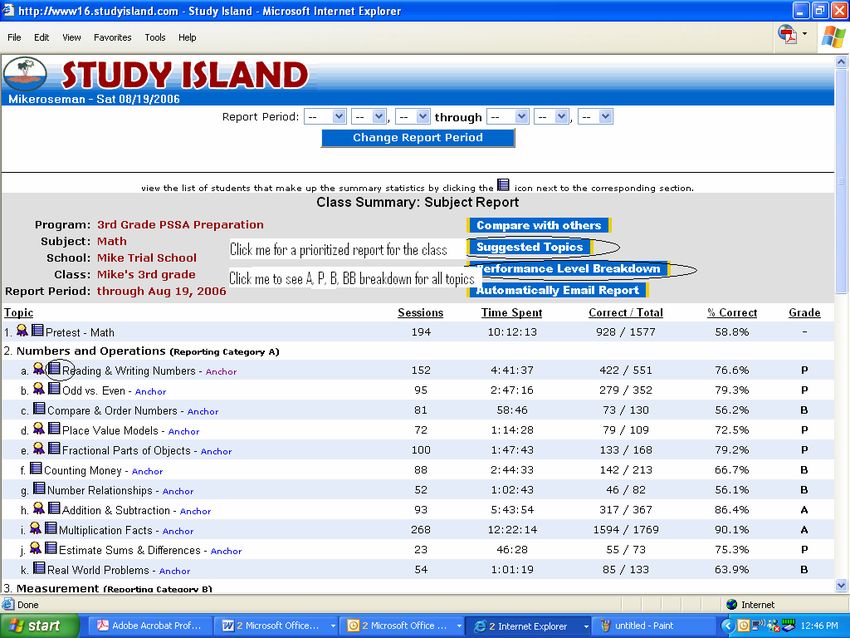
8Snapshot III: Topic Suggestion Report From snapshot I, click suggested topics to generate a Topic Suggestion Report. The report is disaggregated into strengths and weaknesses and this classification is further refined by accounting for sample size. Snapshot IV: Generating a Class Summary Subject Report Instead of generating individual data from the Blue Ribbon Report, click on the average % for a subject in green (14% in the initial report) to generate a Class Summary Subject Report. 9
Snapshot V: Topic Suggestion Report for the class
From the Class Summary Subject Report (Snapshot IV), click Suggested Topics to have the classroom report
prioritized by need.

Snapshot VI: Class Gradebook Report
Generate a Class Gradebook Report by clicking on the lined paper in either Snapshot V or VI. Sorting the
results allows you to easily assess individual students and/or collective classroom performance in a topic.

10
Step 4: Adjusting Student Difficulty
If your SI administrator has given permission for this feature, you will be able to :
               • Adjust the passing parameters for your different classes and/or individual students. This
                   percentage is what determines the awarding of the blue ribbons.
               • Reset the start date (this in effect wipes a student’s slate clean but doesn’t erase the
                    data). This is a good option after summer school.
                • Restrict students to easier or harder material and even have the option of hiding the
                   grade level name.

This same wording will
appear on the STATS
screen instead of ADJUST
PASSING PARAMETERS.

                                                                                    Clicking on the above will
                                                                                    bring you to this new
                                                                                    screen.

                                                                                               This will allow teachers to
                                                                                               adjust the grade level
                                                                                               content per class or per
                                                                                               student as well as the option
                                                                                               of HIDING the grade level.

                  This will allow teachers to now control the RESTRICT USERS TO THIS LEVEL feature
                  which before, only the admin person could do.

                                                                                                                 NEW

                                                                                                     Step 5:
Additional Features:
11
Printable User List
Pull up a user list using this link (located at the top of the “School Stats” page). You can view the entire
school roster or view the roster by class. This is an easy way to look up a student’s password if they forget.
Automatically E-mail Reports
On the “School Stats” page, detailed reports of student progress can be generated. Use the “Automatically
Email Report” button to periodically send this through email. Some schools even generate individual
student reports and then e-mail these to parents. Our new Emailed Report Manager lets you add your email
address to receive weekly Study Island reports of the prior week’s usage, and you can also delete reports
that you no longer need (also a lifesaver if you inadvertently send a child’s report to the wrong parent).
Study Island Message Center
Study Island messaging enables students and teachers to communicate with each other. Once inside the
"Message Center," (located on the left side of the page once you are logged into the program), you have the
ability to read messages and send messages to individual users or "classes." Throughout the program there
are envelope icons next to student usernames that can be clicked if you desire to send them a Study
Island message. A flashing envelope appears upon logging in next to the message center link, if a new
message has arrived. By default, student to student messaging is blocked!
Remedial Topics (Building Block Topics)
If a student is having difficulty passing in a topic, a hazard symbol ( ) will appear next to the topic, and
oftentimes an additional topic will show up below (see diagram).
The topic that comes up is a remedial topic, also referred to as a Building Block Topic. The student can no
longer attempt the original topic until he or she has passed the Building Block Topic. Passing the Building
Block Topic is represented by a white ribbon ( ).
Create New Topics (Custom Tests)
Teachers have the ability to create custom topics in the Study Island program which can include a lesson
along with assessment questions with explanations. Students access these lessons by clicking on “Custom
Material” which is located under the grade levels on the left. To obtain directions for creating new topics go
to –
HELP->FEATURES->CUSTOM MATERIAL.
(This is an advanced function. Call Study Island for assistance!)
Step 6: Suggestions for Using Study Island:
12• Utilize classroom computers as one-on-one SI time or in a group rotation option.
• At the beginning of the year, allow your grade-level students to use the PRIOR YEAR’S topics
as a review if it is available with your subscription.
• If your classroom has a projection device, SI can be used as a whole class lesson by connecting
the projector to a computer and projecting the SI website.
• After students have completed various topics, use the reports to find the low-scoring areas
per student or per class. Use SI to review as a whole group, one-on-one, or small group.
• Use the PRINTABLE WORKSHEET mode to create a transparency, test, review, tutorial, or
substitute lesson plan. You can also make games by printing the worksheet and cutting the
questions into strips. Remember: You can select multiple topics to be included in the
worksheet.
• HOMEWORK: After teaching a lesson on a particular topic in class, assign that topic as
homework using this program. You can utilize the “Messaging Center” to send directions for
working at home OR print the lesson using the WORKSHEET MODE.
• TUTORIALS: SI provides great tutorial material. Students can utilize the program before or
after school. If your subscription allows, it can be a major part of summer school or suggested
to parents for a means to review over the summer.
• EXTRA CREDIT: Offer additional points for students completing a section in the program or for
scoring well on a lesson.
• Use SI for student recognition by displaying a “High Scores” bulletin board, announcing
students’ names on internal TV broadcasts, or during daily announcements.
• Decorate a bulletin board with Study Island blue ribbons.
• Island Party: Students are awarded leis after passing all of the topics, and the class is
awarded an island party after all students have completed the program.
• Award Certificates of Completion.
• Use SI to help bring new students to grade level.
For HELP with Study Island…..
• Click on the HELP link at the top of the screen.
• Call Study Island Technical Support at 1-800-419-3191.
• Email: support@studyisland.com
• Click on: Live Support:
13You can also read