WEBMAIL SYSTEM USER GUIDE - LAST UPDATED APRIL 10, 2019 - EXCALTECH
←
→
Page content transcription
If your browser does not render page correctly, please read the page content below
22102 N. Pepper Rd. #201
                               Lake Barrington, Illinois 60010
                                    ph/fx: [847] 842 - 9570
                                          www.excaltech.com
                                         sales@excaltech.com

Webmail System
  User Guide
 Last Updated April 10, 2019
ExcalTech
                                                                                                                                                                                -2-
                                                             Webmail System User Guide

Table of Contents

Welcome and Introduction ............................................................................................................... 4
System Requirements ....................................................................................................................... 4
Warranty and Disclaimer .................................................................................................................. 4
Getting Started ................................................................................................................................. 5
   How to Access Webmail................................................................................................................................................... 5
   Main Webmail Screen ...................................................................................................................................................... 6
Email ................................................................................................................................................ 6
   Creating a New Message.................................................................................................................................................. 7
   Compose ......................................................................................................................................................................... 8
   Actions............................................................................................................................................................................. 8
   Attachments .................................................................................................................................................................... 8
   Sending Mail .................................................................................................................................................................... 9
Checking your Inbox ....................................................................................................................... 10
   Reading Email ................................................................................................................................................................ 10
   Selecting Messages ........................................................................................................................................................ 12
   Search............................................................................................................................................................................ 12
   Contacts ........................................................................................................................................................................ 12
   Calendar ........................................................................................................................................................................ 13
   Tasks.............................................................................................................................................................................. 15
   Notes ............................................................................................................................................................................. 17
Team Workspaces .......................................................................................................................... 18
News Feeds .................................................................................................................................... 18
File Storage..................................................................................................................................... 18
Reports ........................................................................................................................................... 18
My Settings .................................................................................................................................... 19
       Account Profile ............................................................................................................................................20
       Signatures....................................................................................................................................................20
       Auto-Responder ..........................................................................................................................................21
   Events ............................................................................................................................................................................ 21

                                                                                     Page 2
ExcalTech
                                                                                                                                                                             -3-
                                                            Webmail System User Guide

   Folder Auto-Clean .......................................................................................................................................................... 21
   Connectivity ................................................................................................................................................................... 21
   Spam Filtering ................................................................................................................................................................ 21
   Content Filtering ............................................................................................................................................................ 22
Domain Settings ............................................................................................................................. 23
Reminders ...................................................................................................................................... 23
Logout ............................................................................................................................................ 23
Help................................................................................................................................................ 23

                                                                                    Page 3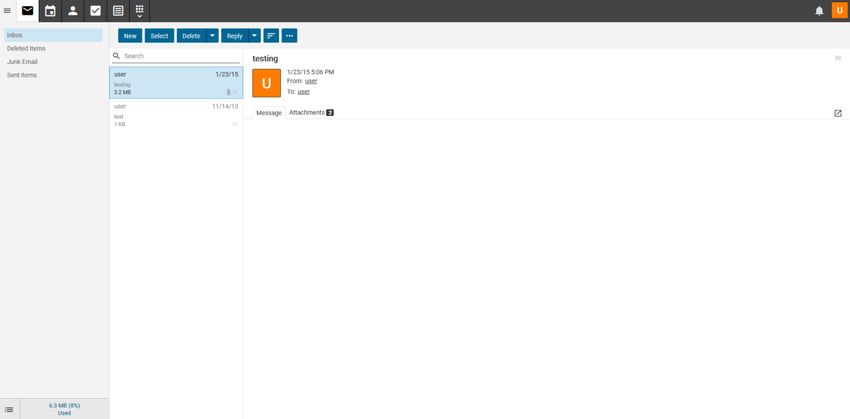
ExcalTech
-4-
Webmail System User Guide
Welcome and Introduction
Thank you for choosing ExcalTech to handle your e-mail services. Like many other ExcalTech services,
we have strived to bring you the best possible e-mail solution. There are many enhancements and
features to our web based e-mail system that you will not find on any other service. Our Webmail
system provides an easy way for you to access your e-mail messages from anywhere in the world, using
any Internet connected PC, using only a standard web browser such as Internet Explorer. There is no
setup or configuration necessary to use the Webmail system, simply open a web browser and login with
your username and password! It is that simple! Of course, you can always configure and use a POP3 e-
mail program such as Microsoft Outlook to download and read your mail. Our Webmail interface is not
meant to replace your POP3 program, it is simply an enhancement when you are away from your mail
computer system and need quick and easy access to your messages. For more information on
configuring POP3 clients, please see our website. Please read this entire manual to familiarize yourself
with all of the options that are available to you.
System Requirements
Any Internet-ready computer system or device capable of displaying DHTML graphics and
running JavaScript
An Internet connection
ExcalTech Hosting Service
Your domain name, username, and password
Warranty and Disclaimer
This manual, the webmail interface, and all features are provided “as is” at no cost to our users. If you
do not wish to use the webmail interface, please use a POP3 e-mail client such as Microsoft Outlook,
Windows Live Mail, or Mozilla Thunderbird. No warranty or guarantee as to the performance of this
system is made by Excalibur Technology Corporation. We are not responsible for any accidental,
incidental, or consequential damages that arise from using this system. You assume any and all risk
involved by using this system.
Page 4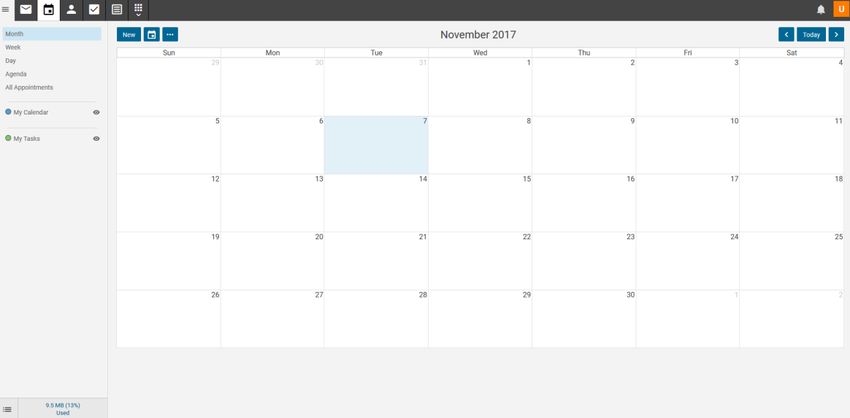
ExcalTech
                                                                                                    -5-
                                   Webmail System User Guide

Getting Started

How to Access Webmail
Starting the Webmail interface is extremely simple. Open any web browser and type the following line
into the address bar: http://webmail.example.com where example.com is your unique domain name
such as excaltech.com. Make sure that you do not type www when you enter the address as this will
cause an invalid URL error. When you successfully type the URL, you will see the login screen, similar to
below.

Figure 1 – Webmail Login Screen

In the Email Address box, enter your e-mail address. For example, if it is user@example.com, you would
enter user@example.com. In the Password box, enter your mailbox password. If you do not have either
of these pieces of information, please see your company e-mail administrator or call ExcalTech for
additional help.

Once your information is entered, click the Login button to continue.

                                                Page 5
ExcalTech
                                                                                                 -6-
                                   Webmail System User Guide

Main Webmail Screen

Figure 2 – The Today Page

Once you have successfully logged into the Webmail system, you will see a screen similar to the screen
in figure 2.

Each of these sections will be described in detail in the coming pages.

Email
The email section is probably the most important part of the Webmail interface. From this page, you
can create a new e-mail, go to your inbox, view deleted items, view drafts, view your sent items and
view your “Today” page. Depending on your settings, when you log-in, you will see either your inbox
or your “Today” page. Your “Today” page shows any appointments for today, any news items, how
many unread messages you have, how much disk space is available and how much is used, and any
scheduled tasks for today.

                                                Page 6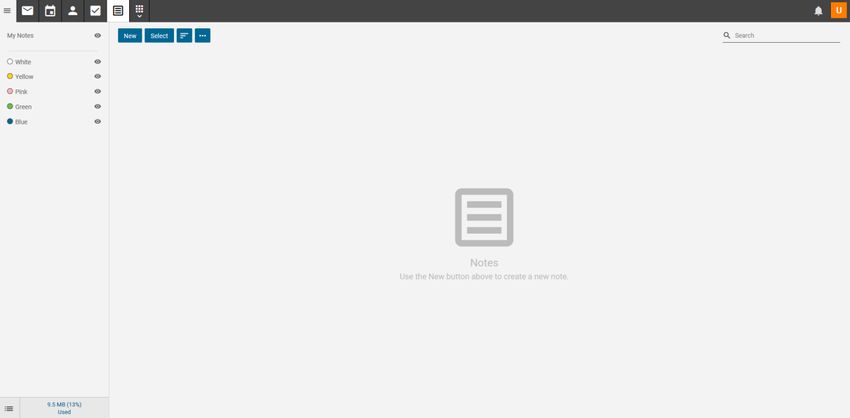
ExcalTech
                                                                                                   -7-
                                  Webmail System User Guide

Creating a New Message
When you click on “New”, a window should pop-up similar to figure 3:

Figure 3 – New Email Popup Box

If no window appears, check that your pop-up blocker didn’t block it.

From this window, you can create a message and send it, save it as a draft to e-mail at a later time, or
cancel creating a message.

There are three parts to creating a message, namely Compose, Options, and Attachments. These are
explained in detail below.

                                                Page 7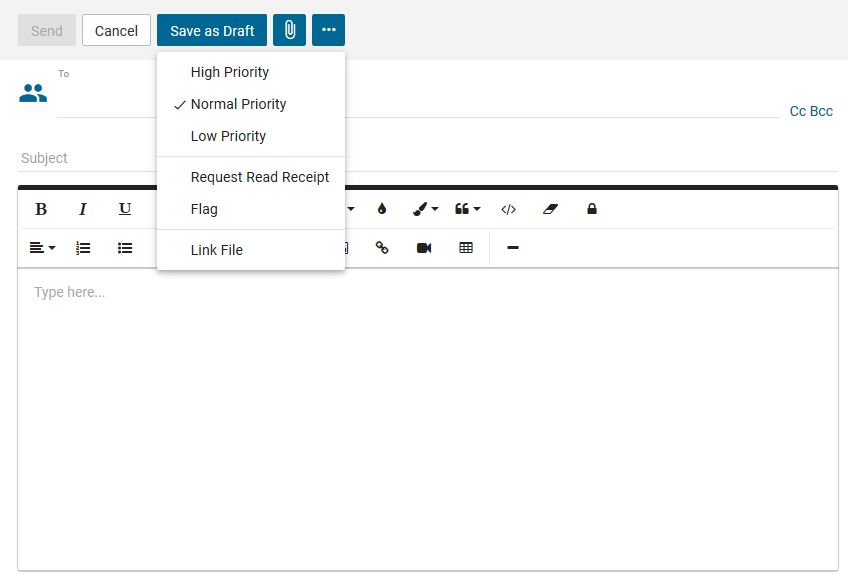
ExcalTech
                                                                                                       -8-
                                    Webmail System User Guide

Compose
“Compose” is where you actually create the e-mail. Here, you can specify the recipient of the e-mail,
and any carbon copy (Cc) and/or blind carbon copy (Bcc) recipients. You can also enter the subject and
body of your e-mail. Fill in the To, Cc, Bcc: and subject lines as you would any e-mail message, separating
multiple addresses using a comma (,). If you wish to pick names from your online address book, click
the “To”, “Cc”, or “Bcc” text.

Actions
The Ellipsis (    ) lets you choose the message importance and allows you to request a read receipt, as
seen in figure 4.

Figure 4 – New Email Options Tab

Attachments
The “Paperclip”(     ) lets you add files to your e-mail. This is discussed in more detail in the “Attaching
Files to Messages” section below.

                                                  Page 8
ExcalTech
                                                                                                    -9-
                                    Webmail System User Guide

Attaching Files to Messages
If you wish to attach files to your e-mail, click the paperclip (    ) at the top of the New Message
window, as seen in figure 5.

Figure 5 – The Attachments Tab of the New Message Window

Once you click Attach Files, this will bring up a standard file browsing window on your computer (This
feature may not work on all systems or all browsers). Browse to the file you wish to attach and click the
Open button. There will be a delay as the file is copied from your computer to the Webmail server. The
larger the attached file, the longer the delay will be.

Note: File attachments must be less than 10 Megabytes in total size. To send larger file attachments,
use a POP3 mail client such as Outlook.

Attached files will show on the bottom of the message. If you wish to remove the attachment click the
(   ) to the right of the file.

Sending Mail
When you have finished editing and spell checking your message and have attached any files to the
message, you are now ready to send it through the Internet to the intended recipient(s).

To send your message, click the Send button.

If you wish to save your e-mail message for later editing instead of sending it, click the Save to Drafts
button. This will place a complete copy of your message in your Drafts folder for later editing and
sending.

To cancel sending your messages and abandon any changes you have made, click the Cancel button.

                                                   Page 9
ExcalTech
-10-
Webmail System User Guide
Checking your Inbox
Figure 6 – The Inbox and a Displayed Message
When you first view your inbox, the first message will be selected in the list of e-mail messages and
depending on your account settings, the message view pane may show the contents.
Each line represents a unique message. Information displayed about each message includes the address
or name (of the sender), e-mail subject, the date and time the message was sent, and the total size of
the message. E-mails are initially sorted by date and time with the newest messages being displayed at
the top of the list. Messages which have not been read will appear in bold text. Messages which have
been read and retained will be displayed in normal text.
Reading Email
To read an e-mail message, simply click the desired e-mail. The mouse cursor will become a pointing
finger indicating that you may click the message. Once you click an e-mail message, the contents of the
message will appear in the Message View Area.
Your message along with several options will be displayed in the Message View Area. Use the scrollbar
on the right hand side of the screen to scroll and view the entire e-mail message, if necessary.
The Message View Area displays options relating to the message, as follows:
Reply – Send a reply e-mail to the sender. Opens a new e-mail window and copies the current
Page
10ExcalTech
-11-
Webmail System User Guide
message into the message.
Reply All – Same as Reply but sends the message to everyone who received the original
message.
Forward – Same as reply but does not add any e-mail addresses automatically to the outgoing
message. This allows you to send the message to another e-mail recipient.
Print - Allows you to print the message to a printer you specify
Clicking the person opens a screen ( ), allowing you to add the sender to your
webmail address book.
Figure 7 – Adding a Contact to Your Address Book
You can either save the contact, or cancel. Further details related to Contacts will be explained later in
this manual. In order to continue working in the system, you will need to save or cancel in order to close
the mini-window.
When you are done reading your e-mail message, click another mail message or use one of the Toolbar
icons to start another task.
Page
11ExcalTech
-12-
Webmail System User Guide
Selecting Messages
To select a message or multiple messages for deletion or filing, simply click the message and the
background color of the message will change, indicating that the message has been selected. To select
multiple messages, use the control key to select them individually, or use the shift key to select a range.
Alternatively, you can use the select ( ) option and either choose select all or click the messages
you wish to collect. You can then use actions ( ) to Mark, Move, or Delete to affect all selected items.
Search
Click in the search box to search in the folder selected, as seen in figure 8.
Figure 8 – The Search Bar
Contacts
Figure 9 – The Contacts Screen
To add a new Contact, click the “New” button, which will bring up a screen similar to figure 10.
Page
12ExcalTech
-13-
Webmail System User Guide
Figure 10 – The Add Contact Screen
To edit a contact’s information, select the contact and a new window will open allowing you to
modify the contact.
To delete a contact(s), you would click select ( ) and click the contacts. Once selected click
selected ( ) and choose the delete option.
Calendar
Figure 11 – The Calendar Screen
Page
13ExcalTech
-14-
Webmail System User Guide
In the Calendar section, you can set-up and manage appointments in webmail. To create a new
appointment, click the “New” button in the toolbar. This will cause a pop-up to appear (figure 12).
Figure 12 – The New Appointment Screen
In this window, you provide a subject, attendees, a location and time for the appointment, and can set
a reminder to be sent before the appointment to any e-mail address. The Attendees can be added from
your contact list in webmail, and the “Availability” box allows you to check a person’s availability if they
have shared their calendar and allowed you the appropriate access.
Page
14ExcalTech
-15-
Webmail System User Guide
Tasks
Figure 13 – The Tasks Screen
Page
15ExcalTech
-16-
Webmail System User Guide
Inside the “Tasks” component, you can create tasks. When adding or editing a task, a pop-up window
will show (figure 14).
Figure 14 – The New Task Window
In this window, you specify a subject for the task, a description, when it should be started, when it’s
due, when to get a reminder, its priority, status and % complete.
Page
16ExcalTech
-17-
Webmail System User Guide
Notes
Figure 15 – The Notes Screen
The “Notes” section enables you to add personal notes. You can give different notes different colors,
perhaps using each color for a different category of note. When adding or editing a note, you’ll see
the screen shown in figure 16.
Figure 16 – The New Note Window
Page
17ExcalTech
-18-
Webmail System User Guide
Selecting the apps ( ) will get you to the next set of windows
Team Workspaces
Team workspace allows users to collaborate with others and form meetings. Audio/video is limited to
a maximum of 8 users and may require additional software.
News Feeds
RSS feeds allow people to automatically be notified when a website contains new posts or entries.
Actions - Click ( ) in the lower left corner and select the appropriate option.
File Storage
Allows users to upload files to the mail server and share them by sending out links to those files.
Actions
Delete - Permanently removes the selected file(s) from the server.
Upload - Uploads a new file to the server.
Download - Downloads the selected file(s).
Reports
The webmail system includes reports, and you can create your own reports. This is an advanced feature
which is outside the scope of this document. Please refer to the online help or call the
ExcalTech Help Desk for additional information.
Page
18ExcalTech
-19-
Webmail System User Guide
My Settings
Figure 17 – The Settings Screen
The “Settings” area allows you to customize your Webmail experience.
Account Settings
The Account Settings section has the following sub-sections:
User
This section allows you to change your Language, Time Zone, Reply-To e-mail address, recovery email
address and Plus addressing (see below for more information).
Notifications
This section will allow you choose what notification you may receive, if enabled in a compatible
browser.
Webmail
This section has various options that let you set-up defaults for your Webmail account. You can
change your theme, delete action, text encoding, new email font, default from address, preview pane
location
Forwarding
This page allows you to automatically forward e-mails to another e-mail address and optionally delete
them.
Page
19ExcalTech
-20-
Webmail System User Guide
Plus Addressing
This feature allows you to automatically filter e-mails sent to you without creating rules. For instance,
if you want to sign-up for a newsletter, you can sign-up for the newsletter with the e-mail address of
user+newsletter@example.com (if your normal e-mail is user@example.com). Then, when an e-mail is
sent to user+newsletter@example.com, the e-mail will be moved into a “newsletter” folder due to the
+newsletter in the e-mail address. This folder will be on the same level as your Inbox folder.
You can also use backslashes in the e-mail address to further filter e-mails into subfolders. For instance,
you can use user+newsletter/ExcalTech@example.com to sign up for a newsletter and have the e-mail
go into an ExcalTech folder inside of your newsletter folder. In order to have the subfolder be inside of
your inbox folder, you can use user+inbox/newsletter@example.com.
You have 3 options for what to do with the e-mail, and whether you want the feature enabled. Your 3
options are “Move to Folder,” “Move to Folder (if Exists),” and “Leave in Inbox.” “Move to Folder” will
move the e-mail to the specified folder, creating the folder if necessary. “Move to Folder (if Exists)” will
move the e-mail to the specified folder if it exists, or leave it in the Inbox if the folder does not exist.
“Leave in Inbox” will leave the e-mail as-is.
Account Profile
The Profile section allows you add details about yourself. The subsections are Personal Info, Phone
Numbers, Email addresses, Home address, Work address, and work info
Personal Info allows you to update your Display Name, Title, name (first middle and last), suffix,
home page, instant messenger, and birthday.
Phone numbers allows you to add you phone numbers based on type.
Email addresses allows you to enter any additional email addresses you may have
Home address allows you to enter your home address information
Work address allows you to enter your work address information
Work info allows you to updated your company information
Signatures
This section enables you to create signatures for your outgoing e-mails. Instead of typing a signature
on every e-mail, you can create one here. Use the mapped field to select the default. This signature is
only used on e-mails you compose in webmail. So, if you’re using Outlook or another POP3 client, you
may need to create your signature there also, depending on your company policies.
Page
20ExcalTech
-21-
Webmail System User Guide
Auto-Responder
This section enables you to automatically send a prewritten response when an email message is
received. They are commonly used to notify senders that the recipient is out of the office or on vacation.
Events
The “Events” section allows you to respond to various events that occur. Some events include when
you receive an e-mail, when you send an e-mail, and when your disk space usage is at a certain level.
When you send an e-mail, you might want to add the person you send the e-mail to your Trusted
Senders list. Instead of doing so manually, you can use an event to automatically do so. You can set-up
an event so that when your mailbox is getting full, you are sent a notification by e-mail to any e-mail
address you select, or by using a Notification Profile. (Notification Profiles are covered earlier in this
manual).
Folder Auto-Clean
Folder Auto-Clean lets you set limits on how much of your disk space is used by your Junk E-mail, Sent
Items and Deleted Items folders. By setting limits, these folders will not become full, which means your
account will not become full.
o The options you have are “Use default settings” or “Override settings for this account.”
o If you decide to override settings, the “Rules” section will allow you to add a new rule.
o When adding a rule, you choose the Folder to auto-clean and whether to clean it based
on size or date. If you choose to clean it based on size, you specify the size before and
after the auto-clean. This will allow you to keep specified folders a certain size. If you
choose to clean it by date, you enter the number of days to keep an e-mail before
deleting it from the specified folder. This will let you automatically remove old e-mails.
Connectivity
Connectivity allows you to connect external providers, not provided by webmail. The subsections are
Cloud Storage, Email Retrieval and SMTP Accounts.
Cloud storage allows you to link Google Drive, Dropbox and Onedrive to your webmail
Email retrieval allows you to link an external POP or IMAP account
SMTP Accounts allows you to add another email address to send as.
Spam Filtering
Spam filtering enables you to specify actions to take on possible spam.
Page
21ExcalTech
-22-
Webmail System User Guide
o You can use the default settings, or override settings for your account.
o The Trusted Senders is unique to each account and can be changed regardless of the setting
you choose in the Options section. Trusted Senders can be either an e-mail address, such as
user@example.com, or a domain name, such as excaltech.com. Any e-mail from those
addresses will bypass spam filtering.
If you choose to override settings, in the Options Section, there are three spaces to
fill in; based on the probability the e-mail is spam.
The actions you can take are “No Action,” “Delete Message,” “Move to Junk E-mail
Folder,” and “Add Text to Subject.”
The three settings are individual, so you might decide to delete messages with a High
Probability of being spam, send those with a Medium Probability to the Junk E-mail,
and add text to the subject for those with a Low Probability.
Content Filtering
Content filtering allows you to specify rules for incoming e-mails. This allows you to automatically treat
e-mails based on criteria you specify, which can help your mailbox stay organized.
o The first step is to choose which criteria type(s) you want to use. These include “From
Address,” “Containing Word,” “To Address,” “Attachments,” and “Other.” You can
choose multiple criteria in order to better organize e-mails. That is, e-mails from an
individual with a specific subject can be treated one way, and e-mails from that same
individual with a different subject can be treated differently, if you set-up two filters.
o After choosing your criteria type(s), you specify the value(s) to check for each criterion.
o Finally, you give your rule a name and specify an action to take. The actions include
Delete Message, Bounce Message, Move Message, Prefix Subject, Add Header, Copy
Message, and Reroute Message.
Delete message deletes the message. You’ll never see it in your Inbox, and it is
not recoverable, so be careful when using it.
Bounce message sends a response to the sender that the e-mail has been
bounced.
The message is delivered to you unless you also choose to delete it, or if your set-
up has bouncing disabled.
Move Message moves the message to a specified folder. If you set this up and
later delete the folder, the folder will be re-created when the filter matches.
Prefix subject allows you to add text in front of the subject, which can help you
find e-mails later, as they’ll all have a similar subject.
Add header adds an e-mail header to your e-mail. You will not see it unless you
view the headers, but it can be useful to filtering in Outlook and other e-mail
Page
22ExcalTech
-23-
Webmail System User Guide
clients if you’re using them.
Copy message forwards the message to the given address and delivers it to you.
Reroute message sends the message to the given address, but does not deliver
it to you.
Domain Settings
This is an advanced feature which is outside the scope of this document. Please refer to the online help
or call the ExcalTech Help Desk for additional information.
Reminders
Clicking this link opens a pop-up window with a list of reminders. The reminders are based on events
you’ve set-up in the “Calendar” and “Tasks” sections of webmail. You can snooze items for up to 3 days,
dismiss all reminders, dismiss selected reminders, or close the window. You can also view reminders
that you snoozed on.
Logout
This link logs you out of webmail.
Help
This page displays additional on-line help. This is useful if you are away from this copy of the manual
and need immediate help.
When you click the “Help” link on any screen, you can find out more information regarding the page
you’re on, browse topics, search the Online Help for more help, or close the Help prompt and continue
working in the webmail system.
Page
23You can also read