Blister Check Out User Guide - 60-5050 Rev B - Omnicell.com
←
→
Page content transcription
If your browser does not render page correctly, please read the page content below
Blister Check Out
       User Guide
            60-5050 Rev B
About Omnicell
                 Omnicell, Inc. (NASDAQ:OMCL) is a leading provider of systems and software solutions
                 targeting patient safety and operational efficiency in healthcare facilities. Since 1992, Omnicell has
                 worked with numerous healthcare facilities to enhance patient safety and allow clinicians to spend
                 more time with their patients.
                 This guide and accompanying software and/or hardware described in it are protected under
                 copyright laws and may not be copied, wholly or in part, without the express written consent of
                 Omnicell, Inc. The same proprietary and copyright notices must be attached to any permitted
                 copies as were attached to the original documents.

                 Omnicell, Inc.                       Omnicell Ltd
                 590 E. Middlefield Road              2 Omega Dr
                 Mountain View, CA 94043              River Bend Technology Centre
                 (650)251-6100                        Irlam, Manchester, M44 5GR, UK
                 www.omnicell.com                     Tel +44 (0)161 413 5333
                                                      www.omnicell.co.uk
                 Omnicell MTS                         Omnicell GmbH
                 2003 Gandy Blvd. N                   Robert-Bosch-Str. 7
                 St. Petersburg, Fl 33702             64293
                 (727) 576-6311                       Darmstadt, Germany
                 www.mts-mt.com                       Tel: +49 615 1800-1650
                                                      www.omnicell.co.uk

                 Omnicell, M5000, SureMed, OnDemand, and the Omnicell design mark are trademarks/
                 registered trademarks of Omnicell, Inc. in the United States and internationally. All other
                 trademarks and trade names are the property of their respective owners.

                 The VBM 200F is provided by:
                 Global Factories TEM B.V.
                 Nassaulaan 23
                 2514 JT The Hague
                 The Netherlands
                 No part of this manual may be reproduced, stored in a retrieval system, or transmitted in any form
                 or by any means, electronic, mechanical, photocopying, recording, scanning or otherwise, without
                 the prior written permission of Global Factories TEM B.V.
                 Please note that the contents of this manual are protected under copyright law even if it is not
                 distributed with the software and/or hardware that includes an end user license agreement.
                 The content of this manual is subject to change without notice. Global Factories TEM B.V.
                 assumes no responsibility or liability for any errors or inaccuracies that may appear in the
                 informational content contained in this manual.

Blister Check Out User Guide/60-5050 Rev B                                                            © 2018 Omnicell, Inc.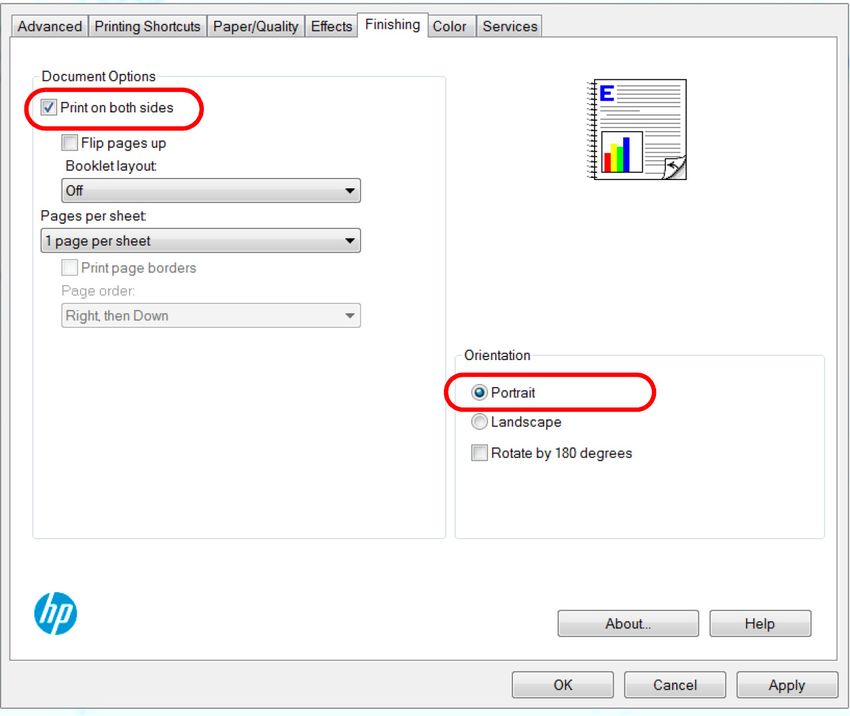
Table of Contents 3

                  Table of Contents
                  Introduction . . . . . . . . . . . . . . . . . . . . . . . . . . . . . . . . . . . . . . . . . . . . . . . . . . . . . . . . . . . . . . . . . . 5
                          Navigating BCO. . . . . . . . . . . . . . . . . . . . . . . . . . . . . . . . . . . . . . . . . . . . . . . . . . . . . . . . . . . . . 6
                        Related Documents . . . . . . . . . . . . . . . . . . . . . . . . . . . . . . . . . . . . . . . . . . . . . . . . . . . . . . . . . . . . 6
                        Contacting Omnicell Technical Assistance Center (TAC) . . . . . . . . . . . . . . . . . . . . . . . . . . . 6

                  Understanding the BCO Process . . . . . . . . . . . . . . . . . . . . . . . . . . . . . . . . . . . . . . . . . . . . . . . . 7
                        Scanning the Blister Tray Holder . . . . . . . . . . . . . . . . . . . . . . . . . . . . . . . . . . . . . . . . . . . . . . . . 7
                        Viewing Blister Tray and Cup Information. . . . . . . . . . . . . . . . . . . . . . . . . . . . . . . . . . . . . . . . 8
                          Cup Indicators . . . . . . . . . . . . . . . . . . . . . . . . . . . . . . . . . . . . . . . . . . . . . . . . . . . . . . . . . . . . . . 9
                          Detailed Cup View . . . . . . . . . . . . . . . . . . . . . . . . . . . . . . . . . . . . . . . . . . . . . . . . . . . . . . . . . 10
                        Emptying and Discarding Cups and Blister Trays . . . . . . . . . . . . . . . . . . . . . . . . . . . . . . . . . 11
                        Reviewing Fill Needs Checked Cups. . . . . . . . . . . . . . . . . . . . . . . . . . . . . . . . . . . . . . . . . . . . . 11
                        Manual Filling in BCO . . . . . . . . . . . . . . . . . . . . . . . . . . . . . . . . . . . . . . . . . . . . . . . . . . . . . . . . 12
                        Printing the Label . . . . . . . . . . . . . . . . . . . . . . . . . . . . . . . . . . . . . . . . . . . . . . . . . . . . . . . . . . . . 15
                        Checking Out . . . . . . . . . . . . . . . . . . . . . . . . . . . . . . . . . . . . . . . . . . . . . . . . . . . . . . . . . . . . . . . . 16

                  Performing the BCO . . . . . . . . . . . . . . . . . . . . . . . . . . . . . . . . . . . . . . . . . . . . . . . . . . . . . . . . . . 17

                  Understanding the SureMed Card . . . . . . . . . . . . . . . . . . . . . . . . . . . . . . . . . . . . . . . . . . . . . . 19
                        Lid Specifics . . . . . . . . . . . . . . . . . . . . . . . . . . . . . . . . . . . . . . . . . . . . . . . . . . . . . . . . . . . . . . . . . 20
                        Patient Label Specifics . . . . . . . . . . . . . . . . . . . . . . . . . . . . . . . . . . . . . . . . . . . . . . . . . . . . . . . . . 20
                        Understanding the Drug Label . . . . . . . . . . . . . . . . . . . . . . . . . . . . . . . . . . . . . . . . . . . . . . . . . 21
                          Drug Label Specifics . . . . . . . . . . . . . . . . . . . . . . . . . . . . . . . . . . . . . . . . . . . . . . . . . . . . . . . . 22
                        Label Data Restriction Guidelines. . . . . . . . . . . . . . . . . . . . . . . . . . . . . . . . . . . . . . . . . . . . . . . 23
                        Verifying Printer Settings . . . . . . . . . . . . . . . . . . . . . . . . . . . . . . . . . . . . . . . . . . . . . . . . . . . . . . 24
                        Troubleshooting Label Issues. . . . . . . . . . . . . . . . . . . . . . . . . . . . . . . . . . . . . . . . . . . . . . . . . . . 25
                          Verifying the Printer Driver . . . . . . . . . . . . . . . . . . . . . . . . . . . . . . . . . . . . . . . . . . . . . . . . . 25
                          Removing the Incorrect Driver . . . . . . . . . . . . . . . . . . . . . . . . . . . . . . . . . . . . . . . . . . . . . . . 25
                          Downloading the HP Printer Driver . . . . . . . . . . . . . . . . . . . . . . . . . . . . . . . . . . . . . . . . . . 26
                          Creating Print Presets for the SureMed Card . . . . . . . . . . . . . . . . . . . . . . . . . . . . . . . . . . . 27

© 2018 Omnicell, Inc.                                                                                                      Blister Check Out User Guide/60-5050 Rev B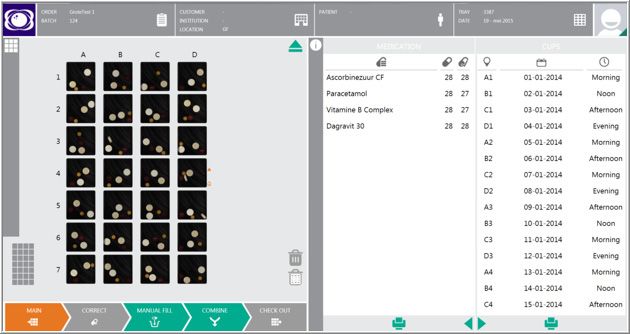
4 Table of Contents

Blister Check Out User Guide/60-5050 Rev B   © 2018 Omnicell, Inc.
Introduction 5

Introduction
                  Blister Check-Out (BCO) is an application that manages the final steps of the blister tray
                  production process. BCO’s primary function is to walk you through checking out a blister tray.
                  Figure 1 BCO Main screen

                                                                       (1)

                                             (2)                                  (3)                         (4)

                  (1)   Header with overall blister tray information (3)     Blister tray layout with pill images
                  (2)   Check out visual walk-through                (4)     Blister tray and Cup Details

                  The main screen depicts order, batch, blister tray, customer, institution, and patient information.
                  The blister tray content displays in the middle section of the screen with cup images on the left
                  and intake information on the right. You can review where you are in the BCO process at the
                  bottom of the screen with the check out visual walk-through.
                  You can extend the medication panel to reveal detailed medication information. You can also
                  extend the cup panel to show more information about the selected cup. Both panels contain
                  printing icons, which can print either a list of medications or an overview of the cups.

© 2018 Omnicell, Inc.                                                                         Blister Check Out User Guide/60-5050 Rev B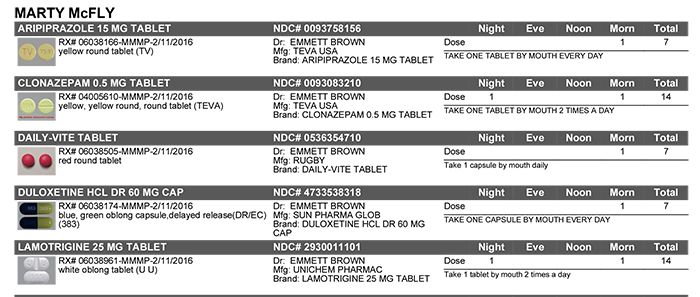
6 Introduction
Related Documents
Navigating BCO
BCO has a visual walk through that you click to move from one screen to another. The color
orange indicates the screen you are on, and you can click on the green tabs to move to another
screen. Grey means you cannot click or go to the screen.
Figure 2 BCO Walk-through Navigation
Related Documents
The following additional documents are available for Omnicell VBM 200F:
60-5048 Omnicell VBM 200F Operation and Maintenance Manual
60-5049 Omnicell VBM Bridge User Manual
60-5051 Vision Station Operation and Maintenance, and Pill Programmer User Guide
60-5053 Omnicell VBM 200F Manager User Guide
Contacting Omnicell Technical Assistance Center (TAC)
For US-based customers, call:
Technical support: 1-800-671-0587.
Email: mtstac@omnicell.com
Customer service (consumable orders): 1-800-845-0053.
Blister Check Out User Guide/60-5050 Rev B © 2018 Omnicell, Inc.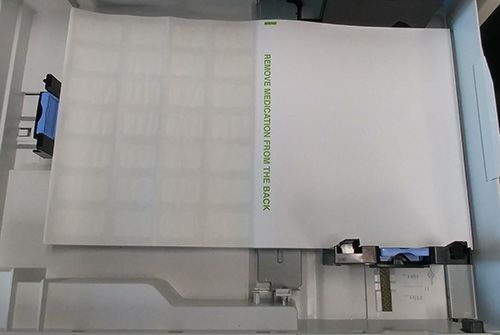
Understanding the BCO Process 7
                                                                                         Scanning the Blister Tray Holder

Understanding the BCO Process
                  The BCO process involves scanning the blister tray holder, adding any manual fills, and combing
                  the blister and blister carton (SureMed card).

Scanning the Blister Tray Holder
                  To begin using BCO, you need to log in and scan the blister tray holder you want to check out.
                  While logged into BCO, the system tracks all of your actions for accountability purposes.
                  To log in and scan the bar code:
                  1. Start up BCO and log in with your username and password.

                  2. To begin in BCO, scan the bar code on the blister tray holder you want to check out.

                  3. BCO validates the bar code and checks if the blister tray is valid. Once confirmed, the blister
                     tray is “in use” and BCO loads the relevant data.

© 2018 Omnicell, Inc.                                                             Blister Check Out User Guide/60-5050 Rev B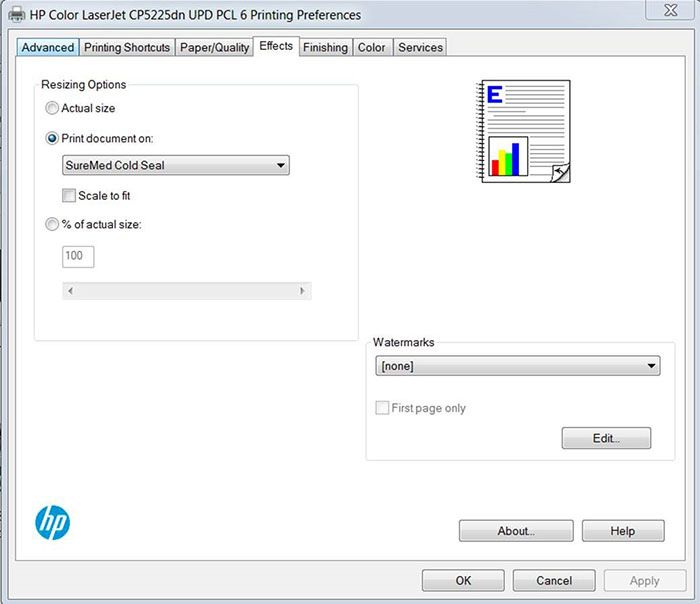
8 Understanding the BCO Process
Viewing Blister Tray and Cup Information
Viewing Blister Tray and Cup Information
Once a blister tray is in use, select a cup to view the information for that particular cup. To view
multiple cups, you can use filters. You can access the filter menu by right clicking on the blister
tray section screen, or by press and holding the screen for 3 seconds.
Figure 3 Right mouse click menu
All: Select all cups.
None: Deselect all cups.
Multiple dispenses: All cups that have multiple dispenses by the VBM.
Filled with error: All cups that have been incorrectly filled by VBM.
Discarded by machine: All cups discarded by VBM.
Ready for manual fill: All cups that need manual filling by BCO.
Partially filled: Partially manual filled cups.
Filled correctly: Correctly dispensed cups by VBM.
Discarded in BCO: Cups discarded in BCO.
Blister Check Out User Guide/60-5050 Rev B © 2018 Omnicell, Inc.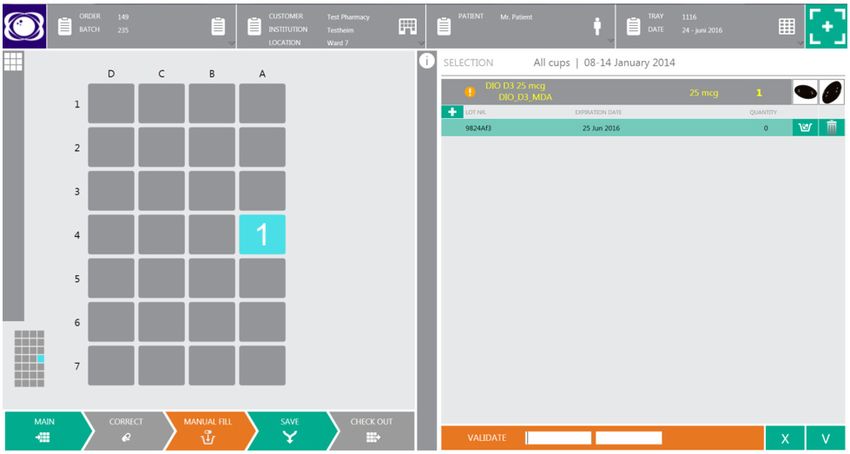
Understanding the BCO Process 9
                                                                                  Viewing Blister Tray and Cup Information

Cup Indicators
                  If the cup needs adjustments or had multiple dispense or inspection takes, an orange icon appears
                  to the right of the cup. A red question mark icon appears if the cup is flagged as Fill Needs Check
                  for a manual review.
                  Figure 4 Cup Indicators
                             (1)
                                                            (2)

                                   (3)

                                             (4)

                  (1) Multiple dispense attempts and empty cup
                  (2) Multiple dispense attempts
                  (3) Manual fill required
                  (4) Fill Needs Checked. Manual review required

© 2018 Omnicell, Inc.                                                             Blister Check Out User Guide/60-5050 Rev B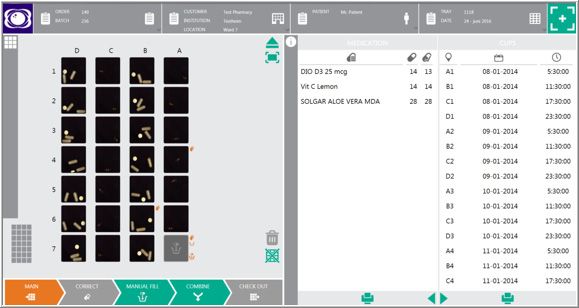
10 Understanding the BCO Process
Viewing Blister Tray and Cup Information
Detailed Cup View
When you select a cup, an orange frame highlights the cup and you can view the contents of the
cup in the detailed cup view. Click the magnifying glass icon in the bottom left corner of the cup
to open the details view.
Figure 5 Magnifying Glass Icon
Figure 6 Detail Cup View
(1) (2) (3)
(4)
(1) Cup with pills (3) Cup information
(2) Dispense attempts (4) Empty or discard cup
The left panel represents the cup, the number of dispense attempts, and the number of inspection
attempts. Every dispense attempt can have more than one inspection attempt. The right panel
shows the cup’s medication information and includes the following:
Medication details
Amount found and missing
Medication images
Blister Check Out User Guide/60-5050 Rev B © 2018 Omnicell, Inc.Understanding the BCO Process 11
Emptying and Discarding Cups and Blister Trays
Emptying and Discarding Cups and Blister Trays
If you determine that the cup contents are incorrect, you can empty or discard the cup. If you
empty a cup, you throw away the medications and are able to reuse the cup. You will need to
empty a cup if you need to make any adjustments or corrections to a cup. If you discard a cup, the
entire cup and its contents are not usable.
You can also discard the entire blister tray, which removes the blister tray and all associated data
from the system.
To discard or empty a cup/tray:
1. Select the cups you want to empty or discard.
2. Click the trash can icon. BCO prompts you to confirm emptying or discarding the cups.
3. To discard the entire blister tray, select the crossed out grid icon below the trash can on the
bottom right.
Reviewing Fill Needs Checked Cups
Depending on how pills drop from the tower, they may land in certain ways that makes the pills
look very similar, if not the same. To make sure there are no errors with the tray, BCO flags the
affected cups as Fill Needs Check.
To review a cup:
1. Manually review and verify each cup marked with the red Fill Needs Check icon.
2. Mark the cup as reviewed and complete by highlighting the cup and then selecting the eye
Reviewed icon on the bottom right.
© 2018 Omnicell, Inc. Blister Check Out User Guide/60-5050 Rev B12 Understanding the BCO Process
Manual Filling in BCO
Manual Filling in BCO
You can use BCO to manually fill blister trays if VBM is down, if you aborted a batch and need to
fill any trays from that batch, or if you are unable to manually fill a cup with the MDA tray. If you
are filling an aborted batch, you first need to reproduce the tray.
Manual fill in BCO requires a PV2 check—a pharmacist or other approved staff member must
verify any changes to the blister tray.
In BCO, the right panel lists the missing medication and the total amount of medication missing
for the blister tray. The left panel shows where to put the pill and how many pills are needed.
Figure 7 Manually Filling a Cup example
To manually fill a drug:
1. Choose a medication on the right. This highlights where to manually add the medication in
the blister tray. The number signifies how many pills you need to add.
Blister Check Out User Guide/60-5050 Rev B © 2018 Omnicell, Inc.Understanding the BCO Process 13
Manual Filling in BCO
2. Select + to add the lot number and expiration date of the medication. Click V to confirm your
entry.
3. Click the manual fill icon and add the pills to the cup.
© 2018 Omnicell, Inc. Blister Check Out User Guide/60-5050 Rev B14 Understanding the BCO Process
Manual Filling in BCO
4. As you add pills, the number in the cup decreases. Once complete, a pharmacist or other
approver must review your additions and enter their login information and click V at the
bottom to validate the manual fill.
5. Repeat as necessary to fill the whole tray or all empty cups. If you have to fill multiple
medications, you can click the green numbers in the grid to assist with filling the medications
one at a time.
Important: BCO only tracks an action when you click V to validate and save an action. At any
point after you click V, you can leave the manual fill screen or remove the blister tray. BCO
remembers where you were in the check out process based on your last save and allows you to pick
up where you left off.
Blister Check Out User Guide/60-5050 Rev B © 2018 Omnicell, Inc.Understanding the BCO Process 15
Printing the Label
Printing the Label
The final step in BCO is printing the label and applying the label to the SureMed card. The label
contains medication and patient information, as well as a 2D bar code associated with the blister
tray. To print the label, click the green print icon in the Blister Label section.
Note: Once you click Print, you can not make any adjustments to the blister tray. Only click Print
when you are ready to finish the check out process.
Figure 8 Label Print Icon
© 2018 Omnicell, Inc. Blister Check Out User Guide/60-5050 Rev B16 Understanding the BCO Process
Checking Out
Checking Out
After printing and applying the label to the SureMed card, scan the 2D bar code to complete the
check out process. This marks the card as complete and releases the blister tray holder for another
order.
If the printer is not working and you cannot print a label but still want to check out the blister tray,
you can click Blister Emergency. Then, enter a unique number by either scanning the bar code on
the card or typing a number you will remember. This allows you to release the blister tray and set
aside the blister tray holder until you are ready to print the label.
Note: Do not scan the label bar code for Blister Emergency. This causes BCO to close out the order
and you will not be able to access the label for printing at a later time.
Figure 9 Emergency Print
Blister Check Out User Guide/60-5050 Rev B © 2018 Omnicell, Inc.Performing the BCO 17
Performing the BCO
To perform BCO, you need to scan the blister tray holder, add any manual fills, and combine the
blister tray to add a label and finish packing the blister tray.
To perform BCO:
1. Start up BCO and log in with your username and password.
2. Scan the bar code for the blister tray holder you want to check out. The blister tray data loads.
3. View, correct, and/or manually fill any cups, if necessary. See Manual Filling in BCO on
page 12.
4. Scan a blister tray and press Print. Then, apply the SureMed card to the blister tray.
5. Scan the 2d barcode on the label to complete the BCO process. The blister tray is now ready for
distribution.
If you need to reprint the label after completing the checkout process, scan the 2d barcode on the
existing SureMed card and select Print.
© 2018 Omnicell, Inc. Blister Check Out User Guide/60-5050 Rev B18 Performing the BCO Blister Check Out User Guide/60-5050 Rev B © 2018 Omnicell, Inc.
Understanding the SureMed Card 19
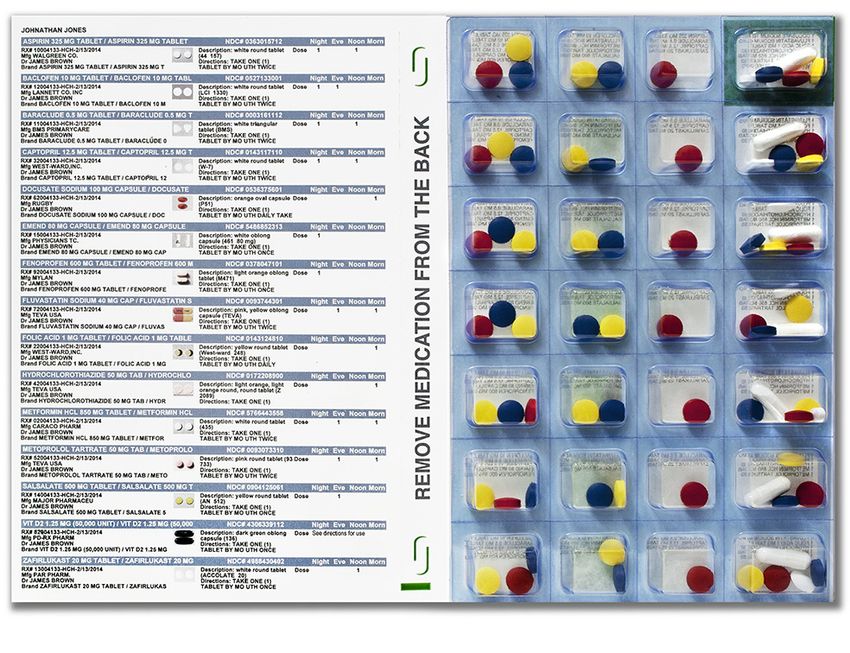
Understanding the SureMed Card
The SureMed card is made up of a patient label, the lid with the administration time, the spine,
and the drug label. Each card contains a week’s worth of medications for a single patient, divided
across four administration times per day (morning, noon, evening, bedtime).
The individual blister cups on the SureMed card are perforated, so patients can tear off individual
blister cups or row of cups when needed. For example, they may be away from home for lunch and
need to take their noontime medications with them.
VBM prints the medication name and strength on the lid that covers each blister cup. The lid also
shows the administration time indicating when the patient needs to take their dose (morning,
noon, evening, etc.).
Note: Depending on your pharmacy’s customization, your card may look different from the
samples below. These images are intended to give you a general understanding of each component
of the card.
Figure 10 Sample Patient Label and Lid
(1) (2) (3)
(1) Lid
(2) Spine
(3) Patient Label
© 2018 Omnicell, Inc. Blister Check Out User Guide/60-5050 Rev B20 Understanding the SureMed Card
Lid Specifics
Lid Specifics
The lid shows the administration time information and prints the names of all the drugs in that
blister cup. In the SureMed Plus card you can typically fit11 drugs into a single blister cup.
Note: Larger drugs will impact the total number of pills able to fit in a single cup.
Figure 11 Sample Lid and Dosage Time Information
(4)
(1) (2) (3)
(1) Card start indicator (3) Administration time
(2) Drugs in blister (4) Day of week
Patient Label Specifics
The Patient Label contains general patient, pharmacy, and card information.
Figure 12 Sample Patient Label
(5)
(1)
(2) (6)
(7)
(3)
(4) (8)
(1) Patient Information (5) Day of the week when pack begins
(2) Pharmacy Information (6) Pack Date and Expiration
(3) DEA Number (7) FDA warning
(4) Who packed and checked the card (8) Pack bar code
Blister Check Out User Guide/60-5050 Rev B © 2018 Omnicell, Inc.Understanding the SureMed Card 21
Understanding the Drug Label
Understanding the Drug Label
The Drug Label lists all the drugs in the pack, and you can have 12 different drugs in a single card.
Figure 13 Sample Drug Label and Blister Cups
(1) (2)
(1) Drug label
(2) Blister cups with dugs
© 2018 Omnicell, Inc. Blister Check Out User Guide/60-5050 Rev B22 Understanding the SureMed Card
Understanding the Drug Label
Drug Label Specifics
The drug label contains information on each drug in the card.
Figure 14 Sample Drug Label Information
(5) (6) (8)
(4)
(3)
(7)
(2)
(9)
(1)
(10)
(1) Drug Image (6) Drug Information
(2) Drug Description (7) Warning/Sig
(3) Drug Name (8) Dose Number
(4) Patient Name (9) Dosage Time
(5) NDC (10) Total number of drugs in the pack
Blister Check Out User Guide/60-5050 Rev B © 2018 Omnicell, Inc.Understanding the SureMed Card 23
Label Data Restriction Guidelines
Label Data Restriction Guidelines
There are character limits on many of the label fields on the SureMed card. See the tables below
for the Standard Template character limits.
Figure 15 Patient Label Data
Field Name Character Limit Font
Patient Name 25 11pt Arial
Patient ID 30 11pt Arial
Patient DOB 30 11pt Arial
Facility Name/DayofWeek 40 10pt Arial
Pack # of # 13 7.5pt Arial
Date Packed 20 7.5pt Arial
Expirations Date 20 7.5pt Arial
Pharmacy Name 26 13pt Calibri
Pharmacy Address 72 10pt Calibri
Pharmacy Phone 27 9pt Arial
Pharmacy DEA# 27 9pt Arial
Figure 16 Card Spine Data
Field Name Character Limit Font
Current Date (Short) 10 11pt Arial
Patient Name 15 11pt Arial
Patient DOB 10 11pt Arial
Patient Location 10 11pt Arial
Figure 17 Drug Label Data
Field Name Character Limit Font
Drug Name 35 8pt Arial
NDC 25 8pt Arial
Prescription Number 45 7pt Arial Narrow
Drug Description 100 7pt Arial Narrow
Physician Name 40 7pt Arial Narrow
Drug Manufacturer Name 40 7pt Arial Narrow
Drug Brand Name 40 7pt Arial Narrow
Directions 240-250 7pt Arial Narrow
Figure 18 Lid (Blister Cups) Data
Field Name Character Limit Font
Patient Name 20 6pt Calibri
Drug Quantity 3 6pt Calibri
Drug Name 25 6pt Calibri
Administration Time 18 6pt Calibri
Day of Week 15 6pt Calibri
© 2018 Omnicell, Inc. Blister Check Out User Guide/60-5050 Rev B24 Understanding the SureMed Card
Verifying Printer Settings
Verifying Printer Settings
The official printer for VBM is the HP PageWide Pro 750dw. You can verify that the HP PageWide
is the default printer associated with BCO to print the SureMed card.
When you are ready to print, set the SureMed card in the printer tray upside down, with the blister
lid on the left and the card stock on the right.
Figure 19 Card Orientation in Printer
Note: If you are having alignment issues with the label, see Troubleshooting Label Issues on
page 25.
To verify printer settings:
1. On the Login popup, select the gears icon to open BCO Settings.
2. Navigate to Reports > View Name > SureMed+.
3. Select the magnifying glass icon. From this screen you can designate the HP PageWide as the
default printer.
Blister Check Out User Guide/60-5050 Rev B © 2018 Omnicell, Inc.Understanding the SureMed Card 25
Troubleshooting Label Issues
Troubleshooting Label Issues
If the label information is not printing correctly, you may have the wrong driver installed on the
printer.
First, you need to verify that you have the correct driver. If you do not, you will need to uninstall
and download the correct driver.
Verifying the Printer Driver
First you need to make sure you have the correct driver downloaded. Using the wrong driver can
cause issues with printing the SureMed card because it is not a standard page size.
To verify the driver:
1. Navigate to Start > Settings > Devices > Printers and Scanners.
2. Right click on the HP PageWide Pro 750dw and select Properties.
3. The popup lists the driver associated with the printer. The correct driver is the HP Universal Print
Driver for PLC6 (64-bit).
4. If you do not have the correct driver installed, follow the procedures for Removing the
Incorrect Driver on page 25. Then follow the instructions for Downloading the HP Printer
Driver on page 26.
5. If you do have the correct driver, restart the BCO Workstation and turn the printer on and off.
Wait 10 seconds after shutting down the printer and computer before turning them on again. If
the print issue persists, call TAC (see Contacting Omnicell Technical Assistance Center
(TAC) on page 6).
Removing the Incorrect Driver
If the incorrect driver is associated with the printer, you need to unplug your printer and remove
the driver currently on your computer.
To remove the driver:
1. Unplug the printer from the computer.
2. Navigate to Start > Settings > Devices > Printers and Scanners.
3. Right click on the HP PageWide Pro 750dw printer.
4. Select Remove Device.
5. Follow the instructions for Downloading the HP Printer Driver on page 26.
© 2018 Omnicell, Inc. Blister Check Out User Guide/60-5050 Rev B26 Understanding the SureMed Card
Troubleshooting Label Issues
Downloading the HP Printer Driver
If you have the incorrect driver, you need to go to the HP website to download the correct driver.
To download the driver:
1. Make sure the printer is still unplugged from the BCO Workstation.
2. Navigate to the following link to the HP site to find the HP PageWide Pro 750dw UPD PLC 6
driver: https://support.hp.com/us-en/drivers/selfservice/hp-pagewide-pro-750-printer-series/11590691.
a. If the link does not work, navigate to https://support.hp.com/us-en/drivers.
b. Select Printers. Enter the HP product name HP Pagewide Pro 750dw.
c. Click Find to search. The printer page appears.
3. Verify your Operating System (OS) in the banner. Select Change to choose a different OS. The
drivers available for that OS appears.
4. Expand the group for Driver-Universal Print Driver. Click Download for the PCL6 driver with the
most recent date.
5. Select Unzip when the WinZip popup appears. Follow the prompts and when complete, click OK.
6. Open the installation application and follow the prompts.
Blister Check Out User Guide/60-5050 Rev B © 2018 Omnicell, Inc.Understanding the SureMed Card 27
Troubleshooting Label Issues
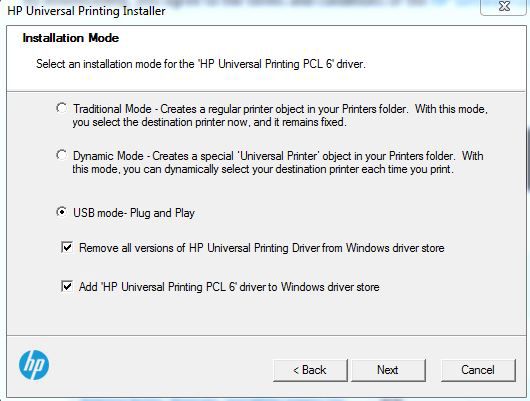
7. On the Installation Mode screen, select USB mode- Plug and Play. Make sure both boxes are
checked.
8. Complete the driver installation by following the prompts.
9. Plug in your printer to the computer The label should not print correctly.
Creating Print Presets for the SureMed Card
These presets apply to the SureMed Standard and Plus cards (exceptions between the Standard
and Plus cards are noted in the procedure). You only need to create the presets once.
To create your settings:
1. Navigate to Start > Settings > Devices > Printers and Scanners.
2. Right click on the HP PageWide Pro 750dw UPD PLC 6 printer. Select Printer Preferences.
3. On the Paper/Quality tab, select Custom. Type the name of the preset and add the dimensions
9.49x16.22 inches (241x408mm). Click Save to set your preset name. Click OK when finished.
4. Set the Type is: as Plain.
a. Expand the dropdown. Select More.
b. Expand the Everyday group. Select Plain.
© 2018 Omnicell, Inc. Blister Check Out User Guide/60-5050 Rev B28 Understanding the SureMed Card
Troubleshooting Label Issues
5. Go to the Finishing tab. Check Print On Both Sides, and make sure the orientation is set to Portrait.
6. Go to the Effects tab. Select Print document on and choose your preset from the dropdown.
Uncheck Scale to fit.
7. Click OK to save your settings and close the window.
Blister Check Out User Guide/60-5050 Rev B © 2018 Omnicell, Inc.You can also read