QAComplete - JIRA Connector Installation and Configuration Instructions QAComplete Release 10.2
←
→
Page content transcription
If your browser does not render page correctly, please read the page content below
QAComplete - JIRA Connector

            Installation and Configuration Instructions

                                             QAComplete Release 10.2

                                      This guide walks you through installing, configuring and using the
QAComplete - JIRA Connector for synchronizing JIRA issues with QAComplete Defects and Requirements
                                                                            QAComplete Release 10.2
                                                                           JIRA Connector Version 2.0
                                                                                         October, 2015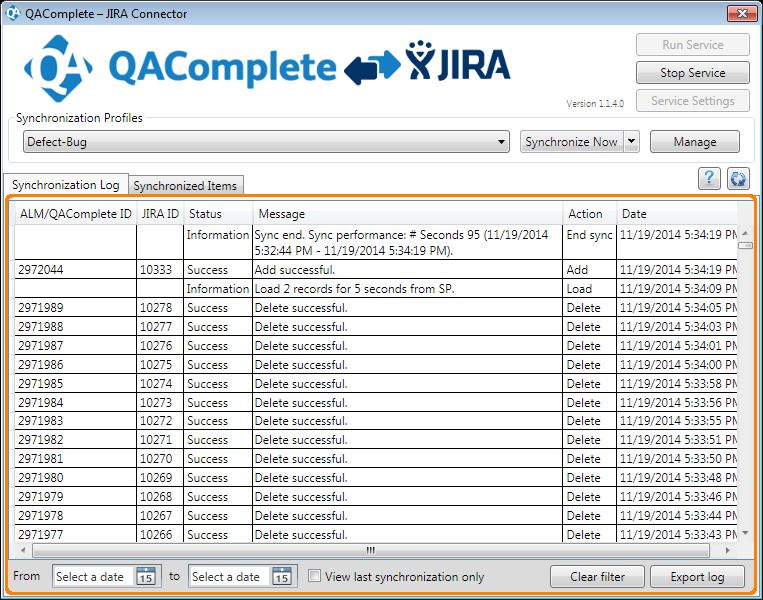
ALMComplete | QAComplete User's Guide

Integration With JIRA                                                                                    3
  QAComplete - JIRA Connector Service                                                                    4
    About the Configuration Tool                                                                         4
  Requirements and Prerequisites                                                                         5
  QAComplete - JIRA Connector Installation                                                               7
  Synchronization Profiles                                                                               8
    Default Profile                                                                                      9
    JIRA KEY                                                                                            10
    Status Mapping                                                                                      10
    Priority Mapping                                                                                    10
    Resolution Mapping                                                                                  10
    Creating a New Synchronization Profile                                                              11
    Configuring General Settings of the Synchronization Profile                                         12
    Configuring QAComplete Connection Settings                                                          13
    Configuring JIRA Connection Settings                                                                15
    Synchronizing Item Fields and Values                                                                17
    Synchronizing Users                                                                                 22
    Synchronizing Workflows                                                                             24
  Configuring the Synchronization Intervals                                                             27
  Viewing Synchronization Logs                                                                          27
  Working With Synchronized Items                                                                       29

                                              Page 2 of 29
             2015 SmartBear Software, All Rights Reserved. Visit us at www.smartbear.com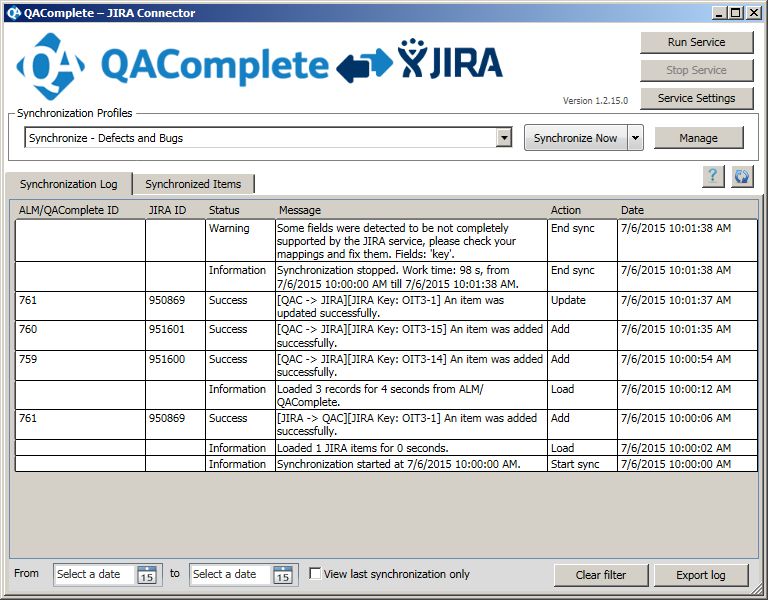
ALMComplete | QAComplete User's Guide

Integration With JIRA
JIRA is an issue-tracking system by Atlassian. You use JIRA to manage your projects and track bugs, issues, use cases and
requirements.
Use the QAComplete - JIRA Connector to synchronize JIRA issues with QAComplete Defects or Requirements modules to:
     l   Integrate issues you create in JIRA into your application/testing lifecycle in QAComplete.
     l   Track and report on JIRA issues in QAComplete.
     l   Track QAComplete entities in JIRA.

                                                         Page 3 of 29
                      2015 SmartBear Software, All Rights Reserved. Visit us at www.smartbear.com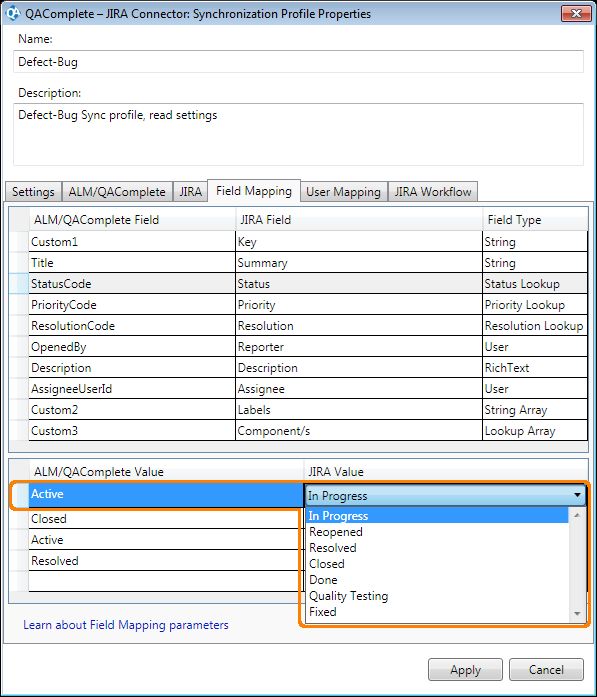
ALMComplete | QAComplete User's Guide

QAComplete - JIRA Connector Service
Use the QAComplete - JIRA Connector service to integrate JIRA issues with QAComplete Defects or Requirements.
While the service is running, it connects to your QAComplete and JIRA instances at specified intervals and synchronizes items:
     l   The service loads data from the source system that was created or edited after the last syn-
         chronization.
     l   The service checks the fields of the source system items and updates the fields of the target system
         so that they match the source items.
     l   If the same field has been changed both in the source item and in the target item, the service will
         update the target item's field only if the source item's field has been edited last. Otherwise, it will
         leave the target item's field unchanged.
     l   If you attach a file to an item in a source system, the service will copy the attachment to the appro-
         priate item in the target system.
         Note: If you change the attachment in the source system, the service will replace the
         attachment in the target system as long as the file name remains the same.
     l   If you comment on an item in a source system, the service will copy the comment to the appropriate
         item in the target system.
     l   The service does not synchronize cross-referencing links between items. For example, if a JIRA
         item is linked to other JIRA items, the relationship between these items is not part of the syn-
         chronization.
The synchronization can be bi-directional, where both systems share updates to items, or one direction, where an item in the
source system changes, the service updates the corresponding item in the destination system.
Note: The service does not synchronize cross-referencing links between items. For example, if a JIRA item is linked to other
JIRA items, the relationship between these items is not part of the synchronization.
"Synchronization Profiles" on page 8 specify synchronization parameters for each pair of items.

About the Configuration Tool
To configure and control the service, you use the QAComplete- JIRA Connector Configuration Tool.

                                                            Page 4 of 29
                       2015 SmartBear Software, All Rights Reserved. Visit us at www.smartbear.com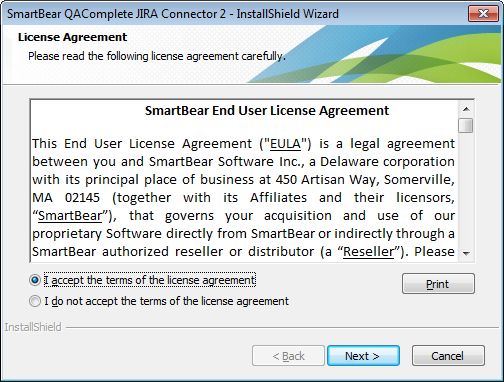
ALMComplete | QAComplete User's Guide

The tool is shipped and installed together with the synchronization service.
To start the synchronization, click Run Service.
To run the synchronization on demand:
     l   Select the profile in the Synchronization Profiles list.
     l   Click Synchronize Now in the drop-down menu.
The service will synchronize items specified by the profile and then stop.
To restore links between synchronized items (you may need this, for example, after you re-install the service):
     l   Select the profile in the Synchronization Profiles list.
         Note: To use a profile stored in an external file, import the profile data first. See "Synchronization
         Profiles" on page 8
     l   Click Repair Database in the drop-down menu, under Synchronize Now.
The service will connect to the databases and restore the links between items using the existing synchronization information.
You can view information about synchronized items in the Synchronized Items tab of the configuration tool's main window.
To stop the service, click Stop Service.

Requirements and Prerequisites
To integrate QAComplete with Atlassian JIRA, the following requirements must be met:
     l   Atlassian JIRA 5.0 - 7.0 must be installed on the server that hosts your JIRA database, or you can
         use JIRA Cloud 7.0.
     l   JIRA must accept remote calls. For information on how to enable JIRA for remote API calls, please
         see the JIRA documentation.
     l   The QAComplete account you use for the integration must belong to a security group that has all
         privileges for items you synchronize with JIRA.
     l   The JIRA account you use for the integration must have Administrator privileges.

                                                           Page 5 of 29
                      2015 SmartBear Software, All Rights Reserved. Visit us at www.smartbear.com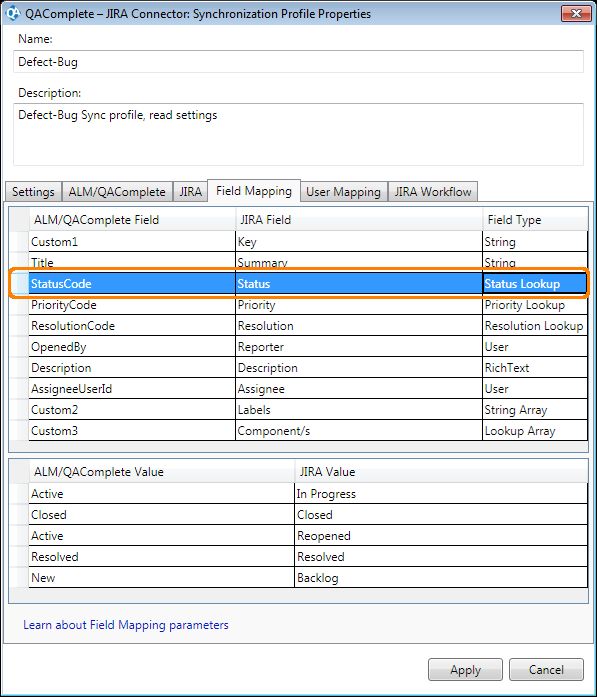
ALMComplete | QAComplete User's Guide

     l   The computer where the QAComplete - JIRA Connector service runs must have access to your
         JIRA database and QAComplete database. The machine cannot have SQL Server installed due to
         a conflict with SQL Compact used by the connector.
Note: QAComplete do not support extended nor Unicode characters. If items in your JIRA projects include extended or
Unicode characters, the service may fail to synchronize the text in these items correctly.

Exporting JIRA Workflow Data

To synchronize your workflow across QAComplete and JIRA, export your JIRA workflow to an .xml file and import it into the
QAComplete - JIRA Connector.
To export JIRA workflow:
    1. In your JIRA client, login to your JIRA project.

    2. Click      and then click Issues.

    3. Select the Workflows section and find the workflow you need to export.
    4. In the Operations column, click View.
    5. Click Export and then click As XML.
    6. In the Opening Your Workflow dialog, click Open With or Save File.
    7. Locate the file and make sure it has an XML extension.
You can import the workflow data when you create a new synchronization profile or on the JIRA Workflow page when you
edit a profile.

Preparation in QAComplete

    1. Create Status Codes in defects or requirements that correspond to your JIRA Statuses.
    2. Create a text Custom Field to use for the JIRA Key. Make note of the custom field number (such
       as "Custom1").
         You will need the custom field number when defining the mapping between the JIRA issue and
         your QAComplete defect or requirement.
         Note: Use a name for the custom field that identifies it as the JIRA Key. Do not use the word
         "Custom" in the custom field name.

On-Premises Only: Allowing Large Attachments

If items you want to synchronize include large attachments, you can adjust the file size limit on your QAComplete server to
allow the larger files.
     l   When you install QAComplete, you configure IIS on your server to allow a maximum file size. (See
         QAComplete Installation Guide.) If you experience issues with synchronizing items with large files
         attached you can adjust the IIS setting.
             1. On your QAComplete server, open IIS Manager console. Click Start,
                select Run, type inetsrv/iss.msc and press Enter.
             2. In the Navigation panel, select Default Website.
             3. In the Features panel, select Request Filtering.
             4. On the Action pane, click Open Feature.
             5. Right-click the feature and then click Edit Feature Settings.
             6. Make sure that the Maximum allowed content length (Bytes) is set
                to 100000000.
             7. Click OK to save the changes and close the dialog.

                                                          Page 6 of 29
                      2015 SmartBear Software, All Rights Reserved. Visit us at www.smartbear.com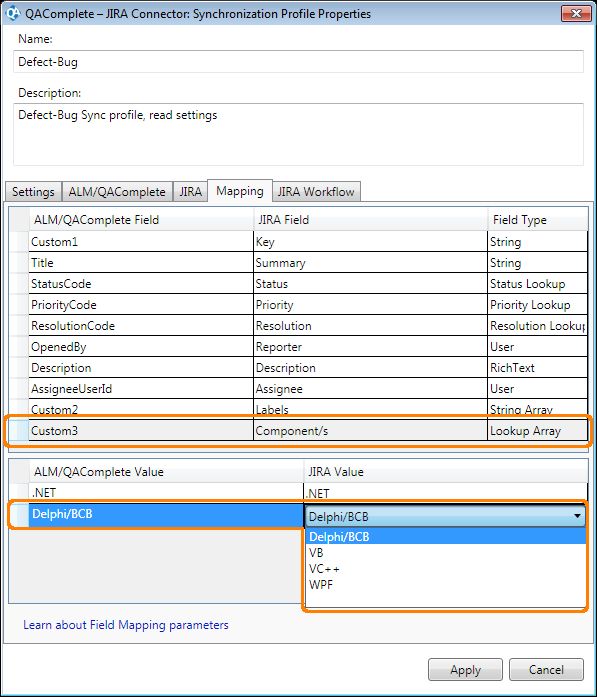
ALMComplete | QAComplete User's Guide

     l   Make sure that your QAComplete web service allows uploading large files.
              1. On your QAComplete server, navigate to the C:\inet-
                 pub\wwwroot\psWS\web.config file and open it for editing. (It is an XML
                 file that you can open in any XML or Text editor such as Notepad.)
              2. Find the system.webServer node in the file.
              3. Make sure that the node has the httpRuntime subnode and that the
                 subnode's maxRequestLength attribute is set to 122800.
              4. If needed, add the httpRuntime subnode manually and set the
                 maxRequestLength attribute to 122800. For example:

                     ...

              5. Save the file.

Restoring Synchronization Data on Updating or Re-Installing the Service

Before you update or re-install the QAComplete - JIRA Connector service, we recommend that you store your
synchronization profiles in external files:
     l   In the configuration tool, stop the service and click Manage.
     l   In the Synchronization Profiles dialog, select the needed profile and click Export.
     l   Specify the file that will store the data.
After you update or re-install the tool, you can restore the existing links between synchronized items instead of creating and
configuring the synchronization anew. (Otherwise, synchronized data may be duplicated).
     l   In the configuration tool, stop the service.
     l   Import your existing synchronization profile:
               l   Click Manage and then click Import.
               l   Browse for the file storing your synchronization data.

         Or create and configure a new profile.
     l   On the main window of the configuration tool, select the profile in the Synchronization Profiles
         list.
     l   Select Repair Database from the drop-down menu.
The service will connect to the databases and restore the existing synchronized data.

QAComplete - JIRA Connector Installation
Download the JIRA Connector installation package from our web site.
Copy the installation package to the machine that will run the synchronization. This needs to be a machine that can connect to
both your JIRA instance and QAComplete, but does not have SQL Server installed.
Unzip the file and run QAComplete JIRA Connector 20 Release.exe.
Note: If you do not have SQL Server Compact 3.5 SP2 on the machine, the installation will offer to install it for you. Click Yes.
Read Microsoft's EULA and click Next to continue installation.
If you have a previous version of JIRA Connector installed on the computer, the installation will offer to upgrade it. Click Yes.

                                                           Page 7 of 29
                       2015 SmartBear Software, All Rights Reserved. Visit us at www.smartbear.com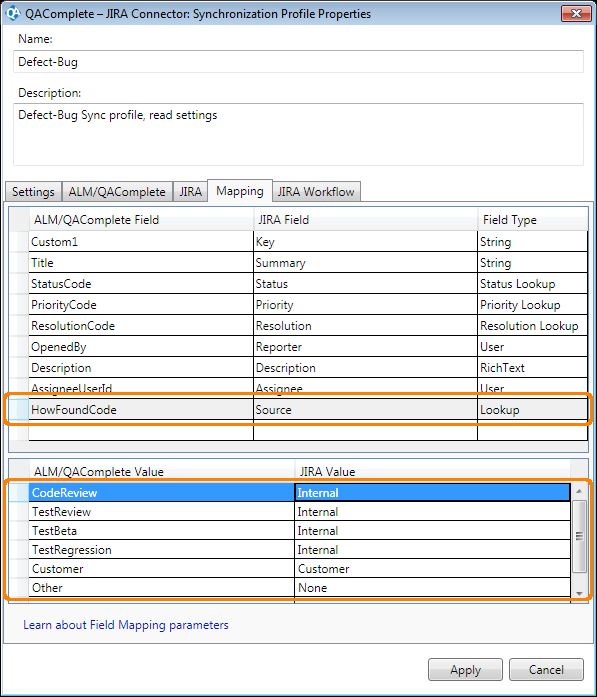
ALMComplete | QAComplete User's Guide

Read SmartBear's EULA, Click I Accept, then click Next to continue installation.
If needed, change the installation folder for JIRA Connector.

Click Install to confirm the installation.
Note: If you are installing on a machine with SQL Server 2008, there may be a conflict with SQL Server Compact if exists on
the machine. To work around the conflict, first uninstall SQL Compact 3.5 (x86 and x64), run the connector installation and
select Repair, and re-install SQL Server Compact from the connector installer.

Synchronization Profiles
For each pair of items you synchronize, you create a separate synchronization profile. A profile stores the information that
QAComplete - JIRA Connector uses to connect to your QAComplete and JIRA instances with rules describing how the service
copies data from one system to the other.
Starting from QAC - JIRA Connector version 1.2, you can synchronize QAComplete Defects and Requirements with JIRA
issues of any type.
The profile you create describes how items in a QAComplete project are synchronized with items in a JIRA project and how
fields are mapped between the two.

                                                         Page 8 of 29
                        2015 SmartBear Software, All Rights Reserved. Visit us at www.smartbear.com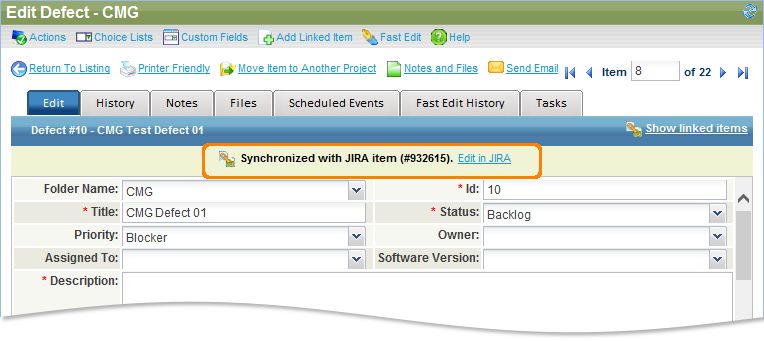
ALMComplete | QAComplete User's Guide

Create and configure profiles with the QAComplete - JIRA Connector Configuration Tool.
To set up a synchronization profile:
      l   In the configuration tool, stop the service and click Manage.
      l   In the Synchronization Profiles dialog, click Add to create a new profile. To copy settings from
          the default profile to your new profile, select Default profile in the Copy settings from drop
          down list. For a description of the default profile, "Default Profile" below
      l   To edit an existing profile, select the desired profile in the list and click Edit.
Creating and configuring a synchronization profile includes the following steps:
     1. "Creating a New Synchronization Profile" on page 11
     2. "Configuring General Settings of the Synchronization Profile" on page 12
     3. "Configuring QAComplete Connection Settings" on page 13
     4. "Configuring JIRA Connection Settings" on page 15
     5. "Synchronizing Item Fields and Values" on page 17
     6. "Synchronizing Users" on page 22
     7. "Synchronizing Workflows" on page 24
You can create multiple profiles to synchronize different items in different projects. For example, create a profile to synchronize
JIRA bugs with QAComplete defects and a second profile to synchronize JIRA user stories with QAComplete requirements.
To disable a profile temporary, clear the check box next to the profile name in the list.
To export profile data to a file for later use, click Export and specify the target file that will store the data.
To import profile data from an external file, click Import and browse for the need file.

Default Profile
The QAComplete - JIRA Connector comes with two default synchronization profiles to use as a starting point: one that links
defects in QAComplete with JIRA issues of the Bug type and another that links Requirements to JIRA Stories. The profiles
map default fields and choice list values in QAComplete to the corresponding default fields and values of JIRA bugs.
When creating your customized profile, use the default profile as a starting point by copying it to your new profile.
Note: if you have customized JIRA or QAComplete choice list values, the values will be different for your instance. You will need
to modify the values to match your choice lists.
Importing Profiles

If you do not see the default profiles in the configuration tool, you can import them from the Program Files location.
      l   Start the configuration tool.
      l   Stop the service.
      l   Click Manage, then Import.
      l   Navigate to the location where the configuration tool is installed (c:/Program Files (x86)/Sm-
          nartBear/qacJIRAConnector).
      l   In this folder look for the two profile template XML files:
          templateProfileBugs.xml
          templateProfileRequirements.xml

      l   Select the profile and click Open. The default template will be imported and available for use.
Configuration

Once you have copied the Default Profile, complete the Settings, ALM/QAComplete and JIRA tabs. After you have configured
the profile, click the Field Mapping tab.
Mapping

The default profile maps the following values between QAComplete Defects and JIRA bugs.

                                                               Page 9 of 29
                        2015 SmartBear Software, All Rights Reserved. Visit us at www.smartbear.com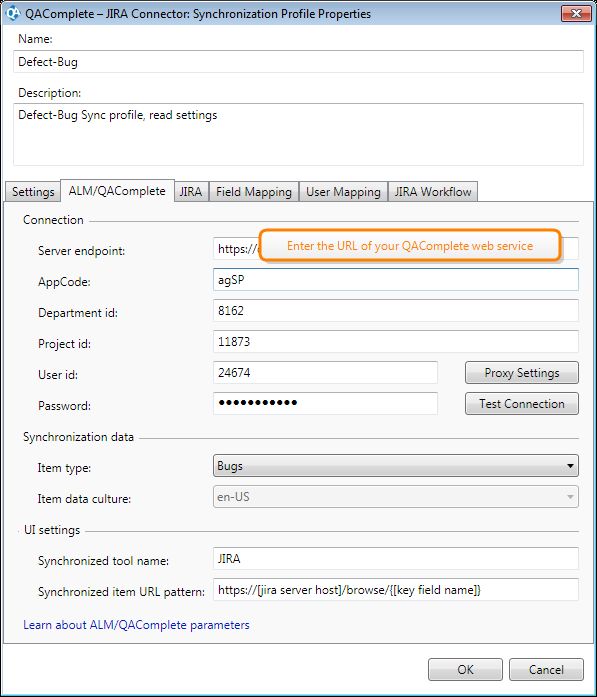
ALMComplete | QAComplete User's Guide

ALM/QAComplete Field JIRA Field Field Type
Custom1                    Key            String
Title                      Summary        String
StatusCode                 Status         Status Lookup
PriorityCode               Priority       Priority Lookup
ResolutionCode             Resolution Resolution Lookup
OpenedBy                   Reporter       User
Description                Description RichText
AssigneeUserId             Assignee       User

JIRA KEY
The default mapping assumes that Custom1 in Defects maps to the "key" field in JIRA. Change this to the correct custom field
used in your system.

Status Mapping
QAComplete Status Codes are mapped to default JIRA status values. You can modify the mapping for changes you may have
in either system.

ALM/QAComplete Value JIRA Value
New                         Backlog
Active                      In Progress
Closed                      Closed
Active                      Reopen
Resolved                    Resolved

Priority Mapping
QAComplete Priority Codes are mapped to default JIRA priorities. You can modify the mapping for changes you may have in
either system.

ALM/QAComplete Value JIRA Value
1-Fix ASAP                  Blocker
1-Fix ASAP                  Critical
2-Fix Soon                  Major
2-Fix Soon                  Normal
3-Fix If Time               Minor
4-Fix If Time               Trivial

Resolution Mapping
QAComplete Resolutions Codes are mapped to default JIRA resolutions. You can modify the mapping for changes you may
have in either system.

ALM/QAComplete Value JIRA Value
By Design                   Won't Do
Duplicate                   Duplicate
External                    Won't Do
Fixed                       Done
Fixed                       Fixed
Not Repro                   Cannot Reproduce
Not Repro                   Invalid

                                                          Page 10 of 29
                     2015 SmartBear Software, All Rights Reserved. Visit us at www.smartbear.com
ALMComplete | QAComplete User's Guide
ALM/QAComplete Value JIRA Value
Postponed Workaround Exists
Will Not Fix Won't Fix
Mapping is fully customizable, so you can add mapped fields and modify the mapping as needed.
Important: If you use required fields in either JIRA or QAComplete, make sure that all required fields are fully mapped.
Creating a New Synchronization Profile
Create a synchronization profile for the items you want synchronized.
You can create separate profiles for various item types. You can also create separate profiles to synchronize items in various
QAComplete projects with issues in various JIRA projects.
To create a new profile, in Synchronization Tool, click Manage and then click Add.
Note: To create a new synchronization profile (or edit an existing one), stop the service first. When you are done creating or
editing the profile, restart the service.
In the Add Synchronization Profile dialog, set up a new profile:
1. Enter the new profile name.
2. (Optional) Enter a description for the profile.
3. To synchronize your item workflow in QAComplete with the JIRA workflow, import the JIRA work-
flow data:
l Click Load JIRA Workflow.
l Browse for the .xml file storing the exported workflow. For information
on how to export JIRA workflow to a file, please see "Requirements and
Prerequisites" on page 5.
l Select the needed file and click Open.
Note: You can import the workflow data later on the JIRA Workflow page by editing the profile.
4. Click OK.
Page 11 of 29
2015 SmartBear Software, All Rights Reserved. Visit us at www.smartbear.comALMComplete | QAComplete User's Guide
To copy settings from an existing profile, select the desired profile in the Copy settings from list and click OK. For ease of
configuration, select one of the default profiles as a starting point to creating your new profile.
To configure or edit an existing profile, select it in the Synchronization Profiles dialog and click Edit.
Configuring General Settings of the Synchronization Profile
On the Settings tab of the Synchronization Profile Properties dialog, you define the synchronize direction and configure
notification emails:
1. In Synchronization direction list, choose how the synchronization should work:
l Choose Both to enable a bidirectional synchronization. When an item in
either QAComplete or JIRA changes, the service updates the cor-
responding item in the other system.
l Choose JIRA -> ALM\QAComplete or ALM\QAComplete -> JIRA to
enable the one-way synchronization. When an item in the source (first)
system changes, the service updates the corresponding item in the des-
tination (second) system.
l JIRA -> ALM\QAComplete: JIRA issues are
pushed to QAComplete items. When the JIRA
issue is changed, the change is pushed to QACom-
plete. If the QAComplete item is changed, it does
NOT update the JIRA issue.
l Note: Changes made in QACom-
plete will be overwritten by
changes made later in JIRA.
Page 12 of 29
2015 SmartBear Software, All Rights Reserved. Visit us at www.smartbear.comALMComplete | QAComplete User's Guide
l ALM\QAComplete -> JIRA: QAComplete items
are pushed to JIRA. When the QAComplete issue
is changed, the changed is pushed to JIRA. If the
JIRA issue is changed, it does NOT update the
QAComplete item.
l Note: Changes made in JIRA will
be overwritten by changes made
later in QAComplete.
2. In Max size of attachment, enter the maximum size limit for your attachments in Kb. The default
value is 2048 Kb and the upper limit is 30 Mb.
3. To configure the service to send email notifications on synchronization results:
l In From, enter the email address to use as the "From" address for noti-
fications.
l In Server, enter the address of the mail server used to send noti-
fications.
l In User Name and Password, enter the account name and password
used to connect to the email server.
l In To, enter the email address to receive the notifications. To send noti-
fications to several recipients, enter their email addresses separated by
comma.
Configuring QAComplete Connection Settings
On the ALM/QAComplete tab of the Synchronization Profile Properties dialog, specify the location of your QAComplete
web service and login information for the project you want to synchronize with JIRA.
Note: the Department ID, Project ID and User ID are the unique numeric identifiers found in QAComplete.
Page 13 of 29
2015 SmartBear Software, All Rights Reserved. Visit us at www.smartbear.comALMComplete | QAComplete User's Guide
1. In Server endpoint, enter the URL of your QAComplete web service.
For SaaS clients, the URL address is ws.softwareplanner.com/psws.asmx.
For On-Premises clients, the URL address is http://[yourserver]/psws/psws.asmx.
2. In appropriate fields, enter the following authentication information:
l In AppCode, enter the application code.
For SaaS clients, use agSP.
For On-Premises clients, use agSPEnt.
l In Department Id, enter the numeric ID of your department.
l In User Id, enter the numeric ID of the user that the service will use to
access QAComplete items. This user must have full permission to the
items in the desired Project.
l In Password, enter the password for the user.
l In Project, enter the numeric ID of the QAComplete project that you
want synchronized with JIRA.
You can find the numeric IDs in QAComplete:
To get the application code
l In QAComplete, go to the Setup tab.
l Note down the AppCode value.
To get the project ID and department ID
l On the Setup tab, in the tree on the left, select Projects (Open &
Create).
l Note the values in the ID and Dept Id columns for the desired Project.
If the columns are hidden, click Choose Fields and add the columns to
the Chosen Fields list.
To get the user ID
l On the Setup tab, in the tree on the left, select Security | Users.
l Find the desired user and note the value in the UserId column.
If the column is hidden, click Choose Fields and add the column to the
Chosen Fields list.
3. If you connect to your QAComplete server through a proxy, click Proxy Settings and configure the
proxy settings in the resulting dialog:
l No proxy - Select this option to connect to your QAComplete server dir-
ectly.
l Use system proxy settings - Select this option to connect to your
QAComplete server through the proxy configured for your operating sys-
tem. You can find that proxy and its settings in the Local Area Network
(LAN) Settings dialog. (To open that dialog, run Internet Explorer and
then click Tools | Internet options | Connections | LAN settings.)
l Custom proxy - Select this option to set the proxy server that you want
to use, manually:
In Proxy address, specify the network name or IP address and
(optionally) the port of the proxy server you will use to connect to your
QAComplete server. For example, 192.168.100.50:8888.
Page 14 of 29
2015 SmartBear Software, All Rights Reserved. Visit us at www.smartbear.comALMComplete | QAComplete User's Guide
If your proxy server requires authentication, enter the user name and
the password of the user account under which you will connect to the
proxy server.
l Click OK to save the changes and close the dialog.
4. The Item type is the QAComplete module to synchronize with JIRA. Choose Bugs or Require-
ments from the drop-down list.
5. The Item data culture is the locale used in QAComplete. Leave the default value of en-US.
6. In Synchronized tool name, enter an identifying name for the JIRA instance that you are syn-
chronizing with QAComplete. Enter JIRA. This name is used in synchronization messages.
7. To open JIRA items directly from the synchronized item in QAComplete, enter the location of your
JIRA instance and the custom field that you defined in QAComplete to hold the JIRA Id in Syn-
chronized item URL pattern. Use the Custom Field number preceded by "Custom" as "Cus-
tomX"
Example: http://myteam.atlassian.com/browse/{Custom2}.
The service will use the pattern to generate proper links to each synchronized JIRA item.
Click Test Connection to verify the credentials.
Configuring JIRA Connection Settings
On the JIRA tab of the Synchronization Profile Properties dialog, specify the JIRA database that you want to synchronize
with QAComplete:
Page 15 of 29
2015 SmartBear Software, All Rights Reserved. Visit us at www.smartbear.comALMComplete | QAComplete User's Guide
1. In Rest host, change [jira server host] to your JIRA server.
2. In User name and Password, enter the name and password for user account used to access and
update JIRA items.
3. If you connect to your JIRA server through a proxy, click Proxy Settings and configure the proxy
settings in the resulting dialog:
l No proxy - Select this option to connect to your JIRA server directly.
l Use system proxy settings - Select this option to connect to your
JIRA server through the proxy configured for your operating system.
You can find the proxy and proxy settings in the Local Area Network
(LAN) Settings dialog. (Open Internet Explorer and click Tools | Inter-
net options | Connections | LAN settings.)
l Custom proxy - Select this option to set the proxy server that you want
to use manually:
In Proxy address, specify the network name or IP address and
(optionally) the port of the proxy server you use to connect to your
JIRA server. For example, 192.168.100.50:8888.
If your proxy server requires authentication, enter the user name
and the password to connect to the proxy server.
Page 16 of 29
2015 SmartBear Software, All Rights Reserved. Visit us at www.smartbear.comALMComplete | QAComplete User's Guide
l Click OK to save the changes and close the dialog.
4. In the Project drop-down list, select the JIRA project that you want to integrate with the QACom-
plete project. The list contains all JIRA projects that the specifiied user has access to.
5. In Item type, select the type of JIRA issues you want to synchronize with the specified QAComplete
items.
6. In Item data culture, leave the default locale of "en-US".
Click Test Connection to verify the credentials.
Synchronizing Item Fields and Values
On the Field Mapping tab of the Synchronization Profile Properties dialog, you set up synchronization rules for each
individual field. These rules define what the service copies from specific fields in one system to corresponding fields in the
other.
Notes:
l Make sure you know of all required fields in both QAComplete items and in JIRA issues. You
need to map all required fields for a successful synchronization
l If you have synchronization rules set in QAC - JIRA Connector version prior to version 1.2, you
may get the "Some fields in Field Mapping are not supported by JIRA service" warning.
This happens because earlier versions of the tool used JIRA SOAP service to work with JIRA.
Starting from version 1.2, the tool uses the JIRA REST service. The format of issue fields the
JIRA REST service uses may differ from the format the JIRA SOAP service uses. As a result,
some fields in your field mapping may be missing. Please check your field mapping and fix the
missing fields.
Synchronizing Fields
1. In the table, click in an ALM/QAComplete Field cell to open a drop-down list of fields. Select the
desired field to synchronize with the corresponding data in JIRA. You can set synchronization rules
for both the built-in and custom fields.
2. Click in the JIRA Field cell to open the drop-down list of JIRA fields for the selected item type.
Select the field that corresponds to the QAComplete field.
Page 17 of 29
2015 SmartBear Software, All Rights Reserved. Visit us at www.smartbear.comALMComplete | QAComplete User's Guide
Note: If you change the JIRA item type, the JIRA Field column will be cleared and you need to
reconfigure the field mapping.
3. In the Field Type column, choose the type of the QAComplete field.
l For lookup fields (fields that take values defined in a choice list), choose
the Lookup field type. (See below.)
l For fields that store information on a user, for example, AssigneeUserId,
choose the User field type.
Note: In order for the service to copy information on users properly, first
synchronize the account information. See "Synchronizing Users" on
page 22
l For fields, that store information on the item status, priority and res-
olution, choose the Status Lookup, Priority Lookup or Resolution
Lookup types. (See below.)
l For JIRA fields that accept multiple string values (for example, the
Labels field), choose the String Array field type. The service will copy
values from JIRA to QAComplete as string values separated by a
comma.
l For JIRA fields that accept multiple predefined values (for example, the
Component/s field), choose the Lookup Array field type. (See
below.)
Important: Make sure that the selected field type can be converted to the appropriate JIRA field
type explicitly.
Page 18 of 29
2015 SmartBear Software, All Rights Reserved. Visit us at www.smartbear.comALMComplete | QAComplete User's Guide
4. Map the QAComplete custom field for the JIRA Key using the custom field ID such as Custom1 to
the Jira Key field.
5. Continue in the next row, selecting corresponding fields to map.
Synchronizing Status, Priority and Resolution Fields
If the field to be synchronized contains the status, priority or resolution, set the mapping rules for each possible value:
1. In the ALM/QAComplete Field, select the field that holds the item status, priority, or resolution.
2. In the JIRA Field, select the field that corresponds to that QAComplete field.
3. In the Field Type, choose the Status Lookup, Priority Lookup, or Resolution Lookup field
type.
4. Click in the ALM/QAComplete Value cell to open the list of possible item statuses (or priorities, or
resolutions) in QAComplete. Select the needed value.
Page 19 of 29
2015 SmartBear Software, All Rights Reserved. Visit us at www.smartbear.comALMComplete | QAComplete User's Guide
5. Click in the JIRA Value column to open the list of item statuses (or priorities, or resolutions) in JIRA.
Select the value that corresponds to the value in QAComplete.
Synchronizing Lookup Fields
If a field to be synchronized is a lookup field (values are defined in a choice list), set the mapping rules for each value:
1. On the Field Mapping tab page, select the lookup field.
2. In the ALM/QAComplete Value column, enter a value from the choice list in QAComplete.
Page 20 of 29
2015 SmartBear Software, All Rights Reserved. Visit us at www.smartbear.comALMComplete | QAComplete User's Guide
3. In the JIRA Value column, for each value, set the corresponding value used in JIRA.
Synchronizing Lookup Array Fields
If a field to be synchronized is a multi select field in JIRA (accepts multiple predefined values), set the mapping rules for each
value:
1. On the Field Mapping tab page, select the lookup array field.
2. Click in the JIRA Value cell to open the drop-down list of available values. Select the needed value.
Page 21 of 29
2015 SmartBear Software, All Rights Reserved. Visit us at www.smartbear.comALMComplete | QAComplete User's Guide
3. In the ALM/QAComplete Value column, enter the corresponding value used in QAComplete.
The service will copy the values from JIRA to QAComplete as string values separated with comma.
Synchronizing Users
On the User Mapping tab of the Synchronization Profile Properties dialog, you associate user accounts in QAComplete
with JIRA user accounts. It enables the service to synchronize fields that hold information on users.
1. In the User Mapping table, click in the ALM/QAComplete Account cell and select an email
address of an QAComplete user account from the drop-down list.
Page 22 of 29
2015 SmartBear Software, All Rights Reserved. Visit us at www.smartbear.comALMComplete | QAComplete User's Guide
2. Click in the JIRA Account cell and select the JIRA user that you want to associate with the QACom-
plete user. The list contains the users that have access to the specified JIRA project.
After you link the user accounts, synchronize the fields that holds user information:
1. Open the Field Mapping page.
2. In the ALM/QAComplete Field column, select the field that holds the information on the QACom-
plete user.
3. In the JIRA Field column, select the field that holds the information on the JIRA user.
Page 23 of 29
2015 SmartBear Software, All Rights Reserved. Visit us at www.smartbear.comALMComplete | QAComplete User's Guide
4. In the Field Type column, choose the User field type.
Synchronizing Workflows
A workflow defines what stages an item passes during its lifecycle in the system. You can synchronize your QAComplete
workflow with JIRA workflow so that when an item transfers to a new state in one system, it automatically transfers to the
appropriate state in another system.
To synchronize workflow, first you must export the workflow from JIRA. See Exporting JIRA Workflow.
The JIRA Workflow tab of the Synchronization Profile Properties dialog displays the imported JIRA workflow.
Page 24 of 29
2015 SmartBear Software, All Rights Reserved. Visit us at www.smartbear.comALMComplete | QAComplete User's Guide
Important: To view the JIRA workflow, upload the workflow data first. Click Load JIRA Workflow and browse for the
exported XML file storing the JIRA workflow. You can also load the workflow data in the Add Synchronization Profile dialog
when you create a new profile.
To synchronize your QAComplete workflow with your JIRA workflow, synchronize the statuses the item can have:
1. Open the Field Mapping page. The page defines synchronization rules for the fields.
2. In the ALM/QAComplete Field column, select the field that holds the item status in QAComplete.
3. In the JIRA Field column, for that field, set the field that holds the item status in JIRA.
Page 25 of 29
2015 SmartBear Software, All Rights Reserved. Visit us at www.smartbear.comALMComplete | QAComplete User's Guide
4. In the Field Type column, choose the Status Lookup field type.
5. Click in the ALM/QAComplete Value cell to open the list of item statuses in QAComplete. Select a
status.
Page 26 of 29
2015 SmartBear Software, All Rights Reserved. Visit us at www.smartbear.comALMComplete | QAComplete User's Guide
6. Click in the JIRA Value cell to open the list of item statuses in JIRA. Select the item status that cor-
responds to the item status in QAComplete.
Configuring the Synchronization Intervals
To configure when and how often the service will connect to databases and synchronize items:
l In QAComplete - JIRA Connector Configuration Tool, click Service Settings.
l In the Service Settings dialog, set the interval (in minutes) for the service to perform the syn-
chronization.
l Use the Period Start Time and Period End Time to set the period during which the service will be
active.
Viewing Synchronization Logs
To view synchronization logs, go to the Synchronization Log tab from the main window of the QAComplete - JIRA
Connector Configuration Tool.
Page 27 of 29
2015 SmartBear Software, All Rights Reserved. Visit us at www.smartbear.comALMComplete | QAComplete User's Guide
The page lists all synchronization events that occurred for profile selected in the Synchronization Profiles list. Check the
status column to see whether the synchronization event passed or failed.
To update the log, click Refresh log data.
To view synchronization actions performed during a specific time period, set the From and To dates. To remove the filter, click
Clear filter.
To view information only for the most recent synchronization action, select View last synchronization only.
To export the log to review and save it outside of the QAComplete - JIRA Connector Configuration Tool:
l Click Export Log.
l Specify the path and file name for the exported log.
l The service will export the log data to a .log file in the specified folder.
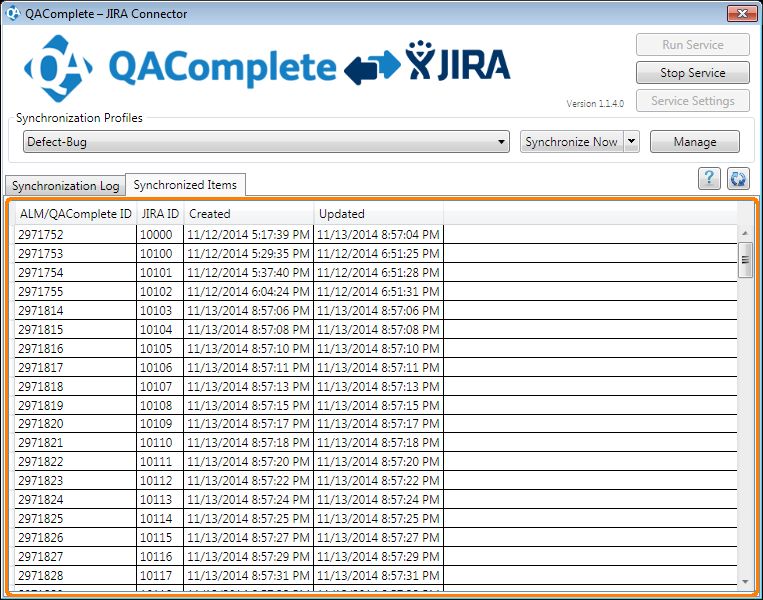
To view information on synchronized items, switch to the Synchronized Items tabbed page.
Page 28 of 29
2015 SmartBear Software, All Rights Reserved. Visit us at www.smartbear.comALMComplete | QAComplete User's Guide
The page lists all QAComplete items synchronized with appropriate JIRA issues by ID.
Working With Synchronized Items
In QAComplete, items synchronized with JIRA issues are marked with the Synchronized with note and a link to open the item in
JIRA.
You configure the link in the synchronization tool (See Configuring URL Pattern).
Important: The link is available only if the initial synchronization between JIRA and QAComplete was completed successfully.
(Examine the log to review the synchronization status.)
Click the link to open the item directly in JIRA.
Page 29 of 29
2015 SmartBear Software, All Rights Reserved. Visit us at www.smartbear.comYou can also read