Blackboard Learn+ Deployment Guide
←
→
Page content transcription
If your browser does not render page correctly, please read the page content below

Deployment Guide

Blackboard Learn+
+
Blackboard Learn Deployment Guide

TABLE OF CONTENTS

1     Introduction ............................................................................................................................................ 4

2     Deployment Guide Overview ................................................................................................................. 4

    2.1       Blackboard Server Roles .............................................................................................................. 5

3     Prerequisites and Assumptions ............................................................................................................. 5

4     Basic Configuration ................................................................................................................................ 6

5     Required Features ................................................................................................................................. 7

    5.1       Cookie Persistence Template ....................................................................................................... 7

    5.2       IP-Source NAT Template .............................................................................................................. 8

    5.3       HTTP Health Monitor .................................................................................................................... 8

6     Acceleration, Security and Optional Optimization Features ................................................................ 10

    6.1       aFleX HTTP-to-HTTPS Redirect Script ...................................................................................... 10

    6.2       Blackboard Security with Transparent SSL Encryption .............................................................. 11

      6.2.1       SSL Certificate ........................................................................................................................ 12

      6.2.2       HTTP Redirect-Rewrite ........................................................................................................... 13

      6.2.3       aFleX Script To Rewrite Absolute Links .................................................................................. 14

    6.3       RAM Caching .............................................................................................................................. 15

    6.4       Connection Reuse ....................................................................................................................... 17

    6.5       HTTP Compression ..................................................................................................................... 18

7     Load Balancing Configuration .............................................................................................................. 19

    7.1       Server Configuration ................................................................................................................... 19

    7.2       Service Group Configuration ....................................................................................................... 21

    7.3       Virtual Server Configuration ........................................................................................................ 22

8     Binding Features to the VIP ................................................................................................................. 24

    8.1       HTTPS Virtual Service Feature Templates ................................................................................. 25

                                                                                                                                                               2
+
Blackboard Learn Deployment Guide

    8.2       HTTP Virtual Service Feature Templates ................................................................................... 26

    8.3       Alternative Configuration Using HTTP Access ........................................................................... 26

9     Conclusion ........................................................................................................................................... 27

10         Appendix ......................................................................................................................................... 28

    10.1      AX System Configuration ............................................................................................................ 28

    10.2      Alternative Configuration Using HTTP Only (No SSL Option) .................................................... 30

                                                                                                                                                              3
+
Blackboard Learn Deployment Guide

1   INTRODUCTION

                     +
The Blackboard Learn System is a powerful learning and knowledge transfer environment that benefits
                                                                                             +
students, faculty and campus Information Technology (IT) administrators. The Blackboard Learn System
makes online learning environments easier to manage and administer. The Blackboard solution has been
in existence for many years and has been deployed by many academic institutions throughout the world.

2   DEPLOYMENT GUIDE OVERVIEW

                                                                  +
This deployment guide shows how to optimize a Blackboard Learn deployment by adding an
A10 Networks Application Delivery Controller (ADC) AX Series device. The Blackboard solution is based
on a multi-server installation of 64-bit Microsoft Windows 2008 Servers, with an A10 Networks AX Series
deployed in front of the servers. The tested Blackboard solution is based on the "Advanced" sizing
                                                                                        +
category as described in the Blackboard document "Configurations for Blackboard Learn Release 9.1".

The Advanced sizing configuration is designed for high-availability and high-performance deployments.
The following diagram shows the network architecture used to test deployment of the AX Series for
optimizing the Blackboard solution.

                                                                                                          4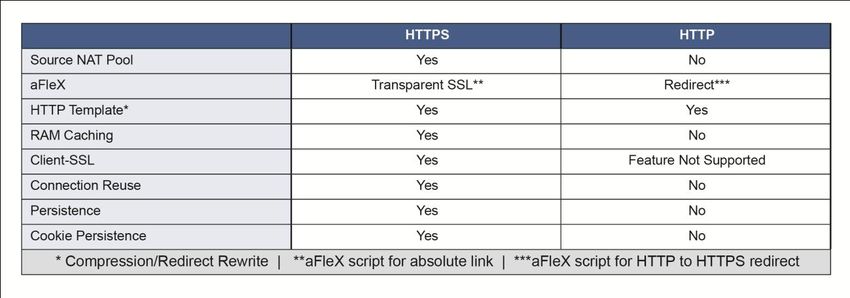
+
Blackboard Learn Deployment Guide
Figure 1: Blackboard deployment overview
2.1 BLACKBOARD SERVER ROLES
Blackboard servers can be deployed to fulfill the following roles:
CS - Collaboration Server – Dedicated server that provides users the ability to use video and
audio conferencing.
AD - Active Directory – Deployment in which all Blackboard servers must be joined in a domain
and in Active Directory Domain Services (ADDS).
+
DB - Database – Server that provides database services for the Blackboard Learn System. The
following information is stored in the database: student credentials, class information, schedule
information, and so on.
+
AS - Application Servers – Server pool on which the core Blackboard Learn System is
installed. The application server contains features such as course management, calendaring,
module management, and so on.
+
For additional deployment information for Blackboard Learn , refer to the following documents:
+
Blackboard Learn 9.1 Installation Guide
+
Blackboard Learn 9.1 Performance Optimization Guide
+
Blackboard Learn 9.1 Release notes
3 PREREQUISITES AND ASSUMPTIONS
Testing of the solution in this deployment guide was based on the following requirements and lab setup:
The A10 Networks AX Series ADC must be running version 2.6.x or higher.
+
The Blackboard Learn 9.1 application was tested and deployed on Windows 2008 (64-bit)
Enterprise Edition Server Operating System.
Microsoft SQL Server 2008 R2 was installed.
Java SE Development Kit (JDK) and Java Runtime Environment (JRE) are required on the
+
application servers. For additional information about the requirements, refer to Blackboard Learn
9.1 Installation Guide.
5
+
Blackboard Learn Deployment Guide
The AX series was deployed in One-Arm Mode configuration. For details about other deployment
modes, refer to the following: http://www.a10networks.com/elearning/002-Four_SLB_Modes.php
Blackboard clients used in the testing were running the 64-bit Windows 7 Ultimate Operating
System.
The Blackboard application was tested with:
Microsoft Internet Explorer Version 9
Mozilla Firefox Version 8
4 BASIC CONFIGURATION
This chapter explains how the AX Series is deployed to use the AX Series to load balance the Blackboard
+
Learn 9.1 Application Servers. This covers detailed instructions to configure real servers, service group,
virtual services, and virtual servers in a basic functional Blackboard setup.
Note: The following configuration will work for Windows and Unix installation load balanced as described
+
in Blackboard Learn 9.1 Installation Guide.
Figure 2: Basic setup overview
The basic setup configuration is the simplest functional solution using the AX Series device to load
balance Blackboard traffic. AX features such as Source-IP NAT, Health Monitoring, and Cookie
Persistence can improve Blackboard Application Server performance, uptime and scalability.
As stated on page 64 in the Blackboard setup guide, "session affinity must be based on the user's
cookie". In the AX feature set, Cookie-based persistence is synonymous with Cookie-based session
affinity (Blackboard terminology). Cookie-based persistence inserts a cookie into the HTTP header of the
server reply to a client. This ensures that subsequent requests from the client will be sent to the same
server or port. In this deployment guide, A10 Networks recommends the use of server-based persistence.
The AX Series offers advanced health monitoring for Blackboard Application Servers. The AX Series can
be programmed to monitor different protocols such as HTTP, HTTPS, FTP and more. (For more
information, refer to the AX Series Graphical User Interface Reference.)
6
+
Blackboard Learn Deployment Guide
The Source-IP NAT feature is required when the AX Series is deployed in One-Arm mode, where the AX
Series Source NAT subnet must be the same as the Blackboard server subnet.
5 REQUIRED FEATURES
Blackboard deployment requires the following AX features:
Cookie-persistence template
Source-IP NAT pool
Health monitor
5.1 COOKIE PERSISTENCE TEMPLATE
To configure Cookie Persistence in the AX Series:
1. Navigate to Config Mode > Service > Template > Persistent > Cookie Persistence.
2. Click Add.
3. Enter the following information:
Name: "bbcookie"
Expiration: Select the checkbox and enter "31536000".
Cookie Name: "bbcookie"
Match Type: Select the checkbox and select "Server” from the drop-down list.
Figure 3: Cookie-persistence template
7
+
Blackboard Learn Deployment Guide
Note: The Match Type option ensures that requests from a particular user land on the same Blackboard
Application Server.
4. Click OK, then click Save to save the configuration.
5.2 IP-SOURCE NAT TEMPLATE
To create an IP Source NAT template:
1. Navigate to Config Mode > Service > IP Source NAT > IPv4 Pool.
2. Click Add.
3. Enter the following information:
Name: “SourceNAT”
Start IP Address: "172.16.1.22"
End IP Address: “172.16.1.22"
Netmask: "255.255.255.0"
Figure 4: Source NAT pool
4. Click OK, then click Save to save the configuration.
Note: For One-Arm mode deployments, IP-Source NAT must use the same subnet as the Blackboard
Application Servers.
5.3 HTTP HEALTH MONITOR
To configure an HTTP health monitor:
1. Navigate to Config Mode > Service > Health Monitor > Health Monitor.
8
+
Blackboard Learn Deployment Guide
2. Click Add.
3. Enter the following Name: "bbhc"
Figure 5: Health monitor
4. In the Method section, enter or select the following information:
Type: "HTTP"
Port: "80"
Expect: Enter “200” and select the Code checkbox.
Figure 6: Health monitor method
5. Click OK, then click Save to save the configuration.
9+
Blackboard Learn Deployment Guide
6 ACCELERATION, SECURI TY AND OPTIONAL OPTIMIZATION FEATURES
This section explains how to configure acceleration and optimization features using templates, which can
be applied to HTTP/HTTPS virtual services. The Blackboard deployment uses the following AX Series
acceleration and optimization features:
aFleX scripting tool for creating HTTP-to-HTTPS redirect script
Blackboard Security with Transparent SSL Encryption
RAM Caching
Connection Reuse
HTTP Compression
6.1 AFLEX HTTP-TO-HTTPS REDIRECT SCRIPT
The aFleX Scripting tool enables advanced, highly-flexible and efficient Layer 7 traffic management.
Using an aFleX script to redirect HTTP to HTTPS enables the Blackboard server HTTP (unsecure) traffic
to be redirected to HTTPS (secure). This provides added security to the Blackboard application servers.
To configure the aFleX script in the AX GUI:
1. Navigate to Config Mode > Service > aFleX.
2. Click Add.
3. Enter the Name "redirect".
4. Enter the aFleX script in the Definition field.
a. Note: You can copy-and-paste it from this document!
when HTTP_REQUEST {
HTTP::respond 302 Location https://[HTTP::host][HTTP::uri]
}
10+
Blackboard Learn Deployment Guide
Figure 7: aFleX script
5. Click OK, then click Save to save the configuration.
6.2 BLACKBOARD SECURITY WITH TRANSPARENT SSL ENCRYPTION
This section describes how to secure the Blackboard solution with the AX Series. Since the Blackboard
solution does not support HTTPS traffic, Blackboard security can be enhanced with transparent SSL
encryption. The AX Series can enhance client access by enabling HTTPS/SSL traffic for incoming
requests.
The following features will secure the Blackboard Application Servers and should be implemented in
every Blackboard deployment to secure communication between client and server.
+ +
Note: On page 85 of the Blackboard Learn Setup Guide states that the Learn system does not
support "SSL acceleration" or "SSL offload" feature. A10 Networks has a workaround to enable
the Blackboard limitations with the following instructions.
Figure 8: Securing Blackboard servers
11+
Blackboard Learn Deployment Guide
6.2.1 SSL CERTIFICATE
The following procedure creates a self-signed certificate on the AX device. The certificate will be
presented to users who send requests to the Blackboard Application Server.
Notes:
The following procedure describes how to create a self-signed certificate. The AX Series also
supports import of certificates signed by a Certificate Authority (CA). A CA-signed certificate
allows users to quickly verify that the website visited is operated by someone listed in the domain
registration contact information.
There are some disadvantages to using a self-signed certificate, as users may disregard the
manual verification and acceptance process, and perhaps disregard the website if the self-signed
certificate comes from an unknown source. Typically, self-signed certificates are often used in lab
or test environments.
The procedure provides only sample values for the common name and other identification
information. When creating the certificate, make sure to use the values that apply to your
organization.
To create a self-signed certificate:
1. Navigate to Config Mode > Service > SSL Management > Certificate.
2. Enter or select the following information:
File Name: “BBCert”
Issuer: "Self"
Common Name: "www.example.com"
Organization: "www.example.com"
State: "CA"
Email Address: "admin@example.com"
Key Size: "1024"
12+
Blackboard Learn Deployment Guide
Figure 9: SSL certificate configuration
3. Click OK, then click Save to save the configuration.
To apply the SSL Certificate:
1. Navigate to Config Mode > Service > Template > SSL > Client SSL.
2. Click Add.
3. Enter or select the following information:
Name: "BB-SSL"
Certificate Name: "BBCert"
Key Name: "BBCert"
4. Click OK, then click Save to save the configuration.
6.2.2 HTTP REDIRECT-REWRITE
The following procedure configures an HTTP application template to redirect HTTP requests to HTTPS
requests.
1. Navigate to Config Mode > Template > Application > HTTP.
2. Click Add.
13+
Blackboard Learn Deployment Guide
3. Enter the Name "redirectrewrite".
4. Click the down arrow next to Redirect Rewrite to display the configuration section shown below.
5. Next to HTTP Rewrite, select Enable and enter “443”.
Note: The Pattern and Redirect To fields rewrite the matching URL string (Pattern) to the specified value
(Redirect To) before sending the redirects to clients. This is optional.
Figure 10: Redirect-rewrite configuration
6. Click OK, then click Save to save the configuration.
6.2.3 AFLEX SCRIPT TO REW RITE ABSOLUTE LINKS
This feature transparently converts an HTTP web application to HTTPS. To configure the rewrite of
absolute links, create an aFleX script as follows:
1. Navigate to Config Mode > Service > aFleX.
2. Click Add.
3. Enter the Name "transparentssl".
4. In the Definition field, enter the following script. Make sure to use your Blackboard domain name
where indicated instead of “www.example.com”, as explained below.
Note: This script is also available on the A10 Networks VirtualADC website (a username and password
are required to access the site):
,.
# Force servers to not reply with compression.
# (Compression can be enabled on the AX device.)
when HTTP_REQUEST { HTTP::header remove Accept-Encoding
}
# Collect HTTP response if the response time is text-based.
when HTTP_RESPONSE {
if { [HTTP::header "Content-Type"] starts_with "text" } {
HTTP::collect
14+
Blackboard Learn Deployment Guide
}
}
# Rewrite absolute links. Replace www.example.com with your
# organization’s domain name.
when HTTP_RESPONSE_DATA {
set payload_length [HTTP::payload length]
HTTP::payload replace 0 $payload_length [string map
{"http://www.example.com" "https://www.example.com "} [HTTP::payload]]
HTTP::release
}
Note: Make sure to replace the domain name in the example with your Blackboard domain. In the
example above, the domain used is “www.example.com".
5. Click OK, then click Save to save the configuration.
6. After configuring the HTTPS service (later in this guide), you can apply this aFleX script to it.
(Refer to Load Balancing Configuration and Binding Features to the VIP.)
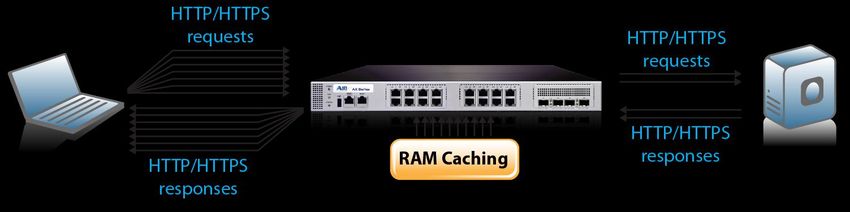
6.3 RAM CACHING
RAM Caching is an AX feature that stores dynamic and static HTTP/HTTPS objects in the AX Series
random-access memory (RAM). The HTTP objects are cached following the initial HTTP request.
Subsequent client requests for the same objects are served from the AX device’s RAM cache. This
provides faster client download for HTTP/HTTPS objects and improves Blackboard Application Server
performance and scalability. RAM Caching also cuts down on the time required to transfer HTTP/HTTPS
objects, such as Blackboard images, JavaScript and CSS style sheets.
Figure 11: RAM Caching feature
To create a RAM Caching template:
1. Navigate to Config Mode > Service > Template > Application > RAM Caching.
2. Click Add.
15+
Blackboard Learn Deployment Guide
3. Enter or select the following values:
Name: "ramcache"
Default Policy No-Cache
Note: Use default values for the other options.
Figure 12: RAM Caching template
4. In the Policy section, enter or select the following values:
URI: portion of the URI string on which to match
Action: Select the cache option
Duration: Cache content age field
5. Click Add.
Figure 13: RAM Caching policy
6. Click OK, then click Save to save the configuration.
16+
Blackboard Learn Deployment Guide
6.4 CONNECTION REUSE
This section describes the AX Connection Reuse feature and how to configure it. Connection Reuse
reduces the overhead associated with TCP connection setup, by establishing TCP connections with
Blackboard Application Servers and then reusing those connections for multiple client requests.
Connection Reuse significantly increases the responsiveness of the Blackboard Application Servers. This
results in better Blackboard server performance and in improved scalability for production infrastructures.
Figure 14: Connection Reuse feature
To configure a Connection Reuse Template:
1. Navigate to Config Mode > Service > Template > Application > Connection Reuse.
2. Click Add.
3. Enter the Name “connectionreuse”.
Figure 15: Connection Reuse template
4. Click OK, then click Save to save the configuration.
17+
Blackboard Learn Deployment Guide
6.5 HTTP COMPRESSION
HTTP Compression provides bandwidth optimization by compressing HTTP/HTTPS objects served by
Blackboard Application Servers before forwarding those objects to clients. The advantage of this feature
is that clients need less bandwidth, and thus experience faster download of the HTTP/HTTPS objects.
The AX Series offers various levels of compression, ranging from 1 to 9. Level 1 compression offers the
lowest compression ratio whereas level 9 offers the highest compression ratio. For optimum compression
performance, level 1 is recommended.
Figure 16: HTTP Compression feature
To enable HTTP compression:
Note: This procedure modifies the existing template called "redirectrewrite" as referred to in section
6.2.2 HTTP Redirect-Rewrite.
1. Navigate to Config Mode > Service > Template > Application > HTTP.
2. Click "redirectrewrite"
3. Click the down arrow next to “Compression” to display the configuration section shown below.
4. Select Enabled next to Compression.
5. Make sure the Level is set to 1 (least compression, fastest).
Figure 17: HTTP template (compression options)
6. Click OK, then click Save to save the configuration.
18+
Blackboard Learn Deployment Guide
7 LOAD BALANCING CONFIGURATION
This section of the deployment guide explains how to configure load balancing for the Blackboard
Application Servers. Basic load balancing consists of the following configuration resources:
Servers (also called “real servers”) – The Blackboard Application Servers.
Service Group – The pool of real servers. A service group contains a set of real servers from
which the AX device can select to service client requests. A service group supports multiple real
Blackboard Application Servers as one logical Application Server.
Virtual Server (also called a virtual IP or “VIP”) – The single virtual device to which clients will
send Blackboard requests.
Virtual Service (also called “virtual port”) – The protocol port on the VIP to which clients send
Blackboard requests. In this deployment guide, the virtual services are HTTP (port 80) and
HTTPS (port 443). The features configured in the previous sections can be applied to these
virtual services.
Load-balancing configuration overview:
1. Configure the servers.
2. Add the servers to a service group.
3. Bind the service group to a virtual server. Add the virtual services to the virtual server and apply
features to the virtual services.
7.1 SERVER CONFIGURATION
To configure the real servers (Blackboard Application Servers):
1. Navigate to Config Mode > Service > SLB > Server.
2. Click Add.
3. In the General section, enter the following information:
Name: “AS1”
IP Address/Host: “172.16.1.4”
19+
Blackboard Learn Deployment Guide
Figure 18: Server configuration
4. In the Port section, enter or select the following values:
Port: “80”
Protocol: “TCP”
5. Click Add.
Note: Enter additional servers if necessary.
Figure 19: Server port configuration
6. Click OK, then click Save to save the configuration.
20+
Blackboard Learn Deployment Guide
7.2 SERVICE GROUP CONFIGURATION
To configure the service group:
1. Navigate to Config Mode > Service > SLB > Service Group.
2. Click Add.
3. In the General section, enter or select the following information:
Name: “80”
Type: “TCP”
Algorithm: “Least Connection”
Health Monitor: "bbhc"
Note: By default, the AX device uses the ICMP (ping) method to test server availability. An additional
health monitor is used to test the availability of the TCP or UDP port. Instead of the default TCP health
monitor, this deployment uses the HTTP health monitor ("bbhc") configured in HTTP Health Monitor. For
more information on AX health monitoring options, refer to the AX Series Application Delivery and Server
Load Balancing Guide.
Figure 20: Service group configuration
4. In the Server section, add the servers:
a. Select “AS1” from the Server drop-down list.
b. Enter “80” in the Port field.
c. Click Add.
21+
Blackboard Learn Deployment Guide
d. Repeat for each server. In the example shown below, two servers, “AS1” and “AS2”, are
added to the service group.
Figure 21: Service group configuration (2)
5. Click OK, then click Save to save the configuration.
7.3 VIRTUAL SERVER CONFIGURATION
To configure the virtual server (VIP):
1. Navigate to Config Mode > Service > SLB > Virtual Server.
2. Click Add.
3. In the General section, enter or select the following information:
Name: “BBAS”
IP Address or CIDR Subnet: “172.16.1.15”
22+
Blackboard Learn Deployment Guide
Figure 22: Virtual server configuration
4. In the Port section, click Add to display Virtual Server Port configuration page.
5. For HTTP-to-HTTP traffic:
a. Enter or select the following values:
o Type: “HTTP”
o Port: “80”
o Service Group: “80”
b. Click Add.
Figure 23: Virtual server configuration (HTTP port)
23+
Blackboard Learn Deployment Guide
6. For HTTPS-to-HTTP traffic (optional; see note below):
a. In the Port section of the Virtual Server configuration page, click Add.
b. Enter or select the following values instead:
o Type: “HTTPS”
o Port: “443”
o Service Group: “80”
c. Click Add.
Note: Configuring an HTTPS port on the virtual server is optional, but is needed if a redirect from HTTP-
to- HTTPS is configured, as described in the earlier section. This is also needed if direct HTTPS access
is required. Adding a front-end HTTPS virtual server will minimize the need for users to guess whether the
site is accessed through either HTTP or HTTPS. This optional HTTPS port provides HTTPS with no
redirect.
Figure 24: Virtual server configuration (HTTPS port)
7. Click OK, then click Save to save the configuration.
8 BINDING FEATURES TO THE VIP
In previous sections of this deployment guide, the following types of resources were configured for the
HTTPS and HTTP virtual services:
NAT pool
aFleX scripts
24+
Blackboard Learn Deployment Guide
Feature templates
The following matrix lists these resources and the virtual service type to which they apply (for installations
not using the SSL option please refer to section 8.3).
Figure 25: Virtual service matrix
You can apply these resources as applicable to the HTTP and HTTPS virtual services created in Virtual
Server Configuration.
To apply a configuration resource to a virtual service:
1. Navigate to Config Mode > Service > SLB > Virtual Service.
2. Click on the virtual service. The service names include the virtual server IP address (VIP), the
service type, and the port number.
3. Select the resource from the applicable drop-down list.
4. Click OK, then click Save to save the configuration.
For example, to apply HTTP template “redirectrewrite” to the HTTP virtual service:
1. Navigate to Config Mode > Service > SLB > Virtual Service.
2. Click on “_172.16.1.15_HTTP_80” in the Name column.
3. Select “redirectrewrite” from the HTTP Template drop-down list.
4. Click OK, then click Save to save the configuration.
8.1 HTTPS VIRTUAL SERVICE FEATURE TEMPLATES
This example shows selection of all the resources configured for the HTTPS virtual service.
25+
Blackboard Learn Deployment Guide
Figure 26: HTTPS virtual service features
8.2 HTTP VIRTUAL SERVICE FEATURE TEMPLATES
This example shows selection of all the resources configured for the HTTP virtual service.
Figure 27: HTTP virtual service features
8.3 ALTERNATIVE CONFIGURATION USING HTTP ACCESS
+
If a Blackboard administrator decides to deploy the Blackboard Learn solution in a simple HTTP
configuration, Figure 28 describes the virtual service features required for a non-secured HTTP VIP
configuration (no SSL). Feature templates must be created as needed using the "create…" option on the
drop-down menu or create feature templates first, then bind the features to the VIP. All feature
configurations are described in the above chapters on this deployment guide.
26+
Blackboard Learn Deployment Guide
Figure 28: Blackboard HTTP AX configuration
Note: HTTP Template will be used for compression feature only.
9 CONCLUSION
+
The deployment guide shows how a Blackboard Learn Solution can be optimized with the A10 Networks
AX Series Advanced Traffic Manager. By using the AX device to load balance Blackboard Application
Servers, the following key advantages are achieved:
More secure Blackboard environment by encryption of client communication to the Blackboard
Application Server using secured (HTTPS) connectivity
Improved server availability using transparent application load sharing across multiple Blackboard
Application Servers
Dynamic addition of new Application Servers to the Blackboard server pool
Continued availability even if a Blackboard Application Server fails, with no direct impact on
users’ access to the applications
Improved Blackboard performance throughput, faster user response time, and reduced
Blackboard Application Server CPU utilization, through implementation of the HTTP
Compression, Connection Reuse, and RAM Caching features
By deploying the AX Series Advanced Traffic Manager, significant benefits are achieved for all
+
Blackboard Learn users. For more information about AX Series products, please refer to the following
URLs:
http://a10networks.com/products/axseries.php
27+
Blackboard Learn Deployment Guide
http://a10networks.com/resources/solutionsheets.php
http://a10networks.com/resources/casestudies.php
10 APPENDIX
The appendix contains two sets of CLI configuration that have been shown in this deployment guide.
Section 10.1 shows a "full" configuration with SSL, while section 10.2 shows the configuration with HTTP
only (no SSL configured).
10.1 AX SYSTEM CONFIGURATION
Below is a CLI configuration based on the parameters entered in this deployment guide
Note: This config sample reflects the configuration parameters within Chapters 5 through
Chapter 8.
hostname BlackboardAX
clock timezone America/Los_Angeles
ip nat pool SourceNAT 172.16.1.22 172.16.1.22 netmask /24
health monitor bbhc
method http expect response-code 200
extended-stats
slb enable-l7-req-acct
slb server AS1 172.16.1.4
port 80 tcp
slb server AS2 172.16.1.5
port 80 tcp
slb service-group 80 tcp
method least-connection
health-check bbhc
member AS1:80
28+
Blackboard Learn Deployment Guide
member AS2:80
slb template connection-reuse connectionreuse
slb template cache ramcache
disable-insert-age
disable-insert-via
default-policy-nocache
policy uri /images/* cache
policy uri /javascript/* cache
policy uri /ui/* cache
policy uri /branding/* cache
slb template http redirectrewrite
insert-client-ip
compression enable
redirect-rewrite secure
slb template client-ssl BB-SSL
cert BBCert
key BBCert
slb template persist cookie bbcookie
name bbcookie
expire 31536000
match-type server
slb virtual-server BBAS 172.16.1.15
port 443 https
name _172.16.1.15_HTTPS_443
source-nat pool SourceNAT
service-group 80
template http redirectrewrite
template cache ramcache
29+
Blackboard Learn Deployment Guide
template client-ssl BB-SSL
template connection-reuse connectionreuse
template persist cookie bbcookie
aflex "transparent SSL"
port 80 http
name _172.16.1.15_HTTP_80
service-group 80
template http redirectrewrite
aflex redirect
end
10.2 ALTERNATIVE CONFIGURATION USING HTTP ONLY (NO SSL OPTION)
Below is a CLI configuration based on the alternative configuration using HTTP Access as referred on
Section 8.3 Alternative CONFIGURATION Using HTTP Access.
hostname BlackboardAX
clock timezone America/Los_Angeles
interface management
ip address 172.16.1.126 255.255.255.0
ip default-gateway 172.16.1.1
interface ethernet 1
ip address 172.16.1.12 255.255.255.0
ip nat pool SourceNAT 172.16.1.22 172.16.1.22 netmask /24
health monitor bbhc
method http expect response-code 200
extended-stats
slb enable-l7-req-acct
slb server AS1 172.16.1.4
30+
Blackboard Learn Deployment Guide
port 80 tcp
slb server AS2 172.16.1.5
port 80 tcp
slb service-group 80 tcp
method least-connection
health-check bbhc
member AS1:80
member AS2:80
slb template connection-reuse connectionreuse
slb template cache ramcache
disable-insert-age
disable-insert-via
default-policy-nocache
policy uri /images/* cache
policy uri /javascript/* cache
policy uri /ui/* cache
policy uri /branding/* cache
slb template http Compression
compression enable
slb template persist cookie bbcookie
name bbcookie
expire 31536000
match-type server
slb virtual-server BBAS 172.16.1.15
port 80 http
name _172.16.1.15_HTTP_80
source-nat pool SourceNAT
service-group 80
31+
Blackboard Learn Deployment Guide
template http Compression
template cache ramcache
template connection-reuse connectionreuse
template persist cookie bbcookie
no terminal auto-size
terminal width 80
terminal length 0
end
32You can also read