Base integrations Version 7.17 - Creatio Academy
←
→
Page content transcription
If your browser does not render page correctly, please read the page content below
Base integrations Version 7.17
This documentation is provided under restrictions on use and are protected by intellectual property laws. Except as
expressly permitted in your license agreement or allowed by law, you may not use, copy, reproduce, translate,
broadcast, modify, license, transmit, distribute, exhibit, perform, publish or display any part, in any form, or by any
means. Reverse engineering, disassembly, or decompilation of this documentation, unless required by law for
interoperability, is prohibited.

The information contained herein is subject to change without notice and is not warranted to be error-free. If you
find any errors, please report them to us in writing.

© 2021 Creatio. All rights reserved.
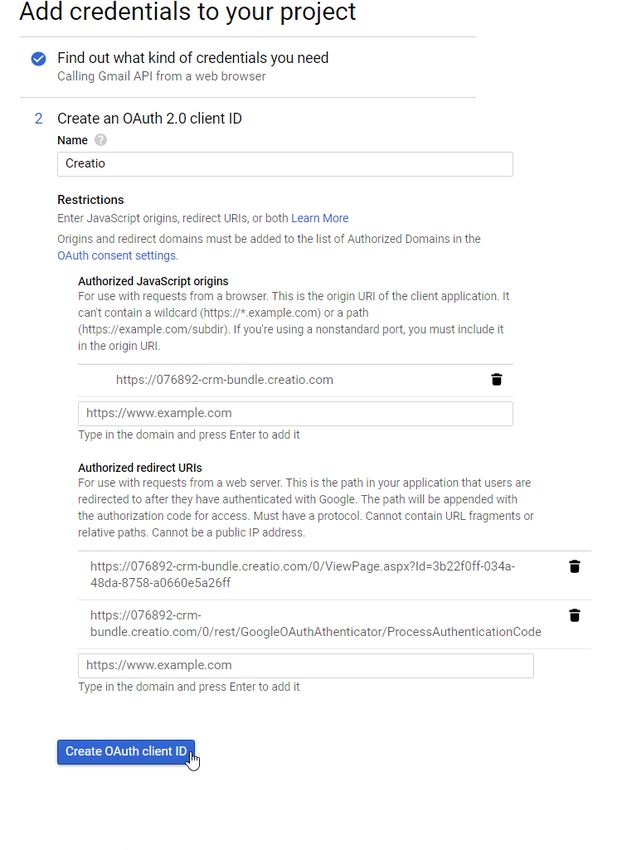
Table of Contents | 3

Table of Contents

Add IMAP/SMTP email provider                                                                               4
  Method 1. Add the IMAP/SMTP provider from the [Email] tab of the communication panel                     4
  Method 2. Add the IMAP/SMTP provider from the user profile                                               7
Set up the MS Exchange and Microsoft 365 services                                                          8
  Method 1. Add the provider from the [Email] tab of the communication panel                               9
  Method 2. Add the email provider from the user profile                                                  12
Synchronize contacts with MS Exchange and Microsoft 365                                                   13
  Set up the import of Exchange contacts to Creatio                                                       13
  Set up the export of Creatio contacts to Exchange                                                       14
  Synchronize contacts with MS Exchange and Microsoft 365                                                 14
Synchronize calendar with MS Exchange and Microsoft 365                                                   14
  Set up the import of Exchange activities to Creatio                                                     15
  Set up the export of Creatio activities to Exchange                                                     15
  Synchronize activities with MS Exchange and Microsoft 365                                               16
Set up OAuth authentication for MS Office 365                                                             16
Register Creatio application in Gsuite                                                                    17
  Set up an account and receive Google keys                                                               17
  Enter a Google key in Creatio                                                                           22
Synchronize contacts and activities with Google                                                           24
  Synchronize Creatio contacts with Google contacts                                                       25
  Synchronize Creatio activities with Google calendar                                                     26
Delete your Google account from Creatio                                                                   26
Set up chat                                                                                               26
  Add a chat queue                                                                                        27
  Add a chat channel                                                                                      28
  Set up the chat actions                                                                                 31
  Additional chat settings                                                                                32

© 2021 Creatio. All rights reserved.

Add IMAP/SMTP email provider | 4
Add IMAP/SMTP email provider
PRODUCTS: ALL CREATIO PRODUCTS
You can add an IMAP/SMTP email service provider using several methods.
Method 1. Add the IMAP/SMTP provider from the [Email] tab of
the communication panel
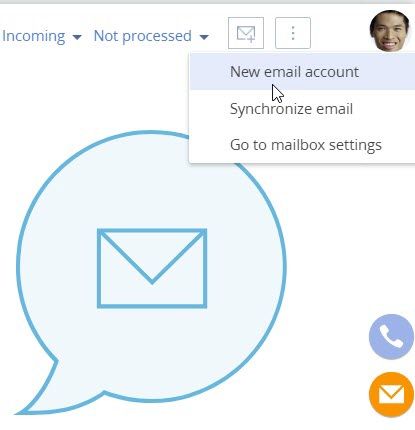
1. In the communication panel, click to open the [ Email ] tab.
2. Click and select the [ New email account ] action (Fig. 1).
Fig. 1 Adding a new email account
Note. You can also add a new email account by selecting [ Go to mailbox settings actions ] under
and clicking [ New ] on the page that opens.
3. Enter the email address in the displayed [ New email account ] window, and click [ Next ].
4. Click the Add New Server button.
Note. Add the domains of a new provider to the [ Email providers domains ] lookup to have Creatio
automatically identify this email provider in the future. As a result, users will not have to specify the mail
provider manually when setting up an email account.
© 2021 Creatio. All rights reserved.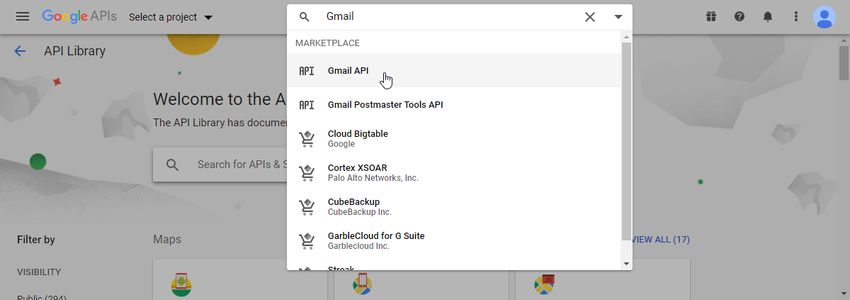
Add IMAP/SMTP email provider | 5

5. On the opened page, click [ Add ] (Fig. 2).

    Fig. 2 Adding a new email provider

6. On the page that opens, select “IMAP” in the [ Service type ] field.
7. Enter two required parameters: the “Inbound mail server (IMAP)” in the “imap@domain.com” format and the
    “Outgoing mail server (SMTP)” in the smtp@domain.com format (Fig. 3).

    Fig. 3 Setting up the IMAP/SMTP email service provider

© 2021 Creatio. All rights reserved.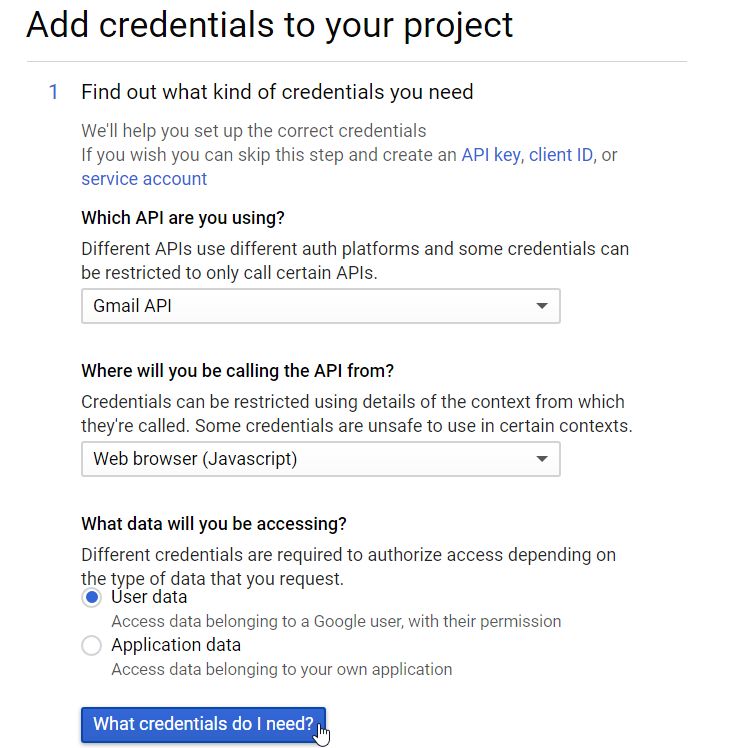
Add IMAP/SMTP email provider | 6

8. The rest of the IMAP/SMTP server settings will be populated automatically. You can change them by selecting
   the needed option from the drop-down list to configure the mail server port and the security parameters.
    Set the inbound mail server port:

    a. Select “143” to use the port without encryption.
    b. Select “993” to use the port for a secure connection.

    Set the security parameters of the inbound mail server:

    a. Select “SSL/TLS” to use the standard data security protocol.

    b. Select “STARTTLS” to use the common protocol extension.

© 2021 Creatio. All rights reserved.
Add IMAP/SMTP email provider | 7
c. Select “None” to disable the inbound mail data security.
Set the outgoing mail server port:
a. Select “587” to use the port without encryption.
b. Select “455” to use the port for a secure connection.
Set the security parameters of the outgoing mail server:
a. Select “SSL/TLS” to use the standard data security protocol.
b. Select “None” to disable the outgoing mail data security.
9. Specify additional settings.
Set up the mailbox login format:
a. Select the [ Use manual entry ] option if users enter their email address and username.
b. Select the [ Use email address ] option if the full email address is used as a login (for instance,
“example@google.com”).
c. Select the [ Use mailbox name ] option if the part of the email address before “@” is used as a username.
For example, the “test” will be a login for “test@google.com” email address.
Set up the authentication method:
a. Select “Basic” for the basic authentication using the user name and password with Base64 encryption.
b. Select “OAuth 2.0” to restrict the service access to protected user resources without the need to pass the
login and password. Populate the [ Application (client) ID ] and [ Client secret ] required fields. [ Application
(client) ID ] is generated by the authentication server of the mail service. The documentation and API may
refer to the application ID as “Product ID.” [ Client secret ] – a secret key generated by the authentication
server. The documentation and API may refer to the client secret as “Product key.”
10.Save the settings by clicking [ Apply ].
As a result, system users will be able to use the mailboxes of this provider to send and receive email
messages.
Method 2. Add the IMAP/SMTP provider from the user profile
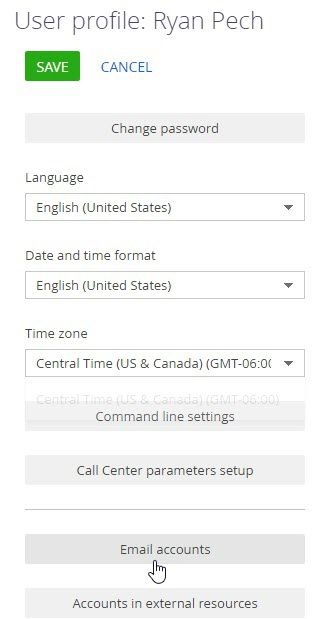
1. Open the user profile page by clicking the [ Profile ] image button on the main page of the application.
2. Click [ Email accounts ] (Fig. 1).
Fig. 1 Opening the email accounts
© 2021 Creatio. All rights reserved.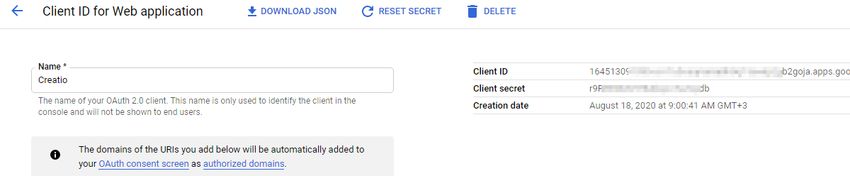
Set up the MS Exchange and Microsoft 365 services | 8

3. Click [ New ] in the opened window.
4. To complete the setup, perform steps 3– 10, described above in Method 1.

        Note. To delete a mail server, delete all its mailboxes (email accounts) first.

Set up the MS Exchange and Microsoft 365
services
PRODUCTS:         ALL CREATIO PRODUCTS

You can add an email service provider using several methods.

    Note. To set up connection parameters for email providers, a user must have the permission to run the
    [ Access to “Access rights” workspace ] (CanManageAdministration) system operation.
    Learn more about using system operations in the “System operation permissions” article.

© 2021 Creatio. All rights reserved.
Set up the MS Exchange and Microsoft 365 services | 9
Method 1. Add the provider from the [Email] tab of the
communication panel
1. In the communication panel, click to open the [ Email ] tab.
2. Click and select the [ New email account ] action (Fig. 1).
Fig. 1 Adding a new email account
Note. You can also add a new email account by selecting the [ Go to mailbox settings actions ] under
and clicking [ New ] on the page that opens.
3. Enter the email address in the displayed [ New email account ] widow, and click [ Next ].
4. Click the [ Add New Server ] button.
Note. Add the domains of a new provider to the [ Email providers domains ] lookup to have Creatio
automatically identify this email provider in the future. As a result, users will not have to specify the mail
provider manually when setting up an email account.
5. On the opened page, click [ Add ] (Fig. 2).
Fig. 2 Adding a new email provider
© 2021 Creatio. All rights reserved.Set up the MS Exchange and Microsoft 365 services | 10
6. On the page that opens, select “Exchange” in the [ Service type ] field.
7. Populate the [ Service address ] field in the “example.exchange.com” format (Fig. 3).
Fig. 3 Specifying the mail service address
8. You can also populate the additional settings to set up receiving and sending emails, specify the login format,
service name and the authentication method (Fig. 4).
Note. Setting up passwordless OAuth authentication for Microsoft 365 requires an existing OAuth
application. Read more in the “Setting up OAuth authentication for integration with Microsoft 365”
article.
© 2021 Creatio. All rights reserved.Set up the MS Exchange and Microsoft 365 services | 11
Fig. 4 Additional settings of the mail service
Enable receiving and sending emails:
Select the [ Receive emails ] and/or [ Send emails ] option.
Select at least one checkbox.
Set up the mailbox login format:
1. Select the [ Use manual entry ] option if users enter their email address and username.
2. Select the [ Use email address ] option if the full email address is used as a login (for instance,
“example@google.com”).
3. Select the [ Use mailbox name ] option if the part of the email address before “@” is used as a username. For
example, the “test” will be a login for “test@google.com” email address.
Set up the authentication method:
Select “Basic” for the basic authentication using the user name and password with Base64 encryption.
Select “OAuth 2.0” to restrict the service access to protected user resources without the need to pass the
login and password. Populate the [ Application (client) ID ] and [ Client secret ] required fields.
© 2021 Creatio. All rights reserved.Set up the MS Exchange and Microsoft 365 services | 12
[ Application (client) ID ] is generated by the Microsoft authentication server. The documentation and API
may refer to the application ID as “Product ID.”
[ Client secret ] – a secret key generated by the authentication server. The documentation and API may
refer to the client secret as “Product key.”
4. Save the settings by clicking [ Apply ].
As a result, system users will be able to use the email provider to send and receive email messages.
Method 2. Add the email provider from the user profile
1. Open the user profile page by clicking the [ Profile ] image button on the main page of the application.
2. Click [ Email accounts ] (Fig. 1).
Fig. 1 Opening the email accounts
3. Click [ New ] in the opened window.
To complete the setup, perform steps 3– 9, described above in Method 1.
Note. To delete a mail server, delete all its mailboxes (email accounts) first.
© 2021 Creatio. All rights reserved.Synchronize contacts with MS Exchange and Microsoft 365 | 13
Synchronize contacts with MS Exchange
and Microsoft 365
PRODUCTS: ALL CREATIO PRODUCTS
Use the mailbox synchronization setup page to set up synchronization of Creatio contacts with the MS Exchange
or Microsoft 365 contacts (Fig. 1). There are several ways to access the page:
Click –> [ Edit email accounts ] in the communication panel.
Select [ Actions ] –> [ Synchronize contacts ] –> [ Set up... ] in the [ Contacts ] section.
This command contains the name of the account (for example, [ John.best@mycompany.com settings ]).
Fig. 1 Example of synchronizing Creatio contacts with the MSExchange
Set up the import of Exchange contacts to Creatio
To set up the import of the MS Exchange or Microsoft 365 contacts into Creatio:
1. Select the [ Import contacts ] checkbox on the [ Contacts ] tab of the mailbox synchronization setup page.
2. Select the [ Import all contacts ] option to import all records from the mailbox folders of the “Contacts” type.
To import contacts from specific folders only, select the [ Import contacts from specific folders in MS
Exchange ] option. Click and select the checkboxes next to the needed folders.
3. Click [ Save ].
© 2021 Creatio. All rights reserved.Synchronize calendar with MS Exchange and Microsoft 365 | 14
Note. Creatio automatically links imported contacts to Creatio accounts. If more than one account with
the same name is found in Creatio, the contact will be imported without connection to the account. If
the user who performs the import has access to one of these accounts, then the contact will be
imported with the connection to this account.
Set up the export of Creatio contacts to Exchange
To set up the export of Creatio contacts to MS Exchange or Microsoft 365:
1. Select the [ Export contacts ] checkbox on the [ Contacts ] tab of the mailbox synchronization setup page.
2. Select the [ Export all contacts ] option to export all contacts to which you have access.
If you only want to export contacts of certain types or folders, select the [ Export specific contacts ] option.
a. Select the [ Employees ] and/or [ Customers ] checkbox to export all contacts of the corresponding types
during synchronization (only those contact will be exported to which you do have the access).
b. Select the [ From folders ] checkbox to export contacts included in particular folders, for example,
“Employees”. Open the list of folders and select the folders for synchronization.
3. Click [ Save ].
Note. Adding folders is described in the Groups article.
Synchronize contacts with MS Exchange and Microsoft 365
Contacts can be synchronized between Creatio and the Exchange server automatically. To enable automatic
synchronization, select the [ Synchronize contacts automatically ] checkbox on the synchronization setup page.
To perform the synchronization, open the [ Contacts ] section, click the [ Actions ] button and select the
[ Synchronize contacts ] –> [ Synchronize now ] action.
Synchronize calendar with MS Exchange
and Microsoft 365
PRODUCTS: ALL CREATIO PRODUCTS
Use the mailbox synchronization setup page to set up the synchronization of the Creatio activities with the MS
Exchange or Microsoft 365 tasks and meetings (Fig. 1). There are several ways to access the page:
Click –> [ Edit email accounts ] in the communication panel.
Select [ Actions ] –> [ Synchronize activities ] –> [ Set up... ] in the [ Activities ] section.
This command contains the name of the account (for example, [ John.best@mycompany.com settings ]).
Fig. 1 Example of synchronizing Creatio activities with the MS Exchange calendar.
© 2021 Creatio. All rights reserved.Synchronize calendar with MS Exchange and Microsoft 365 | 15
Set up the import of Exchange activities to Creatio
To set up the import of the MS Exchange or Microsoft 365 meetings into Creatio:
1. On the [ Meetings and tasks ] tab, select the [ Import meetings ] checkbox.
2. Select the [ Import all appointments and meetings ] option to import all records from MS Exchange or
Microsoft 365 calendars.
If you only want to import records from the selected calendars, select the [ Import appointments and
meetings from specific MS Exchange calendars ] option. Open the list of calendars and select the calendars
you wish to import.
3. Select the [ Import tasks ] checkbox and if necessary, select folders whose tasks must be imported.
4. Click [ Save ] on the mailbox synchronization setup page.
As a result, appointments and meetings will be imported to Creatio as the activities of the “Meeting” category.
When importing the activities of the “Task” type, records will be added in Creatio as the activities of the “To
do” category. In this case, only those tasks whose owner is the current user of Creatio will be imported.
Setting up the import of tasks is similar to that of the meetings.
Set up the export of Creatio activities to Exchange
© 2021 Creatio. All rights reserved.Set up OAuth authentication for MS Office 365 | 16
To set up the export of Creatio activities to MS Exchange or Microsoft 365:
1. On the [ Meetings and tasks ] tab, select the [ Export activities ] checkbox.
2. Select the [ Export all tasks and meetings ] option to export all activities to which you have access.
If you only want to export activities from specific folders, select the [ Export tasks and meetings from specific
folders ] option. A list of folders corresponds to the folders configured in the [ Activities ] section
3. Click [ Save ] on the mailbox synchronization setup page.
As a result, the activities of the “Appointment” type will be created in MS Exchange or Microsoft 365 when
exporting tasks with the [ Display in calendar ] checkbox checked. When exporting tasks with the [ Display in
calendar ] checkbox unchecked, the activities of the “Task” type will be created in MS Exchange or Microsoft
365.
Synchronize activities with MS Exchange and Microsoft 365
Activities can be synchronized between Creatio and the Exchange server automatically. To enable automatic
synchronization, select the [ Synchronize activities automatically ] checkbox and select the date in the [ Import
activities starting from ] field. To perform the synchronization, open the [ Activities ] section, click the [ Actions ]
button and select the [ Synchronize contacts ] –> [ Synchronize now ].
Set up OAuth authentication for MS Office
365
PRODUCTS: ALL CREATIO PRODUCTS
OAuth is an open authentication standard for restricted access delegation. OAuth provides third parties with
secure delegated access to protected user resources without saving user login and password in the application.
Set up OAuth authentication for Microsoft 365 by registering your OAuth application.
To do this:
1. Register your application using the administrator role in the Azure Active Directory identity and access
management service (Azure AD). Learn more in the Microsoft documentation.
Note. Specify redirection parameters in the [ Redirect URI ] field. Use this template:
https://.creatio.com/0/rest/Office365OAuthAuthenticator/ProcessAuthenticationCode.
Azure AD will assign a unique ID to the application after the registration is complete. The ID will display in the
[ Application (client) ID ] field on the Overview page of the application. Creatio will request this parameter as
the client secret key.
2. Add permissions to provide application access to users. Learn more about adding web-API permissions in the
Microsoft documentation.
a. Select “Exchange” in the list of supported APIs. Specify the “Delegated permissions” permission type and
select the [ EWS.AccessAsUser.All ] checkbox.
© 2021 Creatio. All rights reserved.Register Creatio application in Gsuite | 17
b. Select “Graph” in the list of supported APIs. Specify the “Delegated permissions” permission type and
select the [ User.Read ] checkbox.
3. Click the [ Grant admin consent for Tenant ] button to grant admin consent to the permissions configured for
the application. Read more about the Admin consent button in the Microsoft documentation.
4. Create a client secret for Creatio to use. Learn more in the Microsoft documentation.
5. Copy the key for later use by Creatio.
As a result, you will get the values for the “Client ID” and “Client Secret” parameters required by Creatio to
finish the integration. The Creatio application itself will be specified in the redirection parameters.
Register Creatio application in Gsuite
PRODUCTS: ALL CREATIO PRODUCTS
GSuite registration procedure can be divided into two steps:
Register a Google account and set it up, enable access to the API, and generate the keys required for
integration (“Client ID” and “Client Secret”).
Use the values of the “Client ID” and “Client Secret” keys to populate the [Google Service Access Key] and
[Google Secret Access Key] Creatio system settings respectively.
For security reasons, we recommend enabling two-factor authentication for Gmail accounts and using app
passwords to access your mail. Read more in the Google Help Center.
To test this functionality, you can turn on “less secure app access” in your Gmail account as a temporary
solution. Read more in the Google Help Center.
Set up an account and receive Google keys
Note. When you transfer to version 7.17.1, create an OAuth 2.0 client ID with a new redirection address.
To configure your Google account:
1. Follow the https://code.google.com/apis/console/ link.
2. Log in as a GSuite administrator.
3. Open the API library and use the search bar to find Gmail API.
Accessing Gmail API
© 2021 Creatio. All rights reserved.Register Creatio application in Gsuite | 18
4. Go to the Gmail API page and click [ Enable ].
Enabling Gmail API
5. Repeat steps 3 and 4 to enable [ Contacts API ] and [ Calendar API ].
As a result, both APIs are added to the list of available APIs (Fig. 3).
Fig. 3 The list of available project API
© 2021 Creatio. All rights reserved.Register Creatio application in Gsuite | 19
6. Specify the information about the product to create the client ID. In the [API Manager] menu, click
[ [Credentials] ] (Fig. 4).
Fig. 4 Opening the [ Credentials ] setup page
7. Specify API parameters:
a. Select [ Gmail API ] in the [ [Which API are you using?] ] drop-down menu.
b. Select [ Web-browser (Javascript) ] in the [ [Where will you be calling the API from?] ] drop-down menu.
c. Select [ User data ] in the [ What data will you be accessing? ] field.
Click [ What credentials do I need? ] (Fig. 5).
Fig. 5 Adding credentials to your project
© 2021 Creatio. All rights reserved.Register Creatio application in Gsuite | 20
8. Create an OAuth client ID
a. Specify the name of the product in the [ Name ] field to show to the Creatio users during authorization for
using Google accounts.
b. Enter your Creatio website address in the [ Authorized JavaScript origins ] field.
c. Populate the [ Authorized redirect URLs ] field with links formatted as follows:
For Creatio version 7.17.0 or lower::
https://your_website_address/0/ViewPage.aspx?Id=3b22f0ff-034a-48da-8758-a0660e5a26ff
https://your_website_address/0/rest/GoogleOAuthAuthenticator/ProcessAuthenticationCode
For Creatio version 7.17.1 and up:
https://your_website_address/0/LegacySocialAccountAuthPage.aspx?Id=3b22f0ff-034a-48da-8758-
a0660e5a26ff
https://your_website_address/0/rest/GoogleOAuthAuthenticator/ProcessAuthenticationCode
Click [ Create an OAuth client ID ] (Fig. 6).
© 2021 Creatio. All rights reserved.Register Creatio application in Gsuite | 21
Fig. 6 Creating OAuth client ID
As a result, Google will suggest to set up an OAuth consent screen. Click [Set up consent screen] to proceed.
9. Specify the required parameters in the OAuth consent screen:
© 2021 Creatio. All rights reserved.Register Creatio application in Gsuite | 22
a. The name of the application that requires access
b. Support service email address
c. Authorized domains
d. Link to the main page of the application
e. Link to the privacy policy of the application.
Click [ Save ].
10.Go back to the credentials page. Refresh the page. As a result, the [ Create OAuth client ID ] button will
become available. Click the button to create your “Client ID” and “Client Secret”.
11.Enter your Google keys (Fig. 7) in the corresponding system settings in Creatio.
Fig. 7 Google keys
Enter a Google key in Creatio
Enter Google keys to synchronize with contacts and calendar
Enter the received “Client ID” and “Client Secret” keys into Creatio for the values of the [Google Service Access
Key] and [Google Secret Access Key] system settings. To do this:
1. Open the Creatio application.
2. Open the System Designer by clicking in the top right corner of the application window.
3. Click [ System settings ] in the [ System setup ] block (Fig. 8).
Fig. 8 The [ System settings ] section
4. Select the “Google services access key” system setting in the list and click [ Open ].
5. Populate the [ Default value ] field of the system setting page with your client ID that you retrieved during the
Creatio registration in Google (available in the [ Here is your client ID ] field in the Google API message).
6. Select the “Google secret access key” system setting in the list and click [ Open ].
© 2021 Creatio. All rights reserved.Register Creatio application in Gsuite | 23
7. Populate the [ Default value ] field of the system setting page with your client secret key that you retrieved
during the Creatio registration in Google (available in the [ Here is your client secret ] field in the Google API
message).
As a result, users will be able to synchronize their mail, tasks, and contacts with their Google calendar and
Google contacts.
Enter Google keys to synchronize with email
Enter the received “Client ID” and “Client Secret” codes in Creatio when setting up the secure OAuth 2.0
connection for the Gmail provider. To do this:
1. Open the Creatio application.
2. Open the System Designer by clicking in the top right corner of the application window.
3. Go to the [ System setup] ] block –> click [ Lookups ].
4. Select the [ List of email providers ] lookup.
5. Open Gmail provider settings.
6. In the [ Additional settings area ], specify the OAuth 2.0 authentication method. This enables limited access of
the email service to the user protected resources and does not require login and password.
7. Specify the “Client ID” and “Client Secret” codes that you received earlier in the [ Application client ID ] and
[ Client secret ] required fields.
Setting up OAuth 2.0 for Gmail
© 2021 Creatio. All rights reserved.Synchronize contacts and activities with Google | 24 8. Save the email provider settings. Synchronize contacts and activities with Google PRODUCTS: ALL CREATIO PRODUCTS To enable synchronization setup of Google contacts and calendar with Creatio contacts and activities, the synchronization must be set up beforehand. An example of synchronization setup in the [ Contacts ] section is described below. © 2021 Creatio. All rights reserved.
Synchronize contacts and activities with Google | 25

1. Open the [ Contacts ] section
2. Create a private tag to be used for synchronization, for example, “Google synchronization”.

        Note. Only records with private tags are synchronized. Records with public or corporate tags never
        synchronize.

3. Click [ Actions ] –> [ Synchronize contacts ] –> [ Set up... ]. Take the following steps in the settings page:

    a. For activities to synchronize automatically, select the [ Synchronize activities automatically ] checkbox and
        specify the synchronization interval. To start synchronization from a specified date, select the required
        date in the [ synchronize from ].
    b. To automatically synchronize contacts, select the [ Synchronize contacts automatically ] checkbox and
        specify the synchronization interval.
    c. To synchronize contacts with a specific tag, in the [ Send all contacts with a tag from Creatio to Google ]
        field select the required tag.

4. Click [ Save ].

        Note. Date and time of the latest synchronization session is displayed on the setup page.

    As a result, both your Google account and the Creatio contact tag for synchronization will be saved in the
    system, and the synchronization will be started at the specified time intervals automatically.

        Note. In the [ Activities ] section, setting up synchronization with Google is done in the same manner.
        Note that you don't need to specify the tag for synchronizing tasks in the synchronization settings of
        the [ Activities ] section.

Synchronize Creatio contacts with Google contacts
You can use the synchronization option to add your Google contacts into Creatio. The action is only performed
for records that are specially tagged as per the synchronization settings.
To run the synchronization for the first time:

1. Open the [ Contacts ] section

2. Click [ Actions ] –> [ Synchronize contacts ] –> [ Start synchronization ].
    As a result of synchronization, a new group of contacts titled “Creatio” will be added to your Gmail contacts.

        Note. If you set up automatic synchronization, the process starts automatically.

3. Move the Gmail contacts to the “Creatio” group.
4. Click [ Synchronize contacts ] –> [ Start synchronization ] again to synchronize.
    As a result, the Gmail contacts from the “Creatio” group will be imported into Creatio with the private tag

© 2021 Creatio. All rights reserved.
Delete your Google account from Creatio | 26
specified during the synchronization setup.
Note. If you set up automatic synchronization, the process starts automatically.
From this point on, the synchronization of Google and Creatio contacts is performed in both directions.
Synchronization is run only for those records that have been changed or added since the last synchronization
session.
If a record has been modified in both Gmail and Creatio, the most recent changes will be used for the
synchronization.
If records were deleted in Gmail or Creatio, the next synchronization will not delete them from Creatio or
Gmail. In the first case, the tags will be removed from such records. In the second case, the records will be
excluded from the “Creatio” group.
Synchronize Creatio activities with Google calendar
If you use the Google calendar to plan your activities, you can synchronize it with your Creatio calendar.
Go to the [ Activities ] section and click [ Actions ] –> [ Synchronize activities ] –> [ Start synchronization ].
When you run this action, the Creatio activities are synchronized with the primary calendar of the Google account
specified in the synchronization settings. All activities with the [ Display in calendar ] mark synchronize from
Creatio. Synchronization runs by the [ Organizer ] field. Thus, if an event organizer has not set up
synchronization, the [ Organizer ] field is filled by the participant of the activity who has run the synchronization.
If the current author creates an event in Google, synchronization with Creatio adds it into the system and adds
the participants to the [ Participants ] detail. Only users who have the same email listed on the [ Communication
options ] detail and in the Google event will be added to the list of participants. This collective task is displayed for
other participants only after they synchronize their calendar with Google.
If a collective task that was created in Creatio by synchronizing with Google has been modified by one of its
participants, all changes will be displayed in Google.
Note. Synchronization can also be run automatically, within the time intervals specified in the
synchronization settings.
Delete your Google account from Creatio
PRODUCTS: ALL CREATIO PRODUCTS
To delete a Google account, do the following:
1. Open the user profile page. Click the [ Profile ] button on the home page.
2. Click the [ Accounts in external resources ] button.
3. Select the Google account and click [ Actions ] –> [ Delete ]. Click [ Yes ].
Set up chat
© 2021 Creatio. All rights reserved.Delete your Google account from Creatio | 27
Set up chat
Use the [ Chat settings ] section of the System Designer to set up Creatio chat and messenger integration. Chat
setup is performed by the system administrator or by a user with the “Access to "Setup chats" section”
(CanManageChats) operation permission.
Set up a chat
Add a chat queue
To process chat messages, you need to set up chat queues. A chat queue determines the team of agents that
will be processing the chat. The number of queues does not depend on the number of channels. For example, to
process messages coming from the brand page, set up a “Support service” chat queue, while to process online
shop requests - create a “Sales assistants” chat queue. Use the [ Chat settings ] section of the System Designer
to create queues for chat agents. To add a chat queue:
1. Open the System Designer by clicking .
2. Click [ Chat settings ].
3. In the [ Chat queues ] area, click .
4. Populate the parameters of the new queue in the window that opens.
a. [ Name ] – provide a name that would imply the queue purpose and the target role. For example, “1st-line
support”.
b. [ Routing rule ] – determines the agent who will be processing the chat.
“To all agents” – the new chat will be available for all agents of the current queue.
“To an available agent” –automatically assign the chat to the available agent for processing. The
available agent is the one with the least number of chats in progress. If several agents have the same
number of chats in progress, the new chat will be assigned to the agent who has not taken any chats
© 2021 Creatio. All rights reserved.Delete your Google account from Creatio | 28
longer than others. If an agent does not take the chat within 5 minutes, the chat will be assigned to the
next agent. The current agent will become “inactive”. You can change this time using the “Omni chat
operator accept chat timeout” (OmniChatOperatorAcceptChatTimeout) system setting. To continue
processing the chat, the agent must change their status for the “Active” in the communication panel.
e. [ Chat completion timeout, minutes ] – the maximum waiting time from the moment of the last outgoing
chat message to closing the chat automatically. When the specified time expires, the chat will close
automatically. When the chat closes due to timeout, the subsequent messages will be processed as new
chats and will be redistributed to the active operators. If you do not specify any value in the field, the chat
will not close.
f. On the [ Queue agents ] detail, click . Specify the users and roles that will be processing chat messages.
For example, you can use the “Call center managers” organizational role. You can add several users or
roles to the list of agents. Similarly, the same user can be added as an agent to several chat queues.
Set up a chat queue
Add a chat channel
A chat channel displays message feed from specific sources. For example, a channel can display messages
posted on a specific public Facebook page. The following chat integrations are available as channel sources in
Creatio:
Facebook Messenger
Telegram (available for version 7.17.1 and up)
The channels with at least one integrated chat cannot be deleted. If the channel is no longer valid, deactivate the
channel.
© 2021 Creatio. All rights reserved.Delete your Google account from Creatio | 29
Add Facebook Messenger channel
ATTENTION. Before you start setting up the Facebook messenger channel, make sure the “Identity
server Url (IdentityServerUrl), “Identity server client id” (IdentityServerClientId) and “Identity server client
secret” (IdentityServerClientSecret) system settings are populated. If the values of these system settings
are not populated, contact support assistance.
1. Open the System Designer by clicking .
2. Click [ Chat settings ].
3. In the [ Channels ] area, click . In the menu that appears, select “Facebook messenger”. Facebook login
window opens.
4. In the opened Facebook window:
a. Log in to Facebook.
b. Select the checkboxes for the pages that you want to synchronize with Creatio. Note that you can only set
up synchronization for public pages and not for personal profiles.
c. Click [ Next ].
Select a public Facebook page to synchronize with Creatio
d. Permit Creatio to manage your public page. This will allow the application to send and receive messages on
© 2021 Creatio. All rights reserved.Delete your Google account from Creatio | 30
behalf of your brand using the Facebook Messenger channel. If you restrict Creatio from managing the
page, the chat functionality may not work properly.
e. Click [ Done ].
As a result, a separate channel will be created for each of the selected pages. The channel name will match
the name of the corresponding Facebook page.
Set up access to managing the page
5. To process the messages from the created channel in the communication panel, activate the channel, and link
it to the queue.
a. In the [ Channels ] detail list, click the created channel name.
b. On the mini page that opens:
Set the switch to “Active.”
Select the chat queue to process the messages that come via this channel.
Click [ Apply ].
6. Repeat step 5 for all created channels if needed.
Add a Telegram channel
© 2021 Creatio. All rights reserved.Delete your Google account from Creatio | 31
Note. This functionality is available for Creatio version 7.17.1 and up.
1. Open the System Designer by clicking .
2. Click [ System settings ].
3. In the “Website URL” (SiteUrl) system setting, specify the URL of your Creatio application that will be
synchronized with Telegram. To specify the URL, use the following format: https://yoursite.domain.com/0 .
4. Go back to the System Designer by clicking .
5. Click [ Chat settings ].
6. In the [ Channels ] area, click . In the menu that appears, select “Telegram.” A mini page with channel
parameters opens.
7. Populate the channel parameters:
a. Specify the token for your chatbot. The token is generated on the Telegram side.
b. Set the switcher to the “Active” position to enable processing chat messages in the communication panel.
c. Select the chat queue to process the messages that come via this channel.
Note. To ensure the correct channel operation, make sure the telegram bot you are integrating with
is only used on a single resource. If you are not sure whether the bot you are adding is integrated
with any other websites or applications, generate a new bot token before you set up the channel in
Creatio.
8. Click [ Apply ].
Example of setting up a Telegram channel
Set up the chat actions
© 2021 Creatio. All rights reserved.Delete your Google account from Creatio | 32
Chat actions simplify and automate the processing of messages. A pre-configured “Create case” action (available
for the Service Creatio products) triggers the “Create case from chat” (CreateCaseFromChat) business process.
You can set up a list of actions that will be available for the agent when processing the chat, e.g., “Create order”,
“Notify a manager about invoice payment” or “Notify system administrator.” To implement this, create a
corresponding process to run when working in the chat. Learn more about creating and setting up processes in
the Business process setup (BPMN) block of articles. When the process is ready, add a corresponding chat
action:
1. Open the System Designer by clicking .
2. Click [ Chat settings ].
3. In the [ Chat actions ] area, click .
4. On the “Chat action” mini page, specify:
a. [ Caption ] – the action title that will display for the agent when working with the chat.
b. [ Chat queue ] – select the chat queue. The agents of the selected queue will have access to this action.
c. [ Process ] – select the process that will be triggered by the action.
d. Click [ Apply ].
Set up a chat action
Note. The business process is connected to the current chat through the incoming “ChatId” and/or
“ContactId” parameters that are passed to the process when running the chat action. Read more in
the Process parameters article.
Additional chat settings
Restrict the number of active chats in the communication panel
You can set up restrictions for the number of active chats that agents can process at a time. By default, the
number of chats is restricted by 2. To change the active chat settings:
© 2021 Creatio. All rights reserved.Delete your Google account from Creatio | 33 1. Open the System Designer by clicking . 2. Click [ System settings ]. 3. Open the “Simultaneous Chats” (SimultaneousChats) system setting. 4. In the [ Default value ] field, specify the number of chats that the agent can process at a time. For example, 5. If an agent has a maximum number of chats in progress, they will not see any new chats until they terminate at least one of their chats. This restriction is valid for all chat channels available to the operator. 5. Click [ Save ]. Change the chat notification alert You can change the standard notification alerts about new chat messages to make them easily recognizable by the agents. To do so: 1. Open the System Designer by clicking . 2. Click [ System settings ]. 3. Open the “Omni chat notification sound” (OmniChatNotificationSound) system setting. 4. Click [ Clear value ] to delete the standard alert. 5. [ Select a local audio file ]. 6. Click [ Save ]. © 2021 Creatio. All rights reserved.
You can also read