Summer Salary System User Documentation - Research ...
←
→
Page content transcription
If your browser does not render page correctly, please read the page content below

RESEARCH FOUNDATION
                                      of The City University of
                                      New York
                                      230 West 41st Street
                                      New York, NY 10036-7207

Summer Salary System User Documentation

Rev. 5.14.19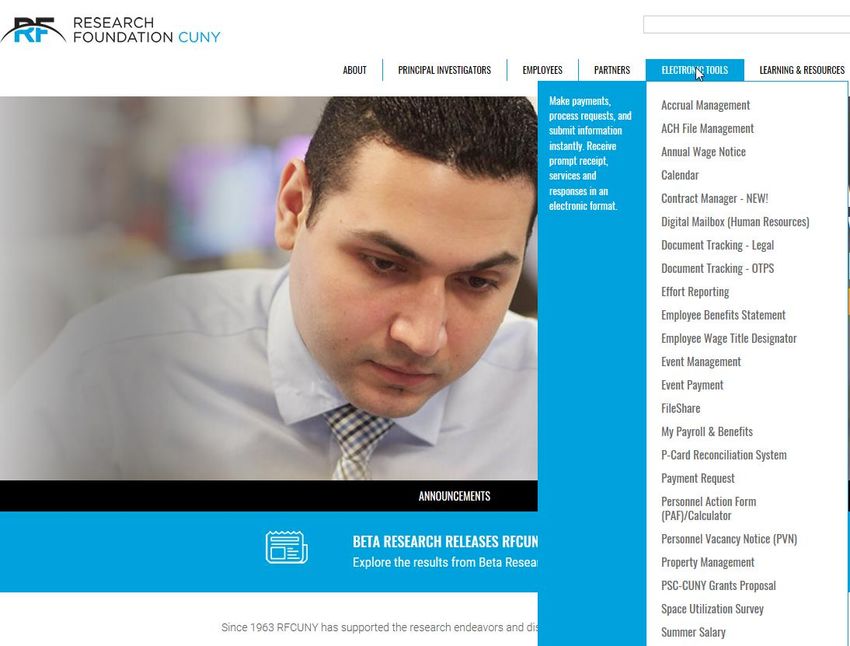
CONTENTS

Overview ...…………………………………………………………………….…                    2

Users .…………………………………………………………….……………….                      3

Understanding Workflow ....……………………………………………..…….           5

Accessing the System ………………………………………………………….                7

Appointments …..………………………………………………………..…….. 8

     Creating a New Appointment …………………………………………. 8

     Modifying an Existing Appointment……….…………………………..      13

Payment Authorizations.…..…………………………………………..……….            16

     Creating a New Payment Authorization……...……………………….. 16

     Modifying an Existing Payment Authorization……..…………………. 20

View Pending …….…………..………………………………………………….                  21

    Available Functions ………………….…………….…………………….. 21

    Accessing Your Transactions..………………….………………………. 22

Reports ……...…….…………..…………………………………………………. 24

    Downloading to Excel ……………….…………….……………………..            25

    Report Descriptions ………………….…………….…………………….. 26

Effort Certification ………..………………………………………………….              27

    Certifying Effort Online ……………….………….……………………..         27

Contact Information ………..………………………………………………….               30

CUNY Payroll Calendar … ..………………………………………………….              31

                          Page 1 of 31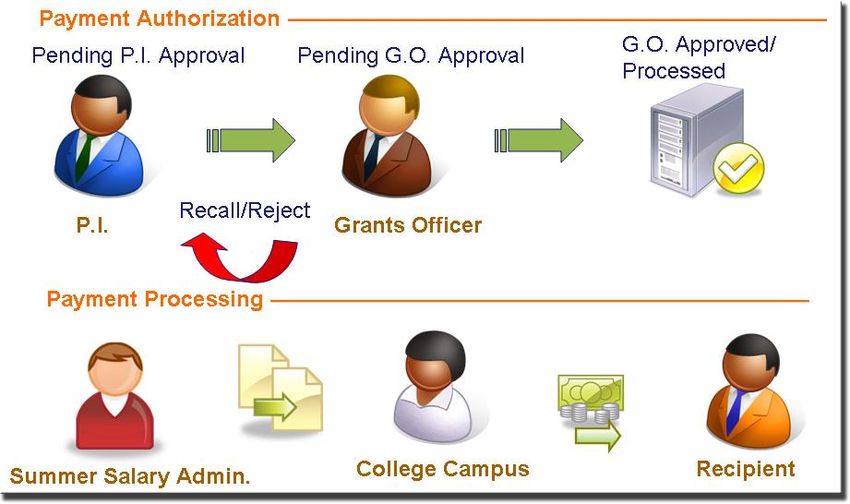
Overview
Section 1: Overview

     The Summer Salary System allows you to process your summer salary transactions
     electronically.

     This new release is the third version of the Summer Salary System. While redesigning
     the system, we attempted to reengineer existing processes to make them both intuitive

                                                                                                1
     and streamlined. Special attention was given to reduce and simplify data entry.

     The system has a number of benefits. The following are a few:

  1) Appointments: The system streamlines appointment creation by allowing users to enter
     one appointment per employee and PRSY for the summer. This means fewer
     transactions to enter and fewer transactions to approve.
  2) Payment Authorization: This system introduces a new Payment Authorization
     mechanism, which will replace existing paper certifications that employees must fill out
     and submit to their campus Payroll Office for payment. Now Payment Authorizations can
     be entered electronically via the system and, once approved, payment will be made by
     your campus – no additional action is required outside the system to ensure payment.
  3) New User Interface: This system sports a new user interface which is not only clean
     and uncluttered, but also includes tools that give the user greater control over the
     process and provide a better user experience.
  4) Centralized Access: The system allows users to access all summer salary transactions
     electronically. Appointments and Payment Authorizations no longer have to be done at
     the office – if you can access the Internet, you have access to process and review your
     transactions. Additionally, users can obtain status updates and other important
     information regarding their summer salary online, at any time – day or night.
  5) Reduction in Human Error: This system reduces the need to perform manual checks
     (e.g. AVL availability) during data entry. This reduces processing errors, and in turn,
     contributes to faster transaction turnaround times.

                                        Page 2 of 31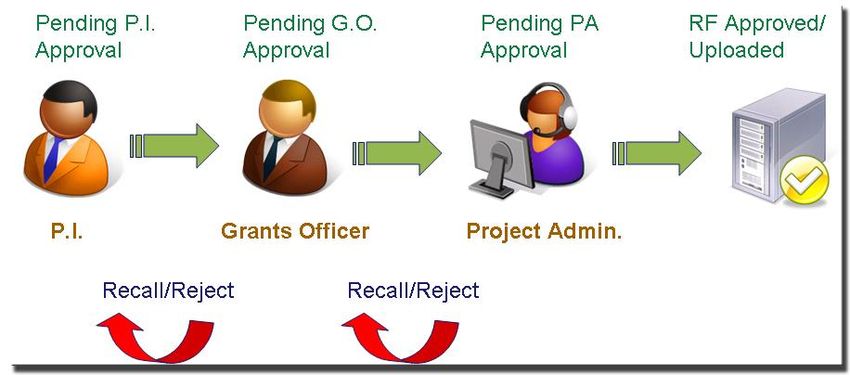
Users
Section 2: Users
           The following users have access to the Summer Salary System. This manual
           focuses on the first two user groups: Principle Investigators (P.I.s) and Grants
           Officers (G.O.)

     2.1   P.I.s: These users typically operate from a C.U.N.Y. campus and create summer

                                                                                              2
           salary transactions on behalf of a summer salary recipient/employee. In some
           cases, the P.I. and the summer salary recipient is the same person. These users
           perform the following actions within the system:

           Appointments
           ▪   Create appointments.
           ▪   Delete appointments.
           ▪   Edit appointments that they created.
           ▪   Recall appointments that were submitted by them.
           ▪   Save appointments.
           ▪   Submit appointments to their G.O. for approval.

           Payment Authorizations
           ▪   Create payment authorizations.
           ▪   Delete payment authorizations.
           ▪   Edit payment authorizations that they created.
           ▪   Recall payment authorizations that were submitted by them.
           ▪   Save payment authorizations.
           ▪   Submit payment authorizations to their G.O. for approval.

     2.2   G.O.s: These users also typically operate from a C.U.N.Y. campus and are
           responsible for approving and submitting summer salary transactions to the
           Research Foundation (RF) for processing.
           Please note that in order for any summer salary transaction (Appointments or
           Payment Authorizations) to be processed, they must be approved by a campus
           GO.
           These users may perform the following actions within the system:

                                      Page 3 of 31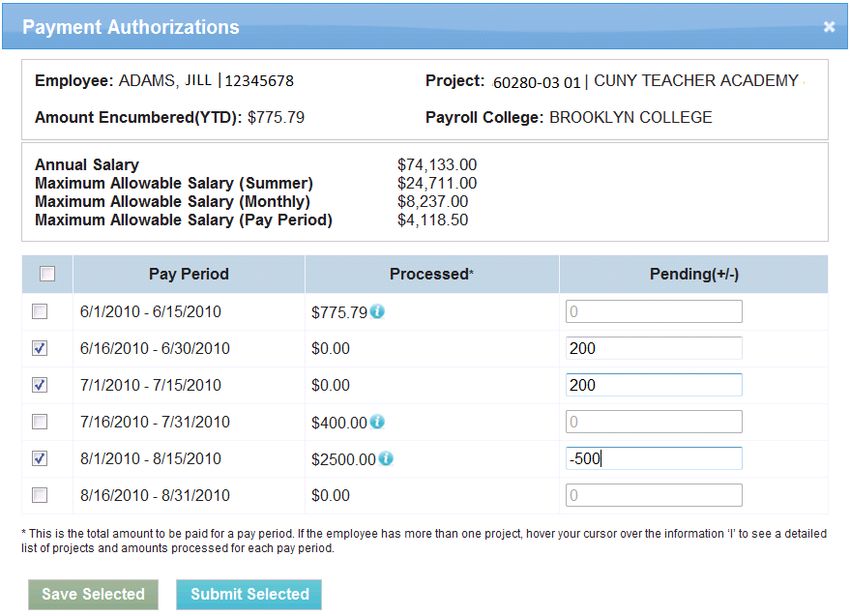
Appointments
                    ▪   Approve appointments and submit them to the RF for approval.
                    ▪   Create appointments.
                    ▪   Delete appointments.
                    ▪   Edit appointments that they created or that was submitted to them for
                        approval1.
                    ▪   Recall appointments that were submitted to the RF.
                    ▪   Reject appointments that were submitted by a P.I.
                    ▪   Save appointments.
      .
                    Payment Authorizations
                    ▪   Approve payment authorizations that were either created by them or a P.I.
                        Once a payment authorization is approved by a G.O., it requires no additional
                        approval by the RF.
                    ▪   Create payment authorizations.
                    ▪   Save payment authorizations.
                    ▪   Edit payment authorizations that they created or that were created/submitted
                        to them for approval2.
                    ▪   Reject payment authorizations that were submitted by a P.I.

           2.3      RF Processors: These users are Project Administrators who work at the RF.
                    They are responsible for reviewing and processing appointments that are sent to
                    the RF by G.O.s.

           2.4      Summer Salary Administrator: This user is responsible for managing the
                    overall summer salary process, coordinating the actions of users, creating
                    payment authorization reports for CUNY, and answering general questions.
                                                                                                           Understanding Workflow

           Section 3: Understanding Workflow

1
    G.O.s may edit a summer salary if they have access to the project(s) used to pay that summer salary.
2
    G.O.s may edit a summer salary if they have access to the project(s) used to pay that summer salary.

                                                     Page 4 of 31
                                                                                                           3
The workflow used by the Summer Salary System is similar to the workflow used
      by most RF E-Systems. It’s important to understand the system’s workflow as it
      will allow you to monitor your transaction and gain a better understanding of the
      overall process.

3.1   The Appointment Workflow: Figure 1 illustrates how an appointment flows
      between users and how its status (shown in green) is changed by each user’s
      action.

                             Figure 1: The Appointment Workflow

                                Page 5 of 31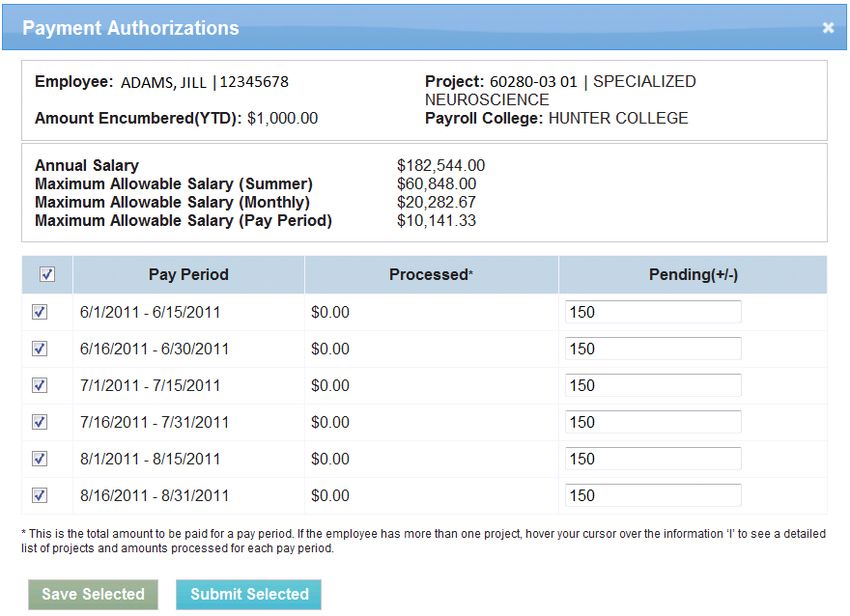
3.2   The Payment Authorization Workflow: Figure 2 illustrates how a payment
      authorization flows between users and how its status (shown in green) is
      changed by each user’s action.

                   Figure 2: Payment Authorization Workflow

                                                                                 Accessing the System

Section 4: Accessing the System

                                Page 6 of 31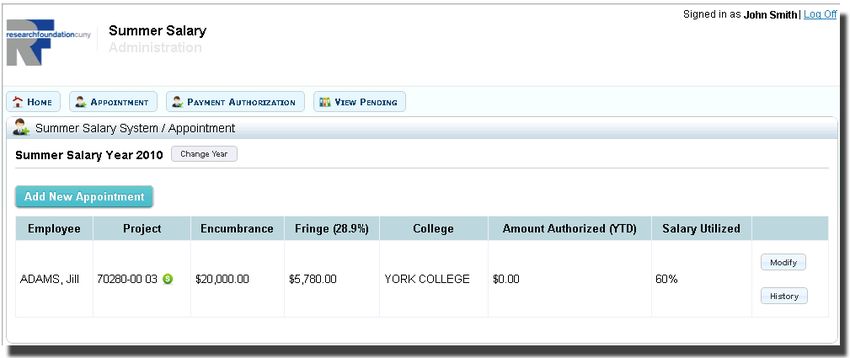
The Summer Salary System is available via the RF Website. From the RF
               Website, go to the Electronic Tools menu and select Summer Salary (see
               figure 3). This will bring you to the system’s Dashboard.

                                      Figure 3: Accessing the system

Note: You must log on to the RF Website with either a P.I. or grants officer’s User ID. You cannot access this
system with a Preparer or Employee ID.

If you do not have a valid User ID or if you do not see the Summer Salary option listed under your E-Service
menu please call the summer salary administrator at 212-417-8402

               The Summer Salary System is divided into four modules: Appointment,
               Payment Authorization, View Pending, and Reports. The remainder of this
               manual will discuss how to use each of these modules.

                                                Page 7 of 31
Appointments
Section 5: Appointments
      This module allows you to create new appointments and modify existing ones.

5.1   Creating a New Appointment
      From your Dashboard, click on the Appointment icon or click on the
      Appointment tab from the Main Navigation Bar (see figure 4).

                                                                                            5
                                                                 Main Navigation Bar

                                        Click either one of these buttons to
                                        begin creating a new appointment or
                                        modify an existing one.

                       Figure 4: Your system’s Dashboard

      This will bring you to the main Appointment page. On this page, verify that the
      Year is correct. The system will always default to the current year. If you wish to
      process a retroactive appointment (i.e. for a previous year), click Change Year
      and select the appropriate year. Next, click OK to complete your selection (see
      figure 5).

                                  Page 8 of 31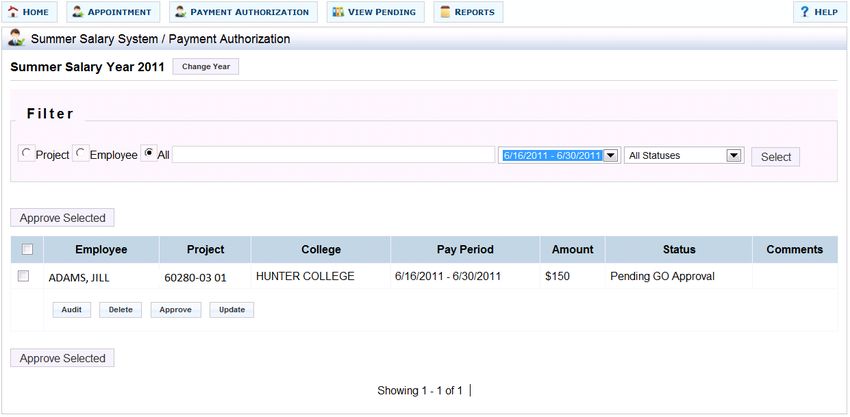
To change the year, start by
                                   clicking Change Year

                          Next, select the appropriate
                          year and click OK

                   Figure 5: Changing the Summer Salary Year

With the correct year selected, click Add New Appointment to begin creating a
new appointment. This will bring up an Add New Appointment screen (see
figure 6).

                          Page 9 of 31
Click here to enter a new appointment
The Add New
Appointment window
Figure 6: Adding a New Appointment
Enter your Project Number, Employee Name (you may search for an employee
by entering their last name, first name, or their 8 digit CUNYFirst ID), and
Encumbrance Amount in the Add New Appointment screen.
The employee’s maximum salary for
the summer across all projects. This
may be less according to restrictions
on a particular grant.
Your project’s Available
After entering your Balance
information, click Preview
Figure 7: Entering information in the Add New Appointment screen
Next, click Preview to view data generated by the system (see figure 7).
Page 10 of 31Note: In an attempt to make important information readily available, the system will display the available funds for
your project at the point of appointment creation. Your project’s available balance will appear after you enter your
project number and begin entering an employee name (see figure 7)
Note: The Project and Employee text-boxes feature an auto-complete function that will attempt to display
relevant results as you type. For example, you may enter only the first few numbers of your project or the first few
letters of the employee’s last name, and the system will display results that match your input. This saves you time
while entering data.
The system generates the following data based on your input (see figure 8).
1. Fringe: This is the fringe amount that will be charged to your appointment.
It’s a percentage of the salary encumbrance entered.
2. College: This is the recipient’s Payroll College. This college will receive
payment authorizations and issue payment to the recipient.
3. Allowable Salary: This indicates the percentage of the recipient’s allowable
salary used by this appointment. This does take into account restrictions,
such as the NSF 2 month restriction. You may place your cursor on for an
explanation of this information.
4. Total Allowable Salary: This indicates the cumulative percentage of the
recipient’s allowable salary used by all appointments for the summer. This
number will differ from the Allowable Salary figure if the recipient has two or
more appointment for the summer. If the recipient has multiple appointments,
you can view a breakdown of his/her cumulative salary by placing your cursor
over
Page 11 of 311
2
3
4
Click here to print a
summary of the
appointment.
Figure 8: Reviewing System Generated Data
After you have reviewed the information generated by the system, you may
choose to:
(i) Edit the information you entered by clicking
(ii) Save the appointment for submission at a later time by clicking
(iii) Submit the appointment to the next stage of the workflow by clicking
.
If you are a P.I., by choosing this option you will be sending the
appointment to your campus grants officer for approval. If you are a
grants officer, you will be sending the appointment to the RF for approval.
Once your appointment has been approved by the RF, you will receive a
notification email.
Page 12 of 31(iv) Close the window and return to the previous screen by clicking
g Please note that you must Save or Submit your changes before
choosing this action or your information will be lost.
5.2 Modifying An Existing Appointment
After your appointment has been approved by the RF, you may choose to modify
the appointment’s current Encumbrance. You may increase the encumbrance up
to the maximum allowable salary for the recipient (encumbrances from other
appointments will be taken into account), or reduce the encumbrance up to the
amount of outstanding Payment Authorizations submitted for the appointment.
All approved appointments will be displayed below the Add New Appointment
button (see figure 9).
Note: If your appointment does not appear in the section below the Add New Appointment button, it means that it
has not been approved by the RF. Please contact your Campus Grants Office or the RF summer salary
administrator at 212-417-8402 for more information.
Click on any
heading to sort!
Click here to
modify this
appointment
Approved
appointments
will be
displayed here Click here
Click here to
to view
viewall
all transactions
transactions
for this
for thisappointment
appointment
Figure 9: Modifying an existing appointment
Note: To view all actions taken on an appointment (i.e. the original Add and subsequent Modifications), click on
the History button beside the appointment. See figure 9.
To begin modifying an appointment, click (see figure 9). This
Page 13 of 31will bring up a Modify Appointment window (see figure 10).
To modify the appointment’s current Encumbrance Amount, you can enter a
positive or negative adjustment in the Encumbrance Adjustment (+/-) text-box.
For example, to add $500 to the existing appointment, enter 500 in the
Encumbrance Adjustment (+/-) text-box (see figure 10).
Enter a positive or
negative Salary
Adjustment
Amount here
Figure 10: Modifying an Appointment.
Next, click Preview to review the information generated by the system.
For an explanation of the information generated by the system, please see
Figure 8 in the previous section.
After you have reviewed the information, you may choose to:
(v) Edit the information you entered by clicking
(vi) Save the appointment for submission at a later time by clicking
(vii) Submit the appointment to the next stage of the workflow by clicking
If you are a P.I., by choosing this option you will be sending the appointment to
your campus grants officer for approval. If you are a grants officer, you will be
Page 14 of 31sending the appointment to the RF for approval. Once your appointment has
been approved by the RF, you will receive an email notification.
(viii) Close the window and return to the previous screen by clicking b
. Please note that you must Save or Submit your changes before choosing this
action or your information will be lost.
Page 15 of 31Payment Authorizations
Section 6: Payment Authorizations
Payment Authorizations must be submitted in order for recipients to get paid.
Once payment authorizations have been approved, they will be submitted by the
RF to the recipient’s Payroll Campus for payment.
6
6.1 Creating a New Payment Authorization
Payment Authorizations can only be created after an appointment has been
approved by the RF. To begin creating a payment authorization, click on the
Payment Authorization icon or tab from your Main Dashboard (see figure 11).
Click either one of these buttons to
begin creating a payment authorization.
Figure 11: The System’s Dashboard.
This will bring you to the Payment Authorization screen. This screen displays
the following information (see figure 12).
1) Employee: These are the recipients of summer salary payments. They are
the individuals for whom you have created Appointments and on whose
behalf you can now create Payment Authorizations.
Page 16 of 312) Project No: The project that was used to create the Appointment
(encumbrance). This project will also be used to reimburse the college, after
payment is made.
3) College: This is the Payroll College of the recipient. This is the college
which will receive the payment authorization after it’s processed and will
issue payment to the recipient.
4) Encumbrance: This is the sum total of the Original Encumbrance and any
Adjustments that were processed for this appointment. The sum total of all
payment authorizations submitted for the summer on a project cannot exceed
this amount.
5) Amount Authorized (YTD): This is the sum total of all payment
authorizations processed for this appointment.
6) Note that you can search for appointments by either a project number or
employee name. Click the radio button and then enter the (partial) value
you are looking for. The dark bar will display possible items. Click on the
item, then click ‘Select’.
6
1 2 3 4 5
Click here to create a
Payment Authorization Figure 12: The Payment Authorization Screen.
To begin creating a payment authorization, click the recipient’s name (see figure 12).
This will bring up the Payment Authorization screen (see figure 14).
For your convenience, the Header portion of this screen displays the following
information (see figure 13):
1) Total Amount Encumbered (YTD): This is the sum total of the original
encumbrance and any adjustments that were processed for this appointment.
Page 17 of 312) Annual Salary: This is the recipient’s annual salary. If this number is
incorrect, please contact CUNY’s Payroll Manager, Shakira Smith, at 646-
313-8260, or via email Shakira.Smith@cuny.edu .
3) Maximum Allowable Salary (Summer): This is the maximum allowable
salary for the recipient for the entire summer. Most projects allow Three-
Ninths of the recipient’s Annual Salary; however, NSF projects only allow
Two-Ninths of the Annual Salary. Please note that this number is for your
reference only.
4) Maximum Allowable Salary (Monthly): This is the monthly limit that the
recipient can receive. In most cases it’s One-Ninth of the recipient’s Annual
Salary.
5) Maximum Allowable Salary (Pay Period): This is the pay period limit that
the recipient can receive. Please note that the sum total of all payment
authorizations submitted for a pay period in the summer on a project cannot
exceed this amount.
1
2
3
4
5
Figure 13: Payment Authorization Header.
To begin creating a payment authorization, check the check-box next to the Pay
Period that you wish to process (see figure 14).If you wish to allocate the entire
encumbrance across all pay periods, select all pay periods
Next, enter the appropriate payment amount in the Pending (+/-) column against
each selected Pay Period (see figure 14).
Page 18 of 31To select all
Pay Periods.
Enter the Amount to Pay
Select the Pay Period(s) to
process by clicking the
appropriate check-boxes.
Figure 14: The Payment Authorization Screen
Finally, click to save the information entered for submission at
a later time, or click to submit the information for processing.
Note: Since Payment Authorizations must be submitted after work is completed (after the fact), you will only be
able to save Payment Authorizations for future pay periods. Submissions can be performed by the P.I. or grants
officer after the pay period is over.
6.1 Modifying an Existing New Payment Authorization
Page 19 of 31After your Payment Authorizations have been processed, (after the pay period
is over and payment has been authorized) they will appear in the Processed
column in the Payment Authorization screen (see figure 15).
Enter
Amounts new
previously amounts
processed
Information about other
projects for this employee.
Figure 15: Modifying an Existing Payment Authorization.
To enter a new amount or to adjust an amount already processed, click the
check-box beside the appropriate pay period and enter an amount in the
Pending (+/-) column. This can be a new amount or an adjustment.
To finish your entry, click to save your information entered for
submission at a later time, or click to submit your
View Pending
information for processing.
Section 7: View Pending
Your View Pending section enables you to take action on transactions
(Appointments or Payment Authorizations) that require your attention. For
Page 20 of 31
7example, this is where you would approve/submit a transaction that you had
saved. This section also allows you to follow the progress of your transaction
after you have approved/submitted it.
Transactions remain in this section until they have been fully processed. For
Appointments, this means that they will remain here until they are approved by
an RF processor. Payment Authorizations will remain here until they are
approved by a grants officer.
7.1 Available Functions
From your View Pending section, you may do the following:
1) Approve transactions that were saved by you, or that were submitted for
your approval. The latter is only applicable to grants officers.
2) Audit the actions taken on a transaction. This allows you to see who
performed various actions on your transaction.
3) Delete transactions that were saved by you or submitted to you.
4) Recall transactions that were submitted by you. You may choose to perform
this step in order to make changes and resubmit a transaction. Please note
that you will only be able to perform this action as long as the next person in
the workflow has not approved the transaction. For example, a P.I., can recall
a transaction only until the grants officer has approved. After grants officer
approval, it cannot be recalled. Similarly, a grants officer can recall an
appointment so long as the RF processor has not processed it.
5) Reject transactions that were submitted to you for approval. Rejecting a
transaction sends it back to the P.I. who submitted it. An email with optional
comment will be generated.
6) View Details of the pending transactions. This includes the encumbered
amount and information about the recipient’s salary limits (yearly, monthly,
and pay period).
7.2 Accessing Your Transactions
Page 21 of 31To access this section, click the View Pending icon or tab from your
Dashboard. Next, selecting the Type of transaction you would like to view (i.e.
appointment or payment authorization) and click (see figure 16). This
will bring you to your View Pending screen.
Select the transaction type
Figure 16: Your system’s Dashboard.
On the next screen you can change the year and use search criteria to locate a
particular transaction. The available functions are displayed below each
transaction (see figures 17 and 18). To perform an action, click the button
describing the action.
Page 22 of 31Mass Approval is available by clicking on the topmost check box. All
transactions valid for your approval will be checked. Click Approve Selected to
process. If some transactions encounter errors, the other transactions will
process normally.
Check here for mass
approval. Then click
Approve Selected button.
Other available functions
Figure 17: View Pending Appointments Screen
Additional search criteria.
Select one pay period and/or
status.
Check here for mass
approval. Then click
Approve Selected button.
Other available functions
Figure 18: View Pending Payment Authorizations Screen
Page 23 of 31Section 8: Reports
Reports
Running Reports: Select the Reports tab from anywhere in the system. and
click on a report to run. The selection of reports available to you is determined
by your role in the organization.
8
Figure 19: Reports Menu
Selection Criteria: Make sure you have selected the correct year. Not all reports
have any additional selection criteria. You are always limited to viewing your own
projects and/or college. Click on Show Report to run.
Click here to generate
the report.
Figure 20: Example of Report Request Screen
Page 24 of 31Export to Excel: You can view the reports on the web or export to another format.
Click Select a format. Select Excel. Click Export.
If you choose to SAVE, you will be prompted to specify the file location of the
spreadsheet.
3
1
2
Figure 21: How to Download to a Spreadsheet
Return to Summer Salary: Click on your browser’s Back Arrow to return to the report request
screen.
Print Request
Icon
Paging Control Search Option
Figure 22: Features of the Report Viewer
Page 25 of 31Report Descriptions:
Remaining Encumbrance Detail or Summary.
Keep track of encumbrances that have not been spent. Unused amounts can be
removed by entering a negative adjustment in the Appointment module.
Payment Authorization Detail.
View all payments authorized and pending amounts for your own college’s projects. This is
especially useful for users who do not have access to the Payment Authorization module.
GO Payroll Report.
View activity for all employees on your college’s payroll even if they are working on another
college’s project.
Payroll Detail or Summary.
RF Finance uses these reports to reconcile CUNY payroll records to Summer Salary.
Payment History.
All college payroll data for use of CUNY payroll department.
Certification Status.
For PIs and GOs to see which employees have completed effort certification at the end of the
summer. Remaining encumbrance is also displayed for those employees not eligible for
certification. These amounts must be cleared for effort certification.
Finance Certification Report.
Available to RF Finance users to review effort certification by college and provide information
for auditors.
Summer Salary Available Budget.
This report allows the Grants Officer to view all projects belonging to their college that are
budgeted for Summer Salary. Use the dollar amount cutoff to limit the report to projects that
have substantial unused budget amounts.
Page 26 of 31Effort Certification
Section 9: Effort Certification
The Effort Certification module enables you to certify effort percentage for yourself and
employees on projects where you are a PI. Effort may be certified when all summer
projects for an employee are completed and Payment Authorizations have been
approved.
9
Effort must be certified within 45 days of the end of the summer session. Normally this
will mean you must certify before October 15 th. After that time you will need to print a
standard blank PAR form, fill it out manually and submit it to the RF Finance department.
9.1 Available Functions
From Effort Certification, you may do the following:
1) Certify Effort for employees working on your projects. Click the Certify button to the
right of the employee. Or use the checkboxes on left side of the screen and click on
Certify Selected. You will see a pop-up box asking for confirmation of your intent.
Click Agree to confirm.
2) Revoke Certification if adjustments/additions need to be made to Summer Salary
appointments or Payment Authorizations.
3) View Detail of employee’s projects. Click on the employee’s name to display all
their projects for the summer. If some projects are for other PIs, you will not be able
to certify effort for those. The percentages of effort are calculated to be in proportion
to the salary paid for Summer Salary.
Page 27 of 314) Run a Report of the status of your projects, including the amount of remaining
encumbrance. Locate the Reports icon to request the Certification Status report.
9.2 Screen Display
1) Filters. Near the top of the page, you will notice three filters: “Unprocessed”,
“Processed”, and “All” (see screen shot below). These filters have been developed to
help you quickly isolate records that you wish to work on/review. Or search for a
specific employee by last name, first name.
The “Unprocessed” filter displays employees on your projects that have not yet been
fully certified.
The “Processed” filter displays employees on your projects that have been fully certified.
The “All” filter displays all employees on your projects eligible for certification (remaining
salary encumbrance is zero), regardless of their certification status. If an employee does
not appear, they will most likely appear in Pending Payment Authorizations as needing
approval.
Page 28 of 312) Columns
The columns in this module have been selected to help give you the most relevant
certification information.
a b c d e f g
a) Employee: This is the employee’s name. Clicking on the name will display the
detail for the line –i.e. breakdown of effort by project, audit trail, etc.
b) Total Appointments: This is the total number of summer salary appointments for
the employee and may include appointments on projects that are not yours.
c) My Appointments to Approve: These are the total number of summer salary
appointments for the employee on your projects. In most cases this number will be
the same as the “Total Appointments” number and will only differ when the
employee is on multiple projects belonging to different PIs.
d) Total Effort: This is the employee’s total effort across all projects.
e) Effort on My Projects: This is the employee’s effort on your projects.
f) Effort on Other Projects: This is the employee’s effort on projects belonging to
other PIs.
g) Total Effort Certified: This is the total amount of effort that was certified for the
employee (either by you or other users).
Page 29 of 31Contact Information
Section 10: Contact Information
General Questions: For general questions about the Summer Salary process or
for specific questions about your transactions or payments please contact your
Campus Grants Office.
10
Employee Information: If you are unable to add an appointment for a recipient
because that individual’s name does not appear in the system, or if the annual
salary within the system for a recipient is incorrect, please contact CUNY’s
Payroll Manager, Shakira Smith, at 646-313-8260, or via email
Shakira.Smith@cuny.edu.
Project Information: For information related to your projects (e.g. fund
availability, classification, etc.) or for questions about unprocessed transactions
that were approved by your campus grants officer, please contact your RF
processor. Contact information for processors is available on the RF Website,
under Staff Directory.
Technical Support: For questions about using the system please contact the RF
summer salary administrator at 212-417-8402.
Reviewed By; Lisa DeStefano, Director
Approved By: Jarnee Bramlette, CFO
Page 30 of 31RF Summer Salaries
Semi-Monthly Certification and Paydate Deadlines
SUMMER 2021
Senior College Schedule
CUNY RF
Certification Period RF Submits Payroll Senior College
Submission # From To Approved Close Date Check Date
Spreadsheet
1 June 1, 2021 June 15, 2021 June 23, 2021 June 28 2021 July 15, 2021
2 June 16, 2021 June 30, 2021 July 7, 2021 July 13, 2021 July 29, 2021
3 July 1, 2021 July 15, 2021 July 21, 2021 July 27 2021 August 12, 2021
4 July 16, 2021 July 31, 2021 August 4, 2021 August 10, 2021 August 26, 2021
5 August 1, 2021 August 15, 2021 August 19, 2021 August 24, 2021 September 9, 2021
6 August 16, 2021 August 24, 2021 September 2, 2021 September 7, 2021 September 23, 2021
7 na na September 16, 2021 September 21, 2021 October 7, 2021
8 na na September 30, 2021 October 4, 2021 October 21, 2021
9 na na November 23, 2021 November 30, 2021 December 16 2021
Final Submission 10 na na February 17, 2022 February 22, 2022 March 10, 2022
Community College Schedule
CUNY RF
Certification Period RF Submits Payroll Community College
Submission # From To Approved Close Date Check Date
Spreadsheet
1 June 1, 2021 June 15, 2021 June 23, 2021 June 28 2021 July 9, 2021
2 June 16, 2021 June 30, 2021 July 7, 2021 July 13, 2021 July 23, 2021
3 July 1, 2021 July 15, 2021 July 21, 2021 July 27 2021 August 6, 2021
4 July 16, 2021 July 31, 2021 August 4, 2021 August 10, 2021 August 20, 2021
5 August 1, 2021 August 15, 2021 August 19, 2021 August 24, 2021 September 3, 2021
6 August 16, 2021 August 24, 2021 September 2, 2021 September 7, 2021 September 17, 2021
7 na na September 16, 2021 September 21, 2021 October 1, 2021
8 na na September 30, 2021 October 4, 2021 October 15, 2021
9 na na November 23, 2021 November 30, 2021 December 10 2021
Final Submission 10 na na February 17, 2022 February 22, 2022 March 4, 2022
Please note: Faculty can only work on RF grants from June 1 through August 24. The schedule above allows faculty members to certify
work on a semi-monthly basis. Once fully approved and reconciled, grants are to be paid in the next available bi-weekly payroll.You can also read