Cauliflower Books' Classic Book Creator Users Help Guide
←
→
Page content transcription
If your browser does not render page correctly, please read the page content below

1

                     Cauliflower Books’
                    Classic Book Creator
                        Users Help Guide

    Version 5.00
    With updates for Book Creator version 3.04
    Date 31/02/2019

Online Book Creator Guide & Help Manual v3.04    Cauliflower Books Ltd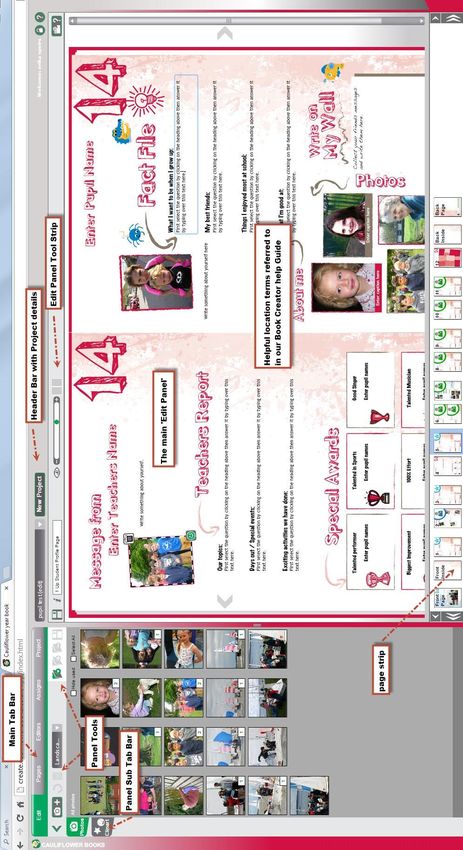
2

    Contents
    This book creator runs on a flash based system which is now being phased out by
    Adobe you will be asked permission to run FLASH on your machine. To use this system
    you will have to agree to this - IT IS PERFECTLY SAFE TO DO SO - the notification
    serves as a reminder that Flash will no longer be available to run this system in the
    next year or two.

    Section One: Book Organiser - Setting Up Your Book (GUIDE)
    1. Password and Login
    2. Creating a New Project
    3. Adding Editors: Teacher or Parent supervisors and Pupil Editors
    4. Adding and Organising Pages
    5. Assigning Pages
    6. Adding and Organising Photographs
    7. Adding Options to drop down options
    8. Viewing and Editing Pages in Your Project
    9. Signing Off Your Book and Ordering

    Section Two: Supervisors - Teachers/Parents (GUIDE)
    1. Password and Login
    2. Your role
    3. Access to Features

    Section Three: Populating & Editing Pages (Pupils/All Editors GUIDE)
    1. Password and Login
    2. Your Pages
    3. Uploading Images
    4. Organising Images
    5. Placing Images on the Page
    6. Clip Art
    7. Editing Headings
    8. Entering Text
    9. Editing Text
    10. Saving work

Online Book Creator Guide & Help Manual v3.04                            Cauliflower Books Ltd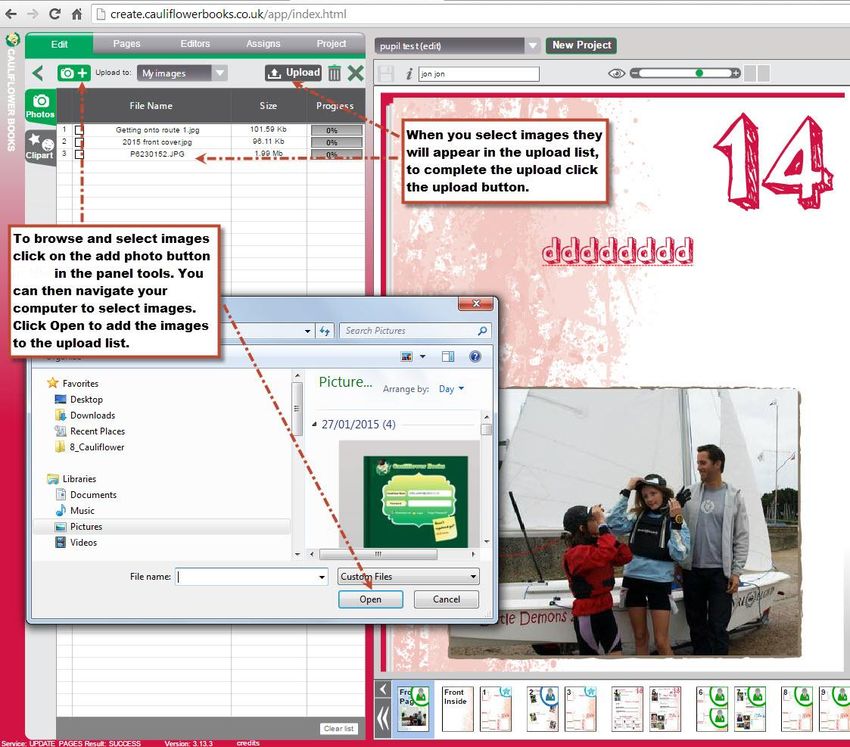
3
Section One: Book Organiser – Setting Up and Managing your Project
1 Password and Login
Register for your login and password – this will be emailed to you.
All book types can be created from your personal login. Our Book Creator allows for
multiple projects to be created so you only need to register once.
You can then access the login either by:
Button on the Home page on our website
Button from the Yearbook page on our website
Direct URL http://create.cauliflowerbooks.co.uk/app/
Login to access our Book Creator.
You will be the Book Organiser and your Login will allow you to set up books, add
editors if you wish, edit and oversee all pages, request proof and set the status of your
books to publish.
Online Book Creator Guide & Help Manual v3.04 Cauliflower Books Ltd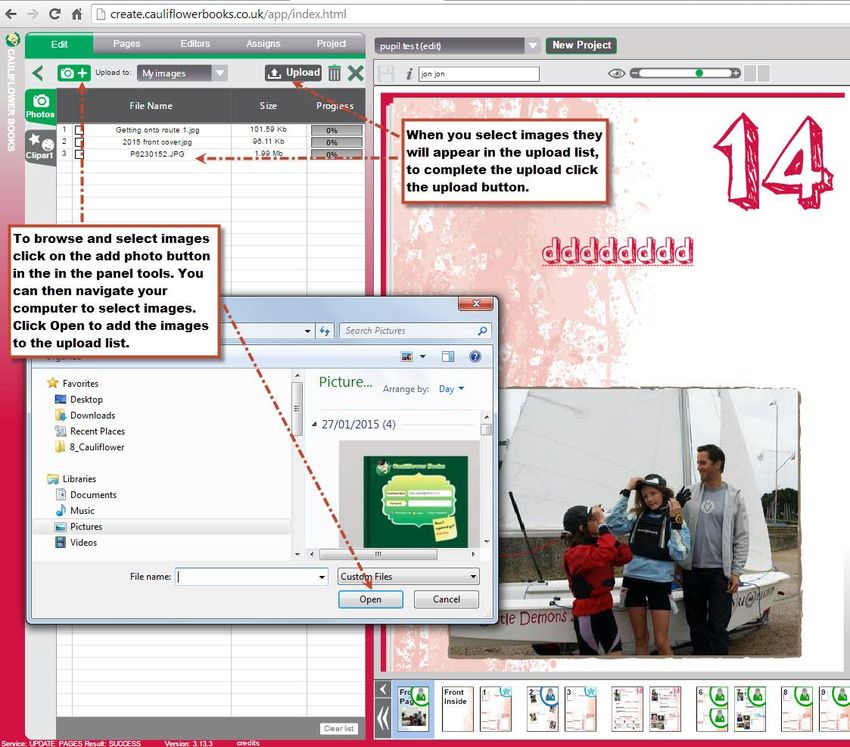
4

    Location Terms for areas on our Book Creator Interface:

Online Book Creator Guide & Help Manual v3.04                 Cauliflower Books Ltd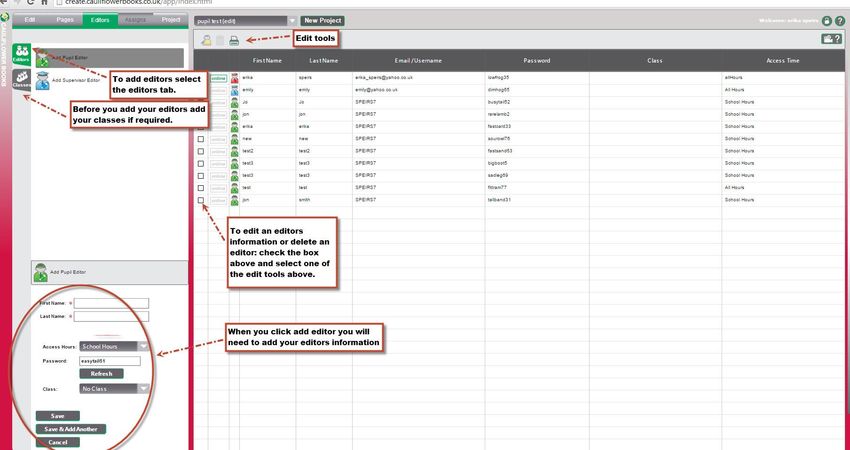
5
2 Creating a New Project
2.a General Information
When you are logging in for the first time you will automatically be taken to the New
Project Wizard (fig 2). Here you will be asked to complete 5 easy steps to set up
your project:
Select the type of project you wish to do
Choose the style theme for your project
Choose the colour scheme for your project (if applicable)
Give your project a name
Create your project
You can create more than one project by revisiting the New Project Tab at any time
and setting up a new project. This is located in the Main Header Bar at the top of the
Book Creator Interface.
Fig.2 New Project Wizard/New Project Panel
2.b Step 1 - Choosing a Book
First you will be asked to choose from the options which type of book you would like to
set up. From the options click on your choice to select the book you would like to
create.
2.c Step 3 - Theme
The next options allow you to select a Theme for your book. Once your book has been
started the theme cannot be changed due to slight variations in editing spaces between
different themes.
Online Book Creator Guide & Help Manual v3.04 Cauliflower Books Ltd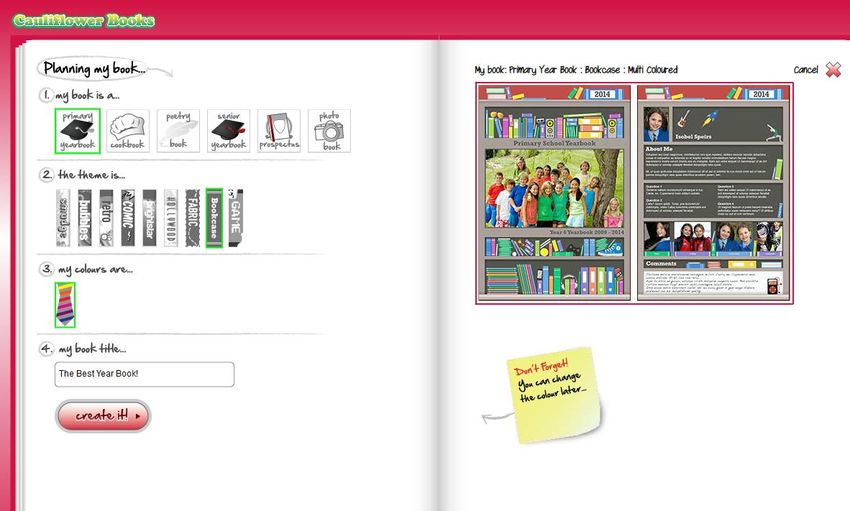
6
2.d Step 4 - Choosing a Colour
Many of our themes are available in a range of school colours - choose a tie colour to
view options. Alternatively we have a range of exciting one off multicoloured designs
for some book types.
2.e Step 5 - Project Name
Enter in a suitable name for your project eg 5S Year Book
2.f Step 6 - Click on 'Create It!' to create your project.
2.g Switching between Projects
You can switch between the projects that you have created by selecting the name of
the project from the drop down options located in the Header Bar.
2.h Switching Colours
If you would like to have a look at your book in the other colour options available for
that design then revisit the Project tab and select a different colour from the colour
options.
2.I Creating a New Project
To create a new project click on the 'New Project' button located in the Header Bar.
3 Editors
3.a General Information
Depending on the type of book you are creating you may choose to populate the book
yourself or have a team of helpers to help oversee the process and/or pupil editors who
can edit their allocated pages.
The Book Creator Interface can support three levels of editor:
The Organiser - sets up the book and can oversee and edit everything.
Supervisors - (Teacher/Parent/ Yearbook Team Member) can edit and oversee all
pages belonging to a book. This includes proof reading and editing pages populated by
pupil editors. They can also populate pages that they have agreed to complete.
Pupils - can edit pages that the Book Organiser has specifically allocated to them only.
Organising the editing of your book
The three levels of editor could allow for the following organisation (or similar):
Any book being organised and edited by an individual requires: Book
Organiser only.
A single class book (where pupils will help with editing) requires: A Book
Organiser and Pupil Editors.
A multiple class book (where pupils will help with editing) requires: A Book
Organiser, Supervisors (these could be teachers, parents or Yearbook team
members).
A multiple class book or whole school book (where Parents/Teachers or
Yearbook Team Supervisors will be the editors ie a PTA Project/ Senior School
yearbook) requires: Book Organiser, Adult or Student Supervisors.
Online Book Creator Guide & Help Manual v3.04 Cauliflower Books Ltd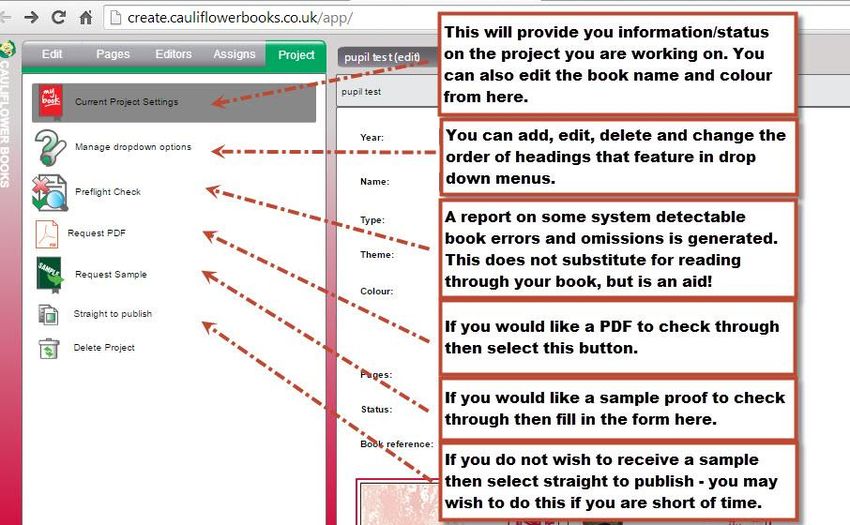
7

    3.b Editors Tab
    To add and manage your editors click on the Editors Tab in the Main Tab Bar.

    Fig. 3 Editors Tab

    3.c Step two- Adding Editors Name
    Click on the Editors Tab in the Sub Tab Bar. Decide whether each editor you add to our
    Book Creator will be a Supervisors or Pupil Editor and select the correct icon. Enter in
    the first and last name of your editor.
     Supervisors will also require an email address and check the Access all pages box
    to give your Supervisor access to the book pages.

    3.d Access Time
    From the drop down options choose when you would like the editor to be able to access
    their pages. Security Considerations - if pupil editors are given out of school hours as
    an option to complete pages this could allow members of the family to be involved with
    the content on the child’s allocated pages.
    You will also know when your editor have access to editing pages so that when you
    read through and make changes you are not overwriting content the same time as
    they might be working on a page.

    3.e Saving your Editors
    Click on Save and select the next editor type you wish to add from the editors panel
    above. When an editor is saved their name will be appear in the Editors Table. Their
    passwords are automatically generated.

    3.f Changing an Editors Details
    Details can be edited by selecting and double clicking on the editor's name from the
    editors table. The editor's dialogue box containing the editor's information will open
    and the organiser can then change the spelling of a name and/or access time, change a
    password or assign them to a class.
Online Book Creator Guide & Help Manual v3.04                              Cauliflower Books Ltd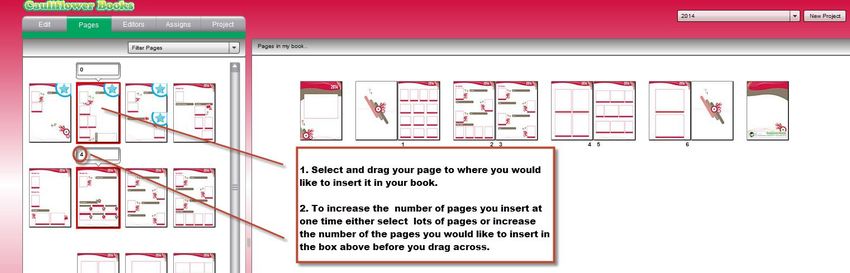
8
3.g Deleting an Editor
Select the editor(s) by checking the box on the left of the editors name in the table the
click on the Delete button located in Main Panel Tool Strip.
* Make sure the Editors Details Form is closed by clicking on CANCEL on the bottom
left of the Editors Panel as the delete button will not be available if this form is open.
3.h Editor Passwords
Editors passwords are generated automatically by our Book Creator . These need to be
given to the pupils/supervisors so that they can access and edit their pages our Book
Creator can email this list to yourself as the Organiser for you to print out. (A good
place for pupils to record their passwords would be in their ICT Books or rough books.)
If the computer generated password is not appropriate then the project organiser can
change the password by opening the Editors Details Form and click on the Refresh
Button under the current password our Book Creator will generate a new password.
4 Adding and Organising the Pages of Your Book
4.a General Information
From the Pages Tab you can view the pages available for the type of book you have
chosen. The filter button will help you view different styled pages.
Fig 4. Pages Tab – Pages Section
4.b Adding Pages
When the book is created it will already have a back and front cover and the
reverse side of the cover pages showing in the book strip.
To add more pages either select, drag and drop the page icons into book strip
where you want them – this will add one page at a time - or select the page type
then change the number of pages you wish to add and then drag the page icon
into the book strip as before but now it will add multiple copies of that page
type.
You can also select a range of pages and quantities and drag them all across
together.
Online Book Creator Guide & Help Manual v3.04 Cauliflower Books Ltd
9
To help you set up the book, default pages are indicated with a ‘star’ icon (e.g. for a
cookbook project it will indicate the recipe page and for yearbooks profile pages)
Do not drag and drop pages before the front cover as this will muddle the default
order of pages. If you have accidently done this please delete the pages and
add them again, alternatively contact customer services to rearrange the pages
for you.
4.c Ordering the Book Pages
Pages can be ordered in the page strip by clicking and dragging and dropping them
where you want them to be.
*** we will always insert if necessary a blank filler page to make your book an even
number of pages this can also be replaced with a page of your choice***
4.d Deleting Pages
Click on the page you wish to delete in your book strip and then click on the delete
button found in the 'Main Panel Tools Strip' located above the Main Panel.
5 Assigning Editors to Pages
5.a General
When you assign pages to editors these will be the pages your editors will be able to
view and edit from their personal log in.
5.b Assigning Pages
To assign an individual page to a pupil editor click on the Assigns Tab. The
Assigns Panel will open displaying all the editors that have been added to the
Book Creator Interface, Supervisors will be in blue, Pupils in green. The editors
can be sorted by class, type of editor or by unassigned.
To assign a pupil editor to a page drag the icon next to their name onto the page
you are assigning. The greyed out icon will now change to the pupil editors icon
and the pupils name will be displayed below the page.
Online Book Creator Guide & Help Manual v3.04 Cauliflower Books Ltd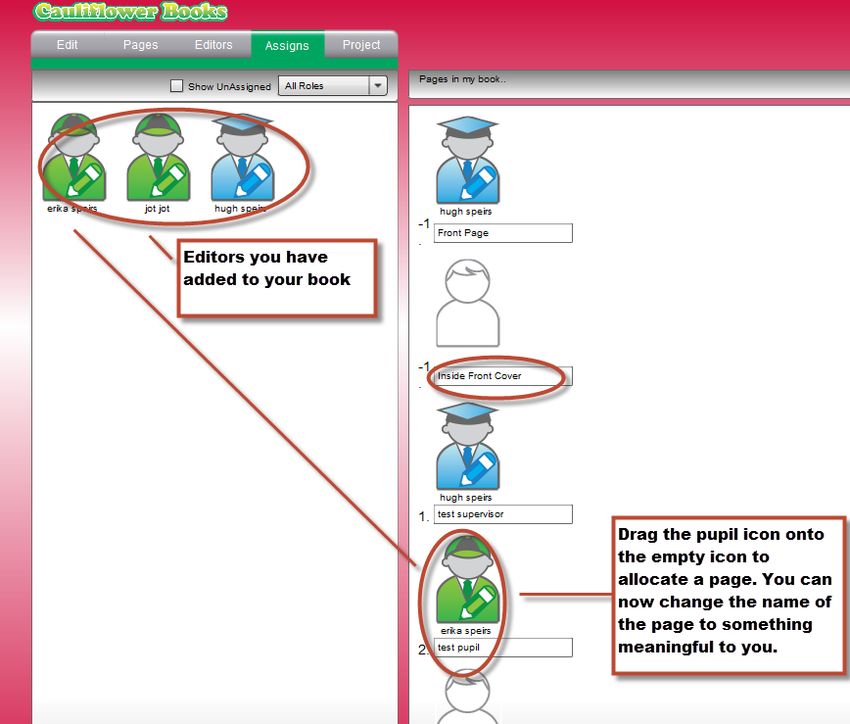
10

    Fig .5 Assigns Tab (To assign editors you need to already have added editors. See
    section 3)

    5.c Un-assigning a Page
    To un-assign the page drag the editor icon away from the page it has been assigned to.

    5.d Naming a page
    From the assigns tab the page names can be edited to something meaningful to the
    project (or the Supervisors).
    *save your changes.
    5.e Two up pages
    To assign editors to a two up page you will see 2x editor icons next to the page. This
    will allow 2 editors to be assigned to the page however each editor will only be able to
    edit their own section.

Online Book Creator Guide & Help Manual v3.04                              Cauliflower Books Ltd
11
6 Adding and Organising Photographs
6.a General Information
Images are managed from the Photos Tab located to the left of the Edit Panel. Click
on Edit in the Main Tab Bar and select the 'Photos' tab from the Sub Tab Bar on the left
of the Panel.
Fig 6. Images Tab
All editors can add their own images from their login.
6.b Uploading Images
Click on the Add Photos Search Button located in the Panel Tools. This will allow
you to locate images on your computer system.
Select the first image you want and click open. This will transfer the image to
our multi picker box. Continue selecting more photos in the same way.
When you have completed your selection click on the Upload button in the Panel
Tools. Once the photo's have uploaded they will display in the Photo Panel.
*** Images are converted to lower resolution images for the use in our Book
Creator ***
Online Book Creator Guide & Help Manual v3.04 Cauliflower Books Ltd12
6.c Image Quality
Do not upload low resolution photos. Standard or high (500kb+) will print nicely for all
small photo boxes and higher resolution (1 to 1.5 mb) would be best for the larger
photo boxes. For full page photos we would recommend 2 mb. Super high quality
photos will take a long time to load but once uploaded the Book Creator will
automatically reduce the quality for online use in the future.
6.d Checking Image Quality
Once you have dragged your photo into the box on the page where you wish to use it,
you can click on the image to do a quality check. The smiley face will let you know
whether the image is of a suitable resolution for the size of box you put it in.
6.e Organising Your Images
Using the View filter 'Sort by' options found in the Panel Tools above your photo panel:
Just portrait
Just landscape
Unused photos
All
Newest
Oldest
6.f Organising Images into Folders
Your images can be organised into folders eg events, dates, class groups etc
Creating Folders
Click on the +Folder Button in the Panel Tools at the top of the photo panel.
(If this is greyed out - click on the open folders Icon next to it to enable)
A new set of Panel Tools will appear showing a folder 'My Images' (a default
folder) and your 'New Folder' for you to name and organise your photos into. To
give your folder a meaningful name, click on the 'New Folder' text with the hand
and a curser will appear replace 'New folder' with your own text.
You can set up as many folders as you like to help you organise your images.
You can only view photographs you have uploaded - you don't see photographs
uploaded by another editor.
Adding Photos to Folders
Click on your 'My Images' folder to see any images you have uploaded - photos
will always upload to this folder from here you can then organise them into
folders you have set up. Select your photo or photographs (a tick will appear in
the bottom left corner of the image if it has been selected correctly) drag
selected photo/ photographs to the folder you wish them to be stored in.
You can only view photographs you have uploaded - you don't see photographs
uploaded by another editor
Viewing and using images in Folders
Click on the folder you wish to view. Your photographs will appear in the photo
panel. Photos can be dragged onto your page from any folder.
Online Book Creator Guide & Help Manual v3.04 Cauliflower Books Ltd13
6.g Deleting Images from the Online Book Creator
To delete a photo select the photo and click on the bin button in the Panel Tools.
This will delete the photo from the Book Creator system.
To remove a folder select the folder by clicking on it and then click on the - folder
button in the Panel Tools. Your photos will be returned to the 'My Images' folder
and the folder you have selected for deletion will be deleted.
6.h Rotating Images
To rotate an image select it and click on the Rotate Arrow button in the Panel
Tools.
7 Drop Down Options Editing - Manage Drop Down Options
7.a Adding your own questions/titles
It is possible to add your own options to the drop down options. To do this go to
Projects Tab and click on Manage Drop Down Options.
Along the top of this panel are all the pages that have drop down options on them.
Select the page that you wish to add or edit the drop down options.
To add a new wording option
Click on the 'New Option' icon located in the Panel Tools Strip above the
Manage Options Panel. A box will appear for you to type in your text and then
click on Add.
To change the order of the list
Click in the check box next to the wording and toggle up and down using the
buttons on right to change the order.
To edit the existing wording
Click in the check box next to the wording you wish to edit and then click on the
edit icon located in the Panel Tools Strip above the Manage Options Panel. Edit
the wording and click save.
8 Viewing and Editing the Pages of Your Project
8.a General Information
Once the project is under way the Project Organiser will want to view the Editors work
regularly to make corrections and do any final editing before a sample proof is ordered.
If you have created more than one project then you can change which project you view
from the Project Picker located in the Header of the Book Creator Interface.
Online Book Creator Guide & Help Manual v3.04 Cauliflower Books Ltd14
8.b Moving between projects
To view different projects that you may be organising select the project you wish to
work on from the drop down Options in the Header of the Book Creator Interface.
8.c Organising your screen area
Once you have set up your book select the Edit Tab. If you don't want to add photos or
clip art and you are proof reading and editing text you can collapse the organisers
panel on the left by dragging the line separating the two sections of the screen over to
the left. This will mean that the screen is now predominantly displaying the editing
area.
Fig 7. Edit Tab
8.d Book view
You may view book pages one at a time using the directional arrows to move
backwards and forward. (default setting)
Or you can view your book in spreads (double pages). To change to the view to spreads
click on the spread icon located in the 'Edit Panel Tool Strip' located along the top of the
interface.
8.e Zoom
To make your pages easier to check you may wish to use the zoom located in the 'Edit
Panel Tool Strip' located along the top of the interface.
8.f Navigation
For larger books you may wish to locate specific sections of your book and jump to
these sections. Use the page strip at the bottom to move quickly to the section of the
book you are looking for. If you have named your pages these will be displayed as you
slide up the book strip.
Online Book Creator Guide & Help Manual v3.04 Cauliflower Books Ltd15
8.g Editing
To find out about populating and editing the pages please read Section Three of the
User’s Guide......this section can also be used as instructions for Pupil Editors.
9 Signing off your project and requesting a proof
9.a General Information
The signing off of your project and requesting a printed proof is done in the Project
Tab.
Fig 8. Projects Tab
9.b Pre flight Checks
This tool provides assistance for checking through your book but this is no substitute
for reading the book carefully yourself!
A list of the following errors will be automatically generated for your book:
Missing Images
Repeated Images
List of unedited prompt text left in place (headings & captions)
List of low resolution images
9.c Edit Status
When you have created a project it will automatically be at the Edit Status. Edit
Status allows The Organiser and Editors to work on the pages.
Online Book Creator Guide & Help Manual v3.04 Cauliflower Books Ltd16
Remember that this is a self editing project so check through the Editors work
carefully!
9.d Request Sample
When the Organiser thinks the book is finished and they have checked it for
mistakes and are happy with the images....then the Organiser can request a
soft back printed proof.
Click the Request Sample Proof check box in the Project Tab and we will
prepare your saved book for printing.
At this point your book will change in status in the Project Pickers List. You will
temporarily be locked out from editing this book whilst we create a PDF of your
book to print.
When we have printed your soft back proof we will change the status of your book
in the list so that you can make any final edits before you order.
Request a PDF Proof can also be selected from the project tab and a low
resolution and watermarked PDF will be generated for you. This is another good
tool for checking through and making sure you are happy with your book and a
good way of distributing multiple copies to editors who are assisting you.
9.e Final Edit
When your sample proof has been printed the project organiser will be able to make
final adjustments and changes and the status of the project will be at Final Edit
stage.
9.f Publish & Order
Once you are happy with your book please click on Publish in the Project Tab. Fill in
the online order form. Please send a cheque for your order when you receive your
email confirmation. (If your order is urgent please phone the office.)
Cheques should be made to Cauliflower Books.
Online Book Creator Guide & Help Manual v3.04 Cauliflower Books Ltd17
Section Two: Supervisors (Teachers/Parents/ Yearbook Team) - GUIDE
1. Password and login
1.a General Information
Passwords and Login will be given to you by your Organiser, or they may be emailed to
you by the Organiser via our Book Creator system.
Enter these into the Login box and you will access the Book Creator Interface.
2. Your role
As supervisor you will be assisting your Book Organiser and you will be able to edit
pages but not add additional pages. The Book Organiser controls the book set up and
ordering.
When you Log in you will see the pages of the book you have been added to. If you try
to log in and you see No Projects Assigned - speak to your organiser as they have
not allocated you to a project.
3. Your access to features
Your login will allow access to oversee and edit the work of pupil editors as well as
editing any pages you have been asked to do directly - you will not have any access to
the set up features of the book.
If you require extra pages or a new pupil adding to the Book Creator you will need to
liaise with your Book Organiser to make any changes you require.
To edit your pages please read: Section Three Editors: Populating & Editing Pages
(Guide)
Online Book Creator Guide & Help Manual v3.04 Cauliflower Books Ltd18
Section Three: Editors: Populating & Editing Pages (Users Guide)
1. Passwords and Login
1.a General Information
Pass words and Login will be given to you by your Organiser.
Enter these into the Login box and you will access the Book Creator Interface.
If you cannot login ' NO PROJECT ALLOCATED' your book organiser has not
assigned you any pages in the project
2. Your pages
2.a General Information and set up of your working area
The pages that have been allocated to you will be displayed in the Page Strip at the
bottom of your screen. Your editing space can be enlarged by collapsing the photo and
clipart panel this can be achieved by clicking on the green arrow at the top left of your
Edit Panel.
To edit your page click on the required page in your page strip and it will load into the
Main Edit Window. To Enlarge the Page use the zoom bar located in the 'Tool Strip'
above the Main Edit Panel.
If you don't have the pages you expected displayed in the page strip your organiser
has not yet allocated these to you - speak to your organiser!
Online Book Creator Guide & Help Manual v3.04 Cauliflower Books Ltd19
3 Adding and Organising Photographs
3.a General Information
Images are managed from the Photos Tab located to the left of the Edit Panel. Click
on Edit in the Main Tab Bar and select the 'Photos' tab from the Sub Tab Bar on the left
of the Panel.
Fig 6. Images Tab
All editors can add their own images from their login.
3.b Uploading Images
Click on the Add Photos Search Button located in the Panel Tools. This will allow
you to locate images on your computer system.
Select the first image you want and click open. This will transfer the image to
our multi picker box. Continue selecting more photos in the same way.
When you have completed your selection click on the Upload button in the Panel
Tools. Once the photos have uploaded they will display in the Photo Panel.
*** Images are converted to lower resolution images for the use in our Book
Creator ***
Online Book Creator Guide & Help Manual v3.04 Cauliflower Books Ltd20
3.c Image Quality
Do not upload low resolution photos. Standard or high (500kb+) will print nicely for all
small photo boxes and higher resolution (1 to 1.5 mb) would be best for the larger
photo boxes. For full page photos we would recommend 2 mb. Super high quality
photos will take a long time to load but once uploaded the Book Creator will
automatically reduce the quality for online use in the future.
3.d Checking Image Quality
Once you have dragged your photo into the box on the page where you wish to use it,
you can click on the image to do a quality check. The smiley face will let you know
whether the image is of a suitable resolution for the box you are using it in.
4. Organising Your Images
Using the View filter 'Sort by' options found in the Panel Tools above your photo panel:
Just portrait
Just landscape
Unused photos
All
Newest
Oldest
4.a Organising Images into Folders
Your images can be organised into folders eg events, dates, class groups etc
Creating Folders
Click on the +Folder Button in the Panel Tools at the top of the photo panel. A
new set of Panel Tools will appear showing a folder 'My Images' (a default
folder) and your 'New Folder' for you to name and organise your photos into. To
give your folder a meaningful name, click on the 'New Folder' text with the hand
and a curser will appear replace 'New folder' with your own text.
You can set up as many folders as you like to help you organise your images.
Adding Photos to Folders
Click on your 'My Images' folder to see any images you have uploaded - photos
will always upload to this folder from here you can then organise them into
folders you have set up. Select your photo or photographs (a tick will appear in
the bottom left corner of the image if it has been selected correctly) drag
selected photo/ photographs to the folder you wish them to be stored in.
Viewing and using images in Folders
Click on the folder you wish to view. Your photographs will appear in the photo
panel. Photos can be dragged onto your page from any folder.
4.b Rotating Images
To rotate an image select it and click on the Rotate Arrow button in the Panel
Tools.
Online Book Creator Guide & Help Manual v3.04 Cauliflower Books Ltd21
4.c Deleting Images from the Online Book Creator
To delete a photo select the photo and click on the bin button in the Panel Tools.
This will delete the photo from the Book Creator system.
To remove a folder select the folder by clicking on it and then click on the - folder
button in the Panel Tools. Your photos will be returned to the 'My Images' folder
and the folder you have selected for deletion will be deleted.
5. Placing Images on the Page
5.a General Information
To get the best results use the correct orientated image in a similarly orientated image
box in our system ie drop a landscape pictures in landscape image boxes and portrait
ones in portrait boxes. You can use the any photo in any box but some of the image
may be truncated.
5.b How to
Move your mouse so that the cursor is over the image you wish to use from the photo
viewer on the left. Click on the image and keep the mouse button depressed. Drag the
mouse so that the cursor moves across the page. When the cursor is over the photo
frame you require let go of your mouse button. Your image will now fit to the size of
this frame.
5.c Choosing the best view
You may drop a portrait photo into a landscape frame or vice versa. If you do then you
have the option of moving the image around the frame to choose the best position for
your image. Once you have dropped your image into the frame move the cursor over
the image and a hand will appear. Drag the hand around until the picture is where you
would like it.
5.d Removing an Images from the page
Click on the photo you have dragged into the photo frame and select the bin Icon to
remove the image from the page.
6. Clip Art
We have a wide range of clip art themed and colour coordinated to populate Profile
Pages in the Yearbook Options, Recipe pages in the Cookbook Option and Poetry Pages
in the Poetry books. Clip art can only be added to predefined areas - if you click the
Show Button (an eye symbol) located in the 'Tool Strip' above the Main Edit Panel
clipart positions are revealed as small square boxes. To add clip art, dragged and
dropped images into the square boxes. To delete clip art select the clip art and a
delete button will appear.
Online Book Creator Guide & Help Manual v3.04 Cauliflower Books Ltd22
7. Editing Headings
7.a General Information
Many of the headings on the page are editable and you can simply write your own text
where it prompts you to. Also on some of the book pages there are fixed set of
headings for sections on the page. Clicking onto Paragraph headings /Questions /Award
titles etc this will reveal a drop down options with a set of predetermined headings
from which you can choose which heading you prefer.
* The book organiser can add additional options to the drop down options from their
login. (Ref section 7 in the organiser guide to setting up a book)
7.b How to
Use the Show Button (an eye symbol) located at the top of the main Edit Panel of
the interface. This will reveal in grey the titles/headings which are editable and which
have drop down options. For drop down options click on the existing heading to reveal
the selection bar and then use the arrow to view all of the drop down options. Some of
the drop down options are large and can be scrolled through using the slider bar.
Click on the one you want and it will appear in the heading.
8. Entering Text
8.a General Information
The text style and size is fixed so that the finish of the project has a consistent look
throughout. There are prompts on each page to show you where to enter your text;
you can also locate text areas by clicking on the Show Button (an eye symbol)
which will then turn the editable areas grey on your page. Please make sure you delete
any text prompts before you begin to write.
Paragraph text can be formatted using italic, bold and underline - these options are
located above the Main Edit Panel.
8.b How to type in your text:
Place curser in editable area and drag to highlight the prompt and begin to type – the
prompt text will then disappear and will be replaced with your text.
To format text with italic, bold or underlined select the text you wish to change and use
the Paragraph text tools located at the top of the Edit Panel.
*Click in the box where you would like to start using formatting tools before
you start selecting text. Then select the text you wish to edit.*
Online Book Creator Guide & Help Manual v3.04 Cauliflower Books Ltd23
9. Editing Text
9.a General Information
You can enter, delete and retype text in the same way as you do in any word
document.
Spell Check
Words underlined in red may be spelt wrongly - right click on your mouse to see some
suggested alternative spellings.
10. Saving Work
The Book Creator will save your page automatically when you move to another page or
when you logout. However we recommend so as to avoid losing any work click on the
save button regularly.
Online Book Creator Guide & Help Manual v3.04 Cauliflower Books LtdYou can also read