Gradekeeper Web App User's Guide - Copyright 2021 by Daniel Ethier All Rights Reserved
←
→
Page content transcription
If your browser does not render page correctly, please read the page content below
Gradekeeper Web App
    User's Guide
    Copyright © 2021 by Daniel Ethier
           All Rights Reserved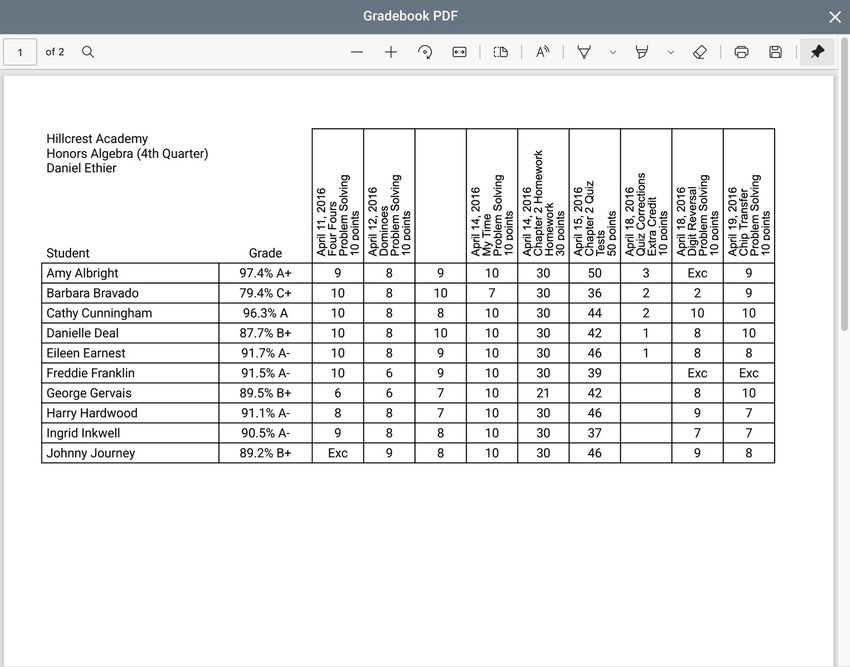
Introduction

Welcome to the Gradekeeper web app. With the web app, you can work with your classes
from any web browser. You do not need to install anything to use the Gradekeeper web app.
Just open your web browser and visit https://www.gradekeeper.com/app/ and you are in the
app.

When you first start the app, you will see the reminder to pay window:

If you already have an individual license to use the desktop app, then you already have a
license to use the web app as well. Click Enter Code at the bottom of the reminder window
and enter the same name and registration code you used with the desktop app.

You will need to enter your name and registration code into the web browser you want to use
on each computer you will be using the Gradekeeper web app on. Be sure to write down your
registration code and keep it in a safe place.
When you are in the Gradekeeper web app, there will be a toolbar at the top with buttons for
common tasks.

On the left side of the toolbar, from left to right, are buttons to link to your Dropbox, to create a
new class, to make a copy of the current class, to upload a class from your computer to your
Dropbox, to open a class from your Dropbox, and to save the current class:

In the middle of the toolbar, are buttons to undo the most recent major change, to edit global
comments, to sort students or assignments, and to curve assignment scores:

On the right side of the toolbar, are buttons to send email reports, to print the gradebook grid,
attendance grid, seating chart, or student report, to export students and their grades to text, to
export the gradebook and attendance grids to Excel, to get information about Gradekeeper,
and to view this user's guide in a new tab in your browser:

At the bottom of the window is a tabbed bar to choose the current view of your class:

You can view the gradebook grid, the attendance grid, the seating chart, the student report, or
various options to set up your school year, assignment categories, letter grades and more.
Using Dropbox

The Gradekeeper web app saves your classes in your Dropbox. You must have a Dropbox
account to use the web app. Dropbox is free for the first 2 gigabytes of space, which is more
then enough for Gradekeeper.

There are many advantages to saving your classes in Dropbox. You will be able to access
your classes from anywhere you have internet access. You can keep your classes in sync
when you make changes from different devices. Your classes will always be backed up, in
case something happens. And you can access older versions of your classes, in case you
make a serious mistake or even delete a class by mistake.

To link to your Dropbox, click the Dropbox icon on the left side of the toolbar. A new tab will
open in your web browser showing the Dropbox login page:

If you already have a Dropbox account, enter your email and password and click Sign In. If
you do not have a Dropbox account, click the link at the bottom to create an account. Once
you have authenticated into your Dropbox account, you will be returned to the Gradekeeper
web app.
When you link to your Dropbox, a folder called Gradekeeper will be created inside the Apps
folder in your Dropbox. This is where your classes will be saved. This is the only folder that
Gradekeeper can access in your Dropbox.

You can only open Gradekeeper classes with Gradekeeper. You cannot open Gradekeeper
classes with the Dropbox app or from the Dropbox web page.

While you will be able to open your classes from different devices, you should never open the
same class from different devices at the same time. Changes made from different devices will
not be synced. The most recently saved class will completely replace any previous copy.

If you do open the same class from different devices and save from both devices, Dropbox
will notice this and may create a “conflicted copy” of the class. You will need to open both
classes and manually merge your changes into one copy of the class.

Since your classes are saved to your Dropbox, you will need internet access to use the
Gradekeeper web app. If you do not have internet access, you will not be able to open any
classes or save the currently open class.

If you have a class open, and you are no longer linked to Dropbox, clicking the save button
will allow you to download the updated class to your computer, so you can update it in your
Dropbox later.

The Gradekeeper web app saves Dropbox information and other information in the web
browser's local storage. Some ad blockers may prevent Gradekeeper from saving to local
storage. If you have trouble linking to Dropbox, try whitelisting the Gradekeeper web app in
your ad blocker.

Creating a New Class

To create a new class, click the new class icon in the toolbar. The new class dialog will
appear:

Enter a file name for your new class. File names cannot begin with a period or include the
forward or backward slash characters. If you do not include the .grk file extension, it will be
added for you.

The file name must be different than any class currently saved in your Dropbox.

Enter a name for this class, the school name, and the teacher name. If you have opened or
created classes before this class, the same school name and teacher name will be entered
for you.

You can also choose the term in the school year to start with.

Click Create when you are ready to create the new class. You will then sent to the options
view, where you can set up your school year, categories, letter grades, etc.
Opening an Existing Class

To open an existing class from your Dropbox, click the open button in the toolbar. The open
class dialog will appear, listing the classes currently in your Dropbox:

Click a class to select it, then click Open to open that class. You can also double click a class
to open it immediately. Note that the Gradekeeper web app cannot see inside of other folders
in the Gradekeeper folder in the Apps folder in your Dropbox. Only classes saved at the root
level of that folder will be listed.

You can also upload a class from your computer to your Dropbox. Click the upload button in
the toolbar. The open dialog will appear, allowing you to select a class from your computer.
The class will be opened in the Gradekeeper web app. When you save the class, it will be
saved to your Dropbox.

After making changes to a class, you can save the class by clicking the save button in the
toolbar. The class will be saved to your Dropbox. If this is a new class without a file name,
then you will be asked for a file name.

The Gradekeeper web app will try to save any changed class to your Dropbox whenever you
create a new class or open an existing class. This is to help prevent you from losing any
changes you've made. But it is always best to save your changes often.

If you try to close the browser window or go to another website, the web browser will ask you
to confirm, since any changes you made to the currently open class will not be saved if you
leave the web app.
Gradebook View

To view the gradebook grid, choose the Gradebook tab at the bottom of the window:

On the upper left is the subject name and the current term in the school year. Across the top
are the assignments for the current term. When you view the gradebook, the app will scroll to
the last few assignments for convenience. You can use the scrollbar at the bottom to see
earlier assignments.

Student IDs and names are listed along the left, along with the percent and grade for the
current term. Scores are listed in the body of the gradebook. Scores with a footnote are color
coded.

Click the subject name on the upper left to edit the subject, teacher name, school name, and
to choose the current term in the school year:
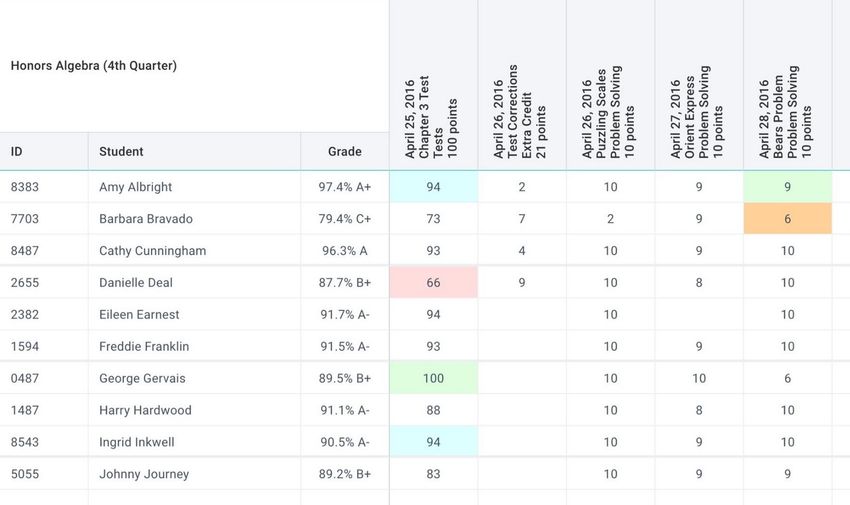
Click an assignment header to edit an existing assignment, or click an open column in the
assignment header area to create a new assignment:

You can choose the assignment date, assignment name, choose a category, and points
possible for the assignment. As you are typing in an assignment name, if the name partially
matches a previous assignment, a pop-up menu will appear. Choose an assignment name to
enter the name, category, and points possible for that assignment. This can save time when
entering the same assignment in more than one section of a class.

The edit assignment window shows assignment statistics, including the breakdown by letter
grade, the minimum and maximum scores, the range of scores, the mean, median, and the
standard deviation. You can click the dots to switch between the breakdown by grade and the
statistics views. You can mouse over a column in the bar graph to see the number of students
with that letter grade.

Click Delete to delete an existing assignment. The last deleted assignment and its scores will
be saved so it can be inserted into an open column in another term or even in another class.
When you click the assignment header for an open column, click the Paste button to insert
the last deleted assignment and its scores into that open column.
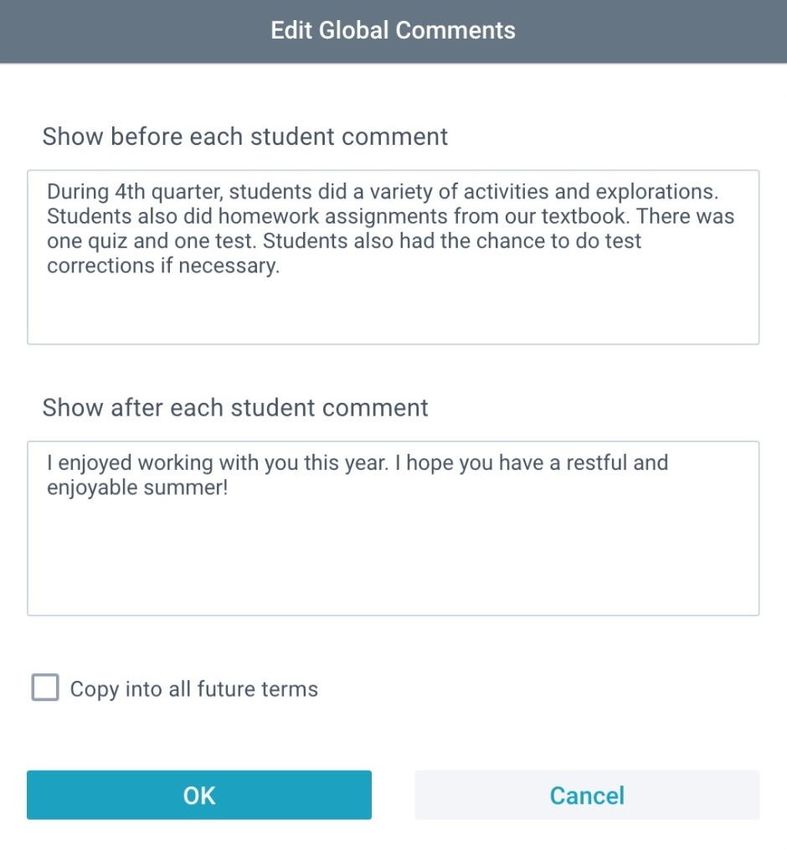
Click the edit global comments button in the toolbar to edit comments that will appear before
and after each individual student comment on student progress reports:

If you check the box to copy into all future terms, these global comments will be copied into all
terms following the current term.

Global comments can supplement individual student comments by sharing things you did in
class during a term along with what is coming next and things you want all parents to know.

If you are unhappy with your new global comments, you can undo them by clicking the undo
button in the toolbar. This will also undo any global comments copied into future terms.
Click the curve assignment scores button in the toolbar to curve the scores for an assignment
to your desired high score, average score, and minimum score:

Choose the assignment you want to curve. The current high score, average score, and low
score will be displayed. Enter your desired high score, average score, and low score, then
click OK to curve the scores for that assignment. You can choose to round curved scores to
the nearest whole integer.

If you are not happy with the curved scores, you can undo the curve by clicking the undo
button in the toolbar.
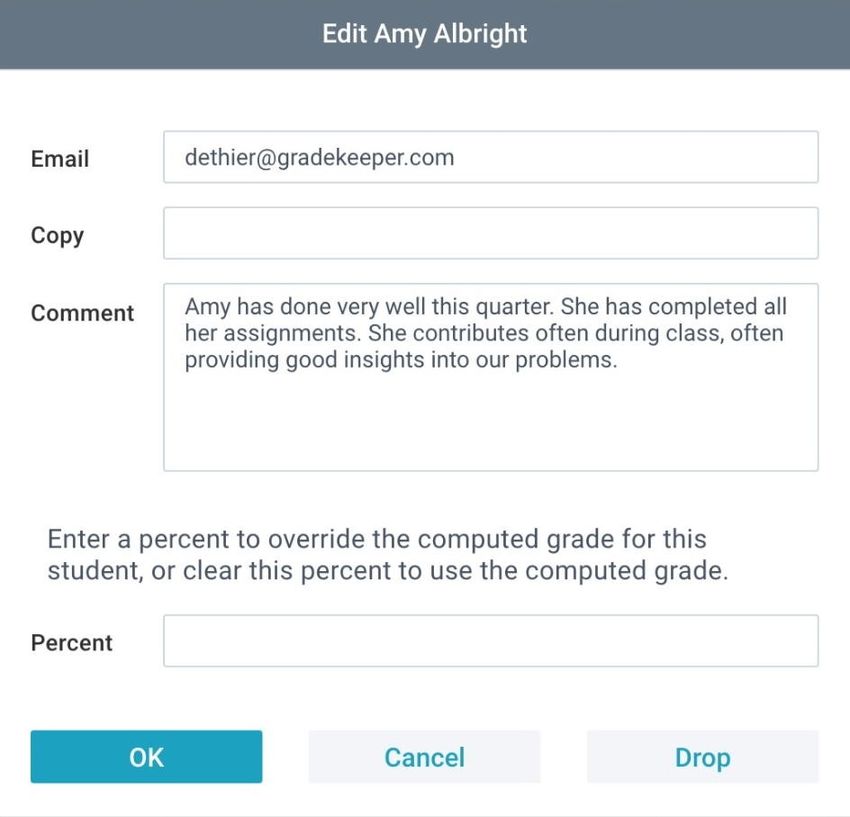
Click a student's grade to edit the student email addresses and add a comment for the
student:

The email and copy addresses are used when sending email reports. You can include more
than one email address in each field by separating them with a comma or a space. You can
add a comment of up to 255 characters, which will be included in progress reports.

You can enter a percent to override the computed grade for this student and lock it. When a
grade has been entered, the term grade will be shown in square brackets. You can clear a
locked grade by clearing the edit field and leaving it blank.

You can drop a student from the active roster by clicking the Drop button. You can delete a
dropped student from the class by clicking the Delete button.
To edit student IDs or names, just click and type the new ID or name. Do not delete a name
though. This does not delete the student, but will cause all following students to be dropped
from the active roster!

To assign random IDs to all students, enter an ID in the desired format for the first student,
then hold the shift and control keys and hit return or the down arrow. All IDs will be replaced
with random IDs in the same format.

To edit a score, click the score and type the new score. Scores can be decimal numbers,
special scores (like Exc to excuse a score), ratios (like 3/4 to give 75 points on a 100 point
assignment), or negatives (to deduct some number of points from the points possible for the
assignment).

To give the same score to all students, enter the score for the first student, then hold the shift
and control keys and hit return or the down arrow. To give the same score on all assignments
to a student, enter the score for the first assignment, then hold the shift and control keys and
hit the right arrow.

To edit the footnote for a score, right click the score when it is not being edited:

The current footnote will appear in a lighter shade. Choose a footnote from the list, or choose
to remove any footnote from the score. The color codes for your footnotes appear next to the
footnotes in the footnotes tab in options.
To print the gradebook grid, click the print icon in the toolbar. If you are using the Chrome,
Edge, or Firefox web browsers, a window with a PDF of the gradebook will open. If you are
using the Safari web browser, the PDF will open in a new tab:

Chrome, Edge, and Firefox will show a toolbar at the top that will allow you to print or save the
PDF. Safari will open the PDF in a new browser tab. You can print by choosing Print from the
File menu.
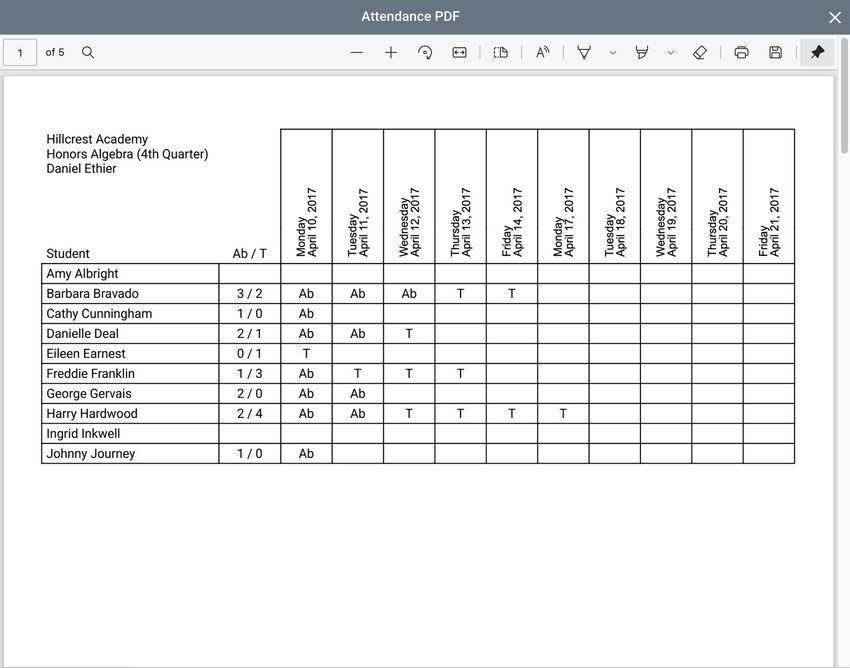
Attendance View

To view the attendance grid, choose the Attendance tab at the bottom of the window.

The attendance grid includes the subject name on the upper left and the student ID and name
on the left, just like the gradebook grid. The dates class is in attendance are listed along the
top. Attendance codes for each student and date are listed in the body of the attendance grid.

As with the gradebook view, you can edit the subject or choose another term in the school
year by clicking the subject on the upper left. You can edit student IDs or names by clicking
and typing.

You can enter an attendance code for a student by clicking the cell for that student and date
and entering a valid attendance code. Attendance codes are set up in the attendance tab in
options.

To give the same attendance code to all students, enter the code for the first student, then
hold the shift and control keys and hit return or the down arrow.
To print the attendance grid, click the print icon in the toolbar. If you are using the Chrome,
Edge, or Firefox web browsers, a window with a PDF of the attendance grid will open. If you
are using the Safari web browser, the PDF will open in a new tab:

Chrome, Edge, and Firefox will show a toolbar at the top that will allow you to print or save the
PDF. Safari will open the PDF in a new browser tab. You can print by choosing Print from the
File menu.
Seating Chart

To view the seating chart, choose the seating chart tab at the bottom of the window.

You can assign students to seats randomly by clicking the Assign Seats button. The assign
seats dialog will appear:

Enter the number of rows and columns in your seating arrangement, then click OK. Students
will be randomly assigned to new seats.

You can manually swap students in the seating chart. Click once on a student. The seat will
turn orange. Click on another student or on an open seat. Those two seats will be swapped.

You can make open seats unavailable or hidden by clicking on the seat. Unavailable seats will
be shaded gray. If a seat is hidden, click that space to make the seat visible.
You can take attendance from the seating chart by clicking the Attendance button above the
seating chart. The take attendance dialog will appear:

The seating chart will highlight those students who have been marked with that attendance
code on that date. Click on a seat to mark the student in that seat with that attendance code
on that date. Click again to remove that attendance code.

When you are done taking attendance, click the Seating Chart button above the seating chart
to return to the normal seating chart.
To print the seating chart, click the print icon in the toolbar. If you are using the Chrome, Edge,
or Firefox web browsers, a window with a PDF of the attendance grid will open. If you are
using the Safari web browser, the PDF will open in a new tab:

Chrome, Edge, and Firefox will show a toolbar at the top that will allow you to print or save the
PDF. Safari will open the PDF in a new browser tab. You can print by choosing Print from the
File menu.
Printing Reports

To view reports, choose the reports tab at the bottom of the window.

Click the Report Options button at the top center to choose which items will appear in email or
PDF reports:

You can choose to include a summary of all categories, attendance totals, and a summary of
grades for each term in your school year, including semester grades and the year end grade.
You can also choose to include a signature line on all student reports.

To open a report, click the image of the report you want. If you are using the Chrome, Edge,
or Firefox web browsers, a window with a PDF of the gradebook will open. If you are using
the Safari web browser, the report will open in a new tab.
The class summary report lists each student in the class and a summary of the current term in
the school year.

If you choose to include attendance in Report Options, then a summary of absences and
tardies will be shown, along with the grade for the current term. No semester or year grade
will be shown.

If you choose not to include attendance, but choose to include the semester grade, then the
semester grade will be shown if this is the last term in the semester. If you choose to include
the year grade, then the final grade for the year will be shown if this is the last term in the
school year.

Chrome, Edge, and Firefox will show a toolbar at the top that will allow you to print or save the
PDF. Safari will open the PDF in a new browser tab. You can print by choosing Print from the
File menu.
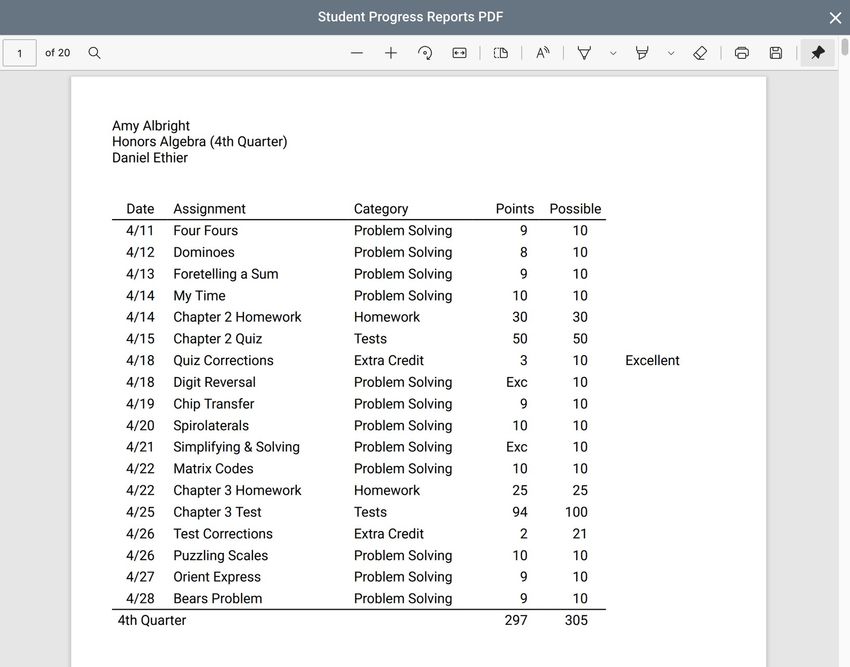
The student progress report lists each student and their assignments for the current term in
the school year. You can choose to show a summary by category and a summary of grades
for each term in the school year.

Chrome, Edge, and Firefox will show a toolbar at the top that will allow you to print or save the
PDF. Safari will open the PDF in a new browser tab. You can print by choosing Print from the
File menu.

To print one student report, note the page number of that student's report. When you choose
to print, enter that page number as the page to print.
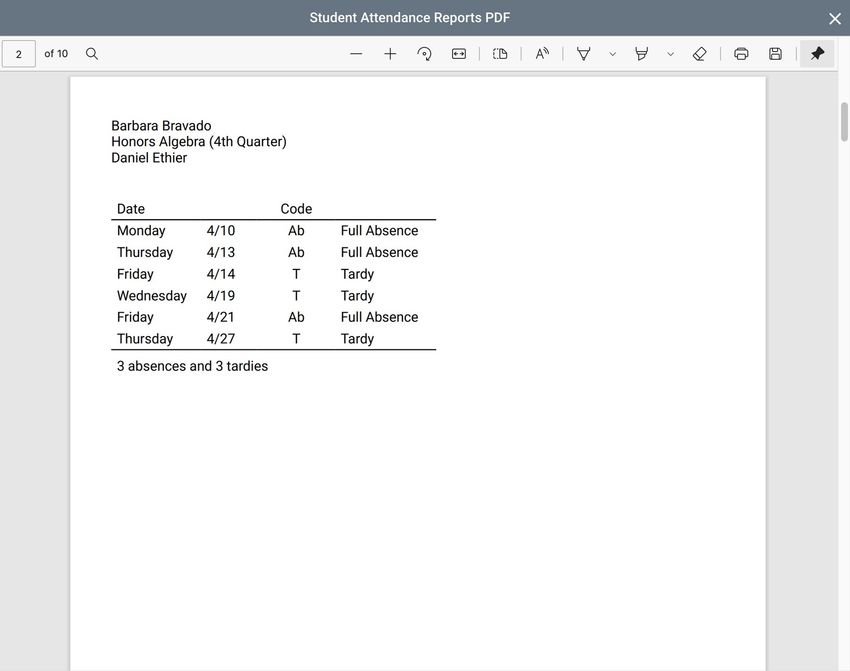
The student attendance report lists each student and their absences and tardies for the
current term in the school year.

Chrome, Edge, and Firefox will show a toolbar at the top that will allow you to print or save the
PDF. Safari will open the PDF in a new browser tab. You can print by choosing Print from the
File menu.

To print one student report, note the page number of that student's report. When you choose
to print, enter that page number as the page to print.
The missing assignments report lists each student and any assignments they are missing.

Chrome, Edge, and Firefox will show a toolbar at the top that will allow you to print or save the
PDF. Safari will open the PDF in a new browser tab. You can print by choosing Print from the
File menu.

To print the missing assignments report for one student, note the page number of that
student's report. When you choose to print, enter that page number as the page to print.
The multiple class report shows the attendance, final exam grade, and term grade for each
student in each of their classes.

When you choose the multiple class report, a modal will appear to allow you to select the
classes to include in the report. Click once on each class you want to include, then click the
Open button.

Chrome, Edge, and Firefox will show a toolbar at the top that will allow you to print or save the
PDF. Safari will open the PDF in a new browser tab. You can print by choosing Print from the
File menu.

To print one student report, note the page number of that student's report. When you choose
to print, enter that page number as the page to print.

You can replace the school name at the top of each page with an image. When choosing the
classes for the report, click the Choose Header Image button. Choose a jpeg or png image
from your computer. For the best results, your image should have a resolution of 300 dpi.
Emailing Reports

You can email student progress or missing assignment reports to one or all students by
clicking the email button in the toolbar. The email report dialog will appear:

Choose whether to send email reports to one student or all students. Choose to email all
assignments or missing assignments. Enter your email address. And choose which email
addresses to use, or add an email address. Click Send to email the reports.

Before sending email reports, you must set up your email server in options.
Exporting Students

You can export student IDs, names, percents, and grades as tab delimited text or as comma
separated values (CSV) by clicking the export button in the toolbar. The export modal will
appear:

Check the boxes for the items you want to include in your export. You must choose at least
one item. Choose the format you want to export to. The tab delimited text format will separate
items with a tab character. The comma separated values format will quote each item and
separate items with a comma.

Either format can be opened with Microsoft Excel. Other applications may require one or the
other format.
School Year Options

The school year panel in the options view allows you to set up your school year.

To show the school year panel, choose the Options tab at the bottom of the window, then
choose the School Year tab at the top of the window:

You can choose the number of terms in your school year from the picker at the top left. Note
that if you change the number of terms in an existing class to fewer terms, you may be asked
to confirm in the event there are assignments in the terms that will be deleted.

You can enter the names of each of your terms. Click the date to choose a start and end date
for each term. You can also click the holidays field at the top right to select dates when class
will not meet due to holidays or vacations.

Check the boxes for the days of the week that your class meets.
Category Options

The categories panel in the options view allows you to set up your assignment categories.

To show the categories panel, choose the Options tab at the bottom of the window, then
choose the Categories tab at the top of the window:

Enter the name and weight for each category. Enter a weight of NG if assignments in that
category should be excluded from grade computation. You can choose the number of worst
scores to drop from a category. The worst score is the score which, when dropped from the
category, most improves the percent correct within that category for a student.

You can also choose to compute grades using total points earned or using category weights.
Total points will total the points earned and possible for each student and compute a percent.
Category weights will do the weighted average of the percent correct within each category
using your category weights.
Final Exam Options

The final exams panel in the options view allows you to set up your final exams.

To show the final exams panel, click the Options tab at the bottom of the window, then click
the Final Exams tab at the top of the window:

Enter the percent that your final exams will contribute to the grade. Choose which grade final
exams will contribute to. You can also choose to round percents to the nearest whole percent
or to the nearest tenth of a percent.
Letter Grade Options

The letter grades panel in the options view allows you to set up your letter grades and what
percent is required to earn each letter grade.

To show the letter grades panel, click the Options tab at the bottom of the window, then click
the Letter Grades tab at the top of the window:

Enter each of you letter grades and its corresponding percent. Use only the fields you need
and leave the others blank. You can use the buttons on the lower right to fill in letter grades
and percents for several common schemes.

You can also choose to display both percents and letter grades, percents only, or grades only
when showing term grades. Grade computation is always done using percents to tenths.
Special Scores Options

The special scores panel in the options view allows you to set up special scores and define
their meaning.

To show the special scores panel, click the Options tab at the bottom of the window, then click
the Special Scores tab at the top of the window:

Enter each of your special scores and choose its meaning. You can choose from Excused,
Pending (excused but still considered missing), Full Credit, or Zero Points. You cannot use
numbers for special scores, since this would cause confusion with regular scores.
Attendance Options

The attendance panel in the options view allows you to set up your attendance codes and to
include attendance in the computed grade.

To show the attendance panel, click the Options tab at the bottom of the window, then click
the Attendance tab at the top of the window:

Enter each of your attendance codes and choose its meaning. You can choose from Full or
Half Absence, Tardy, or Excused (not included in totals of absences or tardies).

If you want to include attendance in grade computation, check the box to do so. You can
choose the number of absences that will be forgiven, the percent deducted for each absence
after that, and how many tardies will count as an absence for this computation.
Footnotes Options

The footnotes panel in the options view allows you to set up various footnotes you can attach
to scores in the gradebook.

To show the footnotes panel, click the Options tab at the bottom of the window, then click the
Footnotes tab at the top of the window:

Enter the footnotes you want to be able to attach to scores. Note the color next to each
footnote. Any score with that footnote will be given that color.
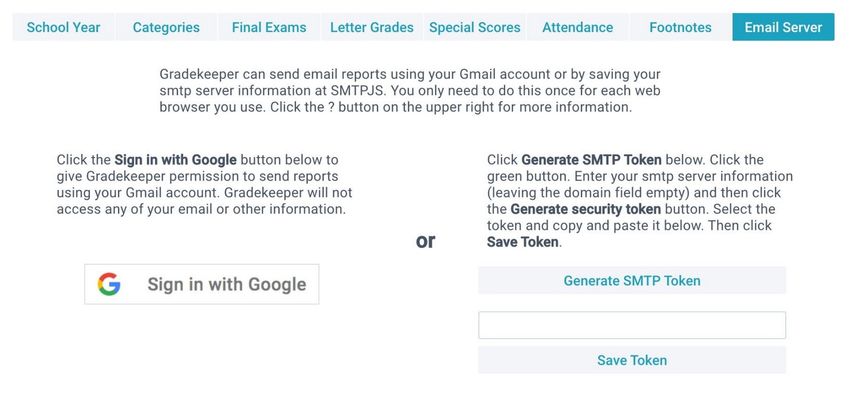
Email Server Options

The email server panel in the options view allows you to set up your email server information,
so you can email progress reports to parents and students.

To show the email server panel, click the Options tab at the bottom of the window, then click
the Email Server tab at the top of the window:

The Gradekeeper web app can send email reports using your Gmail account.

If you have a Gmail account, or if your school uses Google to provide your school email
account, click Sign in with Google on the lower left to give Gradekeeper permission to send
email reports using your Gmail account. You will need to do this once for any web browser
you use with the Gradekeeper web app.

Gradekeeper will only use this permission to send email reports. It will never access any of
your information from your Google account. You can revoke this permission at any time by
clicking the Sign in with Google button again.

If you use another email provider, Gradekeeper will use the SMTPJS service to send email
reports. To use this service (and to keep your SMTP server information secure when sending
reports) you will need to save your SMTP server information at SMTPJS.
Click the Generate SMTP Token button. This will open a new browser tab to the SMTPJS web
site. Click the green button to Encrypt your SMTP Credentials.

A modal window will open allowing you to enter your SMTP server information:

Enter your SMTP server address, your username, your password, and the port number. Most
servers require SSL, so leave that checked. Leave the domain field empty. Click the green
button to Generate security token.
A window will open showing you your security token:

Copy and paste that token into the edit field in the Gradekeeper web app smtp server options
view. Then click the Save Token button.

Once your security token has been saved, you will be able to send email reports for any of
your classes from this web browser. You will need to do this for each web browser you use
with the Gradekeeper web app.
Grade Computation

Gradekeeper normally determines grades using total points earned. For every student, the
sum of their points earned is divided by the total points possible. This result is converted to
the nearest tenth of a percent. This percent is then used to determine a letter grade based on
the current letter grade percents.

Extra credit assignments (assignments in the Extra Credit category or assignments with 0
points possible) contribute to each student's points earned, but do not contribute to the total
points possible.

For example:

               It All Adds Up               7/ 10
               Orient Express              10/ 10
               Bulgarian Solitaire          8/ 10
               Spirograph Special           8/ 10
               Extra Credit Work           10/ 0
               Chapter 1 Homework          25/ 35
               Chapter 1 Test              73/100

               Total                     141/175 = 80.6%

If you want certain kinds of assignments (such as tests or homework) to contribute a fixed
amount to each student's grade, then you should compute grades using category weights.
The percent correct within each category will be computed, with grades being determined by
a weighted average of the percent correct within each category.

Extra credit assignments can affect grades in different ways when you are computing grades
using category weights.

Assignments with 0 points possible improve the percent correct within that category. If you
place an assignment with 0 points possible in the homework category, this would increase the
percent correct in that category for students earning points on that assignment.

Assignments in the Extra Credit category are treated like assignments in any other category.
The percent correct on these assignments is multiplied by the category weight. But the Extra
Credit category weight is not included when category weights are totaled.

The weight you choose for the Extra Credit category determines how much your extra credit
assignments will contribute to term grades, relative to your other categories. If you choose a
weight of 10 for Extra Credit, and the total of the weights of your other categories is 100, any
student with a perfect score on every assignment would earn a grade of 110% for the term.
The following is a detailed example of grade computation using category weights when you
have extra credit assignments:
Tests Chapter 1 Test 82/100
Chapter 2 Test 80/100
Chapter 3 Test 78/100
Total 240/300 = 80%
Homework Chapter 1 Homework 30/ 40
Chapter 2 Homework 20/ 30
Chapter 3 Homework 40/ 50
Total 90/120 = 75%
Activities Spirolaterals 8/ 10
Spirograph Special 7/ 10
Total 15/ 20 = 75%
Extra Credit Math Counts #1 7/ 10
Math Counts #2 3/ 10
Total 10/ 20 = 50%
Tests 80% correct x 50 weight = 40.0%
Homework 75% correct x 30 weight = 22.5%
Activities 75% correct x 20 weight = 15.0%
Extra Credit 50% correct x 10 weight = 5.0%
Total 100 weight = 82.5%
Without the assignments in the Extra Credit category, this student would have earned a grade
of 77.5% for the term. Note that the Extra Credit category is not included when the category
weights are totaled. That is what makes these assignments truly extra credit.
Missing extra credit assignments are excused (excluded from grade computation), so the
percent correct on extra credit for a student includes only those extra credit assignments they
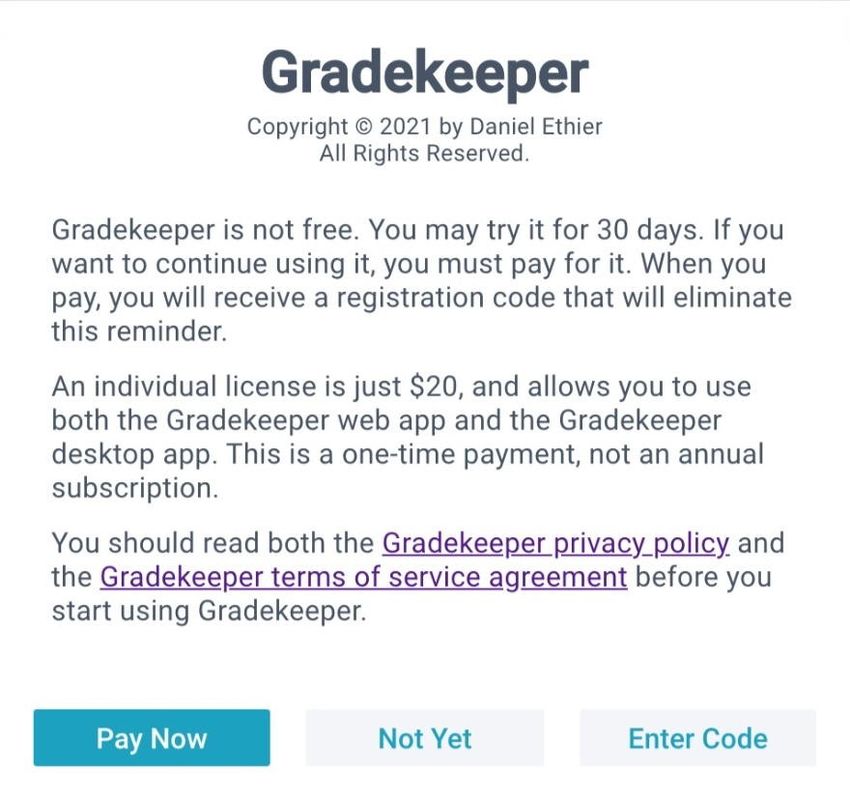
received scores for. Extra credit assignments a student does not do will not affect their grade.Paying for Gradekeeper Gradekeeper is not free. You may try Gradekeeper for 30 days. If you decide to continue using it, you must pay for it. When you pay, you will receive a registration code that will eliminate the reminder to pay. This registration code will also allow you to use future versions of Gradekeeper at no additional cost. A single license is $20 and allows you to use Gradekeeper. A school license is $100 and allows everyone at your school or university department to use Gradekeeper. All licenses allow you to use the desktop and web app versions of Gradekeeper, at school and at home. You can pay for Gradekeeper at the Fastspring online store using a credit card, a check or money order, or a school purchase order. Your license and registration code will be sent to you by email when Fastspring receives your payment. To pay using a school purchase order, choose the purchase order payment method after choosing your license. You will be given an invoice at the end of the payment process. Print the invoice and mail it to the specified address with your payment. To pay using a check or money order, choose the check or money order payment method after choosing your license. You will be shown your invoice at the end of the payment process. Print the invoice and mail it to the specified address with your payment. You will not be mailed an invoice. For school licenses, please enter your school name in the company field and choose your school name as the license name. This is the name that will be used to generate your registration code. You should use upper and lower case, since the name is case sensitive.
Programmer's Notes

I wrote Gradekeeper because I was unable to find an inexpensive grading program that had
the features I wanted and was also easy to use. I hope Gradekeeper will fill that void for you
as well.

Special thanks to my fellow teachers for their many comments and suggestions, which have
helped make Gradekeeper so friendly and powerful. Your comments and suggestions are also
appreciated. You can reach me at:

             info@gradekeeper.com

For more information, visit my web site at:

             https://www.gradekeeper.com/
You can also read