Load Balancing Microsoft Sharepoint 2010 Load Balancing Microsoft Sharepoint 2013 Deployment Guide - rev. 1.4.4
←
→
Page content transcription
If your browser does not render page correctly, please read the page content below
Load Balancing Microsoft Sharepoint 2010
Load Balancing Microsoft Sharepoint 2013

            Deployment Guide
                            rev. 1.4.4

          Copyright © 2002 – 2015 Loadbalancer.org, Inc.

                                1
Table of Contents

About this Guide............................................................................................................................................................3
Appliances Supported..................................................................................................................................................3
Microsoft Sharepoint Software Versions Supported..........................................................................................3
Loadbalancer.org Software Versions Supported.................................................................................................3
Sharepoint Server..........................................................................................................................................................4
     Server Roles................................................................................................................................................................................ 4
     Installation Options.................................................................................................................................................................. 4
     Farm Size & Topology.............................................................................................................................................................. 4
Load Balancing Sharepoint.........................................................................................................................................5
     The Basics.................................................................................................................................................................................... 5
     TCP Ports..................................................................................................................................................................................... 5
     Persistence (aka Server Affinity)............................................................................................................................................ 6
        Sharepoint 2010.................................................................................................................................................................. 6
        Sharepoint 2013.................................................................................................................................................................. 6
     Load Balancer Virtual Service (VIP) Requirements......................................................................................................... 6
Lab Deployment Architecture....................................................................................................................................7
     Lab Environment Architecture Notes................................................................................................................................. 8
        Planning for High Availability.......................................................................................................................................... 8
           Front-End Web Servers............................................................................................................................................... 8
           Application Servers...................................................................................................................................................... 8
           Database Server............................................................................................................................................................ 8
Sharepoint Installation & Configuration................................................................................................................9
     Installation Considerations.................................................................................................................................................... 9
        Central Administration Website..................................................................................................................................... 9
        Alternate Access Mappings / Zones.............................................................................................................................. 9
        Authentication..................................................................................................................................................................... 9
        SSL Certificates.................................................................................................................................................................... 9
        Service Applications........................................................................................................................................................... 9
        DNS Configuration............................................................................................................................................................. 9
     Lab Environment Installation.............................................................................................................................................. 10
        Site & Zone Structure....................................................................................................................................................... 10
        Installation Steps............................................................................................................................................................... 10
        Accessing Sharepoint...................................................................................................................................................... 13
Loadbalancer.org Appliance – the Basics...........................................................................................................14
     Initial Network Configuration............................................................................................................................................. 14
     Accessing the Web User Interface (WUI)......................................................................................................................... 15
     Load Balancer Deployment Method................................................................................................................................. 16
     Clustered Pair Configuration.............................................................................................................................................. 16
Loadbalancer.org Appliance – Configuring for Sharepoint..........................................................................17
     STEP1 – Configure Layer 7 Global Settings.................................................................................................................... 17
     STEP2 – Configure the Load Balanced Central Administration Site......................................................................18
        Create the Virtual Service (VIP)..................................................................................................................................... 18
        Define the Real Servers (RIPs)....................................................................................................................................... 19
     STEP3 – Configure the Load Balanced User Portal Site............................................................................................ 20
        Create the Virtual Service (VIP).................................................................................................................................... 20
        Define the Real Servers (RIPs)....................................................................................................................................... 21
     STEP 4 – Finalizing the Configuration............................................................................................................................. 21
Testing & Validation....................................................................................................................................................22
Technical Support.......................................................................................................................................................23
Conclusion.....................................................................................................................................................................23
Appendix........................................................................................................................................................................24
     1 – Clustered Pair Configuration – Adding a Slave Unit............................................................................................ 24
     2 – Configuring a HTTP to HTTPS Redirect for the User Portal..............................................................................24
     3 – Company Contact Information.................................................................................................................................. 26

                                                                                                2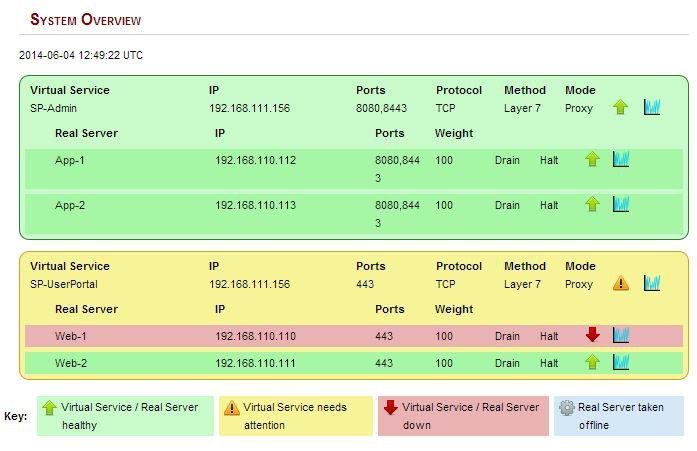
About this Guide
This guide details the configuration of Loadbalancer.org appliances for deployment with Microsoft
Sharepoint 2010 & 2013. It includes details of ports/services that must be load balanced, topology
considerations for the various Sharepoint 2010 / 2013 components.
For an introduction on setting up the appliance as well as more technical information, please also refer to
our quick-start guides and full administration manuals which are available at the following links:

Version 7 Documentation
v7.x Quickstart Guide : http://www.loadbalancer.org/pdf/quickstartguideLBv7.pdf
v7.x Administration Manual : http://www.loadbalancer.org/pdf/loadbalanceradministrationv7.pdf

Version 8 Documentation
v8.x Quickstart Guide : http://www.loadbalancer.org/pdf/quickstartguideLBv8.pdf
v8.x Administration Manual : http://www.loadbalancer.org/pdf/loadbalanceradministrationv8.pdf

Appliances Supported
All our products can be used with Sharepoint 2010 & 2013. The complete list of models is shown below:

Discontinued Models           Current Models *
Enterprise R16                Enterprise R20
Enterprise VA R16             Enterprise MAX
Enterprise VA                 Enterprise 10G
                              Enterprise R320
                              Enterprise VA R20
                              Enterprise VA MAX
                              Enterprise AWS
                              Enterprise AZURE **

* For full specifications of these models please refer to: http://www.loadbalancer.org/products
** Some features may not be supported, please check with Loadbalancer.org support

Microsoft Sharepoint Software Versions Supported
    •   Microsoft Sharepoint 2010 – all versions

    •   Microsoft Sharepoint 2013 – all versions

Loadbalancer.org Software Versions Supported
    •   v7.3.2 and later
        N.B. this guide includes configuration steps for v7.6 & later. For older versions of the appliance
        please contact Loadbalancer.org sales or support

                                                      3
Sharepoint Server
Microsoft Sharepoint is Microsoft's enterprise collaboration platform. Sharepoint makes it easier for people
to work together. Using Sharepoint, staff can set up web sites to share information with others, manage
documents from start to finish, publish reports to help everyone make better decisions and search across a
range of internal and external data sources to find answers and information more quickly and effectively.

Server Roles
In Sharepoint 2010 & 2013 what were roles in prior versions of the product can now be viewed simply as
components, so as opposed to assigning a specific role to a server, components are placed on an agnostic
machine, independent of any specific role definition. For example, in the past the role of indexer or query
server was assigned to a machine, now the search topology is extended by assigning one or more search
components, such as Query or Crawl to a machine. Roles are a concept that do not necessarily apply in
2010 & 2013, instead a machine is generic and flexible to provide a multitude of services. Components and
services are shared between servers in the farm depending on server performance, topology requirements,
anticipated user load etc.

Installation Options
The Sharepoint installation supports two options as described in the table below:

Option        Description
Standalone Installs all components on a single machine including SQL Express, but servers cannot be
           added to a server farm, typically only used for trialling the product or for very small
           deployments

Complete      Installs all components (except SQL Express) and allows servers to be added to a farm – this
              option must always be used in a Farm environment

Farm Size & Topology
The physical architecture is typically described in two ways: by its size and by its topology. Size, which can
be measured in several ways, such as the number of users or the number of documents, is used to
categorize a farm as small, medium, or large. Topology uses the idea of tiers or server groups to define a
logical arrangement of farm servers. Microsoft uses the following definitions for size and topology:

Farm Size:

Size          Description
Small         A small server farm typically consists of at least two Web servers and a database server

Medium        A medium server farm typically consists of two or more Web servers, two application
              servers, and more than one database server

Large         A large server farm can be the logical result of scaling out a medium farm to meet capacity
              and performance requirements or by design before a Sharepoint Server solution is
              implemented

                                                      4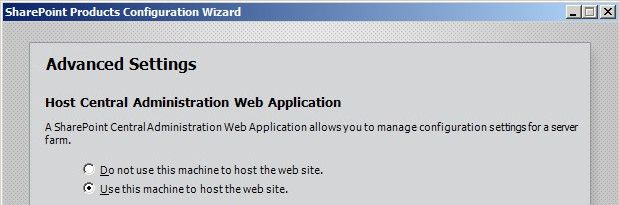
Farm Topology:

Topology      Description
Single-Tier In a single-tier deployment, Sharepoint Server and the database server are installed on one
            computer

Two-Tier      In a two-tier deployment, Sharepoint Server components and the database are installed on
              separate servers

Three-Tier    In a three-tier deployment, the front-end Web servers are on the first tier, the application
              servers are on the second tier, which is known as the application tier, and the database
              server is located on the third tier

For more information please refer to: http://technet.microsoft.com/en-us/library/ee667264.aspx

Load Balancing Sharepoint

The Basics
Load balancing is required for the Front-end Web Servers to provide performance and resilience for users
connecting to the Sharepoint farm.
For the middle (application) tier, multiple application servers running the same service applications are load
balanced by default and there is no external load balancing requirement.
Sharepoint is based on IIS and associated technologies at the top / middle tier and Microsoft SQL Server
for back-end storage. Therefore, load balancing Sharepoint is relatively straight- forward, but to provide a
resilient and robust Sharepoint system, it's important to consider Microsoft's various architectural
recommendations, best practices and guidelines when designing your Sharepoint Infrastructure.

TCP Ports
Sharepoint uses a range of ports for internal and external farm communication. The ports that need to be
load balanced are those used in communications between external users and the Front-End Web Servers
as shown in the following table:

TCP Port         Use                   Description
80               Web Front-End         Standard HTTP port used for Web Application / Site access
443              Web Front-End         Standard HTTPS port used for Web Application / Site access
8080*            Central Admin         Custom port for Central Administration Website (HTTP)
8443**           Central Admin         Custom port for Central Administration Website (HTTPS)

* During the Sharepoint 2010 / 2013 installation the installer suggests a random HTTP port for the Central
Administration website. In the lab environment used for this guide, this was set to port 8080
** In the lab environment, the Central Administration website was extended to the Custon Zone and
configured for HTTPS on port 8443. System administrators are then able to access the Central
Administration website over HTTP and HTTPS
For a full Sharepoint Server port list, please refer to:
http://technet.microsoft.com/en-us/library/cc262849.aspx

                                                           5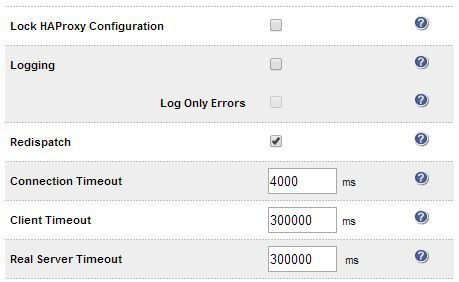
Persistence (aka Server Affinity)
Enabling persistence ensures that clients continue to connect to the same server when connecting into
the Sharepoint farm.

Sharepoint 2010
For Sharepoint 2010 we recommend using IP persistence for simplicity and compatibly across protocols.

Sharepoint 2013
Persistence is no longer required for Shareport 2013. This is because the Distributed Cache service
maintains authentication information across all Sharepoint 2013 Web Servers and therefore a particular
client no longer needs to persist to the same Server.

For more details please refer to the following Technet article:
http://technet.microsoft.com/en-us/library/jj219758(v=office.15).aspx

Load Balancer Virtual Service (VIP) Requirements
It is possible to configure a single VIP that includes all required ports as listed in the table above. However,
to enable more granular control and improved health-check monitoring, multiple Virtual Services are
recommended. The list below shows the general approach used in this guide:

    •   VIP-1: For the Load balanced Sharepoint Central Administration site running on the selected port.
        In this guide HTTP port 8080 & HTTPS port 8443

    •   VIP-2: For the load balanced Sharepoint User Portal, typically running on the default ports: HTTP
        (80) & HTTPS (443)

    •   VIP-3 etc.: Used for additional Sharepoint Web Applications / IIS sites that require a different IP
        address to be used

        NB. In the lab setup used for this guide, the Front-End Web Servers have a single IP address. Also
        all VIPs configured on the load balancer use the same IP address with different ports. The VIPs
        could also be configured using different IP addresses if needed.

                                                       6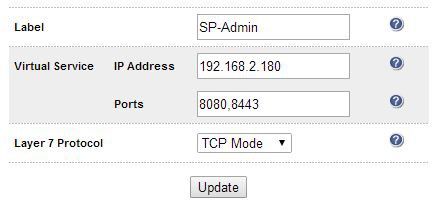
Lab Deployment Architecture
There are multiple ways to deploy Sharepoint depending on a number of factors including number of end-
users, physical server topology options / preferences etc. For the lab environment used in this guide, the
following 3-tier redundant topology was used:

                                        Sharepoint
                                         Clients

                                          VIP(s)

                             Loadbalancer.orgLoad
                            Loadbalancer.org      LoadBalancer
                                                        Balancer
                               (singleunit
                              (single  unitororclustered
                                                clusteredpair)
                                                          pair)

                Front End Web                               Front End Web
                  Server #1                                   Server #2              Tier 1

                  Application                                 Application
                  Server #1                                   Server #2              Tier 2

        SQL Back-End                                                                 Tier 3
    (Mirrored or Clustered)

        NOTE : The load balancer can be deployed as a single unit, although Loadbalancer.org
        strongly recommend a clustered pair for resilience & high availability.

                                                    7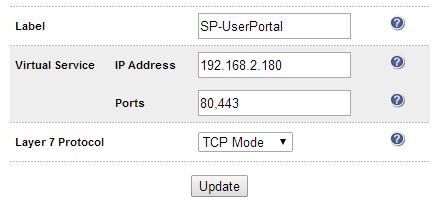
Lab Environment Architecture Notes

Planning for High Availability
The following table shows Microsoft's general guidance to achieve high availability:

Server                             Preferred redundancy strategy within a farm
Front-End Web Server               Deploy multiple front-end Web servers within a farm, and use Load
                                   Balancing
Application Server                 Deploy multiple application servers within a farm
Database Server                    Deploy database servers by using clustering or high-availability
                                   database mirroring

For more details please refer to the following Microsoft link:
http://technet.microsoft.com/en-us/library/cc748824.aspx

Front-End Web Servers
Two Front-end Web Servers are used to provide redundancy. These servers are load balanced by the
Loadbalancer.org appliances (clustered pair for high availability). The servers also run the query related
components so the index is also located on these servers. Therefore the index files should be located on a
disk which has the capacity and performance required. Multiple query components can be added for fault
tolerance and improved performance. For more details on the Sharepoint search / query architecture the
following Microsoft link provides a useful insight:
http://blogs.msdn.com/b/russmax/archive/2010/04/16/search-2010-architecture-and-scale-part-2-
query.aspx

Application Servers
Two application servers are used to provide redundancy. Both servers run the same service applications
which enables built in load balancing. This distributes requests from the Web Servers on a round-robin
basis. For more details on the built-in service application load balancer, please refer to the following
Microsoft link:
http://blogs.msdn.com/b/dtaylor/archive/2011/02/23/sharepoint-2010-service-application-load-
balancer.aspx

In the lab setup, these servers also run the crawl components. Multiple crawl components can be added
for fault tolerance and improved performance. For more details on the Sharepoint Search architecture and
configuring crawl please refer to the following Microsoft articles:
http://blogs.msdn.com/b/russmax/archive/2010/04/16/search-2010-architecture-and-scale-part-1-
crawl.aspx
http://technet.microsoft.com/en-us/library/dd335962(v=office.14).aspx

Database Server
In a live environment the SQL back-end should be mirrored, clustered or made redundant in any other
appropriate way. For more details on SQL database clustering and mirroring for Sharepoint please refer to
the following Microsoft links:
Planning for availability: http://technet.microsoft.com/en-us/library/cc748824.aspx
Sharepoint SQL Server availability: http://technet.microsoft.com/en-us/library/dd207313(v=office.15).aspx

                                                      8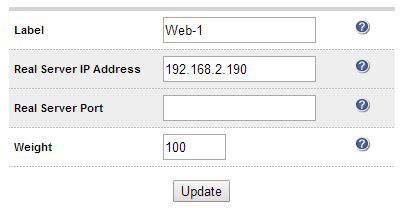
Sharepoint Installation & Configuration

Installation Considerations

Central Administration Website
For improved resilience and redundancy the Central Administration website can also be load balanced.
This requires that the Central Administration component is installed on multiple servers – this is done
during initial installation of the software by selecting the Advanced Settings, Host Central Administration
Website & checking “Use this machine to host the website”. In the lab environment used for this guide,
Central Administration is installed on both Application Servers.

Alternate Access Mappings / Zones
Alternative Access Mappings must be setup correctly to ensure that users are able to connect consistently
without receiving broken links and experiencing other issues. These are configured automatically when
new Web Applications are created and extended using Central Administration. If manual changes are made
later to Sharepoint or IIS, the mappings may also need to be adjusted manually.
Microsoft recommends extending a Web Application to a new IIS web site for each zone required. This
provides a backing IIS Web site. Its not generally recommended to reuse the same IIS web site for multiple
zones.

For more information please refer to the following Microsoft links:

http://technet.microsoft.com/en-us/library/cc261814(v=office.15).aspx
http://blogs.msdn.com/b/sharepoint_strategery/archive/2013/05/27/alternate-access-mappings-
explained.aspx

Authentication
Sharepoint supports various authentication methods, the method used in this guide is NTLM.

SSL Certificates
For performance scalability, installing SSL certificates on the Sharepoint Servers is recommended rather
than terminating SSL on the load balancer. For the lab setup a trial Thawte certificate was used. The
Common Name was set to sharepoint.robstest.com.

Service Applications
For a three-tier infrastructure, Service Applications should be distributed between the servers in each tier
according to the topology in use. The complete installation option and the Configuration Wizard should
be used to provision all service applications on each server. Central Administration can then be used to
configure where each service runs.

DNS Configuration
DNS records must be configured that point to the Virtual Services on the load balancer. For the lab setup,
Internal DNS entries were created for 'sharepoint.robstest.com' on the domains DNS server and external
DNS entries were created on the local hosts file of a non domain member test PC.

                                                      9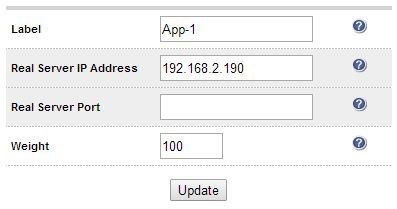
Lab Environment Installation

Site & Zone Structure

Site            Zone      Protocol    Ports      Notes    Host Header Value        Certificate CN
Central        Default    HTTP        8080       -        -                        -
Administration
Central        Custom HTTPS           8443       Extended -                        sharepoint.robstest.co
Administration                                   site                              m
Sharepoint      Default   HTTP        80         -        sharepoint.robstest.co   -
User Portal                                               m
Sharepoint      Custom HTTPS          443        Extended -                        sharepoint.robstest.co
User Portal                                      site                              m

Installation Steps

Install Software:

    •   Install & prepare Microsoft SQL Server

    •   Install Sharepoint on both Application Servers. Install Central Administration on both servers
        setting the port to 8080. Use the 'Complete' install option, run the Configuration Wizard and
        deploy all Service Applications. Later, these services can be enabled or disabled as required

        Use the Advanced Settings option to install Central Admin:

    •   Install Sharepoint on the Front End Web Servers. Use the 'Complete' install option, run the
        Configuration Wizard and deploy all Service Applications. Later, these services can be enabled or
        disabled as required

                                                     10
Configure the Central Administration site for load balancing:
• Edit the Public URL's to ensure that both Application Servers are listed as shown below:
Once configured the AAM's are set as follows:
(see http://www.harbar.net/articles/spca.aspx for more details)
• Now edit the public URL's again and add http://sharepoint.robstest.com:8080. Also ensure that this
URL is set as the Default Zone as shown below:
Once configured the AAM's are set as follows:
N.B. these settings ensure that the CentralAdministrationURL registry key is set correctly as
shown below:
11• Now Extend the Central Administration Web Application to the Custom Zone on port 8443, using
SSL. Once done a corresponding AAM is automatically configured as shown below:
• On one of the application servers create a CSR for CN=sharepoint.robstest.com, then complete
the request once a signed certificate is obtained
• Export the certificate & private key and import to the other Application Server
• Using IIS Manager on both Application Servers ensure that the HTTPS bindings correctly refer to
the sharepoint.robstest.com certificate
Configure the User Portal Web Application & Top Level Default Site:
• Create a new Web Application for the Sharepoint User Portal on Port 80
• Create a new top level Site Collection under the User Portal Web Application
so navigating to: http://sharepoint.robstest.com/
opens : https://sharepoint.robstest.com/_layouts/15/start.aspx#/
N.B. The lab setup has a HTTP to HTTPS redirect for the User Portal (see pages 22 & 25)
12• Now Extend the User Portal Web Application to the Custom Zone on port 443, using SSL. Once
done a corresponding AAM is automatically configured as shown below:
• Using IIS Manager on both Front End Web Servers import the sharepoint.robstest.com certificate
and ensure that the HTTPS bindings correctly refer to this certificate
Configure DNS:
• Create internal & external DNS entries for sharepoint.robstest.com. This should point to the IP
address of the Virtual Service that's created on the load balancer (see pages 20 & 22).
Accessing Sharepoint
With the configuration described above, the following table shows how Sharepoint is accessed in the lab
environment:
Site HTTP HTTPS
Sharepoint User Portal http://sharepoint.robstest.com https://sharepoint.robstest.com
Central Administration http://sharepoint.robstest.com:8080 https://sharepoint.robstest.com:8443
Useful links:
Building a 3 Tier farm:
http://blogs.technet.com/b/meamcs/archive/2012/05/30/prepare-sharepoint-farm-part-4-install-and-
configure-sharepoint-farm-3-tier.aspx
13Loadbalancer.org Appliance – the Basics
Initial Network Configuration
The IP address, subnet mask, default gateway and DNS settings can be configured in several ways as
detailed below:
Method 1 - Using the Network Setup Wizard at the console
After boot up, follow the instructions on the console to configure the IP address, subnet mask, default
gateway and DNS settings.
Method 2 - Using the WUI:
Using a browser, connect to the WUI on the default IP address/port: http://192.168.2.21:9080
To set the IP address & subnet mask, use: Local Configuration > Network Interface Configuration
To set the default gateway, use: Local Configuration > Routing
To configure DNS settings, use: Local Configuration > Hostname & DNS
Method 3 - Using Linux commands:
At the console, set the initial IP address using the following command:
ip addr add / dev eth0
e.g.
ip addr add 192.168.2.10/24 dev eth0
At the console, set the initial default gateway using the following command:
route add default gw
e.g.
route add default gw 192.168.2.254 eth0
At the console, set the DNS server using the following command:
echo nameserver >> /etc/resolv.conf
e.g.
echo nameserver 192.168.2.250 >> /etc/resolv.conf
N.B. If method 3 is used, you must also configure these settings using the WUI, otherwise the settings will
be lost after a reboot
14Accessing the Web User Interface (WUI)
The WUI can be accessed from a browser at: http://192.168.2.21:9080/lbadmin
* Note the port number → 9080
(replace 192.168.2.21 with the IP address of your load balancer if its been changed from the default)
Username: loadbalancer
Password: loadbalancer
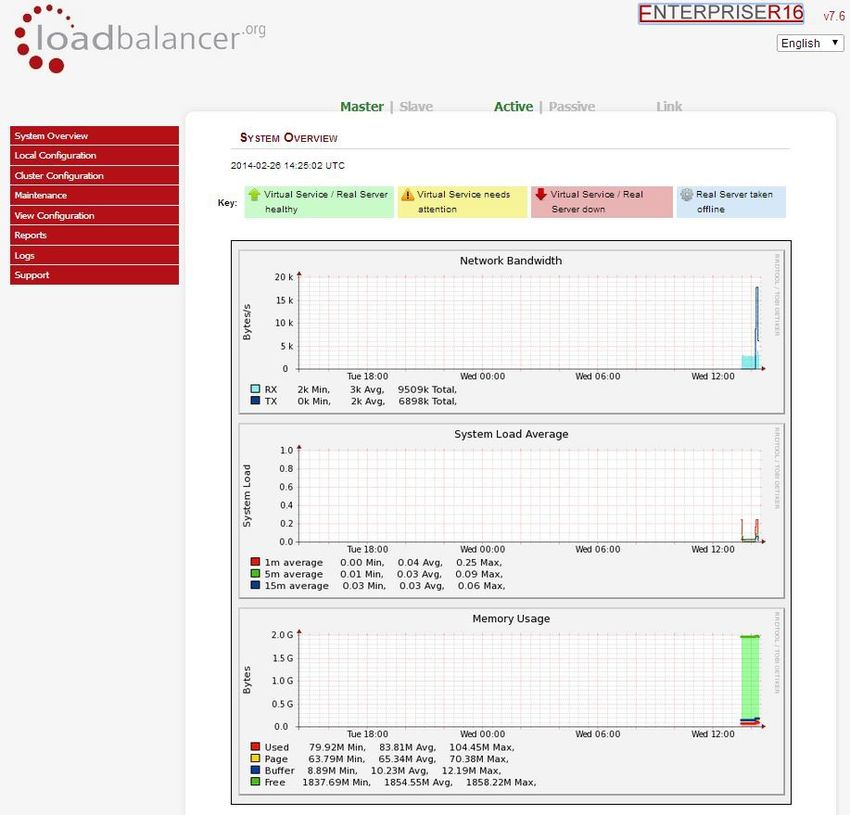
Once you have entered the logon credentials the Loadbalancer.org Web User Interface will be displayed as
shown below:
The screen shot below shows the v7.6 WUI once logged in:
15Load Balancer Deployment Method
As with other Microsoft applications, for Sharepoint the load balancer is deployed in one-arm SNAT mode
(Source Network Address Translation) at layer 7 using HAProxy. This mode is generally recommended by
Microsoft and also has the advantage that it requires no changes to the Sharepoint servers.
Clustered Pair Configuration
Loadbalancer.org recommend that load balancer appliances are deployed in pairs for high availability. In
this guide a single unit is deployed first, adding a secondary slave unit is covered in the Appendix.
16Loadbalancer.org Appliance – Configuring for Sharepoint
NOTE : It's highly recommended that you have a working Sharepoint environment first
before implementing the load balancer.
N.B. The steps presented in this section cover versions 7.6 & later of the Appliance. For older versions of
the appliance please contact loadbalancer.org sales or support.
STEP1 – Configure Layer 7 Global Settings
To ensure that client connections remain open during periods of inactivity, the Client and Real Server
Timeout values must be changed from their default values of 43 seconds and 45 seconds respectively to 5
minutes. To do this follow the steps below:
• Go to Cluster Configuration > Layer 7 – Advanced Configuration
• Change Client Timeout to 300000 as shown above (i.e. 5 minutes)
• Change Real Server Timeout to 300000 as shown above (i.e. 5 minutes)
• Click the Update button to save the settings
17STEP2 – Configure the Load Balanced Central Administration Site
Create the Virtual Service (VIP)
This VIP is used to provide access to the Central Administration website on ports 8080 & 8443.
• Go to Cluster Configuration > Layer 7 – Virtual Services and click [Add a New Virtual Service]
• Enter the following details:
• Enter an appropriate label for the VIP, e.g. SP-Admin
• Set the Virtual Service IP address field to the required IP address, e.g. 192.168.2.180
• Set the Virtual Service Ports field to 8080,8443
• Change Layer 7 Protocol to TCP Mode
• Click Update
• Now click [Modify] next to the newly created VIP
• Set Balance Mode as required – Weighted Least Connections is recommended
• For Sharepoint 2010 - Ensure Persistence Mode is set to Source IP
• For Sharepoint 2013 - Ensure Persistence Mode is set to None
• Click Update
18Define the Real Servers (RIPs)
• Go to Cluster Configuration > Layer 7 – Real Servers and click [Add a New Real Server] next to the
newly created Virtual Service
• Enter the following details:
• Enter an appropriate label for the RIP , e.g. App-1
• Change the Real Server IP Address field to the required IP address , e.g. 192.168.2.190
• Leave the Real Server Port field blank
• Click Update
• Repeat the above steps to add your other Application Servers
NOTE : Because SNAT is a full proxy, any server in the cluster can be on any accessible
subnet including across the Internet or WAN
19STEP3 – Configure the Load Balanced User Portal Site
Create the Virtual Service (VIP)
This VIP is used to provide access to the User Portal website on ports 80 & 443.
• Go to Cluster Configuration > Layer 7 – Virtual Services and click [Add a New Virtual Service]
• Enter the following details:
• Enter an appropriate label for the VIP, e.g. SP-UserPortal
• Set the Virtual Service IP address field to the required IP address, e.g. 192.168.2.180
• Set the Virtual Service Ports field to 80,443
• Change Layer 7 Protocol to TCP Mode
• Click Update
• Now click [Modify] next to the newly created VIP
• Set Balance Mode as required – Weighted Least Connections is recommended
• For Sharepoint 2010 - Ensure Persistence Mode is set to Source IP
• For Sharepoint 2013 - Ensure Persistence Mode is set to None
• Click Update
NOTE : Please refer to the appendix for details on configuring a HTTP to HTTPS redirect for
the User Portal.
20Define the Real Servers (RIPs)
• Go to Cluster Configuration > Layer 7 – Real Servers and click [Add a New Real Server] next to the
newly created Virtual Service
• Enter the following details:
• Enter an appropriate label for the RIP, e.g. Web-1
• Change the Real Server IP Address field to the required IP address, e.g. 192.168.2.190
• Leave the Real Server Port field blank
• Click Update
• Repeat the above steps to add your other Web Front End Servers
NOTE : Because SNAT is a full proxy, any server in the cluster can be on any accessible
subnet including across the Internet or WAN
STEP 4 – Finalizing the Configuration
To apply the new settings for the Layer 7 based VIPs, HAProxy must be restarted as follows:
• Go to Maintenance > Restart Services and click Restart HAProxy
21Testing & Validation
It's important to verify that the load balancer is working as expected. Network cables on the Front-End
Web Servers can be removed to simulate a sever failure.
The System Overview in the WUI can then be used to check that the server has been marked down
(colored red). Also, when the cable is plugged back in, the server should return to normal status (colored
green).
Alternatively, IIS can be used to stop a website on one of the web servers. For example, stopping the IIS
User Portal site on Web-1 will cause the system overview to mark SP-UserPortal / Web-1 as down (red) as
shown below:
SP-UserPortal / Web-2 is still healthy (green), so all requests will now be routed here.
The System Overview also enables the servers to be taken offline using the Drain and Halt options. The
enables servers to be removed from the cluster to perform maintenance tasks etc. Once again, requests
will then only be sent to the remaining operational server.
22Technical Support
For more details or assistance with your deployment please don't hesitate to contact the support team:
support@loadbalancer.org
Conclusion
Loadbalancer.org appliances provide a very cost effective solution for highly available load balanced
Sharepoint environments.
23Appendix
1 – Clustered Pair Configuration – Adding a Slave Unit
If you initially configured just the master unit and now need to add a slave - our recommended procedure,
please refer to the relevant document referenced below for more details:
Version 7
Please refer to Chapter 8 – Appliance Clustering for HA in the v7 Administration Manual.
Version 8
Please refer to Chapter 9 – Appliance Clustering for HA in the v8 Administration Manual.
Don't hesitate to contact our support team if you need further assistance: support@loadbalancer.org
2 – Configuring a HTTP to HTTPS Redirect for the User Portal
An additional later 7 VIP is required that listens on HTTP port 80 on the same IP address. The VIP is then
configured to redirect connections to HTTPS port 443.
e.g.
http://sharepoint.robstest.com/
should be auto redirected to:
https://sharepoint.robstest.com/
The steps:
1) Create another Layer 7 VIP with the following settings:
◦ Label: SP-UserPortalRedirect
◦ Virtual Service IP Address:2) Remove port 80 from the user portal VIP
(otherwise a configuration error message will be displayed since there would be a conflict)
N.B. This redirect VIP will show in red in the System overview since no real servers are defined. The same
RIPs that are configured for the SP-Admin VIP can be added if preferred. The VIP will then be displayed
green if both Web Servers are up.
Don't hesitate to contact our support team if you need any further assistance: support@loadbalancer.org
253 – Company Contact Information
Website URL : www.loadbalancer.org
North America (US) Loadbalancer.org, Inc.
270 Presidential Drive
Wilmington,
DE 19807
USA
Tel : +1 888.867.9504 (24x7)
Fax : +1 302.213.0122
Email (sales) : sales@loadbalancer.org
Email (support) : support@loadbalancer.org
North America (Canada) Loadbalancer.org Ltd.
300-422 Richards Street
Vancouver, BC
V6B 2Z4
Canada
Tel : +1 855.681.6017 (24x7)
Fax : +1 302.213.0122
Email (sales) : sales@loadbalancer.org
Email (support) : support@loadbalancer.org
Europe (UK) Loadbalancer.org Ltd.
Portsmouth Technopole
Kingston Crescent
Portsmouth
PO2 8FA
England, UK
Tel : +44 (0)330 3801064 (24x7)
Fax : +44 (0)870 4327672
Email (sales) : sales@loadbalancer.org
Email (support) : support@loadbalancer.org
Europe (Germany) Loadbalancer.org GmbH
Alt Pempelfort 2
40211 Düsseldorf
Germany
Tel : +49 (0)30 920 383 6494
Fax : +49 (0)30 920 383 6495
Email (sales) : vertrieb@loadbalancer.org
Email (support) : support@loadbalancer.org
26You can also read