JURASSIC WORLD TABLE GUIDE BY SHORYUKENTOTHECHIN - PAGE 1 OF 35 - ZEN STUDIOS
←
→
Page content transcription
If your browser does not render page correctly, please read the page content below
Page 1 of 35

Jurassic World Table Guide
 By ShoryukenToTheChin

                            10
                    8

                        9
                             11
            7

        6

                5
                                       13

                    4       12

2

            3

    1
                                  14
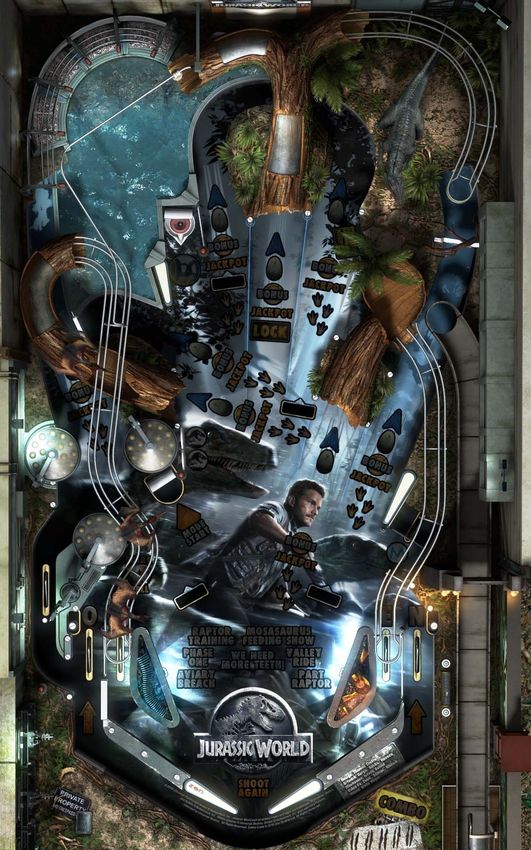
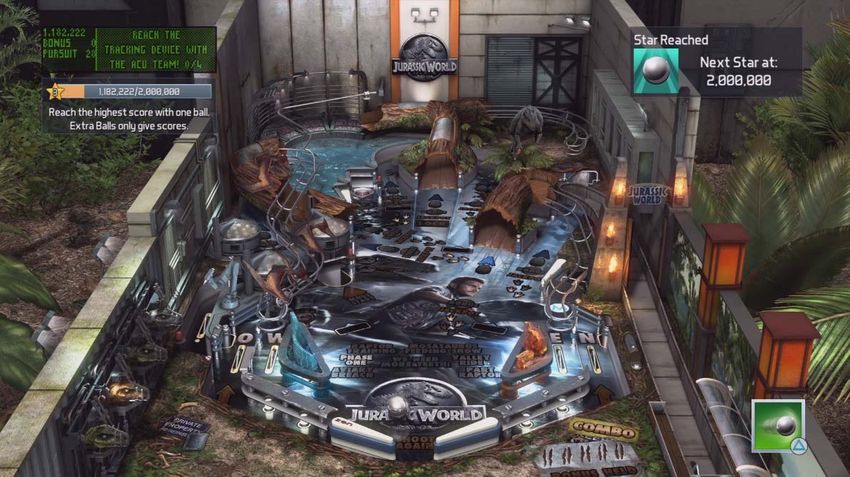
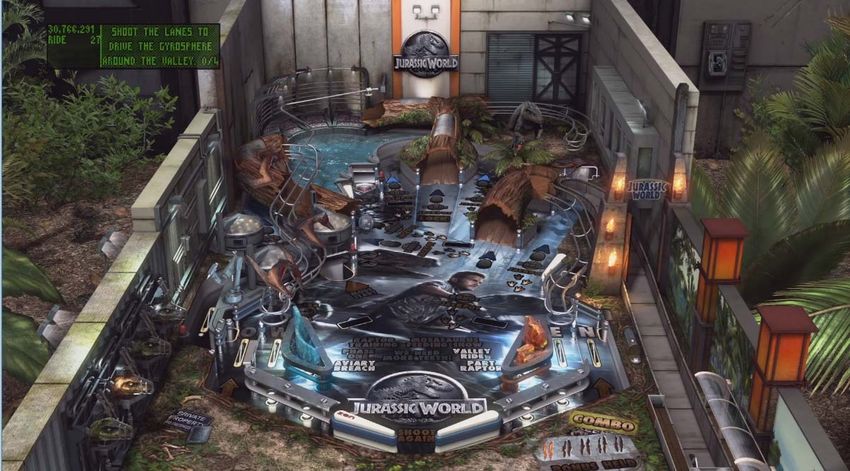
Page 2 of 35

Key to Table Overhead Image –

   1. Extra Ball Target
   2. Left Orbit
   3. Main Mode Sink Hole
   4. Logo Targets
   5. Left Ramp
   6. Left Lane
   7. Gyrosphere Saucer
   8. Left Mini Loop
   9. Centre Ramp
   10. Right Mini Loop
   11. T.REX Paddock Target
   12. Right Ramp
   13. Right Orbit
   14. Varitarget

In this guide when I mention a Ramp, Lane, Hole etc. I will put a number in brackets which will correspond
to the above Key, so that you know where on the Table that feature is located.
Page 3 of 35

                                        TABLE SPECIFICS
 Notice: This Guide is based off the Pinball FX3 (PS4) version of the Table on default controls. Some of
the controls will be different on the other versions (Steam, etc...), but everything else in the Guide remains
                                                   the same.

INTRODUCTION

In collaboration with Universal Brand Development, Zen Studios celebrates the 25th anniversary of Jurassic
Park™ by releasing a three-pack of prehistoric pinball perfection for Pinball FX3. Jurassic World Pinball is
comprised of thrilling tables themed around the history and lore of the iconic film franchise.

Jurassic World Pinball sees you play through various Modes in homage to the iconic film of the same name.
Join Owen, Claire and other movie characters as they attempt to escape Jurassic World™ and the deadly
Indominus Rex. Add to that various audio works from the characters of the film themselves to add that extra
bit of authenticity.

I hope my Guide will help you understand the Table better.
Page 4 of 35

Select How You Wish to Play Through the Tables Main Modes
The Main Modes can be played automatically in film order, or you can choose to select them in any order.

Use the Flipper Buttons to alternate the highlighted option, and press the “Launch” Button to select your
preferred option.
Page 5 of 35

Skill Shot - *Value starts at 1.5 Million Points, can be raised*
Launch the Ball into the Playfield. Before the timer runs out, spell V.I.P. by successively shooting the
flashing Left Ramp (5) -

Then the Right Ramp (12) –
Page 6 of 35

Finally sink the Ball into the Main Mode Sink Hole (3) to gain a V.I.P. access award.

This award gives the you a large score and increases all Lane Side Mode starters by 1 footprint (look later in
the guide under “Side Modes” for more information).
Page 7 of 35

Skill Shot Value Increase:
Light both Logo Targets (4) next to the right Bumper to increase the Skill Shot Value.
Page 8 of 35

Kickbacks & Ball Save
To activate the Kickbacks &/or Ball Save, you will need to complete the below steps.

   1. Collect all 4 of the “OWEN” Rollover lights which are located on the In’s & Outlanes.

   2. Once done, an Owen bonus hurry-up will start at the indicated bonus lamp Lane.
Page 9 of 35

3. Shooting the Ball up the flashing Lane will result in the award of a Kickback, Ball Save (Ball Save is
   also temporary activated at the start of the many Game Modes) or bonus points award.

      *Note – Any Kickbacks that have been activated will remain as such upon the Ball draining. *

        *Note – This Ball Save will expire once its 30 Second timer expires or you drain the Ball,
                                        whichever comes first. *
Page 10 of 35
Extra Balls
There are 5 Ways to achieve an Extra Ball;
Collect the Extra Balls by hitting the Ball at the Extra Ball Target (1) –
Method 1: Completing any 3 Main Modes; look later in the section titled ‘Main Modes” for
information on how to get this Extra Ball.
Method 2: Hatching 8 Dinosaurs in the Hatchling Hurry Up; look later in the Guide under “Side
Game Modes – Hatchling Hurry Up” section for information on how.
Method 3: Hatching all 16 Dinosaurs in the Hatchling Hurry Up; look later in the Guide under
“Side Game Modes – Hatchling Hurry Up” section for information on how.
Method 4: Scoring a Super Jackpot in the Pteranodon Multiball Mode; look later in the Guide
under “Side Game Modes – Pteranodon Multiball” section for information on how.
Method 5: Given as a random DNA reward (weighted chance depending on score & Ball number);
look later in the Guide under “Side Game Modes – Random DNA Rewards” section for information
on how.Page 11 of 35 Raising the Multiplier Hitting the Extra Ball Target (1) below the bottom Bumper enough times will increase the Bonus Multiplier. You can also increase the Multipliers be collect the corresponding award from the DNA Rewards, and if you gain the award for holding the Multipliers then they won’t be reset upon the Ball draining. (more info later in the guide under “Side Modes - Random DNA Reward” section).
Page 12 of 35
Side Game Modes
Random DNA Reward
If the ball arrives to the left crossover Rollover via the Bumpers, it will give you a random DNA
reward.
Awards include:
- Light Extra Ball (Extra Ball will be lit at the Extra Ball Target (1)).
- Quick lock for Pteranodon Multiball.
- Large Points.
- Hold Multipliers (the end-of-Ball Multipliers will be held to the next Ball).
- +1 Bonus X (the end-of-ball Multipliers will be increased).
- Activate a Kickback.
- Activate Ball Saver.Page 13 of 35
Hatchling Hurry Up –
Enough shots to the incubator bumpers (as indicated on the Dot-Matrix) will eventually cause a
Dinosaur to start hatching from its egg.
This will start a countdown, and shooting the randomly flashing Lane will fully hatch the Dinosaur.
If you manage to hatch 8 Dinosaurs, you will be rewarded with an Extra Ball being made available
at the Extra Ball Target (1). Now hatching all 16 of the different Dinosaurs found at Jurassic World
will reward you with an InGen Honoured Guest helicopter tour of the island, awarding a significant
score and an Extra Ball being made available at the Extra Ball Target (1). Shooting the Varitarget
(14) whilst no timed mode is running will also increase the points awarded for a successful egg
hatch.Page 14 of 35
Lane Side Modes
Shooting any Lane or Ramp which isn’t being used for a specific Main or Side Mode shot will light
the dinosaur footprints at its entrance to start a Side Mode or increase some points value. By default,
4 shots are needed to activate them, though it may be decreased by each successful Skill Shot.
- Jurassic Rage
Shooting the Left Orbit (2) &/or the Right Orbit (13) will start the Jurassic Rage mode.
This temporarily increases all scoring on the table 1.5X for 30 seconds– and if both Lanes are
lit at the same time, it will restart the timer to 30 seconds and increases the scoring to 2X.
When the Mode finishes, the scoring returns to the default 1X value.Page 15 of 35
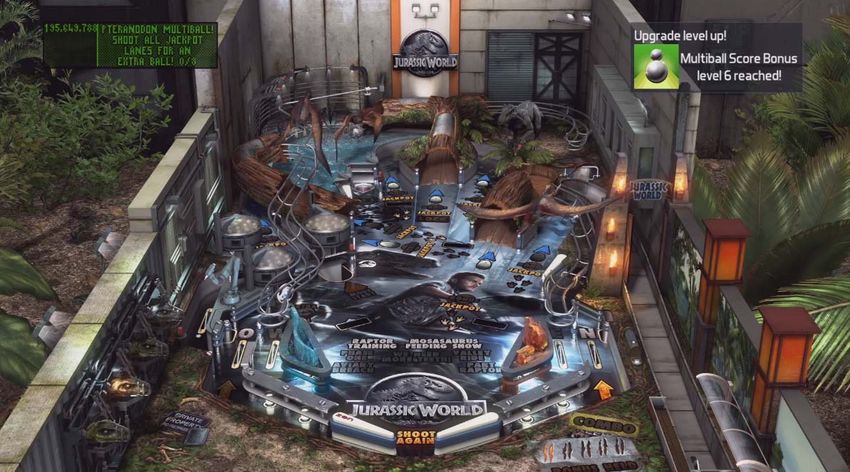
- Pteranodon Multiball *3 Balls*
Activation (Locking Mechanic):
Shooting the Left Ramp (5) 3 times will activate the Lock for the Pteranodon Multiball.
When the lock is activated, shooting the Centre Ramp (9) will drop a Ball into the
Mosasaurus Pool, with a new one being delivered from the Plunger Lane.
Repeat the above process to lock a further 2 Balls. After locking 3 Balls at the Mosasaurus
pool, the Pteranodons dive into the pool and retrieve the Balls, delivering them back to the
Playfield. At this point the Multiball Mode will begin.Page 16 of 35
Mode Itself:
All lanes are lit for Jackpots. If all the Jackpot lanes are hit, an Extra Ball will be awarded
(for the 1st time only).
After which a Super Jackpot is given for subsequent completions. Shooting the Centre
Ramp (9) will alternate the diverter to guide the Ball to the upper Right Flipper for a shot at
the Left Ramp (5) and Left Lane (6) Jackpot lanes; and to the Mosasaurus pool, which will
see a Pteranodon once again retrieve the Ball from the water, giving you some time to cope
with fewer Balls on the Playfield and hit unlit Jackpot lanes. Additional shots to the Left
Ramp (5) will increase the Jackpot value.
This Multiball will continue if you have more than a single Ball alive on the Playfield.
Otherwise the Mode will end, and you will need to repeat the above activation process to re-
enter this Mode
- Bumper Points Increase
Shooting the Left Lane (6) will increase the base value of the bumpers.
- Stage Win Value
Shooting the Left Mini Loop (8) will increase the points given for a Stage Win.
- Stage Shot Value
Shooting the Right Mini Loop (10) will increase the points given for the various Stage
progression shots.Page 17 of 35
- T. Rex Kingdom
Hit the T. Rex paddock door (11) once to make the drop Target lower and it will open.
Once done, shoot the Ball into the revealed Sink Hole to deliver food to the T. Rex paddock.
The more food that gets delivered, the more points are available when the Side Mode fully
starts.
Once activated by shooting the Right Ramp (12), continue to quickly shoot the T. Rex
Kingdom Right Ramp (12) to view the T. Rex (on the Dot-Matrix) and collect the decreasing
frenzy score as the T. Rex rapidly satisfies her voracious appetite.Page 18 of 35 Main Modes The Main Modes can be played automatically in film order, or you can choose to select them in any order. This option is given to you at the start of your game. The Main Modes are started with 3 shots to the Main Mode Sink Hole (3). It may be possible to have multiple Side Modes running simultaneously with a Main Mode. Hitting the Varitarget (14) whilst any timed mode is running will increase the remaining time for all Modes. All Main Modes must be completed to advance to the Wizard Mode, however a checkpoint system has been added to most Main Modes to aid progression. This ensures that you will see all the Mode’s features, whilst assisting you if you struggle to complete some Modes all in one go.
Page 19 of 35

Scene 1 – Raptor Training:
The Raptors are released from their side wall enclosures, and their heads emerge from underneath the
Playfield.

Changeable lamps with the Raptors’ names on will flash in front of the corresponding Raptor. With their
jaws wide open, you will need to shoot the Ball into their mouths, if the correct Raptor (shown on the Dot-
Matrix) is hit it will devour the Ball and take it back underground, or violently shooting it back towards the
Flippers if the incorrect Raptor is hit. Once all 4 Raptors are fed in the correct order, the Mode will be
completed.
Page 20 of 35

Scene 2 – Mosasaurus Feeding Show:
Shoot the Ball at the Spinner via the Right Orbit (13) to fully move the Shark bait into position. This is done
once the Spinner rotates 20 times.

Once the bait has been placed into position, shoot the Ball up the Centre Ramp (9).
Page 21 of 35

The Mosasaurus will then eat the Ball, and at this point the Mode will be completed.
Page 22 of 35

Scene 3 – Phase One *2 Ball Multiball*:
The Indominus Rex breaks out of his paddock enclosure and starts to run around the Table. Following the
immediate chaos of his escape, the 4 randomly lit Lanes (1 lit at a time) must be hit to chase the Indominus
Rex.

Once done, sink the Ball into the Main Mode Sink Hole (3).
Page 23 of 35

At which point a 2 Ball Multiball will begin, and now the Indominus Rex must be directly using those Balls
to attempt to try and contain him. Repeatedly hit him until his health reaches 0 (shown on the Dot-Matrix).

Although, the Indominus Rex escapes capture for now, the immediate danger to the park’s visitors has
successfully been avoided. Thus, the Mode is completed.
Page 24 of 35

Scene 4 – Valley Ride:
Once the Mode starts, an initial shot to the Gyrosphere Saucer (7) will turn the metal ball into the
Gyrosphere Ball.

Hit the Mini Loops 4 times - Left Mini Loop (8) &/or Right Mini Loop (10) must be hit to steer successfully
around the Valley.
Page 25 of 35

Once done, sink the Ball into the Main Mode Sink Hole (3) this allows the kids to go off road.

At this point you must avoid hitting the Indominus Rex character, whilst making shots to the lit Lanes to try
and escape. You will need to hit 4 of those Lanes, with each successful hit the flashing Lanes will alternate
to another set.

Hitting the Bumpers will also destroy the Gyrosphere’s stabilization mechanism, as the Ankylosaurus’ bash
the Ball around (with the scene from the film on the Dot-Matrix).
Page 26 of 35

Finally, sink the Ball into the Main Mode Sink Hole (3) will see the kids escape from the Indominus Rex.

Thus, completing the Mode.
Page 27 of 35

Scene 5 – Aviary Breach:
Initially, you must pursue the Indominus Rex by shooting the lit Lanes. You will need to hit 4 of those
Lanes, with each successful hit the flashing Lanes will alternate to another.

On the Dot-Matrix, the Indominus Rex reaches the Aviary and smashes through the glass. Sink the Ball into
the Main Mode Sink Hole (3).
Page 28 of 35

The Pteranodons escape the confinements of their Aviary enclosure (scene from the film on the Dot-Matrix)
and land at various places around the Table.

You will then need to hit them with the Ball before they take off again. If they are hit and neutralized
enough times within the time limit, the Mode is won.
Page 29 of 35

Scene 6 – Part Raptor:
Shoot the flashing Lanes to make Owen follow the Velociraptors on his bike (shown by way of Dot-Matrix
animations from the film) whilst in pursuit of the Indominus Rex.

Now hit the Ball into the Main Mode Sink Hole (3) to get to cover.
Page 30 of 35

Once complete, the Velociraptors find the Indominus Rex, who returns to the Table and communicates with
the Raptors. “That thing’s part Raptor!” The Velociraptors in turn strike back towards you; reappearing on
the playfield as in the Scene 1: Raptor Training Main Mode.

Now the correct Raptors must be hit in the correct order (shown on the Dot-Matrix) to restore Owen’s
dominance as the pack’s Alpha. Shooting the Ball to the incorrect Raptors will this time eventually lead to
the Mode being failed. Once they have been hit in the correct order, the Mode will be completed.
Page 31 of 35

Wizard Mode – “We Need More Teeth” *3
         or 4 Ball Multiball*
Once all 6 Main Mode have been completed, the Wizard Mode can be started by shooting the Main Mode
Sink Hole (3).

Wizard Mode itself:

Several goals related to the Indominus Rex’s final fight in the Main Street are presented in this multi stage
Wizard Mode. Many short Dot-Matrix sequences from the film may also help to convey what is happening
during this Mode.
Page 32 of 35
The stages of the Wizard Mode include:
Shooting the lit Lanes (or the Indominus Rex model itself) to make the Raptors attack the Indominus
Rex.
Once the Indominus Rex health is just below 70, you will need to hit the T. Rex Paddock Target (11)
to open the door of the Paddock.Page 33 of 35 and then shooting the revealed Sink Hole via T. Rex Paddock Target (11) will launch another Ball. Which can lead to a 4 Ball Multiball.
Page 34 of 35
Finally defeating the Indominus Rex by forcing him back to the Mosasaurus pool.
Once his health reaches 10 or so, the Mosasaurus emerges to drag him down to the depths of his
watery enclosure.
If you Ballout or tilt during the Wizard Mode (it's the only way to lose it) the Table will also reset. Meaning
you will have to complete all the Main Modes again to re-enter the Wizard Mode to try again.Page 35 of 35 Special Thanks to all the Zen Studios Forum Community! Members such as shogun00, Cloda, Ty-43, Thomas Crofts (without his help this guide wouldn’t have been possible!), Deep, wims, skyway73, tenorhero, DiscoKing & surf1der. I couldn’t have completed the Guide without your help either directly or indirectly - you are all awesome!!! In closing I hope you enjoyed this Table, I certainly have and I hope by using this Guide it increases that Fun factor for you and everyone else who plays with you. Check out the other Tables available, they are all available to download on the Xbox Live Marketplace in Add-Ons section or download it straight from the PFX2 Platform itself. Zen Pinball 2 on PlayStation Network, Zen Pinball on the Apple AppStore, Zen Pinball 3D on Nintendo 3DS and Zen Pinball THD on Android Marketplace. Thanks for viewing my Guide; any feedback would be greatly appreciated - “Pinballs. We need more PINBALLS!!!” Yours ShoryukenToTheChin
You can also read