SAP S/4HANA Fully-Activated Appliance: Simplified Human Capital Management Using SAP Fiori: Own Data & Absences
←
→
Page content transcription
If your browser does not render page correctly, please read the page content below

SAP S/4HANA Fully-Activated Appliance                  PUBLIC
(2020 all FPS & 1909 FPS02)

July 2021 (V1.3)
English

SAP S/4HANA Fully-Activated Appliance:
Simplified Human Capital Management Using SAP Fiori:
Own Data & Absences
Demo Guide

Table of Contents

1         How Can This Script Be Used?                                                                       3

2         Demo Story: Simplified HCM Tasks Using SAP Fiori                                                    4
2.1       Employee logon and personalization of Fiori Launchpad                                               5
2.2       Checking Time Management Data and own data.                                                         7
2.3       Check the availability of colleagues                                                               11
2.4       Entering absences                                                                                 18
2.5       Entering an emergency address                                                                     38
2.6       Manager logon and checking availability of the team.                                              44
2.7       Approving absences                                                                                48
2.8       Entering data for an employee                                                                     51

3         Background Information                                                                            58
3.1       Data of demo scenario                                                                             58
          3.1.1     Employee Master Data                                                                    58
          3.1.2     Organizational Management/Organizational Structure                                      58
          3.1.3     Qualification Catalog                                                                   59
3.2       Time dependent (transactional) data of demo scenario                                              60
3.3       Data needing refresh after usage of demo                                                          60

Document History

    Revision      Date              Change

    1.0                 Release for customer for 1909 FPS02

    1.1                 Added scenarios for SAP S/4HANA 2020 and release for customer

    1.2           April 2021        Minor adaptations for SAP S/4HANA 2020 FPS01 and release for customer

    1,3           July 2021         Minor adaptations for SAP S/4HANA 2020 FPS02 and release for customer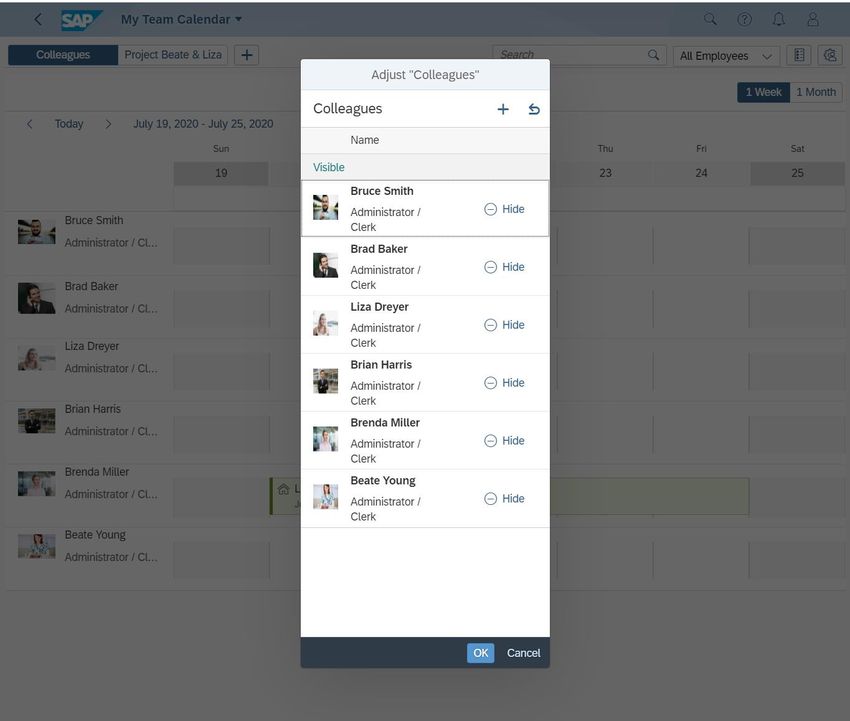
1 How Can This Script Be Used?

This demo script has been written for usage with the SAP S/4HANA Fully-Activated Appliance (for 2020 FPS02 / FPS01 / SP00 &
1909 FPS02), in short “appliance” in this script. Hence you will need such an appliance to make use of this guide.
The appliance can be brought up in two ways, and the demo scenario in this script is largely the same for both:

1.   Via SAP Cloud Appliance Library (hosted on cloud providers)
     You need a cloud provider account at AWS, MS Azure, or GCP. With this, you can deploy the appliance within 1-2 hours from
     https://cal.sap.com > Solutions> SAP S/4HANA (your desired version 2020 or 1909) Fully-Activated Appliance.
2.   Via installing it on your own on-premise hardware.
     You need to provide your own hardware, and order & install the appliance as explained in SAP Note 2041140.

If you are new to the SAP S/4HANA Fully-Activated Appliance, introductory information can be found here:
https://blogs.sap.com/2018/12/12/sap-s4hana-fully-activated-appliance-create-your-sap-s4hana-1809-system-in-a-fraction-of-
the-usual-setup-time/

Important:
Before you start your demo, please read SAP S/4HANA Fully-Activated Appliance: Demo Scripts for information about necessary
preparations, especially any post-deployment steps to ensure the full functionality of your appliance. These steps are covered in
sections;
         B) General Remarks
         C) Post-deployment Steps
         D) Log-on to the system
Besides this, you will also find links to all demo scripts on this page.

                                                                                                                                    3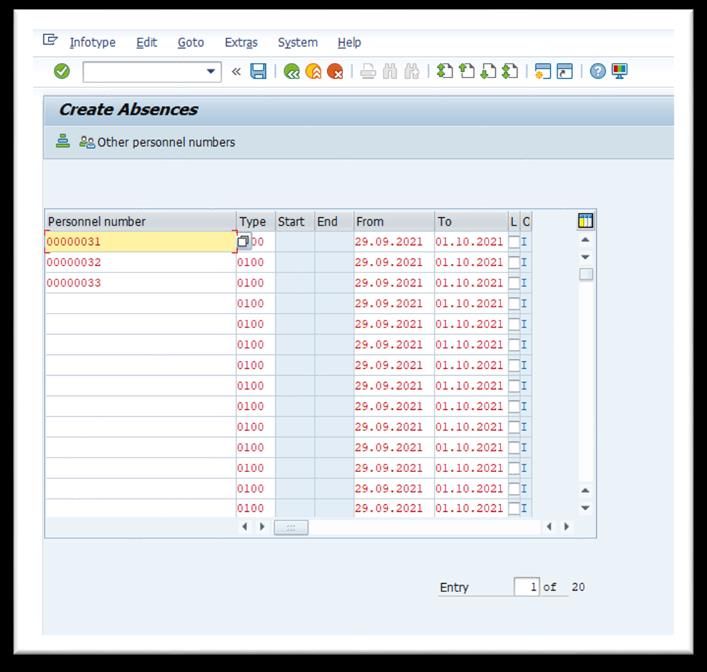
2 Demo Story: Simplified HCM Tasks Using SAP Fiori

This scenario demonstrates a typical usage of Fiori-based Self-Services by an employee and a manager.
In this scenario the following apps are actively used:

By role ‘employee’:
     •   My Profile
     •   My Team Calendar
     •   My Leave Requests
     •   My Addresses
By role ‘manager’:
     •   My Team Calendar
     •   My Inbox
     •   My Addresses in on-behalf mode

In this scenario, two employees are involved.
     •   Bruce Smith (PERNR 29)
     •   Bill West (PERNR 30)
     •   Furthermore, Bruce has five colleagues, who also work in the Payroll Department. Bill is also their manager.
Bruce is a payroll clerk; he shares his tasks with his colleagues in the same department. All employees handle general payroll tasks,
but some also have specific topics like tax or benefits. The employees have a flexible work schedule; thus, they are not recording
working times. Nevertheless, they record when they work from home. This is only for information purposes for the company.

In the scenario:
A.   Bruce will access different types of data for information, furthermore, he will enter the following data;
     •     Bruce was recently sick one day but had only informed his manager by phone. Now, he wants to enter the data about his
           sick leave in the system.
     •     He also wants to take a day off soon.
     •     As he works from home today, he also will record how much time he works from home.
     •     He also enters a further emergency address.
B.   Bill, the manager, will access different types of data, furthermore he will approve requests from his employees and enter data
     on behalf of one of his employees.

You find a short introduction about the used apps in the relevant chapters. Additionally, you can find more information about the
used apps and further apps in the documentation of the HCM Apps (SAP Fiori 2.0 for SAP HCM, use the latest release from the
pull-down menu):
https://help.sap.com/viewer/d59d9f81f4884bf9b115936b92c27202/2.0%202020-12/en-
US/90fbca4713064718825cfcbdb8e5bb70.html
For more technical information about the apps in the SAP Fiori apps reference library, please visit:
https://fioriappslibrary.hana.ondemand.com/sap/fix/externalViewer/

                                                                                                                                      4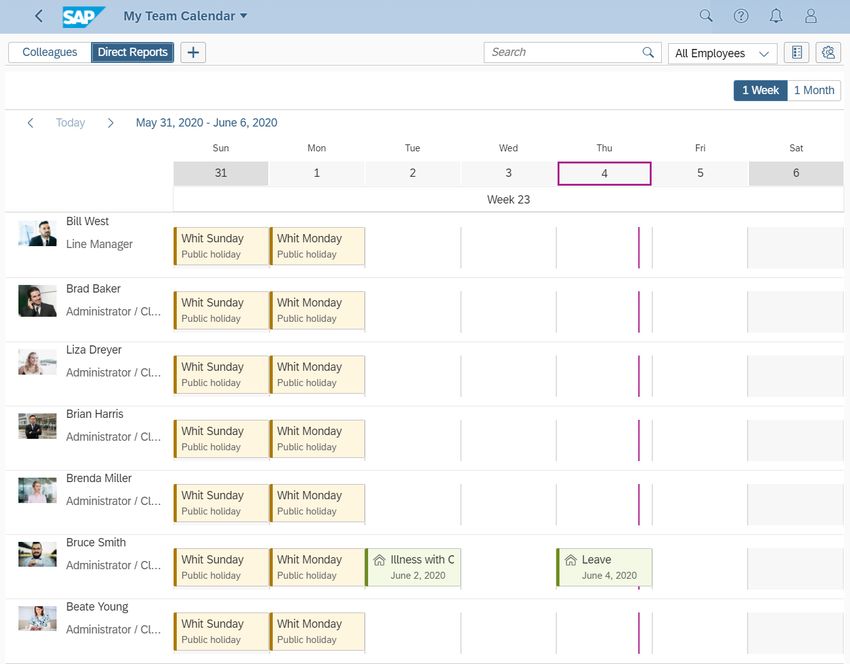
2.1 Employee logon and personalization of Fiori Launchpad

 What to Do                  What You Will See
 Open your Fiori             On the Fiori Launchpad (FLP), You see the initial screen of this user. Using personalization, this
 Logon-Page and logon        user has removed some of the apps available for his role (which he doesn’t need often), however
 with following data.        he will change this to make one of these apps available again (”My Addresses”) so that he can
                             use it.
 User: S4H_HCM_EE
 Password: Welcome1
 Language: EN, DE, FR,
 ES
 (beyond these
 languages the Fiori apps
 are still available, but
 texts of used scenario
 data, like for example
 positions are not
 translated)

 Click the user icon (top
 right) and choose “Edit
 Home Page”.

                             You will see the Fiori Launchpad of this user in the personalization mode.
 Click the empty tile with
 a plus sign “+”in the
 Employee (HCM) group

                                                                                                                                  5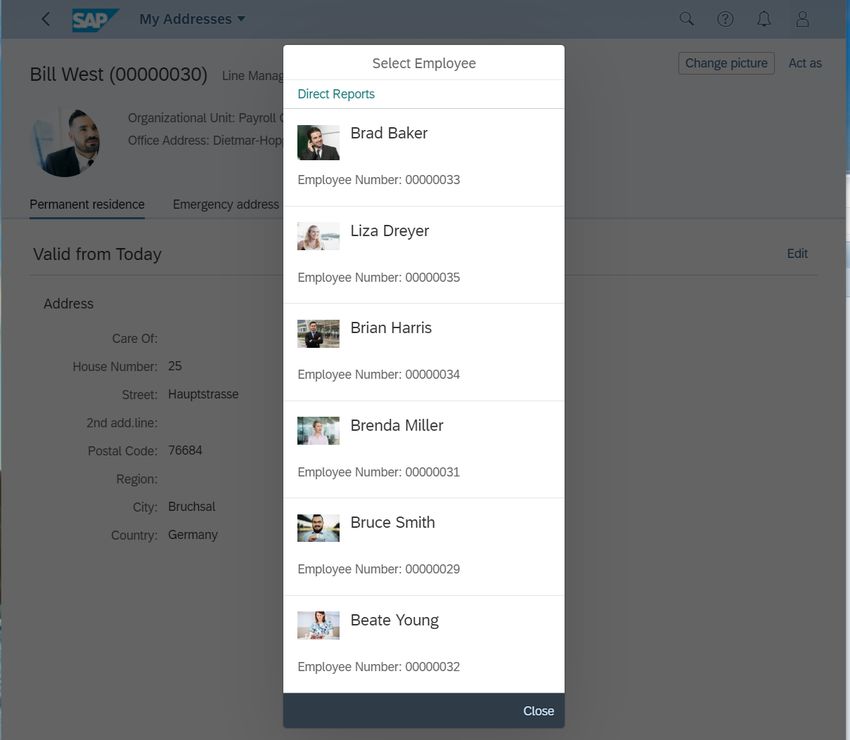
What to Do                What You Will See
Click the icon in the     You see the apps which are available for this user through his role (employee).
frame for “My             Based on the color of the icon inside the apps, you can see if an app is currently set on visible or
Addresses”.               invisible in the Fiori Launchpad.

Click the back icon (in   You still see the FLP in the Edit mode, but now “My Addresses” is activated.
the Fiori Top Bar).

                                                                                                                                 6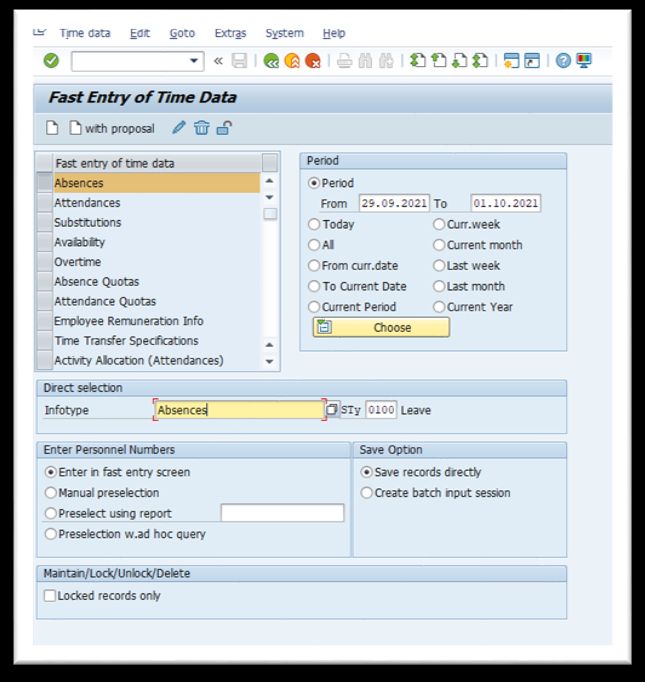
What to Do                   What You Will See

                               You are now back in the initial screen of the personalization mode.
  Choose “Close”.

                               You are back in the FLP, the app “My Addresses” is now available.

2.2 Checking Time Management Data and own data.
Story:

Bruce plans to use multiple self-service apps today to catch up on some routine tasks. He wants to record different types of
absences, the time he is working from home and enter an additional address. For some of these tasks, he is not sure if he already
had completed them the previous week.

Therefore, before starting with the different tasks, he first wants to get an overview. For this purpose, “My Profile” is the ideal app,
Using this app, he can get a quick overview and if needed, he can jump directly to a specific app.

Used App:

“My Profile” (including a navigation to “My Leave Requests”)

                                                                                                                                           7
What to Do                What You Will See
In the FLP click on “My
Profile”.

                          Story:
                          Bruce wants to enter a lot of data today. To get an overview about his data, he first opens “My
                          Profile” to quickly get an overview about data (pending requests etc). If he sees that he is
                          missing data, he can easily navigate to the specific apps to add the missing information.
                          He sees that he has one absence in status Informed, but he wants to check the details, therfore
                          he navigates to “My Leave Requests”
                          App Information:
                          You see the initial screen of “My Profile”.
                          “My Profile” has a header section with information about himself including information to which
                          manager he is reporting to.
                          Under the header section you find four further sections:
                              •    Timesheet and Absences
                              •    Talent
                              •    Compensation
                              •    Personal Information
                          In each of these sections you find information about these HCM-areas. In case there is a specific
                          app or multiple apps for an area, you can navigate directly to these apps. For example in the
Click on “View my         screenshot below, using the button “View my Absences” you can navigate directly to the app
Absences” .               “My Leave Request”. Once you are in the target app, when you select the back navigation icon,
                          you are redirected to “My Profile”.

                                                                                                                              8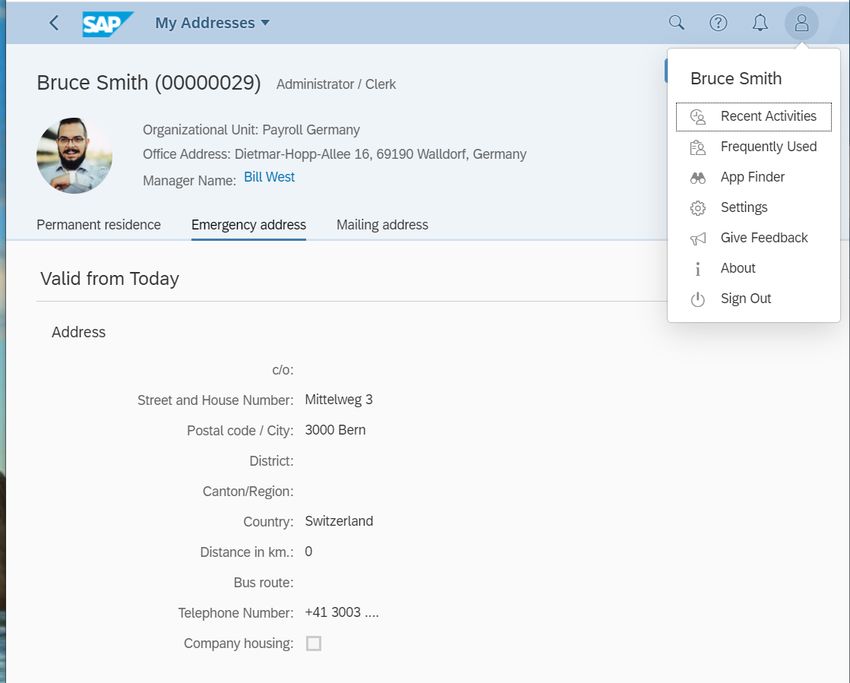
What to Do        What You Will See

                  Story:
                  Bruce can now see the status and details about his absence requests. After checking this he
                  navigates back to “My Profile”.
                  App information:
                  You are now in the app “My Leave Requests”.
                  The upper area (“Entitlement”) shows the entitlements of the employee.
                  The lower area (“Request Overview”) shows the existing requests for absences. The requests
                  can be displayed either as a list or in a calendar.

Click on “Back.

                                                                                                                9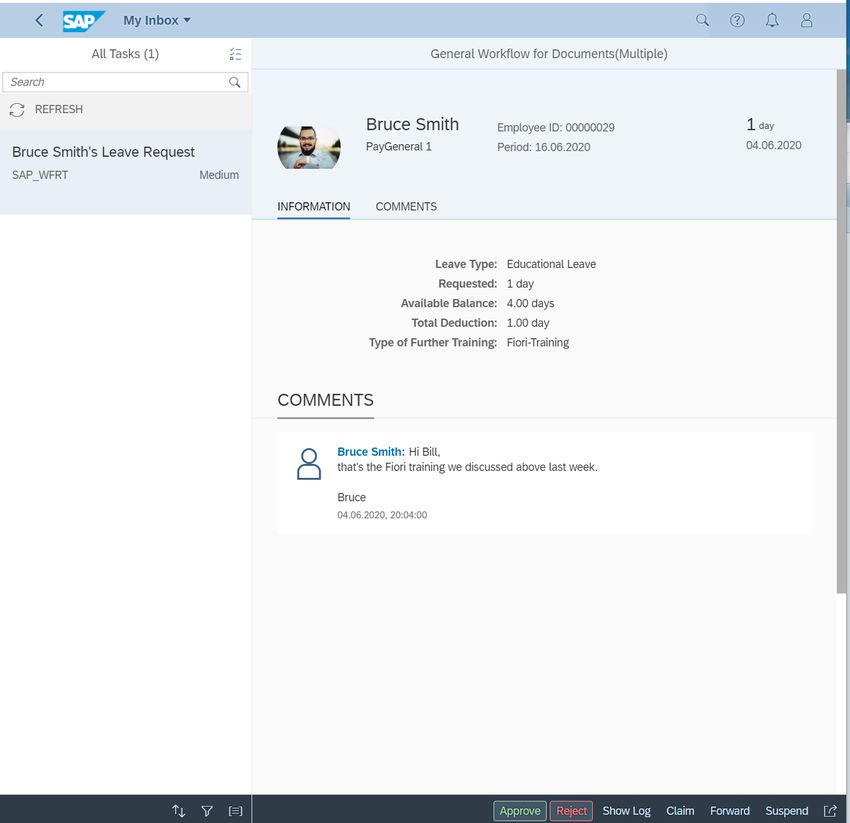
What to Do              What You Will See
Click on “Personal      Story:
Information”.           Bruce is now back in “My Profile”. Before leaving the app, he wants to check if he has entered the
                        additional emergency address. He selects the area “Personal Information”
                        App information:
                        The section “Personal Information” shows the employee master data (technically the content of
                        the PA-Infotypes). In the standard, data from six infotypes are shown. For each of these
                        infotypes, there is an independent app.

                        Bruce can see that he hasn’t entered an emergency address yet and will do this later by
Click on “Back” or      accessing the specific app. This is the app he has made visible in his FLP at the beginning of the
                        scenario. Now he goes back to the FLP:
“Home (SAP Logo) to
get back to the Fiori
Launchpad,

                                                                                                                             10
What to Do What You Will See
2.3 Check the availability of colleagues
Story:
As Bruce wants to enter multiple absences, he first wants got get a good overview about absences of his colleagues.
Used App:
“My Team Calendar”
11What to Do What You Will See
Click on “My Team Story:
Calendar” in the FLP. As Bruce wants to enter absences in a longer time period, he changes to the month view.
Click on “1 Month”.
Click on “1 Week”.
12What to Do What You Will See
Select the forward
navigation icon.
Go to the third week of
the month. See
explanation in note
below.
Note:
In order to have some
interesting calendar
situations, there are
already some absences
maintained in the
system for the
colleagues of Bruce. We
put absences around
the following dates
(days may vary):
• Feb 13th
• May 20th
• July 20th
• Sep 28th
If you are executing the
scenario later, you need
to maintain some
absences for his
colleagues (TCode
PA30 or PA71, info type
2001/Absences)
Story:
Select the value help for Bruce wants to understand how many employees are available in his team and uses the filter.
the filter.
13What to Do What You Will See
Select “Available” in the
drop-down list of
options.
Select the value help for
the filter and select “All
Employees”
14What to Do What You Will See
Select “Project Beate & Story:
Liza”. Bruce works on a project with his colleagues Beate and Liza. For this project he created an own
view. With this view, it’s quicker to see how well the project team is staffed in a specific time
period.
Select the “+” Icon. Story:
Creating such views is very easy, Bruce just needs to click the + icon, can give a name and then
insert employees.
15Feel free to create your
own view, in this demo
script we won’t do it
though, so select
“Cancel”.
Select “Colleagues”. Story:
It is also easy to adapt the (predefined) view “Colleagues”, for example, by hiding colleagues who
are not working on same topics as he.
16Select the
“Personalization icon”.
Select “Hide” for Beate Story:
Young and click “OK. As Beate is working on completely different topics, an overlap in their both absences is not
relevant, thus he hides her from the Colleagues view.
17Select “Back” or
“Home” to get back to
the Fiori Launchpad.
2.4 Entering absences
Story:
Now Bruce wants to enter his three absences:
• A leave request (vacation)
• A sick leave
• An educational leave
Used App:
“My Leave Requests”
18What to Do What You Will See
Click on “My Leave Story:
Requests” in the FLP. First Bruce checks his entitlements, i.e. available absence types he can still use.After checking
this he close this screen area.
Collapse the
“Entitlement” area .
Story:
Click on “Calendar” . Bruce now can check the list of his request. But he can also have a calender view of this
absences.
19What to Do What You Will See
Note: Story:
Selecting the date by Bruce is now in the calendar view. This helps also for entering an absence quicker, by clicking
working with the into a date, the date is entered by default and doesn’t need to be entered in the detail screen.
calendar view and
automatic navigation to
the detail screen:
• Double click on one
date: One day
absence
• Single click on one
day, second click on
other date: Multiple
day absence
Select some absence
days in the calendar.
20What to Do What You Will See
If you chose days where Story:
some of your colleagues Bruce can see that there is an overlapping absence and checks if this his relevant for his
are also absent (see planning.
note about pre-
configured days below),
you can click on “Show
absent” to see their
absence data.
Note:
In order to have already
some “interesting
calendar situations”
there are already some
absences maintained in
the system for the
colleagues of Bruce. We
put these absences in
the weeks.
• Feb 13th
• May 20th
• July 20th
• Sep 28th
If you are executing the
scenario later, you need
to maintain some
absences for his
colleagues. i.e. enter
some absences for his
colleagues (Transaction
code: PA30, info type
2001/Absences).
21What to Do What You Will See
Story:
Click on “Close” . He can see that only Brenda is absent, this is not critical so he continues to enter his absence.
Story:
Bruce enters a note to his manager. His manager is entered by default and can also not be
changed by Bruce (this can be customized).
Enter a note to the
approver/manager.
22What to Do What You Will See
Click on “Save” .
Open/expand the Story:
“Entitlement” area. Bruce is back on the initial screen, and he can see his request in the calenar. He opens the
entitlements again because he want to check his educational leave entitlement. He also can see
that he has one day more planned absence.
23What to Do What You Will See
Click “Items” .
Click “Create Request”.
24What to Do What You Will See
Click the entry help for Story:
the field “Leave Type”. Bruce has changed to the list view and selected the “Create Request” button on the main screen.
In this case he needs to select the date in the detail screen.
Select “Illness with Story:
Certificate”. Now he wants to enter his sick leave from last week. It is possible to create leave requests in the
past (customizable).
25What to Do What You Will See
Click the date control
for the field “Start/End
Date” .
26What to Do What You Will See
Select a date in a
previous week.
27What to Do What You Will See
Enter a description in
the field “Description of
illness”.
28What to Do What You Will See
Click “Save”. Story:
Bruce has a sicknes certificate, but he forgets to attach it. Therfore he first gets an error as for
this leave type, the attachment is mandatory (customizable). For this leave request, he also
needs to enter the description of sickness (customizable additional fields). Note that a sick leave
doesn’t need an approval at all (customizable).
29What to Do What You Will See
Click “Close”.
30What to Do What You Will See
Add an attachment by Story:
clicking the “+ “ icon or Bruce adds his sickness certificate.
drag and dropping it to
the “Attachments” area.
31What to Do What You Will See
Click “Save” .
32What to Do What You Will See
Click “Create Request”. Story:
Bruce can see one more entry in his list. As a sick leave doesn’t need an approval, he can see the
status has been updated (compared to requests with approval)(customizable).
Click the entry help for Story.
the field “Leave Type”. Now Bruce enters his third leave request. This is with an approval process and he is able to enter
additional information.
33What to Do What You Will See
Select “Educational
Leave” .
34What to Do What You Will See
Select a date, enter a App info:
note and enter a After selecting the leave type the screen has changed. In this case a further description of the
description in the field leave type is shown.
“Type of further
training” .
35What to Do What You Will See
Click “Save” .
36What to Do What You Will See
Select “Back” or Story:
“Home”. Bruce has entered now his 3 leave requests.
372.5 Entering an emergency address
Story:
Bruce now updates his emergency address.
Used App:
“My Addresses”
What to Do What You Will See
Click on “My Story:
Addresses” in the FLP. Bruce now wants to enter an emergency address.
Click on “Emergency
address”.
38What to Do What You Will See
Click on “Create”.
39What to Do What You Will See
App info:
It is possible to enter addresses for all HR country versions. The screen changes accordingly to
Click on the entry help the selected country.
for the field “Country”.
40What to Do What You Will See
Select “Switzerland”.
41What to Do What You Will See
Enter the address data
displayed in the
screenshot.
42What to Do What You Will See
Story/App info:
Bruce selects “Save” after entering the address data and did not select a specific date in the field
Click on “Save”. “Validity”. Thus this record will be valid as of today.
43What to Do What You Will See
Story:
Bruce has done all the tasks he wanted to complete and logs out.
Click on the user-icon Bruce is back on the logon screen of the FLP
an select “Sign out” .
2.6 Manager logon and checking availability of the team.
Story:
Bill, the manager of Bruce, logs on to his FLP. As he is also an employee, he has also the employee app catalog.
Before going in his inbox Bill likes to go in “My Team Calendar” to get a high-level overview about absences of his employees. He
gets the view “Colleagues”, but as manager he also gets a view for his employees (“Direct Reports”).
Used Apps:
• “My Inbox”
• “My Team Calendar” (with special view)
• “My Addresses” (on-behalf)
44What to Do What You Will See
Open your Fiori Story:
Logon-Page and logon Bill logs on.
with following data.
User: S4H_HCM_MGR
Password: Welcome1
Click on “My Team
Calendar” in the Fiori
Launch Pad.
Click on “Direct App info:
reports”. As Bill is a manager, he has the additional app “Direct Reports”
45What to Do What You Will See
Click on “1 Month” .
Click on the Legend-
icon.
46What to Do What You Will See
Story:
Click on “Close”. As Bill is not sure about the color coding, he checks.
Select “Back” or
“Home” .
Bill is back in the FLP.
472.7 Approving absences
Story:
Bill now wants to process requests in his inbox.
Used App:
“My Inbox”
What to Do What You Will See
Click on “My Inbox” in Story:
the FLP. Bill sees the request(s) of his employees.
App information:
After viewing the The list of requests is visible in the left area, and on the right side of the screen the details of the
request, click on selected requests are displayed. At the botom of the screen are the buttons to process the
“Approve”. request.
48What to Do What You Will See
Click on “Submit” .
49What to Do What You Will See
Note:
How to proceed further
depends on how many
requests you sent from
the employee scenario
earlier. You might still
have other requests, or
your inbox is already
empty.
All work items coming
from “My Leave
Requests” are based on
the same pattern, but it
depends on the specific
requests, which areas
are visible.
In the screenshot on the
right you see an
example with a
maximum of areas
visible:
Top-Area (with
employee information)
Visible for all requests
Information
Visible for all requests
Comments
Visible when employee
entered a note
Attachments
Visible when employee
added an attachment.
Overlap Calendar
Visible when colleagues
from the team of the
employee have
overlapping absences
50What to Do What You Will See
Select “Back” or
“Home” .
You are back in the FLP.
The counter in the tile of “My Inbox” is now on “0”, if you have approved/rejected all requests
2.8 Entering data for an employee
Story:
Bill got a mail from one of his team members, Liza. She had an issue entering an address for herself and asked him to do this for
her.
Used App:
“My Addresses” in on-behalf-mode.
51What to Do What You Will See
Click on “My Story:
Addresses” in the FLP. Bill starts the “My Addresses” app, i.e. the app he would also use to change his own address
data. That’s why we see his data. But instead he chooses “act as” i.e. now his changing data for
Click on “Act as”. the personnenl number of the selected employee.
52What to Do What You Will See
Story:
Select “Liza Dreyer”. A list of Bill’s employees are proposed for him to choose from.
53What to Do What You Will See
Click on “Emergency Story:
Address”. Once he has selected Liza he gets a message (see lower screenshot), that he is now acting on
her behalf, which is also presented on the top of the screen.
54What to Do What You Will See
Story:
Click on “Create”. Now he proceeds exatly as if he would maintain data for himself.
55What to Do What You Will See
Select “Spain” for the
field “Country”,
Enter the address data
displayed in the screen
shot.
Next, click on “Save”.
56What to Do What You Will See
Story.
Click on “Act as At the end he switches back from the “on-behalf-mode” to his own data.
Yourself” to revert to
the Bill’s own data.
Afterwards, select
“Back” or “Home” to
get back to the FLP.
573 Background Information
3.1 Data of demo scenario
The following are the key data which allow this scenario to be run:
• Employee Master Data for the key employee and for his colleagues
• Some transactional data, especially for absences
• An organizational structure where the team is assigned to one organizational unit with a manager.
• A qualification catalogue
3.1.1 Employee Master Data
The employee master data which are maintained for this scenario are:
• Info type 0000 - Actions
• Info type 0001 -Organizational Assignment
• Info type 0002 - Personal Data
• Info type 0006 - Addresses
• Info type 0009 – Bank Data
• Info type 0050 – Time Recording Info
Furthermore, following transactional data are maintained
• Info type 2001 – Absences: Especially for the colleague-employees, to have some absences for overlaps
• Info type 2006 – Absence: Quotas: Allowing to create absences requests
3.1.2 Organizational Management/Organizational Structure
You can find the organizational structure used for the scenario below:
583.1.3 Qualification Catalog
The following qualification catalogue is used. The catalogue is needed to show data in the section “Talent” of the app “My Profile”:
593.2 Time dependent (transactional) data of demo scenario
The absences (Info type 2001 records) are time dependent. As described in the scenario (“In which weeks do the colleagues
already have absences”) we created already some absences. If you wish to adapt the scenario for specific dates and you want
overlapping absences, you can do this by entering absences directly through transaction code PA30 (single entries) or PA71
(multiple entries, screenshots below) by creating records of info type 2001/Absences.
Screenshots from TCode PA71:
3.3 Data needing refresh after usage of demo
After creating a lot of absences, the absence quota of Bruce or other employees might be entirely consumed and it’s not possible to
create new absences. You can “refill” the quota by using transaction code PA30 and changing info type 2006 (Absence Quota) for
the relevant subtypes (0010 is the standard). You just need to increase again the value in the field “Number”.
Also, if you are using an older appliance release (eg. 1-2 years old) the absence quota for the current year will not be maintained yet.
In this case you will need to create a new quota record for each employee for the current year (use info type 2006 in PA30 or PA71
and create the quota for the current calendar year).
Below procedure shows the quota refill for Bruce in a time period where the quota record has already been maintained.
The creation of a new quota record (eg. for a new calendar year) is very similar: In PA30, choose “New” instead of “Edit” and enter
the desired quota plus the deduction time period where this quota should be valid.
60Procedure for refilling days in the existing quota record of Bruce
Start transaction PA30:
Enter in the field Personnel No. “29” (i.e. the personnel number of Bruce).
Enter in the field “Info type” “2006” and select in the field “Sty” “Standard Leave” (10).
Click “Edit”.
You see the detail screen of info type “Absence Quotas”.
Increase the value in the field “Quota Number” for the desired deduction time period and choose Save.
61www.sap.com/contactsap
© 2021 SAP SE or an SAP affiliate company. All rights reserved.
No part of this publication may be reproduced or transmitted in any
form or for any purpose without the express permission of SAP SE
or an SAP affiliate company.
The information contained herein may be changed without prior
notice. Some software products marketed by SAP SE and its
distributors contain proprietary software components of other
software vendors. National product specifications may vary.
These materials are provided by SAP SE or an SAP affiliate company
for informational purposes only, without representation or warranty
of any kind, and SAP or its affiliated companies shall not be liable for
errors or omissions with respect to the materials. The only
warranties for SAP or SAP affiliate company products and services
are those that are set forth in the express warranty statements
accompanying such products and services, if any. Nothing herein
should be construed as constituting an additional warranty.
SAP and other SAP products and services mentioned herein as well
as their respective logos are trademarks or registered trademarks of
SAP SE (or an SAP affiliate company) in Germany and other
countries. All other product and service names mentioned are the
trademarks of their respective companies. Please see
www.sap.com/corporate-en/legal/copyright/index.epx
for additional trademark information and notices.
62You can also read