NC SEEK Phase 1 Provider Refresher
←
→
Page content transcription
If your browser does not render page correctly, please read the page content below
NC SEEK
     Phase 1
Provider Refresher

                     1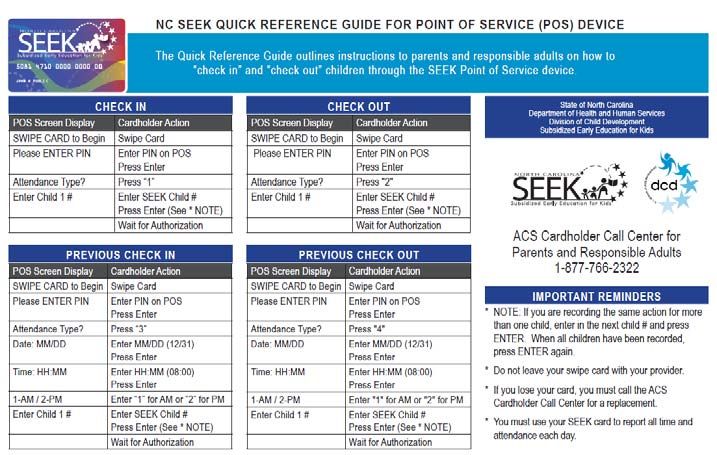
Agenda

           •   Welcome and Introductions
           •   POS Device
           •   Provider Web Portal
           •   Getting Help
           •   Questions

                                                                            2

Welcome to the Phase 1 provider training. Today we are going to cover everything
you ever wanted to know about Phase 1 of the SEEK program – from using your
POS device to logging into the provider web portal to getting additional help. And if
we don’t cover it in the presentation, we’ll get to it in the question/answer session at
the end. This is your time to get all your questions answered!

                                                                                           2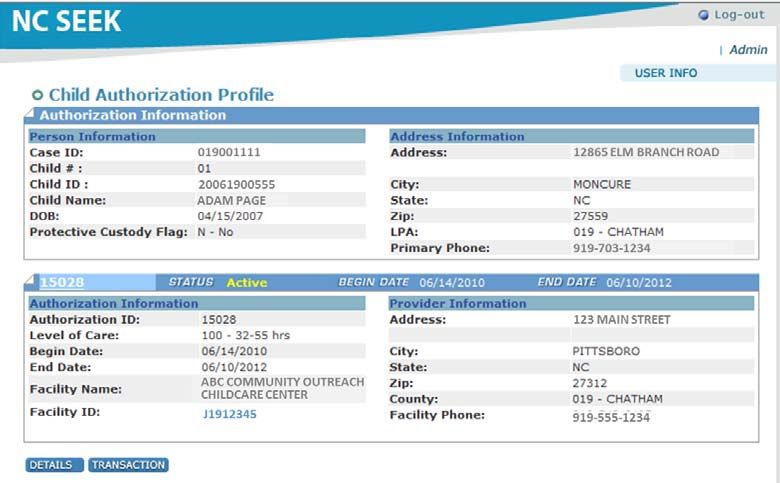
Welcome and Introductions

          • Chris Peterson
          • Xerox/ACS

                                                                         3

My name is Chris Peterson and I’m with ACS – the company contracting with
DCDEE to roll out the SEEK program. You will also see the Xerox name in emails
from me and other communications from the company. Xerox acquired ACS and is
currently in the process of changing everything over to Xerox. So, don’t be thrown if
you see ACS or Xerox!

                                                                                        3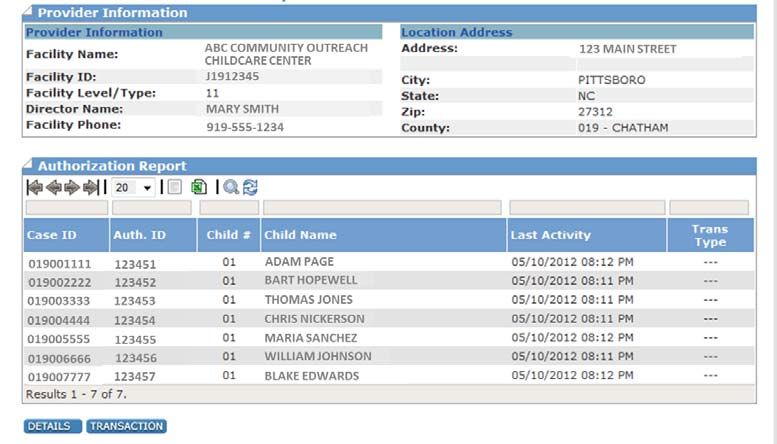
Getting Started

          • Return completed Provider Agreement
              – USPS to Austin, TX
              – Secure Fax: 855-443-1789
              – Email: christina.peterson@xerox.com
          • Provider record in SEEK
          • Active authorization

                                                                          4

If there is anyone here who does not already have a POS device, there are three
things that must be in place before one can be issued to you.
First, we will need the completed provider packet that includes a signed W9 and
your banking information. You packet can be mailed back to us at the Austin, TX
address referenced on the banking form. Or, you can fax it to us via our secure fax
line at 855-443-1789. Or you can scan the entire packet and email it to me and I
will forward to the correct group for processing.

Once we have your completed packet, we will need a record for you in the SEEK
system. Your LPA will send this information to us once you are approved to receive
subsidy children.

Lastly, we will need an active authorization for your location before we can issue the
POS device. Again, your contracting LPA will send this information.

Once all of this is in place, someone from our depot will contact you and confirm
whether you want an analog or IP device and the address where it will be shipped.
So, if you have received a message from us, please return the call with that
information!

                                                                                         4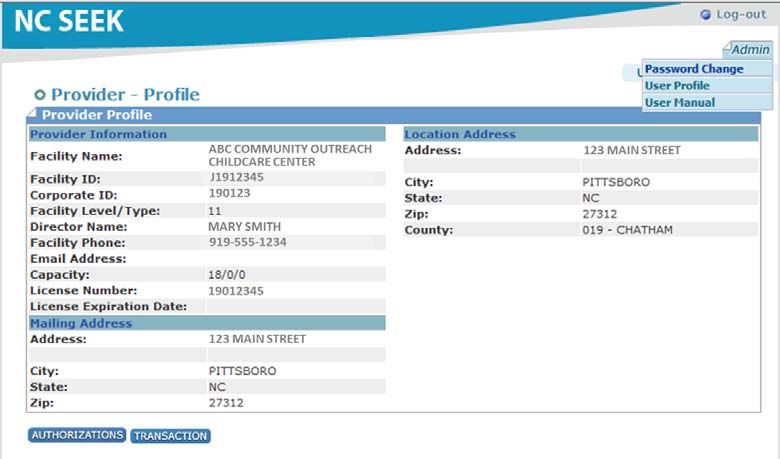
POS Device

                                                                        5

Let’s start with the POS device. You should have a device that looks something like
this one in the picture. Depending on the model you requested, you’ll either get one
that plugs into your phone line or one that plugs into your internet line.

                                                                                       5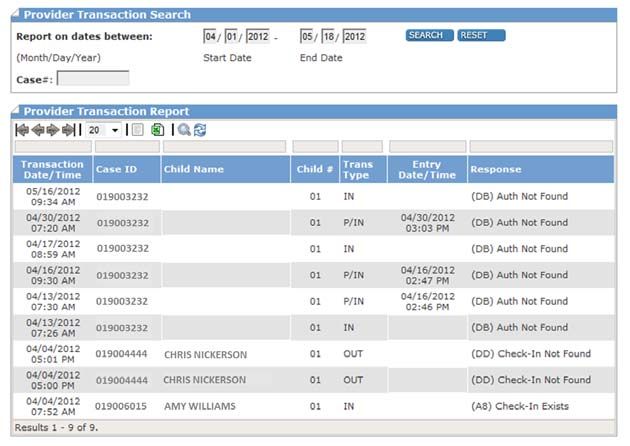
POS Device

             Paper Slot

                                                                                                              6

A few comments on the different parts of the POS device. This is the paper slot, where the receipts will come out of the
machine. While we are on the subject, let’s address the issue of using paper right off the bat. When you receive your
machine, you will also receive 2 rolls of paper. After you use those 2 rolls, you are responsible for purchasing additional
paper. It is thermal, heat-sensitive paper, available at any office supply store. The specific model number for the paper is
listed in the POS user guide that comes with the device. There has been much discussion about the use of paper in the
machines. YES, you can use the machine without paper. It works just fine. BUT there are several considerations to keep in
mind.

If you choose not to use paper, you will not have a record of the transaction number for each swipe. This is important if you
ever need to void a transaction for any reason. Currently, the receipt is the only access you have to the transaction number.
If needed, you can contact your local DSS office and they can pull the transaction number from the Administrative Terminal.
When we roll out Phase 2, you will have access to the transaction number in the provider web portal. So, this is a short term
issue.

The second consideration, should you choose not to use paper, is that the device currently stores all of the swipes in it’s
memory since the swipes are not printing. Eventually, the memory fills and the device stops accepting swipes. If that
happens, you either need to load paper so it can print all of the swipes or you will need to call the provider help desk to open
a ticket to have the memory cleared. Again, this is a short term issue as we are including new functionality with Phase 2 that
will allow you to turn off the “print to memory” function. In other words, you will be able to use the machine without paper and
the memory will not fill.

Last consideration on the topic of using paper, when Phase 2 rolls out, the state and county offices will have the option to
send broadcast messages to providers. These messages are only viewable via the printed receipt. If there is no paper, you
have no way to receive the broadcast message.

Any questions on using paper in the machines?

                                                                                                                                   6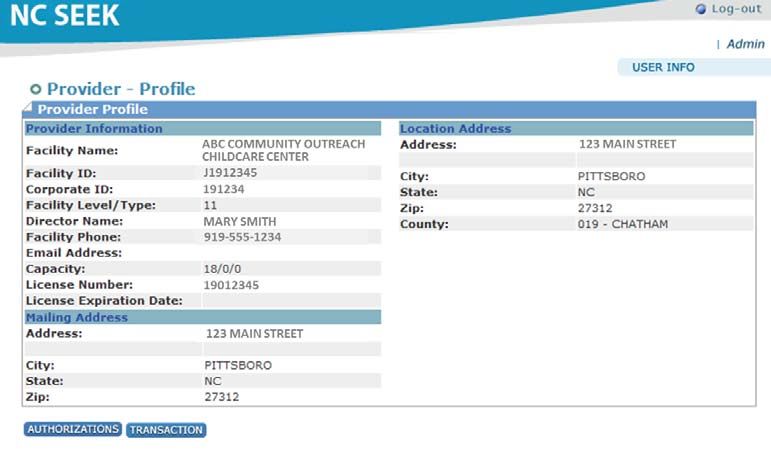
POS Device

           Screen

                                                                        7

Continuing with the overview of the parts of the POS machine. This is the screen
where you or the cardholder will see the prompts for checking in and checking out.

                                                                                     7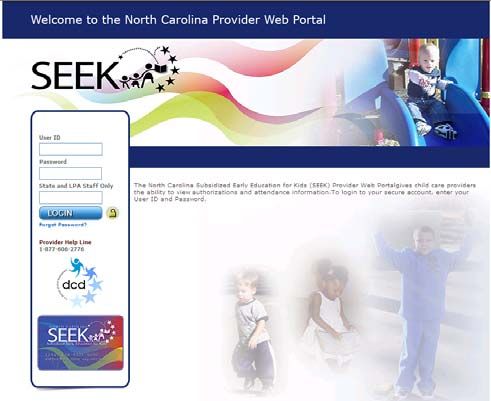
POS Device

                                                              Card Slot

                                                                           8

This is the card slot where the card is swiped – just like at a POS machine in a retail
store.

                                                                                          8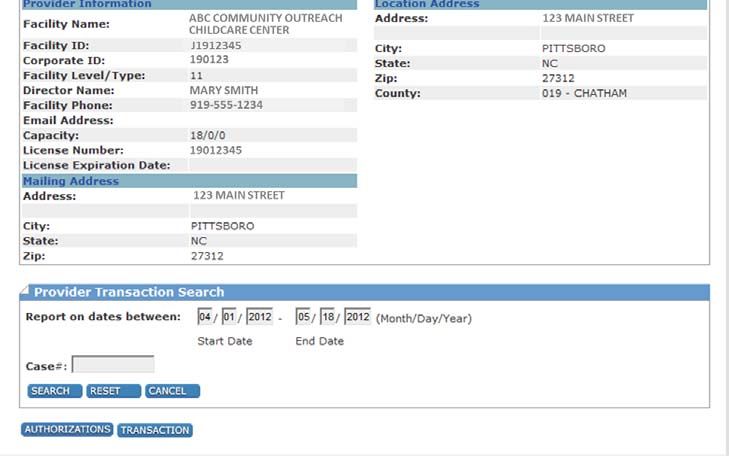
POS Device

                                                       Number Key
                                                       Pad

                                                                       9

These are the number keys where the user will enter child number, dates, etc.

                                                                                9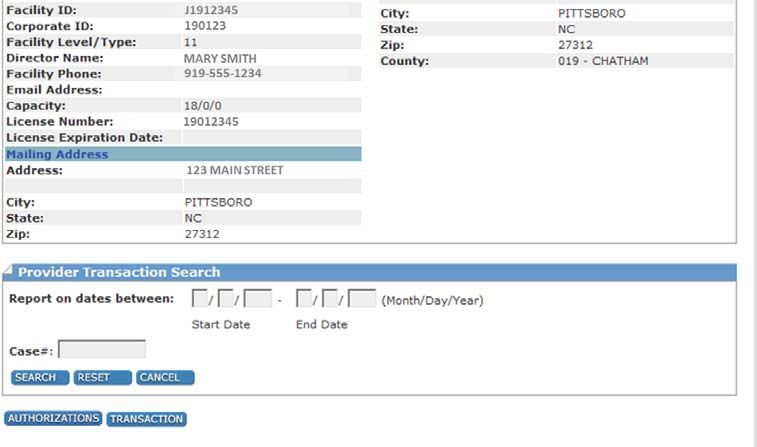
POS Device

                                                         Cancel, Back,
                                                         Enter keys

                                                                        10

These three keys at the bottom are used to cancel a step (red button), enter a step
(green button) or backspace (yellow button)

                                                                                      10
POS Device
Function
Keys
11
On the right side of the screen are the function keys. Generally, the provider is the
only one to use these keys. We’ll talk about the provider functions a little later in the
presentation.
11````` Swipe Cards
• Parents receive a magnetic stripe card, similar to a card
used in a credit or debit card reader. Each card has:
– A unique card number
– The cardholder’s name
• Cardholders must:
– Activate their card using the toll-free number provided with their card mailer
– Select a 4-digit PIN
– Maintain control of their card at all times
12
If you haven’t already seen one, this is what the SEEK card looks like. Each card has a unique number and the cardholder’s
name embossed on the card. Only the person assigned the card should be using the card.
When the cardholder first receives the card, they need to call the 800 number on the back of the card and select a 4-digit PIN
number for the card. They cannot use the card until this is accomplished.
The cardholder will also need the 2-digit child number for each child on the authorization. These numbers are printed on the
card mailer that the card is attached to when it is mailed to the cardholder. If the cardholder does not know the child number,
he/she will need to contact the cardholder call center or the local DSS office to obtain the child number. You also have the
ability to access the child number from the provider web portal.
Please do not take possession of the SEEK card for any reason. If a cardholder accidentally leaves one at your location or
drops it in the parking lot, please put the card in a sealed envelop with the cardholders name on the outside. It is considered
fraud for anyone other than the assigned cardholder to use the SEEK card.
Responsible adults must use their SEEK card and the POS device to record attendance. If they are not already, your
cardholders need to start tracking attendance via the POS now. Do not wait – even if they receive the message that their
authorization is not found. Cardholders need to get into the habit of swiping regularly NOW. This information will be used to
validate against the paper attendance reports.
12POS – Check In
Swipe Card
13
Now we are going to look at how each of the swipes is performed by the cardholder.
We’ll start with a basic Check-In. When not otherwise in use, the default screen
always says “Swipe card to begin” The cardholder should run the card through the
card slot on the side of the machine.
13Enter 4-digit PIN
14
The user will be asked to enter his/her 4 digit PIN number and press the green enter
key.
14Select Attendance Type
15
The user will be prompted to select the type of attendance transaction they want to
perform – check in, check out, previous check in, previous check out. They do this
by selecting the number of their choice on the number key pad.
15Enter 2-digit Child
Number
16
Parent keys in child number and presses the green enter key.
Note: If entering more than one child, enter the next child number and press the green
enter key. When finished press enter again.
16Receive response from
SEEK
17
Wait for authorization. The system displays “CONNECTING” then “PROCESSING”, followed
by an approved or denial message.
If the machine is not plugged into a data source – phone line or internet connection, or the
phone line is in use or the data line is otherwise busy, the device will STORE the swipe and
try to access a connection every 30 seconds until it successfully sends the transaction.
17POS – Check Out
Swipe Card
18
To check out, the screen starts out the same way – Swipe card to begin.
18Enter 4-digit PIN
19
You’ll note that the process is basically the same for each type of attendance
transaction. Enter the 4 digit PIN number and hit the green enter key.
19Select Attendance
Type
20
Select 2 for Check Out
20Enter 2-digit Child
Number
21
Parent keys in child number and presses the green enter key.
Note: If entering more than one child, enter the next child number and press the green
enter key. When finished press enter again.
21Receive Response from
SEEK
22
Wait for authorization. The system displays “CONNECTING” then “PROCESSING”,
followed by an approved or denial message.
22POS – Previous Check In
Swipe Card
23
Now, let’s look at a previous check in. There are many instances when a previous
check in would be used. If the child is bused to your location, the responsible adult
will use a previous check in when the child is picked up. If someone other than the
responsible adult drops off the child, the cardholder will use a previous check in next
time he/she is in the facility. Cardholders have FIVE days to perform a previous
check-in or check-out.
If you have children who are bused to and from your facility, the responsible adult
will need to come in once every five days to perform previous check-ins and check-
outs. Otherwise, attendance will not be recorded.
To perform a previous check in, the cardholder swipes the SEEK card.
23Enter 4-digit PIN
24
Enter the 4 digit PIN and hit the green enter key
24Select Attendance Type
25
Select 3 for previous check in
25Enter date
26
Parent keys in the date for the Previous Check‐in (MM/DD, Example 09/09) using the
number key pad then presses the green enter key.
26Enter Time
27
Parent keys in the time the child arrived (HH:MM, Example 08:30) then presses the green
enter key. This does not have to be an exact time down to the minute, but something
reasonably close.
27Select AM/PM
28
Parent selects 1 for AM or 2 for PM.
28Enter Child Number
29
Parent keys in child number and the presses the green enter key.
Note: If entering more than one child, enter the next child number and press the
green enter key. When finished press enter again.
29Wait for Authorization
Wait for authorization. The system displays
“CONNECTING” then “PROCESSING” followed by an
approved or denied message.
30Daily Receipt
31
This is what a regular receipt will look like. The provider information is at the top
followed by the transaction that was performed. In this case, the cardholder
checked in two children – one was approved and the other was denied because the
authorization expired. Also, note the transaction number under the child number on
the right hand side.
31Provider Options
32POS – Provider Options
Select F4
33
To access the provider options, you will select f4 from the side function keys.
33Enter 6-digit user
password
34
You will key your password using the number keys. The password is the same
for everyone – 123456.
34Provider Options Menu
35
This takes you to the Provider Options menu where you can select from
Reports
Void Transaction Number
Send SAF’s
Reprint
Terminal Setup
35Provider Options
Reports
36
Option 1 allows the user to print reports. Select 1 on the number key pad.
36Exceptions Report
37
The only report option in the POS device is to print an Exceptions Report. The
Exceptions Report shows a listing of all unmatched swipes for a specified date. An
unmatched swipe is a check in without a check out. Printing this nightly will allow
you to ensure cardholders catch up on their swipes the next morning when they
drop off their child. To print the report, select 1 on the number key pad.
37Exceptions Report
Enter Date
38
Enter the desired date as mm/yy and hit the green enter key.
38Exceptions Report
Response
39
Machine will connect with SEEK and screen will show “connecting” then
“processing” followed by an approved or denied message. You will need to have
paper in the machine to receive the report.
39Exceptions Report
40
This is a sample of an Exceptions Report.
40Provider Options
Send SAF’s
41
We’ll start with Send SAF’s as that is likely the most used Provider Option.
As with all Provider Options, select F4 to enter the Provider Options.
41Enter 6-digit User
Password
42
Enter your 6-digit password 123456.
42Press 3 for
Send SAF’s
43
Swipes are stored when there is no data connection either through the phone line or
the internet line. This could be due to someone using the phone or the internet
connection is down for any reason. You may also choose to have all swipes go to
SAF. If, for example, your children are checking in or out at a location where there
is no data connection such as a cafeteria or gym. At the end of the day, you can
take the machine and plug it into a data connection, select the Provider Options and
select 3 for Send SAF’s. Please note that cardholders will NOT receive an
approved or denied message when the device is in SAF.
Swipes will stay stored in the device for 5 days – which is the backswipe period.
After that, your machine will disable. If this happens, you will need to contact the
provider help desk to open a ticket to have your machine reset.
You will know you have swipes stored because a bold SAF will appear in the upper
right corner of the screen.
43Wait for Confirmation
44
Wait for confirmation of a successful send. The system displays “connecting” the
“processing” followed by an approved or denied message. If there is paper, the device will
also print a receipt for all of the stored swipes showing if they were approved or denied.
44Provider Options
Void Transaction
45
The next most used provider option is probably the Void Transaction. You begin
the same way by selecting F4 from the function keys.
45Enter 6-digit User
Password
46
Key in your 6-digit user password (123456). Press green enter key.
46Press 2 for Void
Transaction Number
47
Press 2 for Void Transaction Number.
47Key in Transaction
Number
48
Key in up to 12 digit transaction number. Press green enter key. Remember that
the transaction number may be found on the receipt.
48Key in Transaction
Number
49
Wait for confirmation. The system displays “CONNECTING” then “PROCESSING”
followed by an approved or denied message. If paper is being used, a receipt will
print.
49Provider Options
Reprint Daily Transaction Receipt
50
If needed, you can print all of your daily transaction receipts. You will need paper
for this function. If you ever lose a receipt and need the transaction number, this is
a good way to retrieve it. As with the other provider options, you will start by
selecting F4.
50Enter 6-digit User
Password
51
Key in your 6-digit user password (123456). Press green enter key.
51Press 4 for Reprint
52
Press 4 for Reprint.
52Press 1 for Daily Tran
Receipt
53
Press 1 for Daily Tran Receipt.
53Key In Beginning Item
Number
54
The display screen indicates how many “items” or receipts there are for that day.
Key in the beginning Item number and press the green enter key or just press green
enter key for the first item.
54Key In Ending Item
Number
55
Key in the ending Item number and press green enter key or just press the green
enter key for the last item.
55A copy of the requested
receipts print
56
The POS machine prints a copy of the receipts requested.
56Provider Options
Reprint Last Report
57
If needed, you can print the last report you printed. You will need paper for this
function. As with the other provider options, you will start by selecting F4.Key in 6-digit User
Password
58
Key in your 6-digit user password (123456). Press green enter key.
58Press 4 for Reprint
59
Press 4 for Reprint.
59Press 2 for Last Report
60
Press 2 for Last Report.
60POS prints last
Exceptions Report
61
The POS prints a copy of the last Exceptions Report.
61Provider Options
Communication Test
62
One final transaction you may want to perform when you first receive your device –
running a communication test. This will ensure your phone line or internet
connection is working correctly.
Select F4 for Provider Options
62Key in 6-digit User
Password
63
Enter provider password 123456. Press green enter key.
63Option 5 – Terminal
Setup
64
Select option 5 for Terminal Setup. Press green enter key.
64Communication Test
• Select Option 3 for Communication Test
• Success: “Communication Test Successful”
• Unsuccessful: “Communication Test
Failed”
65
On the next screen (for which there is no screen print), select Option 3 for
Communication Test
You will receive a successful response if the device is setup correctly and the
communication line is working properly. If the receipt reads “communication test,
failed”, the POS did not communicate and you will need to perform the
troubleshooting tips that came in the box with the device.
If you are still having problems getting a successful communication test, contact the
provider help desk for additional troubleshooting.
All of these instructions are included in the box with your POS device.
65POS Messages
• Error Messages
– No SAF to settle
– No host response
• POS Error Codes
– A8 Check in exists
– DD Check in not found
• Communication Messages
– Waiting for line
– Dialing 66
The POS device tries to let you know what is happening at all times through a
series of messages.
Error message typically mean you have tried to do something the device can’t do
such as trying to send store and forward swipes that don’t exist (No SAF to settle)
or if there is no connection to SEEK, you will see No Host Response.
POS Error codes are explanations for why a swipe is denied such as Check in
exists. This error typically occurs when a user has forgotten to check out the
previous evening and needs to perform a previous check-out before checking in for
the current day. Check in not found occurs when the user is trying to check out and
there is not a matching check in. The user needs to perform a previous check in
before performing a check out. The two digit code in front of the error message is
not really significant and do not show up on the POS device, but you will see those
codes in the Provider Web Portal in front of the description.
The device will also give you informative messages such as the Communication
Messages to let you know what is happening. For example, if your device shares a
line with your phone, when the phone is in use and the device cannot send a swipe,
you will see Waiting for Line. Or, if someone swipes and the device is sending the
information, you will see Dialing as the device is establishing a connection.
For a list of all of the different error codes and communication messages, please
refer to your POS User Guide.
66Getting Help
Provider Help Line
1-877-606-2776
Depot
800-797-7474 x2407
67
The Provider Call Center will offer troubleshooting for the POS device. The IVR will
step the caller through the troubleshooting steps. If there are still problems, the
caller can opt out to speak with a live person to further troubleshoot or have a new
device shipped.
If you are a new provider or were recently shipped your POS device and need
additional help with setting up your device, you can contact the depot at this
number. There are instructions included in the box with your device on performing
a communications test and troubleshooting. This document also includes the
contact information for the depot.
If you are not sure who to call, start with the Provider Help Line.
67When to ask for help!
• Questions about POS set up
• Unsuccessful communication test
• POS device seems to be malfunctioning
• Swipes are no longer accepted
• POS device is disabled
68
When should you contact the help line? Just about any time you have a question,
but specifically
- if you have questions about how to set up your device
- you can’t complete a successful communication test
- your working POS device is suddenly malfunctioning
- swipes that were previously accepted are no longer accepted
- your POS device is disabled
or if you have problems accessing the Provider Web Portal.
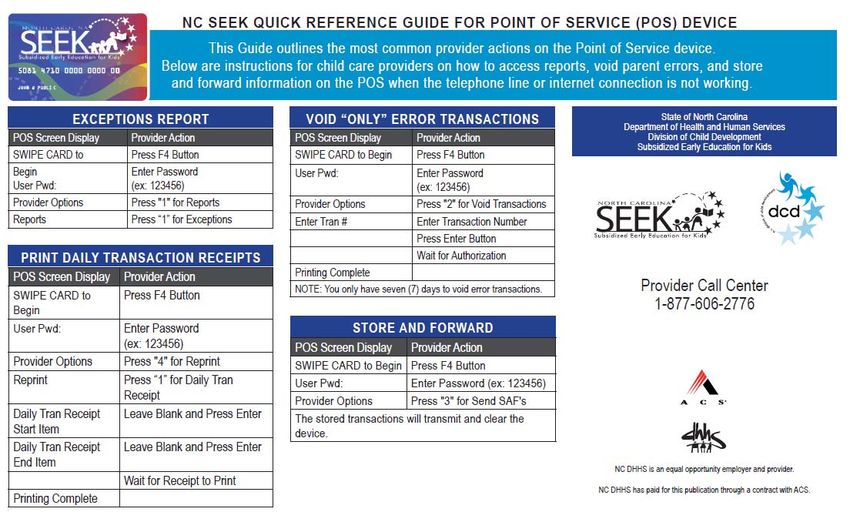
68Quick Reference Guide
Parents
69
With your POS device, you should have received a laminated Quick Reference
Guide. This is a great tool to keep near the POS device at all times. One side is
geared towards the Parents/Responsible Adults. The guide shows the user step by
step how to perform a check in, check out, previous check in and previous check
out. It also references the cardholder call center number if there are any problems.
69Quick Reference Guide
Providers
70
On the reverse side is the quick reference for providers. This shows the user how
to print an exceptions report and daily transaction receipts, how to void a
transaction and how to send stored swipes. This side also references the provider
call center number.
70Provider Web Portal
71Provider Web Portal
www.ncseek.nc.gov
72
The URL for the provider web portal is www.ncseek.nc.gov.
The user ID is your license number.
Your initial password is your facility’s zip code.
72Create new password
73
On your first log in, you will be prompted to change your password.
The new password must be 8 characters with at least 1 lower case letter and one
number.
Password must be changed every 90 days.
73Select security question
74
You will also be asked to select a security question from the drop down menu and
provide the answer.
This will be used if you forget your password and it needs to be reset.
74Forgot Password
75
The “forgot password” link is below the login button on the home page.
75Enter User ID
76
When you select “forgot password”, you are taken to a screen to enter your user ID
(again – license number or facility ID)
76Answer security question
77
Then you will answer your security question.
77Create new password
78
You are then prompted to enter a new password.
78Provide Profile Screen
When you log into the portal, you are immediately taken to the Provider Profile
screen that shows all of the facility information. From here, you can view
authorizations or transactions by using the action buttons at the bottom of the
screen.
79Admin Menu
80
In the upper right corner of the screen, you will find an Admin drop-down menu. At
this menu, you can change your password, review your user profile, or, most
importantly, you can access the Provider Web Portal user manual at any time. In
phase 2, this menu will be updated to include the POS user manual as well.
80View Authorizations
81
Looking now at the action buttons at the bottom of the screen, let’s start with
viewing Authorizations. You will click on the Authorizations action button.
81Authorization Report
82
This will take you to the Provider Authorizations Report. Here you will see the Case
ID, Authorization ID, child #, and child name for every authorization assigned to
your facility. You will also see the last activity date. Last activity could be an
attendance swipe or an update to the authorization record sent over by the state.
The Trans Type tells you, if it was an attendance swipe, whether it was a check in,
check out, previous check-in or previous check-out.
A couple of navigation notes. If you have multiple pages of authorizations, you can
use the arrows to move forward/back one page or move forward to the last page or
back to the first page. You can select how many records you see on each page
from the drop down menu. You can also export your authorizations to Excel or in a
csv format (which is a generic spreadsheet format).
Notice the gray boxes at the top of each column. You can use these boxes to
search for a specific character string. For example, if you have multiple pages of
authorizations and you only want to see those with the last name Baker, you can
type Baker in the gray box above Child Name and SEEK will filter out everyone
whose name does not include BAKER.
82Select Child Name
83
When you move your mouse over a Child Name, you will see that your mouse
becomes a pointing finger. This indicates that you can click on that child’s name to
be taken to the Child Authorization Profile screen.
83Child Authorization
Profile
84
The Child Authorization Profile contains all of the pertinent information about the
selected profile.
The blue bar in the middle of the screen shows the authorization ID, the status of
the authorization and the begin and end date of the authorization.
From this screen or any other screen, you can search for attendance transactions
by selecting the transaction action button at the bottom of the screen.
84Transaction Search
85
When you click on the transaction button, SEEK displays the Provider Transaction
Search screen.
85Transaction Search
86
You can enter a date range from one day up to three months in the past. You also
have the option to see transactions for a specific case by entering a case number in
the Case # box. Or, you can leave it blank and view all attendance transactions for
all authorized children.
86Transaction Search
Results
87
When you click the search button, you will receive the search results. On this
results screen, you see several swipes where the authorization was not found.
There are two check-out swipes for Chris Nickerson that were denied because a
check-in does not exist. In this instance, the cardholder needs to perform a
previous check-in before performing a check out. There is one transaction that was
denied because a check-in already exists. In this case, the cardholder may have
missed checking out the previous evening and may need to perform a previous
check out.
Note also the Transaction date/time column and the Entry date/time column. When
the cardholder performs either a previous check in or a previous check out, the
system records the time of the transaction is actually entered (Entry date/time) and
the time the check in or check out should have been recorded (Transaction
date/time).
You can see on the second transaction, it is a previous check in. The swipe
actually occurred on 4/30 at 3:03 pm for a check in that occurred on 4/30 at 7:20am.
87Thank you for viewing the
Phase I Provider Training on
the POS and Provider Web
Portal
88
Slide 88
88You can also read