Installation | KUARIO Gateway - Product Version: 3.0 Revision of this manual: R 15
←
→
Page content transcription
If your browser does not render page correctly, please read the page content below

Installation | KUARIO Gateway
                                Product Version: 3.0

             Revision of this manual: R 15

    © 2021 KUARIO B.V. All rights reserved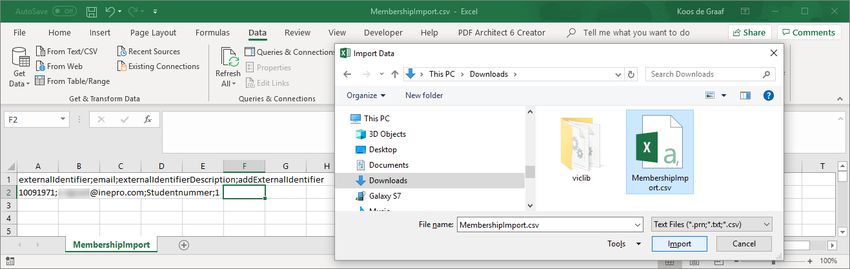
All rights reserved. No parts of this work may be reproduced in any form or by any means - graphic, electronic, or mechanical, including photocopying,
  recording, taping, or information storage and retrieval systems - without the written permission of the publisher.

  Products that are referred to in this document may be either trademarks and/or registered trademarks of the respective owners. The publisher and the
  author make no claim to these trademarks.

  While every precaution has been taken in the preparation of this document, the publisher and the author assume no responsibility for errors or omissions,
  or for damages resulting from the use of information contained in this document or from the use of programs and source code that may accompany it. In
  no event shall the publisher and the author be liable for any loss of profit or any other commercial damage caused or alleged to have been caused
  directly or indirectly by this document.

  Version 3.0.15 created: 2021 in Nieuw-Vennep.

  Publisher
KUARIO B.V.

  Production
KUARIO B.V.
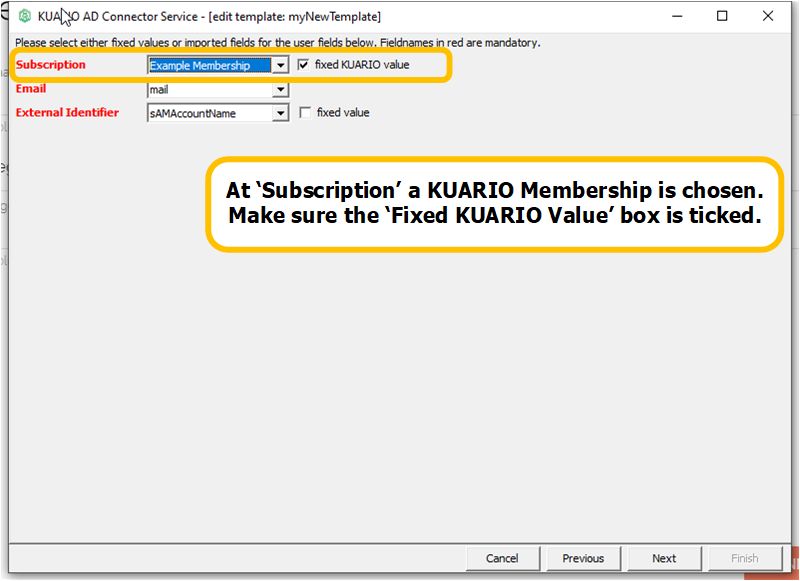
Table of Content

Introduction                                                                                                                                                                                                                                                                4
Architectural overview                                                                                                                                                                                                                                                      5
     UniFlow
          ................................................................................................................................................................................................................................................................. 5
Installation                                                                                                                                                                                                                                                               6
     KUARIO          Gateway
           ................................................................................................................................................................................................................................................................. 6
     NTWare           UniFlow
           ................................................................................................................................................................................................................................................................. 8
     Active.................................................................................................................................................................................................................................................................
               Directory Stand-Alone                                                                                                                                                                                                                                         8
Configuration                                                                                                                                                                                                                                                               9
     Link the          Gateway in KUARIO
              ................................................................................................................................................................................................................................................................. 9
     Add /       Remove Users
           .................................................................................................................................................................................................................................................................  12
     NTWare             UniFlow
          .................................................................................................................................................................................................................................................................  20
     Active       Directory GUI
           .................................................................................................................................................................................................................................................................  21
Testing                                                                                                                                                                                                                                                                 24
Troubleshooting                                                                                                                                                                                                                                                         24
Appendix A: Using fixed KUARIO values                                                                                                                                                                                                                                   27
Appendix B: Edit CSV file in MS Excel                                                                                                                                                                                                                                   29
Appendix D: Create a KUARIO Membership                                                                                                                                                                                                                                  32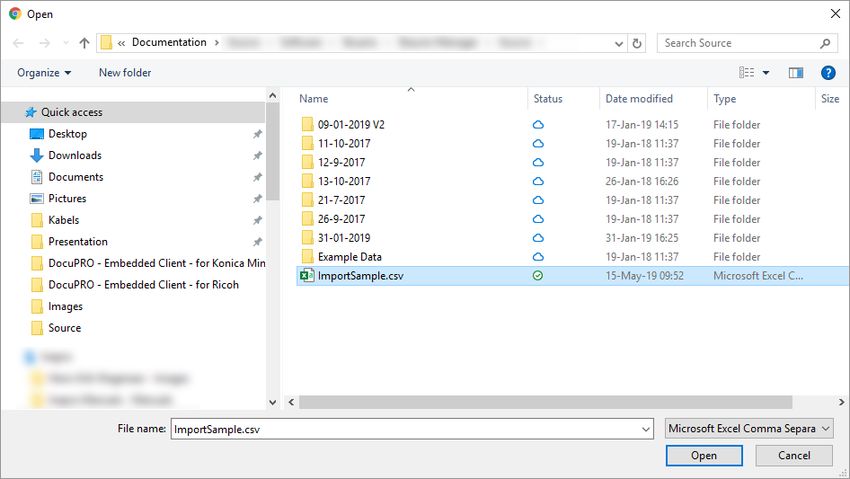
Introduction
Introduction
KUARIO Gateway is a solution to give a third-party access to the KUARIO payment service. It acts as a KUARIO Order Terminal,
and sits between the third-party solution and the KUARIO Cloud Payment service. Third-party solutions can request payment
transactions via the KUARIO Gateway.
This manual explains what the KUARIO Gateway solution offers. It will also help you to install and configure the KUARIO
Gateway in combination with the Uniflow solution.
Usage
Registered users of the Uniflow solution are required to pay for their print products. Without the KUARIO Gateway, there is a
pre-paid balance stored in Uniflow. When a user prints using the Uniflow solution, an amount will be removed from the
Uniflow balance. The downside to this, is that the users can not use these funds outside of the Uniflow solution.
The KUARIO Gateway enables users to use their KUARIO funds in the Uniflow print solution environment, as well as in all
other KUARIO enabled pay points. The KUARIO Gateway is authorized to view a users funds within KUARIO and to make a
transaction from a users KUARIO balance to the KUARIO Gateway's Merchant. Users that want to use their funds within the
Uniflow solution have to accept an agreement with this Merchant via a KUARIO Membership.
When a user has accepted the Membership, the user's KUARIO funds are linked to the KUARIO Site where the Gateway is
registered. The last known amount of KUARIO funds is visible in Uniflow credit as an external balance. These funds can now
be used to pay for jobs in Uniflow. The balance will be transferred from the KUARIO Account of the user to the KUARIO
Merchant.
Note: It is not possible to add credit to a KUARIO Account directly from Uniflow.
Note: It is not possible to 'see' your KUARIO funds accurately in Uniflow as the user's KUARIO transactions on other sites
cannot be monitored. The KUARIO Funds are shown as known the last time a user was 'seen' by the system.
Version 3.0.15 - 4Architectural overview The payment architecture consists of the following parts: § The KUARIO Gateway § UniFlow User DB § KUARIO Cloud Payment service, with KUARIO users. 5 - KUARIO Gateway - https://kuario.com
Installation Acquiring the software The KUARIO Gateway software is available. Please contact KUARIO Support (support@KUARIO.com) to receive a copy of the software. Before installation Before installing the KUARIO Gateway: § Make sure is installed. § Make sure the is installed. KUARIO Gateway The KUARIO Gateway is the link between the KUARIO plug-in and the KUARIO Cloud Payment service. To use the KUARIO Gateway plug-in, the KUARIO Gateway should be running. Version 3.0.15 - 6
Installation Installing the KUARIO Gateway The KUARIO Gateway is installed by following these instructions: 1. Start the KUARIO Gateway Setup executable (double-click the KUARIOGatewaySetup-.exe). 2. Follow the Setup instructions. Please remember the installation path (usually at C:\Program Files\KUARIO\Gateway ), as this is required in one of the following steps. 7 - KUARIO Gateway - https://kuario.com
Installation 3. After finishing the Setup, please verify that the Gateway is running. There should be a KUARIO icon in the tray. NTWare UniFlow NTWare UniFlow can be directly connected to the gateway, you just need to configure it correctly. Please refer to Configuration - NTWare UniFlow. Active Directory Install Active Directory by selecting the 'KUARIO AD Connector Service' component in the KUARIO Gateway set up. The AD Connector connects your Active Directory to the gateway, you just need to configure it. Please refer to 'Configuration - Active Directory' 21 . Version 3.0.15 - 8
Configuration Link the Gateway in KUARIO The KUARIO Gateway must be set up in KUARIO before it can be used. The KUARIO Gateway must become a part of a KUARIO Outlet under a KUARIO Site. Preparation To manage a KUARIO Site you need to be a Merchant that has Site Management rights. As a KUARIO Merchant, you can link the Gateway to your Site using the Manager at https://manager.kuario.com/ or by linking the Site using the service module in the KUARIO App. For more information about creating a KUARIO Site and /or a KUARIO Outlet, please refer to our KUARIO Manager and KUARIO App manuals and Visual Help guides respectively at our site. To become a KUARIO Merchant, please contact us via info@KUARIO.com. We can help you with linking your Gateway to a KUARIO Site. Please contact: support@KUARIO.com. You should include the terminal ID, the preferred language and the preferred currency in your email. Optionally if you have an existing account, you could also let us know the preferred KUARIO Outlet and your account info. 9 - KUARIO Gateway - https://kuario.com
Configuration Put the Gateway in KUARIO 1. Click on the KUARIO Gateway GUI (it should display "ONLINE"). 2. You can start a demo of the software or continue to set up a fully functional, unlimited production version. Click the 'demo mode' button for the demo mode and continue with step 3. Or, for the production version, go to step 6. 3. Select the preferred currency for this demo and the preferred language. Click 'accept' to accept the terms and conditions. 4. Click 'start demo'. Version 3.0.15 - 10
Configuration 5. From this moment on, your KUARIO Gateway can be used to make demo KUARIO payments. You are finished, ignore the other steps below. The demo version is limited on user import, only the first 5 users will be imported from a CSV file or from the AD import service. Link the Gateway in KUARIO 6. Please either scan the terminal ID QR with the service module of the KUARIO App, or copy it on paper to link the Gateway in the KUARIO Manager (The terminal ID can be found trailing behind 'terminal:' at the bottom of the screen, See example at the bottom of this page). The KUARIO Gateway will be linked as a terminal to a KUARIO Outlet, From this moment on, your KUARIO Gateway can be used to make KUARIO payments. KUARIO Gateway GUI - Not linked KUARIO Gateway GUI - Linked 11 - KUARIO Gateway - https://kuario.com
Configuration Add / Remove Users Users must be known by KUARIO for them to make payments with the help of KUARIO Gateway. A user in UniFlow is linked to a user in KUARIO via a Membership. When you invite users for this Membership, an email will be sent to the user on a given email address. The user has to accept this Membership to use their KUARIO funds from . A Membership can have an external identifier. For each user that needs to be able to use their KUARIO funds in UniFlow, a Membership with the user's ID as external identifier is required. To import users from UniFlow to KUARIO (which will automatically invite them) either an Excel *.csv must be used, that is a * .csv file with not comma, but semicolon ';' separated values, this request can then be mailed or placed in the csv directory where it will upload the user information automatically. In UniFlow, you can set up the ID in UniFlow. When the Membership of this user is removed, the link between UniFlow and KUARIO is removed. From that moment on the user can no longer see or use their KUARIO funds in UniFlow. A user can decide to remove this Membership via the KUARIO App. Import Process With the import process you will generate an invitation for each user in the the import to be a member of the KUARIO Gateway membership at your Site. By joining that membership you will be able to pay with the UniFlow solution. To create a membership invitation an email address of the user is needed and the related . The user data; and User's email address must be made into a *.csv file. That file is imported into the Gateway by the KUARIO Plug-in and the invitation mails are sent. Either the invitation email address is known as a KUARIO user and you can accept the invite directly, or the email address is not recognized as a KUARIO user and you can register as a KUARIO User with the email address to which the invitation was sent or if you are an existing user under another email address you can log using that email address as a KUARIO User and accept the invite in that way. See the flow chart below: Note: At the end of the process the registered KUARIO membership (accepted or not) will consist of the invitation Email Address (A) and the , even when the user already has a KUARIO user account that is linked to a different email address (B) then the invitation Email Address (A). Version 3.0.15 - 12
Configuration

13 - KUARIO Gateway - https://kuario.com
Configuration Prepare CSV For bulk user imports you must use the 'Automatic Import' or the 'Import Request By Email' methods, these require an Excel *.csv file. We will help you to prepare such a file here. Note: If you do not have MS Excel or do not wish to use it, you can create and edit a standard text file with the ** .csv extension yourself, just make sure the file is semicolon separated. 1. Preferably use your existing system that holds the information of your users to export the user information into a *.csv. If you have that option, create the *.csv file and continue with 'Name the CSV File 16 '. 2. If you do not, create a new text file in notepad.exe 3. Type the text: "externalIdentifier;email;externalIdentifierDescription;addExternalIdentifier;mutation;startDateTime;endDateTime;status" These will be the column headers of your file. Each line below is a new row (or record) with member values. In this example the external ID is 10091971, joe@example.com is the email address to which the KUARIO Membership invitation is sent, the description is irrelevant for the system, but we will use "
Configuration

15 - KUARIO Gateway - https://kuario.com
Configuration
Name the CSV file
6. Give the file a name, that has meaning for this import, in this example a meaningless generic name
"MembershipImport.csv" is used. Make sure to use '.csv' as extention.
7. Optionally you can edit the *.csv file, adding or editing the user information in MS Excel. To see how to do this refer to
Appendix A: Edit CSV file in MS Excel 29 .
If you want to import the CSV file in the KUARIO Manager, please continue to: 'Import using the KUARIO Manager: Inserting
users via a *.CSV file 19 '.
Note: To export or delete users a 'csv' folder exist in %ProgramData%\KUARIO beside the 'ini' and 'log' folders.
In this 'csv' folder you will find two sub-folders: 'delete' and 'update'.
Note: These directories are checked every minute while the Gateway is running.
When a file is read, the Gateway tries to send the data to KUARIO.
When this succeeds, the CSV file is deleted. When this fails, you can find the reason in the Gateway log file:
C\ProgramData\KUARIO\log\KUARIOGateway.log .
Import via local CSV
If this is your first time importing users via a CSV file, we recommend you to import just one (test) user before importing a bulk
of users.
If you made an error, and user data was imported incorrectly, please use the same CSV and follow 'Delete via CSV 17 '.
8. To add or update the users, copy the CSV file to the update folder C:\ProgramData\KUARIO\csv\update .
9. After a while the CSV file should have been deleted, then the operation was a success. If not, please email the *.csv file to
support@KUARIO.com. KUARIO Support will help you finish the import task.
10. All members in this file will be added, the mutation field is ignored.
11. You have finished the import task.
Version 3.0.15 - 16Configuration Delete via local CSV 12. To remove this list of users, place the CSV file (with those users) in the delete folder C:\ProgramData\KUARIO\csv\ delete. 13. All members in this file will be removed, the mutation field is ignored. 14. You have finished the remove users task. Import using the KUARIO Manager Memberships are groups that a user can be a member of and that may give that user extra rights or options. Memberships can be used to grant exclusive access to an Outlet, provide a deduction of the product price or make it possible for the members to use KUARIO as payment source, or lastly to use invoices in stead of direct payments. They are also commonly used in combination with KUARIO gateways as (in most cases) they link to the external user account via the Membership's 'External Identifier'. You need to have Site management rights to import users from the KUARIO Manager. As a Merchant, you can invite users to become a Member of your Site via the KUARIO Manager. 1. Browse to https://manager.kuario.com 2. Log in with your KUARIO Merchant credentials. 3. Navigate to the Memberships tab 4. Select a Membership, or create one if none exist. (See Appendix D: Create a KUARIO Membership 32 ) 5. Click on next until you find the members list. 17 - KUARIO Gateway - https://kuario.com
Configuration Inserting one or more users directly 6. Add members to your membership by adding the email address that they also use for their KUARIO Account. Confirm with the ' ' Plus or 'Add item' button 7. In the newly added row, edit the External identifier to represent the identifier of the external program. Make sure to check the 'Gateway' box. 8. Repeat this for every user and click the 'save'-button when done. Version 3.0.15 - 18
Configuration Inserting users via a *.CSV file 9. Another method to insert members is the *.csv import method. 10. Click the 'Import CSV' button. 11. Select your CSV file and click 'Open'. 19 - KUARIO Gateway - https://kuario.com
Configuration
12. You have finished the import task.
Note: For more information about the import via the KUARIO manager refer to Appendix D in this manual
KUARIO support.
32 or contact
NTWare UniFlow
Required before installation
§ MS SQL Server Management Studio
§ uniFLOW + RPS | 2020 LTS SR4 installation or higher with functioning IIS website
§ The instructions of the ‘Installation Notes Generic Budget Connector’ uniFLOW manual) should be executed from chapter 2
through paragraph 2.3.4.
§ uniFLOW Generic Budget Connector (v2.2.0.0 or higher) license
§ KUARIO Gateway (v2.0.6 or higher)
Configuration
In the uniFLOW software the setting at the ‘Budget mgmt. system’ page must be configured as followed:
1. Start the uniFLOW server configuration on the uniFLOW server using this URL: http://localhost/pwserver.
2. Click the ‘Server Config.’ menu-item.
3. Click the ‘Interface’ item.
4. Click the ‘Budget mgmt. system’ page.
The following options should already be preselected at their respective fields:
§ Budget Management System= Universal Budget Manager
§ Default Budget Plug-in= uniFLOW Generic Budget Connector
5. Insert at the ‘Web Service URL’ field, the IP address of the KUARIO Gateway server, the port number 10059 and
'/BudgetService' in this format:
Example: \\10.0.0.20:10059/BudgetService
6. The retry time at ‘Pending Transaction retry time’ should be set to 5.
7. Insert '%USER.Default_CardNumber%' at the ‘User identification token’ field.
8. Insert 'KUARIO' at the ‘Customer Code’ field.
9. Select the option 'ERROR' at the ‘Log Level’ field.
10. Click the ‘Save’ button.
Version 3.0.15 - 20Configuration
Active Directory GUI
Note: Before continuing with this section please make sure that your KUARIO Gateway is now online and linked!
Look for the 'KUARIO AD Connector' link in the start menu under your KUARIO Gateway entry.
Start the 'KUARIO AD Connector', a window named 'KUARIO AD Connector service' will now open.
1.
1. Click Add Template... 2. Enter the template's name and description,click OK
21 - KUARIO Gateway - https://kuario.comConfiguration 3. Select your template. 4. Click 'Edit Template'. 5. Confirm or edit the template's description, click Next. 6. Fetch the DN's, and enter the user name and password. Version 3.0.15 - 22
Configuration
7. Click 'Preview' to preview a sample of the data. 8. Select the field with the email, membership and External Identifier
data. You will need this at the next step.
Note: Make sure that before this step your KUARIO
Gateway is now online and linked!
10. Select the template click Edit Template, click Edit Template'.
9. Set up the link fields. Make sure to use a fixed KUARIO value. Refer to
'Appendix A: Using fixed KUARIO values' 27 for more information.
23 - KUARIO Gateway - https://kuario.comConfiguration
11. Reboot the service
Testing the configuration
Check the log files
Make sure to check the log files for error messages.
Useful log files:
Application File Description
The KUARIO Gateway is the link between the KUARIO plug-in and the
KUARIO Gateway %ProgramData%\KUARIO\log\KUARIOGateway.log KUARIO Cloud Payment service. In this log you will find all the relevant
process messages.
Troubleshooting
Sometimes things do not work out as expected, if so please read through this section before contacting your service
organisation or dealer. Chances are you are able to solve the issue yourself.
The section is set up in a Symptom - Prognosis - Resolution format, that is; first the symptom is given, then the possible causes
and then the resolution for those causes.
More information about why a process might have gone wrong can be found in the log files, scroll to the end of this section to
learn more.
Prognosis: There is no (reliable) connection from the KUARIO Gateway to KUARIO
Resolution:
A - Check if the KUARIO Gateway Service can connect to KUARIO.
1) Browse to 'https://kuario.com/' on the same machine to make sure requests to KUARIO are not blocked.
a) If you can't, the connection is blocked.
b) Check your firewall and security settings to see if KUARIO is blocked or try to solve this issue with your network
manager.
Version 3.0.15 - 24Troubleshooting
Prognosis: The KUARIO Gateway is not (yet) linked to a KUARIO Outlet
Resolution:
B - Check if the Gateway is linked to an Outlet
1) If the terminal is not yet linked, please follow this section of the manual to link the terminal 9 .
Prognosis: The KUARIO User is not a part of the Membership
Resolution:
C - Make sure the Membership process has been concluded successfully.
1) The KUARIO User is not yet invited for the Membership.
a) Invite the KUARIO User for the Membership.
2) The KUARIO User has not (yet) excepted the Membership.
a) Remember the KUARIO User to accept the Membership.
b) Log in as the user in the KUARIO App or on the KUARIO website.
c) Navigate to Settings -> Account -> Memberships
d) Check if there are any Unapproved Memberships
e) Confirm that the KUARIO User has accepted the Membership. If not remind him again.
3) If the process cannot be completed successfully, ask for help with the Membership request with KUARIO Support.
Prognosis: The KUARIO User is invited for a Membership under the wrong KUARIO Site.
Resolution:
D - The KUARIO User is invited for a Membership under the wrong KUARIO Site.
1) Make sure the invitation is sent from the correct KUARIO Site.
25 - KUARIO Gateway - https://kuario.comTroubleshooting
Symptom(s): I had a import configuration error, that I resolved but now the users are still not
imported
Prognosis: Users that failed to be imported will not be tried in future runs
Resolution:
E - Set the import date back before any failed tries
1) Set the import date to a date prior to the imports that failed because of the faulty configuration. Select 'Changed since'
and set the date.
2) Start the import process again.
Symptom(s): Other issues
Prognosis: This issue cannot be solved without external help
Resolution:
F - Please open the log files.
1) If after carefully examining these files, the issue cannot be resolves by you or your team, please contact KUARIO support
(support@KUARIO.com) to help you further on your way.
Version 3.0.15 - 26Troubleshooting
Log files
If you run into trouble please examine these files carefully as they should contain very useful information.
Useful log files:
Application File Description
The KUARIO Gateway is the link between the KUARIO plug-in and the
KUARIO Gateway %ProgramData%\KUARIO\log\KUARIOGateway.log KUARIO Cloud Payment service. In this log you will find all the relevant
process messages.
Appendix A: Using fixed KUARIO values
Warning: Before continuing with this section please make sure that your KUARIO Gateway is now online and linked!
In the KUARIO Active Directory Connector you should leave the 'fixed KUARIO value' box ticked.
The 'Subscription' refers to KUARIO memberships. KUARIO Memberships are part of their site. When you connect KUARIO
Gateway to a site, you have access to the memberships of that site.
Memberships
Memberships are groups that a user can be a member of and that may give that user extra rights or options.
Memberships can be used to grant exclusive access to an Outlet, provide a deduction of the product price or make it possible
27 - KUARIO Gateway - https://kuario.comAppendix A: Using fixed KUARIO values for the members to use KUARIO as payment source, or lastly to use invoices in stead of direct payments. They are also commonly used in combination with KUARIO gateways as (in most cases) they link to the external user account via the Membership's 'External Identifier'. 1. Select a membership from the 'Subscription combo box'. 2. At 'Email' select the Active Directory field that holds the user's email address. 3. At 'External Identifier' enter the External Identifier (an unique non-KUARIO identifier for the user. We recommend using 'sAMAccountName' (This is the user's log-on name for older Windows OS's). Version 3.0.15 - 28
Appendix B: Edit CSV file in MS Excel Appendix B: Edit CSV file in MS Excel 1. Open the created *.csv file. 2. As in Notepad headers and values are separated by semicolons. But to comfortably work with these files in Excel we will take the next steps. 3. Open Excel. 4. Go to the 'Data' tab. 5. Click 'From Text/CSV'. 6. Browse to the created * .csv file. 29 - KUARIO Gateway - https://kuario.com
Appendix B: Edit CSV file in MS Excel

7. Excel will automatically detect the format and settings, please check if these are correct and click 'Load'.

8. The document will now be opened in a way that is easy to scroll trough and to edit.
9. Make sure you only have eight headers and that they are named according to the table above. They should be in this
   order and match with the corresponding user data (email should be the user's email address as used in his KUARIO
   account and the user's should be in the 'externalIdentifier' column). 'addExternalIdentifier' should be 1, indicating that you
   are using a KUARIO gateway.

Mutation
10. The mutation field is ignored when using the local import via CSV. It is used when importing CSV files via the KUARIO
    Manager. It should be set to 'add' when you want the member to be added, and to 'delete' when you want an existing user
    to be deleted. The last three fields ('startDateTime', 'endDateTime' and 'Status') are optional.

Version 3.0.15 - 30
Appendix B: Edit CSV file in MS Excel
Membership period
11. 'startDateTime' and 'endDateTime' are DateTime stamps that indicate for what period this user is a member of this
membership. Before or after this date this user will not be a member of this membership. This is useful working with users
that arrive and/or leave your organisation at a time known beforehand. Like a student with a membership that grants him
access to rooms in his school or university.
Status
12. The last field 'status' allows you to let the member have a non-active status, a member can be active. An active member
can normally use the perks of it's membership. A blocked member cannot use it's membership. The status 'Pending' is
used for specific application for the period that the application is evaluating if the user's membership is granted/revoked.
The status 'Pending should not be entered in the *.csv file! This field should have the value 'active' unless instructed
otherwise.
Note: The first row (with the headers) is ignored by the import functionality, so this should not contain (user) import
information.
Note: Rows with the email address 'example@kuario.com' are ignored by the import functionality, so these should not
contain (user) import information.
Warning: The status 'Pending should not be entered in the *.csv file!
Header Name Description Allowed Values
The value must be unique if it is a personal
identifier. In this case the field
'addExternalIdentifier' must be set to '1'.
The external identifier is used by an external system via the KUARIO Gateway Group identifiers do not to be unique as
externalIdentifier
to identify a user or a group f users multiple persons can be members of a group
or membership.
All identifiers may contain the full range of
alphanumeric values.
email The email address of the KUARIO User A valid email address.
A description of the sort of identifier for clarity. Like 'Student number' if the
externalIdentifierDescription A text description of the identifier.
identifier is a student number.
addExternalIdentifier Internal KUARIO value, must be set to 1 Please set this value to 1
13. Now add you can add/edit users and check if everything is correctly listed.
14. If the document is satisfactory, we can now export it to KUARIO.
31 - KUARIO Gateway - https://kuario.comAppendix D: Create a KUARIO Membership
Appendix D: Create a KUARIO Membership
Add Membership
1. Open the KUARIO Manager.
2. Go to Main Menu -> Memberships.
3. Add a Membership, click ('+ Add').
Version 3.0.15 - 32Appendix D: Create a KUARIO Membership 4. Name the Membership. 5. Check the box if you want to allow invoicing (by default it should remain unchecked as you would not) want to allow invoicing). Note: With invoicing your users will to not pay directly, rather their transactions are stored and the Merchant will be responsible to charge these costs to the user. 6. If the members may enjoy a generic (over all available products) deduction you can enter the deduction percentage here. 7. Click ' '. 8. KUARIO Email message, select the language for our default message. Or create your custom message yourself. 9. Click ' '. 33 - KUARIO Gateway - https://kuario.com
Appendix D: Create a KUARIO Membership

10. Add members to your membership by adding the email address that they also use for their KUARIO Account. Confirm with
    the ' ' Plus or 'Add item' button

Version 3.0.15 - 34
Appendix D: Create a KUARIO Membership 11. Another method to insert members is the *.csv import method, explained in the next section. 35 - KUARIO Gateway - https://kuario.com
Appendix D: Create a KUARIO Membership
Import via CSV
12. Click the 'Import CSV' button.

To Import a CSV file via the manager it should be formatted like this:
externalIdentifier;email;externalIdentifierDescription;addExternalIdentifier;mutation;
       startDateTime(yyyy-mm-ddThh:mm);endDateTime(yyyy-mm-ddThh:mm);status
Gerald Green;g.green@mysite.com;name;0;add;2021-05-01T00:01;2025-05-01T00:01;active

Version 3.0.15 - 36
Appendix D: Create a KUARIO Membership
The example above creates a member identified with email address 'g.green@mysite.com', with an external identifier 'Gerald
Green', a description 'name'. The external Identifier will be added in the member information, even though
'addExternalIdentifier' is set to false! The member is not allowed to use KUARIO Gateway, because 'addExternalIdentifier' is
set to 0.
Note: If 'addExternalIdentifier' is set to 0 the 'externalIdentifier' string will still be added to the member information.
However the member is not allowed to use KUARIO Gateway. That means that that user can not use KUARIO as an external
payment system, (because it must be linked via his 'externalIdentifier'), through a third party application, using KUARIO
Gateway.
Note: Refer to the KUARIO Gateway manual for more information about this.
37 - KUARIO Gateway - https://kuario.comAppendix D: Create a KUARIO Membership 13. Select your CSV file and click 'Open'. The members should now be added to your membership. Version 3.0.15 - 38
Appendix D: Create a KUARIO Membership
Completing creating a new Membership
When you have added the members, it is possible to also add external identifier. An external identifier can be used to create a
subgroup of users in you membership. In the example below two groups are created one has the external ID '50', the other
group has the ID '150'. These ID's combined with the membership ID may be exported to external administrative systems,
showing the usage of certain groups without showing their email addresses, thus complying to privacy concerns.

When a *.csv is imported using the startDateTime(yyyy-mm-ddThh:mm), endDateTime(yyyy-mm-ddThh:mm) or status field,
then these fields can also be edited for other members..

39 - KUARIO Gateway - https://kuario.com
Appendix D: Create a KUARIO Membership
14. Tick the check box if you are using KUARIO Gateway, in this case the external identifier must be exactly the same as the
    user's ID in the external system connected with KUARIO Gateway.

15. When you need to edit the member period, the member period dialogue will show. Here the start and end of a period can
    be determined.

Version 3.0.15 - 40
Appendix D: Create a KUARIO Membership 41 - KUARIO Gateway - https://kuario.com
Appendix D: Create a KUARIO Membership
16. Click '   ' to save the Membership.

Version 3.0.15 - 42
Appendix D: Create a KUARIO Membership
Set exclusive access to an Outlet
17. Go to Outlets.
18. Select an Outlet that you want the Membership to have exclusive access to.
19. Tick the box 'Is this Outlet private?'. A pop-up selection list will appear.
20. Select the appropriate Membership(s) from that list.
21. Make sure the box is checked, click '         '.

43 - KUARIO Gateway - https://kuario.com
Appendix D: Create a KUARIO Membership
22. Click '   '.

Version 3.0.15 - 44
Appendix D: Create a KUARIO Membership
23. Click '   ' to save the Outlet Settings.

24. The Outlet can now only be used by members of the Membership(s) you selected for it. Other users cannot use it.

45 - KUARIO Gateway - https://kuario.com
You can also read