E-Expenses Claimant User Guide - sthk - Shared Services
←
→
Page content transcription
If your browser does not render page correctly, please read the page content below
e-Expenses
Claimant User Guide

Copyright 2019 Allocate Software and its subsidiaries
Contents
1           Foreword............................................................................................................................... 4
2       Introduction........................................................................................................................... 5
    2.1   About HealthRoster....................................................................................................................................... 5
    2.2        About e-Expenses.......................................................................................................................................... 5
3       e-Expenses Applications.......................................................................................................... 6
    3.1   Applications................................................................................................................................................... 6
4           Employee Online – Access and Overview.................................................................................. 7
    4.1      Logging In ...................................................................................................................................................... 7
    4.2        Single Sign-On for Employee Online .............................................................................................................. 7
    4.3        Changing Login Password .............................................................................................................................. 8
    4.4        Accessing e-Expenses in Employee Online .................................................................................................... 8
    4.5        Screen / Navigation Overview ....................................................................................................................... 8
       4.5.1          Claims Screen ........................................................................................................................................ 9
5       Entering an Expense Claim .................................................................................................... 10
    5.1   Mileage ....................................................................................................................................................... 10
       5.1.1          Vehicle Information ............................................................................................................................. 12
       5.1.1          Mileage Calculations ............................................................................................................................ 12
       5.1.2          Multi-Leg Expense Claims .................................................................................................................... 13
       5.1.3          Agenda for Change Journeys ............................................................................................................... 14
       5.1.4          Searching for Post Codes ..................................................................................................................... 14
    5.2        Travel .......................................................................................................................................................... 14
    5.3        Subsistence ................................................................................................................................................. 15
    5.4        Supplementary ............................................................................................................................................ 15
    5.5        Rule Breakages ............................................................................................................................................ 16
       5.5.1          Warnings ............................................................................................................................................. 16
       5.5.2          Violations ............................................................................................................................................. 17
    5.6        Expense Claims Sorted by Category ............................................................................................................ 17
    5.7        Submitting a Claim ...................................................................................................................................... 18
    5.8        Disclaimer.................................................................................................................................................... 18
    5.9        Editing and Printing a Claim ........................................................................................................................ 19
       5.9.1          Editing a Claim ..................................................................................................................................... 19
       5.9.2          Printing a Claim .................................................................................................................................... 19
       5.9.3          Unsubmit a Claim ................................................................................................................................ 20
    5.10       Confirmation Pop-up when Deleting an Expense Claim .............................................................................. 20
6       Vehicle Information .............................................................................................................. 21
    6.1  Adding Vehicles (Self Service) ..................................................................................................................... 21
       6.1.1          Vehicle Checks ..................................................................................................................................... 21
7           Email Notifications ............................................................................................................... 23

Version : 5.0
Date : November 2019
Copyright 2019 Allocate Software and its subsidiaries                                                                                                                            2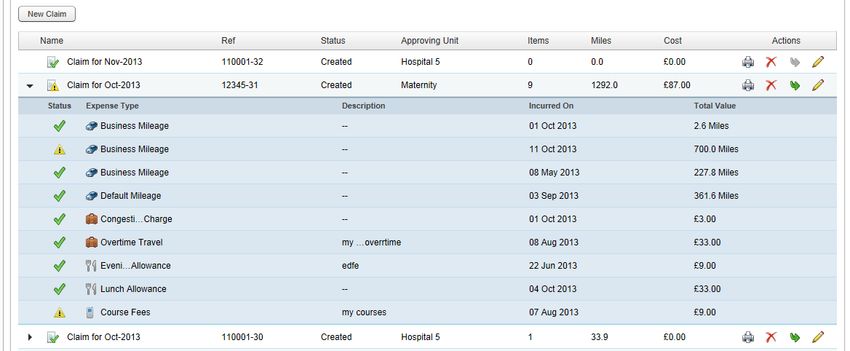
7.1.1          Claim Approved ................................................................................................................................... 23
      7.1.2          Claim Rejected ..................................................................................................................................... 23
      7.1.3          Claim Partially Rejected ....................................................................................................................... 24
   7.2        Viewing Claim Status ................................................................................................................................... 24

Version : 5.0
Date : November 2019
Copyright 2019 Allocate Software and its subsidiaries                                                                                                                     3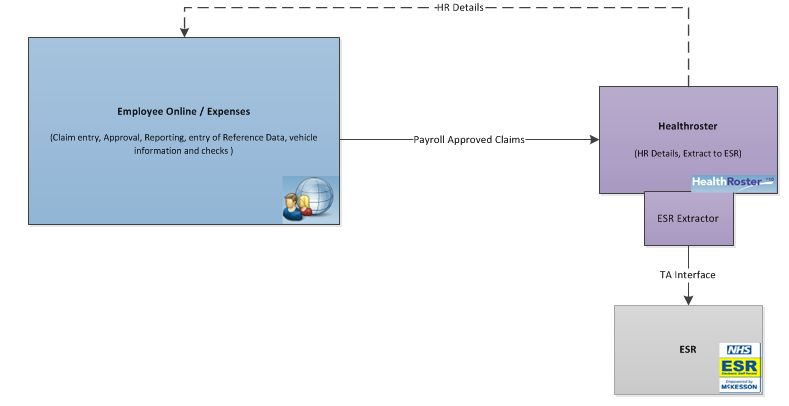
1 Foreword
This User Guide covers all elements and functionality of the e-Expenses module in HealthRoster v10. It is a complete
overview for claimants.

This document is a reference guide for Trust staff who will use e-Expenses.

Version : 5.0
Date : November 2019
Copyright 2019 Allocate Software and its subsidiaries                                                                  4
2 Introduction
2.1 About HealthRoster
HealthRoster has been specifically designed for Ward/Unit/Team Managers, Modern Matrons etc. to roster staff to
an agreed duty requirement, view ward/unit staffing levels over time and also to have the ability to track, for
example, levels of no-show, additional/agency duties etc., for the purpose of managing their rosters and staff on a
day-to-day basis.

HealthRoster stores personnel data, providing visibility of a person’s availability and contractual obligations. This
information is used to support HealthRoster to provide information to Ward/Unit/Team Managers regarding staff
availability.

By building rosters using HealthRoster, Ward/Unit/Team Managers can assign staff against a defined duty
requirement using the Auto Roster function and simple drag-and-drop interface.

2.2 About e-Expenses
e-Expenses is an optional module of the HealthRoster suite. It enables employees to electronically record expenses
and submit claims to their line manager, which are approved and sent to ESR. It is an extra tab within Employee
Online.

As Employee Online is web based, employees can submit their claims from wherever internet access is available, as
Trust policy permits.

Expense claims are submitted using Employee Online and electronically fed into HealthRoster, where the manager
can view and approve all claims for their department. The ESR interface is then used to pay the employee their
expense claims with their salary.

e-Expenses can significantly reduce the administration involved in entering, approving and processing expense
claims, and can make payment of expense claims more accurate. It has been specifically designed for the NHS and
works exclusively with ESR.

Version : 5.0
Date : November 2019
Copyright 2019 Allocate Software and its subsidiaries                                                                   5
3 e-Expenses Applications
3.1 Applications
The e-Expenses Process primarily utilises Employee Online but also requires HealthRoster for HR details and user
administration, as well as the extract to ESR (for payment).

The applications and HealthRoster modules required are shown in the process flow below;

Version : 5.0
Date : November 2019
Copyright 2019 Allocate Software and its subsidiaries                                                              6
4 Employee Online – Access and Overview
Employees add and submit their expense claims via Employee Online. This is web based and can be accessed
anywhere where there is Internet access, as permitted by Trust policy.

4.1 Logging In
     1. In order to gain access to Employee Online, enter the Username and Password as provided by the
        System Administrator
     2. Click on the Login button.

Note: Upon first time login the User will be require to change their password

4.2 Single Sign-On for Employee Online
When logging in to Employee Online, by leaving the Username and Password fields blank, the login credentials used
to authenticate Windows will be used as a default.

Note: For terminals that use a single Windows sign on for all users, this option is not applicable.

Version : 5.0
Date : November 2019
Copyright 2019 Allocate Software and its subsidiaries                                                               7
4.3 Changing Login Password
By default, the user is prompted to change their password on first-time login.
4.4 Accessing e-Expenses in Employee Online
For information on how to access and log in to Employee Online, please refer to the Employee Online Quick
Reference Guide.
Refer to the HRv10 User Account Management Guide for information regarding the creation of Employee Online
User Accounts.
4.5 Screen / Navigation Overview
Once logged in to Employee Online, the User will see a tab for Expenses.
The Expenses tab contains the following shortcut to the left of the screen:
• Claims
• Vehicle Info
Upon selecting the Expenses tab within Employee Online, the Claims screen will automatically be displayed.
Version : 5.0
Date : November 2019
Copyright 2019 Allocate Software and its subsidiaries 84.5.1 Claims Screen This shows all current and submitted claims, and claims sent for payment. Items can be edited, submitted, deleted or printed from here. Each claim ‘resides’ here until it is submitted, so additional items can be added to a claim. Rejected claims are returned to this area with a visible rejection comment. Version : 5.0 Date : November 2019 Copyright 2019 Allocate Software and its subsidiaries 9
5 Entering an Expense Claim
To enter an expense claim, the staff member must navigate to the Expenses tab in Employee Online and select the
Claims task group.
They should then click on the New Claim button, enter the Claim Description and select the required Posting &
Approving Unit. (Notes are optional and are visible to the approver when submitted)
Note: If the employee has more than one posting, in the Posting field there will be a drop-down menu. The
employee must select the relevant posting for the claim and then click on Create. A message will appear Claim
created successfully.
This will bring up the Claim Categories to select from;
• Mileage
• Travel
• Subsistence
• Supplementary
Once a Claim Category has been selected, click the New Expense button.
A new window is display where the claim details are to be entered. All fields that are outlined in orange are
mandatory fields.
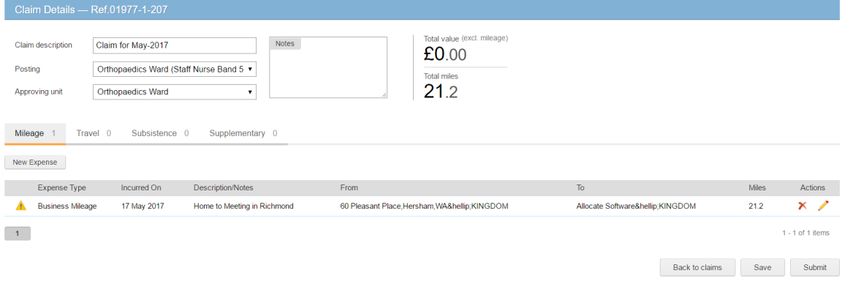
5.1 Mileage
To create a mileage claim, select the Mileage tab and click on the New Expense button. It is a mandatory
requirement to fill in the following sections
• Description
• Expense Type
Version : 5.0
Date : November 2019
Copyright 2019 Allocate Software and its subsidiaries 10• Date
• Using
• From & To
and, when completed, the mileage is generated by clicking on the Save button.
The claimant should enter the postcodes of the start and end locations of their journey or enter the name of the
location and a drop down menu will appear with suggestions for the claimant to choose from. The mileage is then
calculated by Post Code Anywhere (PCA) as the shortest possible route between the two locations.
After filling in all the relevant details and saving the claim, the journey mileage will then be calculated and appear at
the top right of the window. This will be shown as the number of miles that have been claimed.
A return journey can be indicated by checking the relevant tick-box. The associated element on ESR is then included
when payment is determined. (This option is not available when using Circa 01 July 2013 categories)
The form is submitted for approval by clicking on the Submit button at the bottom right of the pane.
Version : 5.0
Date : November 2019
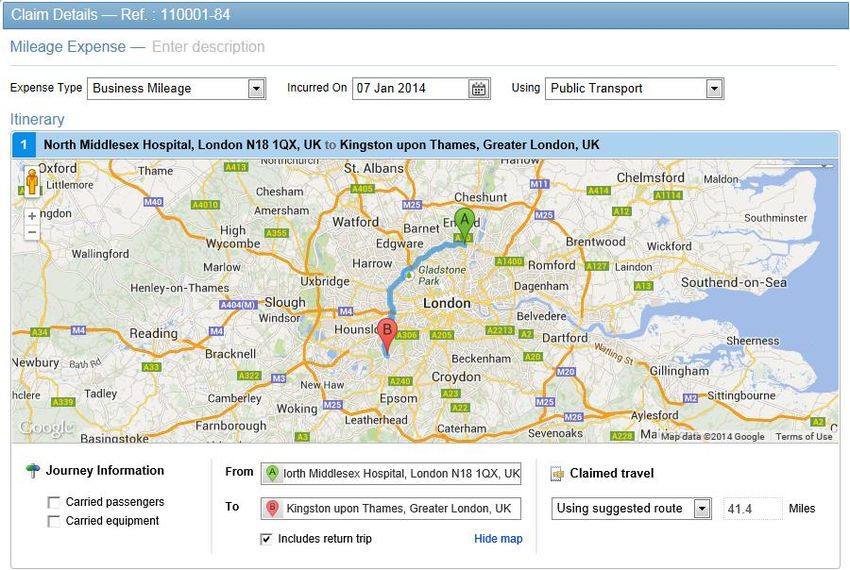
Copyright 2019 Allocate Software and its subsidiaries 115.1.1 Vehicle Information Vehicles can be selected when creating mileage entries. A ‘Public Transport’ option can also be selected, which will mean that the entry will go through to ESR using the public transport rate. Vehicle information is captured from ESR and inserted into Employee Online. The element to be paid depends on the persons contract with ESR. (please refer to the Agenda for Change Handbook for further information on user definitions and entitlements). A vehicle must be selected in order to make a mileage claim; this ensures that the correct entitlement is determined. A drop-down list will appear if there is more than one vehicle held on the employee’s profile. If ‘Public Transport’ is selected, then the mileage entry will go through to ESR using the public transport rate. Warning! If the claimant’s vehicle details are incorrect, then the amount they are paid by ESR may also be incorrect. If vehicle details are known to be incorrect then the e-Expenses Administrator should be notified immediately. 5.1.1 Mileage Calculations The route distance is calculated via the e-Expenses interface PCA. The Mileage engine provides either the shortest route between 2 points or the Fastest, whichever option is adopted by the organisation. The mileage calculator automatically updates once the start and end locations are selected. When the location has been resolved, a green and red icon appears. Details of the journey can be viewed by clicking on the Show map with route icon which appears below the ‘claimed travel’ field. The Map overview of the journey is then displayed. Version : 5.0 Date : November 2019 Copyright 2019 Allocate Software and its subsidiaries 12
If the actual mileage intended to be claimed differs from that suggested by PCA, an alternative mileage amount can
be manually entered into the ‘Claimed Travel’ field.

A reason for the discrepancy in mileage must be entered before it can be changed. These reasons are configured and
controlled by the Trust and configured in Reference Data by the HealthRoster/System Administrator.

  5.1.2 Multi-Leg Expense Claims
Employees can enter the details of a continuous journey with multiple legs. This means that more detailed
information can be included within expense claims.

The Multi-Trip action ‘Add Trip’ (see screenshot below) generates a new area within the entry window, and
automatically sets the following:

     •     Same entry type
     •     Same date
     •     Same vehicle
     •     Last destination as the starting point for the next leg of the journey.

Version : 5.0
Date : November 2019
Copyright 2019 Allocate Software and its subsidiaries                                                                13
5.1.3 Agenda for Change Journeys When entering multi-leg journeys for AfC contracts is it important that the first Point and Last point of the claim Starts and Ends with either Home or Base in any combination. NOTE: The actual word ‘Home’ or ‘Base’ must be entered; not the address or postcode, as this will result in Zero miles being claimable Multiple entries can be saved within one claim simply by clicking on ‘Save’ or ‘Save & New’. This will then generate a new window. The process can be repeated as many times as necessary. 5.1.4 Searching for Post Codes The search mechanism will only commence when 4 or more characters are entered. Example: if the postcode was S10 3BB then ‘S103’ would need to entered. PCA will also only list the first 10 addresses with the same postcode; if the address you require is not listed enter the Number followed by the postcode. Example; the number you require is 75, enter ‘75 NG34 5RD’ (Number, Space, Postcode) 5.2 Travel Under the Travel tab, claims can be submitted for other travel expenses such as rail, bus journeys and congestion charges. Once the user clicks on New Expense, the claim details form will open. Again, it is important that all the fields in Orange are completed. Version : 5.0 Date : November 2019 Copyright 2019 Allocate Software and its subsidiaries 14
Select Add Images and browse for a saved (Receipt) image to upload

Note: Images must be in one of the following formats. (.Png, .Gif, .Tif, .Jpeg)

5.3 Subsistence
An expense relating to time spent away from home, such as meal allowances and overnight accommodation, should
be submitted under the Subsistence tab.

Once you click New Expense, the claim details form will open.

An amount can be entered or a daily rate (set amount for X number of days). Select Add Images and browse for a
saved (Receipt) image to upload

Note: Images must be in one of the following formats. (.Png, .Gif, .Tif, .Jpeg)

5.4 Supplementary
All other expenses, which do not fall under the aforementioned categories, fall into the Supplementary category.

Version : 5.0
Date : November 2019
Copyright 2019 Allocate Software and its subsidiaries                                                              15
Select Add Images and browse for a saved (Receipt) image to upload

5.5 Rule Breakages
When rules are broken or thresholds are exceeded, the types of warnings generated vary according to the category
selected and the parameters set by the Trust.

The rule breakage can be set to trigger either a warning or a violation, depending on the severity of the rule being
broken.

Thresholds are set, rules are activated and their setting as either a warning or a violation is set within Reference Data
by the HealthRoster/System Administrator.

The rules include unique checks that cross-reference the roster, so for example may prevent claims being entered for
periods of sickness.

  5.5.1 Warnings
Claims that break rules but still fall within permitted tolerance levels generate warnings. These warnings are clearly
indicated by a change in colour to the header and a warning icon in the claim form before the submission stage. An
explanation of the rule(s) broken is provided in the tooltip (see below). This gives the claimant the opportunity to
check and edit the claim where necessary before submission.

The rule breakage displays on the expense form when broken, as well as the tooltip on the summary screen:

Version : 5.0
Date : November 2019
Copyright 2019 Allocate Software and its subsidiaries                                                                    16
Claims that generate warnings can still be submitted, but a warning is generated on the manager’s approval screen
for them to review.

The colour of the tab also indicates if there are any entries in it which have warnings (tab is yellow), violations (tab is
red) or both (tab is red).

  5.5.2 Violations
Claims that break rules and create violations cannot be submitted; the Submit button is not accessible. When a claim
has generated a violation, the header of the claim form will change to red, the violation icon will appear, and the
tooltip will provide an explanation (as below). As the claim cannot be submitted, it will prevent all expense items
held on the same claim form from being submitted.

The employee will need to edit the claim until it falls within tolerance levels or abandon the claim by deleting.

The Current Claims page will show the appropriate icons against each entry if there is a warning or violation; the
claim needs to be expanded to show which entry has rule breakages. Simply click on the violation icon to view the
tooltip and the details:

5.6 Expense Claims Sorted by Category
When viewing expense claims, items are now sorted by category if they are part of the same claim.

Version : 5.0
Date : November 2019
Copyright 2019 Allocate Software and its subsidiaries                                                                     17
5.7 Submitting a Claim
A claim can be submitted by clicking on Submit at the bottom of the Claim Details screen.

Claims can also be submitted from the main Current Claims screen by selecting the Green arrow icon on the right
side of the claim line

5.8 Disclaimer
After all the details have been entered, the claimant should click on the Submit button to submit the form for
Manager approval. Before the expense is submitted, the user is presented with a Disclaimer, which needs to be read
and confirmed.

Version : 5.0
Date : November 2019
Copyright 2019 Allocate Software and its subsidiaries                                                             18
5.9 Editing and Printing a Claim
  5.9.1 Editing a Claim
An additional entry can be added to a claim, and a previously saved entry can be edited, within the Current Claims
screen.

A summary view of current claims is available by clicking on the arrow icon      .

The employee can select the claim they wish to edit by clicking on pencil to the far right of the screen (see below).

The current details of the claim can be amended, and new details can be added, in the same way as when new claims
are created.

Note: When submitting a previously saved claim, the Submit button appears to the right of the summary screen.

  5.9.2 Printing a Claim
All current claims and their status are listed in the Current Claims screen. The employee can print a claim within this
screen by clicking on the Print icon to the far right of the screen.

Version : 5.0
Date : November 2019
Copyright 2019 Allocate Software and its subsidiaries                                                                     19
When the option to print has been selected, a detailed preview of the claim will appear:

Receipts can be attached to printouts offline and submitted manually.

  5.9.3 Unsubmit a Claim
Claimants can unsubmit a claim which has yet to be approved. This is done from the Submitted Claims tab by
selecting the red arrow under the Actions column. It will move the claim back to the Current Claims tab. It will also be
removed from the relevant approver’s Outstanding Approvals tab.

5.10 Confirmation Pop-up when Deleting an Expense Claim
Clicking the Delete link on a claim brings up a Delete Claim? confirmation box, to avoid accidental deletion of a claim
(which may have multiple entries).

Version : 5.0
Date : November 2019
Copyright 2019 Allocate Software and its subsidiaries                                                                 20
6 Vehicle Information
Users can review all vehicles that have been assigned to them as a result of a vehicle upload by the System
Administrator.

The column on the left will display the details of the vehicles. The column on the right will list the vehicle checks
(MOT, Insurance & Registration) that are currently assigned and the dates when they are due for renewal. The
Posting(s) for which a mileage claim can be added are also shown here.

Note: if any vehicle checks are indicated with a Red circle with a white cross, mileage claims for this vehicle may not
be allowed.

6.1 Adding Vehicles (Self Service)
Users can self-load vehicles into e-Expenses by selecting the Add icon at the top right of the Vehicle Info Page and
complete the Add Vehicle form.

You must add in the Make, Model, Vehicle Type, Fuel Type, Engine Capacity, Registration, Assignment Date and
Postings.

  6.1.1 Vehicle Checks
If this action has been enabled by an e-Expenses Administrator a staff member can add the own Vehicle checks.
(Insurance, MOT & Car Tax)

Version : 5.0
Date : November 2019
Copyright 2019 Allocate Software and its subsidiaries                                                                     21
Once submitted the vehicle will appear in the vehicle Info section as pending and will not be available for use until it
has been checked and authorised by the e-Expenses Administrator.

Version : 5.0
Date : November 2019
Copyright 2019 Allocate Software and its subsidiaries                                                                      22
7 Email Notifications
Email notifications can be enabled so that the relevant parties receive emails when an action takes place on a claim.

There is a setting which enables or disables email notifications across Expenses. The ‘From’ address for all emails is
also controlled via a setting.

  7.1.1 Claim Approved
This notification is sent to the claimant once a claim has been payroll approved (either manually or automatically).
The email also contains the name of the person that approved the claim. If auto approved, the name of the manager
approver will be displayed:

  7.1.2 Claim Rejected
This notification is sent to the claimant once a claim has been rejected either by the Manager or by Payroll. The email
also contains the name of the person that rejected the claim:

Version : 5.0
Date : November 2019
Copyright 2019 Allocate Software and its subsidiaries                                                                    23
7.1.3 Claim Partially Rejected
This notification is sent to the claimant when a claim has been partially rejected, i.e. if the approver has approved
and rejected entries on a single claim.

7.2 Viewing Claim Status
Depending on their status, claims can be viewed in any of the three available tabs:

     1. Current Claims
     2. Approvals
     3. Payroll Approvals
There are five different stages for a submitted claim:

     1. Submitted – claims that are not yet approved by any user (the claim can still be un-submitted at this stage).
     2. Rejected – the claim has been sent back to Current Claims in Employee Online. It will show as rejected and
        further details are visible on a tooltip detailing the manager’s comments.
     3. Manager Approved – the line manager has approved the expense claim and it may be awaiting second stage
        approval from either payroll or senior management.
     4. Payroll Approved – the claim has passed the final stage of approval and will be sent to ESR in the next
        expense extract to ESR.
     5. Sent for Payment – the claim has been extracted to ESR and will be paid during the next round of expense
        processing.

Version : 5.0
Date : November 2019
Copyright 2019 Allocate Software and its subsidiaries                                                                   24
Change Control History
Document Authorisation
Issue
No Issue Date Description Author Reviewer(s) Approver
ALL0.1 February Abridged version of full Dayo Arobieke Kunal Patel
2014 user guide, created from
guide for previous
product version –
HealthRoster v9 e-
Expenses Guide ALL7.0.
ALL1.0 March Reviewed and finalised Penny Rivers Penny Rivers
2014 for first release.
ALL1.1 July 2014 Updated following Dayo Arobieke Penny Rivers
Release
ALL1.2 January Updated following new Dayo Arobieke Stuart Lloyd, Penny Rivers
2015 release Penny Rivers
ALL1.3 August Reviewed & Updated Rocky Caves
2015
ALL1.4 December Updated to 10.5.2 Rocky Caves
2015 software release
ALL 1.5 August Updated to 10.6.1 Rocky Caves
2016 Software release
ALL2.0 May 2017 Updated to 10.6.3 Rocky Caves
ALL2.1 May 2017 Added vehicle self Rocky Caves
service
ALL3.0 June 2017 Updated to 10.7.1 Rocky Caves Jane Jane
Wanniaratchy Wanniaratchy
ALL4.0 February Updated to 10.7.3 Rocky Caves
2018
ALL5.0 November Updated to 10.9.1 Rob Storer
2019
Rocky Caves
Version : 5.0
Date : November 2019
Copyright 2019 Allocate Software and its subsidiaries 25Allocate Software Ltd Allocate Software AB Allocate Software PTY Ltd
Corporate and UK head office Sweden office Australia head office
1 Church Road Box 30077 Suite 2, Level 13
Richmond 104 25 Stockholm 99 Mount St
TW9 2QE Visiting address: North Sydney
UK Franzéngatan 3 NSW 2060
Tel. +44 (0)20 7355 5555 112 51, Australia
Stockholm, Sweden Tel. +61 (0)3 9534 4477
Tel. +46 (0)8 50551800
Allocate Software SAS Allocate Software GmbH Allocate Software España SL
France office Germany office Spain office
4, route de la Noue, Ruhrallee 9 Avda. de Europa 19 3ºA
91190 Gif sur Yvette 44139 Dortmund Parque empresarial La Moraleja
France Germany 28108 Madrid
Tel. +33 (0)1 82 88 94 98 Tel. +49 (231) 9525211 Spain
Tel. + 34 91 793 21 00
AllocateSoftware.com
Copyright 2019 Allocate Software and its subsidiariesYou can also read