Epoc Blood Analysis System with NXS Host - Resource Guide
←
→
Page content transcription
If your browser does not render page correctly, please read the page content below
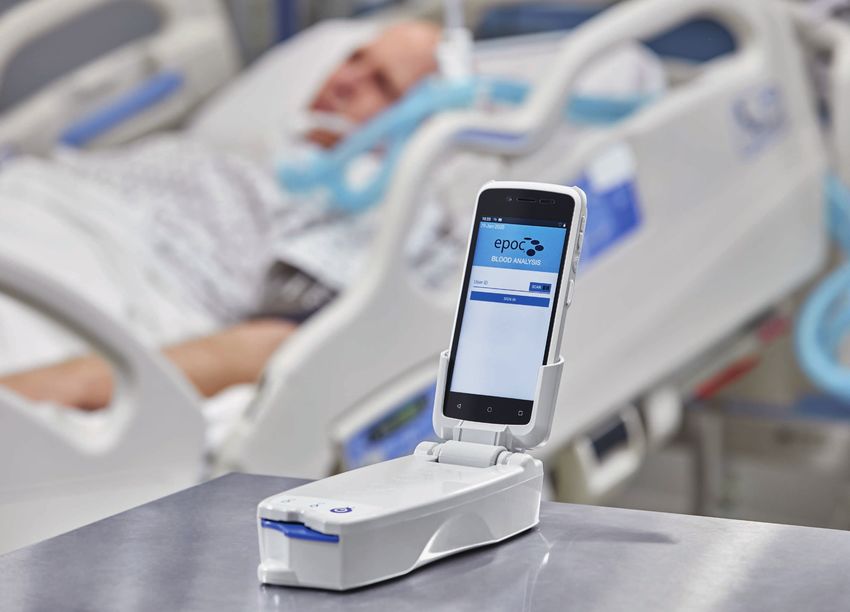
epoc® Blood Analysis System
with NXS Host
Resource Guide
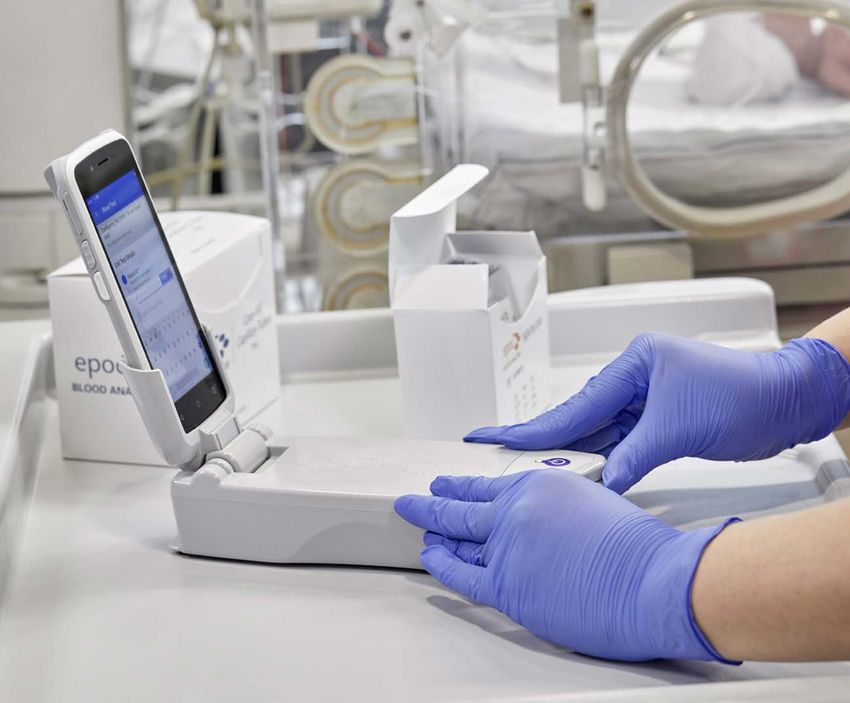
Table of Contents
System Overview.....................................3

Sample Processing...................................7

Quality Assurance (QA)..........................15

As Needed Maintenance.........................18

Troubleshooting.....................................21

T20001.013 | Effective date: 06/14/2021
06-2021 | © Siemens Healthcare Diagnostics Inc., 2021
                                                         2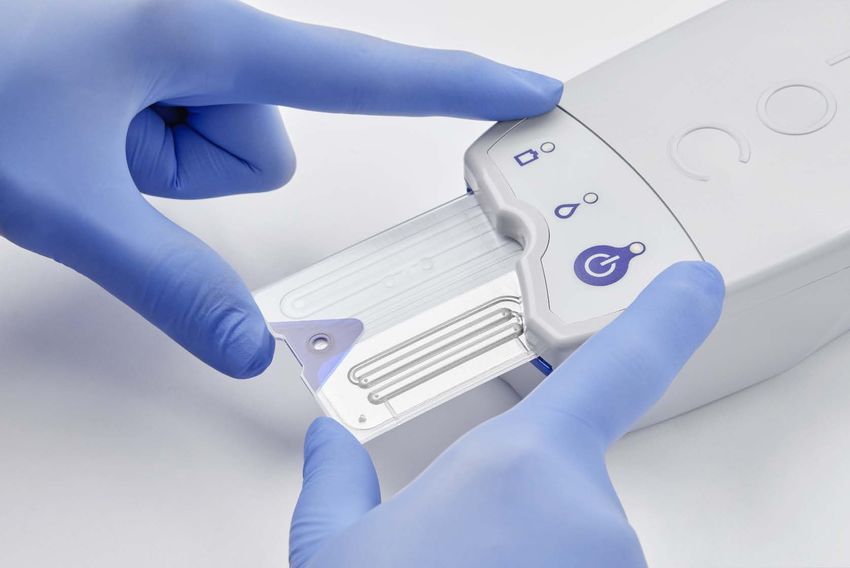
Hardware Overview
epoc® Reader
1. Test Card Slot
• Internal barcode scanner located within card slot
• Scans test cards for serial number, lot number,
expiration date and card type
2. Battery Status Indicator
• Amber: Fully charged
• Blinking Amber: Charging
3. Test Status Indicator
• Green: Ready for use
• Blinking Green: Processing
• Red: Error
4. Power Button
• Green: Reader is on
5. Docking Pivot
• Insert Host cradle blade to connect to the reader
6. Power Jack / AC adapter
• Located at the back of the reader
3
System Overview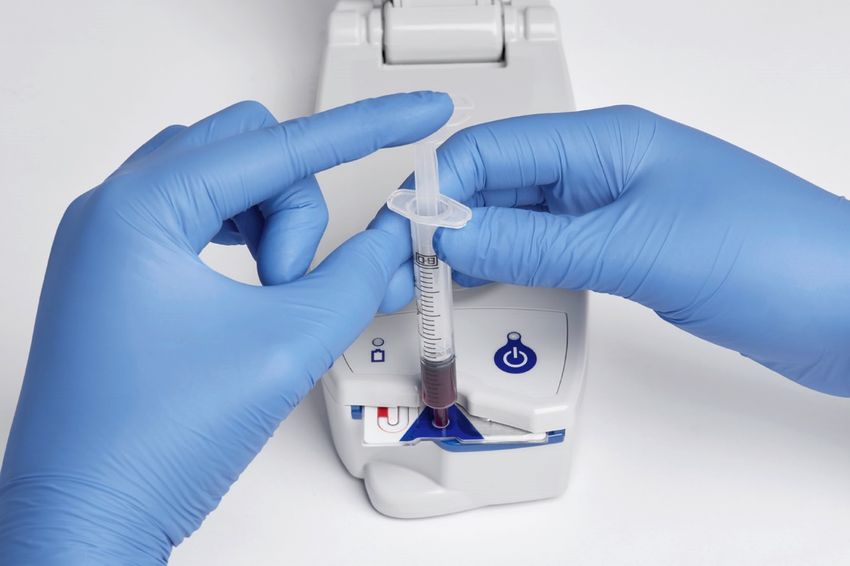
Hardware Overview
epoc® NXS Host
1. Barcode Scanner
• Located at the top of the Host
2. Charging Indicator
3. Power Button
4. Scan Button
5. Cradle Blade
• Insert into Docking Pivot in order to charge the Host
System Overview
4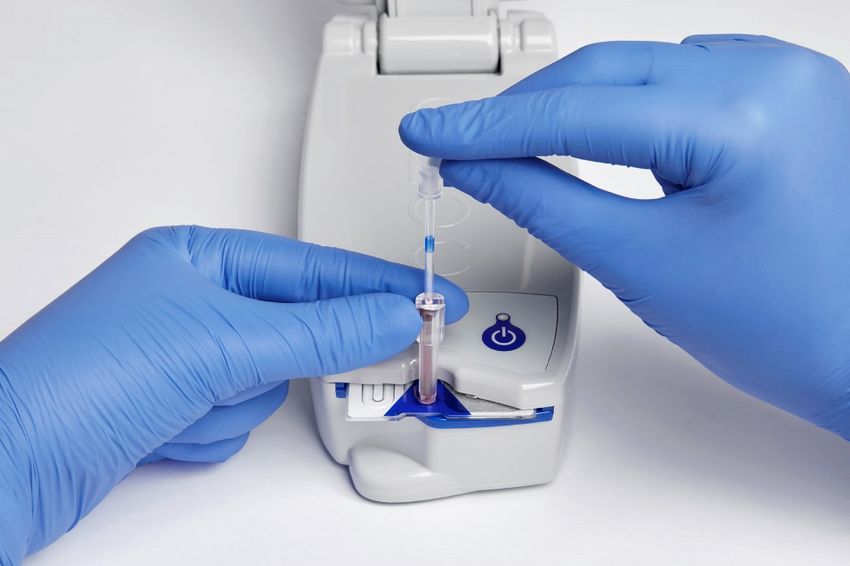
Hardware Overview
epoc® Test Card (Bottom)
1. Sensor Module Contact Surface
2. Test Panel Type
3. Barcode
4. Lot Number and Expiration Date
epoc® Test Card (Top)
5. Measurement Region
6. Sealed Valve
7. Blood Waste Chamber
8. Calibrator Reservoir
9. Sample Entry Port
Note:
Test Card shipping cartons include two Temperature Monitors,
which turn red when the shipping temperature is < 2° C or > 30°C
Test Cards are stored at room temperature
System Overview
Test cards are single use only
5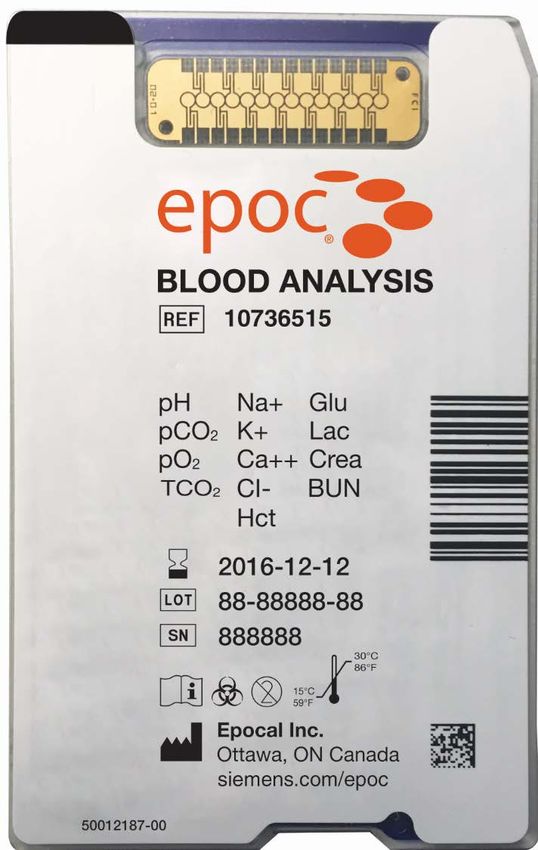
Software Overview
1. Run Blood Test
   Run and view tests in progress

2. View Blood Test History
   Review previous Test Results

3. QA Testing
   • Run QA tests (if authorized)
   • Run Thermal QA tests (if authorized)
   • Review QA test history
   • Review Electronic QC history
   • Review Thermal QA history

4. Synchronize Data
   Update Host settings, receive software updates, send
   tests (if data management is available)

5. Settings
   • Check Reader Settings
   • Update Host
6. About
   View system information

7. Sign out Overview
     System

                                                          6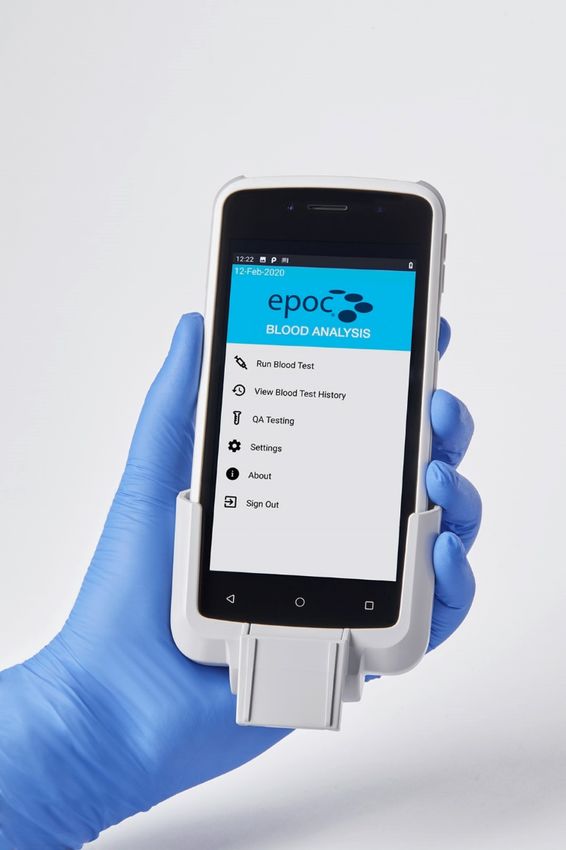
Sample Processing
Logging In
1. Enter a User ID manually or scan a valid ID
   badge by selecting Scan
2. Enter Password (if applicable)
3. Select SIGN IN

                                                 7

                       Sample Processing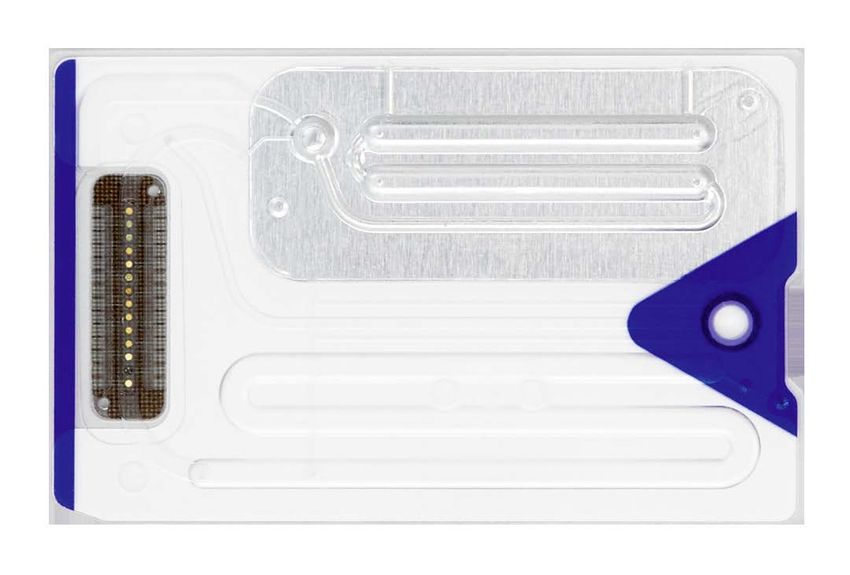
Sample Processing
Running a Blood Test
Option 1

1. Upon login, if the epoc Host is
   already configured to connect
   with a single dedicated epoc
   Reader, the epoc Host will
   automatically connect to that
   epoc Reader to run a blood test.
Option 2

1. Upon login, if the system
   administrator has configured
   the system for use with
   multiple epoc Readers, select
   Run Blood Test.
2. Select desired Reader

     System Overview

                                      8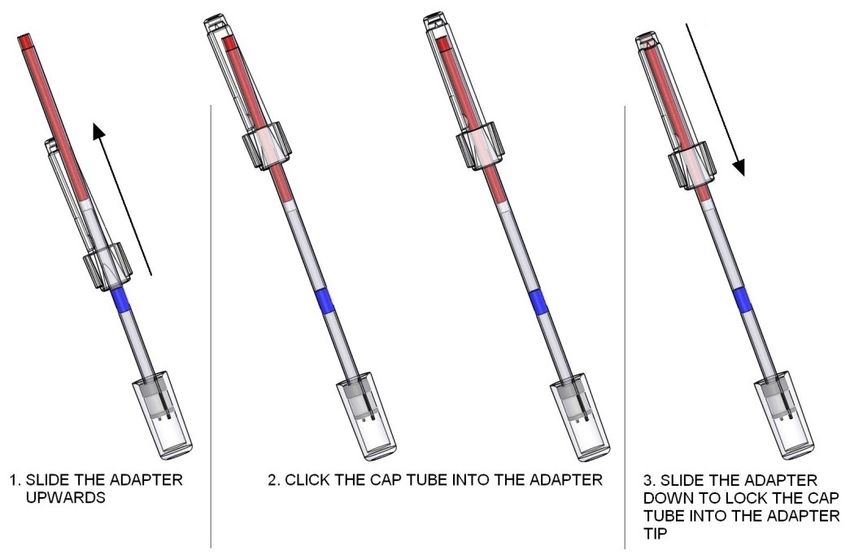
Sample Processing
Inserting a Test Card
1.   Open a test card pouch
2. Position the test card with the sample
   port facing upwards
3. When ready for card insertion, the Host
   will display the message Insert new Test
   Card at the top of the screen (select Show
   me how to display animation). Upon
   successful insertion the epoc Reader will
   beep once and calibration will begin.
   The Reader must remain on a flat surface
   throughout testing
4. After calibration is complete, the message
   Inject Sample will appear at the top of
   the screen

      System Overview

                                                9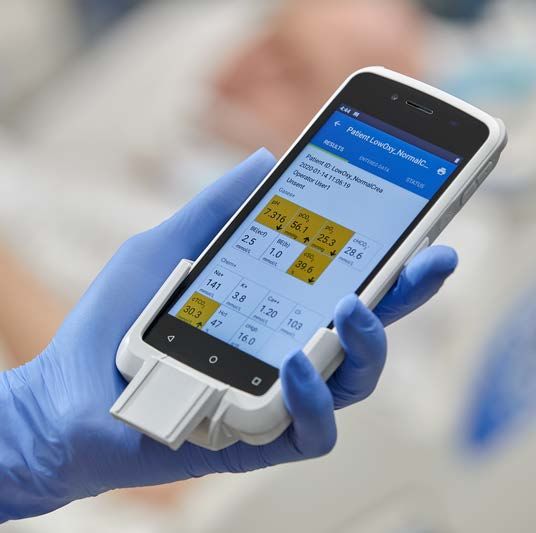
Sample Processing
Entering Test Information
1. Enter or scan the Patient ID
2. Select Yes or No under the Select Hemodilution menu to select
   the hemodilution correction factor for Hematocrit (if configured)
3. Use the Select Sample Type menu to select a sample type
4. Use the Select tests menu to edit tests to perform during analysis
5. Use the Enter Patient information menu to input patient
   temperature, age, gender, height and secondary ID
6. Use the Enter sample information menu to select draw site and
   Allen’s test result
7. Use the Enter respiratory information menu to select respiratory
   delivery system, mode and additional parameters
8. Use the Enter Comments menu to enter or scan comments

      Note:
      Hemodilution is used to correct hematocrit results
      for patients undergoing cardiopulmonary bypass,
      ECMO, or patients receiving large amounts of IV
      fluids. Please see section 12.15 in the epoc System
      Manual with epoc NXS Host for more information.
      System Overview

                                                                        10
Sample Processing
Sample Injection (Syringe)
1. When ready for sample injection, the Host will display
the message Inject Sample at the top of the screen
(Select Show me how to display animation)
2. Once sample is obtained, discard a drop of blood as
volume permits
3. Hold the syringe barrel vertically between fingertips
and thumb and perpendicular to the test card
4. Using slight downward pressure, secure the syringe’s
tip into the sample entry port of the test card. Rotate
the syringe clockwise ¼ turn to ensure a good seal
5. While maintaining downward pressure, use the index
finger of the other hand to steadily depress the syringe
plunger with one continuous motion until prompted
to stop. The Reader provides an audible beep and the
Test Status Indicator flashes green indicating enough
sample was received. The Host will display the message
Analyzing sample at the top of the screen
System Overview
11Sample Processing
Sample Injection (Care-Fill™ Capillary Tube)
1. Once the sample has been collected, hold the capped tube by the
blue band and point the end of the capped tube upwards
2. Slide the adapter towards the end of the capped tube and insert the
tube into the adapter
3. Gently push the capped tube into the adapter end and gently push
until it clicks and locks in place
4. Hold the capped tube by the large end of the adapter and insert
into the sample entry port of the test card. Rotate the capillary tube
clockwise ¼ turn to ensure a good seal
5. Using the index finger of the other hand, push the plunger down
completely with one continuous motion. The Reader provides an
audible beep and the Test Status Indicator flashes green indicating
enough sample was received. The Host will display the message
Analyzing sample at the top of the screen
System Overview
12Sample Processing
Reviewing Results
1. Once analysis is complete, test results will display on the Host. If the prompt
“To view results: Enter patient ID” appears, enter the Patient ID. Select Save
2. If needed, select Edit Test Details to edit patient information
3. Test results will display with the following color indicators, as values
configured by Host Administrator
• White: result is within range
• Yellow: result is outside of the reference range
• Red: result is outside of the critical range
• Grayed-out: Any specific sensor result with an error (iQC or cnc)
4. If critical results are present and Host is configured to “enforce critical
handling”, select REPORT CRITICAL RESULTS to record Notify Action, Name
of person notified, Read back, Notify Date (optional), Notify Time (optional).
5. Remove the used test card and dispose in a biohazard receptacle
6. Insert a new test card and repeat previous sample processing steps if desired
7. When all testing with the Reader is complete, close testing by selecting SAVE
& CLOSE, or CLOSE & TRANSMIT (depending on configuration).
Note:
The Administrator may configure the epoc Host to synchronize upon closing
a test. In this configuration, synchronization with the data manager occurs
System
immediately Overview
after the test result screen is closed at the end of a test.
13Sample Processing
Viewing Historic Results
1. From the home screen, select
View Blood Test History
2. Select the drop down arrow at
the top of the screen to filter by
All Blood Tests, Unsent Tests and
Sent Tests
3. Select the magnifying glass to
search by Pat ID, Op ID, etc.
System Overview
14Electronic Quality Control (EQC)
Performing Electronic
Quality Control
Every time a Host and Reader connect,
or when a Host and Reader have been
connected continuously for 8 hours or
more, the Reader begins a two-level
Electronic QC Test. Configuration data
is sent by the Host to the Reader, and
preparations begin for a test. No operator
interaction is required to run EQC.
Viewing Electronic Quality
Control
1. From the home screen, select
QA Testing
2. Select Electronic QC History
3. Select the magnifying glass to search
by Reader or Operator ID
4. Select a record to view details
Note:
Unlike Test Records, Electronic QC Records are
removed from the Host after each synchronization
15
Quality
Assurance (QA)Additional Quality Assurance
Quality Control Fluid
Commercially available control fluids can be processed as determined by facility policy, federal, state and local requirements. It is recommended
to perform external quality control for each lot in each shipment of test cards. Refer to the epoc System Manual for recommended products.
Calibration Verification
Calibration verification is performed to verify accuracy of Test Results over an extended measurement range of a test. Performance of this
procedure may be required by regulatory or accreditation bodies. Refer to the epoc System Manual for recommended products.
Proficiency Testing
Follow Proficiency Testing procedure to verify the Accuracy and Precision of epoc System test results over multiple laboratories and/or sites.
Various laboratories can choose to register with different proficiency testing organizations.
Electronic Value Assignment Datasheet (eVAD)
Download the current electronic Value Assignment Datasheets from Siemens Document Library.
eVADs are available for quality control and calibration verification fluids specific to the epoc system. eVADs are lot and software specific.
System Overview
16Additional Quality Assurance
Performing Quality Assurance
1. From the home screen, select QA Testing.
2. Select Run QA Test.
3. Select one or multiple Readers to perform QA
testing.
4. Select START TESTING
5. When prompted, insert a test card to begin
calibration
6. Input the lot number manually or select Scan
to use a printed eVAD barcode, or the barcode
located on the box of control or verifier
7. Use the Select Test Type menu to select which
QA test to perform
8. Use the Select test menu to edit tests to
perform
9. Use the Enter Comments menu to manually
enter or scan comments
10. When prompted, inject sample to begin
analyzing
11. When using eVADs, the Host will display a
result of Pass or Fail when analysis is complete
System Overview
17As Needed Maintenance
Cleaning the Reader or Host
1. Using a soft cloth or gauze pad, moisten with 10%
bleach or 70% isopropyl alcohol
2. Gently rub any areas of dried blood or contamination
with one or more moist pads until the stains are soft
enough to wipe clean
3. After removal of stained areas, clean all surfaces
twice with fresh pads soaked in 10% bleach or 70%
isopropyl alcohol
• Ensure the bleach solution is in contact with the
surface for 3 minutes before wiping off
• Ensure the cleaned surface is wet with 70%
isopropyl alcohol for at least 5 seconds with each
cleaning
4. Discard all pads after use in a biohazard receptacle
18
As Needed
MaintenanceAs Needed Maintenance
Replacing the Reader Battery
1. Remove the battery door screw using a Philips
#0 or 3/16” slotted screwdriver Battery door screw
2. Lift the battery door from the Reader
3. Remove the battery from its compartment
and unplug the battery from the Reader. Use
tweezers if necessary
4. Insert the new battery connector to the Reader.
The connector orientation tab should be visible
Orientation tab
Note:
epoc Reader Battery Replacement SMN: 10736373
System Overview
19As Needed Maintenance
Replacing the Reader Battery
(continued)
Battery wires
5. Place the new battery into the Reader
compartment. Place the wires in the area
next to the battery connection. Ensure that
the battery is lying flat without any wires
underneath or on top
6. Install the battery door by inserting its hinge
behind the battery. Snap the hinges into place
by applying pressure
7. Secure the battery door screw, using a Philips
#0 or 3/16” slotted screwdriver
System Overview
20Troubleshooting
Troubleshooting Result Error Messages
For each type of test result, messages may appear next to test names if data cannot be determined or displayed
Result Error Troubleshooting
Error Meaning Corrective Action
Could not calculate. Component required for
cnc Verify sample integrity and re run test
calculation was not available
View the epoc Host screen for specific failure
and instructions to resolve error. Ex. “iQC
iQC Failure Failed internal quality control
Failure: Calibration fluid not detected.” “Insert
new card and repeat test.”
Card was expired. Test results not
Expired Test Card Use a non expired test card and re run test
displayed
Note:
Refer to the epoc System Manual, Section 14, for
additional Troubleshooting and Error Messages
21
TroubleshootingTroubleshooting
Troubleshooting Hardware
Hardware Troubleshooting
In addition to the corrective action listed for
common hardware troubleshooting, the following Scenario Corrective Action
is recommended:
Ensure the Host blade is seated into
• Do not submerse the epoc Host or Host not charging
the Reader docking pivot
Reader into liquid
• Fold the Host and Reader together while • Clean barcode reader with a dry
carrying to prevent dropping lint free cloth
Host barcode reader
• Do not remove the test card during sample unable to scan • Perform a soft reboot by holding
analysis, damage to the reader could occur the power button, then select
Restart
Perform a hard reboot by holding
Host screen frozen the power button for at least 10
seconds
View epoc Host screen for error
Reader red test indicator light on message and troubleshoot using the
epoc System Manual
System Overview
22Troubleshooting
Troubleshooting Failed EQC
If Reader repeatedly fails Electronic QC, then this
indicates it is not fit for use. It is not possible to use
a Reader that has failed Electronic QC. Complete
the following troubleshooting steps if the message,
“Electronic QC failure,” displays on the Host.
1. Close the Reader screen
2. Turn the Reader OFF and back ON
3. If the Reader connects successfully and passes
EQC, it is acceptable for use. If EQC continues to
fail, contact Technical Support
System Overview
23Troubleshooting
Troubleshooting Failed Quality Control
or Calibration Verification
Close the Reader screen and turn the Reader Off and back
On. If Electronic QC passes, verify the following and repeat
the test.
1. Confirm use of the correct Control or Calibration
Verification Value Assignment Datasheet
2. Review the preparation, storage conditions and
expiration date of the Test Card, Calibrator Verifier, or
Control product used
If the repeated results pass, the cards are acceptable for use.
If the repeated results fail, repeat the test using a new box
of control solutions, calibrator verifiers and/or Test Cards.
Contact Technical Support if results continue to fall outside
of specified ranges.
System Overview
24All rights, including rights created by patent grant or registra- Note: This document is for supplemental use only, and not
tion of a utility model or design, are reserved. All other trade- meant to be used in place of primary technical materials.
marks and brands are the property of their respective owners.
This resource guide, and the software described within, are
Product availability may vary from country to country and is copyrighted. No part of this may be copied, reproduced, trans-
subject to varying regulatory requirements. Please contact lated, or reduced to any electronic medium or machine-read-
your local representative for availability. able form without the prior written consent of Siemens
Healthcare Diagnostics, Inc.
06-2021 | All rights reserved
© 2021 Siemens Healthcare Diagnostics Inc. T20001.013 Effective date 06/14/2021
Global Siemens Headquarters Global Siemens Healthcare Global Division
Siemens AG Headquarters Siemens Healthcare Diagnostics Inc.
Wittelsbacherplatz 2 Siemens AG 511 Benedict Avenue
80333 Muenchen Healthcare Sector Tarrytown, NY 10591-5005
Germany Henkestrasse 127 USA
91052 Erlangen www.siemens.com/diagnostics
GermanyYou can also read