Oracle Hospitality Gift and Loyalty - User Guide - Release 9.1 - Oracle Help Center
←
→
Page content transcription
If your browser does not render page correctly, please read the page content below
Oracle® Hospitality Gift and Loyalty
User Guide

   Release 9.1
   E96410-07
   October 2020
Oracle Hospitality Gift and Loyalty User Guide, Release 9.1

E96410-07

Copyright © 2000, 2020, Oracle and/or its affiliates. All rights reserved.

This software and related documentation are provided under a license agreement containing restrictions on
use and disclosure and are protected by intellectual property laws. Except as expressly permitted in your
license agreement or allowed by law, you may not use, copy, reproduce, translate, broadcast, modify,
license, transmit, distribute, exhibit, perform, publish, or display any part, in any form, or by any means.
Reverse engineering, disassembly, or decompilation of this software, unless required by law for
interoperability, is prohibited.

The information contained herein is subject to change without notice and is not warranted to be error-free. If
you find any errors, please report them to us in writing.

If this is software or related documentation that is delivered to the U.S. Government or anyone licensing it on
behalf of the U.S. Government, then the following notice is applicable:

U.S. GOVERNMENT END USERS: Oracle programs (including any operating system, integrated software,
any programs embedded, installed or activated on delivered hardware, and modifications of such programs)
and Oracle computer documentation or other Oracle data delivered to or accessed by U.S. Government end
users are "commercial computer software" or “commercial computer software documentation” pursuant to the
applicable Federal Acquisition Regulation and agency-specific supplemental regulations. As such, the use,
reproduction, duplication, release, display, disclosure, modification, preparation of derivative works, and/or
adaptation of i) Oracle programs (including any operating system, integrated software, any programs
embedded, installed or activated on delivered hardware, and modifications of such programs), ii) Oracle
computer documentation and/or iii) other Oracle data, is subject to the rights and limitations specified in the
license contained in the applicable contract. The terms governing the U.S. Government’s use of Oracle cloud
services are defined by the applicable contract for such services. No other rights are granted to the U.S.
Government.

This software or hardware is developed for general use in a variety of information management applications.
It is not developed or intended for use in any inherently dangerous applications, including applications that
may create a risk of personal injury. If you use this software or hardware in dangerous applications, then you
shall be responsible to take all appropriate fail-safe, backup, redundancy, and other measures to ensure its
safe use. Oracle Corporation and its affiliates disclaim any liability for any damages caused by use of this
software or hardware in dangerous applications.

Oracle and Java are registered trademarks of Oracle and/or its affiliates. Other names may be trademarks of
their respective owners.

Intel and Intel Inside are trademarks or registered trademarks of Intel Corporation. All SPARC trademarks are
used under license and are trademarks or registered trademarks of SPARC International, Inc. AMD, Epyc,
and the AMD logo are trademarks or registered trademarks of Advanced Micro Devices. UNIX is a registered
trademark of The Open Group.

This software or hardware and documentation may provide access to or information about content, products,
and services from third parties. Oracle Corporation and its affiliates are not responsible for and expressly
disclaim all warranties of any kind with respect to third-party content, products, and services unless otherwise
set forth in an applicable agreement between you and Oracle. Oracle Corporation and its affiliates will not be
responsible for any loss, costs, or damages incurred due to your access to or use of third-party content,
products, or services, except as set forth in an applicable agreement between you and Oracle.
Contents
    Preface

1   Gift and Loyalty FAQ
    What is Gift and Loyalty?                                    1-1
    What are Programs and Rules?                                 1-1
    What is the Workflow for Creating a Program?                 1-2

2   Card Programs
    Setting Up Basic Gift Cards                                  2-1
    Setting Up Gift Cards with Additional Stored Value           2-2
    Setting Up Reloading Meal Cards                              2-3
    Setting Up Spend or Lose Programs                            2-4
    Setting Up House Account Credit Cards                        2-5
    Setting Up Discount Cards                                    2-6

3   Loyalty Programs
    Setting Up Points Per Amount Spent Loyalty Programs          3-1
    Setting Up Points Per Visit Loyalty Programs                 3-2
    Setting Up Round Robin (Unique Purchases) Loyalty Programs   3-3

4   Loyalty Awards and Award Programs
    Setting Up Tiered Loyalty Awards                             4-1
    Setting Up Birthday Discounts                                4-2
    Setting Up a Registration Bonus                              4-2
    Setting Up Bonus Cards for Gift Card Purchases               4-3

5   Customer Account Administration
    Account Administration Permissions                           5-1

                                                                  iii
Card and Account Numbers 5-2
Reviewing Existing Card Numbers 5-2
Creating Card Numbers 5-2
Issuing an Fully-Functional and Active Account to a Customer 5-3
Creating a Batch of Empty Accounts 5-3
Creating Inactive Accounts for One or More Customers 5-4
Managing Customer Accounts 5-4
Managing Customer Transactions 5-6
Managing the Customer Registration Form 5-7
Notices and Consent 5-8
Configure Guest Consent 5-8
6 Gift and Loyalty GPL Setup and Configuration
Organization-wide Gift and Loyalty Configurations 6-1
Setting Up myicard.net 6-2
7 Program Configuration References
Gift or Debit Program Configuration Reference 7-1
Creating a Gift or Debit Program 7-2
Configuring Gift or Debit Programs 7-2
Loyalty Programs Configuration Reference 7-4
Creating a Loyalty Program 7-4
Configuring a Loyalty Program 7-5
Credit Card Programs Configuration Reference 7-7
Creating a Credit Card Program 7-8
Configuring a Credit Card Program 7-9
Assigning Rules to Programs 7-9
8 Rule Configuration References
Card Rule Configuration Reference 8-1
Creating Card Rules for iCard 8-1
Creating Card Rules for Third-Party Cards 8-1
Eligibility Rule Configuration Reference 8-2
Configuring Eligibility Rules 8-2
Configuring Menu Item and Item Groups to an Eligibility Rule 8-4
Adding Time Restrictions to an Eligibility Rule 8-6
Configuring Coupon Types 8-7
Loyalty Rule Configuration Reference 8-10
Configuring How Loyalty Points are Issued 8-10
ivConfiguring Loyalty Point Awards 8-13
Configuring Redemption Rules 8-15
Setting Up Stored Value Bonuses 8-16
9 Configuration References
Configuring Point-of-Sale Touchscreen Keys 9-1
Printing Chits and Receipts 9-2
General-Purpose Print Tokens 9-3
Coupon Print Tokens 9-3
Date Print Tokens 9-4
Customer Information Print Tokens 9-5
Print Directives 9-6
Database Synchronization Jobs 9-6
Scheduling Database Synchronization 9-8
vPreface
Preface
Oracle Hospitality Gift and Loyalty is an enterprise Customer Relationship
Management (CRM) solution that supports account administration, gift payment and
loyalty card programs, and coupon administration.
Purpose
This document is intended for customers subscribed to Oracle Hospitality Gift and
Loyalty Advanced Cloud Services. Customers using Standard Cloud Services and On-
Premise deployments may not have access to all features described in the
documentation.
The navigation instructions throughout the documentation may not accurately depict
the menu layout for your Oracle Hospitality Enterprise Back Office deployment
because administrators can customize the name and organization of the groups and
links in the sidebar menu. Use the navigation instructions provided as a guideline for
locating the links in your deployment, or contact an administrator for assistance.
Audience
Oracle Hospitality Enterprise Back Office documentation applies to the following users:
• Users who perform day-to-day operations with Enterprise Back Office and who
typically do not have permissions to configure applications.
• Administrators who configure and maintain Enterprise Back Office. Administrators
can also have permissions to configure applications.
• System Administrators or Super Administrators who maintain Enterprise Back
Office servers and configuration files, implement initial application settings and
configurations, and maintain back-end processes such as automated jobs and
data interfaces with third-party applications.
Customer Support
To contact Oracle Customer Support, access My Oracle Support at the following URL:
https://support.oracle.com
When contacting Customer Support, please provide the following:
• Product version and program/module name
• Functional and technical description of the problem (include business impact)
• Detailed step-by-step instructions to re-create
• Exact error message received
• Screen shots of each step you take
viPreface
Documentation
Oracle Hospitality product documentation is available on the Oracle Help Center at
http://docs.oracle.com/en/industries/food-beverage/.
Revision History
Date Description of Change
June 2018 Initial Publication
September 2019 Updated Loyalty Program Configuration
Reference
February 2020 • Updated Configuration References
• Added Notices and Consent
vii1
Gift and Loyalty FAQ
This section introduces key Gift and Loyalty concepts and answers frequently asked
questions.
• What is Gift and Loyalty?
• What are Programs and Rules?
• What is the Workflow for Creating a Program?
What is Gift and Loyalty?
Oracle Hospitality Gift and Loyalty is an enterprise Customer Relationship
Management (CRM) solution that supports the following capabilities:
• Account Administration for issuing or pre-activating new accounts, managing
existing accounts, and reviewing customer changes.
• Gift Payment and Loyalty (GPL) card program that supports loyalty and reward
capabilities, such as with gift, payment, and loyalty accounts. These accounts are
typically associated with a stored value card or loyalty card that the customer uses
at the point of sale.
• Coupon Administration for issuing coupons to account holders.
In conjunction with third-party sales marketing and campaigning products, Gift and
Loyalty provides campaigning functionality for creating, uploading, and distributing
promotional materials.
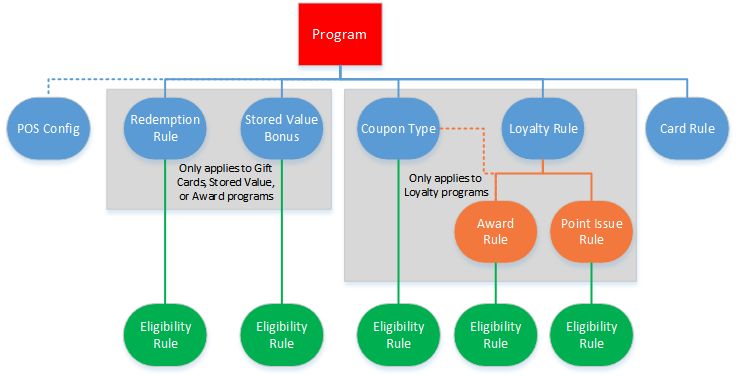
What are Programs and Rules?
Gift and Loyalty programs are a set of rules that define how a group of accounts and
cards function online and at the Point-of-Sale. Program types include gift cards, meal,
loyalty, awards (such as through stored value loyalty cards), and credit. Each program
is tracked and reported separately. The following image shows a hierarchy of rules for
a program:
1-1Chapter 1
What is the Workflow for Creating a Program?
Figure 1-1 Program Rule Hierarchy
What is the Workflow for Creating a Program?
Creating a program consists of the following workflow:
1. Create a card rule.
2. Create a program and assign a card rule to the program.
3. When applicable, add eligibility rules to the program.
4. When issuing or using Gift and Loyalty coupons as a reward, add coupon types.
5. Add loyalty rules.
6. When using Gift Cards, Stored Value, or Award programs:
a. To limit the payment days or menu items, add redemption rules.
b. To allow additional value to be added at no charge to the purchaser, add
stored value bonus rules.
7. Link the rules to the program.
8. In the Point-of-Sale application, link the tenders, service charges, discounts, or
menu items to be used by Gift and Loyalty programs.
1-22
Card Programs
Gift and Loyalty lets you create card programs using Oracle Hospitality iCards or a
third-party card. This section contains instructions for setting up basic or commonly-
used card programs.
• Setting Up Basic Gift Cards
• Setting Up Gift Cards with Additional Stored Value
• Setting Up Reloading Meal Cards
• Setting Up Spend or Lose Programs
• Setting Up House Account Credit Cards
• Setting Up Discount Cards
Setting Up Basic Gift Cards
Follow these instructions to set up a basic gift card program with stored value and
options to let customers reload their gift card. These instructions do not include loyalty
tracking or rewards.
1. Set up the gift card program. Gift or Debit Program Configuration Reference
contains more information about setting up the program.
a. Create a Gift or Debit program.
b. On the Gift or Debit/Credit/Award tab, select Do Not Allow Issue/Reload
and Redemption on Same Check.
c. Make sure to configure gift card behavior using the Allow Partial Redeem,
Allow Reload, Reserve for Auth, Allow Cash Out, and Cash Out limit
options.
2. Set up the card accounts for the gift card program:
a. Create the card rules depending on whether you are using Oracle Hospitality
Gift and Loyalty iCards or a third-party card:
• Creating Card Rules for iCard
• Creating Card Rules for Third-Party Cards
2-1Chapter 2
Setting Up Gift Cards with Additional Stored Value
b. Assign one or more card rules to the program and specify the applicable
locations.
c. Create card numbers for the program and card rule, and then have the cards
printed.
3. Configure the following touchscreen keys, and then add them to the Point-of-Sale
screens. Configuring Point-of-Sale Touchscreen Keys contains more information
about the Point-of-Sale touchscreen keys.
• Issue
• Redemption
• Reload (if allowed)
• Redemption Auth (if allowed)
• Cash Out (if allowed)
Setting Up Gift Cards with Additional Stored Value
Follow these instructions to set up a gift card that contains value additional to the
purchase cost. For example, you can offer a gift card that costs $50 but has
redeemable value of $60. In such a case, the basic gift card rules will load the card
with the $50 payment, but the additional $10 must be applied to the card as a stored
value bonus award.
1. Set up the base card that must be purchased, such as a gift card or promotional
card.
2. Set up the stored value bonus rule for the additional amount to be appended to the
purchased card.
3. Set up the gift card program. Gift or Debit Program Configuration Reference
contains more information about setting up the program.
a. Create a Gift or Debit program.
b. On the Gift or Debit/Credit/Award tab, select Do Not Allow Issue/Reload
and Redemption on Same Check.
c. Make sure to configure gift card behavior using the Allow Partial Redeem,
Allow Reload, Reserve for Auth, Allow Cash Out, and Cash Out limit
options.
2-2Chapter 2
Setting Up Reloading Meal Cards
4. Set up the card accounts for the gift card program:
a. Create the card rules depending on whether you are using Oracle Hospitality
Gift and Loyalty iCards or a third-party card:
• Creating Card Rules for iCard
• Creating Card Rules for Third-Party Cards
b. Assign one or more card rules to the program and specify the applicable
locations.
c. Create card numbers for the program and card rule, and then have the cards
printed.
5. Set up the stored value bonus for the gift card:
a. Setting Up Stored Value Bonuses
b. Assign the stored value rule to the program and specify the applicable
locations.
6. Configure the following touchscreen keys, and then add them to the Point-of-Sale
screens. Configuring Point-of-Sale Touchscreen Keys contains more information
about the Point-of-Sale touchscreen keys.
• Issue
• Redemption
• Reload (if allowed)
• Redemption Auth (if allowed)
• Cash Out (if allowed)
Setting Up Reloading Meal Cards
Follow these instructions to set up meal cards that automatically reload with a set
dollar amount on a recurring basis. These cards can be allowed to accumulate value
over time, and the account transaction history shows the reload and debit transaction.
1. Set up the gift card program. Gift or Debit Program Configuration Reference
contains more information about setting up the program.
a. Create a Gift or Debit program.
b. On the Gift or Debit/Credit/Award tab:
• Select Do Not Allow Issue/Reload and Redemption on Same Check.
• Enter the amount to be automatically reloaded into the meal card in
Period Reload Amount.
2-3Chapter 2
Setting Up Spend or Lose Programs
• Enter the amount that can carry over at the end of each time period in
Period Carry over Amount.
c. Make sure to configure gift card behavior using the Allow Partial Redeem
and Reserve for Auth options.
2. Set up the card accounts for the meal card program:
a. Create the card rules depending on whether you are using Oracle Hospitality
Gift and Loyalty iCards or a third-party card:
• Creating Card Rules for iCard
• Creating Card Rules for Third-Party Cards
b. Assign one or more card rules to the program and specify the applicable
locations.
c. Create card numbers for the program and card rule, and then have the cards
printed.
3. Configure the following touchscreen keys, and then add them to the Point-of-Sale
screens. Configuring Point-of-Sale Touchscreen Keys contains more information
about the Point-of-Sale touchscreen keys.
• Issue
• Redemption
• Redemption Auth (if allowed)
4. Configure database sync jobs for Limit and reload debit accounts. Scheduling
Database Synchronization contains instructions for configuring sync jobs.
Setting Up Spend or Lose Programs
A spend or lose program maintains customer accounts that are reset to a given stored
value amount at the end of each predefined time period. For example, you can use a
spend or lose program to maintain employee meal credits, providing up to $25 a week
for employees to use on lunches. Employees can then use up to the allotted $25 for
lunch during the week, are given a new allotment of $25 for each week, and cannot roll
over remaining credit to the next week.
When the time period rolls over:
• No transaction is posted to the Gift and Loyalty card detail when reload occurs.
The balance in Gift and Loyalty shows 0.
• After the first transaction is posted, Gift and Loyalty adjusts the current balance.
• A balance inquiry from the workstation always reflects the current balance.
1. Set up the spend or lose program. Gift or Debit Program Configuration Reference
contains more information about setting up the program.
a. Create a Gift or Debit program.
b. On the Gift or Debit/Credit/Award tab:
• Select Enable Spend or Lose.
• Enter the amount to be automatically reloaded into the card in Spend or
Lose Allowance.
2-4Chapter 2
Setting Up House Account Credit Cards
• Enter a description to be shown for the reload transaction in Spend or
Lose Description.
• Select the length of the time within which the credits must be used from
Spend or Lose Schedule.
• For weekly spend or lose allotments, select the day of week that each
week starts from Spend or Lose Start.
c. Make sure to configure card behavior using the Allow Partial Redeem and
Reserve for Auth options.
2. Set up the card accounts for the spend-or-lose card program:
a. Create the card rules depending on whether you are using Oracle Hospitality
Gift and Loyalty iCards or a third-party card:
• Creating Card Rules for iCard
• Creating Card Rules for Third-Party Cards
b. Assign one or more card rules to the program and specify the applicable
locations.
c. Create card numbers for the program and card rule, and then have the cards
printed.
3. Configure the following touchscreen keys, and then add them to the Point-of-Sale
screens. Configuring Point-of-Sale Touchscreen Keys contains more information
about the Point-of-Sale touchscreen keys.
• Issue
• Redemption
• Redemption Auth (if allowed)
Setting Up House Account Credit Cards
Follow these instructions to set up a credit card for house accounts, which can provide
an organization or group with:
• A consolidated bill for convenience with tracking and accounting for expenses.
• A credit (expense) limit.
1. Set up the credit card program. Gift or Debit Program Configuration Reference
contains more information about setting up the program.
a. Create a Credit Card program.
b. Click Gift or Debit/Credit/Award tab, enter the Default Credit Limit, and
then enter the message to be shown when the limit is reached in Credit
Denial Text. The default credit limit sets an expenditure limit before the
amount is paid.
c. Make sure to configure card behavior using the Allow Partial Redeem and
Require Customer on Redeem options.
2. Set up the card accounts for the credit card program:
a. Create the card rules depending on whether you are using Oracle Hospitality
Gift and Loyalty iCards or a third-party card:
• Creating Card Rules for iCard
2-5Chapter 2
Setting Up Discount Cards
• Creating Card Rules for Third-Party Cards
b. Assign one or more card rules to the program and specify the applicable
locations.
c. Create card numbers for the program and card rule, and then have the cards
printed.
3. Configure the following touchscreen keys, and then add them to the Point-of-Sale
screens. Configuring Point-of-Sale Touchscreen Keys contains more information
about the Point-of-Sale touchscreen keys.
• Redemption
• Redemption Auth (if allowed)
Setting Up Discount Cards
Follow these instructions to set up discount cards, such as membership discount cards
for restaurants, or to apply employee discounts.
1. Create a card rule. Card Rule Configuration Reference contains information and
instructions for setting up the set of cards.
2. Create an eligibility rule to require at least one purchase. Eligibility Rule
Configuration Reference contains more information about eligibility rules.
a. Create a Use with Loyalty Rule eligibility rule.
b. Select the Num Items in Transaction item rule type, and then enter 1 as the
Item Quantity.
c. If the discount should be based on items instead of the check subtotal, click
Save, select the eligibility rule, click Edit Item Rules, and then configure the
list of eligible items.
3. Configure the discount. Loyalty Rule Configuration Reference contains more
information about loyalty rules.
a. Create a Points Awards Rule loyalty rule.
b. Select the Eligibility Rule you created.
c. On the Awards tab, select Points Balance Total from Balance Use Type.
d. Enter 0 in Point Threshold.
e. Select Issue Immediate Discount from Award Type.
f. Configure the discount by selecting the Award Discount Type, and then
entering the Discount & Award Amount or Discount Percentage based on
the selected type.
g. Enter 0 in Point Cost.
h. If you want the receipt to print with a message about the discount, enter the
message in POS Print Text.
i. Select Require Customer Info to require that the customer have an account
before they can begin using the discounts.
4. Set up the loyalty program. Loyalty Programs Configuration Reference contains
more information about loyalty programs.
a. Create a Loyalty program.
2-6Chapter 2
Setting Up Discount Cards
b. On the Loyalty Programs tab, select Auto Create Loyalty Accounts to allow
Gift and Loyalty to create a loyalty account for a customer being issued points
for the first time. Do not select the option if you want to require customers
create an account prior to the transaction.
5. Set up the card accounts for the discount card program:
a. Create the card rules depending on whether you are using Oracle Hospitality
Gift and Loyalty iCards or a third-party card:
• Creating Card Rules for iCard
• Creating Card Rules for Third-Party Cards
b. Assign one or more card rules to the program and specify the applicable
locations.
c. Create card numbers for the program and card rule, and then have the cards
printed.
6. Configure the Issue Points Point-of-Sale touchscreen keys. For this program, the
key requires a tender and a discount. Configuring Point-of-Sale Touchscreen Keys
contains more information about the Point-of-Sale touchscreen keys.
2-73
Loyalty Programs
This section contains instructions for setting up basic or commonly-used loyalty
programs.
• Setting Up Points Per Amount Spent Loyalty Programs
• Setting Up Points Per Visit Loyalty Programs
• Setting Up Round Robin (Unique Purchases) Loyalty Programs
Setting Up Points Per Amount Spent Loyalty Programs
Follow these instructions to set up a loyalty program that accumulates a loyalty points
based on the subtotal of a check.
1. Set up the loyalty program. Loyalty Programs Configuration Reference contains
more information about setting up the program.
a. Create a Loyalty program.
b. On the Loyalty Programs tab, select Auto Create Loyalty Accounts to allow
Gift and Loyalty to create a loyalty account for a customer being issued points
for the first time. Do not select the option if you want to require customers
create an account prior to the transaction.
2. Set up the card accounts for the loyalty program:
a. Create the card rules depending on whether you are using Oracle Hospitality
Gift and Loyalty iCards or a third-party card:
• Creating Card Rules for iCard
• Creating Card Rules for Third-Party Cards
b. Assign one or more card rules to the program and specify the applicable
locations.
c. Create card numbers for the program and card rule, and then have the cards
printed.
3. Create an eligibility rule to require at least one purchase. You can also require the
transaction to include purchases of specific items to be eligible for points. Eligibility
Rule Configuration Reference contains more information about eligibility rules.
a. Create a Use with Loyalty Rule eligibility rule.
b. Select the Num Items in Transaction item rule type, and then enter 1 as the
Item Quantity.
c. To require that the transaction include specific sales itemizers, click the Sales
Itemizers tab, and then select the required itemizers.
d. To require that the transaction include specific items, click Save, select the
eligibility rule, click Edit Item Rules, and then configure the list of eligible
items.
3-1Chapter 3
Setting Up Points Per Visit Loyalty Programs
4. Create and assign a loyalty rule to the program. Loyalty Rule Configuration
Reference contains more information about loyalty rules.
a. Create a Points Issue Rule loyalty rule, and then select the Eligibility Rule
you created.
b. Click the Points tab.
c. In the Point Calc Method Type drop-down list:
• To issue points for each dollar spent, select Per check value, and then
enter the number of points per dollar in Point Factor.
• To issue points for each dollar spent on selected items, select Value of
selected items, and then enter the number of points per dollar in Point
Factor.
• To issue points for each dollar spent in the entire transaction if one or
more selected items is purchased, select Per check value if any
selected, and then enter the number of points per dollar in Point Factor.
• To issue a point by incremental amount on the check, select Per defined
check value, and then enter the dollars per point in Per Defined Value.
5. Configure the Point Issue touchscreen key, and then add it to the Point-of-Sale
screens. Configuring Point-of-Sale Touchscreen Keys contains more information
about the Point-of-Sale touchscreen keys.
6. If the loyalty program is for specific items, configure the following database sync
jobs. Scheduling Database Synchronization contains instructions for configuring
sync jobs.
• Sync Menu Items
• Sync Menu Item Masters
• Sync Family Groups
• Sync Family Group Masters
• Sync Major Groups
• Sync Major Group Masters
Setting Up Points Per Visit Loyalty Programs
Follow these instructions to set up a loyalty program that accumulates a loyalty points
based on visits or transactions.
1. Set up the loyalty program. Loyalty Programs Configuration Reference contains
more information about setting up the program.
a. Create a Loyalty program.
b. On the Loyalty Programs tab, select Auto Create Loyalty Accounts to allow
Gift and Loyalty to create a loyalty account for a customer being issued points
for the first time. Do not select the option if you want to require customers to
create an account prior to the transaction.
2. Set up the card accounts for the loyalty program:
a. Create the card rules depending on whether you are using Oracle Hospitality
Gift and Loyalty iCards or a third-party card:
• Creating Card Rules for iCard
3-2Chapter 3
Setting Up Round Robin (Unique Purchases) Loyalty Programs
• Creating Card Rules for Third-Party Cards
b. Assign one or more card rules to the program and specify the applicable
locations.
c. Create card numbers for the program and card rule, and then have the cards
printed.
3. Create an eligibility rule to require at least one purchase. You can also require the
transaction to include purchases of specific items to be eligible for points. Eligibility
Rule Configuration Reference contains more information about eligibility rules.
a. Create a Use with Loyalty Rule eligibility rule.
b. Select the Num Items in Transaction item rule type, and then enter 1 as the
Item Quantity.
c. To set a minimum requirement for the transaction to count as a visit, enter a
Check Min Value. For example, enter 1 to require a transaction to be worth at
least a dollar, and to prevent customers from accruing points by purchasing
a $0.75 candy bar.
4. Create and assign a loyalty rule to the program. Loyalty Rule Configuration
Reference contains more information about loyalty rules.
a. Create a Points Issue Rule loyalty rule, and then select the Eligibility Rule
you created.
b. Click the Points tab.
c. In the Point Calc Method Type drop-down list, select Per visit, and then
enter the number of points per visit in Point Factor.
5. Configure the Point Issue touchscreen key, and then add it to the Point-of-Sale
screens. Configuring Point-of-Sale Touchscreen Keys contains more information
about the Point-of-Sale touchscreen keys.
Setting Up Round Robin (Unique Purchases) Loyalty
Programs
A round robin loyalty program awards customers with loyalty points for purchasing
items for the first time, or for the first time within a limited timeframe.
For example, a bar might have a menu with 100 types of craft beers, and offers a
challenge for customers to drink every beer on the menu. The bar can set up a round
robin loyalty program that awards a point whenever a customer purchases a beer for
the first time. The loyalty program can then be set up with the following tiered loyalty
awards:
• 10 points: free entrée.
• 25 points: $10 gift card.
• 50 points: $20 gift card, free meal of up to $25.
• 75 points: $30 gift card.
• 100 points: $50 gift card, placard with name and date of achievement on store
wall.
This program requires Oracle Hospitality Simphony or Oracle Hospitality RES 3700
with SVC 4.1.0.326 or later.
3-3Chapter 3
Setting Up Round Robin (Unique Purchases) Loyalty Programs
1. Create an eligibility rule for the round robin loyalty items. Eligibility Rule
Configuration Reference contains more information about eligibility rules.
a. Create a Use with Loyalty Rule eligibility rule.
b. Select the Num Items in Transaction item rule type, and then enter 1 as the
Item Quantity.
c. Select Item must be unique.
d. In the Unique Item Expiration Method drop-down list, select whether
customers can earn points for purchasing an item again. For example, you can
configure the program to reset points after two years, or you can configure the
program to accept purchases again after one year. You can define the time
interval using Period Type and Number of Periods
• Never Expire: the program does not allow items to count for another point
for the lifetime of the account.
• Expire items after x periods: the program allows an item purchase to
earn a point after a defined amount of time has elapsed since its purchase
date.
• Expire items after x rolling periods: the program allows an item
purchase to earn a point after a defined number of time periods has
elapsed since the period in which the item was purchased.
• Reset all items after x periods: the program allows all item purchases to
earn a point after a defined amount of time has elapsed since the first item
was purchased.
• Reset all items after x rolling periods: the program allows all item
purchases to earn a point after a defined amount of time periods has
elapsed since the period in which the first item was purchased.
e. Enter the maximum number of unique items in Max Saved Unique Items per
Account. If this configuration is not set or is set to a significantly greater value
than necessary, workstations can experience performance degradation when
processing transactions.
f. Click Save, select the eligibility rule, click Edit Item Rules, and then configure
the list of items that count toward this program.
The round robin program uses Reporting and Analytics End-of-Day posting,
item alignment, and Gift and Loyalty sync jobs to align and update items. It
can take up to a full calendar day for Gift and Loyalty to show new menu
items.
g. Click Edit Time Rules to configure a time restriction on the program. For
example, you can configure the program to run for two years, or you can omit
Happy Hour times.
2. Create a loyalty rule for the program. Loyalty Rule Configuration Reference
contains more information about loyalty rules.
a. Create a Points Issue Rule loyalty rule, and then select the Eligibility Rule
you created.
b. Click the Points tab.
c. Select Number of unique selected items from the Point Calc Method Type
drop-down list, and then enter the number of points to award for each item in
Point Factor.
3-4Chapter 3
Setting Up Round Robin (Unique Purchases) Loyalty Programs
3. Configure a loyalty award rule. You can use tiered loyalty awards.
4. Set up the loyalty program. Loyalty Programs Configuration Reference contains
more information about setting up the program.
a. Create a Loyalty program.
b. On the Loyalty Programs tab, select Auto Create Loyalty Accounts to allow
Gift and Loyalty to create a loyalty account for a customer being issued points
for the first time. Do not select the option if you want to require customers
create an account prior to the transaction.
c. Select the Default Award Program from the drop-down list.
5. Set up the card accounts for the loyalty program:
a. Create the card rules depending on whether you are using Oracle Hospitality
Gift and Loyalty iCards or a third-party card:
• Creating Card Rules for iCard
• Creating Card Rules for Third-Party Cards
b. Assign one or more card rules to the program and specify the applicable
locations.
c. Create card numbers for the program and card rule, and then have the cards
printed.
6. Configure the Point Issue and Unique Item Inquiry touchscreen keys, and then
add them to the Point-of-Sale screens. Configuring Point-of-Sale Touchscreen
Keys contains more information about the Point-of-Sale touchscreen keys.
7. If the loyalty program is for specific items, configure the following database sync
jobs. Scheduling Database Synchronization contains instructions for configuring
sync jobs.
• Sync Menu Items
• Sync Menu Item Masters
• Sync Family Groups
• Sync Family Group Masters
• Sync Major Groups
• Sync Major Group Masters
• Unique Items Sync
3-54
Loyalty Awards and Award Programs
This section contains instructions for setting up basic or commonly-used loyalty
awards and award programs.
• Setting Up Tiered Loyalty Awards
• Setting Up Birthday Discounts
• Setting Up a Registration Bonus
• Setting Up Bonus Cards for Gift Card Purchases
Setting Up Tiered Loyalty Awards
Follow these instructions to set up a loyalty awards program that allows customers to
earn awards at multiple point thresholds without resetting their accrued point total. For
example, you can set up a program that awards a $5 discount at 50 points, a $10
discount at 100 points and a free entrée at 200 points. You can configure the awards
program to reset the points total after reaching a certain threshold.
1. Follow these instructions to create a loyalty point award, starting with the lowest
tier:
a. Create a Points Awards Rule loyalty rule.
b. Select the Eligibility Rule to apply an eligibility rule.
c. Select Print Points Until Awards to print the amount of points a customer
must accrue to reach this award on the receipt.
d. Select a Precedence. For example, select 95. When configuring a subsequent
tier, make sure the selected precedence is lower. For example, select 94 for
the next tier, 93 after that, and so on.
e. On the Awards tab, select Points Balance Total from Balance Use Type.
f. Enter the number of points required for this award in Point Threshold. For
example, enter 50.
g. Configure the award. Do not enter a Point Cost.
h. Select Cross Point Threshold to indicate that this award belongs to a tiered
award program.
2. To configure a threshold at which the customer points total resets:
a. Create a Points Awards Rule loyalty rule.
b. Do not select an Eligibility Rule.
c. Do not select Print Points Until Awards.
d. Select a Precedence. Set this award rule as the lowest precedence for this
program.
e. On the Awards tab, select Points Balance Total from Balance Use Type.
4-1Chapter 4
Setting Up Birthday Discounts
f. Enter the number of points at which the point total resets in Point Threshold.
This should typically be the same number as the highest award tier.
g. Enter the same number of points in Point Cost. This value is deducted from
the customer point balance.
3. Assign the loyalty rule to a program.
Setting Up Birthday Discounts
Follow the instructions to set up a discount when a customer visits at or around their
birthday.
1. Create an eligibility rule to require at least one purchase, and then assign a
birthday time rule.
a. Create a Use with Loyalty Rule eligibility rule.
b. Select the Num Items in Transaction item rule type, and then enter 1 as the
Item Quantity.
c. Click Save, select the eligibility rule, click Edit Time Rules, and then click
Add.
d. Select Birthday Anniversary Rule from Type.
e. To configure the amount of time before and after the birthday that the discount
is available, select the Period Range Type and enter the duration in Periods
Before or After.
2. Configure the discount:
a. Create a Points Awards Rule loyalty rule.
b. Select a Precedence and make sure this discount has the highest precedence
of all point award rules.
c. Select the Eligibility Rule you created.
d. On the Awards tab, select Points Balance Total from Balance Use Type.
e. Enter 0 in Point Threshold.
f. Select Issue Immediate Discount from Award Type.
g. Configure the discount by selecting the Award Discount Type, and then
entering the Discount & Award Amount or Discount Percentage based on
the selected type.
h. Enter 0 in Point Cost.
i. If you want the receipt to print with a message about the discount, enter the
message in POS Print Text.
j. Select Require Customer Info to require that the customer have an account
before they can begin using the discounts.
k. Select Once Per Year.
Setting Up a Registration Bonus
Follow the instructions to set up a bonus or gift when a customer registers for the
program. This award requires the overnight sync jobs to work for Gift and Loyalty
before the bonus is issued.
4-2Chapter 4
Setting Up Bonus Cards for Gift Card Purchases
1. Create a Points Awards Rule loyalty rule.
2. On the Awards tab, select New Customer Info Provided from Balance Use
Type.
3. Configure the award by selecting the Award Type, selecting the Award Discount
Type for discounts, and then entering the Discount & Award Amount or
Discount Percentage based on the award selections.
4. Select Once Per Life Time.
Setting Up Bonus Cards for Gift Card Purchases
Follow these instructions to give the customer a bonus card after purchasing gift cards
totaling a given amount. For example, a location can offer the deal “buy 100$ in gift
cards and we’ll give you a $20 gift card.”
Create the bonus card rule:
1. In Reporting and Analytics, click the link to go to the Stored Value Bonus Rules
page in the iCare Gift, Payment, and Loyalty Configuration portlet, and then
click Add. If you cannot find the link, contact your system administrator.
2. Enter an identifying Name for the bonus card rule, and optionally enter a
Description for comments or notes regarding the rule.
3. Enter the minimum gift card amount that a customer must purchase to qualify for
the bonus card in Bonus Threshold.
4. Configure the bonus type and amount:
a. To configure a percentage-based bonus, select Percentage from the Bonus
Type drop-down list, and then enter the percentage of the loaded amount to
award in Bonus Percentage.
b. To configure a fixed value bonus, select Fixed Amount from the Bonus Type
drop-down list, and then enter the amount in Bonus Amount.
c. To configure an incremental bonus, select Stepped Amount from the Bonus
Type drop-down list, enter the amount awarded at the threshold and at each
increment in Bonus Amount, and then enter each increment after the
threshold in Bonus Step Amount. For example, you can configure the
threshold as $100, the step amount as 30$, and the bonus amount as $5.
When a customer purchases $150 worth of gift cards, this program awards $5
for the passing the $100 threshold and another 5$ for passing the first
increment at $130, for a total of $10 bonus.
5. To implement “not valid with any other offer,” select Do Not Allow Other Bonus.
6. Select Issue Bonus to Separate Card.
7. Select the priority for the rule in Precedence. If more than one stored value bonus
rule would apply to a transaction, Gift and Loyalty uses the rule with the highest
precedence value.
8. Select an Eligibility Rule that has been configured with the Use with Stored
Value Bonus Rule type. You do not need to select an eligibility rule.
9. To configure a limited duration for this offer, select a start and end date in the
Effective From and Effective To fields.
4-3Chapter 4
Setting Up Bonus Cards for Gift Card Purchases
10. Click Save.
Assign the bonus card rule to the program:
11. From the Reporting and Analytics side menu, click the link to go to the Programs
page in the iCare Gift, Payment, and Loyalty Configuration portlet, select the
program you want to configure, and then click Edit SV Bonus Rules. If you
cannot find the link, contact your system administrator.
12. Select the bonus card rule, and then click Edit.
13. Select No Locations, All Locations, or the specific locations for which the stored
value bonus rule and program apply.
14. Click Save.
4-45
Customer Account Administration
Corporate staff, such as guest relations, administration, or marketing, can use the
Account Administration portlet to issue, modify, or close customer accounts. System
administrators can configure access to the account administration functionality by role.
• Account Administration Permissions
• Card and Account Numbers
• Issuing an Fully-Functional and Active Account to a Customer
• Creating a Batch of Empty Accounts
• Creating Inactive Accounts for One or More Customers
• Managing Customer Accounts
• Managing Customer Transactions
• Managing the Customer Registration Form
• Notices and Consent
Account Administration Permissions
The Gift and Loyalty account administration portlet contains the following permissions.
The Enterprise Back Office Reporting and Analytics User Guide contains more
information about portlet permissions and user roles.
To let employees do the following Enable this permission
Add or modify customer data associated with an account. Add/Edit Account Info
Reopen a closed customer account. Reopen Account
Close an active customer account. Close Account
Reverse transactions through Gift and Loyalty account Reverse Transactions
administration.
Post transactions and balance adjustments through Gift and Post Transactions
Loyalty account administration.
Issue fully-functional and active accounts to customers. Issue New Accounts
Create a batch of fully-functional and active but unassigned Bulk Issue New Accounts
accounts.
Issue inactive accounts to customers. Pre-activate Accounts
Create one or more card numbers for printing and for customer Create Account Numbers
accounts.
Transfer a customer account data to a new card number. Transfer Accounts
Review changes made by a customer in myicard.net. Review Customer Changes
Reset the PIN for customer accounts. Reset Pin
Issue a request for a card replacement for a customer. Replace Cards
5-1Chapter 5
Card and Account Numbers
To let employees do the following Enable this permission
Flag an account. Set Red Flag
Use custom transactions. Allow Custom Transactions x
Create or set an account as being for testing purposes. Set Test Account
Reset the email undeliverable flag. Reset Email Delivery Flag
Change the program level of a customer account. Change Account Tier
Card and Account Numbers
After creating a card program and card rule, generate and reserve card numbers to be
printed for a specific program and rule. Gift and Loyalty uses card numbers as the
account numbers.
This process does not forego the need to issue the cards before they are active, and
you must avoid duplicate card numbers. Review existing numbers to make sure you
are entering an unused range of card numbers.
• Reviewing Existing Card Numbers
• Creating Card Numbers
Reviewing Existing Card Numbers
1. In Reporting and Analytics, click View Created Card Numbers in the iCare
Account Administration portlet. If you cannot find the link, contact your system
administrator.
2. Use the columns to find the set of numbers, and then click View.
3. Scroll to the end of the list of numbers and make note of the last card number. You
must enter a higher number when creating your next batch of cards.
Creating Card Numbers
1. In Reporting and Analytics, click Create Card Numbers in the iCare Account
Administration portlet. If you cannot find the link, contact your system
administrator.
2. Select the Program.
3. If the program uses more than one type of card, select the Card Rule for this set
of numbers.
4. If the field is not automatically populated, enter the first number to assign, enter
the number of increments to create in Number of Accounts, and then click
Create.
5. You can now print cards with these numbers, and then issue customer accounts
using these numbers.
5-2Chapter 5
Issuing an Fully-Functional and Active Account to a Customer
Issuing an Fully-Functional and Active Account to a
Customer
Follow these instructions to issue a fully functional and active card and account to a
customer.
1. In Reporting and Analytics, click Issue New Account(s) in the iCare Account
Administration portlet. If you cannot find the link, contact your system
administrator.
2. Select the program and card type for the account. If only one card rule is assigned
to the program, Gift and Loyalty auto-populates this field.
3. For gift cards, enter the monetary value to be issued in Denomination. The
amount entered in this field is immediately available to the customer for
redemption after issuing the account without further interaction at a workstation.
4. Enter the number on the card being issued in Account Number. Gift and Loyalty
validates this entry against the record of created card numbers.
5. Select the location or organization level from Location. This setting affects the
region-based rules and configurations that apply to the customer account and
card.
6. Enter an identifying Description, and then click Next.
7. Fill out the customer information form as necessary, and then click Issue.
Creating a Batch of Empty Accounts
In some cases, such as when you want to create a batch of reusable gift cards that are
pre-loaded with 50$ but do not require customer registration, you can create a batch of
accounts and cards that are fully functional and active.
1. In Reporting and Analytics, click Bulk Issue New Account(s) in the iCare
Account Administration portlet. If you cannot find the link, contact your system
administrator.
2. Select the program and card type for the accounts. If only one card rule is
assigned to the program, Gift and Loyalty auto-populates this field.
3. For gift cards, enter the dollar amount to be issued in Denomination. The amount
entered in this field is immediately available to the customer for redemption after
issuing the account without further interaction at a workstation.
4. Enter the first card number for the batch in First Account Number, and then enter
the Number of Accounts to be created. Make sure you created enough card
numbers to support the whole batch of accounts.
5. Select the location or organization level from Location. This setting affects the
region-based rules and configurations that apply to the customer accounts and
cards.
6. Enter an identifying Description, and then click Issue.
5-3Chapter 5
Creating Inactive Accounts for One or More Customers
Creating Inactive Accounts for One or More Customers
Follow these instructions to issue an inactive card and account to a customer. These
cards can be loaded with a dollar amount, but cannot be redeemed by the customer
until they register and pay at a workstation.
Note:
Oracle Hospitality recommends that system administrators remove this
configuration from the iCare Account Administration portlet if the
functionality is not needed by the organization or location.
1. In Reporting and Analytics, click Pre-Activate New Accounts in the iCare
Account Administration portlet. If you cannot find the link, contact your system
administrator.
2. Select the program and card type for the account. If only one card rule is assigned
to the program, Gift and Loyalty auto-populates this field.
3. For gift cards, enter the dollar amount to be issued in Denomination. The amount
entered in this field is immediately available to the customer for redemption after
issuing the account without further interaction at a workstation.
4. Enter the number on the card being issued in First Account Number.
If you are creating a batch of inactive accounts, enter the Number of Accounts to
be created. Gift and Loyalty validates this entry against the record of created card
numbers. Make sure you created enough card numbers to support the whole
batch of accounts.
5. Select the location or organization level from Location. This setting affects the
region-based rules and configurations that apply to the customer account and
card.
6. Enter an identifying Description, and then click Issue.
Managing Customer Accounts
You can manage customer accounts using the following tasks:
If you want to... Then do the following...
Navigate to the customer’s 1. In Reporting and Analytics, click Manage Existing
information hub. Accounts in the iCare Account Administration portlet. If
you cannot find the link, contact your system
administrator.
2. Enter the account number of the customer you want to
view or modify, and then click Manage.
If you do not know the account number, click Find
Account Number, use the search filters to find the
customer, and then click Manage.
5-4Chapter 5
Managing Customer Accounts
If you want to... Then do the following...
Make changes to the 1. In the customer’s information hub, click Edit Account
customer profile. Information.
2. Make changes to the customer profile, and then click
Save.
Make changes to the You cannot add customer social media information without
customer’s social media receiving explicit permission.
information.
1. In the customer’s information hub, click Edit SM
Accounts.
2. Make changes to the customer’s social media account
links, and then click Save.
Add or view manager notes 1. In the customer’s information hub, click View Customer
about the customer. Notes.
2. To add notes, click Add, select a preconfigured category
for the note, and enter the note, and then click Save.
Transfer an account. Account transfers let customers maintain their data across
different cards, such as when they lose their card or replace it
for any reason.
1. In the customer’s information hub, click the account
number.
2. Enter the new account (card) number, enter a reason in
the Description, and then click Transfer Account.
Issue a request to replace the 1. In the customer’s information hub, click Replace Card.
customer’s card.
2. Verify that a request for a replacement is not already
pending, and then click Replace Card.
3. After receiving the new card, the customer should have
their account transferred to the new card number.
Change the customer’s loyalty 1. In the customer’s information hub, click the program level
program level. name in the Program Level column.
2. Select the new program level, select the location, and
then click Change Program Level.
Close or reopen the 1. In the customer’s information hub, click the status in the
customer’s account. Status column.
2. Select the location, enter a description for the status
change, and then click the button. Gift and Loyalty
automatically changes this button depending on the
current status of the account.
Review changes to the 1. In Reporting and Analytics, click Review Customer
customer profile by the Changes in the iCare Account Administration portlet. If
customer in myicard.net. you cannot find the link, contact your system
administrator.
2. Select the customer that made changes, and then click
Review.
3. Review the changes, and then click Approve or Discard.
5-5Chapter 5
Managing Customer Transactions
If you want to... Then do the following...
Unlock account 1. In Reporting and Analytics, find the customer’s account.
2. In the customer’s information hub, click Unlock Account.
Managing Customer Transactions
You can manage customer transaction and balance using the following tasks:
If you want to... Then do the following...
View the customer’s remaining 1. In the customer’s information hub, click the program
balance for a program. name.
View the list of transactions by 1. In the customer’s information hub, click the number in the
the customer for a program, Balance column. This shows a list of transactions by the
and drill down to view customer for the program.
transaction details.
2. To view transaction details, click the Description of the
transaction.
Reverse a transaction. 1. In the customer’s information hub, click the number in the
Balance column. This shows a list of transactions by the
customer for the program.
2. Select the transaction that you want to reverse, and then
click Reverse Transaction. Make sure not to click the
Description of the transaction, because the link drills
down into the transaction details and does not let you
reverse the transaction.
3. Select the reason for reversing the transaction, enter a
description for the operation, enter the employee
responsible for reversing the transaction, and then click
Reverse Transaction.
5-6Chapter 5
Managing the Customer Registration Form
If you want to... Then do the following...
Post an transaction or You can use this operation to post credits or debits to
adjustment to the customer’s customer accounts, or to post corrections.
account.
1. In the customer’s information hub, click the number in the
Balance column. This shows a list of transactions by the
customer for the program.
2. Click Post Transaction.
3. Select the location and business date to attribute to the
transaction or adjustment.
4. Select whether to post credit or debit in Transaction
Type, and then select the Transaction Category to which
the adjustments are reported on the program activity
report.
5. Enter the transaction or adjustment amount in currency or
points, and then enter a description.
6. You can specify the revenue center, check, or employee
for the transaction or adjustment.
7. If the transaction or adjustment qualifies for a coupon
award, select Issue Coupon.
8. Click Post Transaction.
Managing the Customer Registration Form
Customers can enter and configure their personal data:
• by logging into myicard.net.
• through an employee accessing the Gift and Loyalty portlet.
• a third-party web application using the Gift and Loyalty API.
Perform the following to configure custom fields for personal data and to configure the
look and feel of the portal or myicard.net forms.
1. To configure fields to the customer registration form in the Gift and Loyalty portlet
or API, in Reporting and Analytics, click Customer Attributes in the iCare Gift,
Payment, and Loyalty Configuration portlet. If you cannot find the link, contact
your system administrator.
2. To add or modify custom fields:
a. Click Add, or select an existing field and click Edit.
b. Fill out the form to configure the field. In the Data Type field, select:
• Date: formatted date.
• Decimal: numeric entry with a decimal place.
• Enumeration: a configurable list of enumerated values.
• Numeric: numeric entry without a decimal place.
• Text: text field that accepts any character type.
• True/False: checkbox.
5-7Chapter 5
Notices and Consent
c. Click Save.
3. To configure the list of values of an Enumeration field:
a. Select the enumerated value field, and then click Edit Enumerated Values.
b. Click Add, or select an existing enumerated value and click Edit.
c. Enter the value, and then click Save.
4. To configure the visibility and layout of the registration form:
a. In Reporting and Analytics, click Customer Fields Display in the iCare Gift,
Payment, and Loyalty Configuration portlet. If you cannot find the link,
contact your system administrator.
b. For each field, select the column and row for the field in Position, and select
whether the field is optional or required in Type.
To hide a field, select the blank line in the Position drop-down list.
You cannot select the same column and row more than once.
c. Click Save.
Notices and Consent
If using Reporting and Analytics 20.1 and higher, you can configure notices and
consent.
As an administrator, you can enable or disable consent statements to appear in the
Gift and Loyalty profiles for guests. If enabled, you can add one or all of these consent
options:
• Transaction processing consent
• Segmentation consent
• Marketing consent
• Configure Guest Consent
Configure Guest Consent
1. In 20.1 and higher, navigate to the Gift and Loyalty portlet.
2. Click iCare, click iCare GPL, click Guest Consent Configuration, and then click
Enabled.
3. Select the consent options you want to enable and enter the consent statement
that will appear for the guest. For example, I consent to have my
transaction data used by this company.
4. Click Enable Privacy Documentation to share your organization's privacy
documentation.
5. If you enable marketing consent, then at least one contact rule must appear on the
customer registration form:
a. Click iCare, click iCare GPL, and then click Customer Fields Display.
5-8You can also read