Shipping Guide - September 19, 2018 - Oracle Help Center
←
→
Page content transcription
If your browser does not render page correctly, please read the page content below
Shipping Guide

September 19, 2018   2018.2
Copyright © 2005, 2018, Oracle and/or its affiliates. All rights reserved.

This software and related documentation are provided under a license agreement containing
restrictions on use and disclosure and are protected by intellectual property laws. Except as expressly
permitted in your license agreement or allowed by law, you may not use, copy, reproduce, translate,
broadcast, modify, license, transmit, distribute, exhibit, perform, publish, or display any part, in any
form, or by any means. Reverse engineering, disassembly, or decompilation of this software, unless
required by law for interoperability, is prohibited.

The information contained herein is subject to change without notice and is not warranted to be error-
free. If you find any errors, please report them to us in writing.

If this is software or related documentation that is delivered to the U.S. Government or anyone
licensing it on behalf of the U.S. Government, then the following notice is applicable:

U.S. GOVERNMENT END USERS: Oracle programs, including any operating system, integrated software,
any programs installed on the hardware, and/or documentation, delivered to U.S. Government end
users are "commercial computer software" pursuant to the applicable Federal Acquisition Regulation
and agency-specific supplemental regulations. As such, use, duplication, disclosure, modification,
and adaptation of the programs, including any operating system, integrated software, any programs
installed on the hardware, and/or documentation, shall be subject to license terms and license
restrictions applicable to the programs. No other rights are granted to the U.S. Government.

This software or hardware is developed for general use in a variety of information management
applications. It is not developed or intended for use in any inherently dangerous applications, including
applications that may create a risk of personal injury. If you use this software or hardware in dangerous
applications, then you shall be responsible to take all appropriate fail-safe, backup, redundancy, and
other measures to ensure its safe use. Oracle Corporation and its affiliates disclaim any liability for any
damages caused by use of this software or hardware in dangerous applications.

Oracle and Java are registered trademarks of Oracle and/or its affiliates. Other names may be
trademarks of their respective owners.

Intel and Intel Xeon are trademarks or registered trademarks of Intel Corporation. All SPARC
trademarks are used under license and are trademarks or registered trademarks of SPARC
International, Inc. AMD, Opteron, the AMD logo, and the AMD Opteron logo are trademarks or
registered trademarks of Advanced Micro Devices. UNIX is a registered trademark of The Open Group.

This software or hardware and documentation may provide access to or information about content,
products, and services from third parties. Oracle Corporation and its affiliates are not responsible
for and expressly disclaim all warranties of any kind with respect to third-party content, products,
and services unless otherwise set forth in an applicable agreement between you and Oracle. Oracle
Corporation and its affiliates will not be responsible for any loss, costs, or damages incurred due to
your access to or use of third-party content, products, or services, except as set forth in an applicable
agreement between you and Oracle.

If this document is in public or private pre-General Availability status:

This documentation is in pre-General Availability status and is intended for demonstration and
preliminary use only. It may not be specific to the hardware on which you are using the software.
Oracle Corporation and its affiliates are not responsible for and expressly disclaim all warranties of any
kind with respect to this documentation and will not be responsible for any loss, costs, or damages
incurred due to the use of this documentation.

If this document is in private pre-General Availability status:

The information contained in this document is for informational sharing purposes only and should be
considered in your capacity as a customer advisory board member or pursuant to your pre-General
Availability trial agreement only. It is not a commitment to deliver any material, code, or functionality,
and should not be relied upon in making purchasing decisions. The development, release, and timing
of any features or functionality described in this document remains at the sole discretion of Oracle.

This document in any form, software or printed matter, contains proprietary information that is the
exclusive property of Oracle. Your access to and use of this confidential material is subject to the terms
and conditions of your Oracle Master Agreement, Oracle License and Services Agreement, Oracle
PartnerNetwork Agreement, Oracle distribution agreement, or other license agreement which has
been executed by you and Oracle and with which you agree to comply. This document and information
contained herein may not be disclosed, copied, reproduced, or distributed to anyone outside Oracle
without prior written consent of Oracle. This document is not part of your license agreement nor can it
be incorporated into any contractual agreement with Oracle or its subsidiaries or affiliates.

For information about Oracle's commitment to accessibility, visit the Oracle Accessibility Program
website at http://www.oracle.com/pls/topic/lookup?ctx=acc&id=docacc

Oracle customers that have purchased support have access to electronic support through My Oracle
Support. For information, visit http://www.oracle.com/pls/topic/lookup?ctx=acc&id=info or visit http://
www.oracle.com/pls/topic/lookup?ctx=acc&id=trs if you are hearing impaired.

Sample Code

Oracle may provide sample code in SuiteAnswers, the Help Center, User Guides, or elsewhere through
help links. All such sample code is provided "as is” and “as available”, for use only with an authorized
NetSuite Service account, and is made available as a SuiteCloud Technology subject to the SuiteCloud
Terms of Service at www.netsuite.com/tos.

Oracle may modify or remove sample code at any time without notice.

No Excessive Use of the Service

As the Service is a multi-tenant service offering on shared databases, Customer may not use the
Service in excess of limits or thresholds that Oracle considers commercially reasonable for the Service.
If Oracle reasonably concludes that a Customer’s use is excessive and/or will cause immediate or
ongoing performance issues for one or more of Oracle’s other customers, Oracle may slow down or
throttle Customer’s excess use until such time that Customer’s use stays within reasonable limits. If
Customer’s particular usage pattern requires a higher limit or threshold, then the Customer should
procure a subscription to the Service that accommodates a higher limit and/or threshold that more
effectively aligns with the Customer’s actual usage pattern.

Beta Features

Oracle may make available to Customer certain features that are labeled “beta” that are not yet
generally available. To use such features, Customer acknowledges and agrees that such beta features
are subject to the terms and conditions accepted by Customer upon activation of the feature, or in the
absence of such terms, subject to the limitations for the feature described in the User Guide and as
follows: The beta feature is a prototype or beta version only and is not error or bug free and Customer
agrees that it will use the beta feature carefully and will not use it in any way which might result in
any loss, corruption or unauthorized access of or to its or any third party’s property or information.
Customer must promptly report to Oracle any defects, errors or other problems in beta features
to support@netsuite.com or other designated contact for the specific beta feature. Oracle cannot
guarantee the continued availability of such beta features and may substantially modify or cease
providing such beta features without entitling Customer to any refund, credit, or other compensation.
Oracle makes no representations or warranties regarding functionality or use of beta features and
Oracle shall have no liability for any lost data, incomplete data, re-run time, inaccurate input, work
delay, lost profits or adverse effect on the performance of the Service resulting from the use of beta
features. Oracle’s standard service levels, warranties and related commitments regarding the Service
shall not apply to beta features and they may not be fully supported by Oracle’s customer support.
These limitations and exclusions shall apply until the date that Oracle at its sole option makes a beta
feature generally available to its customers and partners as part of the Service without a “beta” label.
Table of Contents
Shipping ............................................................................................................................... 1
   Setting Up Shipping ........................................................................................................... 1
      Shipping Items .............................................................................................................. 6
      Creating Shipping Items ................................................................................................. 7
      Charging for Shipping and Handling Per Item .................................................................. 11
   Shipping Basics ................................................................................................................ 13
      Free Shipping With an Item ........................................................................................... 13
      Using Tracking Numbers ............................................................................................... 14
      Accounting for Extra Packaging Weight ........................................................................... 14
      Printing Shipping Labels ............................................................................................... 15
      Entering Shipping Information on a Sales Transaction ....................................................... 16
   Multiple Shipping Routes .................................................................................................. 16
      Setting a Default Shipping Method Per Item .................................................................... 20
      Item Fulfillments and Multiple Shipping Routes ................................................................ 20
   Shipping Integration with FedEx, UPS, and USPS/Endicia ....................................................... 21
      Using Tracking Numbers with Shipping Label Integration ................................................... 22
      Using Shipping Integration with Pick, Pack, and Ship ......................................................... 22
      Using Shipping Integration with Multiple Locations ........................................................... 23
      Shipping Integration and Third Party Billing ..................................................................... 24
      Integrating with Multiple Shipping Carriers ...................................................................... 24
      Printing Integrated Shipping Labels With a Thermal Printer ............................................... 25
   FedEx® ........................................................................................................................... 28
      Getting Started with FedEx® Integration ......................................................................... 29
      Creating Shipping Items with FedEx Integration ............................................................... 30
      Using FedEx Real-Time Rates (U.S. & Canada) .................................................................. 31
      Using FedEx SmartPost® Services .................................................................................. 33
      Using FedEx One Rate® ................................................................................................ 35
      Using FedEx Customer Returns ...................................................................................... 35
      Shipping Dangerous Goods and Hazardous Materials ....................................................... 38
      Fulfilling Orders with FedEx® Integration ........................................................................ 39
      Applying Discounts to FedEx® Rates .............................................................................. 43
      Printing FedEx® Shipping Labels and Forms .................................................................... 43
      Upgrading Your FedEx Registration ................................................................................ 47
   UPS® ............................................................................................................................. 48
      Registering a UPS® Account (UK) ................................................................................... 50
      Getting Started with UPS Integration .............................................................................. 52
      Creating Shipping Items with UPS Integration .................................................................. 53
      Editing a UPS Shipping Item Name ................................................................................. 54
      Using UPS Integration with Multiple Locations ................................................................. 55
      Using UPS® Real-Time Rates ......................................................................................... 56
      Fulfilling Orders with UPS® ........................................................................................... 58
      Using UPS Customer Returns ........................................................................................ 61
      Voiding a UPS® Order .................................................................................................. 63
      Applying Discounts to UPS Shipping Rates ...................................................................... 63
      Printing UPS Shipping Labels and Forms ......................................................................... 64
   U.S. Postal Service®/Endicia® ............................................................................................ 67
      Creating an Endicia (USPS) Account ................................................................................ 68
      Registering a USPS Account with NetSuite ....................................................................... 68
      Getting Started With USPS Integration ............................................................................ 69
      Creating Shipping Items with USPS Integration ................................................................ 70
      Using USPS Real-Time Rates .......................................................................................... 70
      Fulfilling Orders with USPS/Endicia Integration ................................................................. 72
      Applying Discounts to USPS Shipping Rates ..................................................................... 74
Printing USPS Shipping Labels and Forms ....................................................................... 74
Shipping      1

Shipping
      Important: All NetSuite customers using FedEx integration will have their account credentials
      migrated to FedEx's latest Web services with their upgrade to Version 2017 Release 1.
      To prevent any outage of FedEx services after the upgrade, verify that your registration
      information is correct prior to your upgrade. See the help topic Upgrading Your FedEx
      Registration.

You can use NetSuite to manage all of your company's shipping needs. You can:

■ Generate shipping labels, return labels, and manifests
■ Track shipping status
■ Use your UPS, Fedex, and USPS accounts

For detailed setup instructions and information regarding integrating your NetSuite account with
shipping partners, please see the following topics:

Setup & Use

Integration with Shipping Partners

For information about Advanced Receiving, see the help topic Receiving Purchase Orders Using
Advanced Receiving.

Setting Up Shipping
To set up shipping, complete the following tasks:

■ Set shipping preferences to determine how shipping is handled in your NetSuite account
■ Create package types

Setting Shipping Preferences
You can set options for how to charge for shipping and ship orders in your account on the Set Up
Shipping page. When you finish setting preferences for shipping and registering any integrated UPS,
FedEx, or U.S. Postal Service® (USPS) accounts on this page, you can then create the shipping methods
you want to offer using at Lists > Accounting > Shipping Items > New.

To set up shipping:
  1. Go to Setup > Accounting > Shipping.
  2. Check the Charge for Shipping box to automatically charge for shipping on orders.
      If you do not check this box, you can still charge for shipping on sales transactions by creating
      a separate line item on the transaction. However, this box should be checked if you charge for
      shipping on your website. For more information, see the help topic Creating Shipping Items.
  3. Check the Charge Handling Separate from Shipping to charge handling separately instead of
     combining with shipping. The Charge for Shipping box must also be checked. Shipping and
     handling funds can then be assigned to different accounts, as required.
      Checking this box creates a Handling Rate subtab when creating a shipping item. Shipping and
      handling continue to appear together for website customers.

Shipping Guide
Setting Up Shipping 2
4. In the Default Shipping Carrier field, select a default shipping carrier to appear on sales and
website orders. The carrier options in the dropdown list reflect those setup in your shipping
accounts. See the help topic Selecting a Default Shipping Carrier.
Set up accounts for FedEx, UPS, or USPS on the Carrier Registration subtab before selecting
your default carrier. See the help topic Carrier Registration Subtab.
5. In the Default Shipping Method field, select which service to use when sending sales orders and
invoices.
You can still choose a different method when entering a transaction.
6. If you use the Pick, Pack, and Ship feature, in the Default Item Fulfillment Integration Stage
field, select the Pick, Pack, and Ship stage to be the default fulfillment status in your sales order
process. When you fulfill an order, this is the status of the sales order on the Item Fulfillment
page. You can always select a different stage when fulfilling an order.
7. If you use the Shipping Label Integration feature to print labels and track packages, in the
Shipping Label Creation Stage field, select the earliest Pick, Pack, and Ship stage when you can
receive tracking numbers and print shipping labels. This does not have to be the same as the
Default Item Fulfillment Stage.
For example, you generally want to mark sales orders as Shipped when you fulfill them. For part
of your inventory, you know you will change the order fulfillment status to Picked, and need
to be able to get tracking numbers and print shipping labels at that stage. In this case, set the
Shipping Label Creation stage to Picked.
8. In the Default Item Weight in Lbs field, enter a default shipping weight for items without a
weight specified on their item records.
If no weight is entered here, NetSuite defaults to (1 lb).
Item weight is used to determine shipping costs if you charge shipping by weight or use real time
rates.
9. In the Number of Days to Shipment field, set the average number of days between the date
a sales order is entered and the date the order is shipped. This value is used to create an
estimated ship date on sales orders. The actual ship date updates when the order is fulfilled.
By default, the ship date excludes weekends and holidays. Holiday dates can be set on the
Preferences subtab.
10. In the Cutoff Time for Shipments field, enter the time of day when orders stop being shipped.
Orders entered after this time, are accounted for on the next working day.
11. Check the Ship on Saturday or the Ship on Sunday box to include Saturday or Sunday in the
days to shipment calculation.
For example, if you ship on Saturday and have a three-day shipment policy, orders placed before
Friday’s cutoff will be shipped on Tuesday.
Carrier Registration Subtab
On the Carrier Registration subtab, you can register a UPS®, FedEx®, or U.S. Postal Service® (USPS)
account to use real-time rates or to use the Shipping Label Integration feature.
Note: NetSuite and NetSuite OneWorld support integration with USPS. NetSuite, NetSuite
OneWorld, and NetSuite Canada edition support integration with FedEx.
■ To set up UPS accounts, see the help topic Registering a UPS® Account or Registering a UPS®
Account (UK).
■ To set up FedEx accounts, see the help topic Registering a FedEx® Account.
■ To set up USPS accounts, see the help topic Registering a USPS Account with NetSuite.
Shipping GuideSetting Up Shipping 3
■ For more information on real-time rates, see the help topics Using FedEx Real-Time Rates (U.S. &
Canada), Using UPS® Real-Time Rates or Using USPS Real-Time Rates.
■ For more information on the Shipping Label Integration feature, see the help topic Shipping
Integration with FedEx, UPS, and USPS/Endicia.
Preferences Subtab
Carrier Basics
1. Check the International Shipping box to enable the International subtab on item fulfillments
when using the Shipping Label Integration feature and shipping items internationally using UPS
or FedEx.
Information provided on this subtab is used to generate forms, such as a Shipper's Export
Declaration (SED) and NAFTA Certificate of Origin.
2. Check the HazMat/Dangerous Goods Shipping box to enable shipping of restricted materials
when using FedEx shipping integration. See the help topic Shipping Dangerous Goods and
Hazardous Materials.
3. Check the Insure Packages box to insure packages by default. You can override this option on
item fulfillments.
4. Check the Mask Account Number on Labels box if you do not want to expose your account
number on shipping labels.
Rates
5. In the FedEx Rates Type field, select the type of rates you want to show and charge customers.
■ Select Negotiated Rates to show and charge customers the rate you are charged by FedEx
for order shipments.
■ Select List Rates to show and charge your customers generic list rates. FedEx still charges you
the negotiated rates.
6. Check the Residential Address for Shipping box to mark customer addresses as residential by
default.
Note: If you do not check this box, FedEX and UPS will treat customer addresses as
business addresses.
You can also designate residential addresses on individual customer records and sales orders.
This information helps return accurate shipping rates from UPS and FedEx. Residential
addresses may incur higher shipping rates.
USPS charges the same shipping rates for both residential and business addresses.
7. In the UPS Rates Types field, select the type of rate to show and charge your customers.
■ Standard List Rates
■ Retail Rates
■ Daily Rates
■ UPS Negotiated Rates
Third Party Billing
8. If you use the Shipping Label Integration feature, check the Third Party Billing box to enable
billing of integrated shipping charges to other FedEx or UPS accounts.
For example, if your company has a master account, each location can bill the master account as
a third party. You can also choose to bill a customer or distributor's UPS or FedEx account.
Checking this box enables third party account fields on the Company Information page,
customer records and item fulfillments.
Shipping GuideSetting Up Shipping 4
9. Check the Do Not Charge Shipping on Third Party Billing Orders box to remove shipping
charges on orders where third party shipping is used.
This prevents the customer from being double charged for shipping.
10. Check the Do Not Charge Handling on Third Party Billing Orders box to remove handling
charges on orders where third party shipping is used.
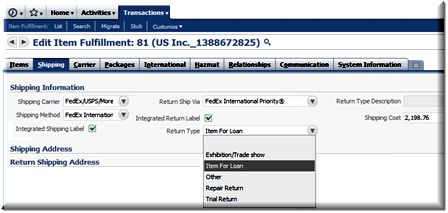
11. Select the duty payment type for FedEx international shipments:
■ None Selected - FedEx bills your account for duty payment.
■ Recipient - FedEx bills the recipient. Enter the recipient's FedEx account number on the
Shipping subtab when fulfilling the order.
■ Third Party - FedEx bills a third party. Enter the account number to bill on the Shipping
subtab when fulfilling the order.
Default Package Type
If you have the integrated shipping labels feature enabled, you can specify the type of packaging
you most frequently use with FedEx, UPS and USPS services.
12. If you specify Your Packaging from the dropdown list in the Fedex Packaging field, you also
need to specify the type of packaging it is in the FedEx Admissibility Package Type field. These
admissibility restrictions do not apply on UPS and USPS.
13. Reference Fields
In the Reference #1 field, select the additional type of information you want to include on all
packages. Including this information helps with package tracking.
This information is copied to the Reference fields on the Packages subtab of order fulfillments.
On multiple package orders, the information is included on all packages.
UPS and USPS support a Reference #2 field. Add additional reference information as required.
Note: If you select Item Name as the reference information type, the name of the first
item on the order is used.
Important: UPS does not support reference information on international shipments. In
such cases, only the sales order number is submitted.
Address Validation
14. Check the respective FedEx Address Validation and UPS Address Validation if you want these
service to validate the delivery address when fulfilling orders.
Note: Only shipping addresses are validated. Return shipping addresses are not
validated. UPS validates in the United States and Puerto Rico only. FedEx also validates
addresses in Canada.
15. If you use the Number of Days to Shipment preference, enter the holiday dates you don’t ship on
in the Holiday Date column. Add a description, and click Add.
These holidays are skipped when calculating the ship date for orders. New holiday dates should
be entered each year.
Packages
If you use the Shipping Label Integration feature, then you can create package types to capture the
shipping information for the packaging you use most often. A package type defines the dimensions
(in inches), the weight (in pounds), and the maximum number of items that can be shipped in a
Shipping GuideSetting Up Shipping 5
package. You can create a package type on the Packages subtab and then assign it on item records to
automatically enter the package details when shipping the item.
Note: To enable Shipping Label Integration, go to Setup > Company > Setup Tasks > Enable
Features. Select the Transactions subtab.
Note: If you typically ship items in the same types of packages and a certain number of items
per package, you can set up default package types to make your fulfillment process quicker and
easier.
To set up a package type:
1. Go to Setup > Accounting > Shipping.
2. If you use the Pick, Pack, and Ship feature, you may want to set your Default Item Fulfillment
Integration Stage to Packed or Shipped.
If your integration stage is Picked, packages are not automatically created based on your items
and package types.
3. Click the Packages subtab.
4. In the Name column, create a name for this package type, such as Largest Box.
5. In the Length column, enter the measurement for the longest side of the package in inches.
6. In the Width column, enter the measurement for the widest side of the package in inches.
7. In the Height column, enter the measurement for the highest side of the package in inches.
8. If the weight for the package contents is the same every time you use it, then enter the weight in
pounds in the Weight column.
9. In the Maximum Items column, enter the highest number of items that would ship in this type
of package.
When an item associated with this package type is selected on an order with a quantity greater
than one or with other items using this package type, the maximum number of items is included
in one package.
For example, speaker sets use a Medium Box package type, which has the maximum number of
items set as three (3). Keyboards also use a Medium box package type. When an order is created
for two speaker sets and one keyboard, they are all placed together in one Medium Box.
If an item always ships in its own package with no other items, you do not have to enter a
separate package for that item. You can enter the default package type here and check the Ships
Individually box on the record of the item that ships alone.
Note: If you do not enter a maximum number of items, the package type maximum
number of items is assumed to be unlimited until the total weight is equal to or greater
than 150 lbs.
10. In the Default column, check the box to use the package type for all items that do not have a
package type defined.
11. Click Add.
12. Repeat these steps for each type of package you ship, and click Submit.
After you set up each of your most-used packages, set packages for an item on the Basics subtab of
each item record.
Then, when an item is selected on an order, the package type for the item is automatically selected
in the Your Packaging field on the Packages subtab of the fulfillment. The number of packages is
Shipping GuideSetting Up Shipping 6 calculated based on the number of items on the order and the number of items allowed in each package type. Shipping Items A shipping item is a delivery method for a shipping carrier. It describes how to ship an item and can include shipping rate information, handling rates, rules for shipping and handling, and specify when shipping is free. In NetSuite, Shipping Item is also referred to as Shipping Method and Ship Via. To access the Shipping Items record go to Shipping > Lists > Shipping Items. On shipping item records, you can: ■ Specify a charge for handling ■ Set the method by which you charge shipping, such as by weight or at a flat rate ■ Specify the country or countries where the shipping item can be used ■ Specify the website applicable for the shipping item ■ Specify a Display Name to use on printed forms, in your web store, and in centers such as the Customer Center. ■ Set conditions for offering free shipping To create a shipping item, go to Lists > Accounting > Shipping Items. For information, see the help topic Creating Shipping Items. To create a shipping item, go to Shipping > Lists > Shipping Items > New. For more information, see the help topic Creating Shipping Items. In a OneWorld account, you can set up multiple shipping items for the same shipping method. For information, see the help topic Associate Subsidiaries with Shipping Items. Automatically Charging for Shipping When you set up shipping preferences, you can choose to automatically charge for shipping on each order or to enter shipping as a line-item for individual sales orders, cash sales, and invoices. To automatically charge for shipping, an administrator must enable the Charge for Shipping preference. To do this, go to Setup > Accounting > Setup Tasks > Shipping. Check the Charge for Shipping box and click Save. If you automatically charge for shipping: ■ For each shipping item you create, you can select a different method to charge shipping. For example, one store charges shipping by item weight while another store lists fees based on the cost of the total order. A third store includes the cost of shipping in item sales prices and uses shipping methods only as descriptive line items on transaction forms. ■ Allocate income from shipping charges to a separate account on your books. ■ Shipping charges automatically show on your website and on transactions based on the shipping item selected. ■ You can choose to charge a separate handling fee if you charge for shipping. Charging a separate handling fee lets you allocate income from fees charged for the labor and supplies for handling to a separate account on your books. ■ You cannot add shipping items to your transactions as line items. The shipping amount automatically appears based on the shipping item selected in the Ship Via or Shipping Method field. Shipping Guide
Setting Up Shipping       7

■ Shipping and handling will still appear as one total to your customers on your website. To charge
  a separate handling fee, go to Setup > Accounting > Setup Tasks > Shipping and check the Charge
  Handling Separate from Shipping box.

If you do not automatically charge for shipping:
■ If you do not automatically charge for shipping but would like to include shipping items as line items
  on transactions, you can enter a basic shipping item record. You can then charge for shipping on
  individual sales orders and invoices. You specify an amount for each shipping item you add to the
  transaction.
■ A choice or charge for shipping does not show in your Web site.

To create a shipping item, go to Lists > Accounting > Shipping Items.

Creating Shipping Items
Create a shipping item record for each shipping method you want to offer your customers.

Handling fees can be included with shipping items when you charge for shipping and charge a separate
handling fee. See the help topic Charging for Shipping and Handling Per Item. If you do not charge a
separate handling fee, you do not see a Handling subtab when creating shipping items. Handling fees
can be treated separately from shipping fees and posted to a separate account on the general ledger.

Shipping and handing fees are listed as one total to the customer, if you use Standard Site Builder
without touch points. SCA and Site Builder sites with touch points list the items separately be default.

In OneWorld accounts, you can create multiple shipping items for a shipping method. For information,
see the help topic Associate Subsidiaries with Shipping Items.

If you no longer use a shipping item, you can inactivate it by checking the Inactive box on the shipping
item record. Inactivated shipping items are removed from the shipping items list and are no longer
available as shipping methods on your website or on transactions.

To create a shipping item without automatically charging for shipping:
  1. Go to Lists > Accounting > Shipping Items > New.
  2. Enter a name for the shipping item.
  3. Enter a display name or code. This is the external name for the item that appears in the Shipping
     Method or Ship Via field on printed forms, your web store, and all centers, such as the Customer
     Center. In all other cases, the Ship Name displays for the item.

               Note: You cannot edit or change the display name/code if you are creating a UPS
               integrated shipping item.

  4. Enter a description.
  5. If you are using a OneWorld account, select a subsidiary for this shipping item.
      For information, see the help topic Associate Subsidiaries with Shipping Items.
  6. Check the Inactive box to make this shipping item inactive, if appropriate.
  7. If you use the Shipping Label Integration feature but do not automatically charge for shipping:
          1.    Check the Shipping Label Integration box to charge your FedEx, UPS, or USPS account
                when sales orders using this shipping item are fulfilled.

Shipping Guide
Setting Up Shipping 8
2. Next to the check box, select the rate you will use when this shipping item is selected.
This is the rate used to charge your account. Because you do not automatically charge
for shipping, real-time rates will not be displayed on your web store, and customers will
not automatically be charged real-time rates.
8. If you want this item to be available on your website, check the Display in Web Site box.
9. Click Save.
Your shipping item is now available as shipping method on transactions.
To create a shipping item and automatically charge for shipping and handling:
1. Go to Lists > Accounting > Shipping Items > New.
2. Enter a name for the shipping item.
3. In the Display Name/Code field, enter a display name or code for this shipping item to show
on your website and on transactions. This is the external name for the item that appears in the
Shipping Method or Ship Via field on printed forms, your web store, and all centers, such as the
Customer Center. In all other cases, the Ship Name displays for the item.
4. Enter a description for the shipping item in the Description field.
5. If you are using a OneWorld account, select the subsidiary for this shipping item.
For information, see the help topic Associate Subsidiaries with Shipping Items.
6. Check the Inactive box to make this shipping item inactive, if appropriate.
7. If you use the Shipping Label Integration feature, check the Shipping Label Integration box to
charge your FedEx, UPS, or USPS account when orders using this shipping item are fulfilled.
Next to the check box, select the rate you will use when this shipping item is selected.
The method you select here is the method used to ship an order and the method charged to
your integrated account. You can choose to charge customers based on either the same method
or a different method on the Shipping Rate subtab.
8. If you want this item to be available on your website, check the Display in Web Site box.
9. Click Save.
Shipping Rate
1. In the Account (Shipping) field, select the appropriate account for shipping charges for this
shipping item.
2. Choose one of the following shipping methods and enter the appropriate charges.
■ FedEx Real-Time Rate – If you added your FedEx account to NetSuite, select the FedEx real-
time option to use for this shipping item.
Add FedEx accounts at Setup > Accounting > Shipping.
For information on using the Discount Rate field to offer discounts on FedEx rates, see the
help topic Applying Discounts to FedEx® Rates.
■ UPS Real-Time Rate – If you added your UPS account to NetSuite, select the UPS real-time
option to use for this shipping item.
UPS fills in the shipping charge when the customer completes the order.
Add UPS accounts at Setup > Accounting > Shipping.
For information on using the Discount Rate field to offer discounts on FedEx rates, see the
help topic Applying Discounts to UPS Shipping Rates.
Shipping GuideSetting Up Shipping 9
■ USPS Real-Time Rate - If you added your USPS account to NetSuite, select the USPS real-
time option to use for this shipping item. USPS fills in the shipping charge when the customer
completes the order.
Add USPS accounts at Setup > Accounting > Shipping.
For information on using the Discount Rate field to offer discounts on USPS rates, see the
help topic Applying Discounts to USPS Shipping Rates.
■ Flat Rate – Enter the amount to charge for every item you ship.
■ By Weight – Enter the amount to charge, by what increment and the unit of measure.
You must enter weights on your item records to use the By Weight shipping method.
You can enter a default weight for items at Setup > Accounting > Shipping.
■ By Item — Enter the default amount to charge for shipping on a per-item basis.
You can enter custom, per-item shipping charges on individual item records.
■ Percent of total — Enter a percent in the % field.
■ Shipping Table – Select Order Total to charge shipping based on ranges of order totals. Select
Weight and select a unit of measurement to charge shipping based on ranges of package
weight.
To set ranges of weight or order total, enter the first line as the minimum charge. The value
for the first line must be zero. The second value is the maximum total or weight for the first
line's charge.
For example, in the chart below, orders that total $0 to $9.99 cost $3.00 to ship. Orders
totaling $10.00 to $24.99 cost $5.00 to ship.
Range Value Charge
0.00 3.00
10.00 5.00
25.00 10.00
50.00 15.00
3. Click Save.
Handling Rate
1. In the Account (Handling) field, select the appropriate account for handling fee income for this
shipping item.
2. Choose one of the following methods for determining a handling fee:
■ No Handling Charge – Select this option to only charge shipping.
■ Flat Rate – Enter the amount to charge for every item you ship.
■ By Weight – Enter the amount to charge, by what increment and the unit of measure.
You must enter weights on your item records to use the By Weight shipping method. You can
enter a default weight for items at Setup > Accounting > Shipping.
■ Per Item – Enter the default handling charge to ship any item. You can enter custom, per-
item handling charges on individual item records.
■ Percent of total – Enter a percent in the % field.
■ Handling Table – Select Order Total to charge handling based on ranges of order totals.
Select Weight and select a unit of measurement to charge handling based on ranges of
package weight.
Shipping GuideSetting Up Shipping 10
To set ranges of weight or order total, enter the first line as the minimum charge. The value
for the first line must be zero. The second value is the maximum total or weight for the first
line's charge.
For example, in the chart below, orders that total $0 to $10.00 cost $3.00 for handling. Orders
totaling $10.01 to $25.00 cost $5.00.
Range Value Charge
0.00 3.00
10.00 5.00
25.00 10.00
50.00 15.00
3. Click Save.
Shipping and Handling Rules
1. To offer free shipping for orders over a certain dollar amount, check the Free if total order is
over box, and enter the amount.
2. To charge a minimum shipping amount, check the Minimum shipping amount box, and enter
the amount.
3. To restrict the amount that can be charged to your customers, check the Maximum shipping
amount box, and enter that amount.
4. Specify the Web Site Rules for the shipping item:
a. To make this shipping method available online only if the order total amount is over or
under a certain amount, check the Available if Order Total Is box, select the criteria, and
enter the total amount.
b. To make this shipping method available online only if the order weight is over or under a
certain amount, check the Available if Order Weight is, select the criteria, and enter the
weight and unit of measure.
c. If you want to restrict the shipping item availability to a specific Web site, select a site
or sites in the Limit to Sites field. If you leave this field blank, then the shipping item is
available on all Web sites. Or you can select sites in this field and check the Exclude box to
specify the sites where the shipping item will not be available.
5. Specify shipping restrictions in the Shipping Restrictions section:
a. In the Countries field, select the countries you ship to using this shipping method. If you
do not select any countries, then this shipping item is available to ship to all countries. To
identify countries you do not ship to using this shipping item, select a country or countries
and check the Exclude box.
b. Select one or more states in the States field to restrict the shipping item for use for
delivery only to those states. If you do not select any states, the shipping item can ship to
all states. To restrict shipping to specific states, select the country in the Countries field
and do not check the Exclude box.
Note: Some states may not be available in the system. To add a state within a
country, go to Setup > Company > States/Provinces/Counties > New
6. If this shipping item is taxable, check the Charge Tax on this shipping portion of item box and
the Charge Tax on this handling portion of item box. Select a tax schedule to calculate the tax.
7. Click Save.
Shipping GuideSetting Up Shipping 11
Free Shipping Items
1. To offer free shipping on an order when certain items are purchased, click the Free Shipping
Items subtab.
2. Check the All items must be purchased box to require that every item you select be on an order
before free shipping is offered. Otherwise, any item on an order qualifies the order for free
shipping.
3. Select each item that qualifies an order for free shipping. Click Add Multiple to add several items
at once.
4. Click Save.
Packaging
When you fulfill a sales order, the system automatically generates the number of packages required for
your order. However, there is a limit of 50 packages per order. If you fulfill an order that exceeds this
amount, the order will not save and the system will display an error.
If you check the Omit Packaging box, this disables the automatic packaging logic that occurs during
item fulfilment and creates only one package for the order.
Note: Omit packaging is not available for all integrated shipping carriers (FedEx, UPS, and UPS)
and web store orders.
Cross-Subsidiary Rules
In NetSuite OneWorld accounts, when you enable the Intercompany Cross-Subsidiary Fulfillment
feature, shipping item records display a Cross-Subsidiary Rules subtab. Use the fields on this subtab to
define rules for shipping items that are fulfilled between subsidiaries.
1. Select a Subsidiary.
2. Select a Shipping Item to define the method to use when fulfilling items from the selected
subsidiary.
3. Click OK.
4. Click Add Row to define shipping items for additional subsidiaries.
5. Click Save.
For more information about the Intercompany Cross-Subsidiary Fulfillment feature, read the help topic
Intercompany Cross-Subsidiary Fulfillment.
Translation
1. If you use the Multi-Language feature, enter the translated text for specific shipping item fields.
2. Click Save.
Charging for Shipping and Handling Per Item
You can charge for shipping and handling on a per item basis instead of per total order weight. This
makes it easy for you to charge the appropriate amount for shipping or handling costs. When a
Shipping GuideSetting Up Shipping 12
customer places an order on your website or you create an invoice, NetSuite automatically calculates
the appropriate shipping and handling charges based on the items purchased.
For example, you can enter shipping and handling costs on each item record. When you invoice
those items, the shipping and handling cost on the transaction is what you entered on the item
record.
To automatically charge for shipping, an administrator must go to Setup > Accounting > Shipping.
Check the Charge for Shipping box and click Save. To charge for handling, check the Charge Handling
Separate from Shipping box and click Save.
You must charge for shipping to be able to charge for handling.
To charge per-item shipping or handling costs:
1. Go to Lists > Accounting > Items..
2. On the Items list, click Edit next to the item you want to enter a shipping or handling cost for.
3. On the Basic subtab of the item record, enter the appropriate price in the Shipping Cost field.
4. In the Handling Cost field, enter the price you want to charge for this item's handling.
5. Click Save.
Repeat these steps for every item you want to charge a specific shipping or handling cost for.
6. To charge per item shipping, you must create a per item shipping item record to use as the
shipping method on transactions and in the web store.
Follow the steps for Creating Shipping Items, and select the By Item option button on the
Shipping Rate subtab.
7. The amount you enter in the Default Charge field is the amount displayed on the transaction or
in the web store if a shipping cost is not entered on the item record.
You must select a per item shipping method on transactions and in the web store to charge the
shipping amount entered on item records.
You can display a per item shipping method on your web store as well as other types of shipping
methods. However, if the web store shopper selects a shipping method other than the per item
shipping method, the shipping cost entered on the item record is overridden.
When you charge for shipping and handling, the full amount is charged on the bill for the first
fulfillment of the items. Subsequent fulfillments to complete an order do not show a shipping or
handling charge.
For example, a customer's order for two widgets has a $15 charge for shipping. The first fulfillment
ships one widget, and the bill shows a $15 charge for shipping. Fulfillment number two ships the
other widget, and the bill shows no charge for shipping.
If Multiple Shipping Routes has been enabled, see , any shipping or handling rule which has been
applied to the transaction, will now be calculated on a shipment-level basis instead. For example, when
calculating the Free if Total is over rule, the total value of items in that shipment is used to determine
whether the discount criteria is met, not the value of the combined transactions on the sales order.
You can display shipping and handling charges on the transactions you print as line items or as a total
amount on the transaction. Go to Setup > Company > Printing & Fax. On the Printing subtab, check
the Print Discount and Shipping Lines in Columns box to show discount and shipping items with
Shipping GuideSetting Up Shipping 13
descriptions as line items in transaction columns. If you clear this box, the footer of the transaction
shows only a shipping item name and the total shipping and handling cost.
Shipping Basics
The following section explains how to perform the most common tasks when using the shipping
feature.
■ Free Shipping With an Item
■ Using Tracking Numbers
■ Accounting for Extra Packaging Weight
■ Printing Shipping Labels
For information on how to create a shipping item, see the help topic Shipping Items.
Free Shipping With an Item
You can offer promotions for free shipping if your customers buy certain items. When you use this
preference, the shipping for the entire order automatically changes to zero when the item or items are
added to the cart.
You can decide if only one of the items in the promotion can make an order ship for free or if all items
in the promotion must be purchased for the order to ship for free.
Important: If an order is eligible for free shipping when a minimum order amount is met, and
you apply a promotion that reduces the price of the order below the minimum free shipping
requirement, then the order remains eligible for free shipping.
Note: You can set a preference to offer free shipping with a shipping method. To make sure
that customers receive the offer of free shipping on a NetSuite website, make sure your default
shipping method on the website is the method with the promotion. Alternatively, you can use
Creating Advanced Promotions to set up free shipping promotions. For more information, see
the help topic Creating Item-Based Shipping Advanced Promotions.
To offer free shipping with certain items:
1. Go to Lists > Accounting > Shipping Items.
2. Click Edit next to the shipping item that should be free when the items are purchased or click
New to create a new shipping item for the promotion.
3. On the Free Shipping Items subtab, select an item that should be offered without a shipping
charge for this shipping method and click Add.
You can also click the Add Multiple button to quickly add several items that should have free
shipping.
4. Continue to select and add each item that should have free shipping.
5. Check the All Items Must Be Purchased box to require that all items you selected be on an order
before free shipping is offered for this shipping method.
Clear this box to offer free shipping on the order if any of the items listed are purchased.
Shipping GuideShipping Basics 14
6. Click Save.
Note: The maximum number of free shipping items you can assign to an individual shipping
item is 10,000.
Using Tracking Numbers
Tracking numbers are used to keep track of your shipments to customers. You can retrieve tracking
numbers from UPS, FedEx, DHL, U.S. Postal Service® (USPS), and Airborne when you ship your
packages.
When fulfilling orders, enter the tracking number associated with the order, so that the tracking
number appears in NetSuite everywhere that the order appears. If you enable Shipping Label
Integration for the shipping items, then UPS, FedEx, and USPS tracking numbers function as links you
can click to open the respective website and check the status of the package.
If you enter the tracking number in the item fulfillment and check the To Be Emailed box, a copy of
the form is emailed to the address or addresses listed in the To Be Emailed field. The tracking number
shows on the form as a link. Customers can then either click the link or open a new browser to go to
the shipping service's website and view the status of their orders.
To enter or view a tracking number on a fulfillment:
1. Go to Transactions > Sales > Fulfill Orders.
2. Click Fulfill next to a Sales Order.
3. Click the Packages subtab. You can enter the tracking number in the Package Tracking Number
field.
If you use the Shipping Label Integration feature, the tracking number automatically displays
after you fulfill the sales order.
Accounting for Extra Packaging Weight
When shipping packages, if your total shipment weight is greater than the total weight of the items,
you can account for extra packaging weight on the item fulfillment for that order. This ensures that the
weights listed on your Shipping Report are correct.
To account for the added weight when you fulfill your sales orders, you must fulfill each order
individually. If the shipping cost changes due to the extra package weight, you must manually adjust
the shipping cost for each package. Click Save and Bill from the Item Fulfillment page to bill the sales
order with the new shipping cost.
To account for extra packaging weight in shipments:
1. After a sales order has been created and approved, go to Transactions > Sales > Fulfill Orders.
2. Select the customer whose order you want to fulfill.
3. Click Fulfill in the Process column of the sales order you want to fulfill.
4. Click the Packages subtab.
5. In the Weight field, edit the weight to equal the total weight of the shipment. This is the weight
reflected on the Shipping Report.
Shipping GuideShipping Basics 15
6. If the total weight you entered changes the shipping cost, enter the new cost in the Shipping
Cost field on the top of the Item Fulfillment page.
7. Click Save & Bill to bill this order with the new shipping cost.
Your total shipment weight is now correct on your Shipping Report. This enables you to import
accurate information to your shipping application.
Printing Shipping Labels
Use this procedure to print shipping labels if you do not enable the Shipping Label Integration feature.
You can also print shipping labels using this procedure, with Shipping Label Integration enabled, for
orders shipped by carriers you do not integrate with or orders shipped using a non-integrated shipping
item.
Note: To print integrated shipping labels, see the help topic Printing Integrated Shipping
Labels With a Thermal Printer.
Shipping labels for orders shipped by non-integrated shipping methods are automatically formatted to
print in PDF format on standard Avery 5164 or equivalent labels. A standard shipping label is 4 x 3 1/3
inches, and the labels come in sheets of six.
To print PDF shipping labels, you need Adobe® Reader®. Visit the Adobe Web site to download the
latest version at no charge.
You can print labels for sales orders, vendor returns and transfer orders. As you fulfill each order,
NetSuite adds the label to the queue to be printed. You can fulfill multiple sales orders and then print
all the shipping labels at once. If you use Fedex or UPS, when you print labels on an item fulfillment, a
return label is printed along with the outbound shipping label.
Use the following procedure to print labels for non-integrated carriers or other shippers.
To print shipping labels:
1. Go to Shipping > Shipping > Print Checks and Forms.
2. Click Shipping Labels.
3. In the Starting Label field, enter the number of the label to begin printing with.
Standard labels come in sheets of six. If the first label sheet has less than six, select the first
available label to start printing with.
4. From the list of orders, check the box next to each label you want to print.
The number 1 automatically appears in the Count column. If you want to print multiple copies of
a label, change the number in the Count column for that label.
5. Check the Allow Reprinting box if you want to be able to print labels for the selected
transactions again.
6. In Shipping Label Form, select a label form if you want to use a customized label form.
7. Click Print.
A preview of your labels pops up in the default Adobe application if you do not enable the
Download PDF Files preference at Home > Set Preferences page.
If you enable the Download PDF Files preference, you must first save your labels, and then open
them with the Adobe application.
Shipping GuideShipping Basics 16
8. Place your labels in your printer tray.
9. Click the printer button in the Adobe application frame.
10. Click OK.
If you receive a printing error, repeat the steps for printing above.
Entering Shipping Information on a Sales Transaction
The Shipping subtab appears on many transaction records including, sales orders, invoices and
estimates. Here you enter all necessary information relating to the shipment of goods as well as
transaction documentation, such as invoices.
To enter shipping information on a sales transaction:
1. Go to Transactions > Sales > Enter Sales Orders > List.
2. Click the Shipping subtab.
3. Complete the relevant fields.
4. To edit the default shipping address, click the edit icon next to the Ship to Select dropdown list.
5. Click Save.
Multiple Shipping Routes
Note: The Multiple Shipping Routes feature can be enabled in NetSuite United States edition
accounts and NetSuite International edition accounts.
The Multiple Shipping Routes feature lets you ship to several addresses and use different shipping
methods on the same transaction.
For example, you are fulfilling an order from your Atlanta warehouse and need to ship some items to
Mr. Smith in Georgia using FedEx and some items to Mr. Jones in New York using USPS.
A shipping route is defined as a unique combination of the following:
■ shipping address
■ shipping method
■ origin address
■ Multiple Shipping Routes and SuiteScript (in the SuiteScript Reference Guide)
■ Multiple Shipping Routes in web services (in the SuiteTalk (Web Services) Records Guide)
These sections provide information that is specific to developers working with this feature.
Important: SuiteScript and SuiteTalk users who enable the Multiple Shipping Routes feature
should also refer to the following sections in the NetSuite Help Center:
■ Multiple Shipping Routes and SuiteScript
■ Multiple Shipping Routes in Web Services
Shipping GuideYou can also read