Setting Up & Using the Educators Resource PSN - Updated June 2019 - ECi Software ...
←
→
Page content transcription
If your browser does not render page correctly, please read the page content below
Setting Up & Using the
Educators Resource PSN
                  ®

                   Updated June 2019
Contents
About the Educators Resource PSN.....................................................................................3
Setting Up and Using the Vendor MultiLoader...................................................................3
Using the MultiLoader to Update DDMS Inventory with EDR Products.....................................................3
Setting Vendor Settings.......................................................................................................................................3
Selecting the Exceptions Report Printer.......................................................................................................5
Downloading Files.................................................................................................................................................5
Starting the Update..............................................................................................................................................5
Setting Up the Educators Resource PSN..............................................................................6
Setting Up the EDI Record...........................................................................................................................................6
Contacting Educators Resource................................................................................................................................7
Setting Up the Vendor Database..............................................................................................................................7
Determining Default Shipping Parameters..........................................................................................................9
Setting Communication Parameters.................................................................................................................... 10
Creating a Customer Record................................................................................................................................... 14
Setting Up a Customer Record...................................................................................................................... 15
Setting Up Trading Partner Parameters............................................................................................................... 16
Testing the System Parameters...............................................................................................................................17
Using the Educators Resource PSN....................................................................................17
Transmitting the P/O...................................................................................................................................................17
Determining Shipping Parameters to Change................................................................................................. 18
Changing the Shipping Method to Drop Ship ........................................................................................ 18
Changing the Shipping Method to Wrap and Label.............................................................................. 18
Changing the Shipping Method to Stand Alone.................................................................................... 18
Changing Shipping Parameters............................................................................................................................. 18
Changing the Drop Ship Parameter............................................................................................................. 18
Changing the Wrap and Label Parameter.................................................................................................. 19
Requesting Acknowledgments.............................................................................................................................. 20
Including EDR Items in ECinteractivePLUS Search...........................................................21
Setting Up Catalog Groups to Include EDR........................................................................................................ 22
Adjusting Feature Group Settings......................................................................................................................... 23
© 2019 ECi Software Solutions, Inc.Setting Up & Using
the Educators Resource PSN
About the Educators Resource PSN
DDMS® supports a direct-buy flow with Educators Resource® (EDR) using Private Supply Network (PSN).
This allows you to automate the procedure of loading your dealer-specific EDR pricing into the DDMS
Item database and transmit your purchase orders through your DDMS system’s short-buy process.
Purchase orders are electronically transmitted to EDR in their preferred format via PSN, and you receive the
acknowledgment of the purchase order automatically. This automation makes the ordering process easier
and more efficient.
Note: PSN setup uses graphical and text-based screens. For more information on opening and using text-
based screens, see Opening Text-Based Screens.
Setting Up and Using the Vendor MultiLoader
The Vendor MultiLoader program gives you access to all the supplemental vendors’ item files in just a
few clicks. You can load supplemental vendor files quickly and easily. The program updates all the OPUS®
supplemental vendors according to the parameters you set. Each vendor has their own settings screen.
The Vendor MultiLoader program is normally run once each quarter after you run the OPUS SIMPLE
program. However, you can run the program as often as updated vendor files become available.
If you need the latest version of the Vendor MultiLoader, download it to your DDMS server or DDMSPLUS™
system.
1. From your DDMS/DDMSPLUS desktop, double-click . The File Transfer window opens.
2. Make sure the correct quarter is selected under the Step 1 heading.
3. Under the Step 2 heading, type VENDOR in the Enter File Name box.
4. Click Add to File Transfer List.
5. Click Transfer Now.
6. When the Download Complete message displays in the File Transfer List box, click Exit. The latest
Vendor MultiLoader program is now installed.
Note: After the initial download of the Vendor MultiLoader program, the program updates
automatically when you process your quarterly OPUSInstall program.
7. To start the program, click Start, then All Programs, and then VENDORMULTILOADER.exe.
Using the MultiLoader to Update DDMS Inventory with EDR
Products
Using the Vendor MultiLoader program takes just a few steps. For more information on each step, refer to
the appropriate heading.
Setting Vendor Settings
1. In the Vendor MultiLoader window, check the box next to Educators Resource.
3 continue to next pageSetting Up & Using
the Educators Resource PSN
2. Click Vendor Settings. The Educators Resource Vendor Settings dialog box opens.
3. Accept the default file name of the Educators Resource update file.
4. Check the Create New Items box to add new items not found in your inventory. The items are
created using the supplied EDR number. A blank space in this box does not create items. If you
choose to create new items, enter a Stock Class and Department for the items created.
5. Enter the Cost Column provided by EDR.
6. Type Y in the Update List Price On Existing Educators Resource Items box to load the EDR supplied
price into the pricing record list. If you leave this box blank, list price on existing items is not
updated.
7. Check the Add Educators Resource UPC ISBN Codes To Your Alias File box to add EDR supplied codes
to the file. If you leave this box blank, aliases are not created.
8. Enter up to 10 stock classes to not update, if needed.
4 continue to next pageSetting Up & Using
the Educators Resource PSN
9. Check the Save A Copy Of The EDU-C-ITEM File box for the program to make a backup copy of the
EDU-C-ITEM file in your work unit. The EDU-C-ITEM file is deleted each time you run an update.
10. Click Done.
Selecting the Exceptions Report Printer
The Exceptions report lists items that were not added or updated, along with the reasons. This report
automatically prints during the update.
1. Enter the DDMS printer ID in the Exception Report Printer box.
2. Check the Always box to use the same printer each time.
Note: In addition to the Exceptions report, the All Item report is always available in the DDMS/SR folder.
The Educators Resource report is named RPT-EDRES.xls.
Downloading Files
1. Click Download Files. The PSNControl File Transfer window opens, and the necessary files are
automatically downloaded. You can see which files are not available in the displayed list.
2. The vendor files are saved to the OPUS Download unit. The Download Complete message displays.
3. Click Exit in the PSNControl File Transfer window.
Starting the Update
Now that you’ve downloaded your vendor supplemental files, you can start the update.
1. Click Start Update to update your item files. A status update message displays next to each vendor
you selected. When finished, the Update Status column shows Done.
2. Click Exit in the PSNControl File Transfer window.
5 continue to next pageSetting Up & Using
the Educators Resource PSN
Note: After the update is complete, run the ;SPCCHGIT program to finalize the item key changes. For
DDMS, use the (Z)[B4] function to run the ;SPCCHGIT program on Unit 04. For DDMSPLUS, use the
(Z)[A] function to run the ;SPCCHGIT program. Enter EDU-C-ITEM as the Input Source Item File.
Setting Up the Educators Resource PSN
Before you set up parameters for Educators Resource, make sure you have PSN set up. If this is your first PSN
vendor and PSN is not already set up, start by following the steps in Setting Up PSN.
Once PSN is set up, setting parameters to communicate with Educators Resource involves the following:
1. Setting up the EDI record
2. Contacting Educators Resource
3. Setting up the vendor database
4. Determining default shipping parameters
5. Setting communication parameters
6. Creating a customer record
7. Setting up trading partner parameters
Note: Dealers must be on version 8.26.0 or higher to transmit or check stock/price for EDR.
Setting Up the EDI Record
Educators Resource cannot accept your transmissions unless they enter your Qualifier, ID, and Code into
their system. If you already have a Qualifier, ID, and Code in the EDI record of the (L6WB) AT&T EDI IMS
Parameters screen, record these numbers and give them to Educators Resource.
Note: The values in these fields are used for multiple PSN vendors. Changing existing data may cause
problems communicating with other PSN vendors that you currently have set up, so only complete
this section if the Qualifier, ID, and Code fields are blank.
If the EDI record is blank, complete it using the following instructions.
1. From the text-based Master Menu, type L to open the (L) Parameters screen.
2. Type 6 to open the (L6) Vendor and Wholesaler Communications screen.
3. Type W to open the (L6W) EDI Network Communications screen.
4. Type B to open the (L6WB) screen.
5. Tab to the Qualifier field and enter one of the following:
• 01 (This is the preferred qualifier)
• 12
• 16
• ZZ
6 continue to next pageSetting Up & Using
the Educators Resource PSN
6. In the ID and Code fields, enter information according to the following:
• If your qualifier is 01, enter your DUNS number.
• If your qualifier is 12, enter your 10-digit business phone number.
• If your qualifier is 16, enter your DUNS number plus 4 letters.
• If your qualifier is ZZ, this means you mutually agreed upon the ID.
7. Press Enter to save your changes.
Contacting Educators Resource
Before you can use PSN with Educators Resource, they must complete some setup on their system that
requires you to provide specific information. The set up process may take several days on EDR’s end.
Contact Educators Resource by emailing edi@edresource.com. In the email, include the Qualifier, ID, and
Code fields in the (L6WB) screen, and ask for your Sign On ID, which you need when setting up your supply
options.
Setting Up the Vendor Database
You must set up a destination ID for Educators Resource and select the features to enable.
1. Set up Educators Resource as a vendor.
1.1 From the Master Menu, double-click .
1.2 In the Vendor Master tab, click .
1.3 Click the Vendor # box and type EDUCATOR.
1.4 Click the Name box and type EDR.
7 continue to next pageSetting Up & Using
the Educators Resource PSN
1.5 Click the Comm drop-down menu and select EDI.
1.6 Click .
Note: You can set up multiple vendors. If you do so, you must also set up parameters for each
vendor.
2. Set up the Supply Options dialog box.
2.1 Click . The Supply Options dialog box opens.
2.2 In the Location box, enter a G/L location, or accept the default of 1.
2.3 In the Destination ID box, type EDR.
2.4 In the Sign On ID box, enter the ID provided by Educators Resource.
Note: If EDR assigns you a Sign On ID that exceeds the 20-character limit for this box, email EDR
to request an alias. EDR then assigns a new Sign On ID under 20 characters and a cross-
reference email address where the confirmations are sent.
2.5 From the Supported Features list, select Purchase Order.
2.6 Click Exit.
8 continue to next pageSetting Up & Using
the Educators Resource PSN
3. Click .
Determining Default Shipping Parameters
Before you begin setting up the communication parameters for Educators Resource, determine your
default shipping method. These default settings can be changed at the time of transmission. Educators
Resource offers three shipping methods.
• Drop ship: This method sends the order directly to the Shipto address on the DDMS ticket attached
to the purchase order. Each drop ship order must be on a separate P/O when using this method.
• Wrap and label: This method separates each DDMS ticket in the transmission, which allows the
vendor to sort and package each end-user order separately. These orders are shipped to the dealer’s
default shipping address. Multiple orders can be sent on a single purchase order and are delivered to
you pre-sorted, packaged, and labeled by customer, which saves you the cost of packing the order
and printing labels.
• Stand alone: This method ships to the dealer’s default shipping address, but the orders are not
separated and packed for each end-user. This option is generally for a dealer’s stocking purchase
order.
After you choose your default shipping method, use the examples below to determine how to set your
Drop Ship and Wrap and Label parameters.
• To set your default shipping method to drop ship, set the Drop Ship parameter to Y.
• To set your default shipping method to wrap and label, set the Drop Ship parameter to N and the
Wrap and Label parameter to Y.
• To set your default shipping method to stand alone, set the Drop Ship parameter to N and the Wrap
and Label parameter to N.
Record these parameters so you may use them while setting up communication parameters.
9 continue to next pageSetting Up & Using
the Educators Resource PSN
Setting Communication Parameters
To set up communication parameters, use the following instructions.
1. Set up the Vendor Private Communications Network dialog box.
1.1 From the Master Menu, double-click .
1.2 Click . The Vendor Query dialog box opens.
1.3 Select Educators Resource and click OK.
1.4 Click to open the Vendor Private Communications Network dialog box.
1.5 From the Communication Type drop-down menu, select Private Communication Network.
1.6 From the Template drop-down menu, select PSN Master Template.
2. Set the general communication information parameters.
2.1 From the Program Group drop-down menu, select General Communication Information.
Note: To change a parameter, enter information in the Value column to add a default. Check the
Override box to allow the default to be changed at the time you transmit the P/O.
2.2 In the Pre-Receive Value box, type Y to pre-receive the purchase order, or type F to final-
receive the purchase order without pre-receiving.
Note: Final-receiving updates receipts and your ITEM AUX file, which allows you to skip the pre-
receiving process and automatically final-receive P/Os using wholesaler acknowledgments.
Pre-receive and final-receive work with automated short-buy (ASB) and manual
purchasing.
2.3 Check the Update Cost Override box. In the Value box, type N to not update the cost on your
purchase order. To update the cost, leave the box blank.
2.4 Check the Acknowledgment Printer Override box. In the Value box, enter the name of the
DDMS printer to use for printing the acknowledgment.
2.5 In the 850 P/O Format Value box, type 850EDR.
2.6 Check the Drop Ship Override box. In the Value box, set the drop ship default based on the
settings you chose in Determining Default Shipping Parameters.
2.7 Check the Wrap and Label Override box. In the Value box, set the wrap and label default based
on the settings you chose in Determining Default Shipping Parameters.
2.8 In the Acknowledgment Selector Value box, type GENACK.
2.9 Click .
10 continue to next pageSetting Up & Using
the Educators Resource PSN
3. Set the account information parameters.
3.1 From the Program Group drop-down menu, select Account Information.
3.2 Check the Account Number Override box. In the Account Number Value box, enter the
account number received from the vendor. Enter a dash (-) between the account number and
buy location. For example, you might enter 123456-7890.
3.3 Repeat Step 3.2 for each vendor account.
3.4 Click .
4. Set the shipto address parameters.
4.1 From the Program Group drop-down menu, select Shipto Address.
4.2 Complete the name and address boxes for the dealership’s default shipping address. We
recommend that you also complete the Shipto Contact Name box.
4.3 Click .
5. Set the supplier information parameters.
5.1 From the Program Group drop-down menu, select Supplier Information.
5.2 In the Standard Order Type Value box, type SA.
5.3 In the Wrap and Label Order Type Value box, type RL.
5.4 In the Drop Ship Order Type Value box, type DS.
5.5 Click .
11 continue to next pageSetting Up & Using
the Educators Resource PSN
6. Set the billto address parameters.
Note: You must set a billto address.
6.1 From the Program Group drop-down menu, select Billto Address.
6.2 Complete the name and address boxes for the dealership’s default billing address.
6.3 Click .
7. Set the end consumer information parameters.
7.1 From the Program Group drop-down menu, select End Consumer Information.
7.2 In the Purchase Order Number Qualifier Value box, type EU.
7.3 In the Purchase Order Number Source Value box, type P to pull the end user’s short P/O
number or type L to pull the end user’s long P/O number. If L is entered and a long P/O does
not exist, the short P/O number is used. A customer purchase order is not sent if this box is left
blank.
7.4 Check the Attention Source Override box. In the Value box, enter one of the following:
• Type A to use the additional name information from the Attention Special.
• Type W to use the additional name information from the Who Called Special.
• Type E to use the additional name information from the End Line Special.
Note: Attention options are only transmitted to the vendor on end-user drop ship orders.
7.5 Click .
12 continue to next pageSetting Up & Using
the Educators Resource PSN
8. Set the shipping information parameters.
8.1 From the Program Group drop-down menu, select Shipping Information.
8.2 Check the Method #1 Override box. In the Value box, type UP01.
Note: Method #1 is used as the default shipping method. Check the corresponding Override
boxes to change the shipping method to one of the methods listed below when
transmitting in the (SR)[B] screen.
8.3 Check the Method #2 Override box. In the Value box, type UP02.
8.4 Check the Method #3 Override box. In the Value box, type UP03.
8.5 Check the Method #4 Override box. In the Value box, type UP05.
8.6 Check the Method #5 Override box. In the Value box, type UP06.
8.7 Check the Method #6 Override box. In the Value box, type UP07.
8.8 Check the Method #7 Override box. In the Value box, type FX05.
8.9 Check the Method #8 Override box. In the Value box, type US02.
8.10 Check the Method #9 Override box. In the Value box, type US03.
8.11 Click .
13 continue to next pageSetting Up & Using
the Educators Resource PSN
Creating a Customer Record
In the Customer Master tab, create a customer with EDR as the account number. Before you can create the
customer record, you must select the option to allow for manual input.
1. From the text-based Master Menu, type LA to open the (LA) Customer and A/R Parameters screen.
2. Select the [C] Change action code.
3. Tab to the Allow Manual Input field and type Y.
14 continue to next pageSetting Up & Using
the Educators Resource PSN
4. Press Enter until the Press Any Key to Continue prompt displays.
5. Press Esc multiple times to return to the Parameter Editor window.
Setting Up a Customer Record
1. From the Master Menu, double-click . The Customer window opens and displays the
information for the last customer selected.
2. Click . The boxes in the window are cleared.
3. Click the Acct # box and type EDR.
4. Click the Name box and enter a name for the EDR customer.
5. Click .
6. To enter any additional customer records, repeat Steps 1-5.
7. If you changed the (LA) screen to allow for manual input, follow these instructions to change it back
to the original setting.
7.1 From the text-based Master Menu, type LA to open the (LA) screen.
7.2 Select the [C] Change action code.
7.3 Tab to the Allow Manual Input field and type N.
7.4 Press Enter until the Press Any Key to Continue prompt displays.
7.5 Press Esc multiple times to return to the Parameter Editor window.
15 continue to next pageSetting Up & Using
the Educators Resource PSN
Setting Up Trading Partner Parameters
To set up your trading partner parameters, use the following instructions.
1. From the text-based Master Menu, type SGA to open the (SGA) Trading Partner Parameters screen.
2. Select the [C] Change action code.
3. Tab to the Account # field.
4. Type EDR and press Enter.
5. At the Correct Record prompt, press Enter.
6. Tab to the Interchange ID Qualif field and type ZZ.
7. In the ID field, type 6307515670.
8. Tab to the Interchange Control Std field and type U.
9. In the Version field, type 00401.
10. In the Receivers Code Id field, type 6307515670.
11. Tab to the Responsible Agency Code field and type X.
12. In the Version field, type 004010.
13. In the Group Control field, type 1001.
14. Tab to the Test Indicator field and type P.
15. Tab to the Seg Term field and enter two tildes (type ~~).
Note: The tilde key (~) is usually located in the upper left corner of the keyboard.
16. Tab to the Default Selector field and type 850EDR.
16 continue to next pageSetting Up & Using
the Educators Resource PSN
Testing the System Parameters
After completing the Educators Resource communication setup, you are ready to send test orders. Email
edi@edresource.com to coordinate the test orders.
Send a test order for each of the following shipping methods: stand alone, drop ship, and wrap and
label. To determine the settings that you need to change to send each order, see Determining Shipping
Parameters to Change. To see how to change those parameters, see Changing Shipping Parameters.
When you have successfully completed each order, you can begin using the Educators Resource PSN to
transmit real information.
Using the Educators Resource PSN
Using the Educators Resource PSN involves the following:
• Transmitting the P/O
• Determining shipping parameters to change
• Changing shipping parameters
• Receiving acknowledgments
Transmitting the P/O
You can manually transmit a P/O to Educators Resource using the (SR)[B] screen.
1. From the text-based Master Menu, type SR to open the (SR) Purchase Order Reports screen.
2. In the (SR) screen, type B in the Request field.
3. Tab to the Who field and type N.
4. In the P/O Numbers field, enter the number of the P/O to send.
5. Press Enter until the Are You Sure prompt displays.
6. Type Y. The Parameters Override screen opens.
17 continue to next pageSetting Up & Using
the Educators Resource PSN
7. Before transmitting the P/O, see Determining Shipping Parameters to Change and Changing
Shipping Parameters to change your shipping parameters to drop ship, wrap and label, or stand
alone, if necessary.
8. Once you are ready to transmit the P/O, type C at the Enter Number For Selection prompt.
9. The P/O is transmitted to EDR.
Determining Shipping Parameters to Change
Refer back to Determining Default Shipping Parameters to see what you set as your default.
Once you know your system‘s default parameters, you can quickly change the shipping method to one
of the other two options that Educators Resource supports. From the examples below, determine what
parameters you need to change during transmission.
Changing the Shipping Method to Drop Ship
• If your default shipping method is wrap and label, change the Drop Ship parameter to Y.
• If your default shipping method is stand alone, change the Drop Ship parameter to Y.
Changing the Shipping Method to Wrap and Label
• If your default shipping method is drop ship, change the Drop Ship parameter to N and the Wrap
and Label parameter to Y.
• If your default shipping method is stand alone, change the Wrap and Label parameter to Y.
Changing the Shipping Method to Stand Alone
• If your default shipping method is drop ship, change the Drop Ship parameter to N and the Wrap
and Label parameter to N.
• If your default shipping method is wrap and label, change the Wrap and Label parameter to N.
Once you know which parameters to change, continue to the next heading to change the shipping
parameters and transmit the P/O.
Changing Shipping Parameters
Before completing transmission of the purchase order, you can change the values you entered when
setting up communication parameters, if you checked the corresponding Override box.
Once you’ve completed the (SR) screen, the Parameters Override screen opens. The Parameter Group
options display.
Note: Changing parameters at communication time is not required if using your default communication
settings.
Changing the Drop Ship Parameter
1. At the Enter Number For Selection prompt, type 0 to select the General Communication Information
parameter group.
18 continue to next pageSetting Up & Using
the Educators Resource PSN
2. At the Enter Number For Selection prompt, enter the number that corresponds to the Drop Ship line.
3. In the 1-20 field, your default setting displays. Type Y or N to change the shipping parameter.
4. Press Enter.
5. At the Enter Number For Selection prompt, type C to complete the transmission and transmit the
P/O to EDR or press Esc to change additional information.
Changing the Wrap and Label Parameter
1. At the Enter Number For Selection prompt, type 0 to select the General Communication Information
parameter group.
2. At the Enter Number For Selection prompt, enter the number that corresponds to the Wrap and
Label line.
19 continue to next pageSetting Up & Using
the Educators Resource PSN
3. In the 1-20 field, your default setting displays. Type Y or N to change the shipping parameter.
4. Press Enter.
5. At the Enter Number For Selection prompt, type C to complete the transmission and transmit the
P/O to EDR or press Esc to change additional information.
Requesting Acknowledgments
Once the purchase order is transmitted, you can use PSN to retrieve a shipping acknowledgment from
EDR and automatically update your purchase order with the vendor’s cost and shipped quantities. It takes
approximately 30 minutes for the vendor to process the acknowledgment. Therefore, you must wait for the
time allotted before completing the following steps.
1. From the text-based Master Menu, type SR to open the (SR) screen.
2. Type C in the Request field.
3. At the Are You Using Private Supply Network query, type Y. The (SRC) Acknowledgment Request
screen opens.
4. Tab to the Vendor # field and type EDR to download all acknowledgments.
20 continue to next pageSetting Up & Using
the Educators Resource PSN
Note: Specifying a single purchase order number is not a valid option for EDR. You must retrieve
acknowledgments by specifying EDR in the vendor field.
5. At the Get Acknowledgment prompt, type Y.
6. In the P=Print Acknowledgment field, do one of the following:
• Type R to receive and print the acknowledgment.
• Type P to print the acknowledgment without pre-receiving it.
• Type F to final-receive a P/O and print an acknowledgment.
Note: If you choose P to print the acknowledgment without pre-receiving it, the purchase order
can no longer be received in the (SR) screen. To receive the acknowledgment later, go to the
Purchase Order Entry window.
7. In the Printer field, enter the name of the DDMS printer to use and press Enter.
8. At the Are You Sure prompt, type Y.
Including EDR Items in ECinteractivePLUS
Search
If you have ECinteractivePLUS® customers who use Enhanced Content and who also order school supplies
from Educators Resource, you can set up your system so keyword searches provide more useful item
results. Do this by setting up the Advanced Search feature group setting to use Standard Content instead of
Enhanced Content.
Enhanced search also offers more content-rich data while shopping, including item attribute filters, bought
and consider items, up-selling, cross-selling, and much more.
Note: The following instructions apply to customers who are using Enhanced Content. If the customer
does not have Enhanced Content enabled, the following instructions do not apply.
21 continue to next pageSetting Up & Using
the Educators Resource PSN
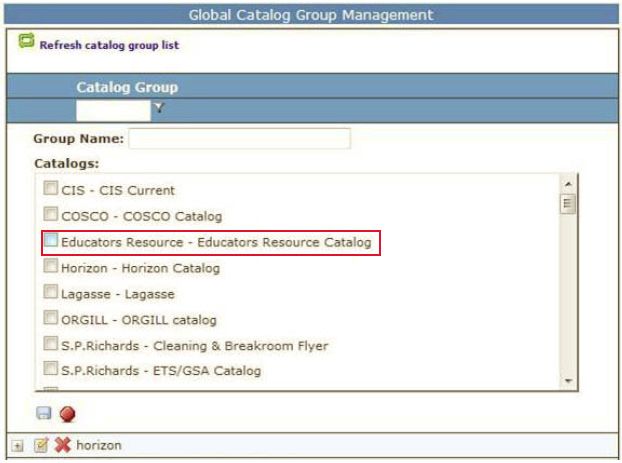
Setting Up Catalog Groups to Include EDR
If you have not previously done so, you must add the EDR catalog to your existing catalog group(s), or you
can create a new catalog group to which the Educators Resource catalog can be added.
If you have already added the EDR catalog to a catalog group, go to the heading Adjusting Feature Group
Settings.
1. Click the Product Management training toolbar and select Global Catalog Group Management. The
Catalog Group Management page opens.
2. Add or edit catalog groups.
• To add a new catalog group, click .
• To edit an existing group, click beside the catalog group to change.
3. In the Group Name box, enter a new group catalog name if you are adding a new catalog group, or
enter a new name over the existing name if you are changing a group.
4. Under the Catalogs heading, scroll down the list until the Educators Resource Catalog displays.
Check the corresponding box.
5. Add other catalogs to this catalog group as needed.
6. Click . The Change Has Been Accepted message displays. To view the index status, click View
Index Status.
7. To specify a default site group, click the down arrow in the list and select Set As Default Group. The
default setting is saved.
8. Assign this catalog group to those shoppers who have Enhanced Content enabled and who also
shop for EDR products. You can assign the group to specific shoppers using the Catalog Groups
option on the Customer View page, or you can use the Parameter Management page to change the
catalog group for some or all of your customers.
22 continue to next pageSetting Up & Using
the Educators Resource PSN
Adjusting Feature Group Settings
After you add the Educators Resource catalog to a catalog group and assign the group to the appropriate
shoppers, you must adjust a feature group setting.
When using Enhanced Content, the feature group assigned to the shopper should be set up as follows:
• Under Choose Content for Quick Search, select Enhanced Content.
• Under Choose Content for Advanced Search, select ECinteractive Standard Content.
Doing this allows the shopper to perform a Quick Search from the Wholesalers’ Enhanced content.
However, the returned item results also include the additional EDR catalog products when using Advanced
Search.
1. Click the Consumer Config training toolbar and select Feature. The Feature Settings page opens.
2. To add a new feature group setting, click . To change a record, click .
3. Click the Enhanced Content tab.
4. Under Choose Content for Quick Search, select Enhanced Content.
5. Under Choose Content for Advanced Search, select ECinteractive Standard Content.
6. Set the remaining feature group settings as needed. For details concerning Feature settings, see
your ECinteractivePLUS Administrative online help.
7. Click Save or Update to save your changes.
8. Assign this feature group to the appropriate shoppers. You can use the User Group Settings on
the Customer View page to assign the group to specific shoppers, or you can use the Mass Setting
Maintenance page to change the group for some or all of your customers at once.
23You can also read