Make your presentation great with Prezi
←
→
Page content transcription
If your browser does not render page correctly, please read the page content below
HSMC Library & Information Service 2013

   Make your presentation great with Prezi

Signing up to Prezi
Before being able to create your presentation using Prezi, you will be required to
sign up and create an account.

   1. Go to the Prezi website at www.Prezi.com.

   2. Click Sign up             or Sign up now at top of the page.

   3. Click Student & Teacher licenses                             (under the 3 license
      choices).
   4. Click on the Enjoy Edu license type.
   5. When prompted, enter your academic email address (this will be your username
      when logging into your Prezi.com account) and click Continue.
   6. When prompted, enter the details of your educational establishment and check the
      checkbox to confirm you are a student or staff member. Once you have entered
      your details, click Continue to submit your details.

You will now receive a confirmation email with a verification link. Follow the instructions in the
email to complete the signing up process.

Now that you have created an account, you are ready to make your first presentation!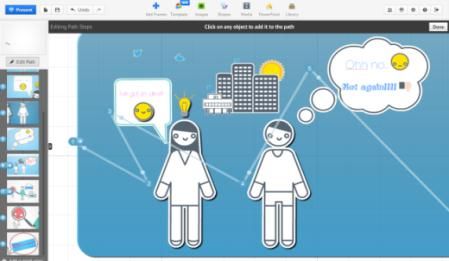
The Prezi Editor Interface
Within the Prezi Editor Interface, controls and options are grouped together on the Top Menu
based on their function. For example, the insert options are grouped together and kept
separate from the output options.

Top Menu – Left-hand side:          These options allow you present your presentation from
                                    the beginning, undo, redo and save any changes.

Top Menu - Centre:                  These options are used to insert content such as
                                    images, videos, icons and frames onto the canvas for
                                    your presentation.

Top Menu – Right-hand side:         These options allow you to invite others to view your
                                    presentation online, save your presentation as a PDF,
                                    view settings, view help and save and close your
                                    presentation.

Left Sidebar:                       This pane shows the running order of your
                                    presentation.

Zoomable Prezi Canvas:              The zoomable workspace where your presentation is
                                    constructed and edited is known as the canvas. This is
                                    a very large blank space to which you can add text,
                                    videos, images and other content.
Creating your first Prezi presentation
This section of the guide explains how the controls in Prezi Editor are used to create your
very own presentation.

The Prezi editor controls
Moving around the canvas:              Hover the cursor over the canvas, hold the left mouse
                                       button down until the Grab       icon appears, and
                                       move the mouse.

Zooming in and out:                    Move the cursor to the extreme right of the canvas and
                                       the zoom options will appear. To zoom in and out from
                                       the canvas, single click on the Zoom In       or Zoom
                                       Out     buttons. Alternatively, you can use the scroll
                                       wheel on your mouse to zoom.

Show Overview:                         Once you have placed content on the canvas, you can
                                       use the Overview      button to view it all
                                       simultaneously. This will display an overview of the
                                       entire canvas.

Making a selection:                    To make a single selection, left click on the object/text
                                       you wish to select. To perform a multi select, hold the
                                       Ctrl or Shift key, and click on multiple objects. To
                                       perform a large selection, hold the Shift key and click
                                       and drag the cursor over the area containing the
                                       objects you wish to select.

Working with text
Any text you insert onto the canvas can be edited and customised. You can change the text
type (title, subtitle and body), size, colour, alignment and add bullet points. Various fonts are
available to use, but can only be changed when the theme is changed. Themes will be
covered later in this guide.

To insert text onto the canvas:

   1. Hover the cursor over the canvas.
   2. Click on the canvas where you wish to add
      your text.
   3. Enter your text into the text entry box.
   4. To close the text entry box, click anywhere
      on the canvas.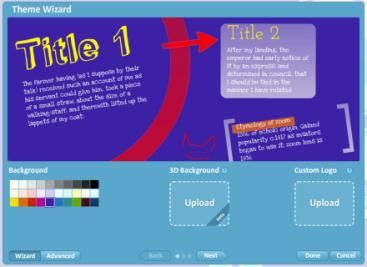
To alter text colour:

    1. Double click on the text you wish to edit.
    2. Highlight the text inside the box.
    3. Click on the Colour Selection
       button.
    4. From the menu, select the colour you wish to apply to your text.
    5. Click anywhere on the canvas outside the text entry box to apply your changes.

To move text on the canvas:

    1. Single click on the piece of text you wish to move.
    2. You will now see the text you have selected surrounded by a blue
       box with other options housed above in grey boxes. This is known
       as the Transformation Tool.
    3. Click and hold the Grab    button in the centre of the box and
       drag the mouse to move the text.
    4. Click anywhere on the canvas to set your text at that location.

To resize text:

    1. Single click on the piece of text to display the Transformation Tool.
    2. Single click the Increase      or Decrease        buttons to alter the size.
    3. Alternatively, you can resize the text by clicking and dragging any corner of the blue
       box     surrounding the text. This method allows you to resize text more precisely.
    4. Click anywhere on the canvas to finish.

To rotate text:

    1. Single click on the piece of text to display the Transformation Tool.
    2. Move the cursor close to the corner of the blue box and when the rotate          icon
       appears, click and drag the mouse to rotate the text.
    3. Click anywhere on the canvas to finish.

Working with frames
Frames are useful to group several objects together on the canvas, allowing them to be
viewed simultaneously when the presentation is viewed. Frames can be different shapes
and sizes, both visible and invisible, and can be used to link objects together when using
paths.

There are several frames to choose from, including brackets, circles, rectangles and invisible
frames.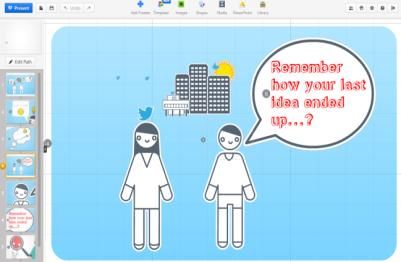
To insert a frame:

   1. On the canvas, arrange any content together which you wish to appear inside the
      same frame.

   2. Click Frames & Arrows                 (Top Menu – Centre).
   3. From the drop down menu, select Draw Rectangle Frame.
   4. To draw the frame, click and drag around the objects and release the mouse button.

As shown below, the frame will now appear
around the content. The frame and any content
contained inside will automatically be added to
the Left Sidebar.

You can also add invisible frames to your presentation using the same frame menu. Invisible
frames are particularly useful when you wish to link sections of your presentation together
using paths, but don’t wish to see the physical frame around the content.

Alternatively, you can add a layout to your presentation from the Add Frames menu. This
allows you to add text, images and other media content to a preassembled arrangement of
frames.

Themes and the Theme Wizard
To help make your presentation a little more interesting, you can change the theme you are
using. This allows you to change the background colour, font type and colour, add a custom
logo and change the colour of shapes, frames, arrows and lines.

You can select a theme from a collection of pre-sets using the Themes window or you can
manually adjust the individual properties for each text type and colour, frame, shape using
the Theme Wizard.

Pre-set themes

To select a pre-set theme for your presentation:

   1. Click Template         (Top Menu – Centre).
   2. When the Themes window appears on screen,
      select one of the themes listed.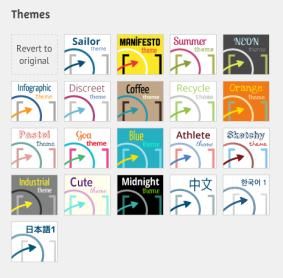
The new theme has now been applied. Note the changes to the background colour, font
colour and frame colours. Changes will be made to all text, frames and shapes visible on the
canvas.

To revert back to your previously used theme, click Template and select Revert to original
from the list of themes.

Theme Wizard
The Theme Wizard is used to manually select which background, font type, colours and
logo you would like to use in your presentation. You can either use the basic Theme Wizard
to alter the colour properties of the objects (select a colour from a palette) or you can use the
Advanced Theme Wizard, allowing you to input specific RGB colour values. Both menus
contain a preview window, allowing you to see a visual representation of how your changes
alter objects on the canvas, as they are made.

To edit your theme using the Theme Wizard:

   1. Click Template (Top Menu – Centre).
   2. Select Customize Current Theme.
   3. Select a colour from the palette for your background colour. You will see the
      background colour change in the preview window.
   4. To view more options, select Next at the bottom of the Theme Wizard.

   5. Once you have made your changes to your theme, click Done.

If you would like to enter your own RGB values instead of selecting a colour from the palette,
select Advanced at the bottom left corner of the Theme Wizard. Enter your RGB values
and once satisfied, click Done.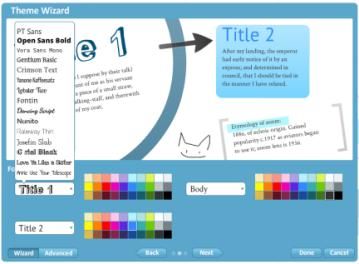
You can save your customised theme by selecting Save current theme from the Themes
window. It will then be added to the list of themes under Your Themes.

Inserting media content
Prezi allows you to insert a wide range of media content into your presentation. You can
insert images, videos, PDFs, SWF files and live links to videos on YouTube. All media
content placed on the canvas can be resized, moved and rotated.

               Note: The maximum file size for
          all media content is 50MB.

Inserting images
There are two ways to insert an image onto your presentation canvas. You can either upload
an image from a location on your computer or you can search Google Images from within
the Prezi editor. Prezi supports image files with .JPG, .PNG and .GIF extensions. If your
image file is not supported, you will be unable to locate it when asked to browse for an
image to insert.

To upload an image from your computer:

   1.   Click Insert       (Top Menu – Centre).
   2.   From the drop down menu, select Image….
   3.   Click Select files…, located at the bottom of the dialog box.
   4.   Locate the image you wish to insert and click Open.
   5.   The image will now be placed onto the canvas.

You can also upload video files, PowerPoint files and PDF files using this menu as it is not
restricted to image upload only.

Alternatively, you can search Google Images
directly within the Prezi editor.

To insert an image directly from Google Images:

   1. Click Insert (Top Menu – Centre).
   2. From the drop down menu, select Image….
   3. When the search box appears, type in the
      name of the image you are looking for. For
      copyright reasons, it is advised you tick the
      checkbox to Search only for images licensed for commercial use before
      searching.
   4. Click the Search      button to begin searching for your
      image.
   5. Your search results will now appear on the canvas. You
      can scroll through and click on individual images to
preview them. Images can also be moved around by clicking and dragging them,
before they have been inserted.
6. Once you have selected an image from the list, click Insert to place the image on the
canvas.
Editing images
After inserting an image onto the canvas, you can alter the size, location and orientation
using the Transformation Tool. You can also crop any images you have uploaded.
To crop your image:
1. Single click on the image to display the Transformation Tool.
2. Click Crop Image (above the image).
3. The Crop tool will now be visible around the image.
4. Click and drag the corners one at a time to crop the image.
5. Once you are satisfied with your cropped image, click anywhere on the canvas for
your changes to take effect.
Inserting video files
Prezi Editor allows you to add videos to your presentation both directly from your computer
and through a live link to YouTube. Videos uploaded from your computer will be embedded
into the presentation, meaning they do not have to be saved inside specific folders to ensure
playback.
Note: It is worth noting that YouTube videos can only be
viewed with an active internet connection, even if you save and
download your presentation.
The following video file formats are supported by Prezi:
FLV
To insert a video file AVI your
directly from WMV
M4Vcomputer hard drive: MPEG
F4V MOV 3GP MPG MP4
To insert a video from your computer:
1. Click Insert (Top Menu – Centre).
2. From the drop down menu, select From File….
3. Locate and select the video file you wish to insert, and click Open.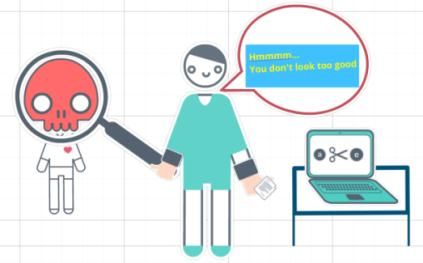
You can also use the Insert option to import a variety of file types including images,
PowerPoint and PDF files as upload is not restricted to video only.

To insert a live link to a video on YouTube:

   1. Open YouTube.
   2. Copy URL of the video you are viewing.
   3. In Prezi, click Insert (Top Menu –
      Centre).
   4. From the drop down menu, select
      YouTube video....
   5. When prompted, paste the URL of
      the video you wish to add.
   6. Click Insert.

To control the video playback and audio options, use the navigation bar at the bottom of the
video.

Videos can be moved, resized and rotated in the same way as images and text on the
canvas using the Transformation Tool.

Adding a path
To create a path for your Prezi:

   1. Click Edit Path                (Left Sidebar).
   2. Use the Zoom Out        button to allow you to see your full presentation on the
      canvas.
   3. Hover over the object or frame where you would like to add the path. A small plus
      sign    and a number       will appear next to the object/frame you are hovering over.
   4. Click on the object/frame and it will be added as a path in the Left Sidebar.

   5. Click on another object/frame to add this as path two, and continue to do so until you
      have constructed a basic running order for your presentation.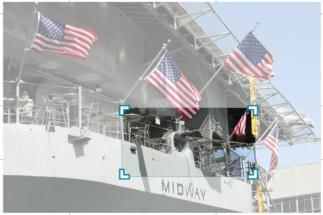
A visual route of the path order is displayed on the
canvas between the linked objects/frames. The
small images displayed in the Left Sidebar show the
running order and how objects/frames will be
displayed when presented. This is similar to the slide
running order displayed in PowerPoint.
Inserting a path
When linking objects/frames together, you can also insert a path between two linked paths.
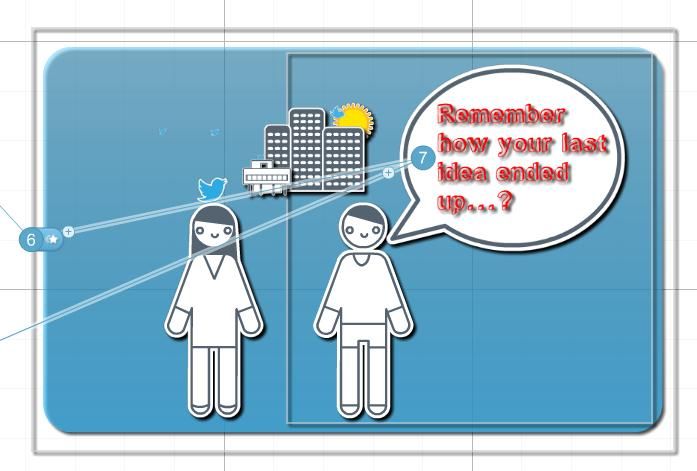
The following images show path six set to display the entire content contained within the
frame, before moving to path seven to display the text inside the speech bubble. If you
wanted the presentation to zoom into the male character before zooming into the speech
bubble, you could insert a path between paths six and seven.
To insert a path between two existing paths:
1. Locate the path you wish to insert another path after (in this case path six).
2. Click and drag the small plus sign displayed after the path number and
place it on the object/frame you wish to be inserted. In this example, a small invisible
frame has been added around the head of the male character and the path is linked
directly to this.
Once you have released the mouse button, the paths will update. You can see the visual
path and the path numbers will change to represent the new running order. The path order
displayed on the Left Sidebar will also update.Reordering paths
You can reorder paths quickly using Left Sidebar when in Edit Path
Mode. Any alterations you make to the running order will be
automatically
updated on the
canvas. This
means that the
path numbers
listed next to
objects/frames and the visual path displayed between objects will
change.
To reorder your presentation paths:
1. Click Edit Path (Left Sidebar).
2. Click on the path you wish to move in the Left Sidebar.
3. Click and drag this path to the location in the Left Sidebar where you wish it to
appear.
4. Release the mouse and the ordering will be updated, as shown below.
Removing paths
There are two ways in which you can delete any path you have created. You can either
remove the path from the Left Sidebar, or you can remove the path directly from the canvas.
To remove a path from the Left Sidebar:
1. Click Edit Path (Left Sidebar).
2. Hover the cursor over the path you wish to remove.3. Click on the cross located above the path image.
To remove a path from the canvas:
1. Click and hold the path point you wish to remove.
2. Drag the point onto an empty space on the canvas.
3. Release the mouse button.
The path link you deleted will be removed from the Left Sidebar.
Presenting your finished presentation
Prezi offers you a variety of ways in which you can view and share your presentation with
others. You can view your presentation in Edit Mode, save it as a PDF, print, present online
(up to 10 viewers at once), save for offline viewing and view using the Prezi viewer app
(iPhone/iPad/iPod).
To view your presentation in Edit Mode:
1. Click on the first path in the Left Sidebar.
2. Click on the next path you wish to view on the Left Sidebar. Alternatively, use the
right and left arrow keys to move forward and backwards between paths.
To view your presentation in Prezi Editor:1. Click on the first path in the Left Sidebar. 2. Select Present (Top menu – Left hand side). 3. Once in full screen mode, press the left arrow key to fully expand your first slide. As before, you can control your presentation using the left and right arrow keys. You can also click the mouse on any part of the canvas to zoom into that specific area. To continue the presentation, press the left or right arrow key to move to the previous or next path. You can also use the left and right arrow buttons (bottom of the screen) to move forward or backwards between paths. Alternatively, you can also use the Playback Bar to move forward or backwards between paths. Click and drag to the left to go back and right to go forward. To enter and exit full screen mode, use the Fullscreen button, located at the bottom right of the screen. You can use the Esc key on the keyboard to exit full screen mode. Your presenation can be set to automatically move between paths using the Autoplay button. This allows you to set your presentation to automatically progress to the next path every 4, 10 or 20 seconds. Saving and printing as a PDF You can save your presentation as a PDF file, allowing it to be viewed by a range of software applications designed to read PDFs, for example, Adobe Acrobat reader. The PDF file will contain a visual overview of your entire presentation and display each individual path on a separate page. This is similar to how a PowerPoint presentation would appear if saved as a PDF file. The PDF can be printed using File > Print… in most software applications. To create a PDF of your presentation: 1. Click the Share button (Top menu – Right-hand side). 2. From the drop down menu, select Download as PDF. 3. Allow the pages to be added to create the PDF. 4. Once the pages have been added, select Save PDF. 5. Select the location you wish to save the PDF file to, enter a file name and click Save. Your PDF file will now be available to open from the location you chose to save it in (providing you have software installed to open and read PDF files).
Tip: You can print your PDF file by selecting File > Print or
          Ctrl + P in the application you have used to view your PDF file, for
          example, Adobe Acrobat Reader.

Downloading your Prezi
Prezi Editor allows you to create a portable presentation file to view and present offline or
burn to a CD/pen-drive. Your portable presentation file cannot be edited offline, unless you
are signed up as a Pro user and use the Prezi Desktop software.

               Note: Youtube embedded videos require internet connection
          for playback

   1. In the Prezi Editor, click Exit (Top menu – Right-hand side).
   2. On the next page, click Download             (under your Prezi).
   3. When prompted to choose a format to download, select the first option - Export to
      portable Prezi to present offline and click Download. Your downloadable
      presentation file will then be compiled.

   4. When prompted, click on click this link to download to download your presentation
      file.
   5. You will be asked to either open or save your downloaded file. Click Save, enter a file
      name, find a location to save your file, and click Save.

   6. Once the download is complete, a compressed folder (.ZIP) containing your
      presentation will be visible. Right click on the folder and select Extract All…, enter a
      location to save your extracted data, and click Extract.
7. The newly created (unzipped) folder will then appear at this location. Open both the
folder and sub folder, followed by the Content folder. Once inside the Content folder,
double click on the Prezi application icon to load your presentation file.
8. When the security warning appears on screen, click Run to launch your presentation.
Your presentation will now load in separate browser. You have the same playback options
available to you as you did when viewing your presentation online individually or with others.
Note: Do not remove any files or the Prezi application file from
this folder as they are linked together for playback. Moving any files
to other location can result in your presentation failing to play.
Adapted from “Creating Effective Presentations with Prezi” from the University of Edinburgh
http://www.ed.ac.uk/schools-departments/information-services/services/help-consultancy/is-
skills/catalogue/posters-presentations/preziYou can also read