REMOTE SUPPORT JUMPOINT GUIDE - BEYONDTRUST
←
→
Page content transcription
If your browser does not render page correctly, please read the page content below
Remote Support
                                                                   Jumpoint Guide

©2003-2021 BeyondTrust Corporation. All Rights Reserved. Other trademarks identified on this page are owned by their respective owners. BeyondTrust is not a chartered bank or trust company, or   TC:9/27/2021
depository institution. It is not authorized to accept deposits or trust accounts and is not licensed or regulated by any state or federal banking authority.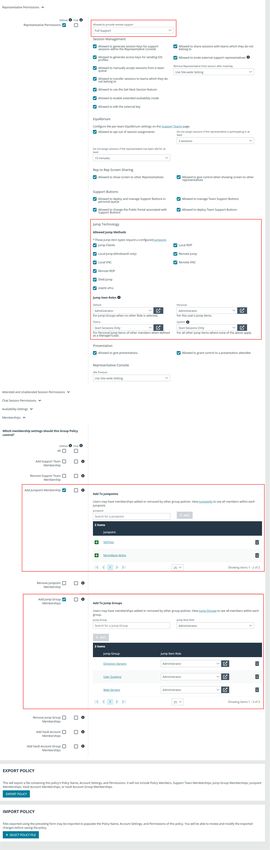
REMOTE SUPPORT
                                                                                                                                                                                          JUMPOINT GUIDE

                                 Table of Contents

                                      Remote Support Jumpoint Guide: Unattended Access to Computers in a Network                                                                   5
                                      Recommended Steps to Implement BeyondTrust Jump Technology                                                                                   6
                                      Use Jump Item Roles to Create Permission Sets for Jump Items                                                                                 7

                                      Create Jump Policies to Apply to Jump Items                                                                                                  8
                                      Use Jump Groups to Determine Which Users Can Access Which Jump Items                                                                         9
                                      Requirements and Considerations to Install a Jumpoint                                                                                      11
                                          Prerequisites                                                                                                                          11
                                          Considerations                                                                                                                         11
                                              Security                                                                                                                           11
                                              File/Print Sharing                                                                                                                 12
                                              BeyondTrust Considerations                                                                                                         12
                                          Jumpoint Requirements                                                                                                                  12
                                              Local Jump Sessions - Target System Requirements                                                                                   12
                                              Remote Jump Sessions - Host System Requirements                                                                                    12
                                              Remote Jump Sessions - Target System Requirements                                                                                  13
                                              Shell Jump Sessions - Host System Requirements                                                                                     13
                                              Shell Jump Sessions - Target System Requirements                                                                                   13
                                              vPro Sessions - Host System Requirements                                                                                           13
                                              vPro Sessions - Target System Requirements                                                                                         14

                                              Local RDP Sessions - Target System Requirements                                                                                    14
                                              Remote RDP Sessions - Host System Requirements                                                                                     14
                                              Remote RDP Sessions - Target System Requirements                                                                                   14
                                              Local VNC Sessions - Target System Requirements                                                                                    14
                                              Remote VNC Sessions - Host System Requirements                                                                                     14
                                              Remote VNC Sessions - Target System Requirements                                                                                   15
                                      Configure and Install a Jumpoint for Windows Systems                                                                                       16
                                          Configure                                                                                                                              16
                                          Download                                                                                                                               18
                                          Install                                                                                                                                19
                                              Deploy Behind Proxy                                                                                                                20
                                              Configure Windows Jumpoint as a Proxy Server                                                                                       21

SALES: www.beyondtrust.com/contact             SUPPORT: www.beyondtrust.com/support                 DOCUMENTATION: www.beyondtrust.com/docs                                                                   2
©2003-2021 BeyondTrust Corporation. All Rights Reserved. Other trademarks identified on this page are owned by their respective owners. BeyondTrust is not a chartered bank or trust company, or   TC: 9/27/2021
depository institution. It is not authorized to accept deposits or trust accounts and is not licensed or regulated by any state or federal banking authority.
REMOTE SUPPORT
JUMPOINT GUIDE
Intel® vPro 21
Shell Jump 24
TTL 28
Jumpoint Setup Completion and Revision 29
Clustered Jumpoint Setup: Adding Nodes 29
Configure and Install a Jumpoint for Linux Systems 30
Configuration 30
Download 31
Install 32
Clustered Jumpoint Setup: Adding Nodes 32
Configure Linux Jumpoint as a Proxy Server 33
Use a Jumpoint to Jump to a Remote System 35
Start a Local or Remote Jump Session 35
Start a Local or Remote RDP Session 37
Start a Local or Remote VNC Session 40
Start a Shell Jump Session 41
Start an Intel® vPro Session 42
Use Jump Shortcuts to Jump to Remote Systems 44
Create and Use Remote or Local Jump Shortcuts 50
Create and Use Local or Remote RDP Shortcuts 53
Create and Use Local or Remote VNC Shortcuts 57
Create and Use Shell Jump Shortcuts 60
Create and Use Intel vPro Shortcuts 62
Use Cases for Jump Item Implementation 64
Basic Use Case 64
Advanced Use Case 67
Appendix: Require a Ticket ID Workflow for Jump Item Access 73
What Users See 73
How It Works 73
Create a Jump Policy Requiring Ticket ID Approval 73
Connect External Ticket ID System to Jump Policies 74
API Approval Request 75
API Approval Response 76
SALES: www.beyondtrust.com/contact SUPPORT: www.beyondtrust.com/support DOCUMENTATION: www.beyondtrust.com/docs 3
©2003-2021 BeyondTrust Corporation. All Rights Reserved. Other trademarks identified on this page are owned by their respective owners. BeyondTrust is not a chartered bank or trust company, or TC: 9/27/2021
depository institution. It is not authorized to accept deposits or trust accounts and is not licensed or regulated by any state or federal banking authority.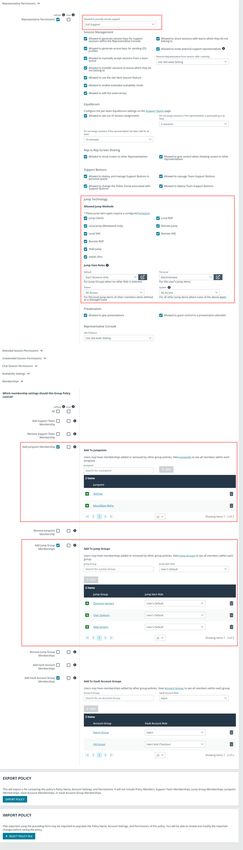
REMOTE SUPPORT
                                                                                                                                                                                          JUMPOINT GUIDE

                                          Error Messages                                                                                                                         76
                                      Appendix: Jumpoint Error Message Reference                                                                                                 78

SALES: www.beyondtrust.com/contact             SUPPORT: www.beyondtrust.com/support                 DOCUMENTATION: www.beyondtrust.com/docs                                                                   4
©2003-2021 BeyondTrust Corporation. All Rights Reserved. Other trademarks identified on this page are owned by their respective owners. BeyondTrust is not a chartered bank or trust company, or   TC: 9/27/2021
depository institution. It is not authorized to accept deposits or trust accounts and is not licensed or regulated by any state or federal banking authority.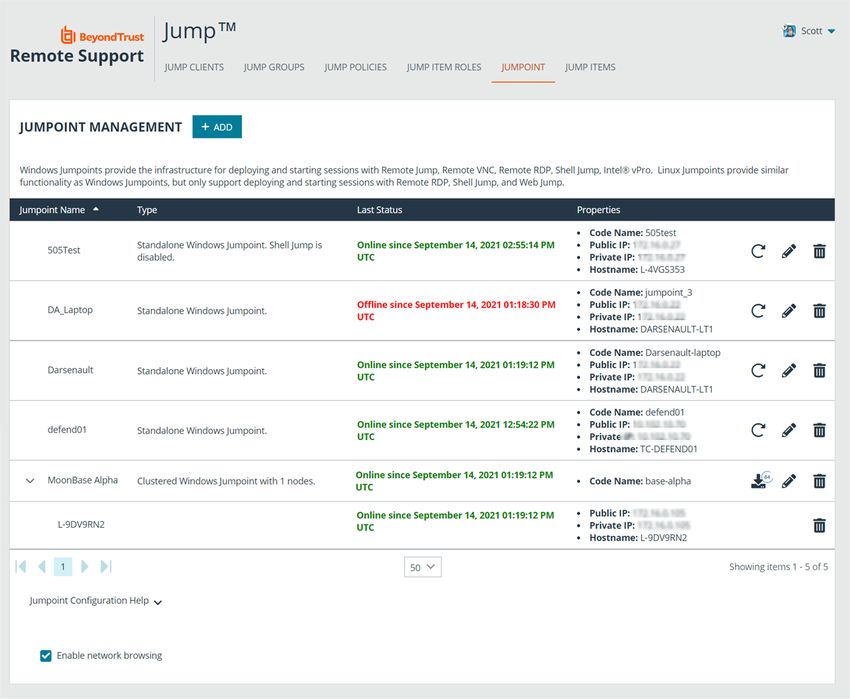
REMOTE SUPPORT
                                                                                                                                                                                          JUMPOINT GUIDE

      Remote Support Jumpoint Guide: Unattended Access to
      Computers in a Network
      With BeyondTrust Jump Technology, a user can access and control remote, unattended computers in any network. Jump Technology is
      integral to the BeyondTrust software offerings. Because BeyondTrust Remote Support is licensed per active representative and not per
      remote system, Jump Technology is a cost-effective way to reach every device in your enterprise.

      A Jumpoint acts as a conduit for unattended access to computers on a known remote network. A single Jumpoint installed on a computer
      within a LAN is used to access multiple systems, eliminating the need to pre-install software on every computer you might need to access.
      Within a LAN, the BeyondTrust user's computer can initiate a session to a Windows system directly without using a Jumpoint, if
      appropriate user permissions are enabled. This is called a Local Jump. A Jumpoint is needed only for a Remote Jump, when the
      BeyondTrust user's computer cannot access the target computer directly.

SALES: www.beyondtrust.com/contact             SUPPORT: www.beyondtrust.com/support                 DOCUMENTATION: www.beyondtrust.com/docs                                                                   5
©2003-2021 BeyondTrust Corporation. All Rights Reserved. Other trademarks identified on this page are owned by their respective owners. BeyondTrust is not a chartered bank or trust company, or   TC: 9/27/2021
depository institution. It is not authorized to accept deposits or trust accounts and is not licensed or regulated by any state or federal banking authority.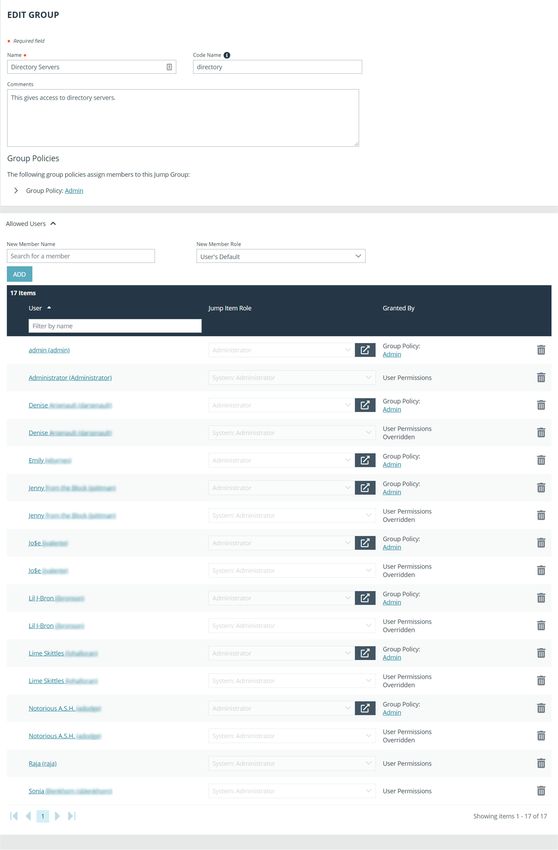
REMOTE SUPPORT
                                                                                                                                                                                          JUMPOINT GUIDE

      Recommended Steps to Implement BeyondTrust Jump
      Technology
      When working with Jump Technology, there are a lot of moving parts. Here is a recommended order of implementation to make full use of
      your software.

            1. Add Jump Item Roles. Jump Item Roles determine how users are allowed to interact with Jump Items. These roles are applied to
               users by means of individual account settings, group policies, and/or when added to Jump Groups.

                   For more information about Jump Item Roles, see "Use Jump Item Roles to Create Permission Sets for Jump Items" on page
                   7.

            2. Add Jump Policies. Jump Policies are used to control when certain Jump Items can be accessed by implementing schedules.
               Jump Policies are applied to Jump Items upon creation and can be modified from the representative console.

                   For more information about Jump Policies, see "Create Jump Policies to Apply to Jump Items" on page 8.

            3. Add Jump Groups. A Jump Group is a way to organize Jump Items, granting members varying levels of access to those items.
               Users are assigned to Jump Groups either individually, by means of group policy.

                   For more information about Jump Groups, see "Use Jump Groups to Determine Which Users Can Access Which Jump Items"
                   on page 9.

            4. Deploy Jumpoints. A Jumpoint acts as a conduit for unattended access to Windows computers on a known remote network. A
               Jumpoint is necessary to use Remote Jumps, Remote RDP, Remote VNC, Shell Jumps, and Intel® vPro sessions. Local Jumps,
               Local RDP, and Local VNC can be performed to systems on the same local network.

                   For more information about deploying Jumpoints, see "Requirements and Considerations to Install a Jumpoint" on page 11,
                   "Configure and Install a Jumpoint for Windows Systems" on page 16, and "Configure and Install a Jumpoint for Linux Systems"
                   on page 30.

            5. Create Jump Shortcuts. A Jump Shortcut is a quick way to start sessions with frequently accessed remote systems. Jump Items
               are created from the representative console or are imported from /login > Jump > Jump Items. When creating or importing Jump
               Items, be sure to set the Jump Group and Jump Policy to determine who can access the Jump Item and with what restrictions.

                   For more information about Jump Shortcuts, see "Use Jump Shortcuts to Jump to Remote Systems" on page 44.

SALES: www.beyondtrust.com/contact             SUPPORT: www.beyondtrust.com/support                 DOCUMENTATION: www.beyondtrust.com/docs                                                                   6
©2003-2021 BeyondTrust Corporation. All Rights Reserved. Other trademarks identified on this page are owned by their respective owners. BeyondTrust is not a chartered bank or trust company, or   TC: 9/27/2021
depository institution. It is not authorized to accept deposits or trust accounts and is not licensed or regulated by any state or federal banking authority.
REMOTE SUPPORT
JUMPOINT GUIDE
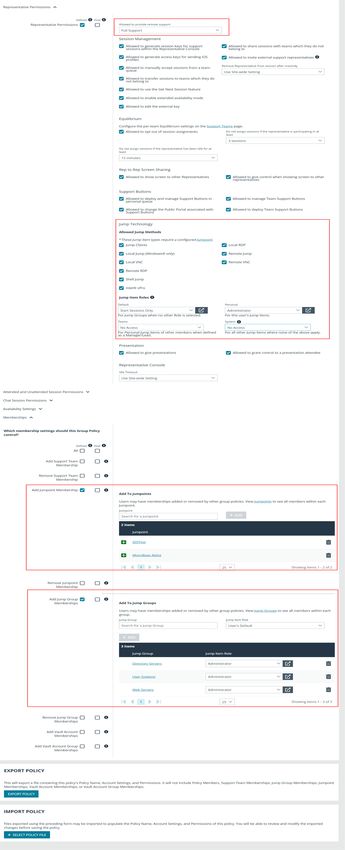
Use Jump Item Roles to Create Permission Sets for Jump
Items
A Jump Item Role is a predefined set of permissions regarding Jump Item
management and usage. Jump Item Roles are applied to users from the
Jump > Jump Item Roles page or from the Users & Security > Group
Policies page.
If more than one role is assigned to a user, then the most specific role for a
user is always used. The order of specificity for Jump Item Roles, from most
specific to least specific, is:
l The role assigned to the relationship between a user and a Jump Group on the Jump > Jump Item Roles page
l The role assigned to the relationship between a user and a Jump Group on the Users & Security > Group Policies page
l The Jump Item Roles configured for a user on the Users & Security > Users page or the Users & Security > Group Policies
page
To create or edit a Jump Item Role, enter or update the name and
description. Then set the permissions a user with this role should have:
1. Under Jump Group or Personal Jump Items, determine if users
can create and deploy Jump Items, move Jump Items from one
Jump Group to another, or delete Jump Items.
2. Check the Start Sessions box to enable users to Jump to any
Jump Items they have access to.
3. To allow users to edit Jump Item details, enable any of the options
including:
l Start Sessions
l Edit Tag
l Edit Comments
l Edit Public Portal
l Edit Jump Policy
l Edit Session Policy
l Edit Connectivity and Authentication
l Edit Behavior and Experience.
l Click the blue info icons next to the last three options to see exactly what is affected by these fields.
4. Under Jump Clients Only, choose whether users can set passwords on Jump Clients. Also choose whether they can access
password-protected Jump Clients without needing to know the password.
SALES: www.beyondtrust.com/contact SUPPORT: www.beyondtrust.com/support DOCUMENTATION: www.beyondtrust.com/docs 7
©2003-2021 BeyondTrust Corporation. All Rights Reserved. Other trademarks identified on this page are owned by their respective owners. BeyondTrust is not a chartered bank or trust company, or TC: 9/27/2021
depository institution. It is not authorized to accept deposits or trust accounts and is not licensed or regulated by any state or federal banking authority.
REMOTE SUPPORT
                                                                                                                                                                                          JUMPOINT GUIDE

      Create Jump Policies to Apply to Jump Items
      To control access to particular Jump Items, create Jump Policies. Jump Policies are used to control when certain Jump Items can be
      accessed by implementing schedules.

      Create a Jump Policy

            1. From the /login administrative interface, go to Jump > Jump Policies.
            2. Click Add.

                   Note: A Jump Policy does not take effect until you have applied it
                   to at least one Jump Item.

            3. Create a unique name to help identify this policy. Use a name that
               clearly identifies this policy when assigning it to Jump Items.
            4. Set a code name for integration purposes. If you do not set a code
               name, one is created automatically.
            5. Add a brief description to summarize the purpose of this policy.
            6. If you want to enforce an access schedule, check Enabled. If it is
               disabled, then any Jump Items that use this policy can be accessed
               without time restrictions.
                        l   Set a schedule to define when Jump Items under this policy
                            can be accessed. Set the time zone you want to use for this
                            schedule, and then add one or more schedule entries. For
                            each entry, set the start day and time and the end day and
                            time.
                        l   If, for instance, the time is set to start at 8 PM and end at 5 PM, a user can start a session using this Jump Item at any time
                            during this window but may continue to work past the set end time. Attempting to re-access this Jump Item after 5 PM,
                            however, results in a notification that the schedule does not permit a session to start. If necessary, the user may choose to
                            override the schedule restriction and start the session anyway.
                        l   If stricter access control is required, check Force session to end when schedule does not permit access. This forces
                            the session to disconnect at the scheduled end time. In this case, the user receives recurring notifications beginning 15
                            minutes prior to being disconnected.
            7. When you are finished configuring this Jump Policy, click Save.

      After the Jump Policy has been created, you can apply it to Jump Items either from the representative console or when importing Jump
      items from the /login interface.

SALES: www.beyondtrust.com/contact             SUPPORT: www.beyondtrust.com/support                 DOCUMENTATION: www.beyondtrust.com/docs                                                                   8
©2003-2021 BeyondTrust Corporation. All Rights Reserved. Other trademarks identified on this page are owned by their respective owners. BeyondTrust is not a chartered bank or trust company, or   TC: 9/27/2021
depository institution. It is not authorized to accept deposits or trust accounts and is not licensed or regulated by any state or federal banking authority.
REMOTE SUPPORT
                                                                                                                                                                                          JUMPOINT GUIDE

      Use Jump Groups to Determine Which Users Can Access
      Which Jump Items
      A Jump Group is a way to organize Jump Items, granting members varying
      levels of access to those items. Users are assigned to Jump Groups from
      this page or from the Users & Security > Group Policies page.

      Create or edit a Jump Group, assigning it a name, code name, and
      comments. The Group Policies section lists any group policies which
      assign users to this Jump Group.
      In the Allowed Users section, you can add individual users if you prefer.
      Search for users to add to this Jump Group. You can set each user's Jump
      Item Role to make their permissions specific to Jump Items in this Jump
      Group, or you can use the user's default Jump Item Role as set on the
      Users & Security > Group Policies page or the Users & Security >
      Users page. A Jump Item Role is a predefined set of permissions regarding
      Jump Item management and usage.
      Existing Jump Group users are shown in a table, along with their assigned
      role and how the role was granted. You can filter the view by entering a
      string in the Filter by name text box. You can also edit a user's settings or
      delete a user from the Jump Group.
      To add groups of users to a Jump Group, go to Users & Security > Group
      Policies and assign that group to one or more Jump Groups.

                   Note: You may see some users whose Edit and Delete options are disabled. This occurs either when a user is added via
                   group policy or when a user's system Jump Item Role is set to anything other than No Access. You can click the group policy
                   link to modify the policy as a whole. Any changes made to the group policy apply to all members of that group. You can click
                   the user link to modify the user's system Jump Item role. Any changes to the user's system Jump Item role apply to all other

SALES: www.beyondtrust.com/contact             SUPPORT: www.beyondtrust.com/support                 DOCUMENTATION: www.beyondtrust.com/docs                                                                   9
©2003-2021 BeyondTrust Corporation. All Rights Reserved. Other trademarks identified on this page are owned by their respective owners. BeyondTrust is not a chartered bank or trust company, or   TC: 9/27/2021
depository institution. It is not authorized to accept deposits or trust accounts and is not licensed or regulated by any state or federal banking authority.
REMOTE SUPPORT
                                                                                                                                                                                          JUMPOINT GUIDE

                   Jump Groups in which the user is an unassigned member. You also can add the individual to the group, overriding their
                   settings as defined elsewhere.

SALES: www.beyondtrust.com/contact             SUPPORT: www.beyondtrust.com/support                 DOCUMENTATION: www.beyondtrust.com/docs                                                                  10
©2003-2021 BeyondTrust Corporation. All Rights Reserved. Other trademarks identified on this page are owned by their respective owners. BeyondTrust is not a chartered bank or trust company, or   TC: 9/27/2021
depository institution. It is not authorized to accept deposits or trust accounts and is not licensed or regulated by any state or federal banking authority.
REMOTE SUPPORT
JUMPOINT GUIDE
Requirements and Considerations to Install a Jumpoint
A Jumpoint-facilitated BeyondTrust session involves three computers:
1. The BeyondTrust user's system
2. A Windows computer that hosts the Jumpoint
3. The unattended Windows computer targeted for remote control
Prerequisites
l The administrator deploying the Jumpoint must have administrative rights on the computer hosting the Jumpoint.
l The BeyondTrust user must have administrative rights to the target computer.
l In the BeyondTrust administrative interface, one or both of the following conditions must be true:
o The user must have the account permission Allowed Jump Methods: Local Jump.
o The user must have the account permission Allowed Jump Methods: Remote Jump and must be granted access to one
or more Jumpoints, either individually or via group policy.
Considerations
The main objective of any BeyondTrust administrator should be to ensure the integrity of the BeyondTrust deployment. The simpler and
more clear-cut a BeyondTrust deployment is, the easier it is to maintain a level of integrity that is in line with your company's security
objectives. Specifically when deploying a Jumpoint on a remote network, another layer of complexity is introduced to your deployment.
Therefore, BeyondTrust recommends using a dedicated resource for a Jumpoint in order to decrease any potential security risks, increase
availability, and reduce management complexity. A dedicated resource is most often a virtual machine or sometimes a physical machine
with the sole purpose of hosting the Jumpoint.
If a dedicated resource is not readily available, there are several factors to take into consideration before deciding to use a shared
resource as a Jumpoint host. When using a shared resource, the BeyondTrust administrator must be aware of everything for which the
shared resource is used. For example, the BeyondTrust administrator would need to identify and control any unwanted changes to or
repurposing of the resource by other groups, especially in large organizations.
There are many other variables that are unique to any given network or business environment. The questions below are provided to
encourage a proactive approach before pursuing the use of a shared resource as a Jumpoint host. BeyondTrust encourages adding your
own list of pros and cons before deploying a Jumpoint on a shared resource.
Security
l Who has access to this resource?
l Are file shares accessible on this resource?
l Are there group policies in place that may restrict Jumpoint functionality?
l What is the risk of virus infection or malware due to multi-user access?
l What is the risk of another user's changing the system permissions or deleting needed files?
SALES: www.beyondtrust.com/contact SUPPORT: www.beyondtrust.com/support DOCUMENTATION: www.beyondtrust.com/docs 11
©2003-2021 BeyondTrust Corporation. All Rights Reserved. Other trademarks identified on this page are owned by their respective owners. BeyondTrust is not a chartered bank or trust company, or TC: 9/27/2021
depository institution. It is not authorized to accept deposits or trust accounts and is not licensed or regulated by any state or federal banking authority.REMOTE SUPPORT
JUMPOINT GUIDE
File/Print Sharing
l What other programs will be competing for resources such as disk space, processor availability, bandwidth, and disk access?
l Will the resource be available at all times? How critical is on-demand access?
l What is the risk of permission modification on file shares?
l Will this resource be used frequently for print jobs? Large or frequent print jobs can consume a large amount of resources,
adversely affecting Jumpoint performance.
BeyondTrust Considerations
l How critical is availability? What is the risk of the Jumpoint not being available?
l How frequently will this Jumpoint be used?
l What is the potential number of Jump sessions that will need to be run through this Jumpoint at the same time?
l Will shared responsibility of this resource across different departments increase complexity?
Jumpoint Requirements
Local Jump Sessions - Target System Requirements
1. Must be a currently supported Windows Vista or higher system.
2. The Workstation service must be running (check using services.msc).
3. The Server service must be running (check using services.msc).
4. The Remote Registry service must be running (check using services.msc).
5. The ADMIN$ share must be available (check using Computer Management).
6. The Windows Network must be running, and printer and file sharing must be activated.
7. Make sure firewall settings do not block the connection. By default on some Windows systems, the firewall blocks any incoming
traffic. It may therefore be necessary to open port 445 (and possible 135) on the target computer for incoming traffic.
8. The target system must be on the same network as the BeyondTrust user's system.
Remote Jump Sessions - Host System Requirements
1. An average server class machine with the following specs can support up to 25 concurrent sessions of any type:
l Windows Server 2003+
l 2 cores @ 2.8Ghz
l 8 GB of RAM
2. A domain account that has local admin rights on the target computer(s). The Jumpoint service runs under the local system account
by default, but this should be changed to an account that has local admin rights on the target computer(s).
l If this account is changed, then the following steps must first be taken:
a. Log onto the Jumpoint host system as an administrator.
b. Stop the BeyondTrust Jumpoint service using services.msc.
SALES: www.beyondtrust.com/contact SUPPORT: www.beyondtrust.com/support DOCUMENTATION: www.beyondtrust.com/docs 12
©2003-2021 BeyondTrust Corporation. All Rights Reserved. Other trademarks identified on this page are owned by their respective owners. BeyondTrust is not a chartered bank or trust company, or TC: 9/27/2021
depository institution. It is not authorized to accept deposits or trust accounts and is not licensed or regulated by any state or federal banking authority.REMOTE SUPPORT
JUMPOINT GUIDE
c. Navigate to C:\ProgramData\Bomgar\Jumpoint\hostname or C:\Users\All Users\Application
Data\Bomgar\Jumpoint\hostname (depends on Windows version).
d. Open the properties for bomgar.ini and go to the Security tab. Click Continue to view the security properties.
e. Select the Users or Everyone group (depends on Windows version).
f. Uncheck the Read permission in the Deny column.
g. Apply the changes.
h. The Jumpoint may now be safely changed to be under a different account.
i. Restart the Jumpoint service using services.msc.
3. File sharing must be turned on, specifically IPC$ and ADMIN$.
4. The Remote Registry service must be running (check using services.msc).
5. The Jumpoint host system must be on the same network as the target system.
Remote Jump Sessions - Target System Requirements
1. Must be a currently supported Windows Vista or higher system.
2. The Workstation service must be running (check using services.msc).
3. The Server service must be running (check using services.msc).
4. The Remote Registry service must be running (check using services.msc).
5. The ADMIN$ share must be available (check using Computer Management).
6. The Windows Network must be running, and printer and file sharing must be activated.
7. Make sure firewall settings do not block the connection. By default on some Windows systems, the firewall blocks any incoming
traffic. It may therefore be necessary to open port 445 (and possible 135) on the target computer for incoming traffic.
8. The target system must be on the same network as the Jumpoint host system.
Shell Jump Sessions - Host System Requirements
1. An average server class machine with the following specs can support upwards of 200 SSH or Telnet sessions:
l Windows Server 2003+
l 2 cores @ 2.8Ghz
l 8 GB of RAM
2. The Jumpoint host system must be on the same network as the target system.
Shell Jump Sessions - Target System Requirements
1. Any available SSH server.
2. The target system must be on the same network as the Jumpoint host system.
vPro Sessions - Host System Requirements
1. An average server class machine with the following specs can support up to 20 full OS KVM sessions or up to 100 serial-over-LAN
sessions:
SALES: www.beyondtrust.com/contact SUPPORT: www.beyondtrust.com/support DOCUMENTATION: www.beyondtrust.com/docs 13
©2003-2021 BeyondTrust Corporation. All Rights Reserved. Other trademarks identified on this page are owned by their respective owners. BeyondTrust is not a chartered bank or trust company, or TC: 9/27/2021
depository institution. It is not authorized to accept deposits or trust accounts and is not licensed or regulated by any state or federal banking authority.REMOTE SUPPORT
JUMPOINT GUIDE
l Windows Server 2003+
l 2 cores @ 2.8Ghz
l 8 GB of RAM
2. The Jumpoint host system must be on the same network as the target system.
vPro Sessions - Target System Requirements
1. Any pre-provisioned vPro system.
2. The target must be running AMT version 5.0+.
3. The target system must be on the same network as the Jumpoint host system.
Local RDP Sessions - Target System Requirements
1. Must be a currently supported Windows Vista or higher system.
2. Microsoft® Remote Desktop Protocol (RDP) must be enabled on the target system.
3. The target system must be on the same network as the BeyondTrust user's system.
Remote RDP Sessions - Host System Requirements
1. An average server class machine with the following specs can support up to 25 concurrent sessions of any type:
l Windows Server 2003+
l 2 cores @ 2.8Ghz
l 8 GB of RAM
2. The Jumpoint host system must be on the same network as the target system.
Remote RDP Sessions - Target System Requirements
1. Must be a currently supported Windows Vista or higher system.
2. Microsoft® Remote Desktop Protocol (RDP) must be enabled on the target system.
3. The target system must be on the same network as the Jumpoint host system.
Local VNC Sessions - Target System Requirements
1. Listening VNC server supporting RFB protocol 3.8 or below, configured for basic or no authentication.
2. The target system must be on the same network as the BeyondTrust user's system.
Remote VNC Sessions - Host System Requirements
1. An average server class machine with the following specs can support up to 25 concurrent sessions of any type. It may support
more, depending on available RAM:
l Windows Server 2003+
l 2 cores @ 2.8Ghz
SALES: www.beyondtrust.com/contact SUPPORT: www.beyondtrust.com/support DOCUMENTATION: www.beyondtrust.com/docs 14
©2003-2021 BeyondTrust Corporation. All Rights Reserved. Other trademarks identified on this page are owned by their respective owners. BeyondTrust is not a chartered bank or trust company, or TC: 9/27/2021
depository institution. It is not authorized to accept deposits or trust accounts and is not licensed or regulated by any state or federal banking authority.REMOTE SUPPORT
JUMPOINT GUIDE
l 8 GB of RAM
2. The Jumpoint host system must be on the same network as the target system.
Remote VNC Sessions - Target System Requirements
1. Listening VNC server supporting RFB protocol 3.8 or below, configured for basic or no authentication.
2. The target system must be on the same network as the Jumpoint host system.
SALES: www.beyondtrust.com/contact SUPPORT: www.beyondtrust.com/support DOCUMENTATION: www.beyondtrust.com/docs 15
©2003-2021 BeyondTrust Corporation. All Rights Reserved. Other trademarks identified on this page are owned by their respective owners. BeyondTrust is not a chartered bank or trust company, or TC: 9/27/2021
depository institution. It is not authorized to accept deposits or trust accounts and is not licensed or regulated by any state or federal banking authority.REMOTE SUPPORT
JUMPOINT GUIDE
Configure and Install a Jumpoint for Windows Systems
Setup of a Jumpoint on a remote network is a multi-step process that includes configuring from the /login administrative interface,
downloading the installer, and running the installation wizard.
Before configuring a Jumpoint, it is important to understand the difference between clustered Jumpoints and standalone Jumpoints,
because they have different feature sets and because a clustered Jumpoint cannot be converted to standalone, nor a standalone
Jumpoint converted to clustered.
A clustered Jumpoint allows you to install up to ten redundant nodes of the same Jumpoint on different host systems in the same local
network. A clustered Jumpoint is available as long as at least one of the installed nodes is online. This provides redundancy, preventing
the failure of all Jump Items associated with the failure of a single, standalone Jumpoint, and improves load balancing across the system.
All configuration of clustered Jumpoints is done in /login, with no local configuration available on the local host either during or after the
installation. This means that if you install a clustered Jumpoint, selecting the BeyondTrust Jumpoint Configuration item on the start
menu of the Jumpoint host does not result in a configuration window, and only an About box is shown. Editing a clustered Jumpoint in
/login loads the same configuration page that was used to create the Jumpoint. This means clustered Jumpoint configuration lacks the
following options which are available to standalone Jumpoints:
l Proxy
l Intel vPro
l Shell Jump
l TTL
This also means that a clustered Jumpoint cannot be configured as a Jumpzone Proxy. vPro, RDP, VNC, Shell Jump, and normal Jump
sessions are all supported when using clustered Jumpoints; however, the advanced configuration of these features is not available. This
includes settings such as provisioned SSH hosts, vPro reimaging, Jumpzone Proxy, TTL, etc.
Configure
1. From the administrative interface, go to Jump > Jumpoint.
2. Click Add.
SALES: www.beyondtrust.com/contact SUPPORT: www.beyondtrust.com/support DOCUMENTATION: www.beyondtrust.com/docs 16
©2003-2021 BeyondTrust Corporation. All Rights Reserved. Other trademarks identified on this page are owned by their respective owners. BeyondTrust is not a chartered bank or trust company, or TC: 9/27/2021
depository institution. It is not authorized to accept deposits or trust accounts and is not licensed or regulated by any state or federal banking authority.REMOTE SUPPORT
JUMPOINT GUIDE
3. Create a unique name to help identify this Jumpoint. This name
should help users locate this Jumpoint when they need to start a
session with a computer on its same network.
4. Set a code name for integration purposes. If you do not set a code
name, one is created automatically.
5. Add comments to help identify this Jumpoint.
6. Select the Jumpoint Platform. Options are Windows and Linux.
Once the Jumpoint has been created this options cannot be
changed.
7. Leave the Disabled check box unchecked.
8. Check the Clustered box, if appropriate.
Note: A Clustered Jumpoint allows you to install multiple,
redundant nodes of the same Jumpoint on different host systems.
If this option is selected, the Jumpoint is available as long as at
least one of the installed nodes is online. This provides
redundancy, preventing the failure of all Jump Items associated
with the failure of a single, standalone Jumpoint, and improves
load balancing across the system. All configuration of clustered
Jumpoints is done in /login, with no local configuration available
during the install. Once created, a clustered Jumpoint cannot be
converted to standalone, nor a standalone Jumpoint converted to
clustered.
IMPORTANT!
Jumpoint cluster nodes must be installed on hosts residing in the same local area network.
9. If you want users to be able to connect to SSH-enabled and Telnet-enabled network devices through this Jumpoint, check Enable
Shell Jump Method.
10. From the Jumpoint edit page, you can authorize users to start sessions through this Jumpoint. After the Jumpoint has been
created, you can also grant access to groups of users from Users & Security > Group Policies.
11. Save the configuration. The new Jumpoint appears in the list of configured Jumpoints.
Note: Once you have installed the Jumpoint, the table populates the hostname of the host system, as well as that system's
public and private IP addresses. This information can help you locate the Jumpoint's host system in case you need to change
the Jumpoint's configuration.
Note: At the bottom of the Jumpoint page is the option to Enable network browsing. If checked, a permitted user can view
and select systems from the network directory tree. If unchecked, a user can access a system through a Jumpoint only by
entering the system's hostname or IP address. Either way, the user must provide valid credentials to the remote system before
gaining access.
SALES: www.beyondtrust.com/contact SUPPORT: www.beyondtrust.com/support DOCUMENTATION: www.beyondtrust.com/docs 17
©2003-2021 BeyondTrust Corporation. All Rights Reserved. Other trademarks identified on this page are owned by their respective owners. BeyondTrust is not a chartered bank or trust company, or TC: 9/27/2021
depository institution. It is not authorized to accept deposits or trust accounts and is not licensed or regulated by any state or federal banking authority.REMOTE SUPPORT
JUMPOINT GUIDE
For more information on Shell Jump, please see "Shell Jump" on page 24.
Download
Now that your Jumpoint is configured, you must install the Jumpoint on a single system in the remote network you wish to access. This
system serves as the gateway for Jump sessions with other computers on the remote network. You can either install the Jumpoint directly
to the host or email the installer to a user at the remote system. If this is to be a clustered Jumpoint, you will be able to add nodes later.
1. From the table, find the appropriate Jumpoint and click the link to
download the installer file (bomgar-jpt-{uid}.exe).
2. If you are logged into the system you want to use as the Jumpoint
host, you can run the installation file immediately.
3. Otherwise, save the file and then transfer it to and deploy it onto the system that will serve as the Jumpoint host.
Note: If you need to change the Jumpoint's host system, click Redeploy. This uninstalls the Jumpoint from its current location
and makes the download links available. You can then install the Jumpoint on a new host. The new Jumpoint replaces the old
one for any existing Jump shortcuts that are associated with it. The new Jumpoint does not copy over the configuration from
the old Jumpoint and must be reconfigured during installation.
Note: The Jumpoint EXE installer can be deployed through a command line interface or a systems management utility, such
as Microsoft Intune. When deploying an EXE installer, the /S option can be specified for a silent installation, without any user
interaction on the target system. When the /S option is used, the Jumpoint installer uses the default installation options.
Example:
bomgar-jpt-24cf209c6aab939fc418813b9723995ev.exe /S
SALES: www.beyondtrust.com/contact SUPPORT: www.beyondtrust.com/support DOCUMENTATION: www.beyondtrust.com/docs 18
©2003-2021 BeyondTrust Corporation. All Rights Reserved. Other trademarks identified on this page are owned by their respective owners. BeyondTrust is not a chartered bank or trust company, or TC: 9/27/2021
depository institution. It is not authorized to accept deposits or trust accounts and is not licensed or regulated by any state or federal banking authority.REMOTE SUPPORT
JUMPOINT GUIDE
Install
1. From the system that will host the Jumpoint, run the installation
package. When the installation wizard appears, click Next.
2. Read and accept the waiver agreement. You must accept the
agreement to be able to proceed with the installation.
3. Read and agree to the disclaimer.
SALES: www.beyondtrust.com/contact SUPPORT: www.beyondtrust.com/support DOCUMENTATION: www.beyondtrust.com/docs 19
©2003-2021 BeyondTrust Corporation. All Rights Reserved. Other trademarks identified on this page are owned by their respective owners. BeyondTrust is not a chartered bank or trust company, or TC: 9/27/2021
depository institution. It is not authorized to accept deposits or trust accounts and is not licensed or regulated by any state or federal banking authority.REMOTE SUPPORT
JUMPOINT GUIDE
4. Choose where you would like the Jumpoint to install. The default
location is C:\Program Files\Bomgar\Jumpoint or C:\Program
Files (x86)\Bomgar\Jumpoint.
5. Click Install. If you are installing a single Jumpoint, the
BeyondTrust Jumpoint Configuration window opens after a
moment. If you are installing a clustered Jumpoint node, the
installation finishes.
Deploy Behind Proxy
Note: In the case of clustered Jumpoints, keep in mind that there is no customization available at the local level. As a result,
you will not see the configuration window that allows for Proxy or other configuration items available for standalone Jumpoints.
If you are installing a clustered Jumpoint, you may skip the following steps and go directly to "Clustered Jumpoint Setup:
Adding Nodes" on page 29.
For a Jumpoint to be deployed on a remote network that is behind a proxy,
appropriate proxy information may be necessary for the Jumpoint to
connect back to the B Series Appliance.
1. From the dropdown on the Proxy tab in the Jumpoint
Configuration application, select Basic or NTLM to configure
proxy settings.
2. Enter the Proxy Host, Proxy Port, Username, and Password,
and then click OK. The Jumpoint supplies this proxy information
whenever Jumping to another system on the remote network,
providing the credentials necessary to download and run the
customer client on the target system.
SALES: www.beyondtrust.com/contact SUPPORT: www.beyondtrust.com/support DOCUMENTATION: www.beyondtrust.com/docs 20
©2003-2021 BeyondTrust Corporation. All Rights Reserved. Other trademarks identified on this page are owned by their respective owners. BeyondTrust is not a chartered bank or trust company, or TC: 9/27/2021
depository institution. It is not authorized to accept deposits or trust accounts and is not licensed or regulated by any state or federal banking authority.REMOTE SUPPORT
JUMPOINT GUIDE
Configure Windows Jumpoint as a Proxy Server
You can set up this Jumpoint to function as a proxy itself by selecting Jump
Zone Proxy Server from the dropdown on the Proxy tab in the Jumpoint
Configuration application. With Jump Zone Proxy Server selected, this
Jumpoint can be used to proxy connections for customer clients and Jump
Clients on the network that do not have a native internet connection, such
as POS systems. Using a Jumpoint as a proxy routes traffic only to the B
Series Appliance. If there is a direct connection available, clients attempt to
use that connection in preference to the Jump Zone Proxy.
For more information on deploying Jump Clients, see the Jump
Client Guide at www.beyondtrust.com/docs/remote-support/how-
to/jump-clients/index.htm.
Note: In order for a Jumpoint to function as a Jump Zone Proxy
Server, its host system cannot reside behind a proxy. The
Jumpoint must be able to access the Internet without having to
supply proxy information for its own connection.
1. Enter the hostname to use at the listening interface, and set which
port to use.
IMPORTANT!
Host and port fields should be set carefully since any Jump Client
deployed using this Jumpoint as a proxy server uses the settings
available to it at the time of deployment and is not updated should the
host or port change. If the host or port must be changed, the Jump
Client must be redeployed.
2. Set whether to allow all IP addresses or to limit the IPs that can connect through this proxy.
3. If allowing or denying access, enter one IP address or CIDR subnet range per line.
Tip: It is a best practice to make an exception in the Windows firewall for the port on which the proxy server listens for the
process which accepts connections.
Intel® vPro
Note: Intel vPro configuration is available only for standalone Jumpoints. Clustered Jumpoints do not have this option.
SALES: www.beyondtrust.com/contact SUPPORT: www.beyondtrust.com/support DOCUMENTATION: www.beyondtrust.com/docs 21
©2003-2021 BeyondTrust Corporation. All Rights Reserved. Other trademarks identified on this page are owned by their respective owners. BeyondTrust is not a chartered bank or trust company, or TC: 9/27/2021
depository institution. It is not authorized to accept deposits or trust accounts and is not licensed or regulated by any state or federal banking authority.REMOTE SUPPORT
JUMPOINT GUIDE
Using Intel® Active Management Technology, privileged users can support
fully provisioned Intel® vPro Windows systems below the OS level,
regardless of the status or power state of these remote systems. Configure
this Jumpoint to enable vPro connection by going to the Intel® vPro tab
and checking Enable Intel® vPro.
Note: For a representative to use Intel® vPro support, they must
be granted access to a Jumpoint with Intel® vPro enabled and
must have the user account permission Allowed Jump
Methods: Intel® vPro.
Authentication
1. Under Authentication, designate how the Jumpoint should attempt
to authenticate to vPro-provisioned computers. Regardless of the
authentication method, the provided credentials must match the
authentication settings in the AMT firmware on the vPro systems.
2. To require representatives to provide credentials each time they
connect to a vPro computer, select Basic Digest Password and
then Prompt Representative for credentials.
Prompting for credentials is useful if the vPro systems on this
network do not share a common username and password.
However, since the vPro AMT firmware is entirely separate from any
user accounts on the computer, administrators frequently provision
all vPro systems to have the same credentials.
Note: There is little security risk in storing credentials in the Jumpoint. To use vPro support, a representative must have not
only the vPro user account privilege but also access to the vPro-enabled Jumpoint. Therefore, prompting for credentials may
be an unnecessary measure.
3. If the same credentials are used for all vPro systems on the network, you can select Basic Digest Password and then Use the
following credentials for all connections. With this configuration, representatives are never prompted for vPro credentials; the
Jumpoint automatically supplies the stored username and password for all vPro connections.
4. If you select Kerberos, the Jumpoint supplies the credentials for the account that the Jumpoint service is running as. These
credentials can be modified to be a specific account that has permissions to access the AMT system. This configuration assumes
that the account hosting the Jumpoint uses the same credentials as all provisioned vPro systems to which you wish to connect.
With this configuration, representatives are never prompted for vPro credentials.
SALES: www.beyondtrust.com/contact SUPPORT: www.beyondtrust.com/support DOCUMENTATION: www.beyondtrust.com/docs 22
©2003-2021 BeyondTrust Corporation. All Rights Reserved. Other trademarks identified on this page are owned by their respective owners. BeyondTrust is not a chartered bank or trust company, or TC: 9/27/2021
depository institution. It is not authorized to accept deposits or trust accounts and is not licensed or regulated by any state or federal banking authority.REMOTE SUPPORT
JUMPOINT GUIDE
Encryption
5. On the Encryption tab, set how the Jumpoint encrypts vPro
network traffic.
6. If the remote vPro systems are provisioned not to use TLS
encryption, simply select No Encryption.
7. Otherwise, select TLS Encryption and define the path to the Base
64-encoded CER file which contains the certificates used during the
provisioning of the remote vPro systems.
Disk Redirection
8. Under Disk Redirection, specify the folder location of any ISO or
IMG disk images you would like to make available for mounting in a
vPro session. Representatives can use these files for IDE-R,
booting the remote vPro system to a disk image rather than the hard
drive.
SALES: www.beyondtrust.com/contact SUPPORT: www.beyondtrust.com/support DOCUMENTATION: www.beyondtrust.com/docs 23
©2003-2021 BeyondTrust Corporation. All Rights Reserved. Other trademarks identified on this page are owned by their respective owners. BeyondTrust is not a chartered bank or trust company, or TC: 9/27/2021
depository institution. It is not authorized to accept deposits or trust accounts and is not licensed or regulated by any state or federal banking authority.REMOTE SUPPORT
JUMPOINT GUIDE
Shell Jump
Note: While Shell Jump can be enabled and disabled from /login
for both standalone Jumpoints and clustered Jumpoints, further
configuration is available only to standalone Jumpoints; therefore,
this section of the guide applies to standalone Jumpoints only.
The Shell Jump tab determines how this Jumpoint can be used to connect
to SSH-enabled and Telnet-enabled network devices.
Note: Shell Jump must also be enabled on the Jump >
Jumpoint page of the administrative interface. For a
representative to use Shell Jump, they must be granted access to
a Jumpoint with Shell Jump enabled and must have the user
account permission Allowed Jump Methods: Shell Jump.
Policy
1. On the Policy tab, if Open Access is selected, permitted
representatives can Shell Jump to any remote device by entering its
hostname or IP address or by selecting it from a list of provisioned
devices.
2. If Limited Access is selected, representatives can Shell Jump to
provisioned devices or can enter a device's hostname or IP
address, provided that it falls within the parameters set by the host
list on the Limited tab.
3. If Provisioned Only is selected, representatives can Shell Jump
only to provisioned devices.
SALES: www.beyondtrust.com/contact SUPPORT: www.beyondtrust.com/support DOCUMENTATION: www.beyondtrust.com/docs 24
©2003-2021 BeyondTrust Corporation. All Rights Reserved. Other trademarks identified on this page are owned by their respective owners. BeyondTrust is not a chartered bank or trust company, or TC: 9/27/2021
depository institution. It is not authorized to accept deposits or trust accounts and is not licensed or regulated by any state or federal banking authority.REMOTE SUPPORT
JUMPOINT GUIDE
Limited
4. If limited access is enabled on the Policy tab, the Limited list
accepts IP addresses and CIDR subnet masks to which Shell Jump
access is limited.
SALES: www.beyondtrust.com/contact SUPPORT: www.beyondtrust.com/support DOCUMENTATION: www.beyondtrust.com/docs 25
©2003-2021 BeyondTrust Corporation. All Rights Reserved. Other trademarks identified on this page are owned by their respective owners. BeyondTrust is not a chartered bank or trust company, or TC: 9/27/2021
depository institution. It is not authorized to accept deposits or trust accounts and is not licensed or regulated by any state or federal banking authority.REMOTE SUPPORT
JUMPOINT GUIDE
Provisioned
5. Configure access to provisioned Shell Jump targets by going to the
Provisioned tab and clicking Add.
6. Enter a Name to help representatives identify this device when
starting a Shell Jump session with it.
7. Enter the device's hostname or IP address.
8. Choose the Protocol to use, either SSH or Telnet.
9. Port automatically switches to the default port for the selected
protocol but can be modified to fit your network settings.
10. Select the Terminal Type, either xterm or VT100.
11. If you are using SSH, you can choose to use Public Key Authentication. If you choose to do so, select a Private Key to use.
Private keys are configured from the Private Keys tab.
12. Representatives Shell Jumping to this provisioned device may connect only with the Username you provide.
13. You can also select to Send Keep-Alive Packets to keep idle sessions from ending. Enter the number of seconds to wait between
each packet send.
SALES: www.beyondtrust.com/contact SUPPORT: www.beyondtrust.com/support DOCUMENTATION: www.beyondtrust.com/docs 26
©2003-2021 BeyondTrust Corporation. All Rights Reserved. Other trademarks identified on this page are owned by their respective owners. BeyondTrust is not a chartered bank or trust company, or TC: 9/27/2021
depository institution. It is not authorized to accept deposits or trust accounts and is not licensed or regulated by any state or federal banking authority.REMOTE SUPPORT
JUMPOINT GUIDE
Private Keys
14. If you are using SSH, you can upload a key file to use by going to
the Private Keys tab and clicking Add.
15. Give this key a Name and click the ellipsis to browse to the key File
you wish to use. Keys must be in OpenSSH format. The ssh-keygen
utility can be used to generate an OpenSSH format key file if
needed.
16. If a Password is required, you can check Store key file password
to save the password for all representatives to use, or you can
require representatives to enter the key file password each time
they connect to a provisioned device using this key.
SALES: www.beyondtrust.com/contact SUPPORT: www.beyondtrust.com/support DOCUMENTATION: www.beyondtrust.com/docs 27
©2003-2021 BeyondTrust Corporation. All Rights Reserved. Other trademarks identified on this page are owned by their respective owners. BeyondTrust is not a chartered bank or trust company, or TC: 9/27/2021
depository institution. It is not authorized to accept deposits or trust accounts and is not licensed or regulated by any state or federal banking authority.REMOTE SUPPORT
JUMPOINT GUIDE
SSH Host Keys
17. You can add SSH Host Keys prior to a representative's Jumping to
that host. If no host key is cached, the representative receives a
message alerting them that the server's host key is not cached and
that there is no guarantee that the server is the computer they think
it is. Caching a server's host key prior to connection can help
prevent confusion.
18. Enter the Hostname or IP address.
19. Enter the Port the device uses.
20. The server then returns its host key, which you should verify.
21. Click Update to poll the device for its host key; the device lets you
know if the host key has changed.
TTL
Note: TTL configuration is available only for standalone
Jumpoints. Clustered Jumpoints do not have this option.
A date and time can be set to specify when the Jumpoint should become
active and when it should automatically uninstall. Setting these delimiters
determines the duration of time for which users can access the remote
network through this Jumpoint.
1. To activate this Jumpoint as soon as its setup is complete, select
Always Active.
2. Alternatively, select Do Not Activate Until, and then set a date and
time upon which this Jumpoint should become active.
3. To keep this Jumpoint available without a designated uninstall date,
select Do Not Automatically Uninstall.
4. Otherwise, select Automatically Uninstall At, and then set a date and time upon which this Jumpoint should uninstall itself.
SALES: www.beyondtrust.com/contact SUPPORT: www.beyondtrust.com/support DOCUMENTATION: www.beyondtrust.com/docs 28
©2003-2021 BeyondTrust Corporation. All Rights Reserved. Other trademarks identified on this page are owned by their respective owners. BeyondTrust is not a chartered bank or trust company, or TC: 9/27/2021
depository institution. It is not authorized to accept deposits or trust accounts and is not licensed or regulated by any state or federal banking authority.REMOTE SUPPORT
JUMPOINT GUIDE
Jumpoint Setup Completion and Revision
After installing the Jumpoint, you receive a confirmation message. Click
Finish.
If you installed a standalone Jumpoint, the configuration options can be
modified by locating the Bomgar folder in the Windows All Programs or
Programs and Features menu, opening the site subfolder, and running
BeyondTrust Jumpoint Configuration.
If you installed a clustered Jumpoint, selecting the BeyondTrust Jumpoint
Configuration item on the start menu of the Jumpoint host does not result
in a configuration window, and only an About box is shown
Clustered Jumpoint Setup: Adding Nodes
The steps for creating a clustered Jumpoint in /login are the same as for a standalone, with only one difference: once you have created the
clustered Jumpoint, you can add nodes to it. At least one node needs to be installed for the Jumpoint to be online.
1. From the administrative interface, go to Jump > Jumpoint.
2. From the table of existing Jumpoints, find the appropriate Jumpoint and click the Add Node link to download the installer file
(bomgar-jpt-{uid}.exe).
3. If you are logged into the system you want to use as the Jumpoint host, you can run the installation file immediately.
4. Otherwise, save the file and then transfer it to and deploy it onto the system that will serve as the Jumpoint host.
5. Follow the prompts and install the node. Note that there are no
configuration screens of any kind.
6. In the Jumpoint table, the clustered Jumpoint now shows
information about each installed node, including public and private
IP addresses and online or offline status.
Nodes can be deleted but cannot be individually edited. In the
representative console, none of the nodes are visible; only the clustered
Jumpoint under which they are installed is visible. Nodes function as redundant connection points. When a user needs to use the
Jumpoint, one of the nodes is selected randomly. At least one node must be online for the Jumpoint to work.
SALES: www.beyondtrust.com/contact SUPPORT: www.beyondtrust.com/support DOCUMENTATION: www.beyondtrust.com/docs 29
©2003-2021 BeyondTrust Corporation. All Rights Reserved. Other trademarks identified on this page are owned by their respective owners. BeyondTrust is not a chartered bank or trust company, or TC: 9/27/2021
depository institution. It is not authorized to accept deposits or trust accounts and is not licensed or regulated by any state or federal banking authority.REMOTE SUPPORT
JUMPOINT GUIDE
Configure and Install a Jumpoint for Linux Systems
Setup of a Jumpoint on a remote network is a multi-step process that includes configuring from the /login administrative interface,
downloading the installer, and running the installation wizard.
Configuration
1. From the administrative interface, go to Jump > Jumpoint.
2. Click Add.
3. Create a unique name to help identify this Jumpoint. This name
should help users locate this Jumpoint when they need to start a
session with a computer on its same network.
4. Set a code name for integration purposes. If you do not set a code
name, one is created automatically.
5. Add comments to help identify this Jumpoint.
6. Select the Jumpoint Platform. Options are Windows and Linux.
Once the Jumpoint has been created, this setting cannot be
changed.
7. Leave the Disabled box unchecked.
8. Check the Clustered box, if appropriate.
Note: A Clustered Jumpoint allows you to install multiple,
redundant nodes of the same Jumpoint on different host systems.
If you select this option, the Jumpoint is available as long as at
least one of the installed nodes is online. This provides
redundancy, preventing the failure of all Jump Items associated
with the failure of a single, standalone Jumpoint, and improves
load balancing across the system. Once created, a clustered
Jumpoint cannot be converted to standalone, nor a standalone
Jumpoint converted to clustered.
SALES: www.beyondtrust.com/contact SUPPORT: www.beyondtrust.com/support DOCUMENTATION: www.beyondtrust.com/docs 30
©2003-2021 BeyondTrust Corporation. All Rights Reserved. Other trademarks identified on this page are owned by their respective owners. BeyondTrust is not a chartered bank or trust company, or TC: 9/27/2021
depository institution. It is not authorized to accept deposits or trust accounts and is not licensed or regulated by any state or federal banking authority.REMOTE SUPPORT
JUMPOINT GUIDE
Note: Linux Jumpoints can only be used for RDP and SSH/Telnet
sessions.
IMPORTANT!
Jumpoint cluster nodes must be installed on hosts residing in the same local area network.
9. If you want users to be able to connect to SSH-enabled and Telnet-enabled network devices through this Jumpoint, check Enable
Shell Jump Method.
10. From the Jumpoint edit page, you can authorize users to start sessions through this Jumpoint. After the Jumpoint has been
created, you can also grant access to groups of users from Users & Security > Group Policies.
11. Save the configuration. The new Jumpoint appears in the list of configured Jumpoints.
Note: Once you have installed the Jumpoint, the table populates the hostname of the host system, as well as that system's
public and private IP addresses. This information can help you locate the Jumpoint's host system in case you need to change
the Jumpoint's configuration.
Note: At the bottom of the Jumpoint page is the option to Enable network browsing. If checked, a permitted user can view
and select systems from the network directory tree. If unchecked, a user can access a system through a Jumpoint only by
entering the system's hostname or IP address. Either way, the user must provide valid credentials to the remote system before
gaining access.
Download
Now that the Jumpoint is configured, you must install the Jumpoint on a single system in the remote network you wish to access. This
system serves as the gateway for Jump sessions with other computers on the remote network. You can either install the Jumpoint directly
to the host or email the installer to a user at the remote system. If this is to be a clustered Jumpoint, you add nodes after the Jumpoint is
installed.
1. From the table, find the appropriate Jumpoint and click the link to download
the installer file.
2. If you are logged into the system you want to use as the Jumpoint host, you
can run the installation file immediately.
3. Otherwise, save the file and then transfer it to and deploy it onto the system that will serve as the Jumpoint host.
Note: If you need to change the Jumpoint's host system, click Redeploy. This uninstalls the Jumpoint from its current location
and makes the download links available. You can then install the Jumpoint on a new host. The new Jumpoint replaces the old
one for any existing Jump shortcuts that are associated with it.
SALES: www.beyondtrust.com/contact SUPPORT: www.beyondtrust.com/support DOCUMENTATION: www.beyondtrust.com/docs 31
©2003-2021 BeyondTrust Corporation. All Rights Reserved. Other trademarks identified on this page are owned by their respective owners. BeyondTrust is not a chartered bank or trust company, or TC: 9/27/2021
depository institution. It is not authorized to accept deposits or trust accounts and is not licensed or regulated by any state or federal banking authority.You can also read