Getting Started Guide 2021 - Forcepoint Web Security Cloud
←
→
Page content transcription
If your browser does not render page correctly, please read the page content below
Getting Started Guide

      Forcepoint Web Security Cloud

                             2021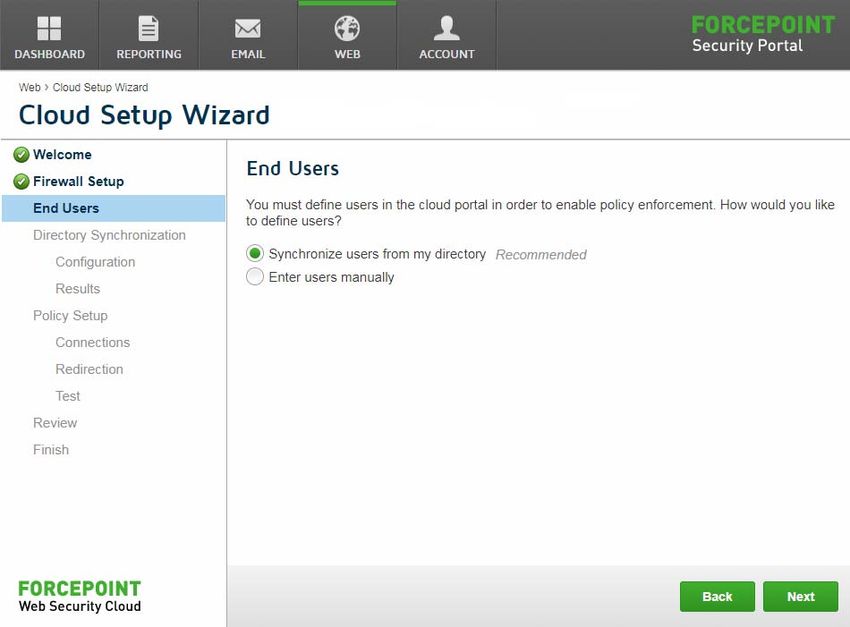
2021, Forcepoint
Forcepoint and the FORCEPOINT logo are trademarks of Forcepoint. All other trademarks used in this document are the property of their
respective owners.
Every effort has been made to ensure the accuracy of this document. However, Forcepoint makes no warranties with respect to this documentation
and disclaims any implied warranties of merchantability and fitness for a particular purpose. Forcepoint shall not be liable for any error or for
incidental or consequential damages in connection with the furnishing, performance, or use of this manual or the examples herein. The information
in this documentation is subject to change without notice.

Last modified: June 21, 2021
Contents
Chapter 1 Introduction . . . . . . . . . . . . . . . . . . . . . . . . . . . . . . . . . . . . . . . . . . . . . . . . . . . . . 1
Technical Support. . . . . . . . . . . . . . . . . . . . . . . . . . . . . . . . . . . . . . . . . . . . . . . . . . 1
How Forcepoint Web Security Cloud works . . . . . . . . . . . . . . . . . . . . . . . . . . . . . 2
Chapter 2 Getting started . . . . . . . . . . . . . . . . . . . . . . . . . . . . . . . . . . . . . . . . . . . . . . . . . . . 7
Logging on to the cloud portal . . . . . . . . . . . . . . . . . . . . . . . . . . . . . . . . . . . . . . . . 7
Cloud setup wizard . . . . . . . . . . . . . . . . . . . . . . . . . . . . . . . . . . . . . . . . . . . . . . . . 9
Chapter 3 Forwarding traffic . . . . . . . . . . . . . . . . . . . . . . . . . . . . . . . . . . . . . . . . . . . . . . . 15
PAC file . . . . . . . . . . . . . . . . . . . . . . . . . . . . . . . . . . . . . . . . . . . . . . . . . . . . . . . . 16
Endpoint . . . . . . . . . . . . . . . . . . . . . . . . . . . . . . . . . . . . . . . . . . . . . . . . . . . . . . . . 17
Chapter 4 Identifying users . . . . . . . . . . . . . . . . . . . . . . . . . . . . . . . . . . . . . . . . . . . . . . . . . 19
Policy selection by IP address . . . . . . . . . . . . . . . . . . . . . . . . . . . . . . . . . . . . . . . 19
Policy selection by user . . . . . . . . . . . . . . . . . . . . . . . . . . . . . . . . . . . . . . . . . . . . 20
User registration methods. . . . . . . . . . . . . . . . . . . . . . . . . . . . . . . . . . . . . . . . . . . 20
User authentication methods . . . . . . . . . . . . . . . . . . . . . . . . . . . . . . . . . . . . . . . . 22
Working with remote users . . . . . . . . . . . . . . . . . . . . . . . . . . . . . . . . . . . . . . . . . 23
Testing whether a browser is using the proxy . . . . . . . . . . . . . . . . . . . . . . . . . . . 25
Chapter 5 Next steps: configuring advanced features. . . . . . . . . . . . . . . . . . . . . . . . . . . . 27
Tailoring your policies . . . . . . . . . . . . . . . . . . . . . . . . . . . . . . . . . . . . . . . . . . . . . 27
Customizing notification pages . . . . . . . . . . . . . . . . . . . . . . . . . . . . . . . . . . . . . . 31
Adding non-proxied destinations . . . . . . . . . . . . . . . . . . . . . . . . . . . . . . . . . . . . . 31
Adding administrators . . . . . . . . . . . . . . . . . . . . . . . . . . . . . . . . . . . . . . . . . . . . . 32
Privacy protection. . . . . . . . . . . . . . . . . . . . . . . . . . . . . . . . . . . . . . . . . . . . . . . . . 33
Cloud service reporting . . . . . . . . . . . . . . . . . . . . . . . . . . . . . . . . . . . . . . . . . . . . 33
Optional add-on modules . . . . . . . . . . . . . . . . . . . . . . . . . . . . . . . . . . . . . . . . . . . 34
Appendix A Preparing end users for deployment. . . . . . . . . . . . . . . . . . . . . . . . . . . . . . . . . 35
Getting Started Guide i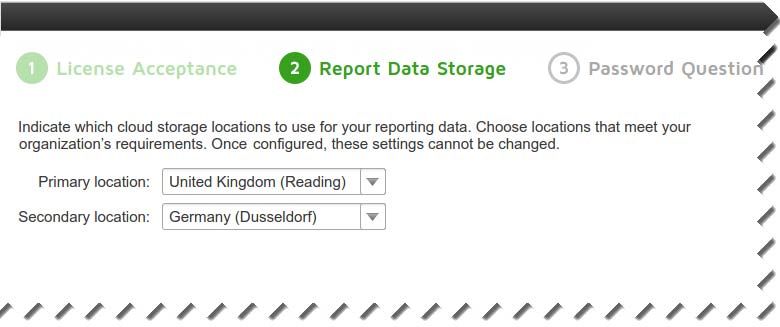
Contents ii Forcepoint Web Security Cloud
1 Introduction
Getting Started Guide | Forcepoint Web Security Cloud
Forcepoint Web Security Cloud is a flexible web protection solution that provides
fine-tuned control over your users’ web access, while providing comprehensive
protection against web threats such as viruses, malware, data loss, and phishing
attacks.
Forcepoint Web Security Cloud is intuitive to use and works out of the box with a
default policy that applies common web filters. To make full use of its features, you
can customize this default policy and configure your own policies to meet the needs of
your organization.
This guide outlines the setup tasks required to get Forcepoint Web Security Cloud
managing your web traffic. It also contains information on how to work with roaming
users, and tips on tailoring policies for your organization. In the appendix you can find
tips for preparing your end users for their new web protection system.
Detailed configuration information for Forcepoint Web Security Cloud is available in
the Forcepoint Web Security Cloud Help. This can be accessed from within the cloud
portl, or online at here.
Note
This guide covers deploying the service as a purely cloud-
based solution. If you are deploying with an I Series
appliance, refer to the guide Deploying an I Series
Appliance on the Forcepoint Support site.
Technical Support
If you have any questions during the set up phase, please contact your service provider
or Forcepoint Technical Support. Technical information about Forcepoint products is
available at the Forcepoint Support website:
https://support.forcepoint.com/
Getting Started Guide 1Introduction
This site includes product documentation, release information, and a Knowledge Base
detailing common configuration scenarios. Some material requies a Forcepoint
Support login.
For additional questions, the support portal offers an online support form. Just click
Contact Support.
Tip
Create your support account when you first set up
Forcepoint Web Security Cloud, so that access is readily
available whenever you need support or updates.
Getting help
To get additional help while setting up the service, access the administrator help and
other reference materials on the Forcepoint Support website, or from the Help menu
in the cloud portal.
How Forcepoint Web Security Cloud works
Getting Started Guide | Forcepoint Web Security Cloud
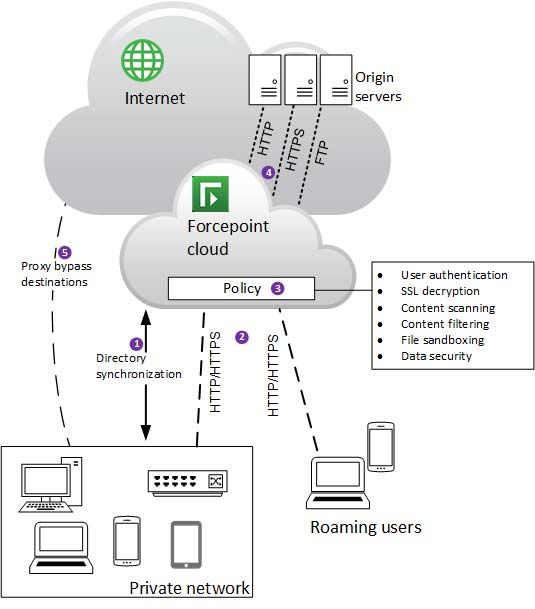
Forcepoint Web Security Cloud operates as a proxy server for HTTP and HTTPS
traffic, as well as FTP over HTTP. When users request a web resource, their browsers
do not connect directly to Internet web servers (shown in the following diagram as
origin servers), but instead connect to the cloud proxy, which in turn relays requests to
the origin server. This allows the cloud service to apply filtering rules and perform
content scanning, providing protection against security threats, data loss, and
inappropriate content.
The service can use various methods to identify and authenticate users: a Forcepoint
Endpoint client, a third-party single sign-on identity provider, NTLM transparent
identification, or manual authentication with a user name and password. Roaming
users (those connecting from an unknown IP address) can be identified via the
Forcepoint Endpoint client, via a single sign-on provider, or they are required to
authenticate.
2 Forcepoint Web Security CloudIntroduction
Optional SSL decryption allows the content of HTTPS sessions to be scanned, and
allows the service to show the correct notification page to users (for example, a block
page if the SSL site is in a category that is blocked). Content is re-encrypted after
inspection.
The following diagram shows a basic overview of web traffic protected by Forcepoint
Web Security Cloud.
The diagram shows the following elements of the service.
1. Directory synchronization allows user details from an LDAP directory to be
synchronized with the cloud, enabling users to be identified and authenticated.
This allows user- and group-level policy settings to be applied, as well as
providing detailed user-level reporting.
2. Web traffic is directed to the cloud service from a private network, and from
roaming users connecting from outside their LAN. There are various methods to
redirect traffic (see in Key concepts, page 4).
3. Authentication, filtering and enforcement settings are applied by a policy, which
determines which requests to allow or block, performs real-time content scanning,
and applies data security filtering, helping to prevent inadvertent or malicious data
loss.
Getting Started Guide 3Introduction
4. When policy decisions have been applied, web requests are then forwarded to the
origin server, and content is served to the user’s browser. If content is blocked, or
security threats are detected, configurable notification pages are shown, informing
the user of the reason why access to the resource is not allowed.
5. Some web requests can go directly to the origin server, if the address is defined as
a proxy bypass destination.
Secure (HTTPS) sessions are forwarded over a tunneled connection. If you enable
SSL decryption, the content of these sessions can be scanned and policy settings
applied, before the traffic is re-encrypted. This feature requires you to install a root
certificate on end-users’ machines, allowing clients to connect securely to the cloud
proxy. (See Enabling SSL decryption in the Forcepoint Web Security Cloud help for
more information.)
Key concepts
In order to get started with the service, you must arrange to forward your web traffic to
the service, add users to the service (if required), and create policies to control web
access (a default policy is pre-configured). A setup wizard is available when you first
log on, to guide you through the setup process.
Traffic forwarding
In order for the service to perform filtering, you must redirect web traffic to the cloud
service, and configure your firewall to allow access to the service on specific ports.
Traffic can be directed to the cloud service in a number of ways:
● A Forcepoint Endpoint: a lightweight software client that runs on end user
devices, providing policy enforcement for web browsing.
● A browser PAC (proxy auto-config) file: a configuration script that can be
configured in your users’ browsers (via GPO or similar) to redirect browser
requests to the service
● Firewall redirection: a simple method implemented on your firewall to redirect all
HTTP/HTTPS traffic to the service
● Tunneling: IPsec or GRE connectivity to forward traffic to the service from a
supported edge device.
Alternatively, a Forcepoint I Series appliance can be deployed in order to provide fast,
flexible on-premises traffic analysis. If you have an existing on-premises proxy, this
can be connected to the service via proxy chaining.
For more information about forwarding traffic, see Forwarding traffic, page 15.
User synchronization
The service can identify and authenticate users against your directory service in order
to provide user and group-specific policy enforcement, and detailed user activity
reporting. Users can be added manually, or using a directory synchronization client
that automatically adds and updates user details from your directory.
4 Forcepoint Web Security CloudIntroduction
This step is optional; some organizations apply the same policies to all users based
solely on IP address, without requiring users to authenticate.
Note: if your organization has roaming users (those who connect from locations
outside of your network), those users must be registered and must identify themselves
in order to use the service remotely. See User registration methods, page 20.
Policies
Policies allow or block access to web resources, and control your authentication,
content filtering, security, and data loss prevention (DLP) settings. Exceptions can be
configured to override or bypass policy settings per user or group.
Filtering is based on a set of web categories drawn from the Forcepoint Master
Database, constantly updated by Forcepoint Security Labs, with security threats
identified in real time by Forcepoint ThreatSeeker Intelligence.
A default policy is available, providing a set of standard web filtering settings. Once
you are up and running with the service, you can edit this policy and create new ones,
providing differing levels of access for different users and departments. (See Tailoring
your policies, page 27.)
Getting Started Guide 5Introduction 6 Forcepoint Web Security Cloud
2 Getting started
Getting Started Guide | Forcepoint Web Security Cloud
This chapter covers logging on to the Forcepoint Cloud Security Gateway Portal, also
referred to as the cloud portal, and getting started with Forcepoint Web Security
Cloud. When you first access your account, a wizard guides you through the initial
setup process.
Logging on to the cloud portal
Log on to the cloud portal:
https://admin.forcepoint.net/portal
Enter your username and password and click Log On.
For the list of browsers supported for use with the cloud service, see the Cloud
Security Browser Support Matrix in the Forcepoint Knowledge Base.
First-time logon
If you are logging on for the first time, a short first-time logon wizard will prompt you
to:
1. Accept the license agreement for your product.
Getting Started Guide 7Getting started
2. Select a primary and backup cloud data center for storing your reporting data.
Note
In most cases, the default data center locations should be
used. These are chosen based on the location of your
connection. They can be changed if your organization has
localization or data sovereignty requirements.
3. Finally, provide an administrator email address and password recovery question
that can be used to reset a lost password.
Once you have completed these steps, you are ready to configure your Forcepoint
Web Security Cloud account.
8 Forcepoint Web Security CloudGetting started
Cloud setup wizard
Getting Started Guide | Forcepoint Web Security Cloud
When you first log on to a new account, a setup wizard is displayed, guiding you
through the initial setup process. The wizard helps you to configure your firewall to
access Forcepoint Web Security Cloud, set up end-user registration and directory
synchronization, set up your first policy, and test your configuration.
If you are not able to complete each step immediately, you can skip to the next step
and complete any missed items later. Any items that have not been completed are
displayed with an exclamation mark icon shown in the progress panel on the left of the
screen. The wizard is available each time you log on, until all steps have been
completed.
To begin, you will need to have:
● Your organization’s external IP addresses
● Knowledge of your organization’s directory infrastructure or NTLM domains.
The stages of the setup wizard are:
● Step 1: Firewall Setup
● Step 2: End Users
● Step 3: Adding users
● Step 4: Policy Setup
Getting Started Guide 9Getting started
● Step 5: Review
Step 1: Firewall Setup
This stage performs a test to check that the required ports are open on your firewall.
For details of the firewall ports required and how they are used, see Configuring your
firewall to connect to the cloud service in the Web Security Cloud help.
Click Test Connection to verify the connection between your network and the cloud
service.
When you are ready, click Next to continue the wizard. (If you cannot immediately
complete the required firewall configuration, you can still move on to the next step in
the wizard.)
Step 2: End Users
The End Users page in the setup wizard has 2 options:
● Synchronize users from my directory (recommended) takes you through the
process of installing the Directory Synchronization Client in your network and
configuring it to synchronize user and group information from your LDAP
directory to the cloud service.
● Enter users manually gives you the option to manually enter end user
information (name, email address, and NTLM identity) to use in testing.
Make a selection, then click Next.
The next step, depending on your choice, is one of the following:
● Step 3: Directory Synchronization
● Step 3: Add Users manually
Step 3: Adding users
Directory Synchronization
Note: if you selected Enter users manually, this option doesn’t appear. Skip to Add
Users manually.
To enable directory synchronization between your LDAP directory and the cloud
service, start by creating the password that the Directory Synchronization Client will
use to connect to the cloud service.
Do one of the following:
● Enter and confirm the password that you want to use.
● Select the checkbox to the right of the Generate password field to create a
password automatically. Make sure you make a note of the password.
10 Forcepoint Web Security CloudGetting started
When you are finished, click Next.
Download and configure the client
Use the Directory Synchronization > Configuration page to download a copy of the
Directory Synchronization Client.
● The client software runs on Windows only.
● 32-bit and 64-bit versions of the software are available.
● Be sure to install the client software on a machine from which it can access the
domain controllers in your network.
Follow the instructions in the wizard to download, install, and run the Directory
Synchronization Client.
When you are finished, click Next.
Verify synchronization results
Use the Directory Synchronization > Results page to verify that the cloud service
has received the expected user and group information from the synchronization
process.
If there are problems with the information synchronized, see Troubleshoot
synchronization failures in the Web Security Cloud help.
When you are finished, click Next.
The next step is Step 4: Policy Setup.
Add Users manually
Note: if you selected Synchronize users from my directory on the End Users page,
this option does not appear. Skip to Step 4: Policy Setup.
Use the Add Users page to provide information about the user accounts that you plan
to use for testing.
To get started, click Add, then:
1. In the Name field, enter the user’s display name (for example, Jane Smith).
2. Enter the user’s Email address (for example, jsmith@mydomain.com).
3. Enter the user’s NTLM identity (for example, mydomain/jsmith).
4. Click OK.
Repeat this process as needed.
To remove an account entry, select the check box next to the user name and click
Delete.
When you are finished, click Next.
Getting Started Guide 11Getting started
Step 4: Policy Setup
Use the Policy Setup page to create a basic policy to determine which websites can
and cannot be accessed by users whose traffic is managed by the cloud service.
1. Select a pre-defined policy template to use as the basis for your new policy:
■ Default blocks access to sites in commonly blocked categories, like Adult
Material, Gambling, and sites that present a security risk, while permitting
access to sites commonly used for business or educational purposes.
■ Security only blocks only sites that present a security risk (such as phishing-
related sites or sites that host malware) and permits access to all others.
■ Monitor only does not block any websites, but logs user activity for use in
reporting.
You can customize the policy after completing the wizard.
2. Select a Time zone for this policy. This may be used both for time-based policy
enforcement and reporting log records.
3. When you are finished, click Next.
Configuring policy connections
Use the Connections page to identify the traffic originating from your organization
that should be managed by the policy that you are creating.
Each connection is a public-facing IP address, range, or subnet for the gateway
through which users’ traffic reaches the Internet.
To get started, click Add, then:
1. Enter a unique Name and Description for the connection.
2. Select a connection Type: IP address, IP address range, or subnet.
3. Enter the connection definition for the type that you selected.
4. Optionally, select a Time zone for this connection. If no time zone is selected, the
time zone defined for the policy as a whole is used.
5. Click OK.
Repeat this process for each connection that you want to define for this policy.
When you are finished, click Next.
Directing user traffic to the cloud service
Use the Redirection page to get the information you need to use a PAC file to direct
user traffic from your browser to the cloud service.
Note: Forcepoint recommends performing initial testing using a PAC file manually
configured in a browser. For details of other connectivity methods, see Forwarding
traffic, page 15.
12 Forcepoint Web Security CloudGetting started
Perform the following steps on a machine that is inside the network that you defined
as a connection in the previous step. (This may be the same machine that you are using
to access the cloud portal.)
When you are finished, return to the setup wizard and click Next.
The next step is Testing your policy settings.
Configure Chrome to use a PAC file
1. Open Chrome on the selected machine.
2. Open the Settings menu.
3. Click the Advanced Settings link, then scroll down to the Network section.
4. Click Change proxy settings. This opens an Internet Explorer dialog box to the
Connections tab.
5. Click LAN Settings.
6. Mark the Use automatic configuration script check box, then paste the URL
from the wizard in the address field.
7. Click OK twice to close the dialog box.
Configure Internet Explorer to use a PAC file
1. Open Internet Explorer on the selected machine.
2. Open the Internet options menu.
3. Select the Connections tab, then click LAN Settings.
4. In the settings dialog box, mark the Use automatic configuration script check
box and paste the URL from the wizard in the address field.
5. Click OK twice to close the dialog box.
Configure Firefox to use a PAC file
1. Open Firefox on the selected machine.
2. Open the Options menu.
3. Select the Advanced > Network tab.
4. Click Settings, in the Connection section at the top of the tab.
5. Select Automatic proxy configuration URL and paste in the URL from the
wizard.
6. Click OK.
Note
We recommend that cookies are enabled in your browser
to use the service. If cookies are not enabled, some
features cannot work.
Getting Started Guide 13Getting started
Testing your policy settings
After you have configured your network connection and set up a browser to use the
PAC file, use the Test page to verify that traffic is reaching the cloud service and
being managed by your policy.
If you are testing using the machine you are using to access the cloud portal, click
Run Test to verify the connection. Otherwise, use the URL shown in the wizard to
verify the connection from your test machine.
When you are finished, click Next to review your configuration.
Step 5: Review
The Review page provides a summary of the steps you have completed, as well as a
reminder of any steps that remain incomplete.
For steps that are incomplete, you can click the link to return to the corresponding
page in the wizard.
If you are not ready to complete any outstanding steps, you can go to the next page to
finish the wizard and start using the cloud portal. (You can return to the wizard later
by navigating to Web > Setup Wizard.)
When you are finished, click Next to close the wizard.
Next steps
After completing the setup wizard, you have the basic setup needed to test and begin
deploying Forcepoint Web Security Cloud. Your account has a single policy that
controls and secures your organization’s web traffic, and traffic is directed to the
service via your browser’s PAC file configuration. By default, the service applies your
policy settings to all traffic from the IP address defined in the policy.
To get the most out of the solution, you may wish to implement a different traffic
forwarding method, enable end-user authentication, tailor your policies, and view and
create reports. The rest of this document guides you through these more advanced
topics as you continue to roll out your deployment. The remainder of the document is
organized into the following topics:
● Forwarding traffic
● Identifying users
● Next steps: configuring advanced features
The appendix provides sample communications you can use to educate your users
about your Forcepoint web protection solution (see Preparing end users for
deployment, page 35).
14 Forcepoint Web Security Cloud3 Forwarding traffic
Getting Started Guide | Forcepoint Web Security Cloud
In order for Forcepoint Web Security Cloud to filter your traffic, web requests must be
redirected to the cloud service. There are a number of methods available to redirect
traffic.
During the initial stages of an evaluation or while testing a deployment, we
recommend that you manually configure a number of web browsers to use the
Forcepoint Web Security Cloud PAC file to forward traffic to the service. This is
described in PAC file, page 16.
The following table outlines all the traffic redirection methods available, which may
be suitable for different organizations and different network environments.
Method Summary Recommended for
PAC file The simplest method to direct browser traffic. Easily Initial setup and testing.
configured for a small number of browsers for testing Organizations where
purposes. software cannot be
Once you are happy that the service works as expected, installed on end user
you can deploy the PAC file to more users, via Windows devices or other types of
GPO or similar. connectivity cannot be
Further detail is given below (see PAC file). used.
Endpoint client A lightweight software application installed on end-user Most scenarios where
devices. The endpoint client seamlessly authenticates software can be
users, and provides policy enforcement for web installed on end user
browsing. Further detail is given below (see Endpoint). devices.
Firewall Transparently redirect all web traffic by configuring Networks with
redirection redirection rules on your firewall. unmanaged devices,
For details on this connectivity method, see Firewall such as a guest Wi-Fi
Redirect: Forwarding Traffic to the Cloud Service. network or BYOD
networks.
IPsec tunneling Securely forward traffic over a virtual private network Networks with
(VPN) using a supported firewall or router. unmanaged devices,
For details on this connectivity method, see the such as guest Wi-Fi
Forcepoint IPsec Guide. networks or BYOD
networks.
Organizations that
require increased
security for web traffic.
Getting Started Guide 15Forwarding traffic
Method Summary Recommended for
GRE tunneling Forward traffic over a GRE tunnel using a supported Networks with
firewall or router. unmanaged devices,
For details on this connectivity method, see the such as guest Wi-Fi
Forcepoint GRE Guide. networks or BYOD
networks.
I Series appliance Forcepoint appliance that performs fast on-premises Organizations that
URL analysis and application/protocol detection for require on-premises
web traffic, forwarding traffic to the cloud proxy where traffic filtering and
required. See Deploying an I Series Appliance on the analysis
Forcepoint Support site for more details.
Proxy chaining Configure your existing on-premises proxy to forward Organizations with an
traffic to the cloud service. See Configuring proxy existing on-premises
chaining with the Forcepoint cloud service on the proxy where existing
Forcepoint Support site for more details. network infrastructure
cannot be changed.
PAC file
A proxy auto-configuration (PAC) file defines how web browsers choose an
appropriate proxy for fetching a given URL. The Forcepoint Web Security Cloud PAC
file contains a number of global settings and includes any exclusions you add (for
example, intranet sites) that should not use the cloud proxy.
All supported browsers have the ability to use PAC files. PAC files can be configured
manually, or delivered via Windows GPO, or similar.
When configuring browsers to download the PAC file, you can specify either the
standard PAC file URL or a policy-specific PAC file URL.
● Standard PAC file URL: if a user’s browser requests the standard PAC file URL
from a known IP address associated with a policy, the user will be served the
policy-specific PAC file. If the standard PAC file is requested from an unknown IP
(for example, roaming users), a global PAC file will be delivered.
Example standard PAC file URL (HTTPS):
https://pac.webdefence.global.blackspider.com:8087/proxy.pac
● Policy-specific PAC file URL: if a user’s browser requests a policy-specific PAC
file URL, then this policy-specific PAC file will always be served. This can be
used to ensure that users always receive their policy-specific PAC file, even when
connecting from unknown IP addresses, such as roaming users.
Example policy-specific PAC file URL (HTTPS):
https://pac.webdefence.global.blackspider.com:8087/
proxy.pac?p=xxxxxx
(Where xxxxxx is a unique policy identifier.)
For more information on PAC files, see Proxy auto-configuration (PAC) in the Web
Security Cloud help.
16 Forcepoint Web Security CloudForwarding traffic
Endpoint
Forcepoint Endpoint clients run in the background on end user devices, providing a
seamless browsing experience. Endpoint automatically authenticates users with the
service, and provides policy enforcement and data security features. The endpoint
client has been designed to consume minimal CPU, memory, and disk resources, and
has tamper controls to prevent users disabling the software.
The endpoint client allows administrators to create policies that provide user-specific
policy enforcement, with seamless authentication, full visibility of inbound and
outbound traffic, and that don’t restrict use of the device.
There are three versions of the endpoint client, each suited to different sets of end user
needs:
● Neo: this endpoint client can be used in either proxy connect mode or direct
connect mode, and can automatically switch from one to the other when
necessary.
● Proxy Connect: also known as Classic Proxy Connect endpoint, this endpoint
client redirects all traffic to the cloud proxy for analysis. Proxy Connect is
recommended for most scenarios, and supports the widest set of security features.
● Direct Connect: also known as Classic Direct Connect endpoint, this endpoint
client contacts the cloud service for each request to determine whether to block or
permit a website, but routes the web traffic itself directly to the Internet. Direct
Connect also routes traffic to the cloud service to perform content analysis, if
configured in your policy. Direct Connect is recommended for scenarios in which
proxy connections may be problematic, and in some circumstances can improve
content localization.
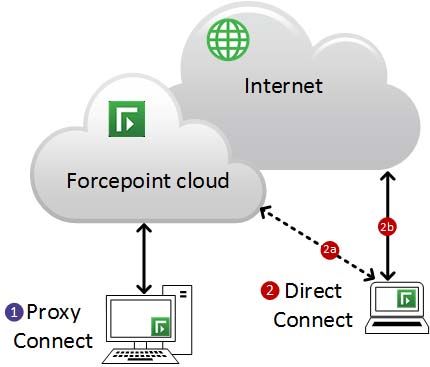
The following diagram illustrates the connectivity for Proxy Connect (through Neo or
the Classic Proxy Connect endpoint) and Direct Connect (through Neo or the Cassic
Direct Connect endpoint).
The diagram shows the two different endpoint versions servicing a web request:
Getting Started Guide 17Forwarding traffic
1. In the first scenario, Neo or the Classic Proxy Connect endpoint directs all web
traffic via the cloud proxy. If the request is permitted, the proxy connects to the
requested website and sends content back to the end-user client. (If the request is
blocked, the user is shown a block page.)
2. In the second scenario, a web request via Neo or the Classic Direct Connect
endpoint consists of two stages:
a. The endpoint connects to the cloud service to look up the user’s policy
settings for the requested site.
b. If the request is permitted, the client then redirects the request directly to the
Internet. (If the request is blocked, the user is redirected to a block page.)
If required, you can deploy a combination of Proxy Connect and Direct Connect
endpoints in your organization. However, only one classic endpoint instance (Classic
Proxy Connect or Classic Directory Connect) can be installed on a client machine at
any one time. The Neo endpoint agent includes both proxy connect and direct connect
modes.
For more information about Forcepoint Endpoint software, including deployment
options and configuration settings, see Web endpoint overview in the Web Security
Cloud help.
18 Forcepoint Web Security Cloud4 Identifying users
Getting Started Guide | Forcepoint Web Security Cloud
Once you have completed the setup wizard, a single policy applies enforcement to all
traffic from your organization’s egress IP. In order to implement per-user or per-group
policy enforcement, Forcepoint Web Security Cloud must identify specific users. User
identification also allows the service to log individuals’ internet usage and provide
user-based and group-based reporting.
This section discusses the options available for registering users with the service and
identifying users when they access the proxy.
Policy selection by IP address
When the cloud service receives a web request, it first identifies the source of the
request in order to find the user’s account. If the request comes from an IP address that
is defined as a connection in a policy, the service identifies the account, and, by
default, applies the settings in that policy.
If you wish, you can define additional policies with different connection addresses,
which can apply enforcement to different parts of your organization (as identified by
egress IP). This is an easy way to apply different policy settings to different
geographical offices, or network segments.
Tip
Using IP-based policy selection also allows users to
browse anonymously, without having to authenticate. If
user authentication is not required by the policy,
enforcement actions are applied to all traffic coming from
the egress IP, but users are not individually identified, and
user-specific reporting data will not be available.
User authentication is always required for roaming users (those connecting from an
unknown IP address), in order to identify the user’s account and ensure that the user is
entitled to access the service.
Getting Started Guide 19Identifying users
Add IP addresses to your policies in the cloud portal via Web > Policy
Management > Policies, using the Connections tab.
Policy selection by user
In order to implement user- or group-level control of your organization’s web
browsing, the service must be able to identify specific users when they request a web
resource.
The process by which this occurs is as follows:
1. When a web request is received from an IP address that is defined as a proxied
connection in a policy, the service first identifies the account and policy using the
source IP address, and by default applies this connection-based policy. (For
connections from unknown IP addresses, see Working with remote users, page
23.)
2. If the connection-based policy requires authentication (defined on the Access
Control tab), the service will then identify the user.
3. Once identified, if the user is found to be assigned to a different policy, the user’s
policy overrides the connection-based policy, and settings from the user’s own
policy are enforced.
In order for this to occur, users must be registered with the service, and user
authentication must be configured in your policy. See the sections that follow:
● User registration methods
● User authentication methods
User registration methods
You can register users with the service, and assign those users to policies, in a number
of ways. User registration methods are as follows:
● Directory synchronization
● By invitation
● Self-registration
These methods are outlined below.
Directory synchronization
Registering your users via directory synchronization is the most flexible and scalable
option for user management.
We recommend that your synchronization includes:
20 Forcepoint Web Security CloudIdentifying users
● Users’ NTLM IDs: these can be used to transparently identify users without the
need for users to manually log on. (Note: if NTLM IDs are not included in the
synchronization, users must perform a one-time self-registration process when
they first connect to the cloud service.)
● Groups that will be useful for policy enforcement purposes - for example, if
members of different departments will have different policy settings. You can
configure the cloud service to assign users to policies based on group
membership, allowing you to manage policy assignment via your directory. You
can also configure policy exceptions based on group membership.
Note
Forcepoint recommends that you include the minimum
number of groups required for policy enforcement.
Including more groups than necessary can impact
performance.
For advice on configuring directory synchronization, see Planning for your first
synchronization in the Web Security Cloud help.
Once you have synchronized your users and groups, assign groups to the relevant
policy via the End Users tab of the policy.
Registering by invitation
If you cannot use directory synchronization, you can invite users to register via an
option on the End Users tab of a policy. Users can be invited individually by email
address, or in bulk via a CSV file. This option may be useful for users on your
network who do not appear in your directory, such as third-party contractors.
When end users are invited, an email is sent inviting the user to create a password
before using the service. Users are added to the policy after completing registration.
For further information, see Registering by invitation in the Web Security Cloud help.
Self registration
You can add email domains to your policies in order to allow users to self-register
with the service using their email address. For example, if your users have email
addresses in the form ‘user@yourcompany.com’, add ‘yourcompany.com’. Add
domains on the End Users tab of your policy, under Self Registration. Users
registering using an email address at this domain will be assigned to the policy.
Domains can also be added at the account level, via Web > Settings > Domains. This
allows you to associate the domain with all policies, allowing users to self-register to
any policy in your account. The actual policy the user is assigned depends on the
connection from which they connect - if this matches a proxied connection in a policy,
the user is registered to that policy. Users connecting from unknown IP addresses are
added to a default policy you can select. (See Configure Domain settings in the Web
Security Cloud help.)
Getting Started Guide 21Identifying users
Users can self-register by clicking Register on the default logon page shown when
they first attempt to browse, or by navigating directly to the self-registration URL:
www.mailcontrol.com/enduser/reg/index.mhtml
For further information, see End user self-registration in the Web Security Cloud
help.
Managing user policy assignment
If you are using directory synchronization, assign groups to the relevant policy via the
End Users tab of the policy. Under Directory Synchronization, click Modify list of
groups, and select the groups that should be assigned to the policy.
User assignment to policies can be overridden per user by editing the user via the
Accounts > End Users page.
You can also add users to policies using a CSV file. Navigate to Web > Policies.
Upload a file under Policy Assignment.
Managing policy assignment via your directory
If you are using directory synchronization, you can manage user policy assignment
entirely using your LDAP directory. Once you have synchronized your users, assign
groups to your policies as required.
On the Account > Directory Synchronization screen, click Edit under Directory
Synchronization Settings. For the User policy assignment setting, ensure Follow
group membership is selected.
With this setting applied, moving users to a different group will automatically update
their policy assignment in the portal.
User authentication methods
Getting Started Guide | Forcepoint Web Security Cloud
You can enable various methods to identify and authenticate users. User
authentication is used if it is required by your policy, or if the user is accessing a
website for which a policy exception is configured. Authentication is always required
for roaming users connecting from an unknown IP address.
Tip
User authentication allows policy enforcement actions and
policy exceptions to be applied to individual users or
groups, as well as user-specific reporting data to be logged.
22 Forcepoint Web Security CloudIdentifying users
User authentication settings are configured on the Access Control tab of a policy.
Authentication methods are listed below, in the order in which they are used by the
service, if enabled in a policy.
● Forcepoint Web Security Endpoint: always used to identify the user, if installed on
an end-user’s machine.
● Single sign-on: if you have configured a supported third-party identity provider to
authenticate your users, this provider is queried to identify and authenticate the
user.
● NTLM identification: identifies users connecting from a known IP address via
their NTLM credentials. (NTLM is not used for roaming users.)
● Secure form: if the user agent supports secure forms, users can enter their logon
credentials if already registered, or choose to register with the service.
● Basic authentication: a user logon page is shown by default if the above options
are not available. Users can enter their logon credentials if already registered, or
choose to register with the service. Use the Welcome page setting to display a
configurable welcome page before users are presented with the authentication
dialog box.
Note: basic authentication uses the HTTP authentication standard. While this is
available as a default fall-back, Forcepoint recommends that you do not rely on
this option, and enable at least one of the other authentication options.
Note
For secure form-based authentication and single sign-on,
an authentication cookie is placed on the user’s machine.
Users do not need to re-authenticate for subsequent web
browsing sessions, for a period of time defined by the
Session Timeout option on the Access Control tab. For
basic authentication, users are asked to authenticate
whenever opening a new browser session.
Working with remote users
Getting Started Guide | Forcepoint Web Security Cloud
Forcepoint Web Security Cloud can protect and monitor users even when they are not
in their typical office location, such as when working from home, connecting from a
public access point, or using a third-party network. This section describes how
Forcepoint Web Security Cloud handles roaming users connecting from a location
other than their network domain.
When the cloud service receives a URL request, it first checks the source IP address of
the request and searches all customer policies for a matching address. (The source IP
address is configured as a connection in a policy’s Connections tab in the cloud
portal.) For roaming users, no match will be found. In this situation, the roaming user
encounters one of the following scenarios:
Getting Started Guide 23Identifying users
● If the user’s device has Neo, Classic Proxy Connect endpoint, or Classic Direct
Connect endpoint installed, the endpoint client sends account and user
information, allowing the service to identify the user seamlessly.
● If you have deployed single sign-on for your users, the roaming user is first asked
to enter an email address, in order to identify the user’s account, and is then
authenticated by the identity provider. (Users are typically only required to enter
an email address once; following a successful authentication, a long-lived cookie
is set, allowing the service to recognize the user's account.)
● If neither Forcepoint Web Security Endpoint nor single sign-on is in use, and the
service cannot find the source IP address in a policy, it responds with a logon page
that states: “You are connecting from an unrecognized location.” The user has to
log on with their cloud service details. The service then searches for the user in its
policies. When it finds the user, the appropriate policy settings are applied.
In order to log on, the user has to be registered. If they have not already set a
password to access the service, roaming users can go through a one-time self-
registration process. See User registration methods, page 20.
Note
Some browsers can exhibit inconsistent behavior in certain
circumstances, such as when used in public Internet access
points in hotels and airports. For more information on
configuring and troubleshooting access for roaming users,
see Using cloud web protection from public Internet
access points on the Forcepoint Support website.
Recommendations for remote users
The simplest solution for remote users is to install Neo, Classic Proxy Connect
endpoint, or Classic Direct Connect endpoint on the client machine. Installing the
endpoint client, either for roaming users or all users, ensures all web traffic receives
policy enforcement from the cloud service, and users are authenticated seamlessly.
When the endpoint client cannot connect to the cloud service, it allows Internet use to
continue, applying filters that have been cached to provide as much protection as
possible (known as Fallback mode).
For cases where the endpoint client cannot be installed:
● Ensure that roaming users have a PAC file configured in their browser in order to
direct web requests to the service. See Configuring browsers for a proxy service
on the Forcepoint Support site for instructions.
● Use the Alternate PAC file address given on the Web > Settings > General
page (or the policy-specific PAC file URL displayed on the General tab of your
policy. This accesses the PAC file over port 80/443, which can address some
issues with using the service from public networks.
For guidance on resolving specific issues that can arise for roaming users without an
endpoint client installed, see How the service works for roaming users on the
Forcepoint Support site.
24 Forcepoint Web Security CloudIdentifying users
Testing whether a browser is using the proxy
Getting Started Guide | Forcepoint Web Security Cloud
A tool is available to help identify whether a browser has a proxied connection to
Forcepoint Web Security Cloud. Find the Proxy query page link on the Web >
Settings > General page in the cloud portal.
When you request the query page from a browser whose requests are routed through
the Forcepoint Web Security Cloud proxy, it looks like this:
If you are not using the Forcepoint Web Security Cloud proxy (for example, you have
lost your proxy connection or you are using Neo in direct connect mode or the Classic
Direct Connect endpoint), it looks like this:
You can customize the remote user home page, if required. The URL for the resulting
account-specific page is available on the Web > Settings > General page in the
portal. It looks like the URL above, but has an account-specific identifier appended.
Getting Started Guide 25Identifying users 26 Forcepoint Web Security Cloud
5 Next steps: configuring
advanced features
Getting Started Guide | Forcepoint Web Security Cloud
Forcepoint Web Security Cloud includes many advanced features that allow you to
configure your web protection product to meet the needs of your organization. This
section covers some of the next steps you can take to help you get the most out of the
service.
● Tailoring your policies
● Customizing notification pages
● Adding non-proxied destinations
● Adding administrators
● Privacy protection
● Cloud service reporting
● Optional add-on modules
Configuration advice for all of these features can be found in the Forcepoint Web
Security Cloud Help. Some basic steps for configuring the service are outlined in the
sections that follow.
Tailoring your policies
The default policy you configured using the setup wizard applies a standard set of
enforcement actions to all users in your organization. (For reference, the standard
default web configuration is summarized in the topic Standard Web Configuration in
the Web Security Cloud help.)
Forcepoint Web Security Cloud also allows you to create more granular policy
configuration on an IP address, user or group basis. For example, specific users or
departments may be permitted to access particular web resources, or you may define
times of day when certain resources are restricted or permitted for some users. For
data security, some users may be permitted to share sensitive information, while it is
restricted for others.
There are a number of ways to make your web policies more granular:
● Create different policies to control traffic from different egress IP addresses that
you manage (for example, different branch locations).
Getting Started Guide 27Next steps: configuring advanced features
● Assign users and groups to specific policies, allowing you to create separate
policies for different departments. By default, user and group policy assignment
overrides connection-specific policy assignment.
● Create category exceptions for specific users and groups, defining override
settings for some users within the policy.
The approach you take depends on the scale and complexity of your setup. You may
deploy a combination of the above methods.
Tip
As a best practice, Forcepoint recommends that you keep
the number of policies to the minimum necessary to
provide granular protection across your organization. This
helps to lower the administration overhead when making
changes across multiple policies.
Web category filtering
Forcepoint Web Security Cloud includes over 95 website categories, designed to help
you apply policy filtering to your organization’s web traffic. Website classifications
are drawn from the Forcepoint Master Database, the industry’s most accurate, current,
and comprehensive classification of URLs. Website classifications are updated
according to automated threat monitoring from Forcepoint Threatseeker Intelligence,
research by Forcepoint Security Labs, and intelligence from customer feedback.
In addition to standard categories, you can create your own custom categories in order
to classify specific websites. Use the Policy Management > Custom Categories
page to define your own categories.
Click the Web Categories tab in a policy to configure the action you want to take
when users try to access websites in each of the categories.
In the standard categories section, child categories are indented under their parent
categories. Parent categories allow specific categories to be grouped by a more
generic description. You can set an action for a parent category without it affecting the
child category, or apply the action to all sub-categories.
The following actions can be applied to your categories:
● Allow access means that any website within the category is always accessible,
regardless of whether it exists in another category that has the Block access
action. (Note: websites blocked by a security category override this action, and
are always blocked.)
● Do not block ensures that the site is not blocked under this rule, but if it also
exists in another category that has an action of Block access, it is blocked under
that category.
● Confirm means that users receive a block page, asking them to confirm that the
site is being accessed for business purposes. Clicking Continue enables the user
to view the site, and starts a timer. During a configurable time period (10 minutes
28 Forcepoint Web Security CloudNext steps: configuring advanced features
by default), the user can visit any site that requires confirmation without receiving
another block page. Once the time period ends, browsing to these sites requires
the user to click Confirm again.
● Use Quota means that users receive a block page, asking them whether to use
quota time to view the site. If users click Use Quota Time, they can view the site
for a configurable period.
Clicking Use Quota Time starts two timers: a quota session timer and a total quota
allocation timer. The session length and total quota time available for each
category depend on the options selected on the General tab.
● Block access blocks access to websites in this category unless they exist in
another category with the Allow access action. When a site is blocked, you can
choose a notification page to be displayed.
For more information, see Web Categories tab in the Web Security Cloud help.
Category exceptions
Exceptions allow the default action for a web category to be overridden for specified
users and groups of users, and for defined time periods. For example, you can allow
users to access certain categories outside of working hours, or apply a time quota
between certain hours.
Define exceptions for a policy under Category Exceptions on the Web Categories tab.
You can click a category to view the exception rules that apply to it.
Click Add to add a new exception.
Tip
Category exceptions are an easy way to apply more
granular policy configuration for specific users and
groups, without creating different policies.
For more information, see Exceptions in the Web Security Cloud help.
Testing filtering actions
To test how the proxy filters a specific website, use the Filtering Test feature on the
Web > Policies page.
This feature can be used to test a specific URL for a named user, for traffic from your
current IP address, an unknown IP address, or a specific IP address.
Enable file blocking
In addition to category-based web filtering, Forcepoint Web Security Cloud allows
you to block users from accessing specific file types. File types can be blocked based
on extension, or based on true file type. True file type blocking scans the file itself to
determine its format, regardless of its extension.
Getting Started Guide 29Next steps: configuring advanced features
File blocking can be configured per web category, or per user and group. For example,
you can enable the Sports category, but prevent users from downloading multimedia
files from sites in that category.
Important
Archived/compressed files are not extracted to determine if the contents contain a
file that should be blocked based on the type or extension. However, they are
inspected for malware. Archived and compressed files can be blocked, if needed, in
which case, all files contained in those archived files are blocked.
Configure file blocking via the File Blocking tab of your policy. For more
information, see File Blocking tab in the Web Security Cloud help.
Enable data security features
Use the Data Security tab to monitor and prevent the loss of sensitive data and
intellectual property via the web. You can protect intellectual property, data that is
protected by national legislation or industry regulation, and data suspected to be stolen
by malware or malicious activities.
The service has a default set of content classifiers that can identify data types that are
important for regulatory compliance, and you can create custom content classifiers
that are used to identify intellectual property and other protected data types important
for your organization. Once defined, these classifiers can be used to identify and filter
traffic that may constitute attempted data theft. This traffic can be blocked, or
monitored for reporting purposes. Configure content classifiers via Web > Content
Classifiers. Configure data security settings in your policies using the Data Security
tab.
For more information on getting started with this feature, see Data Loss Prevention in
Forcepoint Web Security Cloud on the Forcepoint Support site.
ACE security scanning
The Forcepoint Advanced Classification Engine (ACE) identifies and classifies
security threats such as malware, viruses, and compromised websites, in real time
before they can enter your network. ACE is built into Forcepoint Web Security Cloud,
and enabled by default with a standard set of scanning options. You can adjust your
level of protection by selecting the types of sites, files, and applications whose content
is analyzed, and defining exceptions for trusted hostnames.
View and edit your ACE settings via the Web Content & Security tab of your policy.
For more information, see Web Web Content & Security tab in the Web Security
Cloud help.
30 Forcepoint Web Security CloudNext steps: configuring advanced features
Customizing notification pages
Getting Started Guide | Forcepoint Web Security Cloud
When a policy denies access to a resource or needs to inform the user of an event, it
serves a block or notification page, with a message informing the user of the action it
has taken. Forcepoint Web Security Cloud comes with a standard set of notification
pages covering all scenarios.
Notification pages are provided as editable templates. You can modify these to suit
your needs, or add your own pages. You can then configure your policies to use your
custom notification pages for a given action.
You can also create multiple language versions of your notification pages that will be
displayed to a multi-national user base. The most appropriate language page is
displayed based on the user’s browser language settings.
Configure block and notification pages via Web > Block & Notification Pages. For
more information, see Configure block and notification pages in the Web Security
Cloud help.
Adding non-proxied destinations
Getting Started Guide | Forcepoint Web Security Cloud
You can define destinations that will bypass the cloud service, and that users will be
able to access directly. Bypass destinations can be added per policy, or at the account
level, applying to all policies.
Sites that you should add as bypass destinations can include, for example:
● Trusted services, such as organizational webmail
● Antivirus update servers
● Internal destinations that are not accessible to the cloud service
(Note: the cloud service PAC file bypasses private address blocks by default.).
To add a bypass destination to a policy, navigate to Web > Policies > [policy name] >
Connections tab. Add bypass destinations under Proxy Bypass. See Connections tab
in the Web Security Cloud help.
To add a bypass destination that applies to all policies, navigate to Web > Bypass
Settings > Proxy Bypass tab. See Adding and importing sites that bypass the proxy
in the Web Security Cloud help.
Getting Started Guide 31Next steps: configuring advanced features
Adding administrators
Getting Started Guide | Forcepoint Web Security Cloud
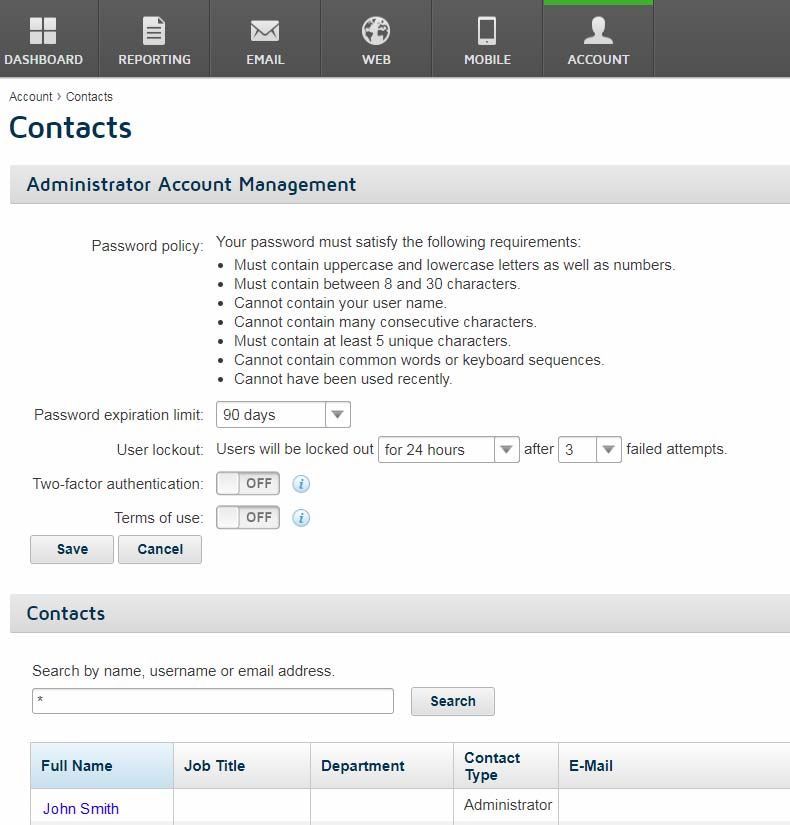
To add additional administrators, go to the Account > Contacts page. Your
administrator contacts can be given a portal login, and permissions to manage certain
features, as well as policy-level permissions, allowing them to view or modify settings
for particular policies.
This allows you to delegate responsibility for administration to particular departments.
Best practices for administrator access
As a best practice, set the administrator’s initial password to a randomly generated
string that meets the minimum password requirements, and require that the password
is changed when the administrator first logs on, using the Change password next log
on option.
32 Forcepoint Web Security CloudYou can also read