AWS Toolkit for VS Code - User Guide - AWS Documentation
←
→
Page content transcription
If your browser does not render page correctly, please read the page content below
AWS Toolkit for VS Code
       User Guide
AWS Toolkit for VS Code User Guide AWS Toolkit for VS Code: User Guide Copyright © Amazon Web Services, Inc. and/or its affiliates. All rights reserved. Amazon's trademarks and trade dress may not be used in connection with any product or service that is not Amazon's, in any manner that is likely to cause confusion among customers, or in any manner that disparages or discredits Amazon. All other trademarks not owned by Amazon are the property of their respective owners, who may or may not be affiliated with, connected to, or sponsored by Amazon.
AWS Toolkit for VS Code User Guide

Table of Contents
  AWS Toolkit for Visual Studio Code ...................................................................................................... 1
        What is the AWS Toolkit for Visual Studio Code ............................................................................. 1
        Related information ................................................................................................................... 1
  Setting Up ........................................................................................................................................ 2
        Installing the Toolkit for VS Code ................................................................................................ 2
              Prerequisites ...................................................................................................................... 2
              Install the Toolkit for VS Code ............................................................................................. 3
        Establishing credentials ............................................................................................................... 3
              Using AWS-supported credentials ......................................................................................... 4
              Using an external credential process ..................................................................................... 9
        Connecting to AWS .................................................................................................................... 9
              Connect to AWS through the Toolkit for VS Code ................................................................... 9
              Use multiple AWS accounts with the Toolkit ........................................................................ 12
        Changing AWS Regions ............................................................................................................. 12
              Add a Region to the AWS Explorer ..................................................................................... 13
              Hide a Region from the AWS Explorer ................................................................................. 14
        Configuring your toolchain ........................................................................................................ 15
              Configure a toolchain for .NET Core .................................................................................... 15
              Configure a toolchain for Node.js ....................................................................................... 15
              Configure a toolchain for Python ....................................................................................... 16
              Using Your toolchain ........................................................................................................ 16
  Navigating the Toolkit for VS Code .................................................................................................... 17
        Fundamental UI Components ..................................................................................................... 17
              The AWS Explorer ............................................................................................................ 17
              The AWS CDK Explorer ...................................................................................................... 18
        Command Locations ................................................................................................................. 18
              Visual Studio Code Command Palette ................................................................................. 18
              AWS Explorer Menu ......................................................................................................... 20
  Working with AWS Services ............................................................................................................... 21
        AWS Explorer ........................................................................................................................... 21
              Amazon API Gateway ........................................................................................................ 23
              AWS CloudFormation stacks .............................................................................................. 23
              Amazon CloudWatch Logs ................................................................................................. 24
              Amazon EventBridge ......................................................................................................... 26
              AWS Lambda Functions ..................................................................................................... 28
              Amazon S3 ...................................................................................................................... 33
              AWS Systems Manager ...................................................................................................... 36
              AWS Step Functions ......................................................................................................... 39
        Amazon ECS ............................................................................................................................ 46
              Using IntelliSense for task-definition files ............................................................................ 46
        AWS CDK Explorer .................................................................................................................... 47
              AWS CDK applications ....................................................................................................... 48
        AWS Serverless Application ....................................................................................................... 50
              Assumptions and prerequisites ........................................................................................... 50
              IAM permissions for serverless applications ......................................................................... 51
              Creating a new serverless application (local) ........................................................................ 51
              Opening a serverless application (local) ............................................................................... 51
              Running and debugging a serverless application from template (local) .................................... 52
              Deploying a serverless application to the AWS Cloud ............................................................ 53
              Deleting a serverless application from the AWS Cloud ........................................................... 54
              Running and debugging Lambda functions directly from code ................................................ 54
              Running and debugging local Amazon API Gateway resources ................................................ 56
              Configuration options for debugging serverless applications .................................................. 58
              Troubleshooting ............................................................................................................... 63

                                                                        iii
AWS Toolkit for VS Code User Guide
Security ........................................................................................................................................... 65
Data protection ........................................................................................................................ 65
Identity and Access Management ............................................................................................... 66
Logging and Monitoring ............................................................................................................ 66
Compliance Validation .............................................................................................................. 66
Resilience ................................................................................................................................ 67
Infrastructure Security .............................................................................................................. 67
Configuration and vulnerability analysis ...................................................................................... 68
Document history ............................................................................................................................. 69
ivAWS Toolkit for VS Code User Guide
What is the AWS Toolkit for Visual Studio Code
AWS Toolkit for Visual Studio Code
This is the user guide for the AWS Toolkit for VS Code. If you are looking for the AWS Toolkit for Visual
Studio, see the User Guide for the AWS Toolkit for Visual Studio.
What is the AWS Toolkit for Visual Studio Code
The Toolkit for VS Code is an open-source extension for the Visual Studio Code (VS Code) editor. This
extension makes it easier for developers to develop, debug locally, and deploy serverless applications
that use Amazon Web Services (AWS).
Topics
• Setting Up the AWS Toolkit for Visual Studio Code (p. 2)
• Navigating the AWS Toolkit for Visual Studio Code (p. 17)
• Working with AWS Services (p. 21)
Related information
Use the following resources to access the source code for the toolkit or view currently open issues.
• Source Code
• Issue Tracker
To learn more about the Visual Studio Code editor, visit https://code.visualstudio.com/.
1AWS Toolkit for VS Code User Guide
Installing the Toolkit for VS Code
Setting Up the AWS Toolkit for
Visual Studio Code
This section helps you set up the AWS Toolkit for Visual Studio Code. It provides information about how
to install and configure the toolkit, set up your credentials, and connect to AWS.
Topics
• Installing the AWS Toolkit for Visual Studio Code (p. 2)
• Establishing credentials for the AWS Toolkit for Visual Studio Code (p. 3)
• Connecting to AWS through the AWS Toolkit for Visual Studio Code (p. 9)
• Changing AWS Regions (p. 12)
• Configuring your toolchain (p. 15)
Installing the AWS Toolkit for Visual Studio Code
This section describes how to install the AWS Toolkit for Visual Studio Code.
Prerequisites
Required
Before you can install the Toolkit for VS Code, you must have the following:
• An Amazon Web Services account – To obtain an AWS account, go to the AWS home page. Choose
Create an AWS Account, or Complete Sign Up (if you've visited the site before). Signing up enables
you to use all of the services that AWS offers.
• A supported operating system – The Toolkit for VS Code is supported on Windows, Linux, and macOS.
• VS Code version 1.42.0 or later – We try to keep the Toolkit for VS Code current with the default
version that's available on the VS Code download page.
Optional
Before you can use certain features of the Toolkit for VS Code, you must have the following:
• Code Development – The relevant SDK for the language that you want to use. You can download from
the following links, or use your favorite package manager:
• .NET SDK: https://dotnet.microsoft.com/download
• Node.js SDK: https://nodejs.org/en/download
• Python SDK: https://www.python.org/downloads
• AWS SAM CLI – This is an AWS CLI tool that helps you develop, test, and analyze your serverless
applications locally. This isn't required for installing the toolkit. However, we recommend that you
install it (and Docker, described next) because it's required for any AWS Serverless Application Model
(AWS SAM) functionality, such as Creating a new serverless application (local) (p. 51).
For more information, see Installing the AWS SAM CLI in the AWS Serverless Application Model
Developer Guide.
2AWS Toolkit for VS Code User Guide
Install the Toolkit for VS Code
• Docker – The AWS SAM CLI requires this open-source software container platform. For more
information and download instructions, see Docker.
Install the Toolkit for VS Code
1. Start the VS Code editor.
2. In the Activity Bar on the side of the VS Code editor, choose the Extensions icon. This opens the
Extensions view, which allows you to access the VS Code Marketplace.
3. In the search box for Extensions, search for AWS Toolkit. Choose the entry to see its details in the
right pane.
4. In the right pane, choose Install.
5. Once installed, if you're prompted to restart the editor, choose Reload Required to finish
installation.
After you install the Toolkit for VS Code, you should configure your credentials (p. 3) to enable you
to access your AWS resources from within VS Code.
Establishing credentials for the AWS Toolkit for
Visual Studio Code
This section shows you the types of credentials that you can use with the AWS Toolkit for VS Code. It
provides information about how to get and configure those credentials.
You can obtain credentials through AWS and provide them to the toolkit by using configuration files. You
can also obtain credentials through an external credential process that isn't directly supported by AWS.
3AWS Toolkit for VS Code User Guide
Using AWS-supported credentials
Topics
• Using AWS-supported credentials (p. 4)
• Using an external credential process (p. 9)
Using AWS-supported credentials
AWS credentials can be provided to the AWS Toolkit for VS Code by using your shared AWS config file or
your shared AWS credentials file. The methods for using these files are the same as those for the AWS CLI.
For general information about how to use these files, see Configuration and Credential Files in the AWS
Command Line Interface User Guide.
Topics
• Obtaining AWS access keys (p. 4)
• Setting up your AWS credentials (p. 5)
• Using AWS SSO credentials (p. 8)
Obtaining AWS access keys
To access Amazon Web Services (AWS) with the AWS Toolkit for Visual Studio Code, you must configure
the toolkit with AWS account credentials. To do this with AWS-supported credentials, you must first
obtain appropriate AWS access keys.
For more information about users and credentials that is out of scope for this guide, see the following
resources:
• AWS Security Credentials in the Amazon Web Services General Reference
• Overview of Identity Management: Users in the IAM User Guide
What are AWS access keys
Access keys are the credentials that identify you to AWS and enable you to programmatically access AWS
services and resources. Access keys can be associated with your AWS account (the account's "root user")
or with users that you create with AWS Identity and Access Management (IAM).
Warning
Because the root user is essentially an administrator with full access to services and resources,
we recommend that you instead create an IAM user with only those permissions needed
to perform the required tasks. Then, for your credentials, you can use an access key that is
associated with that user. For details, see Creating an IAM User in Your AWS Account in the IAM
User Guide.
An access key consists of an access key ID, which is similar to a user name, and a secret access key, which
is similar to a password. This access key is used to sign programmatic requests that you make to AWS. If
you don't have access keys, you can create them by using the AWS Management Console. We recommend
that you use access keys for an IAM user instead of the keys for your account's root user.
Note
To create access keys, you must have permissions to perform the required IAM actions. For more
information, see Granting IAM User Permissions to Manage Password Policy and Credentials in
the IAM User Guide.
Get your AWS access keys
1. Open the IAM console at https://console.aws.amazon.com/iam/.
2. On the navigation menu, choose Users.
4AWS Toolkit for VS Code User Guide
Using AWS-supported credentials
3. Choose your IAM user name (not the check box) to view its details.
4. On the Security Credentials tab, choose Create access key.
5. To see the new access key, choose Show. The credentials resemble the following:
• Access key ID: AKIAIOSFODNN7EXAMPLE
• Secret access key: wJalrXUtnFEMI/K7MDENG/bPxRfiCYEXAMPLEKEY
6. To download the key pair, choose Download .csv file. Store the keys in a secure location.
Important
• Keep the keys confidential to protect your AWS account, and never email them. Do not
share them outside of your organization, even if an inquiry appears to come from AWS or
Amazon.com. No one who legitimately represents Amazon will ever ask you for your secret
key.
• You can't recover the secret key if you lose it. Instead, for security reasons, you must
create a new key pair and delete the old pair.
After you have obtained your AWS access keys, you can use the AWS Toolkit for VS Code to store them
in your shared AWS config file or your shared AWS credentials file. See Add your AWS access keys to your
environment (p. 5) to learn how.
Setting up your AWS credentials
To access Amazon Web Services (AWS) with the AWS Toolkit for Visual Studio Code, you must make your
AWS account credentials available to the toolkit. To use AWS-supported credentials, continue reading in
this topic. To use an external credential process, see Using an external credential process (p. 9).
Note
Some features of the Toolkit for VS Code, such as creating a serverless application, don't require
AWS credentials.
Get your AWS access keys
If you don't already have appropriate AWS access keys to store in your shared AWS config file or your
shared AWS credentials file, you must get them now.
To do so, see Obtaining AWS access keys (p. 4).
About shared AWS files
Your shared AWS config file and your shared AWS credentials file are files that you can use to store
configuration and credential information for AWS. By default, these files are located in the .aws
directory within your home directory and are named config and credentials, respectively. For more
information, see Where Are Configuration Settings Stored? in the AWS Command Line Interface User
Guide.
The Toolkit for VS Code locates and uses AWS access keys through your shared AWS config file and your
shared AWS credentials file. This is the method that is used by the AWS CLI and the AWS SDKs. Access
keys that you enter in the Toolkit for VS Code are saved to one of these files.
These shared files can contain the credentials for more than one AWS account, stored as profiles. Multiple
accounts can be useful, for example, to provide developers and administrators with separate resources
for development and for release or publication.
Add your AWS access keys to your environment
If you have already set your AWS credentials (for example, by using the AWS CLI), the Toolkit for VS Code
will automatically detect those credentials and make them available to the toolkit. If you haven't already
5AWS Toolkit for VS Code User Guide
Using AWS-supported credentials
set your AWS credentials, or if you want to include additional AWS credentials in your environment or
update an existing credentials profile, you can do so through the Toolkit for VS Code, as shown here.
Note
As an alternative to these procedures, you can use the aws configure AWS CLI command to add
AWS credentials to your environment. You can also use aws configure to set the default AWS
Region, which is needed for certain operations such as creating a serverless application.
Create the shared AWS credentials file
• If you already have a shared AWS credentials file, you can skip to the next procedure (p. 7).
• If you already have a shared AWS config file and want to use it, you can skip to the next
procedure (p. 7).
• If you have only a shared AWS config file but do NOT want to use it, you must first create a shared AWS
credentials file by using techniques that are normal for your operating-system. After that, you can skip
to the next procedure (p. 7).
Follow these steps to create the shared AWS credentials file.
1. Open VS Code.
2. To open the Command Palette, on the menu bar, choose View, Command Palette. Or use the
following shortcut keys:
• Windows and Linux – Press Ctrl+Shift+P.
• macOS – Press Shift+Command+P.
3. Search for AWS and choose AWS: Create Credentials Profile.
4. Enter a name for the initial profile.
5. Enter the access key ID for the credentials. If you don't have an access key ID, see Obtaining AWS
access keys (p. 4).
6. Enter the secret access key for the credentials. If you don't have a secret access key, see Obtaining
AWS access keys (p. 4).
6AWS Toolkit for VS Code User Guide
Using AWS-supported credentials
After you complete this procedure, you can verify the shared AWS credentials file by opening it directly
or by performing the first three steps of the next procedure (without making any updates).
Update one of your shared files
Follow these steps to add a new profile to your existing shared AWS config file or shared AWS credentials
file. You can also update an existing profile.
1. Open VS Code.
2. To open the Command Palette, on the menu bar, choose View, Command Palette. Or use the
following shortcut keys:
• Windows and Linux – Press Ctrl+Shift+P.
• macOS – Press Shift+Command+P.
3. Search for AWS and choose AWS: Create Credentials Profile.
4. When one or both of the shared files opens in the VS Code editor, add or update a profile.
5. When you're finished updating the file, save it.
Add additional credential profiles
You can add additional profiles and credentials. To do so, open the Command Palette and choose AWS:
Create Credentials Profile. This will open the credentials file. On this page, you can add a new profile
below your first profile, as in the example below:
# Amazon Web Services Credentials File used by AWS CLI, SDKs, and tools
# This file was created by the AWS Toolkit for Visual Studio Code extension.
#
# Your AWS credentials are represented by access keys associated with IAM users.
# For information about how to create and manage AWS access keys for a user, see:
# https://docs.aws.amazon.com/IAM/latest/UserGuide/id_credentials_access-keys.html
#
# This credential file can store multiple access keys by placing each one in a
# named "profile". For information about how to change the access keys in a
# profile or to add a new profile with a different access key, see:
# https://docs.aws.amazon.com/cli/latest/userguide/cli-config-files.html
#
7AWS Toolkit for VS Code User Guide
Using AWS-supported credentials
[Profile1_Name]
# The access key and secret key pair identify your account and grant access to AWS.
aws_access_key_id = AKIAIOSFODNN7EXAMPLE
# Treat your secret key like a password. Never share your secret key with anyone. Do
# not post it in online forums, or store it in a source control system. If your secret
# key is ever disclosed, immediately use IAM to delete the access key and secret key
# and create a new key pair. Then, update this file with the replacement key details.
aws_secret_access_key = wJalrXUtnFEMI/K7MDENG/bPxRfiCYEXAMPLEKEY
[Profile2_Name]
aws_access_key_id = AKIAI44QH8DHBEXAMPLE
aws_secret_access_key = je7MtGbClwBF/2Zp9Utk/h3yCo8nvbEXAMPLEKEY
Using AWS SSO credentials
To connect with AWS Single Sign-On (AWS SSO), you must complete the following prerequisites:
1. Enable AWS SSO – This includes choosing your identity source and setting up AWS SSO access to your
AWS accounts. For more information, see Getting started in the AWS Single Sign-On User Guide.
2. Add an AWS SSO profile – With AWS SSO, you define a named profile in the credentials file or config
that you use to retrieve temporary credentials for your AWS account. The profile definition specifies
the AWS SSO user portal as well as the AWS account and IAM role associated with the user requesting
access.
To add an AWS SSO profile
The following procedure outlines how to add an AWS SSO profile to your credentials or config file.
Adding an AWS SSO profile to your credentials file in VS Code
1. Open VS Code.
2. To open the Command Palette, on the menu bar, choose View, Command Palette. Or use the
following shortcut keys:
• Windows and Linux – Press Ctrl+Shift+P.
• macOS – Press Shift+Command+P.
3. Search for AWS and choose AWS: Create Credentials Profile. This will open the credentials file.
4. In the either the credentials or config file, under [default], add a template for a named AWS
SSO profile. An example profile follows:
... Named profile in credentials file ...
[profile sso-user-1]
sso_start_url = https://example.com/start
sso_region = us-east-2
sso_account_id = 123456789011
sso_role_name = readOnly
region = us-west-2
Important
Do not use the word profile when creating an entry in the credentials file. This is because
the credentials file uses a different naming format than the config file. Include the prefix
word profile only when configuring a named profile in the config file.
When assigning values for your profile, keep the following in mind:
• sso_start_url – The URL that points to your organization's AWS SSO user portal.
8AWS Toolkit for VS Code User Guide
Using an external credential process
• sso_region – The AWS Region that contains your AWS SSO portal host. This can be different from
the AWS Region specified later in the default region parameter.
• sso_account_id – The AWS account ID that contains the IAM role with the permission that you want
to grant to this AWS SSO user.
• sso_role_name – The name of the IAM role that defines the user's permissions when using this
profile to get credentials through AWS SSO.
• region – The default AWS Region that this AWS SSO user will sign into.
Signing in with AWS SSO
When signing in with an AWS SSO profile, the default browser is launched to the specified portal. You
must verify your AWS SSO login before you can access your AWS resources in VS Code. Note that if your
credentials expire, you'll have to repeat the connection process to obtain new temporary credentials.
Using an external credential process
If you have a process to generate or lookup credentials that isn't directly supported by AWS,
you can configure the AWS Toolkit for VS Code to use that process instead of any stored AWS
credentials (p. 4).
The method for specifying such an external credential process is the same as for the AWS CLI, and
consists of adding a credential_process definition to your shared AWS config file. For detailed
information about how to do this, see Sourcing Credentials with an External Process in the AWS
Command Line Interface User Guide.
Connecting to AWS through the AWS Toolkit for
Visual Studio Code
To interact with Amazon Web Services (AWS) through the AWS Toolkit for Visual Studio Code, you must
establish a connection to AWS.
Connect to AWS through the Toolkit for VS Code
1. Open VS Code.
2. To open the Command Palette, on the menu bar, choose View, Command Palette. Or use the
following shortcut keys:
• Windows and Linux – Press Ctrl+Shift+P.
• macOS – Press Shift+Command+P.
3. Search for AWS and choose AWS: Connect to AWS.
9AWS Toolkit for VS Code User Guide
Connect to AWS through the Toolkit for VS Code
4. Choose a profile from the list.
If you don't have a credentials profile set up, you are prompted to set one up. Look for a pop-up
in the lower-right corner of the editor. Choose Yes, and then follow the setup wizard to enter a
profile name, your access key ID, and your secret access key. For details, see Setting up your AWS
credentials (p. 5).
Note
If you want to provide an external credential process instead of using AWS-supported
credentials, choose No and see Using an external credential process (p. 9) instead.
5. Open the AWS: Explorer Side Bar, which we call the AWS Explorer, to verify the connection. You
will see either a list of AWS Regions (if you have made any Regions visible (p. 13) in the AWS
Explorer) or a message to add Regions to the AWS Explorer.
Before adding Regions (p. 12) to the AWS Explorer, you see the following.
10AWS Toolkit for VS Code User Guide
Connect to AWS through the Toolkit for VS Code
After adding Regions to the AWS Explorer, you see something like the following.
11AWS Toolkit for VS Code User Guide
Use multiple AWS accounts with the Toolkit
Use multiple AWS accounts with the Toolkit
You might have multiple AWS accounts that you want to access from the Toolkit for VS Code. Multiple
accounts can be useful, for example, to provide developers and administrators with separate resources
for development and for release or publication.
Separate sets of AWS credentials are stored as profiles within the shared AWS config file or the shared
AWS credentials file. To choose a different set of credentials, follow the steps in the previous procedure,
and choose a different profile.
Changing AWS Regions
When you set up your credentials, the AWS Toolkit for Visual Studio Code automatically selects and
shows the default AWS Region for those credentials in the AWS Explorer. This topic describes how to
change the list of Regions that is shown in the AWS Explorer.
12AWS Toolkit for VS Code User Guide
Add a Region to the AWS Explorer
Add a Region to the AWS Explorer
1. To open the Command Palette, on the menu bar, choose View, Command Palette. Or use the
following shortcut keys:
• Windows and Linux – Press Ctrl+Shift+P.
• macOS – Press Shift+Command+P.
2. Search for AWS and choose AWS: Show Region in the Explorer.
3. Choose the Region that you want to add to the AWS Explorer.
Note
The list contains only those Regions that are available to add to the AWS Explorer. Regions
you've already added don't appear in the list.
4. Verify that the Region now appears in the AWS Explorer.
13AWS Toolkit for VS Code User Guide
Hide a Region from the AWS Explorer
Hide a Region from the AWS Explorer
1. Choose the AWS icon in the Activity bar to open the AWS Explorer.
2. Choose one of the Regions in the list, and open its context menu.
14AWS Toolkit for VS Code User Guide
Configuring your toolchain
3. Choose Hide Region from the Explorer.
Configuring your toolchain
The AWS Toolkit for Visual Studio Code supports multiple languages that you can use to interact with
AWS. This topic describes how to set up the toolchain for each of these languages.
Configure a toolchain for .NET Core
1. Ensure that you have the Toolkit for VS Code installed (p. 3).
2. Install the C# extension. This extension enables VS Code to debug .NET Core applications.
3. Open an AWS Serverless Application Model (AWS SAM) application, or create one (p. 51).
4. Open the folder that contains template.yaml.
Configure a toolchain for Node.js
1. Ensure that you have the Toolkit for VS Code installed (p. 3).
15AWS Toolkit for VS Code User Guide
Configure a toolchain for Python
2. Open an AWS SAM application, or create one (p. 51).
3. Open the folder that contains template.yaml.
Configure a toolchain for Python
1. Ensure that you have the Toolkit for VS Code installed (p. 3).
2. Install the Python extension for Visual Studio Code. This extension enables VS Code to debug
Python applications.
3. Open an AWS SAM application, or create one (p. 51).
4. Open the folder that contains template.yaml.
5. Open a terminal at the root of your application, and configure virtualenv by running python -m
venv ./.venv.
Note
You only need to configure virtualenv once per system.
6. Activate virtualenv by running one of the following:
• Bash shell: ./.venv/Scripts/activate
• PowerShell: ./.venv/Scripts/Activate.ps1
Using Your toolchain
Once you have your toolchain set up, you can use it to run or debug (p. 52) the AWS SAM application.
16AWS Toolkit for VS Code User Guide
Fundamental UI Components
Navigating the AWS Toolkit for
Visual Studio Code
This topic describes how to navigate in the AWS Toolkit for Visual Studio Code. Be sure to first install the
toolkit (p. 2) before reading this topic.
For general information about the Visual Studio Code user interface (UI), see the UI documentation for
VS Code.
Fundamental UI Components
The following are the basic UI components of the AWS Toolkit for VS Code.
The AWS Explorer
• The following image shows the basic UI components of the AWS Explorer. See Working with AWS
Services in the AWS Explorer (p. 21) for details about what you can do with it.
The AWS Explorer is more formally known as the AWS: Explorer Side Bar.
17AWS Toolkit for VS Code User Guide
The AWS CDK Explorer
The AWS CDK Explorer
• The following image shows the basic UI components of the AWS CDK Explorer. See Working with the
AWS CDK Explorer (p. 47) for details about what you can do with it.
This is prerelease documentation for a feature in preview release. It is subject to change.
Command Locations
You can find the commands for the Toolkit for VS Code in various locations.
Visual Studio Code Command Palette
The VS Code Command Palette contains all the commands you can use for working with AWS services.
To see these commands, open the VS Code Command Palette from the View menu. Or use the following
shortcuts:
• Windows and Linux – Press Ctrl+Shift+P.
• macOS – Press Shift+Command+P.
18AWS Toolkit for VS Code User Guide
Visual Studio Code Command Palette
Then you can filter for "AWS".
19AWS Toolkit for VS Code User Guide
AWS Explorer Menu
AWS Explorer Menu
The AWS Explorer has a More Actions menu that contains the most common commands for working
with AWS services.
20AWS Toolkit for VS Code User Guide
AWS Explorer
Working with AWS Services
The AWS Toolkit for Visual Studio Code enables you a view and work with various AWS services. It
assumes that you've already installed and configured (p. 2) the Toolkit for VS Code on your system.
Topics
• Working with AWS Services in the AWS Explorer (p. 21)
• Working with Amazon Elastic Container Service (p. 46)
• Working with the AWS CDK Explorer (p. 47)
• Working with AWS Serverless Application (p. 50)
Working with AWS Services in the AWS Explorer
The AWS Explorer gives you a view of some of the AWS services that you can work with when using the
AWS Toolkit for Visual Studio Code. See a high-level view of the AWS Explorer in the navigation (p. 17)
topic.
This section provides information about how to access and use the AWS Explorer in VS Code. It assumes
that you've already installed and configured (p. 2) the Toolkit for VS Code on your system.
Some important points:
• If the toolkit is installed and configured correctly, you should see items in the AWS Explorer. To see
the AWS Explorer, choose the AWS icon in the Activity bar.
For example:
21AWS Toolkit for VS Code User Guide
AWS Explorer
• Certain features require certain AWS permissions. For example, to see the AWS Lambda functions
in your AWS account, the credentials you configured in Establishing credentials (p. 3) must include
at least read-only Lambda permissions. See the following topics for more information about the
permissions that each feature needs.
Topics
• Working with Amazon API Gateway (p. 23)
• Working with AWS CloudFormation stacks (p. 23)
• Working with CloudWatch Logs by using the AWS Toolkit for Visual Studio Code (p. 24)
• Working with Amazon EventBridge (p. 26)
• Working with AWS Lambda Functions (p. 28)
• Working with Amazon S3 (p. 33)
• Working with Systems Manager Automation documents (p. 36)
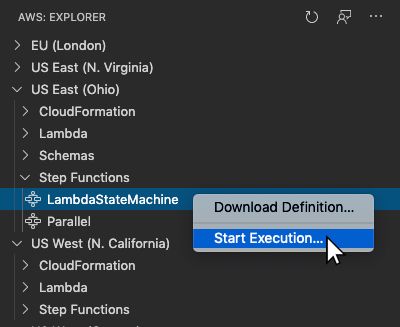
• Working with AWS Step Functions (p. 39)
22AWS Toolkit for VS Code User Guide
Amazon API Gateway
Working with Amazon API Gateway
You can browse and run remote API Gateway resources in your connected AWS account using the AWS
Toolkit for Visual Studio Code.
Note
This feature does not support debugging.
To browse and run remote API Gateway resources
1. In the AWS Explorer, choose API Gateway to expand the menu. The remote API Gateway resources
are listed.
2. Locate the API Gateway resource you want to invoke, open its context (right-click) menu, and then
choose Invoke on AWS.
3. In the parameters form, specify the invoke parameters.
4. To run the remote API Gateway resource, choose Invoke. The results are deplayed in the VS Code
Output view.
Working with AWS CloudFormation stacks
The AWS Toolkit for Visual Studio Code provides support for AWS CloudFormation stacks. Using the
Toolkit for VS Code, you can perform certain tasks with AWS CloudFormation stacks, such as deleting
them.
Topics
• Deleting an AWS CloudFormation stack (p. 23)
Deleting an AWS CloudFormation stack
You can use the AWS Toolkit for Visual Studio Code to delete AWS CloudFormation stacks.
Prerequisites
• Be sure your system meets the the prerequisites specified in Installing the Toolkit for VS Code (p. 2).
• Ensure that the credentials you configured in Establishing credentials (p. 3) include appropriate read/
write access to the AWS CloudFormation service. If in the AWS Explorer, under CloudFormation, you
see a message similar to "Error loading CloudFormation resources", check the permissions attached to
those credentials. Changes that you make to permissions will take a few minutes to affect the AWS
Explorer in VS Code.
Delete a CloudFormation stack
1. In the AWS Explorer, open the context menu of the AWS CloudFormation stack you want to delete.
2. Choose Delete CloudFormation Stack.
23AWS Toolkit for VS Code User Guide
Amazon CloudWatch Logs
3. In the message that appears, choose Yes to confirm the delete.
After the stack is deleted, it's no longer listed in the AWS Explorer.
Working with CloudWatch Logs by using the AWS
Toolkit for Visual Studio Code
Amazon CloudWatch Logs enables you to centralize the logs from all of your systems, applications, and
AWS services that you use, in a single, highly scalable service. You can then easily view them, search
them for specific error codes or patterns, filter them based on specific fields, or archive them securely for
future analysis. For more information, see What Is Amazon CloudWatch Logs? in the Amazon CloudWatch
User Guide.
The following topics describe how to use the AWS Toolkit for Visual Studio Code to work with
CloudWatch Logs in an AWS account.
Topics
• Viewing CloudWatch log groups and log streams by using the AWS Toolkit for Visual Studio
Code (p. 24)
• Working with CloudWatch log events in log streams by using the AWS Toolkit for Visual Studio
Code (p. 25)
Viewing CloudWatch log groups and log streams by using the
AWS Toolkit for Visual Studio Code
A log stream is a sequence of log events that share the same source. Each separate source of logs into
CloudWatch Logs makes up a separate log stream.
A log group is a group of log streams that share the same retention, monitoring, and access control
settings. You can define log groups and specify which streams to put into each group. There is no limit
on the number of log streams that can belong to one log group.
For more information, see Working with Log Groups and Log Streams in the Amazon CloudWatch User
Guide.
Topics
• Viewing log groups and log streams with the CloudWatch Logs node (p. 24)
Viewing log groups and log streams with the CloudWatch Logs node
1. In VS Code, choose View, Explorer to open AWS Explorer.
2. Click the CloudWatch Logs node to expand the list of log groups.
The log groups for the current AWS Region are displayed under the CloudWatch Logs node.
3. To view the log streams in a log group, right-click the name of the log group, and then choose View
Log Stream.
24AWS Toolkit for VS Code User Guide
Amazon CloudWatch Logs
4. From the Command Palette, select a log stream from the group to view.
Note
The Command Palette displays a timestamp for the last event in each stream.
The Log Stream editor (p. 25) launches to display the stream's log events.
Working with CloudWatch log events in log streams by using the
AWS Toolkit for Visual Studio Code
After you've opened the Log Steam editor, you can access the log events in each stream. Log events are
records of activity recorded by the application or resource being monitored.
Topics
• Viewing and copying log stream information (p. 25)
• Save the contents of the log stream editor to a local file (p. 25)
Viewing and copying log stream information
When you open a log stream, the Log Stream editor displays that stream's sequence of log events.
1. To find a log stream to view, open the Log Stream editor (see Viewing CloudWatch log groups and
log streams (p. 24)).
Each line listing an event is timestamped to show when it was logged.
2. You can view and copy information about the stream's events using the following options:
• View events by time: Display the latest and older log events by choosing Load newer events or
Load older events.
Note
The Log Stream editor initially loads a batch of the most recent 10,000 lines of log
events or 1 MB of log data (whichever is smaller). If you choose Load newer events, the
editor displays events that were logged after the last batch was loaded. If you choose
Load older events, the editor displays a batch of events that occurred before those
currently displayed.
• Copy log events: Select the events to copy, then right-click and select Copy from the menu.
• Copy the log stream's name: Right-click the tab of Log Stream editor and choose Copy Log
Stream Name.
Note
You can also use the Command Palette to run AWS: Copy Log Stream Name.
Save the contents of the log stream editor to a local file
You can download the contents of the CloudWatch log stream editor to a log file on your local machine.
Note
With this option, you save to file only the log events that are currently displayed in the log
stream editor. For example, if the total size of a log stream is 5MB and only 2MB is loaded in the
25AWS Toolkit for VS Code User Guide
Amazon EventBridge
editor, your saved file will also contain only 2MB of log data. To display more data to be saved,
choose Load newer events or Load older events in the editor.
1. To find a log stream to copy, open the Log Streams editor (see Viewing CloudWatch log groups and
log streams (p. 24)).
2. Choose the Save icon beside the tab displaying the log stream's name.
Note
You can also use the Command Palette to run AWS: Save Current Log Stream Content.
3. Use the dialog box to select or create a download folder for the log file, and click Save.
Working with Amazon EventBridge
The AWS Toolkit for Visual Studio Code (VS Code) provides support for Amazon EventBridge. Using the
Toolkit for VS Code, you can work with certain aspects of EventBridge, such as schemas.
Topics
• Working with Amazon EventBridge Schemas (p. 26)
Working with Amazon EventBridge Schemas
You can use the AWS Toolkit for Visual Studio Code (VS Code) to perform various operations on Amazon
EventBridge schemas.
Prerequisites
• Be sure your system meets the prerequisites specified in Installing the Toolkit for VS Code (p. 2).
• The EventBridge schema you want to work with must be available in your AWS account. If it isn't,
create or upload it. See Amazon EventBridge Schemas in the Amazon EventBridge User Guide.
• Open the AWS Explorer (p. 17) side bar.
View an Available Schema
1. In the AWS Explorer, expand Schemas.
2. Expand the name of the registry that contains the schema you want to view. For example, many of
the schemas that AWS supplies are in the aws.events registry.
3. To view a schema in the editor, open the context menu of the schema, and then choose View
Schema.
26AWS Toolkit for VS Code User Guide
Amazon EventBridge
Find an Available Schema
In the AWS Explorer, do one or more of the following:
• Begin typing the title of the schema you want to find. The AWS Explorer highlights the schema titles
that contain a match. (A registry must be expanded for you to see the highlighted titles.)
• Open the context menu for Schemas, and then choose Search Schemas. Or expand Schemas, open
the context menu for the registry that contains the schema you want to find, and then choose Search
Schemas in Registry. In the EventBridge Schemas Search dialog box, begin typing the title of the
schema you want to find. The dialog box displays the schema titles that contain a match.
To display the schema in the dialog box, select the title of the schema.
27AWS Toolkit for VS Code User Guide
AWS Lambda Functions
Generate Code for an Available Schema
1. In the AWS Explorer, expand Schemas.
2. Expand the name of the registry that contains the schema you want to generate code for.
3. Right-click the title of the schema, and then choose Download code bindings.
4. In the resulting wizard pages, choose the following:
• The Version of the schema
• The code binding language
• The workspace folder where you want to store the generated code on your local development
machine
Working with AWS Lambda Functions
The AWS Toolkit for Visual Studio Code provides support for AWS Lambda functions. Using the Toolkit
for VS Code, you can author code for Lambda functions that are part of serverless applications. In
addition, you can invoke Lambda functions either locally or on AWS.
Lambda is a fully managed compute service that runs your code in response to events generated by
custom code or from various AWS services, such as Amazon Simple Storage Service (Amazon S3),
Amazon DynamoDB, Amazon Kinesis, Amazon Simple Notification Service (Amazon SNS), and Amazon
Cognito.
Topics
• Interacting with Remote Lambda Functions (p. 28)
Interacting with Remote Lambda Functions
Using the Toolkit for VS Code, you can interact with AWS Lambda functions in various ways, as described
later in this topic.
For more information about Lambda, see the AWS Lambda Developer Guide.
28AWS Toolkit for VS Code User Guide
AWS Lambda Functions
Note
If you have already created Lambda functions by using the AWS Management Console or in
some other way, you can invoke them from the Toolkit. To create a new function (using VS Code)
that you can deploy to AWS Lambda, you must first create a serverless application (p. 51).
Topics
• Prerequisites (p. 29)
• Invoke a Lambda Function (p. 29)
• Delete a Lambda Function (p. 30)
• Import a Lambda Function (p. 31)
• Upload a Lambda Function (p. 32)
Prerequisites
• Be sure your system meets the the prerequisites specified in Installing the Toolkit for VS Code (p. 2).
• Ensure that the credentials you configured in Establishing credentials (p. 3) include appropriate read/
write access to the AWS Lambda service. If in the AWS Explorer, under Lambda, you see a message
similar to "Error loading Lambda resources", check the permissions attached to those credentials.
Changes that you make to permissions will take a few minutes to affect the AWS Explorer in VS Code.
Invoke a Lambda Function
You can invoke a Lambda function on AWS from the Toolkit for VS Code.
1. In the AWS Explorer, choose the name of the Lambda function you want to invoke, and then open
its context menu.
29AWS Toolkit for VS Code User Guide
AWS Lambda Functions
2. Choose Invoke on AWS.
3. In the invoke window that opens, enter the input that your Lambda function needs. The Lambda
function might, for example, require a string as an input, as shown in the text box.
You'll see the output of the Lambda function just like you would for any other project using VS Code.
Delete a Lambda Function
You can also delete a Lambda function using the same context menu.
30AWS Toolkit for VS Code User Guide
AWS Lambda Functions
Warning
Do not use this procedure to delete Lambda functions that are associated with AWS
CloudFormation (for example, the Lambda function that was created when creating a serverless
application (p. 51) earlier in this guide). These functions must be deleted through the AWS
CloudFormation stack.
1. In the AWS Explorer, choose the name of the Lambda function you want to delete, and then open
its context menu.
2. Choose Delete.
3. In the message that appears, choose Yes to confirm the delete.
After the function is deleted, it's no longer listed in the AWS Explorer.
Import a Lambda Function
You can import code from a remote Lambda funcion into your VS Code workspace for editing and
debugging.
Note
The toolkit only supports importing Lambda functions using supported Node.js and Python
runtimes.
31AWS Toolkit for VS Code User Guide
AWS Lambda Functions
1. In the AWS Explorer, choose the name of the Lambda function you want to import, then open its
context menu.
2. Choose Import...
3. Choose a folder to import the Lambda code to. Folders outside the current workspace will be added
to your current workspace.
4. After download, the Toolkit adds the code to your workspace and opens the file containing the
Lambda handler code. The Toolkit also creates a launch configuration, which appears in the VS Code
run panel so you can locally run and debug the Lambda function using AWS Serverless Application
Model. For more information about using AWS SAM, see the section called “Running and debugging
a serverless application from template (local)” (p. 52).
Upload a Lambda Function
You can update existing Lambda functions with local code. Updating code in this way does not use the
AWS SAM CLI for deployment and does not create an AWS CloudFormation stack. This functionality can
upload a Lambda function with any runtime supported by Lambda.
Warning
The toolkit can't check whether your code works. Make sure the code works before updating
production Lambda functions.
1. In the AWS Explorer, choose the name of the Lambda function you want to import, then open its
context menu.
2. Choose Upload Lambda...
3. Choose from the three options for uploading your Lambda function. The options include:
Upload a premade .zip archive
• Choose Zip Archive from the Quick Pick menu.
• Choose a .zip file from your file system and confirm the upload with the modal dialog. This
uploads the .zip file as is and immediately updates the Lambda following deployment.
Upload a directory as is
• Choose Directory from the Quick Pick menu.
• Choose a directory from your file system.
• Choose No when prompted to build the directory, then confirm the upload with the modal dialog.
This uploads the directory as is and immediately updates the Lambda following deployment.
Build and upload a directory
Note
This requires the AWS SAM CLI.
• Choose Directory from the Quick Pick menu.
• Choose a directory from your file system.
• Choose Yes when prompted to build the directory, then confirm the upload with the modal
dialog. This builds the code in the directory using the AWS SAM CLI sam build command and
immediately updates the Lambda following deployment.
Note
The toolkit will warn you if it can't detect a matching handler prior to upload. If you
wish to change the handler tied to the Lambda function, you can do so through the AWS
Management Console or the AWS CLI.
32AWS Toolkit for VS Code User Guide
Amazon S3
Working with Amazon S3
The following topics describe how to use the AWS Toolkit for Visual Studio Code to work with Amazon
S3 buckets and objects in an AWS account.
Topics
• Working with Amazon S3 buckets (p. 33)
• Working with Amazon S3 objects (p. 34)
Working with Amazon S3 buckets
Every object you store in Amazon S3 resides in a bucket. You can use buckets to group related objects in
the same way that you use a directory to group files in a file system.
Topics
• Creating an Amazon S3 bucket (p. 33)
• Adding a folder to an Amazon S3 bucket (p. 33)
• Deleting an Amazon S3 bucket (p. 34)
• Configuring the display of Amazon S3 items (p. 34)
Creating an Amazon S3 bucket
1. In the AWS Explorer, right-click the S3 node, and then choose Create Bucket. Or choose the Create
Bucket icon across from the S3 node.
2. In the Bucket Name field, enter a valid name for the bucket. Press Enter to confirm.
The new bucket is displayed under the S3 node.
Note
Because Amazon S3 allows your bucket to be used as a URL that can be accessed publicly,
the bucket name that you choose must be globally unique. If some other account has
already created a bucket with the name that you chose, you must use another name.
You can check the AWS Toolkit Logs in the Output tab if you can't create a bucket. For
example, a BucketAlreadyExists error occurs if you use a bucket name already in use.
For more information, see Bucket restrictions and limitations in the Amazon Simple Storage
Service Developer Guide.
After a bucket is created, you can copy its name and Amazon Resource Name (ARN) to the clipboard.
Right-click the bucket entry and select the relevant option from the menu.
Adding a folder to an Amazon S3 bucket
You organize a bucket's contents by grouping objects in folders. You can also create folders within other
folders.
1. In the AWS Explorer, choose the Amazon S3 node to view the list of buckets.
2. Right-click a bucket or a folder, and then choose Create Folder. Or choose the Create Folder icon
across from the name of the bucket or folder.
3. Enter a Folder Name, and then press Enter.
33AWS Toolkit for VS Code User Guide
Amazon S3
Deleting an Amazon S3 bucket
When you delete a bucket you also delete the folders and objects that it contains. You're asked to
confirm that you want to do this before the deletion is carried out.
Note
To delete only a folder, not the entire bucket, use the AWS Management Console.
1. In the AWS Explorer, choose the S3 node to expand the list of buckets.
2. Right-click the bucket to delete, and then choose Delete S3 Bucket.
3. Enter the bucket's name to confirm the deletion, and then press Enter.
Note
If the bucket contains objects, the bucket is emptied before deletion. This can take some
time if it's necessary to delete every version of thousands of objects. A notification is
displayed after the deletion is complete.
Configuring the display of Amazon S3 items
If you're working with a large number of Amazon S3 objects or folders, you can specify how many are
displayed at one time. When the maximum number is displayed, you can choose Load More to display
the next batch.
1. In the VS Code Activity Bar, choose Extensions.
2. For the AWS Toolkit extension, choose the settings icon, and then choose Extension Settings.
3. On the Settings page, scroll down to the AWS > S3: Max Items Per Page setting.
4. Change the default value to the number of S3 items you want displayed before choosing to load
more.
Note
The range of accepted values is between 3 and 1000. This setting applies only to the
number of objects or folders displayed at one time. All the buckets you've created are
displayed at once. (By default, you can create up to 100 buckets in each of your AWS
accounts.)
5. Close the Settings page to confirm your changes.
You can also update the settings in a JSON-formatted file by choosing the Open Settings (JSON) icon in
the upper right of the Settings page.
Working with Amazon S3 objects
Objects are the fundamental entities stored in Amazon S3. Objects consist of object data and metadata.
Topics
• Uploading a file to an Amazon S3 bucket (p. 35)
34AWS Toolkit for VS Code User Guide
Amazon S3
• Downloading an Amazon S3 object (p. 35)
• Deleting an Amazon S3 object (p. 35)
Uploading a file to an Amazon S3 bucket
This procedure uploads a file from a user's system and stores it as an S3 object in the AWS Cloud. You
can upload a file to a bucket or to a folder that organizes that bucket's contents.
1. In the AWS Explorer, choose the Amazon S3 node to view the list of buckets.
2. Right-click a bucket or a folder in that bucket, and then choose Upload File. Or choose the Upload
File icon across from the name of the bucket or folder.
Note
If you right-click an S3 object, you can choose Upload to Parent. This enables you to add a
file to the folder or bucket that contains the selected file.
3. Using your system's file manager, select a file, and then choose Upload File.
The selected file is uploaded as an S3 object to the bucket or folder. Each object's entry describes
the size of the stored object and how long ago it was uploaded. You can pause over the object's
listing to view the path, size, and time when it was last modified.
Downloading an Amazon S3 object
You can download objects in an Amazon S3 bucket from the AWS Cloud to your system.
1. In the AWS Explorer, choose the S3 node to view the list of buckets.
2. In a bucket or in a folder in a bucket, right-click an object, and then choose Download As. Or choose
the Download As icon across from the name of the object.
3. Using your system's file manager, select a destination folder, enter a file name, and then choose
Download.
After a file is downloaded, you can open it in the IDE interface using the AWS Toolkit Logs on the
Output tab. Depending on your operating system, press Cmd or Ctrl and click the link to the file's
location.
Deleting an Amazon S3 object
You can permanently delete an object if it's in a non-versioned bucket.But for versioning-enabled
buckets, a delete request does not permanently delete that object. Instead, Amazon S3 inserts a delete
marker in the bucket. For more information, see Deleting object versions in the Amazon Simple Storage
Service Developer Guide.
1. In the AWS Explorer, choose the S3 node to view the list of buckets.
2. In a bucket or a folder in a bucket, right-click an object, and then choose Delete.
3. Choose Delete to confirm.
35You can also read