Spontania User Operations Guide - Attend a meeting
←
→
Page content transcription
If your browser does not render page correctly, please read the page content below
Spontania User Operations Guide
ClearOne
 5225 Wiley Post Way
 Suite 500
 Salt Lake City, UT 84116

 Telephone                            1 800.945.7730
                                      1.801.975.7200

 Spontania Support                    801-974-3612

 TechSales                            1.800.705.2103

 FAX                                  1.801.977-0087

 E-mail:                              spontania.support@clearone.com

 On the Web                           www.clearone.com

Spontania
USER OPERATIONS GUIDE

CLEARONE DOCUMENT

DOC-0211-001 REV. 3.0
SPONTANIA USER OPERATIONS GUIDE

© 2016 ClearOne Inc. - All Rights Reserved.

No part of this document may be reproduced in any form or by any means without
written permission from ClearOne. ClearOne reserves specific privileges.

Information in this document is subject to change without notice.

ClearOne and Spontania are registered trademarks of ClearOne. All other trademarks are
the trademarks of their respective companies.

2 Spontania: User Operations Guide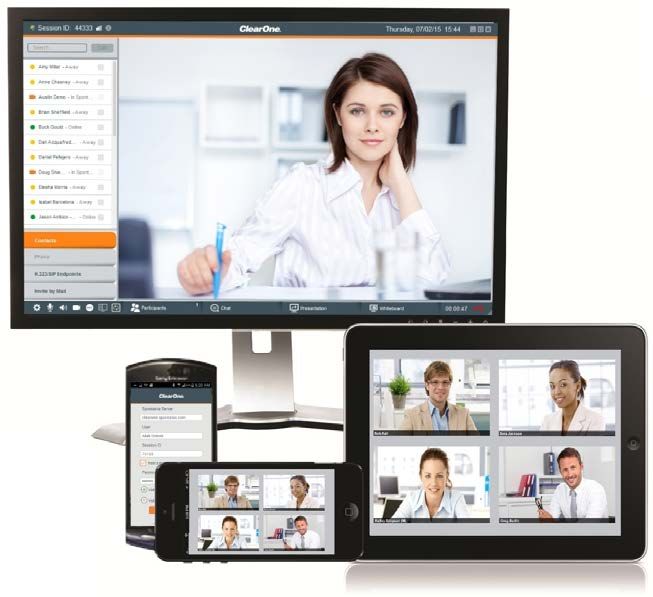
Table of Contents
Section 1: Introduction and Installation....................................................................................................... 5

         What is Spontania? .......................................................................................................................... 5

         Spontania Installation and Getting Started ........................................................................................ 5

Section 2: Spontania Session User Interface ................................................................................................ 6

         Video Window................................................................................................................................. 6

         Upper Bar ....................................................................................................................................... 7

         The Bottom Control Bar ................................................................................................................... 8

         Personal Settings Panel .................................................................................................................. 10

Section 3: Collaboration ........................................................................................................................... 15

         Presentation ................................................................................................................................. 15

         Participants ................................................................................................................................... 23

         Chat .............................................................................................................................................. 25

         Whiteboard................................................................................................................................... 26

Section 4: Moderator Interface................................................................................................................. 29

         Invite Area .................................................................................................................................... 29

         Participants List ............................................................................................................................. 31

         Responding to Raise Hand Request ................................................................................................. 34

         Transferring the Moderator Role .................................................................................................... 35

         User Disconnection........................................................................................................................ 36

         Recording Sessions ........................................................................................................................ 36

Section 5: Direct Access, Instant Messaging, and Scheduling ...................................................................... 38

         Direct Access from Desktop............................................................................................................ 38

         User Option Controls ..................................................................................................................... 50

Section 6: iOS and Android Operation ....................................................................................................... 58

                                                                                              Spontania: User Operations Guide 3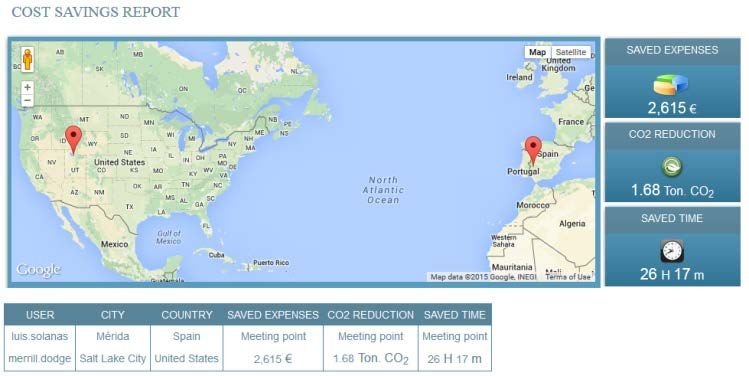
Mobile Application on Device ......................................................................................................... 58

      Connection Process ....................................................................................................................... 58

      User Screens ................................................................................................................................. 60

4 Spontania: User Operations Guide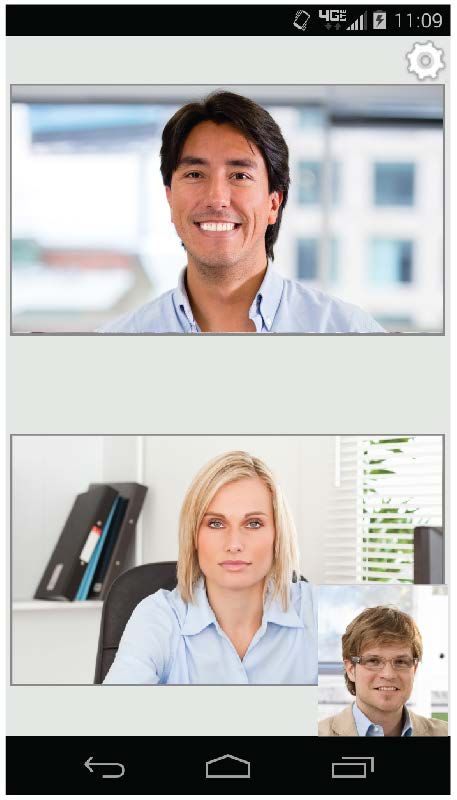
Section 1: Introduction and Installation
What is Spontania?
 Spontania is the most powerful conferencing service available—putting all the benefits of visual
 collaboration within anyone’s reach–while removing the barriers of complexity and high costs.

 This easy-to-use unified video conferencing and collaboration software application provides a full range of
 real-time online communication and collaboration tools. It enables people within your organization to hold
 meetings, conduct training, collaborate as a team, deliver impactful presentations, and provide remote
 support, in an effective and productive way.

 Spontania can be easily accessed by virtually anyone in the world via the internet, using a PC, Mac®,
 iPhone®, iPad®, or Android® device.

       Note: Features described in this document cover all Spontania deployments; Enterprise, Pro,
       Standard, and Classroom. Notations are made in this document to indicate features generally
       available, and specific to particular deployments. Please contact your ClearOne representative with
       any questions regarding specific feature availability for your deployment.

Spontania Installation and Getting Started
 Installation of the Spontania plug-in must be previously set up on the desktop PCs, Macs, iPhones, iPads, or
 Android devices by authorized personnel within the organization following the procedures listed in the
 Spontania Quick Start Guide, available on the ClearOne website at:

                                http://.spontania.com/spn/attend.jsp

       Note: Which server to use depends on your location and deployment type.

 Setup varies depending on the hosting and type of deployment: Enterprise, Pro, Standard, and Classroom.

 This User Operations Guide continues from where the Quick Start Guide ends. It is assumed that Spontania
 has been installed and you are able to connect. This document details the controls and features of the
 application.

       Note: Some antivirus programs block the Spontania and SpontanaIM application. Proper precautions
       must be made to either find a compatible antivirus program or to disable it while using Spontania.

                                                                 Spontania: User Operations Guide 5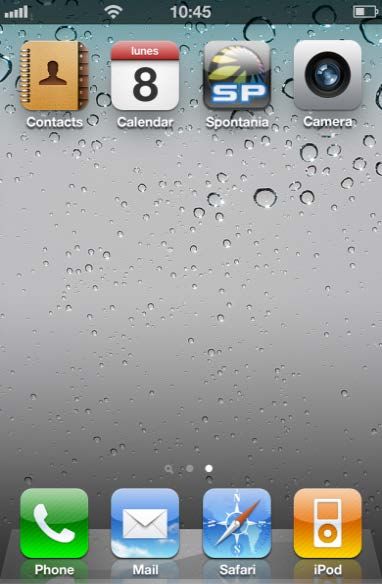
Section 2: Spontania Session User Interface
The Spontania Window is launched using ¾ of the screen. It is possible to resize the interface to occupy the
whole screen with the fill-screen button (which appears when the mouse moves over the interface). To
return from whole screen to a window press the return button .
A window can be made larger or smaller by dragging the lower-right corner to resize the window.
Video Window
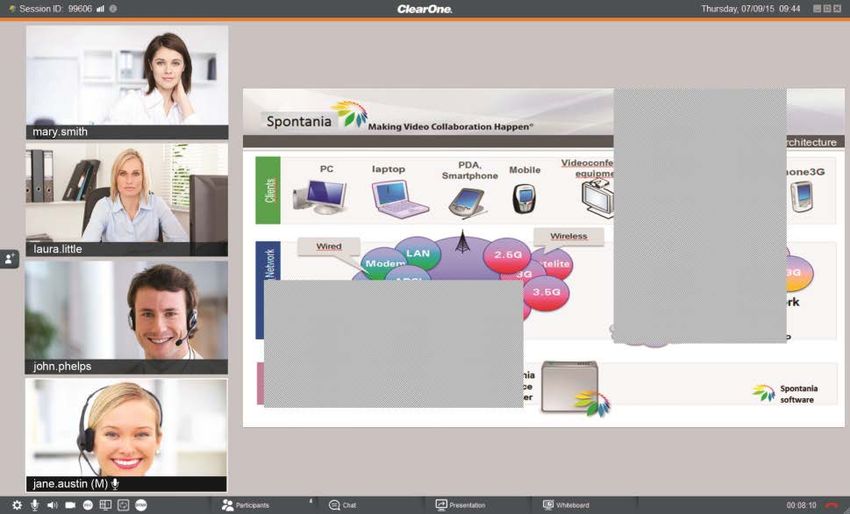
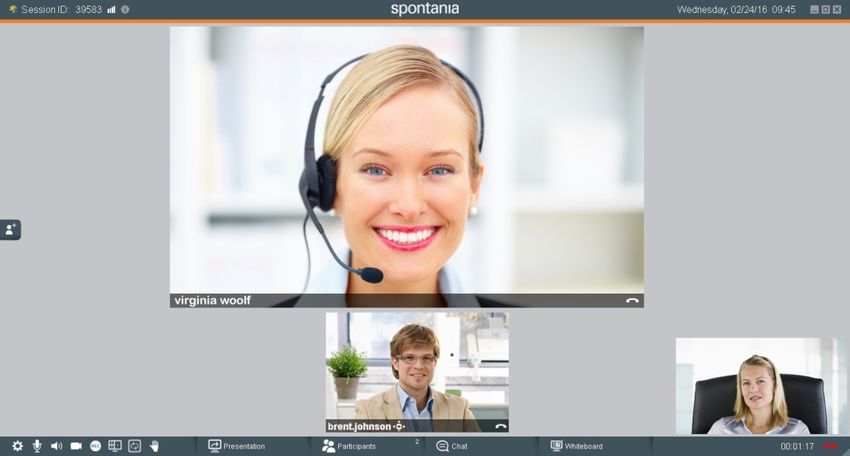
The Video Window of the application, in the middle of the screen, is where the users are displayed in videos,
or any shared application, or the whiteboard appear.
The local video of the attached camera is displayed as a small image in the lower corner. This image can be
dragged with the mouse to any area of the main screen. Clicking the small image will bring it up into the
grouping of all participants; by right-clicking the expanded local camera image, and then selecting “Set as
minimized video,” it will return to the corner. Double-clicking the local camera image will place it in a separate
window.
It is possible select any video image and view of a shared application by double-clicking to place it in a
separate window that can be maximized. Closing the window returns the display back to the previous
situation. This option is useful for PCs with extended desktops.
Note: Spontania supports up to 25 attendees (for Standard and Pro accounts) or 100 attendees (for
Classroom accounts) or up to the purchased number of licenses (for Enterprise accounts). Regardless
of the number allowed attendees, Spontania supports up to 10 visible floating windows. If AVQ is
enabled, and an attendee who is not visible speaks, his or her video is rotated into view for all to see
and another silent attendee is rotated out of view.
6 Spontania: User Operations Guide
Text and small icons appear under each image of those attendees whose video is displayed:

     •   User name
     •   User role, by adding “(M)” after the name if the user is acting as a moderator.
     •   Audio status of the displayed users microphone:

         o           Speaking (White border around image and microphone icon at base of the image)

         o           Not Speaking (No border or icon displayed)

         o           Microphone Muted

 This Main Area automatically selects the most appropriate view of the session depending on the number of
 active videos and on whether the collaboration utilities are being used; it also adapts the size and position of
 the sharing and videos in the screen.

Upper Bar
 At the top of the screen, this bar shows information about the session and has window controls. If you click
 and hold with the mouse on any area of the upper bar not associated with any icon, you can drag the
 window to relocate it on the screen, just like any other application.

 This bar is divided into two parts:

Session Information

     •   SessionID of the session
     •       Connection Quality: This lets the user know about the level of connectivity during the session.
             o Clicking this icon also provides a link to Session Statistics (Bandwidth Utilization and Events
                record)

                                                                   Spontania: User Operations Guide 7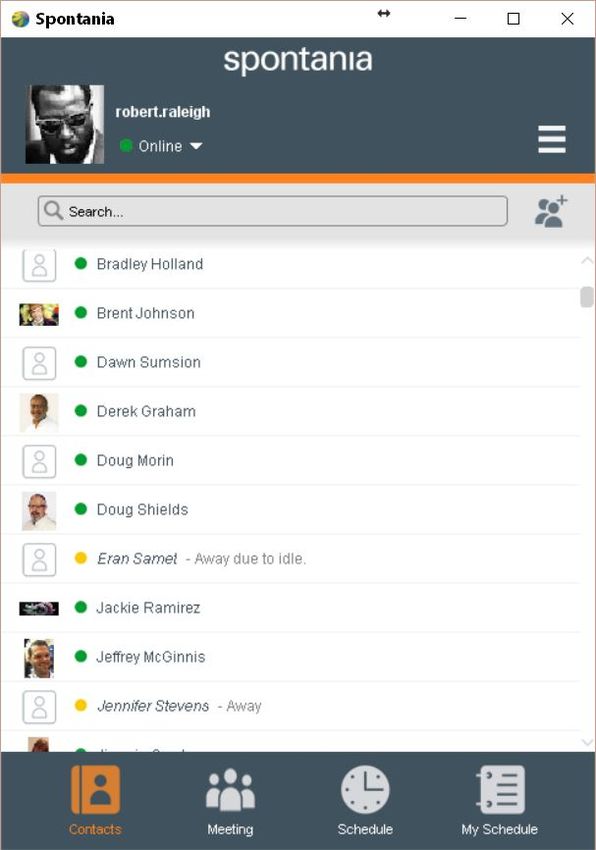
•      Information: a button to view the connection details of the session

 This sample window shows the connection data of a session that allows phone access (this functionality not
 available in all Spontania deployments).

Window Controls

 These are used to minimize, maximize, and close the application.

The Bottom Control Bar
 The Bottom Control Bar has Personal Controls, Collaboration Controls, and Status Information areas.

 Personal Controls
 The left side of the bottom bar has Spontania personal controls.

                                                      or
8 Spontania: User Operations Guide
From left to right, these include:
     •         Settings
     •              Microphone Un-mute/Mute
     •              Speaker Un-mute/Mute
     •             Local Camera On/Off
     •              Recording On/Off (moderator only)
     •                    Layout
     •        Video rotation

     •        DTMF (Dual Tone Multi Frequency is only present on deployments when an endpoint has
         connected to the session, and only in the moderator interface.)

     •        Raise Hand Request

     •        Pending Raised Hand Request (moderator only)

Depending on your deployment and the settings the moderator of a session has implemented for participants,
some services may not be available.

          Service available and user can       Service available but user       Service not available and user
                  enable/disable                cannot enable/disable              cannot enable/disable

Collaboration Controls
 The center of the bar on the user interface consists of Collaboration Control buttons:

     •   Presentation
     •   Participants (Moderator functions)
     •   Chat
     •   Whiteboard

 The functions contained within the Collaboration Control are described later in this document.

Information Area and End Call
 The bottom right corner of the bottom control bar displays information about the current Spontania session,
 such as total time connected and a Hang-up icon to end the session.

                                                                   Spontania: User Operations Guide 9
In the event of a file transfer, a progress bar is displayed showing how much of the selected file has been
 transferred.

Personal Settings Panel
 The Personal Settings panel of the application, accessed by the Settings icon in the Personal Controls at the
 bottom left of the screen, is where you set your preferences during a Spontania session.

 The panel revealed by the icon consists of several parts. Settings and changes made in any of the parts can
 then be applied to the session.

Audio
 This panel is for setting the Audio devices used in Spontania selected from those attached to the local
 computer. You can adjust the local microphone volume as well as the speaker volume using the sound
 controls.

        Note: Speakerphones such as the ClearOne CHAT™ 50, CHAT 150, CHAT 60 and CHAT 160 are
        selected and enabled by default. The Spontania Audio Engine, AGC, CNG, and AEC are disabled for
        ClearOne devices. The Jabra®SPEAK™ 510 USB and the Plantronics® BT300C/P620 are also
        supported.

10 Spontania: User Operations Guide
Video
This panel is for setting the Video devices used in Spontania, selected from those attached to the local
computer. In cases where more than one camera is connected to the computer, you can select which will be
used in Spontania or you can choose multiple cameras to use during this Spontania session.
Note: Click Settings to access the Video Proc Amp and Camera Control dialog boxes (the application
opened depends on the webcam drivers being used). The Video Proc Amp settings let you change
the camera’s Brightness, Contrast, Hue, Saturation, Sharpness, Gamma, White Balance, Backlight
Comp(ensation), Gain, ColorEnable, and Powerline Frequency. The Camera Control settings let you
control the Zoom, Focus, Exposure, Aperture, Pan, Tilt, Roll, and Low Light Compensation.
Depending on the camera you’re using, some of these settings may not be available.
Layout
This panel is for setting the default screen layouts of the Video, Application Sharing, Whiteboard, and Border
Spacing within Spontania meetings for the local user. These setting can be changed and applied only when
that particular Spontania feature is in use; otherwise, they are grayed out. Force view is available only if
Automatic Video Quality (AVQ) is not enabled at the server and the user is the moderator.
Spontania: User Operations Guide 11Recording
This panel is for setting the Record Video options. Only the moderator can record a Spontania session to a
drive whose location, video format, and quality can be set using the controls provided. For more
information, see the Moderators section of this guide.
Session
This panel is for changing session-specific settings.
o Services lets you choose whether session participants can enable/disable services (such as audio,
video, sharing, remote control, file transfer, and whiteboard) for themselves (if checked) or whether
only the moderator can make these kinds of changes (if unchecked).
o Video lets you change the default video quality for sessions.
o Application lets you change the default settings for application bandwidth usage.
General
This panel is for setting the General application options.
o Skip Wizard lets you choose, by checking or un-checking the box, whether the
audio/video/connectivity test wizard is run when Spontania opens.
12 Spontania: User Operations GuideFor convenience, if there is commonly no change in the connection configuration and settings of the
audio and video devices and levels, then the wizard can be turned off.
o Notifications allow Spontania system notifications to be displayed when system events such as
muting and disabling services and devices occur.
o Show Cost Savings Report allows Spontania at the end of each session to calculate and display in the
default browser a Cost Savings Report with information about CO2, time, and travel cost savings of
the session as opposed to expenses for a similar in-person meeting.
Info
This panel shows the current build information for the Spontania software and provides a Need Help button
to access an online version of the user documentation.
Spontania: User Operations Guide 13Hand Raise The Hand Raise icon on the Personal Controls panel allows you to request the moderator’s attention without distraction to the other participants in the session. This is particularly useful in situations where many users are in the session. Furthermore, their video/audio/Text Chat services might have been disabled. Click the Hand Raise icon on the Personal Controls to request the moderator’s attention. Type the text you wish to send to the moderator. Click Ok to send the message. The moderator can Reject the request or check the Text Chat/Audio/Video services to be granted and then click Ok. Approved services are then granted to the requesting user, who can then contribute actively to the session. 14 Spontania: User Operations Guide
Section 3: Collaboration
 The bottom of the main screen holds the Collaboration Tools that make Spontania so powerful. They give
 each user multiple ways to work with and share information with all users.

 Each collaboration tool opens a panel of choices and services. The panel expands when the button is clicked
 and closes when clicked again.
 Each opened panel can be detached when the detach icon        is clicked and operate as a floating panel
 separate from the main screen and movable anywhere on the desktop. Closing the floating panel reattaches
 it to the main screen.

Presentation
 The Presentation collaboration tools allow a participant to share videos, transfer files, show their entire
 desktop (Mac users) or to show the desktop or specific documents and applications (Windows users) to the
 other attendees in the session.

       Note: Windows users can share multiple applications.

Share Video
When a Windows-based PC user clicks the Share Video control, the user is presented a selection dialog box to
locate and open the video.

                                                               Spontania: User Operations Guide 15
Clicking Open plays the video in a new window on each of the participants’ screens. Supported file formats
include: avi, mpg, mpeg, wmv, mov, mp4, and mkv; however, the transmitting PC must have the
corresponding video and audio codecs installed in order to play them. Furthermore, it is possible that the
Share Video option will not work properly if Windows Media Foundation and Windows Media Video are not
configured properly.
If the multiple video camera option is enabled, a user can transmit both their own video camera stream and a
video played from a file simultaneously. Both types of video streams are muted when the user sending the
video mutes the camera and microphone controls, or when the moderator mutes them from the Participants
panel.
To stop playback of the video, the user sending must select Stop Playback from the Presentation panel. The
streaming video will stop and the window that contained it will be closed for all participants.
File Transfer
When a user clicks on the File Transfer control, the user is presented a selection dialog box to locate and
select the file.
Note: Mac users can also transfer files, but the dialog that appears to let you select a file is different.
Clicking Open transfers the file to all participants in the session. As the file transfers, a progress bar appears in
the lower right-hand corner of the Spontania interface.
Progress is also shown in the Spontania icon on the taskbar.
16 Spontania: User Operations GuideAfter the file has transferred, each participant receives a dialog box enabling the transferred file to be locally
saved and accessed.
Clicking Save places the file in the selected directory.
Note: The speed of the file transfer is influenced by number of participants in the session, video
resolutions used, audio, and other session activity. The transfer may slow when other session
activity takes priority in network bandwidth utilization.
Share Application
To start application sharing, a Windows-based PC user clicks the Share Application control.
The user is presented a selection dialog box to select the application(s) or desktop they want to share with
the rest of the participants.
Spontania: User Operations Guide 17The first option, Desktop, allows the whole screen to be shown to the participants. A user preferring to show only certain applications must select only those applications and then click Ok. If the applications the user wants to share are not opened they will not be listed in this first window. The user must open the applications, and then click Refresh to update the list of available applications to share. Clicking Cancel closes the application sharing dialog. Only one participant at a time can share applications during a session. As soon as the user has selected and started the service, the rest of the attendees to the session will be able to see the application and the changes made on it, as well as the movements of the mouse pointer. If the user notices a gray box in any part of the screen (or in the whole sharing area), like the one shown below, that is because another unshared application is in front of the shared one on the screen. The sharing user must hide the other applications or bring the shared one forward to show the full shared image again. (If the desktop is shared, no gray boxes are viewed since the program authorization is for the whole screen). 18 Spontania: User Operations Guide
Change Sharing allows the user who is sharing an application to modify the application(s) being shared with
the session. Clicking this reopens the application sharing selection dialog box to make the changes.

 If the user who starts the sharing has a Mac computer, the complete screen is shown automatically, as
 notified in the following message:

 For the person sharing an application, Spontania minimizes automatically in the task bar to allow the
 application maximum screen space. In its place a small floating bar with the videos of the other participants
 (up to 8) appears. The window containing the videos floats and can be resized and moved about the screen as
 desired.

                                                                Spontania: User Operations Guide 19
Stop Sharing ends application sharing. Remote Application Control Benefits of a shared application are enhanced when the application host participant can share the application with other session participants. This allows real-time collaboration on a document, presentation, etc. To activate the remote application control service, the application must be open and shared as described above. Then, when the application is shared, the participants in the session will see the Application control selection in the Presentation panel is no longer grayed, but can be selected. Clicking Application control sends the user who owns the shared application a message asking for permission to control the application. 20 Spontania: User Operations Guide
Once accepted, the user has control over the remote application along with the application’s owner. Mouse
movements and changes are viewable to all users as the application is used. From then on, the user who has
activated the remote control service will be able to interact with the remote user’s application or desktop.
The owner of the shared application will also be able to use the equipment or application as well; however,
the service permits only one user to take control at a time.

      Note: In the situation where an MS PowerPoint application is being shared in Full Screen, “Use
      Presenter View” must be disabled.

When the sharing function is activated, a new button appears among the icons on the personal controls for
the person sharing their own application.

      Note: This icon returns/opens the Spontania interface, but doesn’t stop remote control of the shared
      application.

This new button allows the application owner to return to the full Spontania UI temporarily without cancelling
the authorization already granted to another user to take remote control of an application.

The user who is controlling an application shared by another has this new icon in the Spontania toolbar.

                                                                Spontania: User Operations Guide 21
If a user clicks this icon, it pauses their control. Then mouse or keyboard interactions are not sent to the controlled device (MAC or PC) and the icon is changed to one resembling a “paused” button. The remote control service can be stopped by clicking the checkbox corresponding to this service. However, since sharing is still active, the remote application remains visible. It is now possible for another user to request remote control of that application. On the other hand, if the control service is active, the remote application control as well as the sharing will stop if the application’s owner presses the Stop Sharing control in the Presentation panel. 22 Spontania: User Operations Guide
Participants
 The Participants list panel area contains the controls used by the moderator to control collaboration of all
 session users. Moderators have access to all controls; users invited to the session can control only those
 controls pertaining to themselves or those granted by the moderator.

 The particpants button shows the number of users in the session.

User Settings
 Icons at the top of the panel identify the functions which are enabled/disabled in the column below the icon.
 The checked boxes indicate the services currently in use by each participant. If a participant has been
 granted moderator privileges, then changes to other participants are enabled.

 The meanings of the icons over the columns are as follows:

                                 Moderator: role of participant controlling the session.

                                 Note: The moderator role can be transferred from one participant to
                                 another when the current moderator clicks the button in the moderator
                                 column associated with another user. A message is sent to the user to
                                 accept the moderator role. If accepted, all moderator functions are
                                 transferred to the new moderator and the original moderator has only
Moderation and                   the services available to other users.
Session Management
                                 Raise Hand: requests permission from moderator to speak. Commonly
                                 used in Classroom deployments. An icon in this column indicates a request
                                 is made to the moderator.

                                 When the user sends a text message regarding their request, the
                                 moderator can enable the devices of the user so others can see and hear
                                 the requesting user’s comments.

Communication                    Video: transmission of camera video stream
Services

                                                                Spontania: User Operations Guide 23
Audio: transmission of microphone sound
Text Chat: capability to send text comments to session participants
Sharing Application
Control Application
Collaboration Services Whiteboard service
File Transfer
Disconnect from session
PC/ Windows computer
Mac computer
Phone or videoconference equipment
(only for advanced deployments)
User Devices iPhone
iPad
Android
Collaborate system
The moderator can activate or deactivate these services for each participant.
Participants can activate or deactivate some of these services for themselves by using the buttons in the
Personal Settings panel shown below:
Note: The REC and DTMF buttons are available only to moderators.
In some cases, the participant may notice that most of these buttons are not available for use. This happens
when it has been decided that the session will be fully managed by a moderator. Moderators have access to
24 Spontania: User Operations Guideall controls for all users. The role of the moderator is explained in detail later in this manual.
Chat
Chat is a standard feature available in sessions on all deployments of Spontania. It is separate from Instant
Messaging, that stands alone, on more advanced deployments. Chat allows participants in a session to
communicate with each other without inturrupting the session. The Participants list panel area contains the
controls used by the moderator and users to control collaboration of all session users.
If chat messages have been sent to you that you have not viewed, they are indicated by a number on the
Chat collaboration control. To open or send a text message while the session is in progress, click the Chat
control on the Collaboration area of the bottom bar.
When opened, the participants in the session are listed in tabs on the left side of the window. The user only
has to select a user to view and send messages with that user. An All users tab is also provided for
messaging to all participants simultaneously.
Type the text in the message composition area (by the Send button). Pressing ALT+ENTER inserts a new line
into the message before sending. Press the ENTER key on the keyboard or click Send to send the chat
message. A maximum of 500 alphanumeric characters is allowed, but that number decreases if using
accented or non-Roman characters, such as Chinese, Japanese, and Korean.
Spontania: User Operations Guide 25Whiteboard
Whiteboard is another service available with Spontania. Using the whiteboard provides one or several
participants a temporary graphic space so that they can draw or take notes on a new “canvas” or on a
previous image.
There are two ways to activate the Whiteboard service:
• New Whiteboard Mode: is started on a board with a white background. This option is activated when
a user presses the Whiteboard button, without the application sharing service being active.
• Revision Mode: This mode is activated when the whiteboard is initiated by the moderator and starts
with an actively shared application. When the Whiteboard button is clicked, the panel opens on an
image taken from the shared application or desktop. The users of the whiteboard can then use the
tools to “draw” over the image as they discuss and collaborate. Sharing is paused while this option is in
operation.
In both cases, the users who have activated the interaction with the whiteboard has a tool bar available, as
shown above, including several graphic utility buttons to enable them to collaborate. The currently selected
tool appears in orange.
“Brush” draws a line traced by the mouse while the left button of the mouse is pressed.
“Thickness” selects the line thickness for the brush, line, circle, and rectangle.
26 Spontania: User Operations Guide“Line”: pressing the left mouse button indicates the starting point of the line. Keeping this button
pressed the user decides the length of the line and, by releasing it, sets the other end of the line.
“Circle”: a click the left mouse button sets the position of one of the corners an invisible rectangle
within which the circular form is to be drawn. Keeping the left mouse button pressed sets the shape and size
of the figure. On releasing the button the final form of the figure remains. The object cannot be moved after it
is drawn. Set the color of the circle outline and the circle fill before drawing the circle using the “Color” tool.
“Rectangle”: the explanation for the “Circle” button is also valid here, but in this case to draw a
rectangular figure. Set the color of the rectangle outline and the rectangle fill before drawing the circle using
the “Color” tool.
“Color” is used to select the outline and fill colors for the graphic resources used on the whiteboard. It
cannot be used to fill existing objects on screen. Left-clicking selects the outline color and right-clicking selects
the fill color. Selecting the makes the object transparent; if left-clicked the object will have no outline, if
right-clicked it will have no fill and the objects behind will show through.
“Text” allows the user to insert text on the whiteboard. Clicking the left button sets the position of the
message (of the first character) on the whiteboard and activates the text writing. The message will not appear
on the whiteboard, and will not be seen by the other participants, until the user presses the ENTER key. Text
does not wrap.
Set the color of the text before creating it by left-clicking a color in the “Color” tool; right-clicking a color
selects a background color for the text.
Spontania: User Operations Guide 27“Text options”: This works only if the option “Text” is active. In that case, it shows a dialog box to
configure the format of the text font (size, type, bold, italic, underline, or strikeout).
“Clear” deletes everything that had been painted on the whiteboard (except the initial image, if there
was one).
“Undo”: deletes the last change made. Clicking it successively deletes previous changes (even the
“Clear” action explained below).
“Save”: allows the user to save a copy of the current whiteboard image (including the background
image) in a file (“.jpg” format).
“Finish” finishes the whiteboard function for the user. If more users have the whiteboard functionality
active, then the whiteboard will remain present but the user will not be able to edit anymore.
28 Spontania: User Operations GuideSection 4: Moderator Interface
The Moderator is an advanced role in Spontania that provides additional privileges for the management of
the session while it is taking place. The user acting as a moderator can perform the same functions as any
other participant, along with some more advanced ones to manage the session. This means that the
moderator can perform all the functions explained so far in this guide plus some additional ones.
This moderator role is assigned at the administration level or when a user opens a personal session, but can
be passed on to another participant during the session.
The advanced functions the moderator can carry out during the session include:
• Determine whether all aspects of the session are managed only by the moderator or if the
participants can manage the session themselves (“self-managed”).
• Control the active status of the communication and collaboration services for all the attendees.
• Control the viewing format for the session.
• Manage the turns to speak.
• Change the predefined configuration of video and sharing quality for individual or all users.
• Activate the audio configuration of “push-to-talk” or “hands free” for each user.
• Record the session.
• Invite users.
• Finish the session.
Invite Area
For moderators of sessions, on the left side of the main screen is the Invite icon which opens a screen for
inviting Spontania session users, phone users, contacts, and endpoints to the session. This screen is closed
using the smaller icon that replaces it when the left side is opened. The Invite area automatically closes
when the Participants Collaboration control or Whiteboard are active.
Invite by Mail
On deployments that do not include Instant Messaging or other contact options, only Invite by Mail is
displayed. Selecting a mail client creates an invitation to a session from the moderator that can be mailed to
prospective attendees.
Invite from Contacts
On deployments that include Instant Messaging, a Contacts list is provided:
Spontania: User Operations Guide 29Contacts in the list have their current Spontania status displayed by a colored icon for Online, Away, and In Spontania Call (users already in a Spontania session do not receive the invitation). Clicking a checkbox alongside a contact name selects the contact for invitation to a session. Clicking the box again removes the selection. Double-clicking a contact displays a box to confirm or deny the invitation. Multiple invitations are possible, and clicking the Call button sends an invitation to each selected user in the Instant Messaging client. Phone Phone calls can be made into and received from the session audio if the Spontania Server has a Public Switched Telephone Network (PSTN) gateway with a phone interface. If this gateway has not been installed, this control is grayed out. H.323/SIP Endpoints If your Spontania deployment includes any H.323/SIP endpoints and licenses, such as a COLLABORATE Room Pro in a conference room, calls can be made by entering the endpoint IP address and clicking the Call button. Once the endpoint is verified and has joined the session, it will be displayed along with the other users in the session. 30 Spontania: User Operations Guide
Some endpoints might have remote camera adjustment capabilities. For these instances, a mouse operated
 camera control is displayed to pan/tilt and zoom in/out, with a home button to return to a preset position.

 When an endpoint allows numerical commands to be entered or an extension, the DTMF button for the
 moderator is active so that when it is clicked it brings up a window with a dialer for entering the numbers.
 The moderator has to select the endpoint and then click in the numbers, or insert the numbers manually and
 click Send.

Participants List
 The Participants list panel area contains the controls used by the moderator to control collaboration of all
 session users. Moderators have access to all controls, where users invited to the session can control only
 those controls pertaining to themselves or those granted by the moderator.

 The particpants button shows the number of users in the session. The panel expands when the button is
 clicked and closes when clicked again.

 Any panel can operate as a floating panel separate from the main screen and movable on the desktop when

                                                               Spontania: User Operations Guide 31
the detach icon is clicked. Closing the floating panel reattaches it to the main screen.
Session participants are represented in the rows of the panel, including their role as moderator and the
system platform each is using to access the session (identified by icon). On the left of each participant’s
name is a colored dot representing the video quality for that user.
Good connection quality. The user is receiving video according to the configured video quality.
Low connection quality. The user is receiving video with lower quality than the one set up for the
session.
Note: User devices like smart phones and tablets may work with low connection quality all the time
due to the difference in processing capacity compared to computers.
A settings icon is present for each user which allows the moderator to set individually the Hands free
option and the application and video bandwidth allowances for the user.
Hands free is the default audio option allowing the user to speak anytime and the microphone (if not muted)
will insert the audio into the session. If disabled, the microphone acts as a “press-to-talk” device whose CTRL
key must be actively pressed during speaking for the audio to be shared in the session.
Note: The press-to-talk option works only when using computers—not when using mobile devices.
32 Spontania: User Operations GuideIcons at the top of the panel identify the functions which are enabled/disabled in the column below the icon.
The checked boxes indicate the services currently in use by each participant. The meanings of the icons over
the columns are as follows:
Moderator: role of participant controlling the session.
Note: The moderator role can be transferred from one participant to
another when the current moderator clicks on the button in the
moderator column associated with another user. A request message is
sent to the user to accept the moderator role. If accepted, all moderator
functions are transferred to the new moderator and the original
moderator has only the services available to other users.
Moderation and Raise Hand: requests permission from moderator to speak. Commonly
Session Management used in Classroom deployments. When services are disabled in Settings,
the user receives a corresponding Raise Hand icon on their Personal
Controls.
When used, the user sends a text message regarding their request, and
then the moderator can enable the devices of the user so others can see
and hear the requesting user’s comments.
Video: transmission of camera video stream
Communication
Audio: transmission of microphone sound
Services
Text Chat: capability to send text comments to session participants
Sharing Application
Control Application
Collaboration Services Interactive whiteboard service
File Transfer
Disconnect from session. Enacted to remove participant from the session.
Spontania: User Operations Guide 33PC/ Windows computer
Mac computer
Phone or videoconference equipment
(Only for advanced deployments.)
User Devices iPhone
iPad
Android
Collaborate system
Each participant individually can activate or deactivate these services by means of the buttons in the control,
or the moderator can do the same from his/her participant’s panel.
Furthermore, participants can activate or deactivate each service for themselves by using the buttons in the
Personal Settings panel shown below:
Responding to Raise Hand Request
The Raise Hand Request icon for the moderator changes when it is indicating that a Raise Hand request has
been made. The icon shows the number of requests in the queue.
Click the icon to open the request queue dialog box. A listing of requests is shown to the moderator to select
which ones to respond to and what services to enable. The time and originator of the request are listed.
34 Spontania: User Operations GuideTo respond to a request, click the hand icon for the user (circled above) to open the request or accept the
hand-raise.
Alternatively, the moderator may open the Participants panel and view Hand Raise requests shown as a
hand for each requesting participant in the row corresponding to each user.
Clicking the hand icon opens the Hand Raise request the same as if it were selected from the queue.
The moderator can Reject the request or grant the user’s request by checking the Text Chat/Audio/Video
services needed by the user for the request and then clicking Ok. The services are then granted to the user,
who can then contribute in the session.
Transferring the Moderator Role
Spontania: User Operations Guide 35A user can access a session with the role of the moderator when:
• The user has entered the session from the web portal and has been authenticated as the originating
user of the Spontania session.
• The user has initiated the connection to a Spontania session from the Instant Messaging component.
A user who has not started the session as moderator could receive this role if the current moderator
transfers it.
To transfer the moderator role, the current moderator must click the empty button in the moderator’s
column in the row of the user to whom the role will be transferred.
The user receiving the moderator’s role is sent a request to confirm the transfer.
Upon accepting, the new moderator receives the privileges of the role and the former moderator becomes a
normal user. The previous moderator can regain the role only if the new moderator transfers the moderator
role back.
User Disconnection
The last column of moderator control panel offers a means to disconnect a user by clicking the icon of
that particular user.
Recording Sessions
Only the moderator can record a Spontania session.
Starting and stopping of the recording is accomplished by clicking the Record icon on the bottom bar. The
icon turns orange when a session is recording.
36 Spontania: User Operations GuideThe recording options panel is in the Personal Settings panel which is accessed by the icon of the
Personal Controls. These settings can be used to specify where to save recordings, what format to use, and
the recording quality.
The default file recording location is C:\Users\username\AppData\Roaming\ClearOne\Spontania\Sessions,
and for MAC users folder /ClearOne/Spontania/Sessions. This can be changed as desired. It is often
useful to save the file to a location accessible to all users who can then review the session when needed.
The filename assigned indicates the date and a number generated for the session. Examples:
“session_20150629_151330.wconf” or “session_20150629_151330.mp4”. This can be changed as desired
after recording. You can choose to record in either WCONF or MP4 format.
o WCONF is the Spontania proprietary format which records the whole session, including all the
communication and collaboration held during the session. The Spontania application itself is the
player for this format; this enables users to view the recording more interactively (changing views…)
including being able to receive a file sent by a participant by means of the file transfer service.
o MP4 records the session in the MP4 format for playback using common multimedia applications.
• Low: 640x360 (360P)
• Medium: 852x480 (480P)
• High: 1280x720 (720P)
MP4 also allows the setting of Background Color and Background Image.
Note: If the appropriate video codec is not installed, the recording will be audio-only.
Spontania: User Operations Guide 37Section 5: Direct Access, Instant Messaging, and Scheduling
Direct Access from Desktop
Note: This functionality is not available in all Spontania versions.
Users who have an account created at administration level that enables them to act as moderators will
notice that, after completing the first connection to Spontania as moderators from the web portal, a direct
access to Spontania icon is created on their desktop. The application opens by double-clicking the direct
access icon, presenting the Loading screen:
When loaded, a new icon appears on the task bar, , and the Spontania control panel displays:
38 Spontania: User Operations GuideThis screen becomes the starting point of all your Spontania interactions: scheduling and joining sessions,
Instant Messaging, preferences, password, and appearance.
As shown in the above image, this control panel launcher offers 4 main buttons across the bottom: Contacts,
Meeting, Schedule, and My Schedule. The screen shown above has the Meeting button active. There are
also controls for Status and Preferences.
Status
You can set your status to logged in users, or you can set it for situations where you might want to include a
custom message or request privacy.
Click the drop-down Status control next to your identification at the top of the screen.
Spontania: User Operations Guide 39Select the status you wish to show, or choose Edit custom status messages to create a custom message. Edit the message for each status; then you can check if you wish to Save for future use. Otherwise they will be in place only as long as you are logged in. You can also create several custom messages for any status, and then apply them as needed. Contacts The Contacts area, displayed in the center of the application in the example below, is the Instant Messaging (IM) client within Spontania. This is separate from Chat within a Spontania session. It allows the sending and receipt of instant messages to individuals and groups, sending files, and initiating audio-only or video/audio Spontania sessions. 40 Spontania: User Operations Guide
Contacts are listed and their current status is shown. You can search for a contact or scroll through the listing
to select contacts. Users who have selected avatars in their profile have their avatars next to their name in
the contact list.

Selecting Contacts

Contacts can be selected for several purposes, such as meetings, IM chats, creating groups, etc. Clicking any
name selects that name in the list. When you select a name, or even when you simply hover the mouse
pointer over a name, controls appear to let you initiate audio, video, or IM sessions with that contact:

To select multiple contacts, click a name and hold, and then SHIFT-click another name to select both
contacts and all the contacts in-between. CTRL-click several names successively to select more than one
contact without selecting a range.

After selecting multiple contacts, right-clicking the mouse opens a panel of actions to perform with the
selected contacts.

                                                                 Spontania: User Operations Guide 41
o Chat – Opens an IM conversation.
o Call – Opens a Spontania session with no video. Each user can enable his/her own video.
o Video call – Opens a Spontania video session.
o Send a file – Transfers a file.
If you have selected a single contact, you have the option setting Spontania to automatically answer calls
from that user.
Contact Groups
For convenience, you can great groups to include frequently used contacts.
To create a group, click the Add a Contact Group icon .
Enter the name of the group and click Ok. Add members to the group by selecting and copying them into the
group as shown in the options above. When the members are in a group, the group appears at the top of the
contacts listing and can be expanded for viewing.
42 Spontania: User Operations GuideBroadcast to Group
You can send a message to all members of a group or selected individuals without creating an IM chat
session with them. Right-click the group name to reveal the following panel:
Selecting Broadcast message to group displays a broadcast message screen to selected recipients. You can
then compose and send the broadcast message.
IM Chat
After selecting a contact (or contacts) from the lists, open an IM Chat window for a conversation by selecting
as shown above or by double-clicking the contact.
Spontania: User Operations Guide 43The name of the invited contact in an active chat appears at the top of the window. This name is also shown in a tab at the top of the window. Included users and their respective statuses are listed on the left side of the IM window. If there are several different chat conversations running, each is in a separate tab along the top. When a tab is selected, the messages exchanged in that conversation are listed. Type your message text in the provided area and press Enter or click Send to transmit it to the recipient(s). A blank line can be inserted by pressing SHIFT-Enter on the keyboard before sending. The messages exchanged move up the screen as the conversation progresses. Text messages can be copied from the history and pasted to other applications using the standard Windows methods. Immediate Requests During an IM session, you can also choose to send a file, make an audio call, or instantly start a video session with active contacts by selecting the appropriate icon at the top of the window. When a request is sent to an active contact for an IM Chat session, a message appears in the contact’s screen making the request. When the user clicks on the message box, the chat window opens. When a request is sent to an active contact for a Spontania session, a message appears in the contact’s screen making the request. 44 Spontania: User Operations Guide
An IM Session, or a video session made from within IM Chat, closes after five hours. Messages are sent to
 the participants when IM Sessions are about to expire.

Meeting
 The Meeting area displayed in the center of the application in the example below has controls giving two
 options: Start meeting (as moderator) or Join a meeting.

 Start Meeting

 As moderator to your own meeting, here you can specify whether to request a video meeting or an audio-
 only meeting, if the session requires a password and if so, what password to use, and whether to send the
 session invitation by email.

                                                              Spontania: User Operations Guide 45
If you choose to use a session password, Spontania generates a random password for you; you can choose to use the random password, or you can create your own password. If you choose to specify a password, it must be 8–15 characters (invalid characters are “&\+’#). Share the password with those you are going to invite to your session. Press the Video meeting button or Audio-only meeting button to start the session. Spontania connects you to your session. Join a Meeting To join a Spontania session created by someone else, specify the Meeting ID, and then click the Join button. If a password has been specified for the session, you will be prompted to enter it before joining. If a moderator has not yet joined the session, by using the Meeting ID and Password, you enter as the moderator of the session. The session will then operate as previously explained in this guide. Schedule The Schedule area, displayed in the center of the application in the example below, is used within Spontania for scheduling sessions. This allows for organization control of scheduled sessions and license control of the audio/video call per session. Scheduling sessions also creates a scheduling entry in the host’s selected email/calendar client or service. This entry contains all the scheduling information that can be sent to session invitees to invite meeting participants. After all fields of the form are filled, the Schedule button is enabled to make the scheduled entry. The form fields are as follows: 46 Spontania: User Operations Guide
Name: The name of the meeting.
Time Zone: Select the time zone reference for the meeting by using the pull-down list.

Start Date: Clicking the Start Date icon opens a Room Availability calendar where a date for the session can
be selected. The calendar can be moved forward/backward. Clicking a date closes the calendar.

Start Time: Clicking the Start Time icon (circled) opens a listing of times when a session can be selected.
These are limited according to the number of licenses and the times already scheduled within the Spontania
server. The green times are available and the red times are unavailable for the date selected. Clicking
adjacent time entries (shown in 30-minute increments) selects those time blocks for the session (orange).

                                                               Spontania: User Operations Guide 47
Click outside of the selections area to close the listing. (Maximum meeting duration is 12 hours.) The times
are now entered into the form.
Repeat: Select to repeat the scheduled session for up to 6 months as Never, Daily, Weekly, Monthly.
Notes:
• Monthly recurring meetings can occur only on the exact date specified. For example, if you
schedule a meeting to occur on the 31st of each month, that meeting will be skipped in months
that do not have 31 days.
• When you have scheduled recurring meetings, only the next instance of the meeting is shown
on your schedule.
• If you change one instance of a recurring meeting, all other instances are also changed
accordingly.
Video: Specify whether the session is to be video on or off.
Options: Select if a password is required to join the session (and what it will be), if other users can join the
session before the host, and if there will be any H.323/SIP endpoints in the session.
Note: If you have a Spontania Enterprise package with user license control, you must indicate the
maximum number of participants.
Calendar: Select the calendar/email service used to create the scheduling notification:
o iCal uses the default email client
o Gmail and Yahoo direct to the Gmail or Yahoo web mail page where login credentials can be entered
o Other creates the scheduling message in a text box for copying and use with other services
After all fields in the form are complete, click the Schedule button to create the session scheduling.
48 Spontania: User Operations GuideNotifications
Spontania provides popup notifications to the session’s host prior to the session. The beginning and interval
between these notifications is set in the User Option Controls discussed later in this guide.
My Schedule
The My Schedule area, displayed in the center of the application in the example below, is used within
Spontania for reviewing and modifying scheduled sessions.
The example below shows two meetings that have been scheduled.
Spontania: User Operations Guide 49Go: Clicking the Go button launches the Spontania session on the desktop. Edit: Clicking the Edit button opens the scheduling form used to schedule the session. Changes can be made and then saved by clicking the Update button. Clicking the Erase button completely removes the scheduled session. User Option Controls This Spontania screen allows the user to set user options regarding how the different parts of the program operate and for changing passwords. Open the User Option Controls by clicking the User Options icon to display the option selections. 50 Spontania: User Operations Guide
Preferences
 The preferences window is used to adjust settings for IM Chat, Login, File transfer, Sounds, Appearance, and
 notifications.

 General Chat Settings

       Disable Chat History: By default, a chat history is maintained on the local user’s computer. Chat
       sessions with different users are separated so they can be reviewed when new chat conversations are
       held. By disabling chat history, the content of the chat conversations is lost when closing the chat
       window. The sub-option is the same for group chats.

       Show time in chat window: Selecting this option places a time entry along with every chat response.

       Show notifications in conference rooms: When enabled, a popup notification will appear when a new
       IM Chat message is received.

                                                               Spontania: User Operations Guide 51
You can also read