SonicWall NSv Series on Microsoft Azure - Getting Started Guide
←
→
Page content transcription
If your browser does not render page correctly, please read the page content below
SonicWall® NSv Series on Microsoft
Azure
Getting Started Guide
Contents                                                                                                                                                   1
   Introducing NSv Series . . . . . . . . . . . . . . . . . . . . . . . . . . . . . . . . . . . . . . . . . . . . . . . . . . . . . . . . . . . . . . . 4
   Feature Support Information . . . . . . . . . . . . . . . . . . . . . . . . . . . . . . . . . . . . . . . . . . . . . . . . . . . . . . . . . . . . 5
   Node Counts per NSv Platform . . . . . . . . . . . . . . . . . . . . . . . . . . . . . . . . . . . . . . . . . . . . . . . . . . . . . . . . . . . 6
   Product Matrix and Requirements . . . . . . . . . . . . . . . . . . . . . . . . . . . . . . . . . . . . . . . . . . . . . . . . . . . . . . . . 7
   Github Repository . . . . . . . . . . . . . . . . . . . . . . . . . . . . . . . . . . . . . . . . . . . . . . . . . . . . . . . . . . . . . . . . . . . . . 7
   Backup and Recovery Information . . . . . . . . . . . . . . . . . . . . . . . . . . . . . . . . . . . . . . . . . . . . . . . . . . . . . . . . 7
   Exporting and Importing NSv Configurations . . . . . . . . . . . . . . . . . . . . . . . . . . . . . . . . . . . . . . . . . . . . . . . 8
   Upgrading to a Higher Capacity NSv Model . . . . . . . . . . . . . . . . . . . . . . . . . . . . . . . . . . . . . . . . . . . . . . . . 8
   Creating a MySonicWall Account . . . . . . . . . . . . . . . . . . . . . . . . . . . . . . . . . . . . . . . . . . . . . . . . . . . . . . . . . 8

   Installing NSv Series on Azure . . . . . . . . . . . . . . . . . . . . . . . . . . . . . . . . . . . . . . . . . . . . . . . . . . . . . . . . 10
   Supported NSv Series Models on Azure . . . . . . . . . . . . . . . . . . . . . . . . . . . . . . . . . . . . . . . . . . . . . . . . . . 10
   Task List for NSv Azure VM Setup . . . . . . . . . . . . . . . . . . . . . . . . . . . . . . . . . . . . . . . . . . . . . . . . . . . . . . . . 11
   Installing NSv on Azure . . . . . . . . . . . . . . . . . . . . . . . . . . . . . . . . . . . . . . . . . . . . . . . . . . . . . . . . . . . . . . . . 11
   Accessing Your NSv in the Azure Portal . . . . . . . . . . . . . . . . . . . . . . . . . . . . . . . . . . . . . . . . . . . . . . . . . . . 24
       Updating Your Dashboard and Accessing the NSv Resource Group . . . . . . . . . . . . . . . . . . . . . . . . 24
       Finding the Public IP Address of Your NSv . . . . . . . . . . . . . . . . . . . . . . . . . . . . . . . . . . . . . . . . . . . . . 25
       Logging into Your NSv for SonicOS Management . . . . . . . . . . . . . . . . . . . . . . . . . . . . . . . . . . . . . . . 25
       Viewing and Configuring Security Rules . . . . . . . . . . . . . . . . . . . . . . . . . . . . . . . . . . . . . . . . . . . . . . . 26
   Forwarding Traffic to Your NSv in Azure . . . . . . . . . . . . . . . . . . . . . . . . . . . . . . . . . . . . . . . . . . . . . . . . . . . 28
   Testing Traffic Through Your NSv in Azure . . . . . . . . . . . . . . . . . . . . . . . . . . . . . . . . . . . . . . . . . . . . . . . . . 32
   Troubleshooting Installation Configuration . . . . . . . . . . . . . . . . . . . . . . . . . . . . . . . . . . . . . . . . . . . . . . . . 34

   Licensing and Registering Your NSv . . . . . . . . . . . . . . . . . . . . . . . . . . . . . . . . . . . . . . . . . . . . . . . . . . . . 37
   Registering the NSv Appliance from SonicOS . . . . . . . . . . . . . . . . . . . . . . . . . . . . . . . . . . . . . . . . . . . . . . 37
   Registering with Zero Touch Deployment . . . . . . . . . . . . . . . . . . . . . . . . . . . . . . . . . . . . . . . . . . . . . . . . . 39
       Deploying from CSC Management . . . . . . . . . . . . . . . . . . . . . . . . . . . . . . . . . . . . . . . . . . . . . . . . . . . 39
       Getting the Latest Firmware for the NSv . . . . . . . . . . . . . . . . . . . . . . . . . . . . . . . . . . . . . . . . . . . . . . 40
       Deploying from GMS On-Premises . . . . . . . . . . . . . . . . . . . . . . . . . . . . . . . . . . . . . . . . . . . . . . . . . . . 40
       Getting the Latest Firmware for the NSv . . . . . . . . . . . . . . . . . . . . . . . . . . . . . . . . . . . . . . . . . . . . . . 41
   Registering an NSv Manually in a Closed Network . . . . . . . . . . . . . . . . . . . . . . . . . . . . . . . . . . . . . . . . . . 41
   Deregistering Your NSv . . . . . . . . . . . . . . . . . . . . . . . . . . . . . . . . . . . . . . . . . . . . . . . . . . . . . . . . . . . . . . . . 42
   Converting a Free Trial License to Full License . . . . . . . . . . . . . . . . . . . . . . . . . . . . . . . . . . . . . . . . . . . . . 43

   SonicOS Management . . . . . . . . . . . . . . . . . . . . . . . . . . . . . . . . . . . . . . . . . . . . . . . . . . . . . . . . . . . . . . . 45
   Managing SonicOS on the NSv Series . . . . . . . . . . . . . . . . . . . . . . . . . . . . . . . . . . . . . . . . . . . . . . . . . . . . 45
   Using SonicOS on an Unregistered NSv . . . . . . . . . . . . . . . . . . . . . . . . . . . . . . . . . . . . . . . . . . . . . . . . . . . 45
   Using System Diagnostics in SonicOS . . . . . . . . . . . . . . . . . . . . . . . . . . . . . . . . . . . . . . . . . . . . . . . . . . . . . 48
       Check Network Settings . . . . . . . . . . . . . . . . . . . . . . . . . . . . . . . . . . . . . . . . . . . . . . . . . . . . . . . . . . . . 49

   Using the Virtual Console . . . . . . . . . . . . . . . . . . . . . . . . . . . . . . . . . . . . . . . . . . . . . . . . . . . . . . . . . . . . 50
   Connecting to the Console with SSH . . . . . . . . . . . . . . . . . . . . . . . . . . . . . . . . . . . . . . . . . . . . . . . . . . . . . 50
   Navigating the NSv Management Console . . . . . . . . . . . . . . . . . . . . . . . . . . . . . . . . . . . . . . . . . . . . . . . . 52

                                                                                     SonicWall NSv Series Azure Getting Started Guide
                                                                                                                                                          2
                                                                                                                             Contents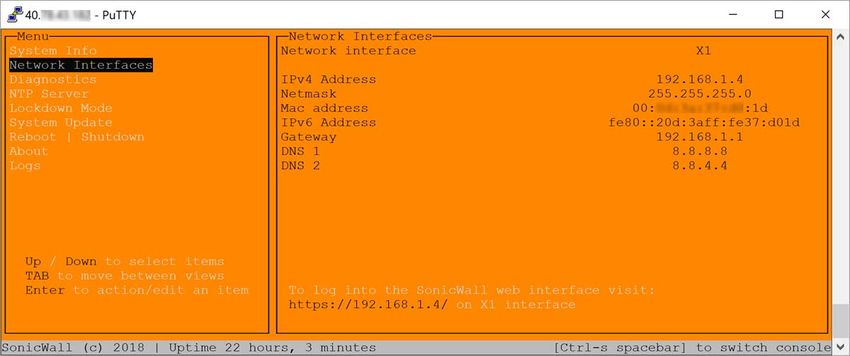
System Info . . . . . . . . . . . . . . . . . . . . . . . . . . . . . . . . . . . . . . . . . . . . . . . . . . . . . . . . . . . . . . . . . . . . . . 54
      Management Network or Network Interfaces . . . . . . . . . . . . . . . . . . . . . . . . . . . . . . . . . . . . . . . . . 55
      Test Management Network . . . . . . . . . . . . . . . . . . . . . . . . . . . . . . . . . . . . . . . . . . . . . . . . . . . . . . . . . 56
      Diagnostics . . . . . . . . . . . . . . . . . . . . . . . . . . . . . . . . . . . . . . . . . . . . . . . . . . . . . . . . . . . . . . . . . . . . . . 57
      NTP Server . . . . . . . . . . . . . . . . . . . . . . . . . . . . . . . . . . . . . . . . . . . . . . . . . . . . . . . . . . . . . . . . . . . . . . 58
      Lockdown Mode . . . . . . . . . . . . . . . . . . . . . . . . . . . . . . . . . . . . . . . . . . . . . . . . . . . . . . . . . . . . . . . . . . 59
      System Update . . . . . . . . . . . . . . . . . . . . . . . . . . . . . . . . . . . . . . . . . . . . . . . . . . . . . . . . . . . . . . . . . . . 60
      Reboot | Shutdown . . . . . . . . . . . . . . . . . . . . . . . . . . . . . . . . . . . . . . . . . . . . . . . . . . . . . . . . . . . . . . . 60
      About . . . . . . . . . . . . . . . . . . . . . . . . . . . . . . . . . . . . . . . . . . . . . . . . . . . . . . . . . . . . . . . . . . . . . . . . . . 61
      Logs . . . . . . . . . . . . . . . . . . . . . . . . . . . . . . . . . . . . . . . . . . . . . . . . . . . . . . . . . . . . . . . . . . . . . . . . . . . . 61
Using SafeMode on the NSv . . . . . . . . . . . . . . . . . . . . . . . . . . . . . . . . . . . . . . . . . . . . . . . . . . . . . . . . . . . . 61
    Enabling SafeMode . . . . . . . . . . . . . . . . . . . . . . . . . . . . . . . . . . . . . . . . . . . . . . . . . . . . . . . . . . . . . . . 62
    Disabling SafeMode . . . . . . . . . . . . . . . . . . . . . . . . . . . . . . . . . . . . . . . . . . . . . . . . . . . . . . . . . . . . . . . 63
    Configuring the Management Network in SafeMode . . . . . . . . . . . . . . . . . . . . . . . . . . . . . . . . . . . . 64
    Installing a New SonicOS Version in SafeMode . . . . . . . . . . . . . . . . . . . . . . . . . . . . . . . . . . . . . . . . . 67
    Downloading Logs in SafeMode . . . . . . . . . . . . . . . . . . . . . . . . . . . . . . . . . . . . . . . . . . . . . . . . . . . . . 68

SonicWall Support . . . . . . . . . . . . . . . . . . . . . . . . . . . . . . . . . . . . . . . . . . . . . . . . . . . . . . . . . . . . . . . . . . 70
About This Document . . . . . . . . . . . . . . . . . . . . . . . . . . . . . . . . . . . . . . . . . . . . . . . . . . . . . . . . . . . . . . . . . 71

                                                                                      SonicWall NSv Series Azure Getting Started Guide
                                                                                                                                                              3
                                                                                                                              Contents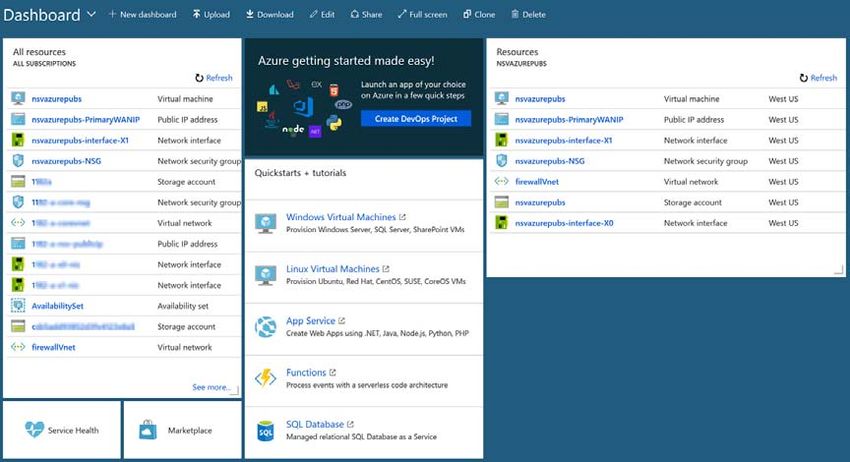
1
                                              Introducing NSv Series

This SonicWall® NSv Series on Azure Getting Started Guide describes how to install SonicWall NSv on Microsoft
Azure and provides basic configuration information.
To jump directly to the installation instructions, go to Installing NSv Series on Azure on page 10.

SonicWall NSv on Azure Marketplace

The SonicWall® Network Security Virtual Series (SonicWall® NSv Series) is SonicWall’s virtualized
next-generation firewall appliance that provides Deep Packet Inspection (DPI) security and segmentation in
virtual environments. SonicOS running on the NSv Series offers the feature functionality and security features of
a physical appliance, with comparable performance. SonicOS Virtual is a fully featured 64-bit SonicOS powered
by SonicCore.

Topics:
   • Feature Support Information on page 5
   • Node Counts per NSv Platform on page 6
   • Product Matrix and Requirements on page 7
   • Github Repository on page 7
   • Backup and Recovery Information on page 7
   • Exporting and Importing NSv Configurations on page 8
   • Upgrading to a Higher Capacity NSv Model on page 8
   • Creating a MySonicWall Account on page 8

                                                                 SonicWall NSv Series Azure Getting Started Guide
                                                                                                                    4
                                                                                           Introducing NSv Series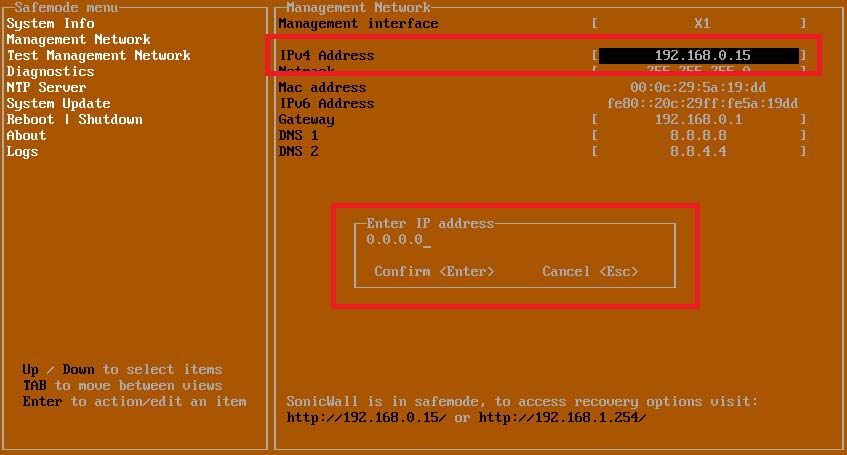
Feature Support Information
The SonicWall NSv Series on Azure has nearly all the features and functionality of a SonicWall NSa hardware
appliance running SonicOS 6.5.4 firmware.
SonicWall GMS 8.4 and higher versions are supported for management of SonicWall NSv Series virtual
appliances. The SonicOS 6.5 NSv Series About SonicOS book contains the list of features not supported on NSv.
The Feature Support List table lists key SonicOS features and whether or not they are supported in deployments
of the NSv Series
Feature Support List
Component               Feature                           Status
Network Interfaces      Override MAC Address              Not supported
Network Interfaces      DHCPv6 Prefix Delegation (PD)     Not supported
Network Interfaces      IPv6 Management                   Supported
Network Interfaces      6rd                               Not supported
Network                 Portshield Groups                 Not supported
Network Interfaces      L2 Bridge Mode                    Not supported
Network Interfaces      Native Bridge                     Not supported
Network Interfaces      Wire Mode v4                      Supported
Network Interfaces      Wire Mode v6                      Supported
Network Interfaces      PPPoE                             Not supported
Network Interfaces      PPTP                              Not supported
Network Interfaces      L2TP                              Not supported
Network Interfaces      Tap Mode                          Not supported
Network Interfaces      Link Aggregation                  Not supported
Network Interfaces      Port Redundancy                   Not supported
Network Interfaces      IP Unnumbered                     Not supported
Network Interfaces      VLAN Translation                  Supported
Network Interfaces      Users IPv6                        Supported
Network Interfaces      DHCP Server                       Not supported
Network Interfaces      VLAN Interfaces                   Not supported
Network Interfaces      Jumbo Frames                      Supported (VMware ESXi only)
Network Interface       SDWAN                             Supported
Firewall Settings       Zero Touch                        Supported
Firewall Settings       QoS Mapping                       Supported
Firewall Settings       Multicast                         Supported
High Availability       Active/Passive                    Not supported
High Availability       Active-Active DPI                 Not supported
High Availability       Stateful Sync                     Not supported
Switching                                                 Not supported
3G/4G Modem                                               Not supported
Wireless                                                  Not supported
SonicPoints                                               Not supported

                                                              SonicWall NSv Series Azure Getting Started Guide
                                                                                                                 5
                                                                                        Introducing NSv Series
Feature Support List
Component                Feature                           Status
SSL VPN                  SSL VPN for IPv6                  Supported
Virtual Assist                                             Not supported
WAN Acceleration                                           Not supported
VoIP                     H.323                             Supported
VoIP                     SIP                               Supported

       NOTE: Per Microsoft, “Azure does not support any Layer-2 semantics.” Therefore, SonicOS Layer 2
       functionality is disabled in NSv deployments in Azure. Consequently, NSv appliances operating in Azure do
       not support VLAN interfaces and DHCP Server functionality.
       See https://docs.microsoft.com/en-us/azure/virtual-network/virtual-networks-faq and
       https://support.microsoft.com/en-us/help/2721672/microsoft-server-software-support-for-microsoft-azu
       re-virtual-machines for more information.

For information about supported features, refer to the SonicOS 6.5.4 NSv Series administration documentation.
This and other documents for the SonicWall NSv Series are available by selecting NSv Series as the Product at:
https://www.sonicwall.com/support/technical-documentation.

Node Counts per NSv Platform
The node count is the maximum number of nodes/users that can connect to the NSv at any one time, and is
displayed on the System Status page in the MONITOR view.

Maximum Node Counts Per Platform
Platform                         Maximum Node Count
NSv 10                           10
NSv 25                           25
NSv 50                           50
NSv 100                          100
NSv 200 and higher               Unlimited

For reference, node counts are calculated by SonicOS as follows:
   • Each unique IP address is counted.
   • Only flow to the WAN side is counted.
   • GVC and SSL VPN connections terminated to the WAN side are counted.
   • Internal zone to zone is not counted.
   • Guest users are not counted.
A log event is generated when the node count exceeds the limit.

                                                               SonicWall NSv Series Azure Getting Started Guide
                                                                                                                  6
                                                                                         Introducing NSv Series
Product Matrix and Requirements
The following table shows the hardware resource requirements for the SonicWall NSv Series virtual appliances.

                                   NSv        NSv        NSv        NSv        NSv         NSv         NSv         NSv
Product Models
                                   10         25         50         100        200         400         800         1600
Maximum Cores1                     2          2          2          2          2           4           8           16
Minimum Total Cores                2          2          2          2          2           2           2           2
Management Cores                   1          1          1          1          1           1           1           1
Maximum Data Plane Cores           1          1          1          1          1           3           7           15
Minimum Data Plane Cores           1          1          1          1          1           1           1           1
Network Interfaces                 2          2          2          2          2           4           8           8
Supported IP/Nodes                 10         25         50         100        No limit No limit No limit No limit
Minimum Memory Required            4G         4G         4G         4G         6G          8G          10G         12G
Minimum Hard Disk/Storage          35G        35G        35G        35G        35G         35G         35G         35G
   1. If the actual number of cores allocated exceeds he number of cores defined in the above table, extra cores will
      be used as CPs. Multiple CP support is introduced in 6.5.4.v.

Github Repository
SonicWall NSv Azure templates are available in the github repository:
   • https://github.com/sonicwall
   • https://github.com/sonicwall/sonicwall-nsv-azure-templates

Backup and Recovery Information
In certain situations, it might be necessary to contact SonicWall Technical Support, use SafeMode, or deregister
the NSv appliance:
   • If the splash screen remains displayed, this can indicate that the disk is corrupted. Please contact
     SonicWall Technical Support for assistance.
   • If the disk is not recoverable, then the NSv appliance needs to be deregistered with MySonicWall. See
     Deregistering Your NSv on page 42 for information.
   • If SonicOS does not boot up, you can go into SafeMode and download the log files, upload a new SonicOS
     image, or take other actions. For information about SafeMode, see Using SafeMode on the NSv on page
     61.
   • If SonicOS fails three times during the boot process, it will boot into SafeMode. Verify that the minimum
     required memory is available and allocated based on the NSv model. If it still cannot boot up, download
     the logs while in SafeMode and contact SonicWall Technical Support for assistance.

                                                                     SonicWall NSv Series Azure Getting Started Guide
                                                                                                                          7
                                                                                               Introducing NSv Series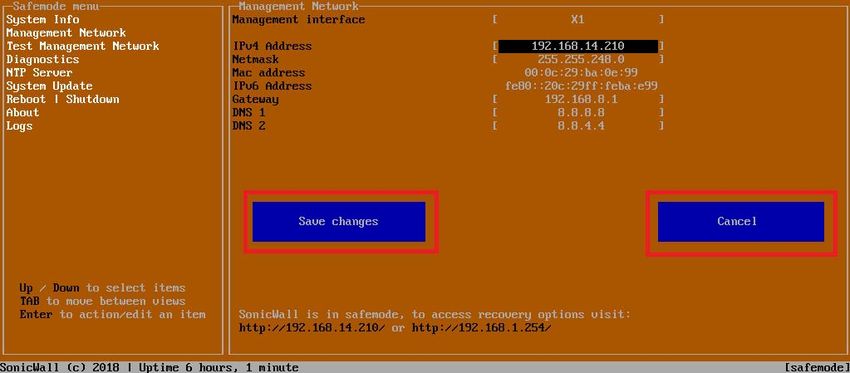
Exporting and Importing NSv
Configurations
Moving configuration settings from SonicWall physical appliances to the NSv Series is not supported. However,
configuration settings may be moved from one NSv to another. See the SonicOS 6.5 NSv Series Updates
administration book and the SonicOS 6.5.4 NSv Series Upgrade Guide on the Technical Publications portal for
more information about exporting and importing configuration settings. Go to
https://www.sonicwall.com/support/technical-documentation/ and select “NSv Series” as the product.

Upgrading to a Higher Capacity NSv Model
It is possible to move up to a higher capacity NSv model, but not down to a lower capacity model. For
instructions refer to the SonicOS 6.5.4 NSv Series Upgrade Guide on the Technical Publications portal. Go to
https://www.sonicwall.com/support/technical-documentation/ and select “NSv Series” as the product.
For details on the number of processors and memory to allocate to the VM to upgrade, refer to Product Matrix
and Requirements on page 7.

Creating a MySonicWall Account
A MySonicWall account is required to obtain the image file for initial installation of the NSv Series virtual
firewall, for product registration to enable full functionality of SonicOS features, and for access to licensed
security services. For a High Availability configuration, MySonicWall provides a way to associate a secondary NSv
that can share security service licenses with your primary appliance.

      NOTE: MySonicWall registration information is not sold or shared with any other company.

To create a MySonicWall account:
   1 In your web browser, navigate to https://www.mysonicwall.com.
   2 In the login screen, click the SIGN UP link.

                                                               SonicWall NSv Series Azure Getting Started Guide
                                                                                                                  8
                                                                                         Introducing NSv Series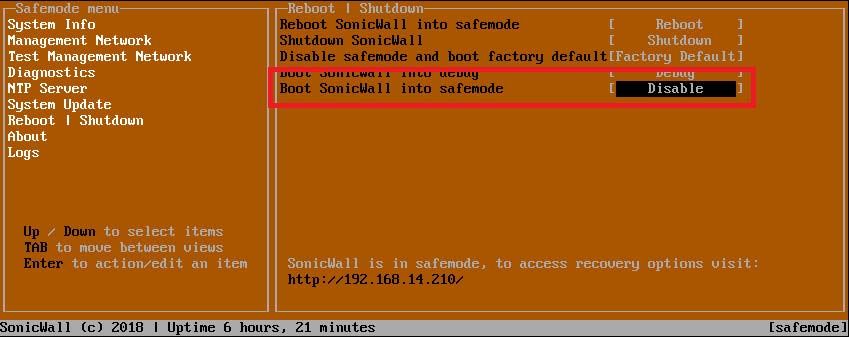
3 Complete the account information, including email and password.

            NOTE: Your password must be at least 8 characters, but no more than 30 characters.

   4 Enable two-factor authentication if desired.
   5 If you enabled two-factor authentication, select one of the following authentication methods:
          • Email (one-time passcode) where an email with a one-time passcode is sent each time you log
            into your MySonicWall account.
          • Microsoft/Google Authentication App where you use a Microsoft or Google authenticator
            application to scan the code provided. If you are unable to scan the code, you can click on a link
            for a secret code. Once the code is scanned, you need only click on a button.
   6 Click on CONTINUE to go to the Company page.
   7 Complete the company information and click CONTINUE.
   8 On the Your Info page, select whether you want to receive security renewal emails.
   9 Identify whether you are interested in beta testing new products.
   10 Click CONTINUE to go to the Extras page.
   11 Select whether you want to add additional contacts to be notified for contract renewals.
   12 If you opted for additional contacts, input the information and click ADD CONTACT.
   13 Click DONE.
   14 Check your email for a verification code and enter it in the Verification Code* field. If you did not receive
      a code, contact Customer Support by clicking on the link.
Click DONE. You are returned to the login window so you can login into MySonicWall with your new account.

Next Steps
   • Installing NSv Series on Azure on page 10
   • Licensing and Registering Your NSv on page 37

                                                                SonicWall NSv Series Azure Getting Started Guide
                                                                                                                   9
                                                                                          Introducing NSv Series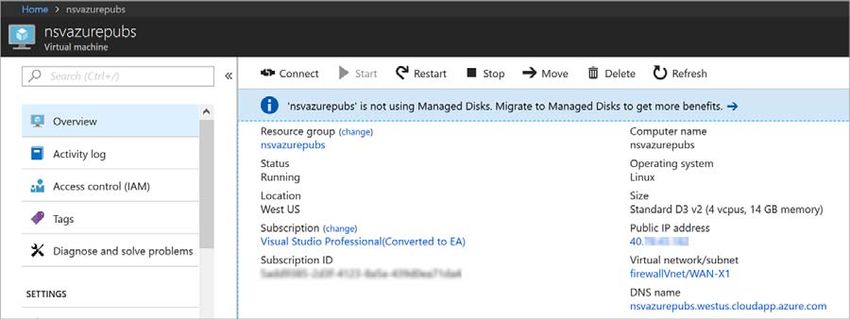
2
                       Installing NSv Series on Azure

Topics:
   • Supported NSv Series Models on Azure on page 10
   • Task List for NSv Azure VM Setup on page 11
   • Installing NSv on Azure on page 11
   • To install from Azure Marketplace: on page 11
   • To Install from an Azure template: on page 19
   • Accessing Your NSv in the Azure Portal on page 24
   • Forwarding Traffic to Your NSv in Azure on page 28
   • Testing Traffic Through Your NSv in Azure on page 32
   • Troubleshooting Installation Configuration on page 34

Supported NSv Series Models on Azure
NSv Models (VM Sizes) on Azure

SonicWall NSv Model         Azure                   Interface Count1      Core Count
NSv 10                      Standard D2 v2          2                     2
NSv 25                      Standard D2 v2          2                     2
NSv 50                      Standard D2 v2          2                     2
NSv 100                     Standard D2 v2          2                     2
NSv 200                     Standard D2 v2          2                     2
NSv 400                     Standard D3 v2          4                     4
NSv 800                     Standard D4 v2          8                     8
NSv 1600                    Standard D5 v2          8                     16
   1. The maximum number of interfaces supported on an NSv instance is defined by the
      type of Azure VM. For example, if more than 2 interfaces are required for an NSv
      200, use the NSv200 with an Azure VM supporting a higher number of interfaces.

      NOTE: The maximum number of NICs supported by SonicWall NSv is always eight for all models. But the
      total number of interfaces in an NSv instance maybe constrained by the Azure VM.

For Azure sizing and pricing information, see:
   • https://azure.microsoft.com/en-us/pricing/details/virtual-machines/linux/
   • https://docs.microsoft.com/en-us/azure/virtual-machines/windows/sizes-general

                                                                  SonicWall NSv Series Azure Getting Started Guide
                                                                                                                      10
                                                                                     Installing NSv Series on Azure
Task List for NSv Azure VM Setup
The process for setting up an NSv Azure virtual firewall is summarized in three main tasks:
1 Install the NSv Azure virtual firewall
• Installing NSv on Azure on page 11
2 Register the NSv on MySonicWall
• Registering the NSv Appliance from SonicOS on page 37
3 Configure traffic forwarding to the NSv
• Forwarding Traffic to Your NSv in Azure on page 28
• Testing Traffic Through Your NSv in Azure on page 32
Installing NSv on Azure
SonicWall NSv is deployed on Azure by using a solution template. The template is a JSON file which is loaded into
Azure via a web page. Templates are a means to deploy VMs in Azure while also creating/modifying existing
resources. Templates use the Azure Resource managers to support not just the deployment of the NSv but also
of of other virtualized network functions.
This section details two deployment procedures:
• To install from Azure Marketplace: on page 11
• To Install from an Azure template: on page 19
To install from Azure Marketplace:
1 In your browser, navigate to https://portal.azure.com/ and log into your Microsoft Azure account.
2 Navigate to SonicWall NSv on Azure Marketplace at
https://azuremarketplace.microsoft.com/en-us/marketplace/apps/sonicwall-inc.sonicwall-nsv-firewall-s
ecurity-vpn-router, click GET IT NOW, and then click Continue to display the SonicWall NSv
(Firewall/Security/VPN/Router)-BYOL page.
3 On the SonicWall NSv (Firewall/Security/VPN/Router)-BYOL page, click Create at the bottom to get
started.
SonicWall NSv Series Azure Getting Started Guide
11
Installing NSv Series on AzureThe Basics screen of the NSv configuration window is displayed.
4 On the Basics screen, configure the following options:
• VM Name – Type in a descriptive name for this NSv instance. Consider using lowercase letters,
numbers and hyphens, as this name is used to create the default DNS Prefix which has some
restrictions. You can, however, adjust the DNS Prefix as needed.
NOTE: The SSH username is set to management by default. This is the user name for
accessing the NSv console using SSH. This is not the NSv administrator user name, but is a
user name created as part of an NSv Azure deployment.
• Authentication type – Select either SSH public key or Password as the authentication method for
the above management SSH username. The default for the template is Password.
• If you selected Password for Authentication Type, type the desired password into the
Password and Confirm password fields. The password must be between 12 and 72
characters in length and contain at least three of the following character types:
• Uppercase character
• Lowercase character
• Number
• Special character (non-alpha-numeric, e.g. !@#$%^&*()_+}{"|:>?• Resource group – Create new or select an existing resource group from the list.
A resource group is a user defined friendly name for a collection of resources. If you are deploying
on Azure for the first time, click Create new. If you already have a network configured and some
virtual machines, then you might wish to use an existing resource group. If you are deploying for
test purposes, consider creating a new resource group so you can easily delete the resources, if
needed.
• If you select Create new, type a name for this resource group into the associated text field,
and then select a location for it from the Location drop-down list.
• If you select Use existing, select the resource group to use from the associated drop-down
list.
• Location – Select the Azure location where the resources will be deployed.
5 Click OK to continue.
The Instance Details screen is displayed.
6 Select Virtual machine size, then select the row with the Azure equivalent for the NSv model you want to
deploy in the Choose a size screen. Click Select.
VM Size in Azure NSv Model
Standard_D2_v2 NSv 10
Standard_D2_v2 NSv 25
Standard_D2_v2 NSv 50
Standard_D2_v2 NSv 100
Standard_D2_v2 NSv 200
Standard_D3_v2 NSv 400
Standard_D4_v2 NSv 800
Standard_D5_v2 NSv 1600
SonicWall NSv Series Azure Getting Started Guide
13
Installing NSv Series on Azure7 Select Virtual Network to configure the virtual network. Create new under Choose virtual network is
selected by default and the Create virtual network settings are displayed.
Under Create virtual network:
• Name – This is the name of virtual network the NSv will be deployed on. Leave the default, VNET.
• Address space – The template default is 10.1.0.0/16. This is a network address in CIDR format
representing the virtual network address space. Accept the default or optionally configure a
different address space, using the same format.
8 Click OK.
SonicWall NSv Series Azure Getting Started Guide
14
Installing NSv Series on Azure9 Select Subnets to configure the subnets for the WAN and LAN zones.
• WAN subnet name – The name of the WAN subnet. The default is WAN. If you have an existing
network on Azure you may wish to change the value.
• WAN subnet address prefix – A sub-network of the Address space configured in Step 7, defined
for WAN traffic. e.g. 10.1.0.0/24.
• LAN subnet name – The name of the LAN subnet. The default is LAN. If you have an existing
network on Azure you may wish to change the value.
• LAN subnet address prefix – A sub-network of the Address space configured in Step 7, defined for
LAN traffic. e.g. 10.1.1.0/24.
10 Click OK.
11 Select Public IP Address. Create new is selected by default and the Create public IP address settings are
displayed. You also have the option to select an existing public IP address to reassign it for use with your
NSv.
• Under Create public IP address, accept the pre-populated name or type a different name into the
Name field.
SonicWall NSv Series Azure Getting Started Guide
15
Installing NSv Series on Azure• For SKU, select Basic or Standard. The default is Basic.
• For Assignment (if displayed), select Dynamic or Static. The default is Dynamic.
12 Click OK.
13 In the DNS Prefix for the public IP Address field, configure the DNS name for the NSv. This must be a
unique DNS name for accessing the management interface of the NSv virtual firewall. When the NSv VM
is created, the WAN will have a public IP and will be assigned the DNS name defined here.
14 In the Management source IP field, type in the public IP address that is allowed to access this NSv virtual
firewall for HTTPS and SSH management.
You can find out your public IP address by typing what is my IP into Google or another search engine in a
different browser window/tab. Additional addresses can be added later in Azure.
15 Select Storage Account. Create new is selected by default, displaying the Create storage account
settings. You also have the option to select an existing storage account.
SonicWall NSv Series Azure Getting Started Guide
16
Installing NSv Series on Azure• For a new storage account, type in a unique Name for the storage account using only lowercase
letters and numbers.
• Select the desired options for Account kind, Performance, and Replication.
• Click OK.
16 Click OK at the bottom of the Instance Details pane.
The Summary screen is displayed.
17 Confirm the settings and then click OK.
SonicWall NSv Series Azure Getting Started Guide
17
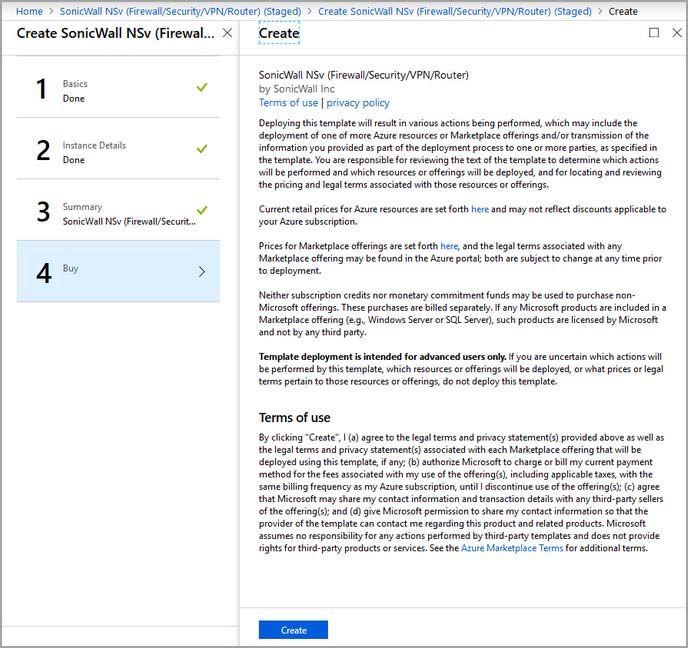
Installing NSv Series on AzureThe Buy screen is displayed.
18 Read the Azure Terms of use | privacy policy and then click Create to agree to the terms and purchase
the Azure NSv instance.
Azure begins the deployment process and displays the Azure Dashboard page.
SonicWall NSv Series Azure Getting Started Guide
18
Installing NSv Series on AzureYou can click the Notifications icon at the top to display the Deployment in progress notification
window, then click Deployment in progress to view the progress.
When finished, the notification window displays Deployment succeeded.
See Accessing Your NSv in the Azure Portal on page 24 for information about accessing the pages and settings
for your NSv virtual machine available in the Azure portal.
The next step is to register your NSv virtual firewall on MySonicWall. See Registering the NSv Appliance from
SonicOS on page 37 for information about registering your NSv.
Once you have registered the NSv, see Forwarding Traffic to Your NSv in Azure on page 28 and Testing Traffic
Through Your NSv in Azure on page 32 for information about forwarding traffic to it.
To Install from an Azure template:
Templates are a means to deploy VMs in Azure while also creating/modifying exiting resources. There are a few
different types of templates: Quick, Solution and Simple. The below is an example of a Simple template which
creates the following resources and defines their interconnections.
• Virtual Machine
• Storage Group
• Public IP
• 2 x Network Interfaces
SonicWall NSv Series Azure Getting Started Guide
19
Installing NSv Series on Azure• Virtual Network
• Network Security Policy
Deploying NSv via Templates
1 Log into Azure.
2 Click to load the webpage: https://github.com/sonicwall/sonicwall-nsv-azure-templates
3 Click the Deploy to Azure Button:
4 The Custom Deployment page should come up:
Enter information to define the custom deployment:
• Resource Group: The user-defined friendly name for a group of resources.
If you are deploying on a Azure for the first time you will need use "Create New," however
if you already have a network configured, and some virtual machines then you may wish to
use an existing resource group. If you are deploying for test purposes, we suggest you
create a new resource group so you can easily delete the resources if needed.
• Location: The region where you wish to deploy.
• Storage Account: A new or existing storage account (we recommend you create a new storage
account).
• Storage Account Type: The type of storage account you wish to use or create.
Currently only “Standard_LRS” is recommended.
• Storage Account New or Existing: Whether you wish to create or use an existing stoage account.
• User Storage Container Name: The name of the container where the VHD file will be stored.
• DNS Name for Public IP: When the NSv VM is created the WAN will have a public IP, this WAN IP
will be assigned a DNS name defined here.
• SSH User Name: The user name required to SSH into the NSv appliance.
SonicWall NSv Series Azure Getting Started Guide
20
Installing NSv Series on AzureThis is not the NSv administror’s user name, but rather a username created as part of an
NSv Azure deployment.
• Authentication Type: Select either "password" or "sshPublicKey" as the authentication method.
• SSH Password: The password for the above SSH user.
Password must contain one non alpha-numeric character (e.g. !@#$%^&*()_+}{"|: >?5 After filling in all the values you will need to click "I agree to the terms and conditions stated above" then
click the "Purchase" button in order to deploy the template and create the SonicWall NSv instance.
It will take approximately 10 minutes to deploy NSv respective resources. You can view the progress by
clicking the icons indicated below:
SonicWall NSv Series Azure Getting Started Guide
22
Installing NSv Series on Azure6 To connect to the SonicWall NSv management GUI click “Virtual Machines” from the left hand menu.
Then select the NSv VM name, in the overview section a public IP address is displayed, In the example
below, that is http://40.76.216.87/
7 Login with the default SonicWall credentials "admin/sonicwall".
8 Now continue with the following section, Accessing Your NSv in the Azure Portal, or go on to Installing
NSv Series on Azure on page 10.
SonicWall NSv Series Azure Getting Started Guide
23
Installing NSv Series on AzureAccessing Your NSv in the Azure Portal
There are a number of pages and settings for your NSv virtual machine available in the Azure portal.
Topics:
• Updating Your Dashboard and Accessing the NSv Resource Group on page 24
• Finding the Public IP Address of Your NSv on page 25
• Logging into Your NSv for SonicOS Management on page 25
• Viewing and Configuring Security Rules on page 26
Updating Your Dashboard and Accessing the NSv
Resource Group
The notification window for Deployment succeeded provides two buttons for your immediate use.
• Click the Pin to dashboard button to add links to your new NSv and its Azure configuration pages to your
Azure Dashboard page. Click Refresh on the Dashboard page to view your new virtual machine, storage
account, and network interface on the Dashboard.
SonicWall NSv Series Azure Getting Started Guide
24
Installing NSv Series on Azure• Click Go to resource group to display the Resource group page.
Finding the Public IP Address of Your NSv
On the Dashboard page or the Resource group page, click the VM name link to display the Public IP address of
your NSv virtual firewall. The VM name link has a description or type of Virtual machine.
TIP: Log into the NSv at the displayed public IP address for SonicOS management and to register the NSv
on MySonicWall.
Logging into Your NSv for SonicOS Management
To log into your NSv for SonicOS management:
1 In the left navigation pane of Azure, click Virtual Machines.
2 Click the name of your NSv.
SonicWall NSv Series Azure Getting Started Guide
25
Installing NSv Series on Azure3 In the Overview screen, the IP address of the NSv is displayed under Public IP address.
4 Point your browser to https://, using the public IP address of your NSv.
5 Log into SonicOS (default credentials: admin/password).
Viewing and Configuring Security Rules
On the Dashboard page or the Resource group page, click the NSG link to view the inbound and outbound
security rules. The NSG link has a description or type of Network security group.
The inbound rules control management access to the NSv. The Source for these rules is initially set to your
public IP address, that you entered during the installation process for Management Access IP Source. To
manage the NSv from another location, you need to add an inbound rule.
SonicWall NSv Series Azure Getting Started Guide
26
Installing NSv Series on AzureTo add a new inbound rule for NSv HTTPS management access from another public IP address:
1 Click Inbound security rules in the left navigation pane of the Azure NSG page. The Inbound security
rules page displays.
2 Click the Add button. The Add inbound security rule dialog appears.
3 For Source, select IP Addresses.
4 For Source IP addresses/CIDR ranges, type in your new public IP address or an address range in CIDR
format.
5 Optionally fill in Source port ranges if you want to specify the port(s).
6 For Destination, select Any.
7 For Destination port ranges, type in 443 for HTTPS access.
8 For Protocol, select TCP.
9 For Action, select Allow.
10 For Priority, type in an available number that is less than (higher priority than) the number for the first
Deny rule.
SonicWall NSv Series Azure Getting Started Guide
27
Installing NSv Series on Azure11 For Name, type in a descriptive name for this rule.
12 Optionally fill in the Description field.
13 Click Add.
Forwarding Traffic to Your NSv in Azure
This section describes how to configure a route on your SonicWall NSv Series virtual firewall so that you can pass
traffic though the NSv.
If you have not yet registered your NSv on MySonicWall, do that now. See Registering the NSv Appliance from
SonicOS on page 37 for information. Your NSv must be registered to enable full functionality.
To configure a route on your NSv Azure firewall:
1 If not already logged into the Azure portal, navigate to https://portal.azure.com/ and log into your Azure
account.
2 In the Azure left navigation pane, click All services.
3 In the All services Filter field, type Route. The display changes to show only services with “Route” in their
names.
4 Click Route tables.
5 On the Route tables page, click Add to create a new route table.
SonicWall NSv Series Azure Getting Started Guide
28
Installing NSv Series on AzureThe Create route table dialog is displayed.
6 In the Name field, type in a name for this route table.
7 For Subscription, select the subscription you are using in Azure.
8 For Resource group, select Create new if you will use the route table for other networks, or select Use
existing if you will use the route table for this network only. If you select Use existing, you can use the
drop-down list to select the same resource group you are using for your NSv.
9 The Location field should already display the same location you selected for your NSv.
10 For BGP route propagation, accept the default of Enabled.
SonicWall NSv Series Azure Getting Started Guide
29
Installing NSv Series on Azure11 Click Create to create the route table. After a brief wait, Notifications displays Deployment succeeded
and the new route table appears in the Route tables screen.
12 Click on the route table name.
13 In the route table screen, under SETTINGS, click Routes.
14 On the Routes screen, click Add to add a route to the route table.
15 In the Add route screen, for Route name, type in a descriptive name such as default_route.
16 For Address prefix, type in 0.0.0.0/0 to elect all traffic to be forwarded to the NSv.
17 For Next hop type, select Virtual appliance from the drop-down list.
SonicWall NSv Series Azure Getting Started Guide
30
Installing NSv Series on Azure18 For Next hop address, type in the IP address of the NSv X0 interface.
19 Click OK. This creates the route.
20 Next, you need to associate the route table. In the Route table options, click Subnets.
21 In the Subnets screen, click Associate.
SonicWall NSv Series Azure Getting Started Guide
31
Installing NSv Series on Azure22 In the Associate subnet screen, click Virtual network. The resources with possible virtual networks are
displayed to the right under Resource.
23 Click on the desired resource. The display on the right changes to the Choose subnet screen and shows
the possible subnets available for that resource.
24 Under Choose subnet, click LAN-X0. Since we entered the X0 IP address above for Next hop address, the
X0 subnet must be selected here.
25 Click OK at the bottom of the screen. Azure performs the association and the LAN-X0 subnet appears on
the screen.
This completes the configuration required for forwarding traffic through the NSv. Continue to Testing
Traffic Through Your NSv in Azure on page 32.
Testing Traffic Through Your NSv in Azure
After configuring a route for forwarding traffic on your NSv, you can verify it with some test traffic. You can send
traffic from any client machine or virtual machine on the same subnet as the route you configured. In our
configuration, this is the LAN-X0 subnet, or 192.168.2.0/24.
For example, you could create an Ubuntu virtual machine in Azure, using the same options as your NSv for the
following settings:
• Subscription
• Resource group
SonicWall NSv Series Azure Getting Started Guide
32
Installing NSv Series on Azure• Location
• Virtual network
• Subnet (such as LAN-X0 or 192.168.2.0/24)
To send traffic through your NSv:
1 On your client machine or VM (Ubuntu, for example), open a console window. For an Ubuntu VM on
Azure, click Serial Console in the Virtual machine options.
2 Type ping 192.168.2.4 on the command line.
The pings should succeed.
3 Log into your NSv and navigate to the MONITOR | Appliance Health | Live Monitor page.
4 Scroll down to view the Connection Count chart. It should show a positive count, caused by the pings.
Other charts on the page will also show activity. This verifies that traffic can be forwarded to the NSv.
SonicWall NSv Series Azure Getting Started Guide
33
Installing NSv Series on AzureTroubleshooting Installation Configuration
If the NSv fails to come up, follow the instruction in Using the Virtual Console on page 50 to go to the NSv
Management Console window or the SonicOS CLI window. Check the boot messages:
NOTE: The error messages shown below indicate that the virtual firewall cannot boot.
Insufficient Memory Assignment
The following messages will appear if the virtual machine has insufficient memory. This may occur when doing
an NSv installation or a NSv product upgrade.
SonicOS boot message:
Insufficient memory 4 GB, minimum memory required 10 GB for NSv model: “NSv 800 Beta”
Power off the Network Security virtual appliance and assign 10 GB to this virtual appliance.
This message can also appear in the Management Console logs as shown in the two following screen shots.
NOTE: For details on navigating the NSv Management Console to troubleshoot the installation, see Using
the Virtual Console on page 50.
SonicWall NSv Series Azure Getting Started Guide
34
Installing NSv Series on AzureMemory may be insufficient without an insufficient memory log entry:
Incompatible CPU
If the CPU does not support AES instructions the following message will appear:
CPU Model Intel(R) Xeon(R) CPU E5-2420 0 @ 1.90GHz is not supported by SonicWall Network
Security Virtual
CPU Model Intel(R) Xeon(R) CPU E5-2420 0 @ 1.90GHz does not support the Advanced Encryption
Standard(AES) instructions
Refer to Getting Started Guide and install the SonicWall Network Virtual on a supported
platform
The message can also be seen in the logs provided by the management console:
If the CPU does not support SSE 4.1 or 4.2 instructions the following message will appear:
CPU Model Intel(R) Xeon(R) CPU E5-2420 0 @ 1.90GHz is not supported by SonicWall Network
Security Virtual
CPU Model Intel(R) Xeon(R) CPU E5-2420 0 @ 1.90GHz does support SSE 4.1 or 4.2 instructions
Refer to Getting Started Guide and install the SonicWall Network Virtual on a supported
platform
SonicWall NSv Series Azure Getting Started Guide
35
Installing NSv Series on AzureIncorrect CPU Configuration
All cores must be on the same socket. Customer needs to change the CPU configuration in settings.
The SonicWall Network Security requires all virtual CPU to reside on a single socket.
Power down the virtual machine and adjust the CPU configuration such that all CPU reside on the
same socket
NOTE: The above error may occur when EVC masks the CPU capability.
https://communities.vmware.com/thread/536227 resolution is to disabled EVC.
Insufficient Resources at Time of Configuration
If the ESXi infrastructure where the NSv is being installed has poor performance the following message may
appear at time of installation:
*******************************************************************
Initializing services: IMPORTANT, DO NOT POWEROFF OR REBOOT
-- Warning --
This initialization is taking longer than expected.
Please ensure sufficient compute resources are available to the SonicWall Network Security
Virtual.
*******************************************************************
If the above message occurs during initialization, more information is available in the logs:
SonicWall NSv Series Azure Getting Started Guide
36
Installing NSv Series on Azure3
Licensing and Registering Your NSv
Topics:
• Registering the NSv Appliance from SonicOS on page 37
• Registering with Zero Touch Deployment on page 39
• Registering an NSv Manually in a Closed Network on page 41
• Deregistering Your NSv on page 42
• Converting a Free Trial License to Full License on page 43
Registering the NSv Appliance from
SonicOS
Once you have installed and configured network settings for your NSv Series appliance, you can log into SonicOS
management and register it in your MySonicWall account. Registration of your SonicWall NSv Series follows the
same process as for SonicWall hardware-based appliances.
NOTE: System functionality is extremely limited if registration is not completed. See Using SonicOS on an
Unregistered NSv on page 45 for more information.
To register your NSv appliance:
1 Point your browser to your NSv WAN or LAN IP address and log in as the administrator (default admin /
password).
2 Click the Register link in the top banner or on the MONITOR | System > Status page.
SonicWall NSv Series Azure Getting Started Guide
37
Licensing and Registering Your NSv3 Enter your MySonicWall credentials and click LOGIN to log into MySonicWall.
4 In the Serial Number and Authentication Code fields, enter the corresponding values you received after
purchasing your NSv Series virtual firewall from SonicWall.
5 Type a descriptive name for the NSv into the Friendly Name field.
6 Click SUBMIT.
7 The licensing server acquires the necessary information from the NSv Series appliance and your
MySonicWall account.
8 Acknowledge the registration completion notification by clicking CONTINUE.
SonicOS automatically restarts and then displays the login page.
9 Log into SonicOS.
On the MANAGE view under Updates, the Licenses page now shows your NSv appliance as Licensed.
10 In the Licenses page, you can activate security service free trials, enable available services, and click to
purchase other services you want.
SonicWall NSv Series Azure Getting Started Guide
38
Licensing and Registering Your NSvRegistering with Zero Touch Deployment
The SonicWall NSv Series for ESXi is Zero-touch enabled. Zero-Touch makes it easy to register your unit and add
it to SonicWall Capture Security Center or SonicWall GMS On-Premises for management and reporting.
Topics:
• Deploying from CSC Management on page 39
• Deploying from GMS On-Premises on page 40
Deploying from CSC Management
1) Register:
• Point your browser to https://cloud.sonicwall.com and log into your MySonicWall account or create an
account.
• In Capture Security Center, click the mySonicWall tile to launch the MySonicWall Dashboard.
• Click the Add Product button to launch the QUICK REGISTER dialog and then type in the serial
number of your SonicWall NSv. Click Confirm.
You should receive the NSv serial number and authentication code with your purchase confirmation
email.
• In the REGISTER A PRODUCT dialog, fill in the Friendly name and Authentication code, and select the
Tenant Name. By default, all products are placed under SonicWall Products Tenant.
• Click Register.
2) Enable Zero Touch and CSC Management and Reporting:
• MySonicWall recognizes your appliance model and displays the Zero Touch option. Enable Zero Touch
and then click Register again. A success message is displayed to indicate Zero Touch readiness.
• In MySonicWall, navigate to Product Management > My Products, select the appliance, and click the Try
button to enable the license for CSC Management and Reporting (if not enabled already). A success
message displays.
3) Connect and Power On the VM:
NOTE: The NSv must be able to obtain an IP address via DHCP from the WAN connection. You may use as
static IP address. For details on using the NSv Management Console to setup a static IP address, see Using
the Virtual Console on page 50.
CSC Management automatically acquires the unit (it can take up to 30 minutes for initial acquisition). Once the
unit is acquired, you can begin management.
To view the status of your NSv instance:
• In MySonicWall, pull down the curtain for Capture Security Center.
• Using the same Tenant as you selected during registration, click the Management tile.
• Click the appliance serial number or friendly name under DEVICE MANAGER to display its status.
SonicWall NSv Series Azure Getting Started Guide
39
Licensing and Registering Your NSvGetting the Latest Firmware for the NSv
1 In Capture Security Center, click the mySonicWall tile.
2 Navigate to Resources & Support > My Downloads and select your product firmware from the Product
Type drop-down menu.
3 Click the link for the firmware you want and save the file to a location on your computer.
4 Pull down the curtain for Capture Security Center.
5 Using the same Tenant as you selected during registration, click the Management tile.
6 In DEVICE MANAGER, click on the NSv instance in the left pane.
7 In the center pane, go to the Register/Upgrades > Firmware Upgrade page.
8 Click the Choose File button to select the firmware you just downloaded, then click Upgrade from Local
File.
Deploying from GMS On-Premises
PREREQUISITE: GMS 8.7 or higher is required. Be sure that your GMS system is
enabled. Refer to the knowledge base article at:
https://www.sonicwall.com/support/knowledge-base/?sol_id=190205183052590
1) Register:
• Log into your MySonicWall account or create an account at www.mysonicwall.com.
• Click the Add Product button to launch the QUICK REGISTER dialog and then type in the serial
number of your SonicWall appliance. Click Confirm.
You can find the serial number and authentication code on the shipping box or appliance label.
• In the REGISTER A PRODUCT dialog, fill in the Friendly name and Authentication code, and select the
Tenant Name. By default, all products are placed under SonicWall Products Tenant.
• Click Register.
2) Enable Zero Touch:
• MySonicWall recognizes your NSv model and displays the Zero Touch option. Enable Zero Touch.
• Select the desired GMS Public IP from the GMS Server Public IP/FQDN drop-down list. The ZeroTouch
Agent Public IP/FQDN field is populated with the associated IP address.
IMPORTANT: Verify that both of these IP addresses are the same as those you configured during
the prerequisite process.
• Click Register.
3) Connect and Power On VM:
NOTE: The NSv must be able to obtain an IP address via DHCP from the WAN connection. If you need to
use a static IP address, refer to the details on using the NSv Management Console, see Using the Virtual
Console on page 50.
GMS automatically acquires the unit (it can take up to 30 minutes for initial acquisition). Once the unit is
acquired, you can begin management.
To view the status of your NSv instance:
SonicWall NSv Series Azure Getting Started Guide
40
Licensing and Registering Your NSv• Log into GMS and navigate to the FIREWALL view.
• Click on the appliance in the left pane to display the status.
Getting the Latest Firmware for the NSv
1 In a web browser, navigate to www.mysonicwall.com.
2 Navigate to Resources & Support > My Downloads and select your product firmware from the Product
Type drop-down menu.
3 Click the link for the firmware you want and save the file to a location on your computer.
4 In GMS, navigate to the FIREWALL view and click on the NSv instance in the left pane.
5 In the center pane, go to the Manage > Register/Upgrades > Firmware Upgrade page.
6 Click the Choose File button to select the firmware you just downloaded, then click Upgrade from Local
File.
Registering an NSv Manually in a Closed
Network
NOTE: This registration method uses Manual Upgrade and is not recommended for normal product
registration on products that have internet access. See Registering the NSv Appliance from SonicOS on
page 37 for the recommended registration method on products with internet access.
In a closed network, your NSv does not have internet access and cannot communicate directly with the
SonicWall licensing server. To complete the registration process, you need to obtain information from
MySonicWall and then log into SonicOS on your NSv and enter that information.
NOTE: System functionality is extremely limited if registration is not completed. See Using SonicOS on an
Unregistered NSv on page 45 for more information.
To register an NSv virtual firewall in a closed network environment:
1 Log into your NSv appliance and navigate to the MONITOR | System Status page.
2 Make a note of the GUID, or leave the page open in your browser. The GUID is displayed in the System
Information section.
NOTE: If the GUID is already updated on MySonicWall, it is necessary to de-register and restart the
NSv. See Deregistering Your NSv on page 42. If your NSv cannot connect with MySonicWall, contact
Technical Support to de-register the GUID from MySonicWall.
3 In another browser tab or window, log into your MySonicWall account.
4 Navigate to My Products and click on the entry for your NSv appliance.
5 Click on the + next to GUID.Enter the GUID into the dialog box and click Update.
6 To get the License Keyset, first click the key icon. The License Keyset is displayed. This is a binary
representation of all the service licenses activated on your NSv.
7 Select the License Keyset and copy it to your clipboard.
8 Log into your NSv appliance or return to that browser window if still logged in.
9 Navigate to the MANAGE | Licenses page in SonicOS.
SonicWall NSv Series Azure Getting Started Guide
41
Licensing and Registering Your NSv10 Under Manual Upgrade, paste the License Keyset into the Enter keyset field.
11 In the Serial Number and Authentication Code fields, enter the corresponding values you received after
purchasing your NSv Series virtual firewall.
12 In the Registration Code field, enter the registration code you received when you did the initial
registration in MySonicWall to obtain the OVA file.
13 Click APPLY to register the NSv and activate the licensed services.
14 Click ACCEPT.
Your NSv virtual firewall is now registered.
Deregistering Your NSv
You can deregister your NSv directly from the SonicOS management interface. Deregistration puts the virtual
appliance into the unregistered state and deletes the binding between it and its serial number in MySonicWall.
Then you can use the serial number to register the same or another NSv instance. Only one NSv instance is
allowed per serial number.
NOTE: Only an NSv which was registered online can be deregistered. If the NSv was registered using the
offline method, deregistration is not supported. For assistance, contact technical support.
To deregister an NSv:
1 Log into the SonicOS management interface on your NSv virtual appliance.
2 Navigate to the Updates | Setting page in the MANAGE view.
3 Select Export Configuration from the Import/Export Configuration drop-down list to export your current
configuration settings before deregistering your NSv.
This makes it possible to import the settings to another NSv instance.
SonicWall NSv Series Azure Getting Started Guide
42
Licensing and Registering Your NSvCAUTION: Be sure to export your configuration settings before deregistering your NSv. You cannot
recover them after deregistration.
4 Navigate to the Updates | Licenses page in the MANAGE view.
5 Under Manage Security Services Online, click the DEREGISTER button.
6 Click OK in the confirmation dialog.
If deregistration is successful, the virtual appliance will return to the unregistered state. You can see the
Register link in the top banner of SonicOS and the message “Your SonicWall is not registered” on the
MONITOR | System > Status page.
If deregistration fails, an error message is displayed in the status bar at the bottom of the SonicOS
management interface.
Converting a Free Trial License to Full
License
A SonicWall NSv instance installed as a 30-day free trial can easily be converted to a full production licensed NSv
instance.
To convert your free trial to a production version:
1 Purchase a SonicWall NSv license from a distributor. You will receive a fulfillment email with the new
serial number and authentication code.
2 Log into SonicOS on your free trial instance.
3 Navigate to the Updates | Licenses page in the MANAGE view.
4 Under Manage Security Services Online, click the DEREGISTER button.
5 Click OK in the confirmation dialog. The virtual firewall returns to the unregistered state.
SonicWall NSv Series Azure Getting Started Guide
43
Licensing and Registering Your NSv6 Click the Register link in the top banner or on the MONITOR | System > Status page.
7 Enter your MySonicWall credentials and then click LOGIN.
8 Enter the Serial Number and Authentication Code you received after purchasing your NSv Series
instance.
9 Click SUBMIT.
10 The licensing server acquires the necessary information from the NSv Series appliance and your
MySonicWall account. If asked, you can specify a Friendly Name or Product Group for the NSv Series
appliance.
11 Acknowledge the registration completion notification by clicking CONTINUE.
SonicOS automatically restarts and then displays the login page.
12 Log into SonicOS.
In the MONITOR view, the System > Status page now shows your licensed security services, and the
Register link is no longer displayed.
13 In the MANAGE view on the Updates | Licenses page, you can activate security service free trials, enable
available services, and click to purchase other services you want.
SonicWall NSv Series Azure Getting Started Guide
44
Licensing and Registering Your NSv4
SonicOS Management
Topics:
• Managing SonicOS on the NSv Series on page 45
• Using SonicOS on an Unregistered NSv on page 45
• Using System Diagnostics in SonicOS on page 48
Managing SonicOS on the NSv Series
The X1 interface is the default WAN Interface and is set to use DHCP addressing by default, with HTTPS
management enabled. You can utilize a DHCP server on the X1 connected network. If DHCP is not available, use
the console to access the CLI and configure a static IP address.
The X0 interface is the default LAN interface, and by default has HTTPS management enabled. Its IP address is
set to 192.168.168.168 by default. You can map this interface to your own network during initial deployment.
After deployment, you can reconfigure the IP address to an address in your network.
To log into SonicOS for management of the NSv:
1 Point your browser to either the LAN or WAN IP address. The login screen is displayed.
When the X1 WAN interface is using DHCP addressing, DNS is also enabled. You can generally access the
WAN address from any machine in your network.
If you have an existing network on 192.168.168.0/24 in your environment, you can access the default IP
address of the X0 LAN interface of your NSv from a computer on that network for SonicOS management.
The NSv X0 IP address is 192.168.168.168 by default.
2 Enter the administrator credentials (default admin / password) and press Enter.
The SonicOS management interface is displayed. You can navigate and update the configuration just as
you would with any SonicWall network security appliance.
NOTE: To upgrade your release of NSv, either use the management interface as described in Soni‐
cOS 6.5 for NSv Series Updates documentation available on the SonicWall portal, or use the SafeM-
ode web interface as described in Installing a New SonicOS Version in SafeMode on page 67.
Using SonicOS on an Unregistered NSv
The SonicOS management interface provides fewer features on an unregistered NSv Series appliance than on a
registered NSv. The Available SonicOS Pages on Unregistered NSv table provides a summary of the available
features on an unregistered NSv.
SonicWall NSv Series Azure Getting Started Guide
45
SonicOS ManagementAvailable SonicOS Pages on Unregistered NSv
Top Level View Page Group Page Within Group Description
MONITOR System Status n/a System information, Node license,
Alerts, Network interface settings
User Sessions SSL-VPN Sessions User sessions connected via SSL VPN
Active Users Active user session information;
Logout button for users
Active Guest Users Active guest user session information;
Logout button for guest users
User Monitor Graph of logged in users over time for
client logins and web based logins
INVESTIGATE Event Logs n/a Log event table, dynamically updated,
filterable, searchable, one-click details
Connection Logs n/a Connection log, source/destinations,
protocols, bytes transferred, filterable,
searchable, flush option
Appflow Logs n/a Requires App Visualization license,
which requires registration
System Diagnostics n/a TSR access and Diagnostic tools:
See Using System Diagnostics in
SonicOS on page 48 for information.
MANAGE Licenses n/a Node license information,
MySonicWall access, Manual Upgrade
Settings n/a Firmware versions, Local Backup,
Settings import/export, Settings
options to send to SonicWall Support
Restart n/a Restarts the virtual firewall after
confirmation
SonicWall NSv Series Azure Getting Started Guide
46
SonicOS ManagementYou can also read