HP Version Control Repository Manager 7.2 User Guide
←
→
Page content transcription
If your browser does not render page correctly, please read the page content below
HP Version Control Repository Manager 7.2
User Guide

 HP Part Number: 367261-404
 Published: March 2013
 Edition: 1

© Copyright 2004, 2013 Hewlett-Packard Development Company, L.P.
Confidential computer software. Valid license from HP required for possession, use or copying. Consistent with FAR 12.211 and 12.212, Commercial
Computer Software, Computer Software Documentation, and Technical Data for Commercial Items are licensed to the U.S. Government under
vendor's standard commercial license.

The information contained herein is subject to change without notice. The only warranties for HP products and services are set forth in the express
warranty statements accompanying such products and services. Nothing herein should be construed as constituting an additional warranty. HP shall
not be liable for technical or editorial errors or omissions contained herein.
Acknowledgments
HP-UX Release 10.20 and later and HP-UX Release 11.00 and later (in both 32- and 64-bit configurations) on all HP 9000 computers are Open
Group UNIX 95-branded products.

Intel and Itanium are registered trademarks of Intel Corporation in the US and other countries and are used under license.

Java is a registered trademark of Oracle and/or its affiliates.

Microsoft, Windows and Windows NT are registered trademarks of Microsoft Corporation in the United States of America and in other countries.
Warranty
HP will replace defective delivery media for a period of 90 days from the date of purchase. This warranty applies to all Insight Management
products.
Contents
1 Product overview........................................................................................5
2 Getting started...........................................................................................7
Logging in...............................................................................................................................7
Logging out.............................................................................................................................8
About software repositories........................................................................................................8
Updating the repository.............................................................................................................8
3 Navigating the software............................................................................16
Configuring Internet Explorer settings........................................................................................16
Home...................................................................................................................................17
Viewing a custom software baseline.....................................................................................18
Configuring auto update.....................................................................................................19
Uploading HP Service Pack for ProLiant................................................................................21
Creating a custom software baseline....................................................................................22
Catalog.................................................................................................................................23
Setting display options.......................................................................................................24
Viewing specific custom software baseline.............................................................................25
Viewing recently added HP Service Pack for ProLiant..............................................................26
Viewing component details.................................................................................................26
Configuring component......................................................................................................26
Copying items to another repository.....................................................................................27
Copying VCRM settings and migrating the data to another repository.......................................27
Rescanning repository........................................................................................................29
Updating repository immediately.........................................................................................30
Deleting items from the repository........................................................................................30
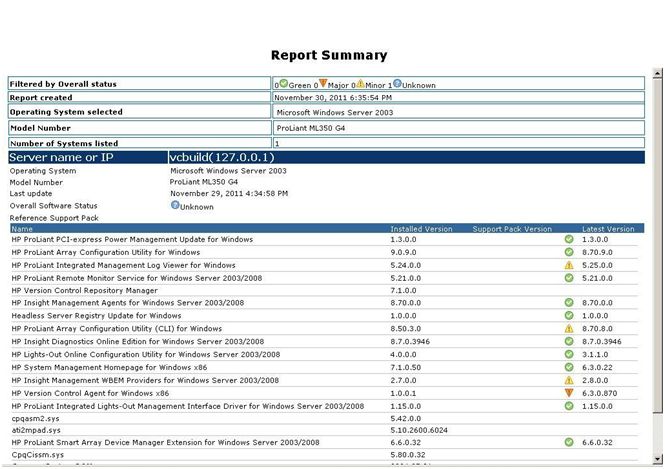
Reports..................................................................................................................................31
Generating detailed report..................................................................................................32
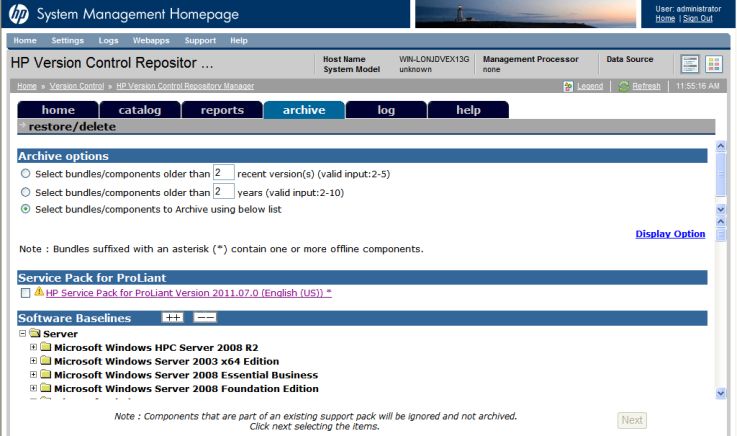
Archive.................................................................................................................................35
Archiving the baselined software bundles/components...........................................................35
Restoring/Deleting the archived components.........................................................................36
Help.....................................................................................................................................38
Log.......................................................................................................................................38
Viewing the log.................................................................................................................38
Log status icons.................................................................................................................39
Viewing log entry details....................................................................................................39
Changing log settings........................................................................................................40
Clearing the log................................................................................................................40
4 Troubleshooting........................................................................................42
Windows events.....................................................................................................................46
5 Support and other resources......................................................................47
Information to collect before contacting HP.................................................................................47
How to contact HP..................................................................................................................47
Security bulletin and alert policy for non-HP owned software components......................................47
Subscription service................................................................................................................47
Registering for software technical support and update service.......................................................47
How to use your software technical support and update service...............................................48
HP authorized resellers............................................................................................................48
Typographic conventions.........................................................................................................48
Contents 3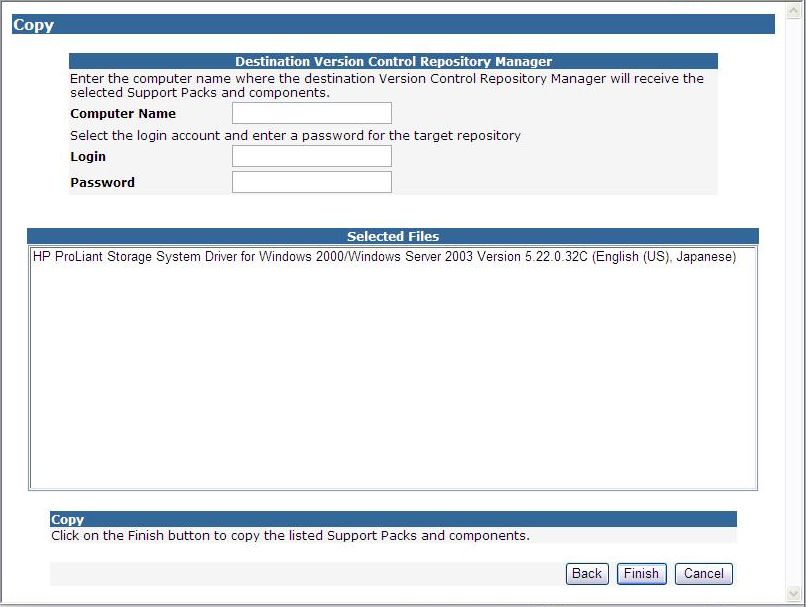
6 Documentation feedback...........................................................................50
Glossary....................................................................................................51
Index.........................................................................................................53

4    Contents
1 Product overview
    The HP Version Control Repository Manager (HP VCRM) is a repository that stores the software
    and firmware components used to support ProLiant servers on Windows and Linux platforms. By
    default, the HP VCRM is installed on the HP Systems Insight Manager (HP SIM). However, you can
    specify a custom repository directory or install HP VCRM on a different server.
    You can use the HP VCRM as a central point to define software baselines and to automate the
    installation and change management of HP software and firmware updates to production systems.
    The HP VCRM catalogs system software and firmware that is stored where the HP VCRM is installed.
    The software and firmware can be manually downloaded from http://www.hp.com/servers/
    swdrivers directly to the file system, or you can use the HP VCRM to automatically download
    software or manually upload software from any web client. Software is organized into groups by
    function and operating system. You can view detailed information about each piece of software
    by clicking the software component name. The HP VCRM also enables you to create customized
    groupings of software, which can then serve as a system software baseline for the entire managed
    environment or a subset of your environment.

    NOTE: Although it is possible to install an HP Service Pack for ProLiant, or component to the
    local machine or component to the local machine using the HP VCRM, must use the HP Smart
    Update Manager or HP Remote Deployment Utility to install the software on remote servers unless
    the HP VCA has been installed on the remote server and the install is initiated using the HP VCA.
    NOTE:    Version Control Repository Manager is supported on virtual machines.
    The HP VCRM permits:
    •   Viewing a custom software baseline - Viewing the contents in the repository, such as HP Service
        Pack for ProLiant, ProLiant and Integrity Support Packs, custom software baseline, and
        components.
    •   Configuring auto update - Configuring Automatic Update to proactively deliver new ProLiant
        software from HP as it is made available.
    •   Uploading HP Service Pack for ProLiant - Uploading a support pack to the repository from a
        CD or other accessible media using the Upload a HP Service Pack for ProLiant feature.
    •   Creating a custom software baseline - creating custom software baseline using software
        components and software bundles available in Repository.
    •   Deleting items from the repository - Deleting Software bundles, Service Pack for ProLiant and
        components from repository.
    •   Copying items to another repository - Copying ProLiant and Integrity Support Packs and
        components to another repository.
    •   Configuring component - Configuring components in the repository that are flagged as requiring
        configuration.
    •   Updating repository immediately - Update from HP.com now.
    •   Rescanning repository - Rescanning the repository and rebuilding the catalog.
    •   Viewing the log - Viewing the log.
    •   Clearing the log - Clearing the log.
    •   Changing log settings - Configuring the log to automatically delete older entries, reducing
        maintenance activity for administrators.
    •   Installing selected components at the local (browser client) system.

                                                                                                      5
•     Multithreaded file download functionality: HP VCRM enables handling the client download
              requests using multiple threads. The default thread count is 5. Four threads handle four
              download requests, and one thread responds busy status to other download requests.
        •     Operating System selection screen to configure VCRM to download only Integrity Support
              Pack and Service Pack for ProLiant for the selected Operating systems.
        •     HP VCRM Command Line Interface: The HP VCRM CLI provides a Command Line Interface to
              interact with the installed VCRM for configuring the repository folder and initiating the auto
              download of HP Service Pack for ProLiant and Integrity Support Packs.
              Updating the repository - Configuring the repository settings and initiating the auto download
              of HP Service Pack for ProLiant using the HP VCRM Command Line Interface.
              ◦    Displaying the current HP VCRM repository settings.

              ◦    Selecting the operating systems to download HP Service Pack for ProLiant and Integrity
                   Support Packs.
              ◦    Changing the repository folder.

              ◦    Initializing the autoupdate from the web.

              ◦    Configuring automatic update for HP VCRM repository directory.
        Additional resources
        For additional resources, go to http://www.hp.com/servers/manage.
        Related topics
        Navigating the software

6   Product overview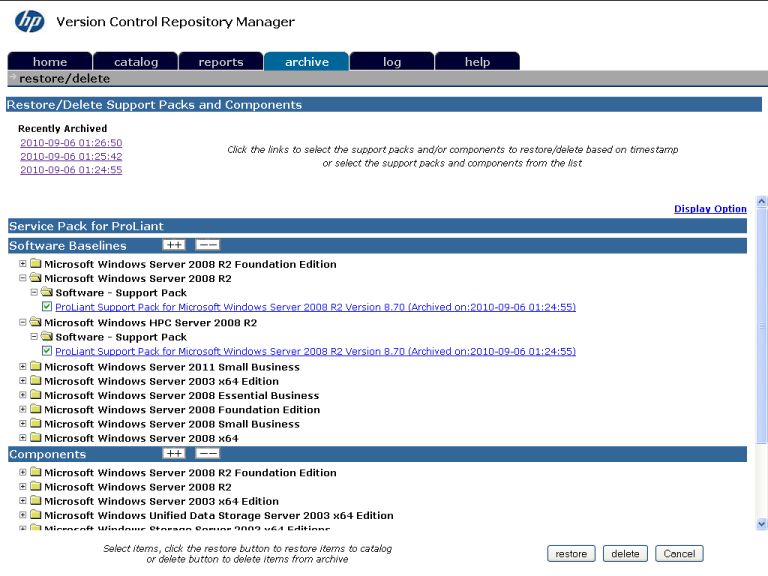
2 Getting started
      To start using the HP Version Control Repository Manager (HP VCRM), use the following steps as
      a guideline for installing and configuring your machines properly:
      The recommended installation for the HP VCRM is on a single system that has a reliable,
      high-performance network connection between it and all managed systems that have the Version
      Control Agent installed. If the Auto Update feature is being used, that system must have Internet
      access.
      1. Verify that your system meets minimum requirements.
      2. Install and configure the HP SMH. For more information regarding the HP System Management
           Homepage (HP SMH), refer to the HP System Management Homepage Installation and
           Configuration Guide at http://www.hp.com/go/insightmanagement/sim/docs.
      3. Install and configure the HP VCRM on your selected system.
      4. Install and configure the HP VCA on the target systems. Installing the HP VCRM before installing
           the HP VCA enables you to configure the HP VCA to use data in the repository specified by
           way of the Change Settings link in the HP VCA, a Replicate Agent Settings task in HP Systems
           Insight Manager (HP SIM), or preconfiguring the HP VCA component and installing the
           component with the preconfigured settings. For more information regarding installing the HP
           VCRM, refer to the http://www.hp.com/go/insightmanagement/sim/docs.
      5. Browse to the HP SMH located at https://:2381 to log in.
      Procedures
      Logging in
      Logging out
      Related topics
      Home
      Log
      Catalog

Logging in
      Access the HP Version Control Repository Manager (HP VCRM) graphical user interface (GUI) from
      any network client using a web browser. For information about which browsers are supported,
      refer to the http://www.hp.com/go/insightmanagement/sim/docs.
      To log in:
      1. To access the HP VCRM with access to all available features, you must log in to the HP System
           Management Homepage (HP SMH) with administrator or operator level access.
      2. To log in to the HP SMH:
           a. From the system where the HP VCRM is installed, navigate to
                https://:2381. If the HP SMH is configured to allow anonymous
                access, click the Login link on the upper right corner of the page, otherwise you are
                immediately directed to the login page.
           b. Enter an account name and password that have the appropriate operator or administrator
                access level.
      3.   After you have logged in, you can browse directly to the HP VCRM by entering
           https://:2381 in the browser address field, or you can click the HP VCRM
           link from the HP SMH under in the Version Control status box on the Home tab. The HP VCRM
           Home page appears.

      NOTE: In SMH 6.x and later, the Version Control (VCA and VCRM) agents links are available
      only under the Version Control status box on the Home tab and it opens in the same window. The
      Integrated Agents will be available in Webapps tab, but there is no link available for any agent.
                                                                                           Logging in   7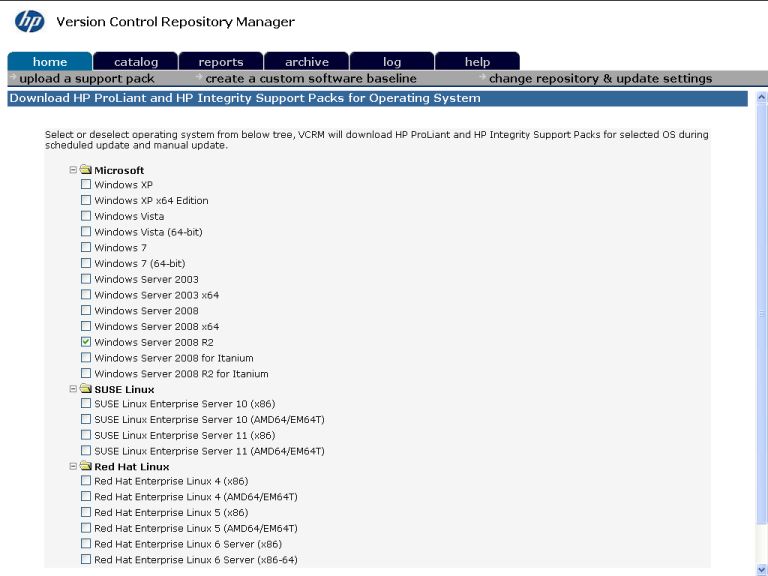
Related topics
         Getting started
         Logging out

Logging out
         Log out of the HP Version Control Repository Manager (HP VCRM) to prevent someone from
         accessing your active session if you walk away.
         To log out of the GUI:
         1. Click the VCRMSystem Home page link in the HP SMH page.
         2. Click Sign out on the HP SMH page.
         3. Close the Web browser.
         Related topics
         Logging in

About software repositories
         The practice of updating HP Service Pack for ProLiant , and Components from a single or multiple
         repositories saves time and is key to standardizing software maintenance and update procedures
         on distributed systems.

         NOTE: Default installation of an HP Version Control Repository Manager (HP VCRM) can manage
         only the repository that is located on the server on which HP VCRM is installed.
         For maximum manageability and flexibility across operating system platforms, each repository that
         is created should be:
         •    Located on a local drive with write access
         •    Updated automatically by the HP VCRM
         •    Managed by HP VCRM
         Related procedures
         Configuring auto update
         Creating a custom software baseline
         Related topics
         Home
         Catalog
         Log

Updating the repository
         Configuring the repository using HP VCRM CLI
         Configuring the repository using HP VCRM CLI
         This section describes procedures that you can use to configure the repository using the HP VCRM
         CLI. The topics discussed in this section are:
         •    Displaying the current HP VCRM settings
         •    HP Service Pack for ProLiant, ProLiant and Integrity Support Packs.
         •    Changing the repository folder
         •    Initializing the update from the web
         •    Configuring automatic update for HP VCRM

8   Getting started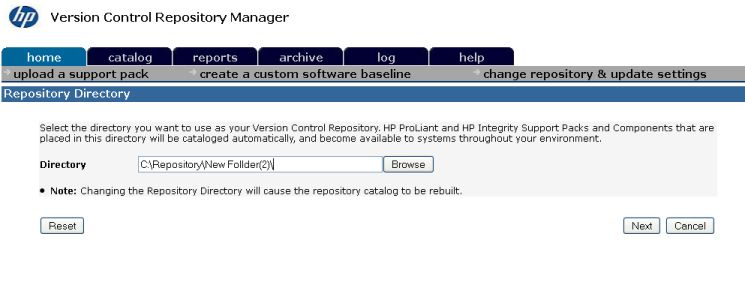
Displaying the current HP VCRM settings
From the command prompt, enter the following command:
vcrmcli.exe /show
The command displays the current settings of the HP Version Control Repository Manager in XML
format.

NOTE:      HP VCRM is restarted while executing vcrmcli.exe file.

NOTE:      The displayed XML output may contain Proxy server password.

Selecting the operating systems to download HP Service Pack for ProLiant
From the command prompt, enter the following command:
vcrmcli.exe /os "OS version"
The command configures the operating systems listed to download HP Service Pack for ProLiant.
Example:
vcrmcli.exe /os "win2003x64,win2003x86,win2008x64"

NOTE:      Specify the values for the parameters in double quotation marks ("").
The command configures the operating systems list to download HP Service Pack for ProLiant as
shown:
•   win2003x64 downloads Bundles and Components for Windows Server 2003 x64 platform.
•   win2003x86 downloads Bundles and Components for Windows Server 2003 x86 platform.
•   win2008x64 downloads Bundles and Components for Windows Server 2008 x64 platform.
•   win2008x86 downloads Bundles and Components for Windows Server 2008 x86 platform.
•   win2008r2 downloads Bundles and Components for Windows Server 2008 x64 platform.
•   win2012x64 downloads Bundles and Components for Windows Server 2012 x64 platform.
•   rhel6 downloads Bundles and Components for Red Hat Enterprise Linux 6 server x86 platform.
•   rhel6x64 downloads Bundles and Components for Red Hat Enterprise Linux 6 server
    AMD64/EM64T platforms.
•   rhel5 downloads Bundles and Components for Red Hat Enterprise Linux 5 server x86 platform.
•   rhel5x64 downloads Bundles and Components for Red Hat Enterprise Linux 5 server
    AMD64/EM64T platforms.
•   rhel4 downloads Bundles and Components for Red Hat Enterprise Linux 4 server x86 platform.
•   rhel4x64 downloads Bundles and Components for Red Hat Enterprise Linux 4 server
    AMD64/EM64T platforms.

NOTE: Executing the command vcrmcli.exe /os without any value displays all the supported
operating system attributes.

NOTE: During automatic update, VCRM downloads bundles and components for the selected
operating system along with the OS details obtained from the VCA system.

Changing the repository folder
From the command prompt, enter the following command:
vcrmcli.exe /repository path

                                                                          Updating the repository   9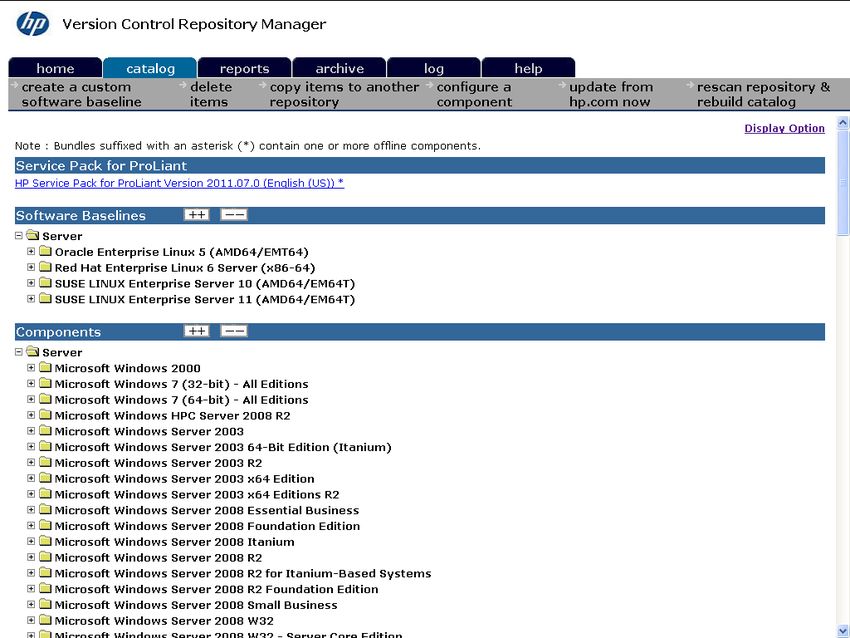
The command configures the HP VCRM repository directory to the new location while retaining all
          of the other settings.
          Example:
          vcrmcli.exe /repository c:\new repository
          The command configures the HP VCRM repository directory to c:\new repository.

          NOTE:        HP VCRM is restarted while executing vcrmcli.exe file.

          NOTE:        Specify the values for the parameters in double quotation marks ("").

          Initializing the update from the web
          From the command prompt, enter the following command:
          vcrmcli.exe /updatenow

          NOTE:        HP VCRM is restarted while executing vcrmcli.exe file.
          The command starts automatically updating the current HP VCRM repository directory from the
          web based on the current settings while retaining all of the other settings including the HP VCRM
          autoupdate schedule settings.

          NOTE: If /updatenow command is entered with other options like /repository,
          /autoupdate, etc, VCRM CLI applies all the new settings and then start the update once.

          Configuring automatic update for HP VCRM directory
          From the command prompt, enter the following command:
          vcrmcli.exe /autoupdate
          /interval "Interval"
          /dayofweek "Day of the week"
          /time "Update Start time"
          /proxyname "Proxy server name or IP address"
          /proxyport "Proxy Port Number"
          /proxyuser "Proxy User Name"
          /proxypwd "Proxy Password"

          NOTE:        HP VCRM is restarted while executing vcrmcli.exe file.
          The command configures the HP VCRM autoupdate schedule settings.
          Example:
          vcrmcli.exe /autoupdate /interval "7" /dayofweek "0" /time "22"
          /proxyname "proxy.domain.com" /proxyport "1234"

          NOTE:        Specify the values for each of the parameters in double quotation marks ("").
          where,
          /interval "7" corresponds to one week (7 days, valid values: 1, 2, 7, 14, 28)
          /dayofweek "0" corresponds to Sunday (0 is default, and is not used if the interval is less than
          7. Valid values: 0, 1, 2, 3, 4, 5, 6)
          /time "22" corresponds to 10PM (24–hour time format, valid values: 0 to 23)

10   Getting started
/proxyname proxy.domain.com "proxy.domain.com" specifies the name or IPv4 of the proxy
server to use for autodownload
/proxyport 1234 "1234" specifies the port number for the given proxy name
/proxyuser specifies the user name for authenticating the proxy server
/proxypwd specifies the password for the given proxy user name
NOTE: If /proxyuser argument has a valid user name and /proxypwd is not used as argument,
vcrmcli.exe prompts the user for a password during execution.
The command configures the autoupdate schedule settings to update the repository on Sunday 10
PM.
Populating a repository
This section describes procedures that you can use to populate the repository after you install
VCRM. The topics discussed in this section are:
• Setting up the Repository Directory
• Initial Repository Population
• Configuring Automatic Update
HP VCRM Setup - Repository Directory
The HP VCRM Setup - Repository Directory dialog box enables you to specify the directory where
HP software is located so the HP VCRM can monitor it. The default repository directory path is
%SystemDrive%\repository. Also, if you are installing HP VCRM for the first time, you can
choose to have the repository populated initially.
NOTE: If you are upgrading or reinstalling the HP VCRM, the Perform an initial repository
population option is unavailable.
To change the repository directory:
1. Click Browse.
2. Select the directory where the HP software is to be stored. The path to the directory appears
in the Repository Directory field.
3. Select Perform an initial repository population if you want to have the repository updated with
HP Service Pack for ProLiant, ProLiant and Integrity Support Packs. (If Perform an initial
repository population is deselected, or the option is not displayed, the Automatic Update
wizard page appears next.)
4. Click Next to accept the selected directory. If you selected Perform an initial repository
population on the previous dialog box, the HP VCRM Setup - Initial Repository Configuration
dialog box appears.
The Automatic Update dialog box enables you to schedule automatic updates for your repository
from the HP website.
Note: If you do not want to use the automatic update feature, see the “Updating the repository
manually from the SmartStart CD ” section to update the repository manually.
Repository Population - Initial Installation
1. Click Add to select a directory that contains a HP Service Pack for ProLiant, ProLiant and
Integrity Support Packs. The Browse for Folder dialog box appears.
Updating the repository 112. Navigate to the directory that contains a HP Service Pack for ProLiant, ProLiant and Integrity
Support Packs, and click OK or Cancel to abort the selection.
All Support Packs found in the selected directory are added to the list shown in the Initial
Repository Configuration dialog box. You can choose as many directories as you want, and
then delete any Support Packs from the list you do not want to be copied.
3. Click Next. The Download HP ProLiant and HP Integrity Support Packs for Operating System
page appears.
Select the operating systems from the list. HP VCRM downloads the HP Service Pack for ProLiant
and HP Integrity Support Packs for the selected operating systems.
4. Click Next. The HP VCRM Setup - Automatic Update dialog box appears.
Configuring automatic update for HP VCRM directory
The Automatic Update dialog box enables you to schedule automatic updates for your repository
from the HP website.
NOTE: If you do not want to use the automatic update feature, refer to the Updating the repository
manually from the SmartStart CD section to update the repository manually.
To configure an automatic update:
1. Select Enable Automatic Update to automatically download HP Service Pack for ProLiant,
ProLiant and Integrity Support Packs and components at a specific time.
2. In the Interval between updates field, select an interval from the dropdown menu.
3. In the Day of Week field, select a day of the week to update the repository from the dropdown
menu to update the repository.
4. In the Time of Day field, select a time for the update to occur from the dropdown menu for the
update to occur.
5. Use the Set Proxy option to configure a proxy server for HP VCRM.
To set the proxy server:
NOTE: VCRM supports Internet Protocol version 6 (IPv6) coexistence.
a. Click Set Proxy. The Proxy Server Settings dialog box displays.
b. In the Server Name field, enter the name of the proxy server. Clearing this field removes
all proxy server settings, and the automatic update is performed without connecting
through a proxy server.
c. In the Port field, enter the proxy server port. For example, enter 8080. If the Server Name
field is blank, this value is ignored.
d. In the Server Login field, enter a valid login for the proxy server. Leave this field blank if
a server login is not required.
e. In the Password field, enter a valid password for the login on the proxy server. If the
Server Login field is blank, this field is ignored.
f. Click OK to save your settings or Cancel to discard the settings.
6. Click Finish to save the HP VCRM settings.
If Automatic Update is enabled and a proxy server is configured, the connection with the
proxy server is verified before continuing. If the proxy server cannot be reached, a message
appears Unable to connect.
7. The HP Setup wizard page appears, and the installation begins. When it completes, the result
of the installation appears.
12 Getting started8. Click Close. The installation is complete.
Note: You can install the HP VCRM during the Systems Insight Manager installation. Refer to
the Systems Insight Manager installation User Guide for more details. Also remember, that in
a network, HP VCRM must be installed on only one system, but the VCA must be installed on
all servers.
NOTE: When you configure for automatic and periodic update of the repository from HP website,
the HP VCRM initially downloads the ISO files and extracts them to a “temp” folder. It moves the
missing components to the repository and starts downloading the individual components that are
not available in the repository. VCRM tries to download files to the repository in both Active and
Passive modes.
Updating the Repository
The automatic update feature of the HP Version Control Repository Manager (HP VCRM) is the
preferred solution for updating repositories automatically. The automatic update feature of the HP
VCRM keeps servers connected to HP for proactive delivery of the latest HP Service Pack for ProLiant,
ProLiant and Integrity Support Packs and components directly to a specified repository. You can
configure the automatic population of the repository during the HP VCRM installation or after
installation. In the event you cannot use the automatic update feature, you can populate the
repository from the SmartStart CD or HP Service Pack for ProLiant ISO as indicated in the“Updating
the repository manually from the SmartStart CD ” section. If you must manually update the repository,
for example, because you deleted a HP Service Pack for ProLiant from the repository and you later
needed it, see the “Updating the repository manually from the SmartStart CD ” section.
Uploading a HP Service Pack for ProLiant
With the Upload a HP Service Pack for ProLiant option, you can complete the following tasks:
• Browse for HP Service Pack for ProLiant, HP ProLiant and Integrity Support Packs on drives
and CD that are accessible to your local system.
• Copy the available support packs into the Version Control Repository directory.
NOTE: For more information on uploading support packs, see the Uploading HP Service Pack
for ProLiant section.
Updating from the Website
The Update from hp.com Now option enables you to update the repository from http://
www.hp.com/servers/swdrivers website without having to wait for a scheduled update.
NOTE: To use the Update Now option, ensure that atleast one Version Control Agent (VCA) is
pointing to the VC Repository Manager. For more information on updating repositories automatically,
see the Updating repository immediately section.
Updating the repository manually from the SmartStart CD
When you are logged in locally at the system where the HP VCRM is installed, you can update
the repository by performing a manual copy of files from the SmartStart CD to the repository
directory on your local system.
To populate the repository manually with Service Pack for ProLiant from the SmartStart CD :
1. Insert the SmartStart CD in the CD-ROM drive.
2. From Windows Explorer, double-click the CD-ROM drive to open the SmartStart CD.
3. Click Compaq to open the directory.
4. From within the Compaq directory, click CSP to open the directory.
Updating the repository 135. The CSP directory contains a Linux directory for Linux-related Support Packs and a Windows
NT® directory that contains components, support packs, and XML files in a self-extractable
executable called cpfiles.exe. Execute cpfiles.exe and provide the path for example,
c:\temp to extract the files for each supported operating system. Click Linux or extracted path
depending on the type of Support Packs with which you want to populate your repository.
6. After you have opened one of the directories, select all of the HP Service Pack for ProLiant
files, click Edit from the Windows Explorer toolbar, and select Copy.
7. From Windows Explorer, navigate to the repository directory, for example, c:\repository.
Click the repository directory.
8. From the Microsoft Windows Explorer toolbar, click Edit and select Paste. The Support Packs
are copied into the c:\repository directory. The repository is now populated.
9. From the c:\repository directory, select a component. Right-click the component and
select Properties. Note that the file is read-only. For the HP VCRM to allow component
configuration, a component cannot be read-only. Deselect the read-only attribute and click
OK.
When you are logged in locally at the system where the HP VCRM is installed, you can update
the repository by performing a manual copy of files from the SmartStart CD to the repository
directory on your local system.
To populate the repository manually with Service Pack for ProLiant from the SmartStart CD :
1. Insert the SmartStart CD in the CD-ROM drive.
2. From Windows Explorer, double-click the CD-ROM drive to open the SmartStart CD.
3. Click Compaq to open the directory.
4. From within the Compaq directory, click CSP to open the directory.
5. The CSP directory contains a Linux directory for Linux-related Support Packs and a Windows
NT® directory that contains components, support packs, and XML files in a self-extractable
executable called cpfiles.exe. Execute cpfiles.exe and provide the path for example,
14 Getting startedc:\temp to extract the files for each supported operating system. Click Linux or extracted path
depending on the type of Support Packs with which you want to populate your repository.
6. After you have opened one of the directories, select all of the HP Service Pack for ProLiant
files, click Edit from the Windows Explorer toolbar, and select Copy.
7. From Windows Explorer, navigate to the repository directory, for example, c:\repository.
Click the repository directory.
8. From the Microsoft Windows Explorer toolbar, click Edit and select Paste. The Support Packs
are copied into the c:\repository directory. The repository is now populated.
9. From the c:\repository directory, select a component. Right-click the component and
select Properties. Note that the file is read-only. For the HP VCRM to allow component
configuration, a component cannot be read-only. Deselect the read-only attribute and click
OK.
When you are logged in locally at the system where the HP VCRM is installed, you can update
the repository by performing a manual copy of files from the SmartStart CD to the repository
directory on your local system.
To populate the repository manually with Service Pack for ProLiant from the SmartStart CD :
1. Insert the SmartStart CD in the CD-ROM drive.
2. From Windows Explorer, double-click the CD-ROM drive to open the SmartStart CD.
3. Click Compaq to open the directory.
4. From within the Compaq directory, click CSP to open the directory.
5. The CSP directory contains a Linux directory for Linux-related Support Packs and a Windows
NT® directory that contains components, support packs, and XML files in a self-extractable
executable called cpfiles.exe. Execute cpfiles.exe and provide the path for example,
c:\temp to extract the files for each supported operating system. Click Linux or extracted path
depending on the type of Support Packs with which you want to populate your repository.
6. After you have opened one of the directories, select all of the HP Service Pack for ProLiant,
click Edit from the Windows Explorer toolbar, and select Copy.
7. From Windows Explorer, navigate to the repository directory, for example, c:\repository.
Click the repository directory.
8. From the Microsoft Windows Explorer toolbar, click Edit and select Paste. The Support Packs
are copied into the c:\repository directory. The repository is now populated.
9. From the c:\repository directory, select a component. Right-click the component and
select Properties. Note that the file is read-only. For the HP VCRM to allow component
configuration, a component cannot be read-only. Deselect the read-only attribute and click
OK.
Updating the repository manually with HP Service Pack for ProLiant ISO
When you are logged in locally at the system where the HP VCRM is installed, you can update
the repository manually with HP Service Pack for ProLiant.
To Populate the repository manually with HP Service Pack for ProLiant :
• Copy or Move the ISO file into VCRM repository folder.
VCRM will automatically add the software components from ISO into the repository.
Related topics
Copying items to another repository
Deleting items from the repository
Updating the repository 153 Navigating the software
You can access the HP Version Control Repository Manager (HP VCRM) by navigating to
https://:2381/vcrepository, or you can access it from the Version Control
status box on the HP System Management Homepage (HP SMH). The HP VCRM provides an
interface that enables you to easily navigate through the HP SMH main pages:
• Home
• Catalog
• Reports
• Archive
• Log
• Help
Procedures
Configuring auto update
Creating a custom software baseline
About Version Control Repository Manager
About software repositories
Related topics
Logging in
Logging out
Configuring Internet Explorer settings
Configuring Internet Explorer to allow the Version Control Repository
Manager Upload feature
Some features on the HP Version Control Repository Manager browser interface depend on browser
settings at the client system used to access the HP VCRM. These security settings in Microsoft Internet
Explorer must be set to use the HP VCRM Upload feature.
To configure the Internet Explorer to use the HP VCRM Upload feature:
1. From the Microsoft Internet Explorer toolbar, click Tools and select Internet Options. The Internet
Options dialog box appears.
2. Under the Security option, select Custom Level. The Security Settings dialog box appears.
3. Under ActiveX controls and plug-ins, Download signed ActiveX controls, select Enable.
4. Under Run ActiveX controls and plug-ins, select Enable.
5. Under Script ActiveX controls marked safe for scripting, select Enable.
The advanced settings in Microsoft Internet Explorer must be set to ensure that saving a copy of
the HP VCRM log functions when the log is cleared.
To configure the Microsoft Internet Explorer advanced settings:
1. From the Microsoft Internet Explorer toolbar, click Tools and select Internet Options. The Internet
Options dialog box appears.
2. Click the Advanced tab.
3. Scroll down to the Security section, and disable Do not save encrypted pages to disk.
4. Click OK to save your changes and close the Internet Options dialog box.
16 Navigating the softwareBy default, Internet Explorer security settings block some actions performed by the HP VCRM. To
correctly configure Internet Explorer security settings, HP recommends that you add the HP System
Management Homepage (HP SMH) URL to Internet Explorer's Local Intranet.
To add the HP SMH to Internet Explorer's Local Intranet:
1. From Internet Explorer, click Tools→Internet Options.
2. Click the Security tab. The Security tab appears.
3. Select the Local Intranet icon.
4. Click Sites.... The Local Intranet dialog box appears.
5. In the Add this Web site to the zone field, enter https://:2381/ and click
Add.
6. Click OK to save your changes and close the Local Intranet dialog box.
7. Click OK to close the Internet Options dialog box.
Configuring Internet Explorer firewall settings
Some operating systems, including Windows XP with Service Pack 2 and Windows Server 2003
SBS, implement a firewall that prevents browsers from accessing the ports required for the HP
VCRM access. To resolve this issue, you must configure the firewall with exceptions to allow
browsers to access the ports used by HP Systems Insight Manager and HP VCRM.
NOTE: For Windows XP with Service Pack 2, this configuration leaves the default SP2 security
enhancements intact, but allows traffic over the ports. These ports are required for the HP VCRM
to run. The secure and insecure ports must be added to enable proper communication with your
browser.
To configure the firewall:
1. Select Start→ Settings →Control Panel.
2. Double-click Windows Firewall to configure the firewall settings.
3. Select Exceptions.
4. Click Add Port.
You must enter the product name and the port number.
Add the following exceptions to the firewall protection:
Product Port Number
HP SMH Insecure Port: 2301
HP SMH Secure Port: 2381
5. Click OK to save your settings and close the Add a Port dialog box.
6. Click OK to save your settings and close the Windows Firewall dialog box.
Related topics
Home
Home
The HP Version Control Repository Manager Home page permits the following:
• Uploading HP Service Pack for ProLiant - Uploading a HP Service Pack for ProLiant
• Viewing a custom software baseline - Viewing the contents in the repository
• Creating a custom software baseline - Creating a custom software baseline
• Configuring auto update - Configuration of the Repository and automatic update settings
Home 17Overview of statistics
The Statistics section displays how many HP Service Pack for ProLiant, ProLiant and Integrity Support
Packs, Custom Software Baselines and component available in repository.
Overview of software baselines
The Software Baselines section lists all of the HP Service Pack for ProLiant, ProLiant and Integrity
Support Packs that the HP VCRM has cataloged in the repository. If a HP Service Pack for ProLiant,
ProLiant and Integrity Support Packs has a Minor status icon displayed with it, the ProLiant and
Integrity Support Packs is invalid because one or more items listed in the HP Service Pack for
ProLiant, ProLiant and Integrity Support Packs was not found in the repository.
Note: You can access a full listing of all available HP Service Pack for ProLiant, ProLiant and Integrity
Support Packs and components by clicking the Catalog tab.
Procedures
Configuring auto update
Creating a custom software baseline
Related topics
Uploading HP Service Pack for ProLiant
Viewing a custom software baseline
Viewing a custom software baseline
You can view the details regarding a Custom Software Baseline, HP Service Pack for ProLiant, or
component details.
NOTE: Document links can appear inside the details view, but these links will not work. The data
displayed is specific to the http://www.hp.com website.
NOTE: You can view the component details from the Home page or the Catalog page.
Viewing Custom Software Baseline, HP Service Pack for ProLiant,
ProLiant and Integrity Support Packs details
You can view details regarding an HP Service Pack for ProLiant, ProLiant and Integrity Support
Packs or component details.
To view Custom Software Baseline or HP Service Pack for ProLiant, or ProLiant and Integrity Support
Packs details:
1. Click the Home tab. The Home page appears.
2. Click the link of the Custom Software Baseline, HP Service Pack for ProLiant, or ProLiant and
Integrity Support Packs you want to view. The HP Service Pack for ProLiant, ProLiant and
Integrity Support Packs details are displayed in a new browser window.
3. To view details about the components in the HP Service Pack for ProLiant, ProLiant and Integrity
Support Packs you are viewing, click any of the component links listed at the bottom of the
HP Service Pack for ProLiant, ProLiant and Integrity Support Packs details page.
Viewing component details
To view component details:
1. Click the Home tab. The Home page appears.
2. Click the link associated with the component you want to view. The Component Details page
appears if you are viewing details for an HP Service Pack for ProLiant, ProLiant and Integrity
Support Packs .
Related topics
18 Navigating the softwareCreating a custom software baseline
Configuring auto update
You can change the Repository Directory settings if you are logged in to the HP SMH with operator
or administrator privileges. However, the maximum length of the path to the Repository Directory
is 128 characters.
NOTE: Automatic update downloads software from HP based on the operating systems of HP
Version Control Agent(HP VCA) that are configured to use this HP Version Control Repository
Manager (HP VCRM) for status and software updates. If something is downloaded that does not
apply to your environment, for example, certain ROM components, use the Delete feature of the
HP VCRM to remove it from the system and catalog.
To configure the repository and automatic update settings:
NOTE: You can also configure the Automatic Update Settings using the Command Line Interface
(CLI).
1. Click the Home tab. The Home page appears.
2. Click the Change Repository and Update Settings link. The Repository Directory page appears.
3. In the Directory field, to select a folder that contains HP Service Pack for ProLiant, ProLiant
and Integrity Support Packs, click Browse and select directories that contain HP Service Pack
for ProLiant, ProLiant and Integrity Support Packs you wish to select. Ensure that the directory
can be accessed with read-write privileges by the HP VCRM Win32 service. Click Reset to
restore the original directory setting, or you can click Cancel to abort the change.
Note: The directory path cannot contain the ampersand (&) character. If this character is used,
the HP VCRM is unable to change the settings.
4. Click Next. The Download HP ProLiant and HP Integrity Support Packs for Operating system
page appears.
Select the operating systems from the list. HP VCRM downloads the HP Service Pack for ProLiant
and HP Integrity Support Packs for the selected operating systems during the automatic update.
Home 195. Click Next. The Automatic Update Settings page appears.
a. Select the Enable automatic downloading of new HP Service Pack for ProLiant, ProLiant
and Integrity Support Packs and components from Hewlett-Packard's website at a specified
interval and time option if you want the repository to automatically update.
Note: If you select the option to automatically receive updates, the Download schedule
settings enable you to configure the frequency and times that you want to automatically
update.
b. In the Interval between updates field, select how often you want to update automatically
from the dropdown menu.
c. In the Day of Week and Time of Day fields, select the day of the week that you want to
automatically update from the dropdown menu, then in the next field, select the time you
want to automatically update from the dropdown menu.
Note: If you select one day or two days from the Interval between updates option, the
Day of Week option is unavailable because the update happens daily, or every two days,
from the day you made the selection.
Note: If the HP VCRM service does not connect to the Internet through a proxy server,
proceed to step 5.
d. In the Proxy field, enter the proxy server name and click Set Proxy Server. The Proxy
Server Settings dialog box appears.
Note: The proxy settings enable you to set the name or IP address of a proxy server, the
proxy port, login name, and password for the proxy server. To configure a proxy server,
the server name must be entered, but the other fields can be left blank if appropriate. If
you do not enter a server name, the other values are not saved.
e. In the Proxy Server Name field, enter the name of the proxy server. Clear this field to
remove all proxy server settings.
f. In the Port field, enter the port address. This value is ignored if the Server Name is blank.
g. In the Proxy Server Login field, enter a login name. You can leave this blank if the proxy
does not require authentication.
Note: If you are using an authenticating proxy server and have supplied a login user
name in this field, you might need to configure the HP VCRM Windows (Win32) service
to log on with a user account, instead of LocalSystem, which is the default.
h. In the Password field, enter the password associated with the Proxy Server Login you just
entered. This field is ignored if the Login field is blank.
i. Click OK. Your new proxy settings are saved and you are returned to the Automatic
Update Settings dialog box. Click Cancel to return to the Automatic Update Settings dialog
20 Navigating the softwarebox, if you do not want to enter the proxy server settings. The configuration you specified
appears in the wizard.
j. When the upload task completes, view the Log to confirm that all of the HP Service Pack
for ProLiant, ProLiant and Integrity Support Packs and components were successfully
uploaded to the HP VCRM.
6. Click Reset to return the settings back to the previous settings, Back to return to the previous
page, or Cancel to abort the operation. If you have enabled the automatic update feature,
the connection is tested at this time. If an error occurs, the settings are not saved, and you
remain on the automatic update settings page to correct any errors.
7. Click Finish. Your changes are saved successfully. Click Close, and you are returned to the
HP VCRM Homepage.
Related topics
Uploading HP Service Pack for ProLiant
Viewing a custom software baseline
Uploading HP Service Pack for ProLiant
This feature enables you to browse for HP Service Pack for ProLiant on drives and CDs accessible
to your local system, and have those HP Service Pack for ProLiant, ProLiant and Integrity Support
Packs copied into the Version Control Repository directory.
NOTE: You can install HP Service Pack for ProLiant from the HP SmartStart CD. Refer to Updating
the repository to learn how to update the repository from the HP SmartStart CD or with HP Service
Pack for ProLiant ISO.
NOTE: This feature is only supported on the Internet Explorer browser, and you must have
configured your security settings to allow downloading and installing the Version Control Upload
(ActiveX) Control.
NOTE: For information regarding Microsoft Internet Explorer Security Settings, refer to Configuring
Internet Explorer settings.
NOTE: To Upload HP Service Pack for ProLiant using “Uploading support packs” option, HP
Service Pack for ProLiant ISO files should be either be mounted, extracted, or burned into a DVD.
To update the repository with ISO refer to Updating the repository.
To upload a HP Service Pack for ProLiant:
1. Click the Home tab. The Home page appears.
2. Click the Upload a HP Service Pack for ProLiant link. The HP Service Pack for ProLiant page
appears.
a. To select a folder that contains HP Service Pack for ProLiant, ProLiant and Integrity Support
Packs, click Browse and select directories that contain HP Service Pack for ProLiant,
ProLiant and Integrity Support Packs you would like to upload into the repository. The
Select HP Service Pack for ProLiant Folders dialog box appears.
Note: You might have to browse to subdirectories to find the HP Service Pack for ProLiant,
ProLiant and Integrity Support Packs for which you are searching.
b. A checkbox appears next to any folder containing the HP Service Pack for ProLiant. Select
the folders to include the desired paths in the upload list. Click OK. The Upload HP Service
Pack for ProLiant page appears.
Note: When the Upload HP Service Pack for ProLiant, ProLiant and Integrity Support Packs
page appears, a Security Warning dialog box might display alerting you that a component
that has access to their file system is being installed on the system. If this Security Warning
dialog box appears, click Yes to install the component. If you do not want to install the
component, which is required to upload the HP Service Pack for ProLiant click No.
Home 213. Verify that you want the selected HP Service Pack for ProLiant uploaded to the HP VCRM, and
click Upload to begin copying the files to the HP VCRM's repository directory.
Note: Before you click Upload, you can deselect any HP Service Pack for ProLiant, ProLiant
and Integrity Support Packs shown to remove it from the list, and it will not be uploaded.
4. After clicking Upload, the Upload Progress section appears. The Current Task field, located
in the Upload Progress section, refers to the file that is being uploaded. The Progress bar
indicates the status of the file that is currently being uploaded. You can click Cancel to abort
the upload process. If you click Cancel, a message appears asking you if you are sure you
want to cancel the operation. Click OK, and the upload is canceled as soon as the current
task is completed.
Note: The Progress bar, located in the bottom of the browser window, indicates the status of
the task currently being executed, while the one in the Upload Progress section shows the
overall progress for all files being uploaded.
5. After the upload is complete, click Close to close the upload window and refresh the HP VCRM
display.
Note: The upload task is complete when the files have been transferred from the local system
to the HP VCRM. For performance reasons, transferred files are queued for cataloging as a
separate activity at the HP VCRM server, meaning that upon completion of the upload, not
all of the files will immediately appear in the catalog, and uploaded HP Service Pack for
ProLiant may be marked as invalid until all files have been cataloged, usually within a few
minutes.
Related topics
Viewing a custom software baseline
Viewing recently added HP Service Pack for ProLiant
Configuring auto update
Creating a custom software baseline
The HP Version Control Repository Manager (HP VCRM) enables you to create Custom Software
Baseline based on the selected software components or HP Service Pack for ProLiant.
NOTE: You can also create a support pack from the Home or Catalog page.
To create a Service Pack for ProLiant from the Home page:
1. Click the Home tab. The Home page appears.
2. Click the Create a custom software baseline link. The Create a custom software baseline page
appears.
Note: The Create a custom software baseline link is also available from the Catalog tab.
a. In the Operating System field, select the appropriate operating system from the down
menu.
b. In the Name field, enter a name for the Software Baseline, for example, ACME Reference
Software Set for Database Servers.
c. In the Version field, enter the version for the Software Baseline, for example, 1.0.0.
d. In the Languages field, enter a list of languages for the Software Baseline, for example,
English, French, or German.
Note: if you plan to install or deploy this custom baseline with HP Remote Deployment
Utility, you must enter the correct English language name of the language. For example,
if you want the target system to use the Japanese language, enter Japanese. Entering
just English with a leading capital E will allow the custom baseline to be deployed to
any system with the HP Remote Deployment Utility.
e. In the Description field, enter a description for the Software Baseline.
22 Navigating the software3. Click Next. Click Reset to clear you entries or Cancel to abort the wizard.
4. Select the desired components or HP Service Pack for ProLiant to be part of the HP Service
Pack for ProLiant. Click Next. Click Cancel to abort the wizard, Back to return to the previous
page, or Reset to clear the selections.
5. To modify the Service Pack for ProLiant contents:
a. In the section that displays the contents, select the desired component, then click Delete,
Move up, or Move down.
b. Repeat step 5a until all components are in the desired order.
Note: Make sure the components are ordered correctly, so they will install. When ordering
the components in a custom software baseline, HP recommends that they be ordered as
follows: drivers first, then services, then utilities or agents.
6. Click Finish. The Result page appears indicating whether the Software Baseline was successfully
created.
7. Click Close. The Home page refreshes, and a link to the new custom software baseline appears
in the list.
Related topics
Viewing a custom software baseline
Uploading HP Service Pack for ProLiant
Configuring auto update
Catalog
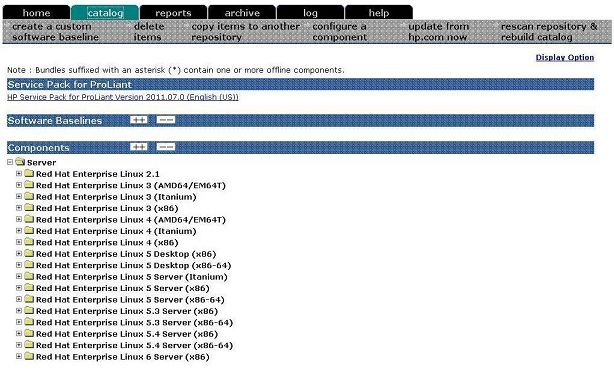
The Catalog page displays all of the Software Baselines, HP Service Pack for ProLiant , and
components (online and offline) stored in the repository. The bundles containing an offline component
is denoted with a ‘*’ mark, implying that the bundle contains an offline component. The contents
are displayed in order by Operating system and Component functionality. You can use the Display
option link to change the ordering of contents based on the Operating system, functionality, and
the Release Date.
HP Service Pack for ProLiant (SPP) section displays the SPP stored in the repository.
NOTE: HP VCRM identifies and extracts only the SPP ISO files found in the repository folders.
HP VCRM identifies the SPP bundle as normal software baselines when adding the files into the
repository folders from the SPP ISO files.
Catalog 23You can also read