Smart A9 User Manual - Vodafone Group
←
→
Page content transcription
If your browser does not render page correctly, please read the page content below

Some services, features and apps may not be available in
all countries. Please ask in-store for details.
© Vodafone Group 2018, Vodacom, Vodafone and the
Vodafone logos are trade marks of the Vodafone Group.
Other product and company names mentioned herein
may be the trade marks of their respective owners.

                                                           Smart A9
                                                           User Manual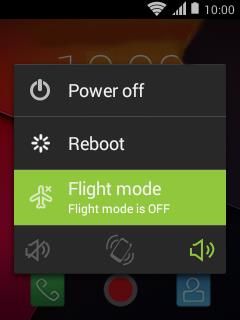
12.4 Setting Date and Time ..............................................................................................12
Table of Contents
                                                                                                                                                            13.       Adding connectivity ..................................................................................................12
1.       Getting to know your device ......................................................................................... 4
                                                                                                                                                              13.1 Adding a Wi-Fi connection ......................................................................................12
2.       Getting to use the keyboard .......................................................................................... 4
                                                                                                                                                              13.2 Activating Bluetooth..................................................................................................13
3.       Inserting a SD card and a SIM card .............................................................................. 4
                                                                                                                                                              13.3 Pairing devices with Bluetooth .............................................................................13
4.       Switching on/off your phone........................................................................................ 5
                                                                                                                                                            14.       Browsing on the Internet.........................................................................................13
5.       Charging your phone ........................................................................................................ 5
                                                                                                                                                            15.       Using WhatsApp ..........................................................................................................13
6.       Presentation of the notification bar ........................................................................... 6
                                                                                                                                                            16.       Using Facebook ...........................................................................................................14
7.       Accessing the application history ............................................................................... 7
                                                                                                                                                            17.       Switching to flight mode .........................................................................................14
8.       Communication .................................................................................................................. 7
                                                                                                                                                            18.       Using the camera........................................................................................................15
     8.1 Using the predictive text ............................................................................................... 7
                                                                                                                                                            19.       Recording voices ........................................................................................................15
     8.2 Launching a call                    .......................................................................................................... 8
                                                                                                                                                            20.       Visualizing your pictures and videos ..................................................................16
     8.3 Managing the call history                             ....................................................................................... 8
                                                                                                                                                            21.       Transferring pictures from your phone to your computer .......................16
9.       Sending an SMS .................................................................................................................. 9
                                                                                                                                                            22.       Transferring files from a computer to your device ......................................16
10.          Using the Email application ..................................................................................... 9
                                                                                                                                                            23.       Listening to music ......................................................................................................17
     10.1 Erasing an email account........................................................................................ 10
                                                                                                                                                            24.       Listening to the radio ................................................................................................17
     10.2 Customizing the email application .................................................................... 10
                                                                                                                                                            25.       Adjusting the volume of the device ...................................................................18
11.          Managing contacts.................................................................................................... 10
                                                                                                                                                            26.       Setting an alarm ..........................................................................................................18
     11.1 Creating a contact ...................................................................................................... 10
                                                                                                                                                            27.       Adding an event in the Agenda ............................................................................18
     11.2 Sorting contacts.......................................................................................................... 11
                                                                                                                                                            28.       Using the calculator ..................................................................................................19
     11.3 Sharing a contact........................................................................................................ 11
                                                                                                                                                            29.       Using the device as a torch ....................................................................................19
12.          Customizing your phone ........................................................................................ 12
                                                                                                                                                            30.       Product safety information ....................................................................................19
     12.1 Editing the phone display ....................................................................................... 12
                                                                                                                                                              Pictograms and Graphic Symbols ..................................................................................19
     12.2 Changing the idle screen applications ............................................................. 12
                                                                                                                                                              Product safety information ...............................................................................................20
     12.3 Selecting an audio profile ....................................................................................... 12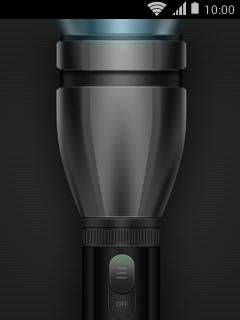
General information ............................................................................................................ 26
31.       WARRANTY INFORMATION.................................................................................... 28
  WARRANTY TERMS AND CONDITIONS........................................................................ 28
32.       Specifications .............................................................................................................. 29
You just bought a Vodafone Smart A9 by Vodafone phone. Get to know your Long press to lock screen
phone's functionalities and specifications through this guide.
Delete key Short press (audio apps): Volume up key
1. Getting to know your device Short press (in text area): Delete key
Long press: # key
Your phone is a "smart feature phone" model. You can use advanced
applications as Facebook Lite and WhatsApp, and you still have a physical
keyboard. To write a message in a text area, press the keys depending on the letters you
want to add. Press the right amount of time until the desired letter/number is
displayed. To write test:
2. Getting to use the keyboard
1. Press the 8 key once.
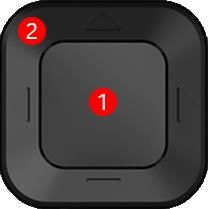
Keys Key name Functions
2. Press the 3 key, twice.
1. Validation key 1. Selection and validation key 3. Press the 7 key, four times.
2. Navigation 2. Use the arrows for navigation 4. Press the 8 key once.
pad When you are typing a message, a bar appears at the bottom of the
screen to indicate on which letter/number you are. Keep pressing the
Upper left key Short press: Settings same key until the right letter is displayed.
Long press: Notification
Green key Launch a call 3. Inserting a SD card and a SIM card
Back key Short press: Back function key You can remove the battery cover of your phone to place the battery and the
Long press: Applications history SIM and SD cards into their sockets.
Red key Switch on/off key Make sure your phone is switched off before doing the following
Short press (during call): End call key procedure. (Switching on/off your phone)
Voicemail Short press (in text area): Select
punctuation
Long press: Call voicemail 1. Remove the battery cover.
Space key Short press (in text area): Add space
Long press (in text area): Add "+"
Lock key Short press (audio apps): Volume down
Long press (in text area): * key2. Insert the SIM card
5. Charging your phone
and the SD card as You may need to charge the battery before use.
indicated on the drawing.
To charge your phone:
1. Take the USB cable provided.
3. Place the battery 2. Plug the micro-USB side to your phone.
and replace the battery 3. Plug the USB side to the wall charger.
cover. 4. Plug the charger to an electrical socket.
4. Switching on/off your phone
To switch on your phone press red key for a moment. Press and hold
the red key again to switch off your phone.6. Presentation of the notification bar Downloading
While using your phone, information is displayed in the notification bar, at the New message
top of the screen. For example, if you received a message, this icon is
displayed in the notification bar. New email
You'll find below a table stating the icons appearing in the notification bar: Call incoming / On a call
Icons Meaning
Missed call
No network
Facebook notification
Network activated
WhatsApp notification
Wi-fi activated
Phone is in silent mode
Bluetooth activated
You are using the FM radio application
No SIM card
You are using the application Recorder
Battery charge level
Battery charging
When this icon appears on your notification bar, it means that
USB connected
you must do a software update.
Screenshot saved To do so :
Screenshot not saved 1. When on the idle screen, press and hold the upper left key to
open the navigation bar.
You need to update your software2. Use the navigation pad to reach the notification following this icon As your device has a physical keyboard, you can use predictive text. This
feature allows you to enhance your typing time as the phone makes
and press the central navigation key to open it. proposals for content depending on the text you are typing.
3. Follow the instructions on the screen to update your phone.
To use the predictive text, you must be in a text area.
To keep your data safe, it is recommended to do the software
updates when asked.
To use the predictive text feature:
7. Accessing the application history 1. Once you are in a text area, press this key until "Language
Once you are done using an application, exit the application by using the red KT9" appears at the bottom of the screen. The predictive text feature
is activated.
key to get back to the idle screen.
2. Start typing as such: To type "test":
However, when you are using your phone, some applications may remain a. Press once the "8" key.
open in the background. The applications history allows you to see what b. Press once the "3" key.
applications are remaining open. c. Press once the "7" key.
d. Press once the "8" key.
As the use of many applications at the same time may cause lack of memory, 3. While pressing the keys, word suggestions appear at the bottom of
or slow down the performance of the phone, it is recommended to regularly the screen.
close all the applications in use.
Sometimes, predictive text cannot guess the word you want to type.
To access the application history: You can normally find it in the suggestions.
1. Long press the upper right key .
Predictive text icon
2. You are now in the applications history.
3. Use the navigation pad to select Remove all
All the applications are now closed.
8. Communication
8.1 Using the predictive text
To communicate with your work colleagues and friends, you can use the
Word suggestions
following applications on your device: Messages, Email, Phone etc…To select a word suggestion:
1. Use the navigation pad to select the perfect word suggestion. 8.3 Managing the call history
2. Press the validation key to insert the suggestion to your text.
The call history allows you to manage your received calls, the calls you made
and your missed calls.
8.2 Launching a call To access the call history:
Depending on your habits, you can choose the following ways to launch a call.
1. Launch the application Phone .
You can: 2. Open the sub-menu by pressing the upper left key .
1. Directly dial the phone number of your contact for the idle screen 3. Select Call history.
2. Use the Contacts application to choose the contact to call 4. Aside from the All tab, you find 3 arrow-indicated tabs:
1 DIALLING A NUMBER:
To access these tabs, use the navigation pad.
1. From the home screen, dial the number. a. Under the blue arrow, you find the calls you received and
2. Press the green key to launch the call. answered.
b. Under the green arrow, you find the calls you made.
c. Under the red arrow, you find your missed calls.
2 USING CONTACTS : If one of your contact calls you, but his/her number is not saved on
your phone, you can save the number directly from the call history.
1. Launch the application Contacts .
2. Select a contact in the list. 1. Launch the Phone .
3. Press the green key to launch the call. 2. Press the upper left key and select Call history.
3. Select the phone number to be saved.
Once you are done with your call, use the red key to hang up. 4. Select Add to contacts.
5. Select Create new contact.
6. Fill in the fields and select OK.
TO DELETE THE HISTORY:
1. Launch the application Phone .2. Press the upper left key and select Call history in the menu.
3. The history of your calls is displayed. Select the All tab to have an You can also type the name of the recipients directly.
overall view of the performed operations.
4. Select the operation you want to delete and press the central
navigation key. 10. Using the Email application
5. Use the arrows to select the bin icon in the top right-hand corner and
press the central navigation key to delete it. To communicate with your contacts, you can use the application Email of
your phone, which you can find in the applications menu.
Before using the application Email, you need to add an email account.
9. Sending SMS
1. Launch the application Email .
To send SMS and MMS to your contacts, use the application Messages. 2. Type the email address and password. Select Next.
To access the Messages application, you can use the shortcut on 3. Your emails are downloaded automatically.
the idle screen or select the application in the application Messages
in the menu. You can add several email accounts.
To send a message: To add a new email account:
1. Launch the application Messages . 1. Launch the application Email .
2. Press the upper left key and select New message. 2. Press the upper left key to display the sub-menu.
3. Add a recipient. 3. Select Settings.
4. Type your message in the text area and use the arrow on the right
to send your message. 4. Select on the top-right corner of the screen.
5. Type your email address and password and select Next.
TO SEND SMS TO SEVERAL RECIPIENTS:
If you have several accounts, to access the emails of a specific account,
To do so, simply add several recipients to your message. do as follows:
1. Press the upper left key to access the pop-up menu and select Email
Select this icon next to the Enter the person's name or number field Folder.
and select the recipients in the list. 2. Select the desired email account.You can also display all the emails of any account you created by a. To edit the general settings of the application,
selecting Combined View. select General Settings.
Once you have added your email accounts, you can start sending mails to
your contacts.
To send an email:
1. Launch the application Email .
2. Press the upper left key and select Compose.
3. Fill in the fields and type your message.
4. Press the upper left key and select Send.
b. To edit the settings of the email account.
10.1 Erasing an email account
To erase an email account: You access a list of settings concerning the
selected account.
1. Launch the application Email .
2. Press the upper left key to display the pop-up menu and select
Email folder.
3. Press the upper left key once more to display the pop-up
menu and select Settings.
4. Select the email account.
5. Select Remove account in the list.
10.2 Customizing the email application
You can edit the General Settings of the application Email to make it easier
to use or more readable.
11. Managing contacts
To access the General Settings, do as follows: 11.1 Creating a contact
The application Contacts allows you to keep your colleagues and friends
1. From Inbox, press the upper left key . contact information up to date.
2. A menu appears. Select Settings.sTo create a contact:
To create a group:
1. Launch the application Contacts .
2. Make sure you are on the central tab and press the upper left 1. Launch the application Contacts .
key . 2. Use the navigation pad to get to the right tab .
3. Press the upper left key and select Add contact. 3. Decide on which account you want your group to be.
4. Select the saving location. 4. Press the upper left key and select Add group.
5. Fill in the fields and select Done at the end of the form. 5. Type the name of the group.
6. Use the navigation pad to select the field "type person's name" or select
Groups
Contact list
the icon.
7. Add contacts to the group.
Favorites list
8. Once you are done with the list, press the upper left key and select
Done.
11.3 Sharing a contact
You may need to share the information of one of your contacts.
To do so:
If you want to save the contact on your SIM card, you can only add the name 1. Launch the application Contacts .
of the contact and its phone number. To add more information to your 2. Press this icon the upper left key and select Share visible
contact form, save the contact on your phone. contacts
11.2 Sorting contacts 3. Select a contact in the list and press the right arrow of navigation pad
to select OK.
You may have the need to sort your contacts depending on their status. For 4. Select a mean of sharing (SMS, email, Bluetooth, etc…)
example, your phonebook is a mix of work colleagues and friends, and you 5. Complete the sharing by following the steps associated with your
would like to sort them by type. sharing method.
You can create a group, add all your work colleagues contacts in this group to
help you find them easily.12.3 Selecting an audio profile
12. Customizing your phone To customize your ringtones, alarm sounds and volumes as follows:
12.1 Editing the phone display 1. Launch the application Settings .
2. Select Audio Profiles.
To make sure your phone is having the right arrangements at your display,
3. From this menu, you can:
you can customise to your satisfaction.
a. Edit the alarm volume.
To do so: b. Edit the ringtone volume.
c. Edit the phone ringtone.
1. Launch the application Settings . d. Choose the default notification tone.
2. Select Display. e. Choose the vibration behavior.
3. From this menu, you can : f. Control the sounds of the dial pad.
a. Change the wallpaper.
b. Edit the brightness of the screen.
12.4 Setting Date and Time
c. Choose the sleep time settings. By default, the date and time is updated automatically. You can choose to set
d. Select the size of the font. the date and time manually.
12.2 Changing the idle screen applications To manually set the date and time:
Some applications shortcuts are already on the idle screen by default. You
1. Launch the application Settings .
may want to change these shortcuts to improve the use of your phone.
2. Select Date and Time.
3. Select Automatic date & time and press the validation key.
1. Launch the application Settings . 4. Select Off and press the validation key to confirm.
2. Select Display. 5. Uncheck the box Automatic time zone.
3. Select Home screen application.
4. You are redirected to the idle screen. Select an application on the You can now set the time and date manually.
screen and press the validation key.
5. The Add app icon appears. Press the validation key once more.
6. Select an application in the list. 13. Adding connectivity
7. Once you’re done editing the applications, press the red key .
13.1 Adding a Wi-Fi connection
To add a Wi-Fi connection:1. Launch the application Settings .
2. Select Wi-Fi. Press this arrow to
move the cursor up
3. Use the switch to activate the feature. Press this key to validate
Press this arrow to Press this arrow to move
4. Select your network and type the password if needed. move the cursor left the cursor right
5. Select Connect. Press this arrow to move
the cursor down
You are now connected.
13.2 Activating Bluetooth To launch a search, do as follows:
1. Move the cursor to the address bar on top of the screen.
1. Launch the application Settings .
2. Enter directly the address of the website you want to visit in the
2. Select Bluetooth.
address bar and press the validation key to launch the search.
3. Use the switch to activate the Bluetooth.
4. Select a device in the list to pair your phone with. When typing, suggestions appear under the address/search bar. To
select a suggestion, you need to place the cursor on the text of the
13.3 Pairing devices with Bluetooth suggestion and press the validation key otherwise, the suggestion is not
selected.
1. Launch the application Settings .
2. Select Bluetooth.
3. Select a device from the list.
4. Follow the on-screen instructions to pair both devices. 15. Using WhatsApp
The WhatsApp application is installed by default on your phone.
14. Browsing on the Internet You can connect to WhatsApp to chat with your work colleagues or friends.
Use the default browser application to search on the Internet. WhatsApp is installed on your device as a default application but you
need to do an update the first time you use WhatsApp. Make sure
Open the application Browser from the menu. Once using the Browser your phone is connected to a Wi-Fi network, or check the use conditions of
application, use the navigation pad to move the cursor around on the screen. your mobile data to avoid money surcharge.
1. From the idle screen, select WhatsApp .
2. Press the validation key to enter the application.
3. You are redirected to the Downloads menu.4. Press the validation key to download the file. 4. Enter your Facebook credentials
5. Select Install. 5. Select Connect.
6. Wait until the end of the installation.
You are now connected to Facebook.
7. Select Open.
8. Accept the terms and conditions. Use the navigation pad to scroll through the page.
To use WhatsApp, you first need to connect to the WhatsApp server
with your account.
If you do not already have an account, you can create one with this procedure:
1. Choose your country and enter your phone number. 17. Switching to flight mode
2. The message appears indicating that your phone number must be You can switch to the airplane mode directly from the idle screen.
verified.
3. Enter the digital code you receive by SMS on your phone number. 1. Press and hold the red key for a moment. A menu appears.
This allows WhatsApp to verify that your phone number is assigned. 2. Select Flight mode.
4. Enter your WhatsApp name.
You can now invite friends to chat.
16. Using Facebook
The Facebook Lite application is installed on your device by default.
The application needs to be updated the first time you use it.
In order to use Facebook, you need to be connected to the Internet.
Make sure your phone is connected to a Wi-Fi network, or check the
use conditions of your mobile data to avoid money surcharge. You can also activate the Flight mode from the Settings:
1. From the idle screen, select Facebook Lite . 1. Launch the application Settings .
2. Press the validation key to enter the application. 2. Select Flight mode.
3. Use the navigation pad to move the mouse over the screen. Update 3. Use the switch to activate the Flight mode.
the application to continue.To customize the picture mode, use the navigation pad to access the side
menus. Use these menus to specifically customize the picture and the video
18. Using the camera modes.
There are two ways to use the camera: To see or watch your pictures and videos:
• Taking a picture
• Taking a video 1. Launch the application Gallery .
2. The application Gallery sorts the pictures depending on the type of
To take a picture or a video: the files. Select the file you want to display.
1. Launch the application Camera .
2. Once in the Camera menu, you have access to the following modes: You can also watch your videos directly from the application Videos.
a. Picture mode
19. Recording voices
b. Video mode Use the application Recorder to record voices during an important event, or
3. To switch from the picture to video mode and vice-versa, use the classes.
navigation pad.
To use the recorder:
To know on which mode you are under, check the icon in the settings
bar at the bottom of the screen. 1. Launch the application Recorder.
2. Select this icon and press the validation key to start recording.
Once in the Camera menu, press the upper left key to access the settings. You 3. The timer on screen indicates the recording's time length.
can then customize the camera by adding effects, enhancing the exposure a. Select this icon and press the validation key to stop
etc. recording for a moment. Press it again to start recording
The pop-up menu gives you access the following settings: again on the same file
b. Select this icon and press the validation key to stop
• Flash mode recording.
• Exposure 4. A notification appears. Select Save to keep the recording or
• Color effect Abandon to erase it without saving it.
• Scene mode
• White balance If you select Abandon, the recording is not saved. You cannot
• Anti-flicker recover it as it is immediately erased.Once you saved the recording, select this icon to see the list of your To transfer files from your device to a computer:
recording.
1. Connect your phone to a computer with a USB cable.
Select a recording in the list and press the validation key to listen to it. 2. A menu automatically opens on your phone. Select USB storage.
3. Navigate inside your phone memory directly from your computer.
20. Visualizing your pictures and videos 22. Transferring files from a computer
To visualize your pictures, open the Gallery application. to your device
1. Launch the application Gallery. It is possible to transfer files from your computer to your device.
2. The application Gallery sorts the pictures depending on the type of To do so:
the files. Select the file you want to display.
3. Select an image. 1. Connect the phone to the computer with a USB cable.
2. A menu automatically opens on your phone. Select USB storage.
To watch your videos: 3. On your computer, you can see that your phone is an external
1. Launch the application Videos. storage. You can access to the data inside your phone from your
2. Select the video you want to watch on the list. computer.
3. Press the validation key to watch it. 4. To add files to your phone's storage:
Under Windows:
21. Transferring pictures from your If your computer is running the Windows operating system:
phone to your computer 1. Open a window Windows Explorer.
2. In the Computer box, select the hard disk named after your phone.
3. Select the folder to which you want to add data.
You may want to keep your multimedia content on your computer rather Example: You want to add pictures / images to the
than on your device. memory of your phone. Select the folder Picture
and copy/paste your picture inside.
You can connect your phone to a trusted computer with a USB cable and
transfer the multimedia files from your phone to the computer. Always think of ejecting a device before unplugging it. Right-click on
the name of your device and select Eject.
When connecting your phone to a computer, this last considers your phone as
a hard drive. You can navigate inside your phone's storage from your
computer. Under OS X:If your computer is running the OS X operating system (Macintosh - Apple):
1. Double-click the icon name after your phone appearing on the
Desktop.
2. Select the folder to which you want to add data.
Example: You want to add pictures / images to the
memory of your phone. Select the folder Picture
and copy/paste your picture inside.
Always think of ejecting a device before unplugging it. Right-click on
the name of your device and select Eject.
To listen to music:
23. Listening to music 1. From the main screen, press the central key and select Music.
To adjust the volume while using an audio application, use the lock 2. Use the navigation pad to navigate through the following tabs:
key and the delete key . a. Artists
b. Albums
If you exist an audio application but are still listen to content through it, use
adjust the volume as explained in the note above. c. Songs
d. Playlists
You can also adjust the volume by opening the notification center. 3. Select a song and press the central key to read the song.
To do so:
1. From the idle screen, press the navigation arrow on top of the
navigation pad twice. 24. Listening to the radio
2. Select the volume scale and use the left and right navigation arrows To listen to the radio, use the application FM radio.
to edit the volume.
3. Once you are done adjusting the volume, press the red key . First, you need to plug in earphones. The plug is used as an antenna.
Once the earphones are plugged, you can choose a frequency for listening to
music. Use the navigation pad to get to the arrows at the bottom of the
screen.Options
Channels list 26. Setting an alarm
To set an alarm:
Add actual channel in the
Channels list 1. Launch the application Clock .
2. Use the navigation pad to navigate through the following tabs:
a. Alarm
Choose an FM frequence to b. World clock
listen to
c. Timer
The star on the right of the frequency allows you to add frequencies to your d. Stopwatch
Channel list. 3. Select the alarm tab.
4. Press the upper left key to display the pop-up menu.
Select the dots on the right-hand corner of the screen to access the
5. Select Add Alarm.
application options: 6. Select a time and press the validation key to create the alarm.
• Search: Search for channels You can customize an alarm by selecting it and pressing the upper left key.
• Speaker/Earphone: The sound gets through the speakers or
earphones.
• Record FM: Record a podcast you like to listen to it later.
To listen to your recorded podcasts, open the File manager 27. Adding an event in the Agenda
application. Choose the Phone storage and select the folder FM
recording. To add an event:
25. Adjusting the volume of the device 1.
2.
Launch the application Agenda .
Select a date and press the validation key to add an event
To adjust the volume while using an audio application, use the lock key 3. Name the event.
and the delete key . 4. Select Edit to add more information.
5. Select Done
The event is created, and the date is highlighted.28. Using the calculator
To use the Calculator:
1. Launch the application Calculator .
2. Use the keyboard to type the operation.
3. Use the navigation pad to select the operation:
If the operation is a sum: use the top arrow to select the + sign.
4. Once you are done typing your operation, press the validation key to
display the result.
If you make a mistake while typing the operation, use the upper left
key to erase the last figure you typed. 30. Product safety information
Please read this safety information before you use the device. Following the
warnings will help prevent injury to yourself or others and damage to your
device.
29. Using the device as a torch Additional safety warnings may be given for the operation of specific Apps on
your device, you should also follow these instructions.
1. From the main screen, press the validation key and select
FlashLight. Pictograms and Graphic Symbols
2. An image of a torch is displayed on the screen. Press the central key
to activate the torch.
Read the Safety & warranty information guide
Once the torch is activated, a ray of light appears on the screen.
Do not use while re-fuelling
Do not use hand-held while driving
This device may produce a bright or flashing lightWhen using the phone, make sure it is kept at least 10 mm away
Only use approved accessories
from your head or body
Do not dispose of in a fire
Product safety information
Small parts may cause a choking hazard RF Exposure
Your phone contains a radio transmitter and a receiver. When it is ON, it
Avoid contact with magnetic media receives and transmits RF energy. When you communicate with your phone,
the system handling your call controls the power level at which your phone
transmits.
This device may produce a loud sound
Specific Absorption Rate (SAR)
Keep away from pacemakers and other personal medical Your mobile device is a radio transmitter and receiver. It is designed not to
devices
exceed the limits for exposure to radio waves recommended by international
Keep away from pacemakers and other personal medical guidelines. These guidelines were developed by the independent scientific
devices organisation ICNIRP and include safety margins designed to assure the
protection of all persons, regardless of age and health.
Avoid contact with liquid, keep dry
The guidelines use a unit of measurement known as the Specific Absorption
Rate, or SAR. The SAR limit for mobile devices is 2 W/kg and the highest SAR
Switch off when instructed in hospitals and medical facilities value for this device when tested at the ear was 1.2 W/kg )1( and when tested
near the body (at a distance of 5 mm) the highest SAR value was 1.68 W/kg.)2(
Do not try to disassemble As mobile devices offer a range of functions, they can be used in other
positions, such as on the body as described in this user guide, see page [XX] for
more information.
Switch off when instructed in aircraft and airports
SAR is measured utilising the device’s highest transmitting power and where
Do not rely on this device for emergency supported with multiple simultaneous transmitters. The actual SAR of this
communications device while operating is typically well below that indicated above. This is due
to automatic changes to the power level of the device to ensure it only uses
Switch off in explosive environments the minimum power required to communicate with the network.)1(
The tests are carried out in accordance with [CENELEC EN50360] [IEC - Model : VFD 120 (Single SIM) or VFD 121 (Dual Sim)
62209-1].
complies with the essential requirements and other relevant provisions of
)2(
The tests are carried out in accordance with [CENELEC EN50566] [IEC Radio Equipment Directive (Directive 2014/53/EU) of the European
62209-2]. Parliament and of the Council.
The full text of the EU declaration of conformity is available at the following
internet address: http://vodafone.com/smarta9/ec-declaration
Body worn operation
By continuing to use this device, you indicate that you have read and agree to
To ensure compliance with RF exposure guidelines the phone must be used the following content:
with a minimum of 0.5 cm separation from the body .
In order to provide better service, this device will automatically check
Failure to observe these instructions could result in your RF exposure for/obtain software update information from Vodafone and its partners after
exceeding the relevant guideline limits and may use more power than connecting to the Internet. This process may use mobile data, and requires
necessary. access to your device’s unique identifier (IMEI/SN) and the service provider
Limiting exposure to radio frequency (RF) fields network ID (PLMN) to check whether your device needs to be updated.
For individuals concerned about limiting their exposure to RF fields, the World Note that neither Vodafone nor its partners will use the IMEI/SN information
Health Organisation (WHO) provides the following advice in Fact Sheet 193 for the purposes of personally identifying you, this is only used for
Electromagnetic fields and public health: mobile phones (October 2014). scheduling/managing software updates.
Precautionary measures: Present scientific information does not indicate the Distraction
need for any special precautions for the use of mobile phones. If individuals Using a mobile device to communicate listen to music or watch other media
are concerned, they might choose to limit their own or their children’s RF could potentially distract you from performing any activity which requires
exposure by limiting the length of calls, or using‘ hands-free ’devices to keep your full attention. It may also reduce your awareness of the environment
mobile phones away from the head and body. around you.
Further information on exposure to radio waves can be obtained from the Driving
WHO http://www.who.int/mediacentre/factsheets/fs193/en/
Full attention must be given to driving at all times in order to reduce the risk
Regulatory information of an accident. Using a phone while driving (even with a hands free kit) causes
The following safety approvals and notices apply in specific regions as noted. distraction and can lead to an accident. You must comply with local laws and
regulations restricting the use of mobile phones while driving.
Hereby, we declare that the following designated product:
Operating machineryFull attention must be given to operating the machinery in order to reduce •Please check local regulations for disposal of electronic products.
the risk of an accident.
Do not carry your phone in your back pocket as it could break when you sit
Walking and Cycling down.
Using a mobile device while walking or cycling will reduce concentration on Small Children
the environment around you and may increase your risk of an accident.
Do not leave your phone and its accessories within the reach of small children
Product Handling or allow them to play with it.
You alone are responsible for how you use your phone and any consequences They could hurt themselves or others, or may accidentally damage the
of its use. phone .
You must always switch off your phone wherever the use of a phone is Your phone contains small parts with sharp edges that may cause an injury or
prohibited. Use of your phone is subject to safety measures designed to which could become detached and create a choking hazard.
protect users and their environment.
Demagnetisation
•Always treat your phone and its accessories with care and keep it in a clean
and dust-free place. To avoid the risk of demagnetisation, do not allow electronic devices or
magnetic media close to your phone for a long time.
•Do not expose your phone or its accessories to open flames or lit tobacco
Avoid other magnetic sources as these may cause the internal magnetometer
products.
or other sensors to malfunction and provide incorrect data.
•Do not expose your phone or its accessories to liquid, moisture or high
Electrostatic discharge (ESD)
humidity.
Do not touch the SIM card’s metal connectors.
•Do not drop, throw or try to bend your phone or its accessories.
Power supply
•Do not use harsh chemicals, cleaning solvents, or aerosols to clean the
device or its accessories. Do not connect your device to the power supply or switch it on until
instructed to do so in the installation instructions.
•Do not paint your phone or its accessories.
Antenna
•Do not attempt to disassemble your phone or its accessories, only
authorised personnel must do so. Do not touch the antenna unnecessarily.
•Do not expose your phone or its accessories to extreme temperatures, Normal hand-held use position
minimum 10– and maximum +50 degrees Celsius.When placing or receiving a phone call, hold your phone to your ear, with the •Make use of the special features in the handset which minimise the number
bottom towards your mouth or as you would hold a conventional fixed line of buttons which have to be pressed, such as message templates and
phone. predictive text
•Take lots of breaks to stretch and relax
•If you continue to have discomfort stop using this device and consult your
doctor
Emergency Calls
This phone, like any wireless phone, operates using radio signals, which
cannot guarantee connection in all conditions. Therefore, you must never rely
solely on any wireless phone for emergency communications.
Loud Noise
This phone is capable of producing loud noises which may damage your
hearing. To prevent possible hearing damage, do not listen at high volume
levels for long periods. Exercise caution when holding your device near your
Air Bags
ear while the loudspeaker is in use.
Do not place a phone in the area near or over an air bag or in the air bag
MP3 and video player function
deployment area.
When listening to pre-recorded music or watching videos on your device, with
Store the phone safely before driving your vehicle.
headphones or earphones at high volumes, you run the risk of permanent
Seizures/Blackouts damage to your hearing. Even if you are used to listening to music at a high
volume and it seems acceptable to you, you still risk damaging your hearing.
This phone is capable of producing bright flashing lights.
Reduce the sound volume to a reasonable level and avoid using headphones
Repetitive Motion Injuries for an excessive period of time to avoid hearing damage.
To minimise the risk of repetitive strain injury (RSI), when Texting or playing Different headphones, earphones or ear buds may deliver a higher or lower
games with your phone: volume, at the same volume setting on your device. Always start at a low
•Do not grip the phone too tightly volume setting.
•Press the buttons or screen lightlyDo not listen to music or video with headphones while driving, riding, cycling Faulty and Damaged Products
or crossing the road.
Do not attempt to disassemble the phone or its accessory.
Prolonged periods of listening to music, playing games or using other content
Only qualified personnel should service or repair the phone or its accessory.
from your device, at high volume, may lead to hearing damage.
If your phone or its accessory has been submerged in water or other liquid,
Bright Light
punctured, or subjected to a severe fall, do not use it until you have taken it to
This phone is capable of producing flash of light or use as a torch, do not use it be checked at an authorised service centre.
too close to the eyes.
Battery Handling & Safety
Phone Heating
Always switch the device off and disconnect the charger before removing the
Your phone may become warm during charging and during normal use, do battery.
not use this phone if it is overheated (showing an overheating warning or feels
Only use the battery and charger supplied, or manufacturer approved
hot to touch).
replacements intended for use with your phone. Using other batteries and
Electrical Safety chargers could be dangerous.
Accessories Improper battery use may result in a fire, explosion, or other hazard. If you
believe the battery has been damaged, do not use the battery, take it to a
Use only approved accessories and chargers.
service centre for testing.
Do not connect with incompatible products or accessories.
Do not disassemble or short-circuit the battery. Accidental short-circuiting
Take care not to touch or allow metal objects, such as coins or key rings, to can occur if a metallic object such as a key, paper clip, or pen touches the
contact or short-circuit the battery terminals, charger, device charging point terminals of the battery.
or any electrical contacts on accessories.
Don't handle a damaged, smoking or leaking battery.
Do not touch your device with wet hands. Doing so may cause an electric
Do not allow the battery to get wet .
shock.
Do not puncture or crush the battery or allow it to be subjected to any
Do not touch the power cord with wet hands or disconnect the charger by
external pressure or force.
pulling the cord. Doing so may result in electrocution.
Interference
Connection to a Car
Care must be taken when using the phone in close proximity to personal
Seek professional advice when connecting a physical phone interface to the
medical devices, such as pacemakers and hearing aids.
vehicle electrical system.Pacemakers Consult the airline staff about the use of wireless devices on board the aircraft,
if your device offers a‘ flight mode ’this must be enabled prior to boarding an
Pacemaker manufacturers recommend that a minimum separation of 15 cm
aircraft.
be maintained between a mobile phone and a pacemaker to avoid potential
interference with the pacemaker. To achieve this use the phone on the Interference in cars
opposite ear to your pacemaker and do not carry it in a breast pocket.
Please note that because of possible interference to electronic equipment,
Hearing Aids some vehicle manufacturers forbid the use of mobile phones in their vehicles
unless a handsfree kit with an external antenna is included in the installation.
People with hearing aids or other cochlear implants may experience
interfering noises when using wireless devices or when one is nearby. Explosive environments
The level of interference will depend on the type of hearing device and the Petrol stations and explosive atmospheres
distance from the interference source, increasing the separation between
In locations with potentially explosive atmospheres, obey all posted signs to
them may reduce the interference. You may also consult your hearing aid
turn off wireless devices such as your phone or other radio equipment.
manufacturer to discuss alternatives.
Medical devices Areas with potentially explosive atmospheres include fuelling areas, below
decks on boats, fuel or chemical transfer or storage facilities, areas where the
Please consult your doctor and the device manufacturer to determine if air contains chemicals or particles, such as grain, dust, or metal powders.
operation of your phone may interfere with the operation of your medical
Blasting Caps and Areas
device.
Turn off your mobile phone or wireless device when in a blasting area or in
areas posted turn off“ two-way radios ”or“ electronic devices ”to avoid
interfering with blasting operations.
Hospitals Disposal and Recycling
Switch off your wireless device when requested to do so in hospitals, clinics or To dispose of or recycle your device in a safe and appropriate manner, contact
health care facilities. These requests are designed to prevent possible your Customer Services centre for information.
interference with sensitive medical equipment.
Protection against theft)3(
Aircraft
Your telephone is identified by an IMEI (phone serial number) shown on the
Switch off your wireless device whenever you are instructed to do so by packaging label and in the product’s memory. We recommend that you note
airport or airline staff. the number the first time you use your telephone by entering *#06# and
keep it in a safe place .It may be requested by the police or your operator ifyour telephone is stolen. This number allows your mobile telephone to be Licences
blocked preventing a third person from using it, even with a different SIM
microSD Logo is a trademark.
card .
This symbol on your telephone, the battery and the accessories means that
these products must be taken to collection points at the end of their life: The Bluetooth word mark and logos are owned by the Bluetooth SIG, Inc. and
any use of such marks by MobiWire and its affiliates is under license .
-Municipal waste disposal centres with specific bins for these items of
equipment. Other trademarks and trade names are those of their respective owners.
-Collection bins at points of sale. VFD 120
They will then be recycled, preventing substances being disposed of in the Bluetooth Declaration ID D035103
environment, so that their components can be reused.
The Wi-Fi Logo is a certification mark of the Wi-Fi Alliance.
)3(
Contact your network operator for service availability.
This equipment may be operated in all European countries.
In European Union countries:
General information
These collection points are accessible free of charge.
You have purchased a product which uses the open source
All products with this sign must be brought to these collection points. (http://opensource.org/) programs mtd, msdosfs, netfilter/iptables and initrd
in object code and other open source programs licensed under the GNU
In non European Union jurisdictions:
General Public License and Apache License.
Items of equipment with this symbol are not to be thrown into ordinary bins if
We will provide you with a complete copy of the corresponding source codes
your jurisdiction or your region has suitable recycling and collection facilities;
upon request within a period of three years from the distribution of the
instead they are to be taken to collection points for them to be recycled.
product from the below mentioned address in chapter Notice.
CAUTION :RISK OF EXPLOSION IF BATTERY IS REPLACED BY AN INCORRECT
You may download the source codes from
TYPE. DISPOSE OF USED BATTERIES ACCORDING TO THE INSTRUCTIONS.
https://sourceforge.net/projects/sagereal/files/Vodafone/VFD120/
If the battery cover is removed please avoid contact to the antennas and the
antenna contacts which can contain Nickel. People allergic or sensitive to this The provision of the source code is free of charge from internet.
metal should avoid contact at all times. This radio equipment operates with the following frequency bands and
maximum radio-frequency power:Operating Frequency Band (RF): GSM 1900: PCL = 0, PWR = 29.0 dbm ± 1 dBm(1up, 1down for gprs test)
GSM 850: 824–849 MHz (TX), WCDMA2100: PWR = 22 ± 0.5 dBm
869–894 MHz (RX) WCDMA 900: PWR = 22 ± 0.5 dBm
EGSM 900: 880–915 MHz (TX), Bluetooth: 7dBm+/-1 dBm (Basic Rate)
925–960 MHz(RX) BLE: -3 dbm+/-1 dbm (BLE)
DCS 1800: 1710–1785 MHz (TX), Wi-Fi:
1805–1880 MHz (RX) 802.11b: max14 dBm+/-1 dB
PCS 1900: 1850–1910 MHz (TX), 802.11g: max 13 dBm +/-1 dB
1930–1990 MHz (RX) 802.11n(20): max 11 dBm +/-1 dB
WCDMA 2100: 1920-1980 MHz (TX), 802.11n(40): max 11 dBm+/-1 dB
2110-2170 MHz (TX) GPS: no TX
WCDMA 900:880–915 MHz(TX),
925–960 MHz (RX) The description of accessories and components, including software, which
allow the radio equipment to operate as intended, can be found in the user
Bluetooth: 2402-2480 MHz (TX/RX)
manual available at the following internet address:
WIFI : 2412-2472 M (TX/RX)
http://vodafone.com/smarta9
GPS : 1575.42 M(RX)
Notice
FM : 87.5-108 MHz
The information in this manual is subject to change without notice.
Max. Of Transmit power:
Every effort has been made in the preparation of this manual to ensure
GSM 850: PCL = 5, PWR = 32.0 dbm ± 0.5 dBm(1up, 1down for gprs test) accuracy of the contents, but all statements, information, and
recommendations in this manual do not constitute a warranty of any kind,
GSM 900: PCL = 5, PWR = 32.0 dbm ± 0.5 dBm(1up, 1down for gprs test) expressed or implied. Read the safety precautions and safety information
GSM 1800: PCL = 0, PWR = 29.0 dbm ± 1 dBm(1up, 1down for gprs test)carefully to ensure that you use this wireless device in a correct and safe g) Scratches or damage to plastic surfaces and all other externally
manner. exposed parts that are due to normal customer use;
4) The phone needing service/repair must be delivered at the user’s cost.
5) This warranty will be null and void in any of the following events:
a) If the serial number or warranty seal on the equipment has been
Importer and manufacturer: Vodafone defaced or removed.
Registered trade mark : b) If any term contained in this warranty has been altered or modified in
any way without prior written consent of Vodafone.
Address: Vodafone S.à r.l., 15 rue Edward Steichen, L-2540 Luxembourg, 6) The limited warranty extends only to customer who purchase the product
Grand-Duché de Luxembourg in one of the countries (or areas) set forth at the end of this document.
The limited warranty is only valid in Vodafone’s intended country (or area)
31. WARRANTY INFORMATION of sale of the Product.
7) If the product is returned to Vodafone after the expiration of the warranty
WARRANTY TERMS AND CONDITIONS period, Vodafone’s normal service policies shall apply and the Consumer
1) Vodafone undertakes the warranty of this Mobile Phone for a period of will be charged accordingly.
one (1) year from the date of Purchase by the original owner (not a) Vodafone neither assumes for it any other obligation or liability
transferable) under normal use. beyond that which is expressly provided for in this limited warranty.
2) The Battery has a limited warranty for twelve (12) months, and Charger for b) All warranty information, product features and specifications are
twelve (12) months against manufacturing defects. Other accessories subject to change without notice.
have a limited warranty for twelve (12) months against manufacturing 8) THIS WARRANTY IS IN LIEU OF ANY AND OTHER WARRANTIES
defects. EXPRESSED OR IMPLIED, SPECIFICALLY INCLUDING ANY
3) This Warranty does not cover damage resulting from: i) IMPLIED WARRANTY OF MERCHANTABILlTY OR FITNESS FOR A
a) Normal wear & tear of the equipment; PARTICULAR PURPOSE. VODAFONE ASSUMES NO LIABILITY FOR
b) Defects and damages due to the equipment being used other than its THE BREACH OF THE WARRANTY BEYOND CORRECTING THE
normal and customary manner; BREACH IN THE MANNER DESCRIBED ABOVE. IN NO EVENT
c) An unauthorised disassembly, repair, alteration or modification being SHALL VODAFONE BE LIABLE FOR CONSEQUENCES.
carried out;
d) Misuse, abuse, negligence or accident howsoever caused;
e) Defects or damage arising from improper testing, operation,
maintenance, installation, or any alteration or modification;
f) Defects or damage due to spillage of food or liquids, corrosion, rust or
the use of wrong voltage;32. Specifications Specifications are subject to change without prior notice.
Processor DualCore @1.2GHz Cortex-A7
The latest Vodafone Feature phone offers a built-in handsfree feature that
Platform Platform MT6572A DualCore
allows you to use the telephone from a distance, placed on a table for
@1.3GHz
Memory 512MB ROM + 256MB RAM example. For those who prefer to keep their conversations confidential, an
Dimensions (LxWxT) (L*W*H): Dimensions earpiece is also available known as the headset.
119.4*50.0*11.8mm
Weight Around 79 grams with battery
Display 2.4” QVGA (320*240) - TFT TN 1. Vodafone Smart A9
Network GSM-GPRS- 2. Charger
EDGE: 850/900/1800/1900 3. Mono Headset
UMTS: 900/2100 - 4. Quick Start Guide
21/5,76MbpsUMTS: 5. Safety and Warranty information
Bluetooth: 4.0 + HS & LE
GPS Assisted GPS/Internal GPS antenna Only use your telephone with the batteries, chargers and
Connectivity Bluetooth Smart (BT v4.0) accessories in your box.
WiFi: 802.11 b/g/n - 2.4GHz
3.5 mm audio jack
USB: 2.0 HS (Plug 5-Pin Micro-B
USB)
Camera 2.0MPx FF
Audio supported formats WAV, MP3, MP2, AAC, AMR-NB, AMR-
WB, MIDI,Vorbis, APE, AAC-plus v1,
AAC-plus v2, FLAC, WMA, ADPCM
Video supported formats MP3/MPEG4/H.264
Battery 1000mAh Li-Ion 4.2V
Expansion Slot microSD memory card slot
(Capacity up to 128GB)
Special Features FM radioYou can also read