User Guide for eToken - RTE 3.65 January 2006
←
→
Page content transcription
If your browser does not render page correctly, please read the page content below
User Guide for eToken
             RTE 3.65
             January 2006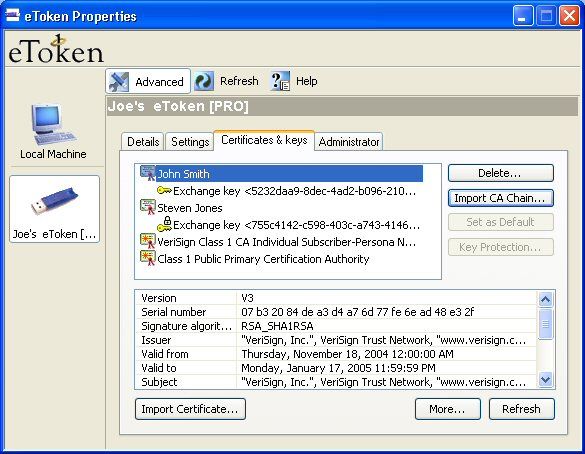
Contact Information
Support
If you have any questions regarding this package, its
documentation and content or how to obtain a valid software
license you may contact your local reseller or Aladdin's technical
support team:

Country / Region                   Telephone
USA                                1-212-329-6658
                                   1-800-223-3494
EUROPE:                            00800-22523346
Austria, Belgium, France,
Germany, Netherlands,
Spain, Switzerland, UK
Ireland                            0011800-22523346
Rest of the World                  +972-3-6362266 ext 2

If you want to write to the eToken Technical Support department,
please go to the following web page:
http://www.Aladdin.com/forms/eToken_question/form.asp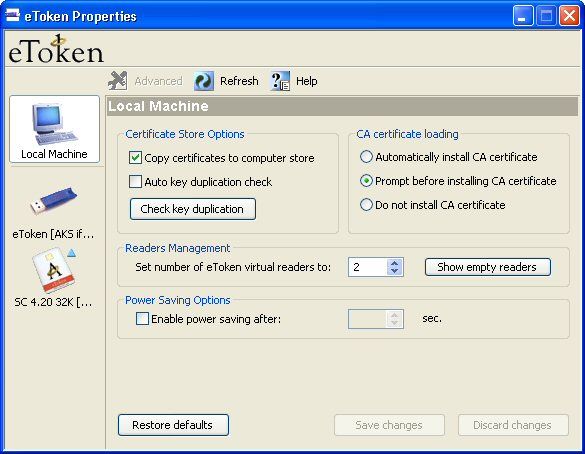
i

                           COPYRIGHTS AND TRADEMARKS
             ™
The eToken     system and its documentation are copyrighted © 1985 to present, by
Aladdin Knowledge Systems Ltd.
All rights reserved.
       ™
eToken is a trademark and ALADDIN KNOWLEDGE SYSTEMS LTD is a registered trademark of
Aladdin Knowledge Systems Ltd.
All other trademarks, brands, and product names used in this guide are trademarks of their
respective owners.
This manual and the information contained herein are confidential and proprietary to Aladdin
Knowledge Systems Ltd. (hereinafter “Aladdin”). All intellectual property rights (including,
without limitation, copyrights, trade secrets, trademarks, etc.) evidenced by or embodied in
and/or attached/connected/related to this manual, information contained herein and the
Product, are and shall be owned solely by Aladdin. Aladdin does not convey to you an interest
in or to this manual, information contained herein and the Product, but only a limited right of
use. Any unauthorized use, disclosure or reproduction is a violation of the licenses and/or
Aladdin's proprietary rights and will be prosecuted to the full extent of the Law.

                                           NOTICE

All attempts have been made to make the information in this document complete and accurate.
Aladdin is not responsible for any direct or indirect damages or loss of business resulting from
inaccuracies or omissions. The specifications in this document are subject to change without
notice.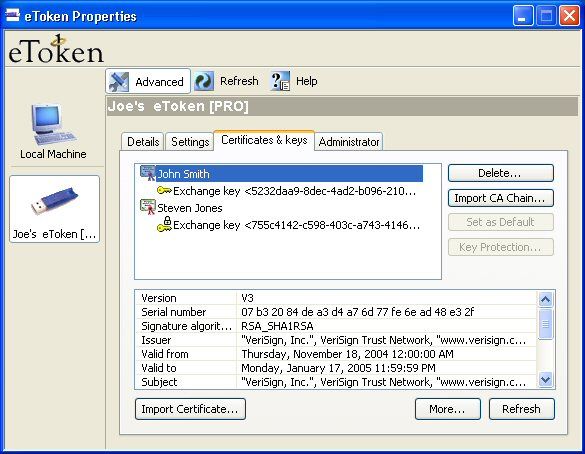
ii

                             ALADDIN KNOWLEDGE SYSTEMS LTD.

                   eTOKEN ENTERPRISE END USER LICENSE AGREEMENT

     IMPORTANT INFORMATION - PLEASE READ THIS AGREEMENT CAREFULLY BEFORE OPENING
     THE PACKAGE AND/OR USING THE CONTENTS THEREOF AND/OR BEFORE DOWNLOADING OR
     INSTALLING THE SOFTWARE PROGRAM. ALL ORDERS FOR AND USE OF THE eTOKEN
     ENTERPRISE PRODUCTS (including without limitation, libraries, utilities, diskettes, CD-ROM,
     eToken™ keys and the accompanying technical documentation) (hereinafter “Product”)
     SUPPLIED BY ALADDIN KNOWLEDGE SYSTEMS LTD. (or any of its affiliates - either of them
     referred to as “ALADDIN”) ARE AND SHALL BE, SUBJECT TO THE TERMS AND CONDITIONS SET
     FORTH IN THIS AGREEMENT. BY OPENING THE PACKAGE CONTAINING THE PRODUCTS
     AND/OR BY DOWNLOADING THE SOFTWARE (as defined hereunder) AND/OR BY INSTALLING
     THE SOFTWARE ON YOUR COMPUTER AND/OR BY USING THE PRODUCT, YOU ARE ACCEPTING
     THIS AGREEMENT AND AGREEING TO BE BOUND BY ITS TERMS AND CONDITIONS.

           IF YOU DO NOT AGREE TO THIS AGREEMENT DO NOT OPEN THE PACKAGE
     AND/OR DOWNLOAD AND/OR INSTALL THE SOFTWARE AND PROMPTLY (within 7
     days from the date you received this package) RETURN THE PRODUCTS WITH THE
     ORIGINAL PACKAGE AND THE PROOF OF PAYMENT TO ALADDIN, ERASE THE
     SOFTWARE, AND ANY PART THEREOF, FROM YOUR COMPUTER AND DO NOT USE IT IN
     ANY MANNER WHATSOEVER.

     1. Title & Ownership. The object code version of the software component of Aladdin’s eToken
        Enterprise Product, including any revisions, corrections, modifications, enhancements,
        updates and/or upgrades thereto about to be installed by you, (hereinafter in whole or any
        part thereof defined as: "Software"), and the related documentation, ARE NOT FOR SALE
        and are and shall remain in Aladdin’s sole property. All intellectual property rights
        (including, without limitation, copyrights, trade secrets, trademarks, etc.) evidenced by or
        embodied in and/or attached/connected/related to the Product, are and shall be owned
        solely by Aladdin. This Agreement does not convey to you an interest in or to the Software,
        but only a limited right of use revocable in accordance with the terms of this Agreement.
        Nothing in this Agreement constitutes a waiver of Aladdin’s intellectual property rights under
        any law.

     2. License. Subject to payment of applicable fees, Aladdin hereby grants to you, and you
        accept, a personal, nonexclusive and fully revocable limited License to use the Software, in
        executable form only, as described in the Software accompanying technical documentation
        and only according to the terms of this Agreement: (i) you may install the Software and use
        it on computers located in your place of business, as described in Aladdin’s related
        documentation; and (ii) you may merge and link the Software into your computer programs
        for the sole purpose described in the accompanying technical guide provided by Aladdin
        (“Technical Guide”).

     3. Prohibited Uses. The Product must be used and maintained in strict compliance with the
        instruction and safety precautions of Aladdin contained herein, in all supplements thereto
        and in any other written documents of Aladdin. Except as specifically permitted in Sections 1
        and 2 above, you agree not to (i) use, modify, merge or sub-license the Software or any
        other of Aladdin’s Products, except as expressly authorized in this Agreement and in the
        Technical Guide; and (ii) sell, license (or sub-license), lease, assign, transfer, pledge, or
        share your rights under this License with/to anyone else; and (iii) modify, disassemble,
        decompile, reverse engineer, revise or enhance the Software or attempt to discover the
        Software’s source code; and (iv) place the Software onto a server so that it is accessible via
        a public network; and (v) use any back-up or archival copies of the Software (or allow
        someone else to use such copies) for any purpose other that to replace an original copy if it
        is destroyed or becomes defective. If you are a member of the European Union, this
        agreement does not affect your rights under any legislation implementing the EC Council
        Directive on the Legal Protection of Computer Programs. If you seek any information within
        the meaning of that Directive you should initially approach Aladdin.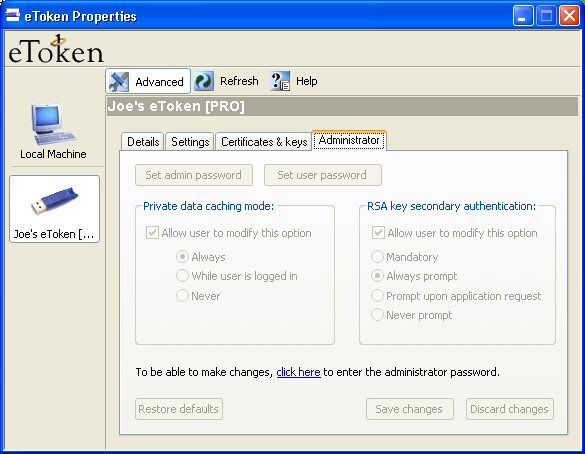
iii

4. Maintenance and Support. Aladdin has no obligation to provide support, maintenance,
   upgrades, modifications, or new releases under this Agreement.

5. Limited Warranty. Aladdin warrants, for your benefit alone, that (i) the Software, when
   and as delivered to you, and for a period of three (3) months after the date of delivery to
   you, will perform in substantial compliance with the Technical Guide, provided that it is used
   on the computer hardware and with the operating system for which it was designed; and (ii)
   that the eToken™ key, for a period of twelve (12) months after the date of delivery to you,
   will be substantially free from significant defects in materials and workmanship.

6. Warranty Disclaimer. ALADDIN DOES NOT WARRANT THAT ANY OF ITS PRODUCT(S)
   WILL MEET YOUR REQUIREMENTS OR THAT ITS OPERATION WILL BE UNINTERRUPTED OR
   ERROR-FREE. TO THE EXTENT ALLOWED BY LAW, ALADDIN EXPRESSLY DISCLAIMS ALL
   EXPRESS WARRANTIES NOT STATED HEREIN AND ALL IMPLIED WARRANTIES, INCLUDING,
   BUT NOT LIMITED TO, THE IMPLIED WARRANTIES OF MERCHANTABILITY AND FITNESS FOR
   A PARTICULAR PURPOSE. NO ALADDIN’S DEALER, DISTRIBUTOR, RESELLER, AGENT OR
   EMPLOYEE IS AUTHORIZED TO MAKE ANY MODIFICATIONS, EXTENSIONS, OR ADDITIONS
   TO THIS WARRANTY. If any modifications are made to the Software or to any other part of
   the Product by you during the warranty period; if the media and the eToken™ key is
   subjected to accident, abuse, or improper use; the Product has not been properly installed,
   operated, repaired or maintained in accordance with the instructions supplied by Aladdin;
   the Product has been subjected to abnormal physical or electrical stress, negligence or
   accident; or if you violate any of the terms of this Agreement, then the warranty in Section
   5 above, shall immediately be terminated. The warranty shall not apply if the Software is
   used on or in conjunction with hardware or program other than the unmodified version of
   hardware and program with which the Software was designed to be used as described in the
   Technical Guide.

7. Limitation of Remedies. In the event of a breach of this warranty, Aladdin's sole
   obligation shall be, at Aladdin's sole discretion: (i) to replace or repair the Product, or
   component thereof, that does not meet the foregoing limited warranty, free of charge; (ii)
   to refund the price paid by you for the Product, or component thereof. Any replacement or
   repaired component will be warranted for the remainder of the original warranty period or
   30 days, whichever is longer. Warranty claims must be made in writing during the warranty
   period and within seven (7) days of the observation of the defect accompanied by evidence
   satisfactory to Aladdin. All Products should be returned to the distributor from which they
   were purchased (if not purchased directly from Aladdin) and shall be shipped by the
   returning party with freight and insurance paid. The Product or component thereof must be
   returned with a copy of your receipt.

8. Exclusion Of Consequential Damages. The parties acknowledge that Product is
   inherently complex and may not be completely free of errors. ALADDIN SHALL NOT BE
   LIABLE (WHETHER UNDER CONTRACT, TORT (INCLUDING NEGLIGENCE) OR OTHERWISE)
   TO YOU, OR ANY THIRD PARTY FOR ANY LOSS OR DAMAGE (INCLUDING INDIRECT,
   SPECIAL OR CONSEQUENTIAL DAMAGES), INCLUDING, WITHOUT LIMITATION, ANY LOSS
   OR DAMAGE TO BUSINESS EARNINGS, LOST PROFITS OR GOODWILL AND LOST OR
   DAMAGED DATA OR DOCUMENTATION, SUFFERED BY ANY PERSON, ARISING FROM
   AND/OR RELATED WITH AND/OR CONNECTED TO DELIVERY, INSTALLATION, USE OR
   PERFORMANCE OF THE PRODUCT AND/OR ANY COMPONENT OF THE PRODUCT, EVEN IF
   ALADDIN IS ADVISED OF THE POSSIBILITY OF SUCH DAMAGES.

9. Limitation Of Liability. IN THE EVENT THAT, NOTWITHSTANDING THE TERMS OF THIS
   AGREEMENT, ALADDIN IS FOUND LIABLE FOR DAMAGES BASED ON ANY DEFECT OR
   NONCONFORMITY OF ITS PRODUCT(S), ITS TOTAL LIABILITY FOR EACH DEFECTIVE
   PRODUCT SHALL NOT EXCEED THE PRICE PAID TO ALADDIN FOR SUCH PRODUCT.

10. Termination. Your failure to comply with the terms of this Agreement shall terminate your
    license and this Agreement. Upon termination of this Agreement: (i) the License granted to
    you in this Agreement shall expire and you, upon termination, shall discontinue all further
iv

        use of the Software and other licensed Product(s); and (ii) you shall promptly return to
        Aladdin all tangible property representing Aladdin’s intellectual property rights and all copies
        thereof and/or shall erase/delete any such information held by it in electronic form. Sections
        1, 3, 6-11 shall survive any termination of this Agreement.

     11. Governing Law & Jurisdiction. This Agreement shall be construed and governed in
         accordance with the laws of Israel (except for conflict of law provisions) and only the courts
         in Israel shall have jurisdiction in any conflict or dispute arising out of this Agreement. The
         application of the United Nations Convention of Contracts for the International Sale of Goods
         is expressly excluded. The failure of either party to enforce any rights granted hereunder or
         to take action against the other party in the event of any breach hereunder shall not be
         deemed a waiver by that party as to subsequent enforcement of rights or subsequent
         actions in the event of future breaches.

     12. Government Regulation and Export Control. You agree that the Product will not be
         shipped, transferred, or exported into any country or used in any manner prohibited by
         applicable law. It is stipulated that the Product is subject to certain export control laws,
         rules, and/or regulations, including, without limiting the foregoing, to the United States
         and/or Israeli export control laws, rules, and/or regulations. You undertake to comply in all
         respects with the export and re-export restriction as set forth herein and any update made
         thereto from time to time.

     13. Third Party Software. Product contains third party software, as set forth in Exhibit A. Such
         third party’s software is provided “As Is” and use of such software shall be governed by the
         terms and conditions as set forth in Exhibit A. If the Product contains any software provided
         by third parties other than the software noted in Exhibit A, such third party’s software are
         provided “As Is” and shall be subject to the terms of the provisions and condition set forth
         in the agreements contained/attached to such software. In the event such agreements are
         not available, such third party software shall be provided “As Is” without any warranty of
         any kind and Sections 2, 3, 6, 8, 9-12 of this Agreement shall apply to all such third party
         software providers and third party software as if they were Aladdin and the Product
         respectively.

     14. Miscellaneous. This Agreement represents the complete agreement concerning this
         License and may be amended only by a written agreement executed by both parties. If any
         provision of this Agreement is held to be unenforceable, such provision shall be reformed
         only to the extent necessary to make it enforceable.

     I HAVE READ AND UNDERSTOOD THIS AGREEMENT AND AGREE TO BE BOUND BY ALL
     OF THE TERMS.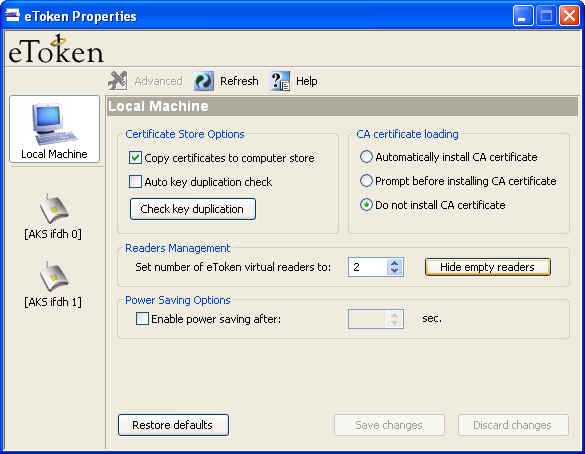
v

Exhibit A

A.      Notices.
        I.         Product has incorporated source code licensed under the Mozilla Public
                   License (“MPL”).
        II.        MPL is available at http://www.mozilla.org/MPL/
The MPL License, version 1.1, Copyright © 1998-2004 The Mozilla Organization.
        III.       The        source       code         is      freely     available       from:
                   http://lxr.mozilla.org/mozilla/source/security/nss/cmd/modutil/modutil.c/
        IV.        “Covered Code” means: source code governed by the MPL.

B.      DISCLAIMER OF WARRANTY.
COVERED CODE IS PROVIDED UNDER THIS LICENSE ON AN "AS IS'' BASIS, WITHOUT
WARRANTY OF ANY KIND, EITHER EXPRESSED OR IMPLIED, INCLUDING, WITHOUT
LIMITATION, WARRANTIES THAT THE COVERED CODE IS FREE OF DEFECTS, MERCHANTABLE,
FIT FOR A PARTICULAR PURPOSE OR NON-INFRINGING. THE ENTIRE RISK AS TO THE QUALITY
AND PERFORMANCE OF THE COVERED CODE IS WITH YOU. SHOULD ANY COVERED CODE
PROVE DEFECTIVE IN ANY RESPECT, YOU (NOT THE INITIAL DEVELOPER OR ANY OTHER
CONTRIBUTOR) ASSUME THE COST OF ANY NECESSARY SERVICING, REPAIR OR CORRECTION.
THIS DISCLAIMER OF WARRANTY CONSTITUTES AN ESSENTIAL PART OF THIS LICENSE. NO
USE OF ANY COVERED CODE IS AUTHORIZED HEREUNDER EXCEPT UNDER THIS DISCLAIMER.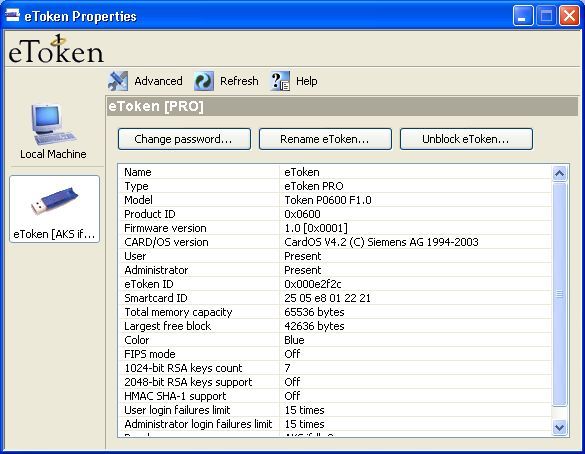
vi

     FCC Compliance

     eToken USB has been tested and found to comply with the limits for a Class B digital device,
     pursuant to Part 15 of the FCC rules. These limits are designed to provide reasonable protection
     against harmful interference in a residential installation.
     This equipment generates, uses and can radiate radio frequency energy and, if not installed and
     used in accordance with the instructions, may cause harmful interference to radio
     communications. However, there is no guarantee that interference will not occur in a particular
     installation.
     If this equipment does cause harmful interference to radio or television reception, which can be
     determined by turning the equipment off and on, the user is encouraged to try to correct the
     interference by one of the following measures:
     a.Reorient or relocate the receiving antenna.
     b.Increase the separation between the equipment and receiver.
     c. Connect the equipment to an outlet on a circuit different from that to which the receiver is
        connected.
     d.Consult the dealer or an experienced radio/TV technician.

     FCC Warning
     Modifications not expressly approved by the manufacturer could void the user authority to
     operate the equipment under FCC rules.
     All of the above applies also to the eToken USB.
     FCC authorities have determined that the rest of the eToken product line does not contain a
     Class B Computing Device Peripheral and therefore does not require FCC regulation.

     CE Compliance

                     The eToken product line complies with the CE EMC Directive and related
                    standards*. eToken products are marked with the CE logo and an eToken CE
                    conformity card is included in every shipment or upon demand.
                    *EMC directive 89/336/EEC and related standards EN 55022, EN 50082-1.

     UL Certification

     The eToken product line successfully completed UL 94 Tests for Flammability of Plastic Materials
     for Parts in Devices and Appliances. eToken products comply with UL 1950 Safety of
     Information Technology Equipment regulations.

                   ISO 9002 Certification

                    The eToken product line is designed and manufactured by Aladdin Knowledge
                   Systems, an ISO 9002-certified company. Aladdin's quality assurance system is
                   approved by the International Organization for Standardization (ISO), ensuring
                   that Aladdin products and customer service standards consistently meet
                   specifications in order to provide outstanding customer satisfaction.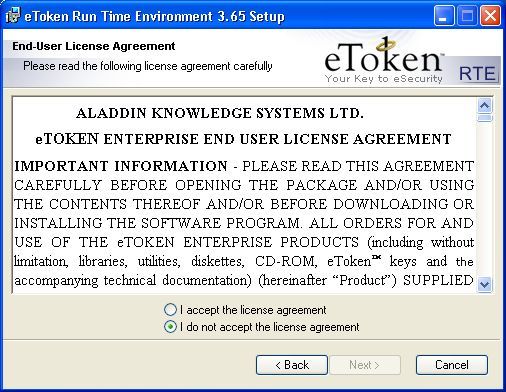
vii

Certificate of Compliance

Upon request, Aladdin Knowledge Systems will supply a Certificate of Compliance to any
software developer who wishes to demonstrate that the eToken product line conforms to the
specifications stated. Software developers can distribute this certificate to the end user along
with their programs.
viii
ix

                                                               Table of Contents
Chapter 1........................................................................................ 1
  Overview .....................................................................................................................1
  RTE Overview .............................................................................................................2
  What’s New in eToken RTE 3.65...............................................................................3
  Minimum Requirements ............................................................................................4

Chapter 2........................................................................................ 5
  Getting Started ...........................................................................................................5
  Installing the eToken RTE .........................................................................................6
  Connecting the eToken Extension Cable ..............................................................10
  Enabling your eToken .............................................................................................12
     Starting eToken Properties ....................................................................................12

Chapter 3...................................................................................... 15
  eToken Properties....................................................................................................15
  Local Machine Configuration Options ...................................................................16
     Certificate Store Options........................................................................................17
     CA Certificate Loading...........................................................................................19
     Readers Management ...........................................................................................20
     Power Saving Options ...........................................................................................21
     General Control Buttons ........................................................................................22
  eToken Configuration Options ...............................................................................23
  Basic eToken Properties .........................................................................................23
     Changing the eToken Password............................................................................26
     Renaming the eToken ...........................................................................................28
     Unblocking the eToken ..........................................................................................29
  Advanced eToken Properties .................................................................................33
     Details tab ..............................................................................................................34
     Settings tab ............................................................................................................35
     Certificates & Keys tab ..........................................................................................38
     Administrator tab....................................................................................................47
x
Overview
                                                                  1
                                                     CHAPTER 1

                                         Chapter 1

                                                Overview

This chapter provides an overview of eToken's new features and
details the minimum hardware and software requirements for
using eToken.

 About This Chapter

This chapter contains the following sections:
♦ “RTE Overview”, on page 2, provides a brief explanation of
  what the RTE does and solutions provided.
♦ “What’s New in eToken RTE 3.65”, on page 2, details the new
  features in RTE 3.65.
♦ “Minimum Requirements”, on page 4, lists the hardware,
  software and operating system requirements for using
  eToken.
eToken RTE 3.65 User Guide
2
RTE Overview
The eToken Run Time Environment (RTE) installs all the
necessary files and eToken drivers to support eToken integration
with various security applications. It enables Windows operating
systems and third party applications to access the eToken.
Installing the RTE allows communication with all available eToken
devices and forms the basis for Aladdin’s various security
solutions. These include eToken PKI solutions using either
PKCS#11 or CAPI, proprietary eToken applications such as WSO
(Web Sign-On), SSO (Simple Sign-On), eToken for Network
Logon and management solutions like eToken TMS – a Token
Management System that is a complete framework for managing
all aspects of token assignment, deployment and personalization
within an organization.
Aladdin’s eToken PKI Solutions enable the implementation of
strong two-factor authentication using standard certificates.
Generic integration with both Microsoft CAPI and PKCS#11
security interfaces enables interoperability with a variety of
security application such As Web Access, VPN Access, Network
Logon, PC Protection and Secure eMail. PKI keys and certificates
can be securely created, stored and used from within the eToken.
When used with eToken PRO / Smartcard or eToken NG-OTP,
the PKI Private keys are generated and operate on board the
secure chip.
eToken RTE supports the various types of eToken devices in
both form factors. This means that only a single RTE installation
is required to enable operations of either a traditional Smartcard
or a USB Token (PRO, NG-OTP or R2), and results in easy
deployment and cost effective installation in use of eToken
products and solutions.
eToken RTE can be deployed and updated using any standard
software distribution system such as SMS. In addition, the
eToken Management System (TMS) supports software
distribution using the Microsoft GPO system.Overview
3
CHAPTER 1
What’s New in eToken RTE 3.65
The eToken RTE 3.65 is enhanced with new features and
additional functionality from previous versions of the eToken RTE.
In addition to increased speed and better usability, the Token
RTE 3.65:
♦ Provides support for new tokens:
• eToken devices with the CardOS 4.20B and 4.30B
operating systems. These will include versions of the
eToken PRO (32K and 64K) and eToken NG-OTP (32K
and 64K).
These new tokens provide the user with better
performance, more EEPROM and support for RSA
2048-bit cryptography.
♦ Provides better support in CAPI-enabled applications for keys
and certificates that were created by PKCS#11-enabled
applications.
♦ Provides better integration of PKCS#11 keys through CAPI.eToken RTE 3.65 User Guide
4
Minimum Requirements
The following are the minimum requirements for using eToken:
♦ PC with at least 10 MB disk space.
♦ Windows 2000 (with Service Pack 4 or later installed) or
Windows XP with full functionality of all new features.
♦ Windows 98, Windows NT 4.0 (with Service Pack 6 or later
installed), Windows Me.
♦ Microsoft Windows Installer (MSI) 1.1 or later.
Internet Explorer 5.0 or later. MSI 1.1 is included with all
installations of Windows 2000, Windows Me and Windows XP.
For details, please see: www.Aladdin.com/etoken
♦ At least one USB port, with USB support enabled in the BIOS.
NOTE:
Additional software may be required for individual eToken solutions.
For more information, please refer to www.Aladdin.com/etoken.Getting Started
5
CHAPTER 2
Chapter 2
Getting Started
This chapter provides the basic information that you need in order
to start using eToken, and gives detailed instructions for installing
and using eToken for the first time.
About This Chapter
This chapter contains the following sections:
♦ “Installing the eToken RTE”, on page 6, explains how to install
the eToken runtime environment.
♦ “Connecting the eToken Extension Cable”, on page 10,
describes how the extension cable enables easy access to
the USB port for insertion and removal of the eToken.
♦ “Enabling your eToken”, on page 12, describes how to enable
the eToken the first time it is used with the RTE, and details
the basic eToken properties.eToken RTE 3.65 User Guide
6
Installing the eToken RTE
The eToken runtime environment (RTE) includes all the
necessary files and drivers to support eToken integration. It also
includes the eToken Properties facility, which enables easy user
management of the eToken password and name.
The eToken RTE (version 3.65) must be installed on each
computer on which eToken is to be used.
¾ To install the eToken RTE:
1 Close all currently opened applications.
2 If you have the eToken Enterprise 3.65 CD ROM, insert it in
your computer and the CD launches automatically. Click the
Install eToken RTE link.
OR
If you have a link to either the eToken web site or Aladdin
License Centre, complete the requirements and then click on
the eToken RTE 3 65.msi file.
3 The eToken RTE Installation Wizard opens as displayed:Getting Started
7
CHAPTER 2
4 Click Next on the eToken RTE installation window. The
License Agreement is displayed:
5 Select I accept and click Next. The Ready to Install window
is displayed:eToken RTE 3.65 User Guide
8
6 Click Next to begin the installation. During the installation files
are copied and placed in the required folders. The Updating
System screen is displayed:
7 When the System Update is complete, eToken RTE 3.65 is
installed and the following window is displayed:Getting Started
9
CHAPTER 2
8 Click Finish. The installation is complete.
If a previous version of the RTE is installed, an Installer
Information message opens as displayed:
9 Click Yes to restart the system and make the configuration
changes take effect.
10 Connect an eToken to the USB port or cable. The new
hardware is processed and the eToken lights up. This process
may take some time, depending on the operating system and
computer. The installation is successful.
If the USB port is not easily accessible, an eToken USB
extension cable can be used, as described below. This
extension cable enables you to insert and remove the eToken
easily without having to access the USB port directly.eToken RTE 3.65 User Guide
10
Connecting the eToken Extension
Cable
The eToken connects to the computer’s USB port. If the USB port
is located at the back of the PC, it is probably difficult to reach.
The eToken extension cable enables easy access to the USB
port for insertion and removal of the eToken. Extension cables
are available from your local Aladdin dealer.
If a USB port or hub is located on the keyboard or monitor, you
may not need an eToken extension cable. If the port is on the
monitor, make sure that the monitor is connected to the USB port
of the PC through a standard USB type A to type B cable.
Your eToken extension cable package includes:
♦ A round, translucent sticker.
♦ A cable, two meters (approximately six linear feet) long, with
USB type A to type B connectors.
At one end of the cable is a socket and a special suction cup.
This end should be mounted in a convenient place, so that you
can easily insert and remove the eToken. At the other end of the
cable is a small plug that connects to the existing USB connector
on the PC.Getting Started
11
CHAPTER 2
USBconnector plug
U SB con n ector
S ock et
Su ction cu p
Ca ble (ap pr ox 2 m)
¾ To install the eToken extension cable:
1 Locate the computer’s USB port, and insert the small USB
connector plug into it.
2 Peel off the sticker and paste it in a convenient place, for
example, on the side of the monitor or on the casing of the
PC.
3 Affix the suction cup of the eToken extension cable to the
smooth surface of the sticker, pressing it firmly in place.
4 Plug the eToken into the cable socket and make sure it lights
up.eToken RTE 3.65 User Guide
12
Enabling your eToken
After installing the RTE, it is necessary to enable the eToken the
first time it is inserted into the USB port.
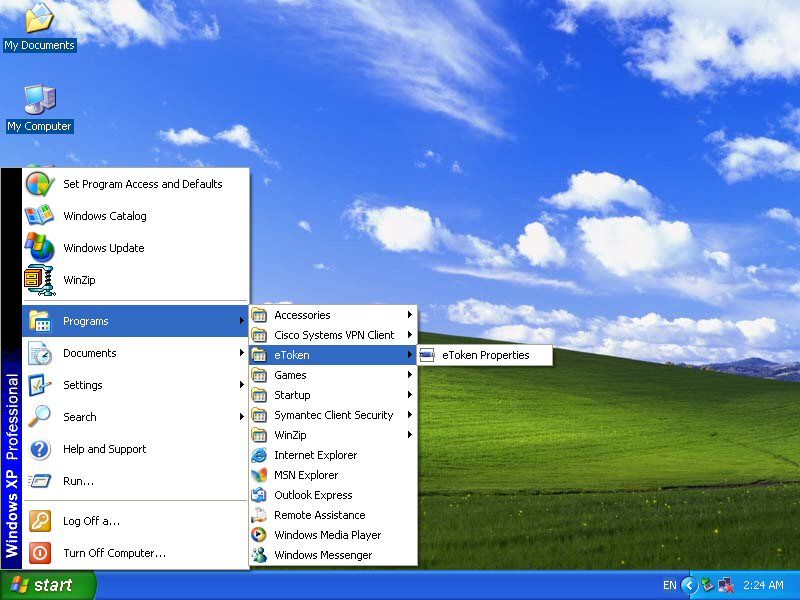
¾ To enable the eToken:
1 Insert your eToken into the USB port or alternatively the USB
extension cable for the first time. The eToken lights up and
during this process, which may take a few moments, the
Found New Hardware pop-up on the Start Bar (The image
displayed is from a Windows XP system. The hardware
recognition steps and messages may vary on other Operating
Systems) is displayed:
2 The hardware installation continues until complete when the
eToken is ready to be used.
Starting eToken Properties
To enable and use your eToken with eToken Properties you must
first start eToken Properties.
¾ To start eToken Properties:
1 From the Start menu, select Programs >eToken >eToken
Properties and the following is displayed:Getting Started
13
CHAPTER 2
2 Click eToken Properties and with your eToken inserted, the
following screen is displayed:
3 You are now ready to work with eToken Properties.eToken RTE 3.65 User Guide 14
eToken Properties
                                                                        15
                                                           CHAPTER 3

                                           Chapter 3

                             eToken Properties

eToken Properties provides users with a configuration tool to
perform basic token management such as password changes,
viewing of information, and viewing of certificates on the eToken.
In addition, eToken Properties provides users with a quick and
easy way to transfer digital certificates and keys between a
computer and an eToken.

    About This Chapter

This chapter provides a brief explanation of eToken Properties
and the various configuration options available to the user.
The chapter includes the following sections:
♦ “Local Machine Configuration Options”, on page 16, details the
  specific options available on the Local machine at all times.
♦     “Basic eToken Properties”, on page 23, explains the
     configuration options available in Basic mode as well as
     changing the password and renaming the eToken.
♦ “Advanced eToken Properties”, on page 33, explains the
  configuration options available in Advanced mode and covers
  the different tabs and their settings.
eToken RTE 3.65 User Guide
16
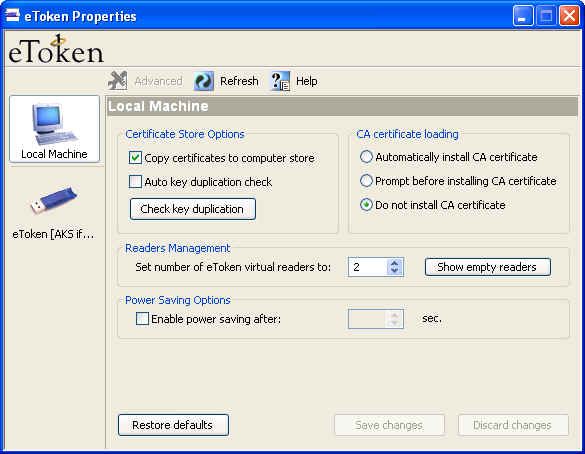
Local Machine Configuration
Options
The Local Machine configuration options enable setting global
parameters that affect the eToken operation. These options are
displayed when eToken Properties is launched (and no eToken
is inserted) or when the Local Machine button in the left panel is
clicked, as shown below:
The window consists of a left vertical panel containing buttons
and a right pane that contains information on the currently
selected button.
The top button in the left panel is the Local Machine button,
which is automatically selected when launching eToken
Properties. The configuration options associated with this button
are not specific to one eToken, but are general configuration
options applicable to any eToken.
Some administrators may choose to disable Local Machine and
Advanced features. In such a case the following is displayed:eToken Properties
17
CHAPTER 3
In order to use the application in this configuration you will need
to insert an eToken.
Certificate Store Options
Copy certificates to computer store
Default - enabled
PKI operations usually require certificates, private and public
keys. Private keys should always be securely stored on the
eToken. Certificates should also be stored on the eToken as this
enables mobility (the certificate will be readily available when
using the eToken on a different machine).
Since certificates themselves do not contain private information,
selecting this box enables pre-loading of certificates from the
eToken and caching them on the local machine. This
considerably speeds up accessing of these certificates by various
applications, and can dramatically shorten response time when
several certificates on the eToken need to be enumerated by an
application.eToken RTE 3.65 User Guide
18
Auto key duplication check
Default - disabled
It is possible that private keys have, in the past, been placed on
the computer. This leads to duplication in that there is a key on
the computer AND on the eToken. For effective security, only one
private key should be allowed. This key should always be kept on
the eToken in order to maximize security.
To perform an automatic key duplication check each time an
application enumerates the eToken certificates, select the Auto
key duplication check check box. Note that this might slow
down certificate and key operations.
Alternatively, if you want to check whether the Auto Key is
duplicated on an ad hoc basis, click Check key duplication. If no
duplicate keys are found, the following pop-up is displayed:
If duplicate keys are found, the following pop-up is displayed:
Click Yes to remove the duplicate keys from the computer.eToken Properties
19
CHAPTER 3
CA Certificate Loading
CA certificates can be downloaded onto the eToken. When this
eToken is inserted into the computer, one or more of these CA
certificates may not be on the computer. In such a case, an
option exists to load the CA certificate if desired.
When the RTE is first installed, it copies settings for the local
machine to a Current User account and then works with the data
from the current user account
The available options are:
Automatically install CA certificate
The CA certificate is copied to the computer without asking the
user.
Prompt before installing CA certificate (Default)
When a CA certificate is to be installed, a message asking the
user whether or not to copy the certificate is first displayed. Click
Yes to copy or No not to copy the CA Certificate
Note:
The message box also has a check box “Don’t ask again”. Selecting
this option will change the selected option above.
If you click Yes, the option changes to Automatically install CA
certificate.
If you click No, the option changes to Do not install CA certificate.
Do not install CA certificate
The CA certificate is not installed at all.
Despite the settings chosen, it is possible that another dialog box
from Microsoft opens asking if you wish to continue this action.
This is standard Microsoft operating procedure because the
action to be undertaken may affect security matters on the
computer. If you want to copy the CA certificate, click Yes in this
case.eToken RTE 3.65 User Guide
20
Readers Management
Set number of eToken virtual readers to:
Default - 2 readers
eToken RTE setup installs two virtual readers. This means two
eTokens can be recognized at the same time and accessed by
applications using them.
You can change the number of installed readers by changing the
value of this field and thereby increase or decrease the number of
eTokens that can be recognized simultaneously by the system.
The Show empty readers button is a toggle button that allows
you to see what readers are installed on the system. When you
click this button, the Local Machine left panel changes as
displayed:
Below the Local Machine button (left panel), are buttons which
represent eTokens and/or smartcard readers available on the
system. When installing the eToken RTE, two virtual smartcard
readers are installed with it. The names of eToken smartcard
readers begin with AKS ifdh. This is followed by the reader
number.eToken Properties
21
CHAPTER 3
When an eToken is inserted into the USB port, it has the effect of
inserting a smartcard into one of the readers. The button's icon
changes to an eToken icon to reflect this.
Physical smartcard readers are also displayed if installed. Once a
smartcard is inserted into these readers, the reader icon will
change to one with a smartcard inserted as displayed:
Power Saving Options
Enable power saving after: ----Sec.
Default - disabled
Microsoft's Windows XP using an Intel processor has built in
support for both USB 1.1 and USB 2.0 and incorporates support
for USB “Selective Suspend”. This feature allows the USB device
driver which supports selective suspend to turn off the USB
device it controls when the device is idle. In effect, the feature
stops the USB host controller (HC) from polling if all ports are
suspended and allows the processor to go to C3/C4 state. When
the device is no longer idle and is to be used again, the system
wakes the device and resumes normal operation. This option is
particularly important when using portable devices (laptops, etc.).eToken RTE 3.65 User Guide
22
C3/C4 states are low power states for the processor in which the
processor saves power and under typical use conditions allows
for battery life to be extended by~10%.
When the Enable power saving after... button is selected, you
have the option to change how many seconds before the power
saving mode activates.
In order to activate the change made to the power saving
configuration, you need to remove the eToken and then reinsert
it.
General Control Buttons
Restore defaults
Clicking this button restores the local machine default
configuration values.
Save changes
Clicking this button saves any changes that have been made to
the local machine configuration values.
Discard changes
Clicking this button discards any changes that have been made to
the local machine configuration values.eToken Properties
23
CHAPTER 3
eToken Configuration Options
Several operations which relate to eToken configuration options
require entering either the eToken user password or the eToken
administrator password. In certain cases there may be functions
that are disabled. These have been deliberately disabled by the
system administrator in line with organizational needs and
requirements.
Basic eToken Properties
After an eToken is inserted into the USB slot (or if eToken
Properties is started with an eToken inserted), an icon indicating
the eToken is accessible becomes visible in the left panel below
the Local Machine icon.
If required for any reason, the information in this window can be
copied to the clipboard. Select one or more lines of text and press
Ctrl+C. To select all the information at once, press Ctrl+A. Paste
the information to the required application by pressing Ctrl+V.eToken RTE 3.65 User Guide
24
The basic eToken Properties window displays three buttons that
enable the user to change a password, rename the eToken and
provides the option for a locked eToken to be unblocked (if
initialized with an administrator password).
Below these buttons is a table that defines the fields in the basic
properties window.
Items marked with (*) apply to the eToken PRO and eToken
NG-OTP only.
Field Name Field Description
Name The name given to the token. This name can be
changed by clicking Rename eToken…
Type Product type description.
Model The eToken model.
Product ID* USB device product identity.
Firmware The version of the eToken firmware.
version
CARD/OS The eToken smartcard operating system version
version*
User For the eToken R2 this value is always Present.
For the eToken PRO this describes if a User has
been defined for this token. Value is either
Present or Not Present. A value of Not Present is
displayed if the eToken was initialized without
defining a user (blank token).
Administrator* This describes if an Administrator has been
defined for this token.
Value is either Present or Not Present.
A value of Present is displayed if the eToken was
initialized with an administrator password
eToken ID The unique ID for the currently inserted eToken.
Smartcard ID* The unique smartcard ID for the currently
inserted eToken PRO.eToken Properties
25
CHAPTER 3
Field Name Field Description
Total memory The total memory size of the eToken.
capacity
Free Memory The amount of available free memory on the
(R2 ONLY) eToken R2.
Largest free The size of the largest contiguous block of free
block memory currently available on the eToken.
Color This field specifies the color of the eToken. This
color is set during the eToken initialization
process.
FIPS Mode* Value can be either On or Off. This field specifies
if the eToken was initialized as a FIPS token or
not.
(Relevant only for eToken PRO models 4.x.5.4)
1024-bit RSA The number of 1024-bit RSA keys that can be
keys count stored on the eToken
2048-bit RSA If the 2048-bit RSA keys Support Module has
keys support been loaded on the eToken, this field will be On,
otherwise it will be Off.
This field only appears if the CARD/OS version is
4.20 or higher.
HMAC SHA-1 If the HMAC SHA-1 Support Module has been
support loaded on the eToken, this field will be On,
otherwise it will be Off.
This field only appears if the CARD/OS version is
4.20 or higher.
User login The maximum number of consecutive failed log
failures limit on retries made by the user before the eToken is
locked.
Administrator If an administrator password has been initialized,
login failures this details the maximum number of consecutive
limit failed log on retries by the administrator before
the eToken is locked.
Reader Name Describes the name of the reader. For USB
eTokens, this will always begin with 'AKS ifdh'.eToken RTE 3.65 User Guide
26
Changing the eToken Password
All eTokens are configured at manufacture with the factory default
password. This password is 1234567890. To ensure strong,
two-factor security, and to enable full user functionality, it is
important that the user changes the factory default password to
an eToken password of the user’s own choice, as soon as the
new eToken is received. For this reason, the user is forced to
change the default password the first time the eToken is used.
After an eToken password has been changed, the new password
must be used with the eToken for all eToken applications. It is the
user’s responsibility to remember the eToken password - without
it, the eToken cannot be used for any purpose.
Password Quality
Your password is an important security measure in safeguarding
your company’s private information. Choosing an effective
password is therefore critical.
The best passwords are at least 8 characters long and include
upper and lower case letters, punctuation marks and numbers
created in a random order. It is not recommended that you use
names or birth dates of family members which can easily be
discovered.eToken Properties
27
CHAPTER 3
When changing your password, you can use the eToken
Password Quality feature to ensure you are using the most
secure password. The eToken Password Quality feature assigns
a quality rating to your new password and provides you with tips
on how to improve the password.
¾ To change the eToken Password:
1 Click Change password... on the eToken Properties screen
and the following eToken Properties dialog is displayed:
2 Enter your current eToken password in the Current
Password field.
3 Enter the new password in the New Password field.
NOTE:
As you type the password, the password quality indicator on
the right displays how well the new password matches the
password quality policy.
If you wish to view more information on why the password
quality receives the score shown, click Show Tips >>. This
expands the window to show a New password tips window.
Following these tips will improve the password quality score.
The Password Quality indicator (on the right) provides a
percentage score of the quality of the new password. Below
the minimum required score, as defined in etpass.ini, the
password quality indicator remains red.eToken RTE 3.65 User Guide
28
Once the score reaches and passes the minimum required,
this color changes to green as displayed:
4 Re-enter the new password in the Confirm Password field
and click OK. The eToken password is replaced.
Renaming the eToken
For additional convenience and ease of identification, the eToken
name can also be personalized.
¾ To rename the eToken:
1 Click Rename eToken... on the eToken Properties screen.
Since renaming the eToken requires the eToken password, if
this is the first time the eToken password is needed, the
following dialog is displayed:
2 Enter the eToken password, click OK and the Input eToken
Name dialog is displayed.eToken Properties
29
CHAPTER 3
3 Enter the new eToken name in the eToken Name field, as
displayed:
4 Click OK and in the eToken Properties window the new
eToken name is displayed:
Unblocking the eToken
Where an eToken has been initialized with an Administrator
password, eToken Properties provides the ability to unblock a
password on the eToken that may have been locked by
attempting to enter an incorrect password too many times.eToken RTE 3.65 User Guide
30
A challenge response authentication system is used that allows
the administrator to unblock the eToken. The user contacts the
administrator with the Challenge data from eToken Properties
and enters the Response data provided by the administrator. The
user then enters a password (either the one previously used or a
new one) and the eToken is then unblocked.
¾ To unblock a locked eToken:
1 Click Unblock eToken in the main eToken Properties window
and the following dialog opens:
2 Contact the administrator and provide him with the Challenge
data (in the example DE B0 E7 55 0D 06 E8 41).
3 The administrator provides the Response data (in the
example 67 D3 AB 06 4E 02 5A 71).eToken Properties
31
CHAPTER 3
4 Enter the Response data in the appropriate text box as
displayed:
5 Enter a New Password in the Password and Confirm text
boxes as displayed:
6 Click OK and the eToken is unblocked.eToken RTE 3.65 User Guide
32
Note:
After providing the Challenge data to the administrator, the user
MUST NOT undertake any activities that use the eToken until after
receiving the Response Data and completing the unblocking
procedure.
If any other eToken activity occurs during this process, it will affect
the context of the Challenge – Response process and invalidate the
procedure.
Administrators can also unblock an eToken by using the Set user
password option on the Administrator tab. For details see the
eToken Administrator Guide.eToken Properties
33
CHAPTER 3
Advanced eToken Properties
eToken Properties provides additional functionality that enables
setting various advanced configuration options.
Click Advanced and for an eToken initialized
without an Administrator password or an eToken R2 the
following dialog is displayed:
For an eToken, initialized with an Administrator password, the
following dialog is displayed:
For all eTokens (tokens and smartcards) except the eToken R2,
you may log on as a user or as an administrator.eToken RTE 3.65 User Guide
34
To log in as a user, enter the user password in the Password
field and click OK.
The Advanced Properties dialog is displayed:
Advanced Properties consists of the following four tabs:
♦ Details
♦ Settings
♦ Certificates and Keys
♦ Administrator (only appears if an administrator password has
been set)
NOTE:
Advanced Properties User access
If you log in as a user, you do not automatically have access rights to
the Administrator tab. See Administrator tab, on page 47 for details.
Details tab
The Details tab provides the same information as the Basic
Properties tab.
See Basic eToken Properties, on page 23, for details.eToken Properties
35
CHAPTER 3
Settings tab
This tab enables the configuring of settings relating to cache
policies and RSA secondary authentication.
Where no administrator entity exists for the token, the user may
set these parameters as displayed:
Where an administrator entity exists, the administrator has the
ability to allow or disallow the user to modify these parameters:
♦ Private data caching mode:
In RTE 3.65, public information stored on the eToken is
cached by the eToken drivers in order to enhance
performance. This group defines the way private information
(excluding private keys on the eToken PRO/NG-OTP/
Smartcard) can be cached outside the eToken. The following
options are available:
• Always (Fastest)
Always caches private information in the eToken drivers.
This enables fast performance as certain information is
cached on the host machine but because of this, this
option is less secure than if no cache is allowed.eToken RTE 3.65 User Guide
36
• While user is logged in
Caches private data outside the eToken as long as the
user is logged into the eToken. Once the user logs out, all
the private data in the cache is erased.
• Never
Does not cache private data in the eToken drivers.
♦ RSA key secondary authentication:
In RTE 3.65, for the eToken PRO and NG-OTP an option
exists to set an additional authentication password for an RSA
key. If this option is used, then in addition to having the
eToken and knowing the eToken's password, accessing the
RSA key requires knowing the password set for that particular
key (as displayed below):
This group defines the policy for making use of this secondary
authentication of RSA keys. Various options can be set for
this policy:
• Mandatory
Every time an RSA key is generated, a secondary
password for accessing this key is required as displayed:eToken Properties
37
CHAPTER 3
Clicking Cancel will cause key generation to fail. Clicking
OK generates the key and uses the entered password as
the secondary RSA password for that key.
• Always prompt
Every time an RSA key is generated, a secondary
password for accessing this key is requested as above,
however the user can choose to dismiss the prompt (by
clicking Cancel) and key generation will continue without
using a secondary password for the generated RSA key.
• Prompt upon application request
This enables applications that wish to use secondary
authentication for RSA keys to make use of this feature on
the eToken (when creating the key in Crypto API with a
user protected flag).
• Never prompt
Secondary passwords will not be created for any RSA key
and the authentication method will only use the eToken
password to access the key.
♦ Restore Defaults
Clicking Restore defaults restores the settings to their default
values (private data is always cached and secondary
authentication is never allowed). This is only possible if the
eToken administrator has defined that the eToken user can
modify these parameters.eToken RTE 3.65 User Guide
38
♦ Save Changes
Saving changes is only possible if the eToken administrator
has defined that the eToken user can modify these
parameters.
Clicking Save changes saves any setting changes that have
been made.
♦ Discard Changes
Clicking Discard changes discards any changes made to the
private data cache settings or the secondary authentication
policy.
Certificates & Keys tab
This tab shows the various certificates, keys and cryptography
parameters available on the selected eToken. The following icons
are used to identify the various PKI elements:
- Represents a certificate
- Represents an RSA private key
- Represents an RSA private key that will serve as the default
(This key is used for Smartcard Logon).
- Represents an RSA private key that requires secondary
authentication
- Represents an RSA private key that requires secondary
authentication stored in a default key container
– Represents a CA Certificate that has been imported to the
eToken
For more information on secondary authentication for private keys
see RSA key secondary authentication, on page 36.eToken Properties
39
CHAPTER 3
The Certificate & keys tab is divided into two windows as
displayed:
The top window contains the list of certificates and keys that are
stored on the eToken. The list is organized so that if a key
corresponds to a certificate, the key appears directly below and to
the right of the certificate it relates to.
The bottom window (below the key and certificate list) provides
information on a key or certificate selected in the top window. The
following tables summarize the available information fields and
their meaning for RSA keys and certificates.
Information for RSA Certificates
Field Name Field Description
Version The version of the certificate format.
Serial The serial number assigned by the certificate
Number issuer.
Signature The algorithm used for the private key when
Algorithm using it for signing.
Issuer The name of the organization that issued this
certificate.eToken RTE 3.65 User Guide
40
Field Name Field Description
Valid from The date the certificate becomes valid. The
certificate cannot be used before this date.
Valid to The date until which the certificate is valid. The
certificate cannot be used after this date.
Subject A combination of the purpose, conditions and
name of the certificate owner might be used as
the subject.
Key container The name of the key container that holds the
private key belonging to the certificate's public
key.
Key The key specification that defines the purpose of
specification the key.
Public Key The content of the key that is part of the
certificate and is used for encryption.
Certificate Details for what purposes the certificate is
Usage dedicated.
Friendly A combination of the reader name:: and the
Name simple display name of the certificate.
Information for RSA Keys
Field Name Field Description
Algorithm Defines the cryptographic algorithm used.
name
Default KC The key container used when no specific key
container name has been specified when trying
to acquire a key container handle.
Key Container The key container is the place on the token
where keys are stored. This field is the name of
the key container that holds the selected key.
Key Length The size of the key in bits.eToken Properties
41
CHAPTER 3
Field Name Field Description
Key Specifies what actions are permitted for this key,
Permissions e.g. if the key is exportable, the permission
would be 0x00000001.
eToken PRO keys always have permissions
0x00000000.
eToken R2 keys may have permissions
0x00000004.
Secondary Details whether the RSA key needs another
Authentication password in order to be used. Valid for eToken
PRO and eToken NG-OTP.
Auxiliary KC Specifies whether this KC serves as an auxiliary
key container (if an auxiliary key container
exists.)
Public Key The public part of the RSA private key that
enables encryption of messages, e. g. email, that
can be decrypted and read only by the eToken
owner (who holds the corresponding private
key).
If one of the field names in the top window is selected, all the field
information is displayed in the bottom window.
To the right of the certificate and key list window are buttons that
perform an action on the currently selected RSA certificate or key
as described in the following table:
Button Description
Removes the selected RSA key or certificate
from the eToken. A confirmation message
appears prior to performing this action.
Imports the complete CA chain of the selected
certificate onto the eToken.
Sets the selected key's key container as the
default.eToken RTE 3.65 User Guide
42
Button Description
This key is enabled only when an RSA key
created with secondary authentication
capability is selected. Key protection… enables
setting a new secondary authentication
password for the selected key.
Note:
The buttons are only enabled if the action the button executes can
be performed on that particular certificate or key.
Import CA Chain
A certificate that is stored on the computer may be part of a
hierarchical structure with more than one Certificate in the chain
up to the Root CA.
Importing a CA Chain takes the CA certificate and the complete
CA Chain up to the root certificate that is stored on the computer
and places it on the eToken.
When the Import CA Chain button is clicked, the CA Chain is
imported onto the eToken and displayed in the certificate and key
list window:You can also read