Popcorn Hour VTEN User Manual - Umax
←
→
Page content transcription
If your browser does not render page correctly, please read the page content below
Popcorn Hour VTEN User Manual
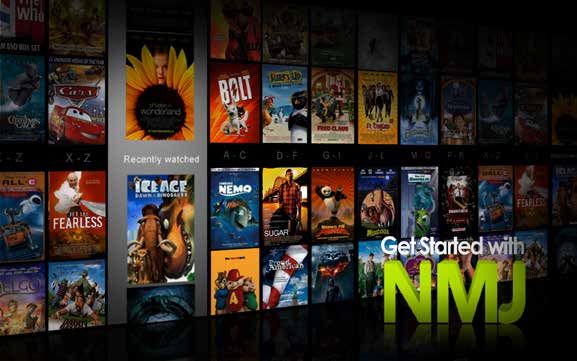
Table of Contents

   1.    Introduction .........................................................................................................   3
   2.    Package Contents ..............................................................................................          3
   3.    Safety Notes ........................................................................................................    4
   4.    Technical Specifications ....................................................................................            5
   5.    Getting Started ....................................................................................................     6
         5.1 Popcorn Hour VTEN Overview .................................................................                         6
         5.2 Connecting to TV via HDMI ......................................................................                     7

   6.  Remote Control ................................................................................................. 10
   7.  Introduction to Home Menu ............................................................................. 16
   8.  Quick Setup Wizard .......................................................................................... 17
   9.  Setup .................................................................................................................. 23
       9.1 Preferences .............................................................................................. 24
       9.2 Audio ........................................................................................................ 25
       9.3 Video ......................................................................................................... 26
       9.4 Customizing Home Page......................................................................... 29
             9.4.1........................................................................................................... 30
             9.4.2........................................................................................................... 31
             9.4.3........................................................................................................... 32
       9.5 Network (Configure IP) ........................................................................... 34
       9.6 Network Share ......................................................................................... 35
             9.6.1 Add Share ...................................................................................... 36
             9.6.2 Browse Share ................................................................................ 37
             9.6.3 Edit Share ...................................................................................... 38
       9.7 Parental Control ...................................................................................... 39
       9.8 BD/DVD/Audio CD ................................................................................... 40
       9.9 Maintenance ............................................................................................. 41
             9.9.1 Firmware Update ........................................................................... 42
   10. Apps Market ...................................................................................................... 43
       10.1 Login to Apps Market .............................................................................. 44
   11. File Browser ...................................................................................................... 46
       11.1 Settings .................................................................................................... 47

2001-2012© Syabas Technology. All Rights Reserved
11.2 View Mode ................................................................................................ 47
      11.3 File Manager ............................................................................................ 49
12.   Movie Meta Data ............................................................................................... 50
      12.1 Movie Info Page Walk-through ............................................................... 51
      12.2 Download Movie Thumbnail and Meta Data ......................................... 52
      12.3 Edit or Update Movie Information .......................................................... 54
      12.4 Download Subtitles ................................................................................. 57
13.   Networked Media Jukebox .............................................................................. 59
      13.1 Configuring NMJ ..................................................................................... 64
      13.2 Navigating in NMJ ................................................................................... 65
      13.3 Updating NMJ Information ..................................................................... 69
      13.4 Networked Media Jukebox Manager ..................................................... 72
14.   NMT Apps .......................................................................................................... 74
      14.1 Installing NMT Apps ................................................................................ 75
      14.2 Using the FTP Server .............................................................................. 79
      14.3 Using the Samba Server ......................................................................... 79
      14.4 Using the Torrent Client .......................................................................... 80
      14.5 Using the Usenet Client .......................................................................... 81
           14.5.1 Setting up NZBGET ....................................................................... 82
           14.5.2 Accessing the NZBGET Client ....................................................... 82
15.   Updating firmware ............................................................................................ 85
16.   Troubleshooting ............................................................................................... 88
17.   NMJ Navigator.................................................................................................... 90
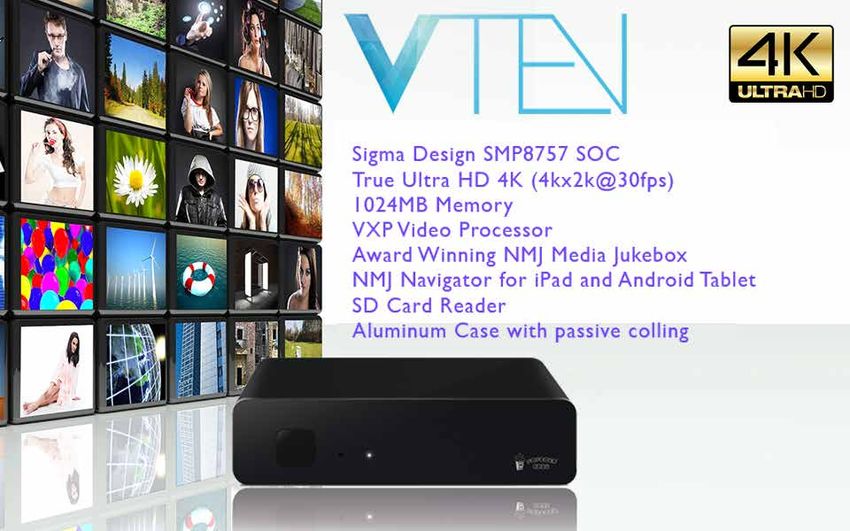
1. Introduction

    Thank you for purchasing the Popcorn Hour VTEN Networked Media
    Jukebox. Powered by Sigma Design 4K SoC, the Popcorn Hour VTEN
    is a state of the art digital entertainment center with a TV apps market to
    enhance your home entertainment.

    2. Package Contents
    1. Popcorn Hour VTEN
    2. Remote Control
    3. 2x AAA Batteries
    4. HDMI Cable
    5. eSATA Cable
                                1)
    6. AC Adapter
    7. AC Power Cord                                                  2)
    8. Quick Start Guide
    9. Warranty Card
                                     3)
                                           SIZE AAA 1.5V

                                           SIZE AAA 1.5V
                                                                4)

                                          5)

                           6)
                                                           7)        8)    9)

3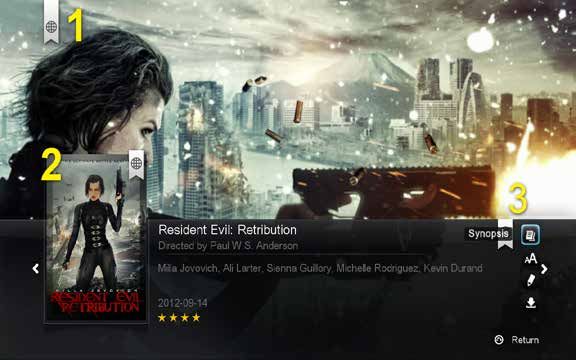
Popcorn Hour VTEN User Manual

   3. Safety Notes
   Read these operating instructions carefully     way, such as power-supply cord or plug
   before using the unit. Follow the safety        is damaged, liquid has been spilled or
   instructions on the unit and the applicable     objects have fallen into the apparatus, the
   safety instructions listed below. Keep these    apparatus has been exposed to rain or
   operating instructions handy for future         moisture, does not operate normally, or
   reference.                                      has been dropped.

   1) Keep these instructions.
                                                  WARNING:
   2) Heed all warnings.
                                                  TO REDUCE THE RISK OF FIRE,
   3) Do not use this device near water.          ELECTRIC SHOCK OR PRODUCT
                                                  DAMAGE:
   4) Clean only with a dry cloth.
                                                  1) DO NOT EXPOSE THIS APPARATUS TO
   5) Do not block any ventilation openings.
                                                     MOISTURE OF ANY TYPE AND ENSURE
      Install in accordance with the
                                                     THAT NO OBJECTS FILLED WITH
      manufacturer’s instructions.
                                                     LIQUIDS, SUCH AS CUPS OR VASES,
   6) Do not install near any heat sources such      ARE PLACED ON THE APPARATUS.
      as radiators, heat registers, stoves, or
                                                  2) ONLY USE RECOMMENDED
      other apparatus (including amplifiers) that
                                                     ACCESSORIES.
      produce heat.
                                                   3) DO NOT REMOVE THE COVER
   7) Do not defeat the safety purpose of
                                                      (OR BACK). THERE ARE NO USER
      the polarized or grounding-type plug. A
                                                      SERVICEABLE PARTS INSIDE. REFER
      polarized plug has two blades with one
                                                      SERVICING TO QUALIFIED SERVICE
      wider than the other. A grounding-type
                                                      PERSONNEL.
      plug has two blades and a third grounding
      prong. The wide blade or the third
      prong are provided for your safety. If the
      provided plug does not fit into your outlet,
                                                   CAUTION!
      consult an electrician for replacement of
      the obsolete outlet.                         DO NOT INSTALL OR PLACE THIS UNIT IN
                                                   A BOOKCASE, BUILT-IN CABINET OR IN
   8) Protect the power cord from being
                                                   ANOTHER CONFINED SPACE. ENSURE
      stepped on or pinched particularly at
                                                   THE UNIT IS WELL VENTILATED. TO
      plugs, convenience receptacles, and the
                                                   PREVENT RISK OF ELECTRIC SHOCK OR
      point where they exit from the apparatus.
                                                   FIRE HAZARD DUE TO OVERHEATING,
   9) Only use attachments/accessories             ENSURE THAT CURTAINS AND ANY
      specified by the manufacturer.               OTHER MATERIALS DO NOT OBSTRUCT
                                                   THE VENTILATION VENTS.
   10)Unplug this device during lightning storms
      or when unused for long periods of time.

   11)Refer all servicing to qualified service
      personnel. Servicing is required when
      the apparatus has been damaged in any
4
2001-2015© Cloud Media. All Rights Reserved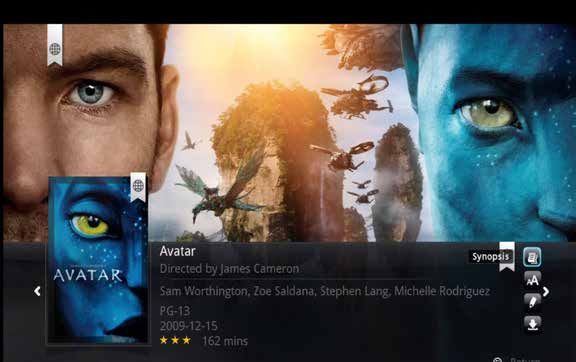
4. Technical Specifications
    Hardware                     Specifications

    CPU                          Sigma Designs SMP8757 ARM CORTEX A-9

    Memory                       1024MB DDR3 DRAM, 512MB SLC NAND Flash

    AV Outputs                   HDMI, Digital Optical, Digital Coaxial

                                 2 x USB Host 2.0, 1 x eSATA, 1 x SD Card Reader 1 x IR
    Interfaces
                                 Receiver Port

    Network                      Gigabit Ethernet, Wireless N USB dongle (optional)

                                 High Quality Aluminum Body, Fanless, Quiet Operation

    Chassis Dimension / Weight   144mm(W) x 30mm(H) x 110mm (L)

                                 Weight: 1kg

    Power                        5V DC, 3.0A Max

    Software                     Specifications
                                 MPEG1/2/4 Elementary (M1V, M2V, M4V),MPEG1/2 PS (M2P,
                                 MPG, VOB),MPEG2 Transport Stream (TS, TP, TRP, M2T, M2TS,
                                 MTS),AVI, ASF, WMV, Matroska (MKV),MOV (H.264), MP4,
                                 RMP4:
    Video
                                 HEVC/H265: MP@L4.1, M10P@L4.1, XVID SD/HD, MPEG-1,
                                 MPEG-2 MP@HL, MPEG-4.2 ASP@L5 HD 1-point GMC, MPEG-
                                 4.10 (H.264) : BP@L3, MP@L4.0, HP@L4.0, HP@L4.1, WMV9 :
                                 MP@HL

                                 AAC, M4A,MPEG audio (MP1, MP2, MP3, MPA),WAV, WMA,
    Audio
                                 FLAC, OGG

    Photo                        JPEG, BMP, PNG, GIF

                                 DTS, WMA, WMA Pro,MPEG-1 Layer 1, 2, 3, MPEG-4 AAC-
    Decoders                     LC, MPEG-4 HE-AAC, MPEG-4 BSAC ,LPCM, FLAC, Vorbis,
                                 TrueAudio, APE Audio, DSD

    Pass-through                 DTS, DTS-HD HR, DTS-HD MA

    Other Formats                ISO, Simple BD navigation, 3D BD ISO

    Subtitle                     SRT, MicroDVD SUB, SSA, SUB/IDX, Opensubtitle

5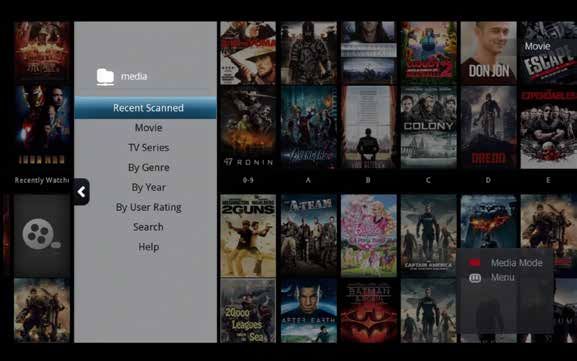
Popcorn Hour VTEN User Manual

   5. Getting Started
   5.1 Popcorn Hour VTEN Overview

                                                       5V/3A

    IR

             OPTICAL     COAXIAL                               +
                                        HDMI   eSATA

6
2001-2015© Cloud Media. All Rights Reserved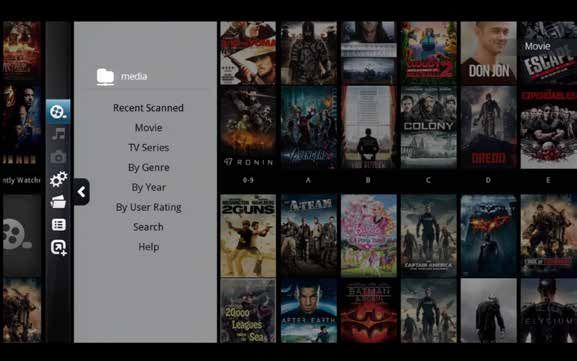
5.2 Connecting to TV via HDMI
               What you need:

                 о Popcorn Hour VTEN

                 о Power Supply

                 o HDMI Cable

                 o TV with HDMI terminal

7
Popcorn Hour VTEN User Manual
   5.3 Connecting to TV via Composite
                                           What you need:

                                                  o Popcorn Hour VTEN
 Step 1
                                                  o Power Supply
 Connect the HDMI cable to your TV HDMI terminal and the other
                o Composite Cables (not included)
 end to your Popcorn  Hour VTEN.
                                                  o TV with Composite Terminal
 Note:
  Step 1
         Some HDMI TVs have input and output HDMI terminals.
 Please    make sure the HDMI terminal is connected to input rather
  Connect the composite cables to both the composite terminals on the VTEN and your TV by
 than  output.
  matching the yellow, red and white plugs to their coordinating terminals.

   Note: Some TVs have input and output terminals for composite connection. Please ensure that it
   is connected to the input terminal.
                                                                                                                                               TV Back Panel Connectors
                                                                                                                                                        TV Back Panel Connectors
                                                                                                                                          ANT IN

                                                                           VIDEO           AUDIO     COAXIAL
                                                                      Pb           Y         L
                                                                                                                                                   ANT IN

                                                                                                               12.0V
                                                                                                               3.5A MAX
                                                                                                                      +

                  IR

                                                                      Pr       CVBS         R        OPTICAL
                       USB3.0 SLAVE           eSATA     HDMI                                                   POWER

                                                                                                                                                                COMPOSITE IN

                                                                                                                            5V/3A

   IR

        OPTICAL         COAXIAL                                                                                                     +
                                           HDMI                                          eSATA

   Step 2
   Connect the AC power cord to AC power adapter. Then plug the power cord into your wall socket
   and connect the power lead to Popcorn Hour VTEN. Your Popcorn Hour VTEN is booting up now,
   check your TV for further instructions.

                                                                                        VIDEO         AUDIO       COAXIAL
                                                                                   Pb            Y      L

                                                                                                                               12.0V
                                                                                                                               3.5A MAX
                                                                                                                                      +

                       IR

                                                                                   Pr        CVBS       R         OPTICAL
                            USB3.0 SLAVE              eSATA    HDMI                                                           POWER

8
2001-2015© Cloud Media. All Rights Reserved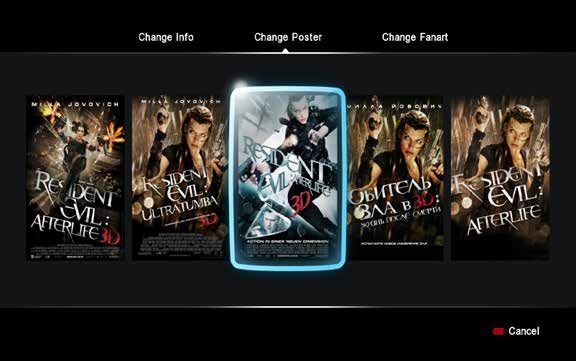
5.4 Connecting to TV via Component
                                     What you need:

                                              o Popcorn Hour VTEN
           Step 2
                                              o Power Supply
           Connect the AC power cord to AC power adapter. Then plug
           the powerocord
                       Component Cables (not included)
                              into your wall socket and connect the power
           lead to Popcorn     Hour VTEN.
                     o TV with Component        Your Popcorn Hour VTEN is
                                         Terminal

Step 1
           booting up now, check your TV for further instructions.
Connect the component cables to both the component terminals on the VTEN and your TV by matching
the green, blue and red video plugs and the red and white audio plugs to their coordinating terminals.

Note: If your component cables only include the green, blue and red plugs you will need to use a set of
composite cables to connect to the TV for audio. If doing so, you do not need to connect the yellow plug.

                                                                                                                                                      TV Back Panel Connectors

                                                                                                                                             ANT IN

                                                                      VIDEO
                                                                      VIDEO         AUDIO
                                                                                    AUDIO      COAXIAL
                                                                                               COAXIAL
                                                                 Pb
                                                                 Pb           YY     LL
                                                                                                                               5V/3A

      IR
                                                                                                         12.0V
                                                                                                         12.0V
                                                                                                         3.5AMAX
                                                                                                         3.5A MAX
            OPTICAL            COAXIAL                                                                          ++                     +
                                                  HDMI                                         eSATA
                IR

                      USB3.0SLAVE
                      USB3.0 SLAVE            eSATA
                                              eSATA   HDMI
                                                      HDMI
                                                                 Pr
                                                                 Pr          CVBS
                                                                             CVBS    RR        OPTICAL
                                                                                               OPTICAL
                                                                                                         POWER
                                                                                                         POWER                                                       COMPOSITE IN

                                                                                                                                                           L    R

Step 2
Connect the AC power cord to AC power adapter. Then plug the power cord into your wall socket and
connect the power lead to Popcorn Hour VTEN. Your Popcorn Hour VTEN is booting up now, check your
TV for further instructions.

                                                                                            VIDEO          AUDIO     COAXIAL
                                                                                     Pb             Y          L

                                                                                                                                  12.0V
                                                                                                                                  3.5A MAX
                                                                                                                                         +

                          IR

                                                                                     Pr         CVBS           R     OPTICAL
                               USB3.0 SLAVE              eSATA        HDMI                                                       POWER

 9
Popcorn Hour VTEN User Manual 6. Remote Control 10 2001-2015© Cloud Media. All Rights Reserved
In STANDBY mode: Press once to turn player ON.
               In ON mode:
               1. Press POWER once turn player in VIDEO OFF mode (video and
     POWER        audio are OFF, other player tasks still run).
               2. Press POWER – EJECT to soft reboot player.
               3. Press POWER – DELETE to turn player into STANDBY mode.
               4. Press POWER for about 5 seconds, until red LED begin flashes, to
                  turn player into STANDBY mode.

               In VIDEO OFF mode:

               Press once to turn player into VIDEO ON mode

     TV Mode
               Quick-access button to select TV output resolution. See 9.3 Video
               (page 25) for more information

     SETUP     Quick access to setup page.
               During video playback allow customization of the display output and
               settings of audio sync.

11
Popcorn Hour VTEN User Manual
HOME
Press HOME to return to main menu.
In App/Apps Market, press to quit app or apps market.
Context sensitive. Refer to the legend on the bottom of the user
interface
Context sensitive. Refer to the legend on the bottom of the user
interface
Context sensitive. Refer to the legend on the bottom of the user
interface
Context sensitive. Refer to the legend on the bottom of the user
interface
RETURN
Return to previous menu
ENTER
Confirm selection.
Start media playback of both single file and DVD/BD formats
12
2001-2015© Cloud Media. All Rights ReservedNavigate within the user interface
D PAD Partial time seek during movie playback
Display File mode menu if available (LEFT and RIGHT directional
keys only).
While viewing the images shifts the screen into the direction buttons
pressed, stopping the sequential play, if a slideshow
INFO
Bring up meta-data of selected media file.
During playback displays the timeline bar and media file information.
STOP
Stop media playback and returns to the menu screen
PAGE UP / VOL+
Moves up a page on a list of media files.
Increases the volume during media playback
PAGE DOWN / VOL-
Moves down a page on a list of media files.
Decreases the volume during media playback
PLAY Creates a temporary playlist of all files in the directory and start
playback.
Resumes playlist playback after pause
PAUSE Pause media playback
Step one frame forward when video is paused
MUTE
Mutes the audio output
REV Rewind the current media playback.
Press again to toggle 2x, 4x, 8x and 16xrewinding
Rotate image anti-clockwise while viewing images
13Popcorn Hour VTEN User Manual
FWD Fast-forward the current media playback.
Press again to toggle between 2x, 4x, 8x and 16x fast-forwarding
Rotate image clockwise while viewing images
MENU Opens menu in NMJ.
During photo slideshow, bring up setting menu to select transition
effect and slide interval
PREV
Skip backward within playlist.
During video playback, skip to previous chapter if available
NEXT
Skip forward within playlist.
During video playback, skip to next chapter if available
TITLE
Bring up Title menu where supported to change scene, audio or
subtitle.
Repeat the current media playback.
During music playback, this button toggle between four mode:
REPEAT
1. Repeat current song
2. Repeat the current playlist
3. Play current playlist in random order
4. Repeat off
SLOW Slows down the current media playback.
Toggle between 1/2, 1/4 and 1/8 speed playback.
Cycle through audio tracks during video playback.
AUDIO
In background music mode (for example, during slideshow) bring up
the audio player control menu
14
2001-2015© Cloud Media. All Rights ReservedBring out subtitle menu during playback.
SUBTITLE Follow instruction on the screen to select subtitle, change time offset
and others. Available option vary according to subtitle type.
Press subtitle key once more to close the menu
Available options vary according to subtitle type.
ZOOM Bring out zoom menu during playback. Follow instruction on the
screen to configure scaling (between actual size, fit to screen, full
screen and crop), zoom in/out and pan. Press zoom key once more
to close the menu
Tip: Replace the Remote Control batteries with two new AAA battery if the Remote Control is slow
to respond or does not respond at all.
15Popcorn Hour VTEN User Manual
7. Introduction to Home menu
The HOME screen is the main hub for accessing content from a local source (USB hard drive), a
network share or from the apps market. You can also view the current time and weather.
Weather Forecast
Know the weather without leaving the comfort of your couch.
Time and Date
Current date and time.
Menu Bar
Free and premium on-demand video, social networking and
Apps Market
game apps
Local Media Access connected USB and eSATA storage devices
Setup Wizard Launch the setup wizard to go through initial setup
Access advanced settings such as audio/video outputs, subtitle
Setup
languages, parental control and more
Browse your local area network for your shared folders that
Network
contain your digital media files
Recently Played Quick access to your recently played media’s
Customized Front Page Please refer to page
16
2001-2015© Cloud Media. All Rights Reserved8. Quick Setup Wizard
Setting up your Popcorn Hour VTEN using the setup wizard is vital for proper operation of the
media player. For advance users, you may skip to Chapter 9.
Using your remote control, navigate to the Setup Wizard icon and press ENTER
Choose your desired language for the user interface. Proceed to next step by pressing the NEXT
button.
Note: This does not affect subtitle language.
17Popcorn Hour VTEN User Manual
Choose your network connection type according to your setup and press the NEXT button to
continue.
1) Wired (Ethernet cable).
2) Wireless (optional wireless dongle needed).
DHCP connection only: Confirm the IP informaton and click NEXT to proceed.
18
2001-2015© Cloud Media. All Rights ReservedInternet connection established: Click on next to proceed.
Important: Please choose your time zone correctly according to where you live. This affects
online application. Click on NEXT to proceed.
19Popcorn Hour VTEN User Manual Weather Forecast Widget: Display weather forecast information on the main user interface. Type your location correctly for an accurate weather information forecast. . 20 2001-2015© Cloud Media. All Rights Reserved
Your setup is complete. Press the DONE button to finish and return to the HOME menu.

21
Popcorn Hour VTEN User Manual

   9. Setup
   Advanced settings such as video/audio output, color-space, subtitle languages, and parental
   controls can be setup here.

   Note: If you have completed the setup wizard steps, the corresponding settings can be found and
         update here.

22
2001-2015© Cloud Media. All Rights Reserved
9.1 Preferences
Choose display language for the user interface and subtitle
Language
language.
Transition setting for photo slideshows and determines how long
Photo Slide Show
each photo will remain on screen during a slideshow
Screensaver Time Set the amount of idle time required before the screensaver turns on
Time Adjust system time and date
Configure repeat option to none, repeat, or repeat all for media
Play Mode
playback
Widgets Configure your location and other settings for the weather widget
Prompt for firmware
System automatically checks for firmware updates online
update
23Popcorn Hour VTEN User Manual
9.2 Audio Codec
HDMI Audio
ON Enable audio signal output from HDMI cable connection
OFF Disable audio signal output from HDMI cable connection
Audio Codec
Adjust how the media player handles each audio codec to match your entertainment system’s
capabilities. Only select Passthrough if your external decoder is capable of decoding the audio
signal.
Audio Codec Options
PCM Downmix or Passthrough
AAC Downmix, Passthrough or decoded multi channel
WMA Pro Downmix or Passthrough
DTS Downmix or Passthrough
Notes: If you are connecting directly to your TV without going through an external decoder such
as AVR, please choose Downmix for the media player to handle all audio decoding.
DRC (Dynamic Range Compression)
ON: Will reduce volume for louder scenes and amplify quieter
sounds for a more even volume level throughout playback on AC3
DRC tracks only. Useful for night time watching
OFF: Disable
DSD Sample Rate 44100 or 176400
24
2001-2015© Cloud Media. All Rights Reserved9.3 Video
Video Output
It’s highly recommended that you set the video output according to the specification of your TV.
Please check your TV specifications before setting the video resolution.
System automatically selects the most suitable video resolution for your display (Should only
AUTO
be used for initial setup)
High Definition Mode 720p/50Hz, 720p/60Hz, 1080i/50Hz, 1080i/60Hz, 1080p/50Hz, 1080p/60Hz
1080p/24Hz Mode 1080p displayed at 24 frames per second; only applicable on 78Hz, 120Hz, and 240Hz TVs
Ultra High Defination Mode 4K/24Hz, 4K/25Hz, 4K/30Hz (Only applicable for UHD capable TV)
Tip: A list of some common output resolutions and their quick-access with remote control buttons see below:
Quick-access button Video resolution
TV Mode + RED Auto (default)
TV Mode + GREEN 720p 60Hz
TV Mode + YELLOW 1080p 50Hz
TV Mode + BLUE 4K 30Hz
Framerate Syncv
Reduce video jitter by selecting the correct framerate sync according to your TV specification.
If your TV is a NTSC TV then do not set PAL in framerate sync. Only set 24p if you have checked
your TV specification and it can display at 24p.
25Popcorn Hour VTEN User Manual
Video Zoom
Setup how you like the media player to handle your video zoom level.
Actual Size Disable video zooming
Fit to screen
Video fills as much of the screen as possible without being cropped
or changing the aspect ratio
Crop
Video fills as much of the screen as possible by cropping portions of
the video
Full Screen
Video fills as much of the screen as possible by stretching the
image. Nothing is cropped but the aspect ratio is not maintained
TV Type
Setup your TV or display aspect ratio
4:3 Typically for older TV sets using CRT technology and 4:3 computer displays
Most High Definition TVs such as LCD and plasma as well as HD projectors use
16:9
16:9
Color Space
Define color space adjustment according to your TV specification.
Select Auto if your TV can display both SD and HD.
26
2001-2015© Cloud Media. All Rights Reserved3D Output
If you do not have a 3D enabled TV, you may turn this option off.
VXP - Adaptive Contrast Enhancement
This option allows you to test drive the enhancement by splitting the
screen into half.
Demo Off
Left : Enhance Right : Original
Right : Enhance Left : Original
Shadows Tune the levels of shadows in your video
Highlight Tune the levels of highlight in your video
VXP - Adaptive deinterlacing and film cadence detection
Depending on your preference, you may turn this option ON or OFF.
27Popcorn Hour VTEN User Manual
9.5 Network (Configure IP)
MAC Address
Your unique NIC MAC address. This is needed when engaging support services or trouble
shooting.
Mode
Select this if your media player is connected to the router via an Ethernet
Wired
cable
Select this if a wireless dongle is inserted and you have a wireless network
Wireless
you want to connect to
Note: Wireless is not available when the media player does not detect a compatible wireless
dongle.
DHCP
Automatically resolve an IP address from your router. DHCP must be
Auto
enabled on your router for this to work
Manual Manually specify a static internal IP address
IP Address and DNS
No input or modification is required if you have set your DHCP to Auto, your router will provide all
the information.
If your DHCP setting is set to manual, you will need to provide the static internal IP address of your
router, the subnet mask, the static internal IP address you want your device to have, and the DNS
servers.
See the NMT WIKI for Guides.
28
2001-2015© Cloud Media. All Rights Reserved9.4 Customizing Home Page The VTEN now comes pre-loaded with the advance active user interface. You can now do the following: - create your own shortcuts on the home screen for fast access to your favorite folder, apps or jukebox. - disabling unwanted icons at home screen - shortcut to recently played videos - Customize wall-paper on file browser or home page 29
Popcorn Hour VTEN User Manual

9.4.1 Apperance

       Apperance 		      - Update the default wall paper on home page or file browser.
       Home Menu Display - Enable or disable default icons on home page
       Shortcut		        - Edit list of shortcut created.

30
2001-2015© Cloud Media. All Rights Reserved
Home Screen
Default - Default Popcorn Hour Active Interface (rotates according to time or weather of the day).
Customized - Select a wall paper of your choice and replace the default wall paper. *Image
dimension must be 1280x720. Max file size 1MB.
File Browser Screen
Default - Default Popcorn Hour black file-list background.
Customized - Select a wall paper of your choice and replace the default wall paper. *Image
dimension must be 1280x720. Max file size 1MB.
9.4.2 Home Menu Display
Enable or disable default icons on the home page.
31Popcorn Hour VTEN User Manual
9.4.3 Creating short-cuts
The VTEN now supports quick shortcuts to your favorite folder, jukebox or apps.
Short-cut available for:
1. Apps from apps market.
2. Share folder in NETWORK.
3. Local drives in local media.
4. Jukebox
APPS SHORTCUT
In apps market, navigate
to your favorite app. Press
the “i” button to bring up
this menu.
1. Click OK on Create
Shortcut
2. Choose where you want
the shortcut to appear.
Home Add-on
Appear as an individual
icon on your home page.
Shortcut Folder
Add to the shortcut folder
on home page.
32
2001-2015© Cloud Media. All Rights ReservedLocal Media or Share
Folder Shortcut
In file-browser mode,
press RIGHT arrow on
the remote to bring up
the shortcut menu.
1. Navigate to the
shortcut icon and Click
OK.
2. Choose where you
want the shortcut to
appear.
Home Add-on
Appear as an individual
icon on your home page.
Shortcut Folder
Add to the shortcut
folder on home page.
33Popcorn Hour VTEN User Manual 9.6 Network Share Add Share Manually add a network share on your PC, MAC or network attached storage (NAS). If you frequently access a network share, it’s recommended that you add it so it will always appear at the top of your network devices list. Browse Share Browse through a list of available network shares using the file browser and quickly add a network share without manually entering the IP address and share name. Edit Share Remove or edit an existing network share. 34 2001-2015© Cloud Media. All Rights Reserved
9.6.1 Add Share

     Protocol

                       Windows computers and most NAS devices use Samba by default. It can
      Samba
                       also be used on MAC and Linux based devices
                       The NFS protocol offers faster network transfer speeds however not every
      NFS
                       device supports it. Please refer to your devices’ network share settings

      NFS TCP          NFS over TCP/IP transport

     Network Share Information

      IP/Host Name     Enter the IP address or host name of the device that you are connecting

      Share Folder     The name of the network share that you are trying to access

                       The display name for this network share in the Popcorn Hour’s Network
      Share Name
                       devices list
                       If your network share requires a username and password please supply it
      Username
                       here
                       If your network share requires a username and password please supply it
      Password
                       here

35
Popcorn Hour VTEN User Manual 9.6.2 Browse Share Under Network Browser, select the workgroup and then the device you want to access. Select the folder you would like to add. 36 2001-2015© Cloud Media. All Rights Reserved
The protocol, IP/host name and shared folder information is automatically added for you. If
     required, you can add a username and password at this stage and then save this share.

     9.6.3 Edit Share

     Choose the shared folder that you want to edit or remove.

37
Popcorn Hour VTEN User Manual
9.7 Parental Control
Setup Lock
Setup Lock OFF
Lock the setup page to prevent unauthorized changes to your settings.
ON
The Default password is 4896
Tip: Press SETUP – PLAY to disable the Setup Page Lock option.
File Lock
OFF Default
Prevents users from editing or deleting files. Useful in NMJ as deleting
ON
removes the file as well as any images or other files.
Child Lock
This only applies to DVD and Blu-ray movies. For more information, please refer to your local
ratings system.
OFF Default, allows all access
Kid Safe General Audiences. All Ages Admitted
G/TV-Y/TV-Y7/TV-G General Audiences. All Ages Admitted
PG/TV-PG Parental Guidance Suggested. Some Material May Not Be Suitable For Children
Parents Strongly Cautioned. Some Material May Be Inappropriate For Children
PG-13/ TV-14
Under 13
Parents Strongly Cautioned. Some Material May Be Inappropriate For Children
PG-15
Under 15
R Restricted. Children Under 17 Require Accompanying Parent or Adult
NC-17 No One 17 and Under Admitted
Adult Adult video
38
2001-2015© Cloud Media. All Rights ReservedMature Content Apps
OFF Hide mature contents apps in apps market
ON Enable mature contents in apps market
Change Password
Allows you to set a password of your choosing. This password is used for disabling the setup lock,
file lock and child lock.
9.8 BD/Audio CD
Auto Play
OFF Default
ON Automatically playback when external optical disc detected
Note: Require external optical devices. Popcorn Hour VTEN does not support commercial Blu-ray
disc.
Audio Language
Pre-select the default subtitle track for Blu-ray videos.
BD Navigation
When you select a BD IFO you can browse the folder contents. BD ISO
File view
files will prompt you for the navigation method
Launches video playback. The Blu-ray menu is replaced by the BD Lite
Simple BD only
menu
Prompt When you select a Blu-ray, you are prompted to choose menu style
39Popcorn Hour VTEN User Manual 9.9 Maintenance Firmware Update This section allows you to check the currently installed firmware version. You can also manually check for a firmware update and reset the device to factory settings from this menu. NMT Setup Wizard Please refer to page 17. Open Source License In accordance with GPL, a list of open source licenses that the device uses are listed here. Credit Info Credits to source code providers. 40 2001-2015© Cloud Media. All Rights Reserved
9.9.1 Firmware Update

     IMPORTANT: Please restart your device by removing the power cord from the wall outlet or
                power connector port on the rear of the device. This will ensure that your device is
                ready for the firmware update process.

     Firmware Version
     Your current firmware version, changes according to the current public release firmware.

     Kernel Version
     System kernel version

     Check for Firmware Update
     Ensure that you are connected to the Internet before proceeding. Use this option to check if a new
     firmware is available for your device. If it is, you will be presented with a disclaimer. Please read it
     carefully before proceeding with the firmware update.

     WARNING: DO NOT DISCONNECT THE POWER TO THE DEVICE DURING THE FIRMWARE
              UPDATE PROCESS. Doing so may cause the device to become inoperable.

     Tip: The Popcorn Hour VTEN supports offline firmware updating. Please visit our support website
          for more information.

     Reset to Factory Setting
     If you ever need to reset all your device settings, you may do so here. You should do this after
     each firmware update.

41
Popcorn Hour VTEN User Manual 10. Apps Market Get access to the Apps Market where you can get free and premium apps for your TV. Access instant video on demand services, online radio, social networking, games and much more. The apps market is updated frequently and geospecific so check back to expand your multimedia lineup. Navigate to the Apps Market Icon and press ENTER on your remote. Choose your desired app and press ENTER on your remote. 42 2001-2015© Cloud Media. All Rights Reserved
Install by pressing ENTER on your remote or exit by press the INFO button.

     The installed apps will appear in the My Apps category.

     Tip: To uninstall any app, press the INFO button on your remote.

43
Popcorn Hour VTEN User Manual
10.1 Login to Apps Market
Login to the Apps Market to purchase premium apps or access a private store provided by your
content provider.
1. On the left navigation pane, choose LOGIN.
2. If you already have an account, please enter your email address and password.
3. Otherwise, move down to SIGN UP and create your Apps Market account.
Tip: If you cannot locate your premium content, please ensure that you are logged in to the
Apps Market.
44
2001-2015© Cloud Media. All Rights Reserved11. File Browser
The file browser allows quick access and navigation to your files. Using the file browser you can
copy, move, delete and rename files. You can also view information and download poster art and
subtitles for individual files here. The file browser displays all your folders and files in list format
and allows for different sort and filter options. You can play your media directly from this view.
Access and browse your network shares from the network option. Network shares that you
Network have added are listed at the top and any other auto-discovered network devices are listed
below. If a username and password is required to access the share, you will be prompted
Browse your media files stored on your external connected USB device, such as portable
Local Media
HDD, USB Thumbdrive, and optical device.
11.1 Settings
In the file browser, press the LEFT arrow on your D-pad to bring up the menu options.
Networked
Launch the NMJ interface
Media Jukebox
NMJ Manager Launch the Jukebox Manager to configure all your NMJ sources
Search Let’s you search for a file by entering the name here
Storage Info Show current storage usage
Return Closes the menu options
Eject Safely remove USB connected devices such as USB thumbdrives
Filter Filter media type: movie, music, photo or all
Sort Sort by Name, Date or Size
Settings Access settings specific to the file browser
Note: The file browser behaves exactly the same in local media or network folder mode.
45Popcorn Hour VTEN User Manual
11.2 View Mode
View Mode
This will allow you to switch between list view and thumbnail view.
Listing
A traditional file list with filename, date and size
Thumbnail
This view displays the thumbnail (if available) and information for the
currently selected file
46
2001-2015© Cloud Media. All Rights ReservedFile Listing Info
None Disable date and size information display in the file browser
Auto Automatically displays date or size when using the sort options
Size Only Displays the file size only
Date Only Displays the file’s modified date only
Date and Size Displays both date and size information
Show Tooltips
On Displays tips for tools when you highlight them
Off Disables tip information
47Popcorn Hour VTEN User Manual
11.3 File Manager
You can use the file manager to copy, move delete and rename files as well as create new folders
on your storage device.
Mark the files that you want to copy/move/delete by pressing the GREEN button. A checkmark is
visible on the filename to indicate that it has been marked.
Press the RIGHT button on the D-pad to access the file manager menu.
Copy To Copy the marked file(s) to a different folder
Move To Move the marked file(s) to a different folder
Create a new folder Create a new folder
Delete Delete marked file(s) or folder(s)
Rename Rename the marked file
Download subtitles for the marked file(s). Only applicable to
Fetch Online Subtitle
video
Tip: Make sure that the destination folder or drive is not copy-protected.
48
2001-2015© Cloud Media. All Rights Reserved12. Movie Meta Data
One of the main features of the Popcorn Hour VTEN is the ability to download and manage movie
meta data without the use of a PC. This feature differs from NMJ as this is only visible in the file
browser mode.
Movie Synopsis
Movie Thumbnail
Tip: Enable thumbnail view by going to file browser settings. See page 37.
49Popcorn Hour VTEN User Manual
12.1 Movie Info Page Walk-through
Press the INFO button on your remote to bring up the movie info page.
1. Movie Fanart.
2. Movie Poster or thumbnail.
3. 4 options are available here.
Movie synopsis gives you an overview of the movie. Including
Synopsis
parental ratings, casts, director, plot, etc.
Download subtitles for your movie from the Internet straight on your
Fetch Online Subtitle
player without using a PC. Supports multiple languages
If the automatically selected meta data is incorrect, or you wish to
Edit
change the fanart or thumbnail, you may edit the selection
After you have confirmed the meta data and fanart, use the
Download
download option to save it on your storage device
50
2001-2015© Cloud Media. All Rights Reserved12.2 Download Movie Thumbnail and Meta Data
On file browser, highlight the movie that you want to download data for and press the INFO button
on your remote.
The fanart, movie poster and meta data are automatically pulled from the Internet and displayed
on your screen.
51Popcorn Hour VTEN User Manual
Navigate to the Download option on the bottom right and press ENTER on your remote.
The poster, fanart and NFO files are downloaded and saved on the same storage device that your
video file is located on.
Tip: If you encounter an error, make sure you are able to write files to your storage device. For
local storage it must be formatted either in the NTFS, FAT32, EXT2 or EXT3 file system. For
network storage devices, make sure you are logged in with a user account that has write/
read/edit permissions enabled.
Repeat the process for any of your movies and TV shows.
52
2001-2015© Cloud Media. All Rights Reserved12.3 Edit or Update Movie Information
If the scanner pulls the incorrect information for the file, or if you wish to change the poster or
fanart for your video, you can do so by editing the movie meta data.
Navigate to the Edit option on the bottom right and press ENTER on your remote.
You can either use the numerical pad or the onscreen keyboard to enter in the movie or TV show
title. Then select the items you would like to download. When you’re ready to search highlight the
search icon and press ENTER on your remote.
Tip: By default, the filename will be in the search field and all items will be checked.
53Popcorn Hour VTEN User Manual Change info Under the Change info section, select the correct title for your video. You can press INFO on your remote to see the synopsis before selecting that particular entry. Change fanart Under the Change fanart section you can select from a number of photos that can be used as the background display when viewing the video information. 54 2001-2015© Cloud Media. All Rights Reserved
Change poster

     In the Change poster section you can choose the movie poster you would like to use.

     Afterwards, remember to download the data that way the changes you selected will always be
     used when you press the INFO button on your video.

     Tip:   In order to download meta data, you must ensure that your Popcorn Hour VTEN is
            connected to the Internet.

55
Popcorn Hour VTEN User Manual 12.4 Download Subtitles On the movie info page, navigate to the Fetch online subtitle option and press ENTER on your remote. A list of results will come up. Choose the subtitle that best matches your movie. 56 2001-2015© Cloud Media. All Rights Reserved
If you need to get subtitles in a different language than your default, press the GREEN button on
     your remote to change your language filter.

     The downloaded SRT subtitle file will be saved on the same storage device as your video file. In
     order to enable it, start playback of your movie and press the SUBTITLE button on the remote.

57
Popcorn Hour VTEN User Manual 13. Networked Media Jukebox Interested in downloading information for all your movies and TV shows in one go? Do you want to browse your video collection based on the movie poster? With the Network Media Jukebox you can! Without the need of additional PC software, the Popcorn Hour VTEN will scan your movie and TV show library and download the poster, fanart and meta-data for you. When you want to watch a movie, you can sort through and view your collection using the posters, just like if you were at a movie store. The Networked Media Jukebox software will also organize your photo and music library so you can view those files in a beautiful and easy to use interface. 58 2001-2015© Cloud Media. All Rights Reserved
13.1 Configuring NMJ
     The Networked Media Jukebox, or NMJ, software works by creating a database for your storage
     device. This database contains all the info, posters and fanart for your entire movie and TV show
     library as well as any other media you scan in.

     To create the NMJ database, use the file browser to navigate to your media storage device. Then
     press LEFT on D-PAD and choose Networked Media Jukebox.

     You’ll be prompted to create an NMJ database for your device. Select YES to begin.
     Tip: Building the NMJ database can take several hours depending on the size of your library. It’s
          recommended to start this procedure before you go to bed or during a time where you don’t
          expect to use the device.

59
Popcorn Hour VTEN User Manual
NMJ Scanning Configuration
NMJ will automatically scan the entire folder for supported media
Scan Entire Folder
and add it to the NMJ database
Specify Scan Allows you to specify which folders the NMJ software will scan and
Target(s) add media from. (Recommended)
In this example, we will select the Specify Scan Target(s) option.
Select the desired language you would like the NMJ software to use when downloading video
information. NMJ will try and use that version of the meta data if available; otherwise it will default
to English.
60
2001-2015© Cloud Media. All Rights ReservedSelect the type of media you would like added to the database. Any file types that aren’t selected
here will be ignored.
Select the folders that you would like the NMJ software to scan.
Tips: You may add additional folder at any time via the NMJ Manager.
You may add “no_xxx.nmj” files to stop certain folders or images being included in the NMJ
output. See the NMT forum NMJ section for more information.
61Popcorn Hour VTEN User Manual On the confirmation page you may review the folders you have selects, remove them from the list or add additional ones if necessary. Once you are finished, press the BLUE button on your remote to complete the setup. Congratulations! Your first NMJ database setup is completed. The system is now scanning your files, downloading relevant data and creating a database. Depending on how large your library is, it can take several minutes or even hours to complete. 62 2001-2015© Cloud Media. All Rights Reserved
While your database is being created, you can view the onscreen NMJ help guide and learn
     valuable information for organizing your media library, navigating inside the NMJ software and
     playing back your media.

63
Popcorn Hour VTEN User Manual
13.2 Navigating in NMJ
Press the MENU button on your remote to bring up the NMJ menu. This will help you navigate and
sort your content in the NMJ software.
MOVIES
Recent Scanned This will display all your recent movies and TV shows recently scanned
Movie This will display all of your movies
TV Series This will display all of your TV shows
By Genre This will display all your videos grouped into different genres
By Year Displays a list of years, select one to view all videos released in that year
Displays a list of ratings, select one to view all videos with that rating
By User Rating
(ratings are pulled from the web at first and can be set by users later)
Search You can search videos by title, cast or director
Bring up the on screen help to view more information about the NMJ
Help
software
64
2001-2015© Cloud Media. All Rights ReservedMUSIC
Recent Scanned Recent Scanned - This will display all of your songs recently scanned
By Album This will display all your music by album
By Playlist Displays a list of playlists in your NMJ database
By Song Displays music tracks alphabetically in a list
By Genre Displays albums based on Genre
By Artist Displays a list of artists, once selected their albums are displayed
Displays a list of years, once selected the albums released that year
By Year
are displayed
Groups all audio tracks based on rating (rating must be added to
By User Rating
audio track by user in the NMJ)
Search Search audio track by name or artist
Bring up the on screen help to view more information about the NMJ
Help
software
65Popcorn Hour VTEN User Manual
PHOTO
Recent Scanned This will display all of your photos recently scanned.
Displays a list of years, once selected all photos taken in that year
By Date
are displayed
Displays a list of albums, once selected all photos in that album
By Album
are displayed (photo albums are folders)
Bring up the on screen help to view more information about the
Help
NMJ software
66
2001-2015© Cloud Media. All Rights ReservedNMJ Media Menu
To bring up the Media Menu, simply press LEFT on the D-pad.
Video Switch to the video section of NMJ
Music Switch to the music section of NMJ
Photo Switch to the photo section of NMJ
Preference Configure your NMJ preferences
Jukebox Manager Launch the Networked Media Jukebox Manager
File browser Exit the NMJ and return to the file browser
Add Shortcut Create shortcut on home menu
Tip: The Popcorn Hour VTEN remembers your preferences for different storage devices. If you
were using the NMJ view the last time, it will automatically launch NMJ the next time you
select that device. If you want to exit back to the file browser, use the Jukebox Manager or
the Switch to File Browser option.
67Popcorn Hour VTEN User Manual 13.3 Updating NMJ Information Sometimes the scanner might download the wrong information for your video file. To fix this, you can manually edit the file in the NMJ library right from the device. In the NMJ library, select the item that’s incorrect and open up the media control panel. Navigate to the Edit option and press ENTER on the remote. You can use the on screen keyboard on the numerical pad to enter in the title of the movie or TV show. 68 2001-2015© Cloud Media. All Rights Reserved
In this example we removed the subtitle and tried to simplify the search more.

     Once you are done typing in the title of the video, navigate down to the search icon and press
     ENTER on your remote.

69
Popcorn Hour VTEN User Manual Depending on the movie title, multiple results may be shown. Choose the correct result and press ENTER on remote. The new poster, fanart and meta data will be downloaded and your database will be updated. Tip: the NMT forum has tools/guides to help you manipulate your NMJ data in many ways. 70 2001-2015© Cloud Media. All Rights Reserved
13.4 Networked Media Jukebox Manager

                     Add additional directories for the NMJ to monitor and add to the
     Add folder(s)
                     NMJ database

     Scan All        Will scan and add any new files added to the monitored folders

     Rescan All      This option will rescan all media and download everything again

     Delete All      This option will delete the NMJ database

     Scan Option     Configure additional scan settings, more information below

     To Jukebox      Launches the NMJ software

     To Source       Launches the file browser

71
Popcorn Hour VTEN User Manual
Scan Option
Auto Download Fanart Enable or disable automatic download of fanart for videos
Specify which language to download meta data in (if not
Scan Language
available, will default to English)
Additional Information
A new folder named “NMJ_Database” will be created on your storage device. Please do not
remove or edit this folder as it contains the NMJ database for your media.
72
2001-2015© Cloud Media. All Rights Reserved14. NMT Apps
NMT Apps turn your Popcorn Hour VTEN into a network attached storage device, Torrent Client
and UseNet Client. An external storage device is required to install the NMT apps.
In order to enable file transfer from your PC to the VTEN, you will need to enable SAMBA Server.
Specify the samba workgroup you’d like the Popcorn Hour
Samba Workgroup
VTEN device to be on
Change the password used to access the local storage via
Change Password
samba or FTP
FTP Server Start or stop the FTP server
NFS Server Start or stop the NFS server
Samba Server Start or stop the Samba server
Torrent Start or stop the torrent client
UPnP Server Start or stop the UPnP server
Usenet Client Start or stop the Usenet client
Note: The username to access your local storage over samba or FTP is “nmt” without quotes.
73Popcorn Hour VTEN User Manual 14.1 Installing the NMT Applications In the Setup menu, select Maintenance and then NMT Setup Wizard. Note: The option is only visible if you have a storage device installed. Select the Fresh Setup option and press the GREEN button the remote to proceed. 74 2001-2015© Cloud Media. All Rights Reserved
WARNING: Please note that this will format the storage device you are setting up; all files on the
              storage device will be erased and will become unrecoverable.
     The NMT applications will be stored on a small hidden partition and any remaining space will be
     formatted in EXT3 as local storage.

75
Popcorn Hour VTEN User Manual
Choose which USB disk you want to store your media files.
In this example we chose the Online option. If you choose this option, you will be presented with
the release notes and terms and conditions.
IMPORTANT: We strongly advise that you read this information before proceeding. Proceeding
any further indicates that you agree to the terms and conditions.
Once you’re ready to proceed, go ahead and press the GREEN button on your remote.
76
2001-2015© Cloud Media. All Rights ReservedThe formatting and installation process then begins. Depending on the size of your storage
devices, it may take several minutes to complete. Once the NMT applications are installed, the
Popcorn Hour VTEN will restart.
Once the NMT applications are installed, you see a new option in the Setup menu titled NMT
Applications. In this area you can start and stop the NMT applications.
77Popcorn Hour VTEN User Manual
14.2 Using the FTP Server
The FTP service allows for simple and convenient file transfer to and from your Popcorn Hour
VTEN. To use the FTP service goes into the NMT Applications section of the Setup menu and
starts the service. Please note that the service will remain on, even after a power cycle, until you
go back and stop it.
To connect to the Popcorn Hour VTEN via FTP, you will need to use an FTP client. Some free
clients are FileZilla and Winscp.
If you are using a Windows computer you can use Windows Explorer as an FTP client by typing
the following into the address bar:
ftp://NMT-IP/
Where NMT-IP is the IP address or host name of the Popcorn Hour VTEN. For example:
192.168.1.101 or A400.
When prompted for credentials use the information provided below (unless you changed the ftp
password).
Host: IP Address of your device
Port: 21
Username: nmt
Password: 1234
14.3 Using the Samba Server
A Samba Server is one of the most common ways to share files over a network. Samba can also
be used to stream your content on your local storage to other devices on your network. To use the
Samba service goes into the NMT Applications section of the Setup menu and starts the service.
Please note that the service will remain on, even after a power cycle, until you go back and stop it.
To access your Popcorn Hour VTEN over samba, type the IP address or hostname of the device
into the address bar on your computer’s file browser.
Example: \\VTEN\
\\192.168.1.101\
\\10.0.0.57\
Note: The device name by default is VTEN but can be changed in the Preference section of the
Setup menu.
When prompted, use the following credentials (unless you changed the samba password):
Username: nmt
Password: 1234
78
2001-2015© Cloud Media. All Rights Reserved14.4 Using Torrent Client
The Popcorn Hour VTEN has a built in torrent client, called Transmission. You can use this torrent
client to download files rather than leave your computer on. To use the torrent client go into the
NMT Applications section of the Setup menu and start the service. Please note that the service
will remain on, even after a power cycle, until you go back and stop it.
IMPORTANT: The torrent client uses the formatted local storage to save your downloaded files.
Please make sure you have enough space for the download to complete.
Once the torrent service has been enabled on the Popcorn hour VTEN, you can use your
computer’s web browser to access the Torrent client interface. Type the following address in the
address bar of your web browser:
http://NMT-IP:8077/transmission/web
Where NMT-IP is the IP address or host name of your Popcorn Hour VTEN. For example:
192.168.1.101 or VTEN.
IMPORTANT: The computer or device you are using the web browser on must be on the same
network as the Popcorn Hour VTEN.
At the BitTorrent client GUI, click on Browse and select the torrent file.
Once the torrent file is selected, click on Upload to add the torrent file to the torrent list on your
Popcorn Hour VTEN. The torrent client will start to download the file(s).
Other settings are available through the web GUI such as the Scheduler which can be used to
schedule torrent downloads and set their upload/download limits.
IMPORTANT: The Popcorn Hour VTEN has to be switched ON and properly connected to the
internet during the scheduled download time in order for the BitTorrent client to
download the required files.
79Popcorn Hour VTEN User Manual
14.5 Using Usenet Client
NZBGet is a command-line based binary newsgrabber that downloads files from Usenet servers
based on information given in NZB files. NZBGet can be installed on the Popcorn Hour VTEN, as
part of NMT Apps, and the files can be downloaded directly to the local storage formatted in the
NMT Setup Wizard. To use the NZBGet client go into the NMT Applications section of the Setup
menu and start the Usenet service. Please note that the service will remain on, even after a power
cycle, until you go back and stop it.
To run the NZBGet application you need access to a Usenet provider. Your internet service
provider may have a news server that you can access, or you can have a separate Usenet
account on a pay-server.
Once you have a Usenet account, you can configure NZBGet on your NMT to access the account.
Your Usenet provider will provide you with the information required, such as:
1. User ID and Password.
2. News-server name and port to connect (usually at port 119).
3. Number of concurrent connections allowed.
80
2001-2015© Cloud Media. All Rights ReservedYou can also read