MicroVision Camera User's Manual - 8101 Cessna Avenue Gaithersburg, MD 20879-4164
←
→
Page content transcription
If your browser does not render page correctly, please read the page content below
MicroVision Camera
                                       User’s Manual
  USA

8101 Cessna Avenue
Gaithersburg, MD 20879-4164

800.728.0154 tel
301.990.3155 fax

www.mcspro.com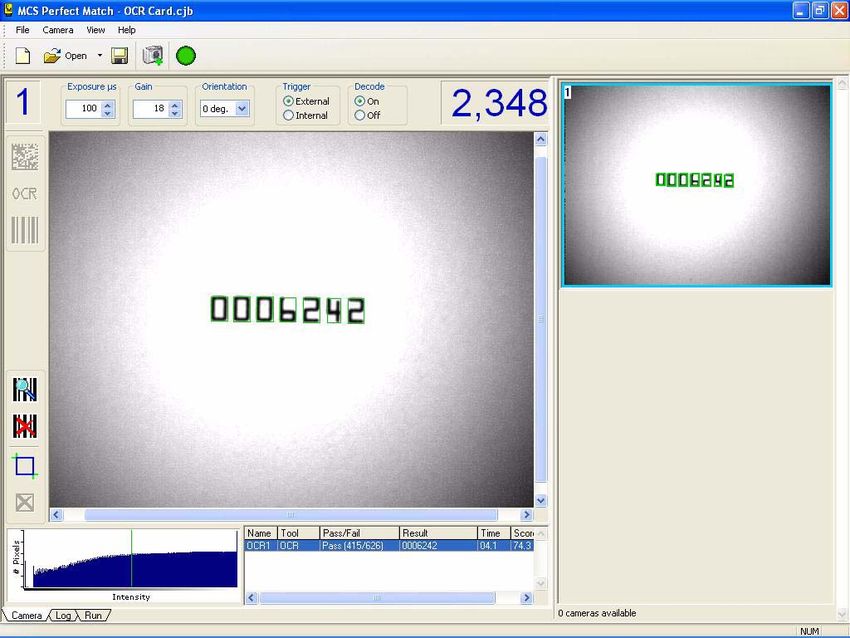
MCS
                            MicroVision Camera

MCSMVCUM1808 • Revision 0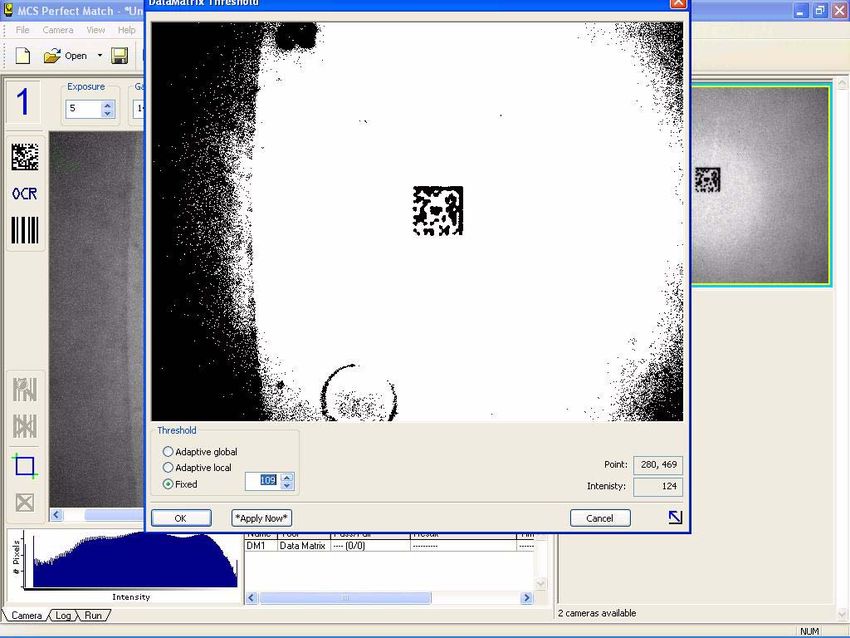
© 2008 MCS Incorporated All rights reserved.

MCS retains all ownership rights to all computer programs offered by MCS, their products, and the contents of this
manual. The source code for software is a confidential trade secret of MCS. You may not attempt to decipher,
decompile, develop or otherwise reverse engineer MCS software, firmware, or products. Information necessary to
achieve interoperability is furnished upon request.

This manual is furnished under license and may be used or copied only in accordance with the terms of such license.
The information in the manual is furnished for informational use only, is subject to change without notice, and should
not be construed as commitment by MCS. MCS assumes no responsibility or liability for any errors or inaccuracies that
may appear in this manual. No part of this manual may be reproduced, stored in a retrieval system, or transmitted, in
any form or by any means, electronic, mechanical, recording, or otherwise, without the express written permission of
MCS.

Existing artwork or images that you may desire to scan may be protected by copyright law. Be sure to obtain
permission for use of existing artwork.

Trademarks

This product carries the trademark of MCS. All the trademarks of component parts used by MCS in the manufacture of
this product are the property of their respective owners. The MCS logo is a registered trademark of MCS.

Microsoft and Windows are registered trademarks of Microsoft Corporation. All other brand or product names are
trademarks or registered trademarks of their respective companies or organizations.
Manufacturer's Statement
Limited Warranty, Disclaimer, Limitation of Liability

MCS warrants this product for a limited period of time from initial purchase against defects in materials and
workmanship. This warranty does not cover damage caused by misuse or abuse of this product or by acts of God or
accidents or other causes beyond the control of MCS. Also not covered by this warranty are claims other than by the
original purchaser. Your sole remedy and our sole liability to you shall be to repair or replace this product at our
discretion if it does not meet the requirements of this warranty.

MCS and its distributors shall under no circumstances be liable for any damages arising from the use of or the inability
to use this product or from any loss of revenue or profit, business interruption, or other loss which may arise from the
use of this product.

THE WARRANTIES ABOVE ARE EXCLUSIVE AND IN LIEU OF ALL OTHER WARRANTIES, WHETHER
EXPRESS OR IMPLIED, INCLUDING THE IMPLIED WARRANTIES OF MERCHANTABILITY AND FITNESS
FOR A PARTICULAR PURPOSE.
Contents
About this Guide................................................................................. 1-1
    Intended Audience ............................................................................................. 1-1
    Conventions ....................................................................................................... 1-1
    Getting Help ....................................................................................................... 1-1

Getting Started.................................................................................... 2-1
    Camera Installation ............................................................................................ 2-1
       Camera Placement....................................................................................... 2-1
       Physical Installation ...................................................................................... 2-6
       Swing-arm Inserter ....................................................................................... 2-8
       PLC-type Inserter ......................................................................................... 2-9
       IR Track ...................................................................................................... 2-10
    Software Installation......................................................................................... 2-11
    Dongle Installation ........................................................................................... 2-11
    System Power Up ............................................................................................ 2-12
    MCS Systems .................................................................................................. 2-12
       Read and Print............................................................................................ 2-13
       IR Track ...................................................................................................... 2-14
    Settings.ini ....................................................................................................... 2-19

Understanding the Interface .............................................................. 3-1
    Opening the Application..................................................................................... 3-1
    The Main Window .............................................................................................. 3-2
    Title Bar.............................................................................................................. 3-2
    Menu Bar ........................................................................................................... 3-2
    Toolbar............................................................................................................... 3-3
        Customizing the Toolbar............................................................................... 3-3
    Display Area....................................................................................................... 3-3
    Tab Selection Area ............................................................................................ 3-3
        Run Tab........................................................................................................ 3-4
    Intensity Histogram ............................................................................................ 3-5
    Results Area ...................................................................................................... 3-5
    Camera Zoom .................................................................................................... 3-5
    New, Open, Save, Save As ............................................................................... 3-5
    Debug Window................................................................................................... 3-6

Camera Operation and Setup ............................................................ 4-1
    Add Camera....................................................................................................... 4-1
      Saving Camera Setup .................................................................................. 4-3

                                                                                                                                  TOC-1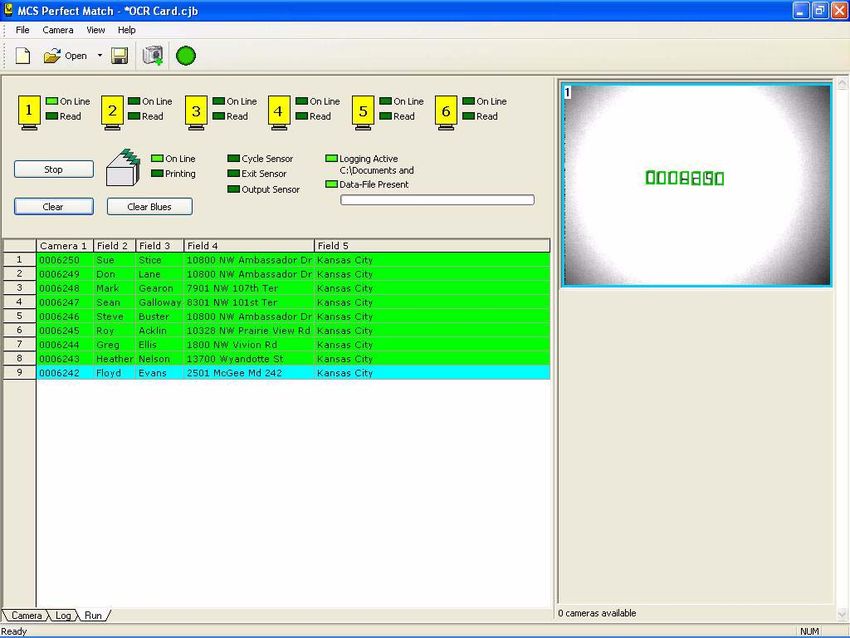
Focusing the Camera......................................................................................... 4-4
    Remove Camera................................................................................................ 4-5
    Properties........................................................................................................... 4-5
    I/O Settings ........................................................................................................ 4-6
    Running the Auto Setup Feature ....................................................................... 4-7
    I/O Timing .......................................................................................................... 4-8
    Run .................................................................................................................... 4-8
    Stop on Error...................................................................................................... 4-8
    Decode Image.................................................................................................... 4-9
        Decode on Tool Update................................................................................ 4-9
    Reset Pass/Fail Counts ..................................................................................... 4-9

Readable Image Types ....................................................................... 5-1
    Printing and Converting Issues .......................................................................... 5-1
    Understanding the Camera Tab......................................................................... 5-1
        Image Tools.................................................................................................. 5-2
        Image Refinement Settings .......................................................................... 5-2
    Data Matrix Barcodes ........................................................................................ 5-3
        Data Matrix Barcode Template Placement................................................... 5-3
        Data Matrix Barcode Tool Configuration ...................................................... 5-4
    Linear Barcodes................................................................................................. 5-6
    OCR Alphanumerics .......................................................................................... 5-9
        OCR Alphanumerics Template Placement................................................... 5-9
        OCR Alphanumerics Tool Configuration ...................................................... 5-9

Troubleshooting and Maintenance ................................................... 6-1
    Software Diagnostics ......................................................................................... 6-1
       Configuration Files........................................................................................ 6-1
       Camera Images ............................................................................................ 6-1
       Debug Utility ................................................................................................. 6-2
    Machine Diagnostics.......................................................................................... 6-2

Configuration Files............................................................................. 7-1
    Perfect Match System Settings.ini ..................................................................... 7-1
    IR Track System Settings.ini.............................................................................. 7-5

    User’s Manual
TOC-2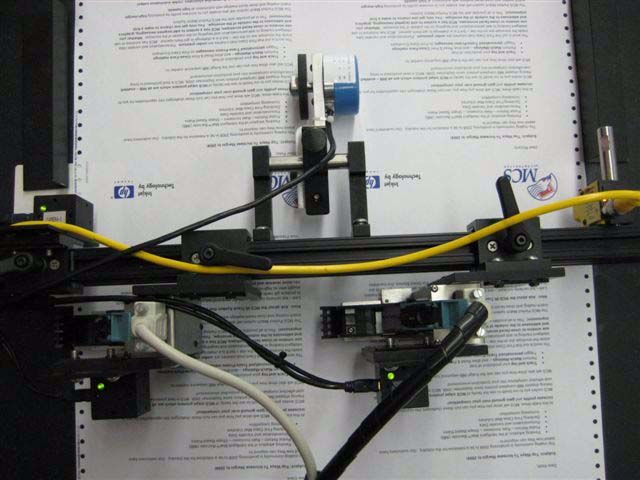
Chapter 1: About this Guide

                      The MicroVision Camera is an integral part of the MCS Perfect              In This Chapter
                      Match, IR Track, Input, and Read and Print systems. The camera
                                                                                                 • Intended
                      reads a variety of readable image types and decodes (or passes)              Audience
                      the image. The software that accompanies the camera is
                      Windows-based and intended to configure camera operation.                  • Conventions
                                                                                                 • Getting Help
               Note: The MicroVision Camera is a productivity tool. It is used to
                      assist in print production but not to replace standard quality
                      control procedures.

                      This document describes how to install and use the camera within
                      these systems. For systems that print, this document assumes that
                      you have already installed the MCS Printer software and have
                      read the accompanying User’s Manual.

Intended Audience
                      This guide is intended for use by MCS equipment operators.
                      Basic knowledge of the Microsoft Windows® operating system
                      and some experience with MCS printing equipment is assumed.

Conventions
                      The following conventions are used in this guide.

                       Convention              Description
                       Bold                    Actions you should take such as text or data to
                                               be typed exactly or items to click.
                       Italics                 Items to type for which you must supply a
                                               value.

Getting Help
                      A complete on-line help system is available in the interface by
                      selecting the Help item on the Menu bar or the Help icon on the
                      toolbar.

                                                                                                                  1-1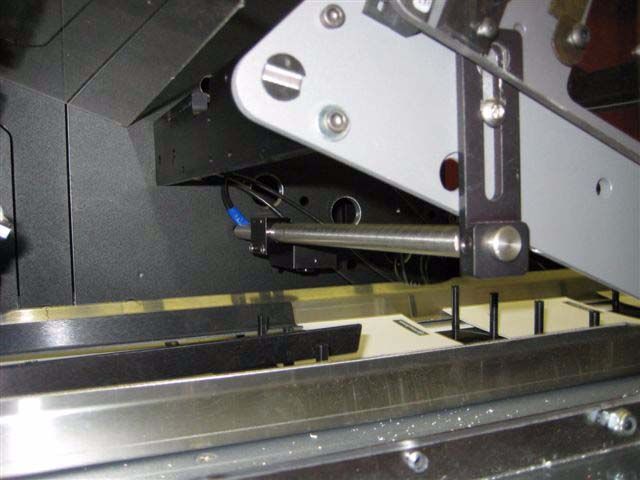
Getting Help
About this Guide

                      If you need further assistance, please contact MCS via e-mail at
                      technicalsupport@mcspro.com or call 877.MCS.PROZ (877.627.7769). Telephone
                      support for MCS equipment is available 8:30am to 8:00pm EST Monday through Friday
                      and is free of charge.

      User’s Manual
1-2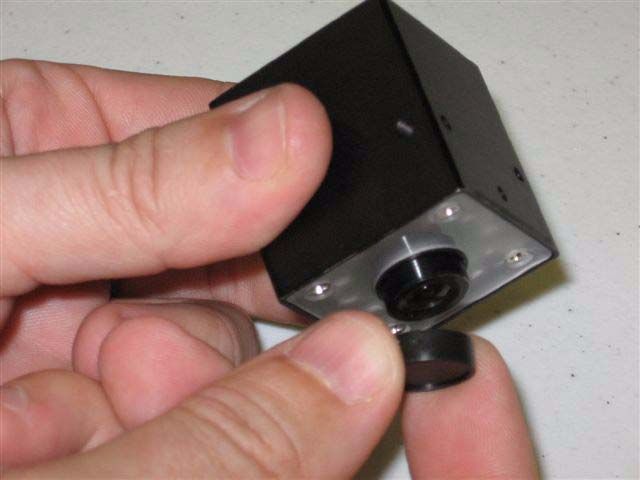
Chapter 2: Getting Started

                    The MicroVision camera can help track, verify, and count on           In This Chapter
                    many pieces of equipment including inserters. The camera takes a
                                                                                          • Camera
                    picture of a readable image type and decodes (or passes through)        Installation
                    what it sees. How it translates that data is determined by your
                    setup. You can read, match, pass, and print data. In order for this   • Software
                                                                                            Installation
                    interaction to occur, you must install the camera and the camera
                    software, and set up the camera via the software as well as           • Dongle
                    configure how the camera interacts with the MCS Printer. This           Installation
                    chapter describes camera installation and setup.                      • System Power
                                                                                            Up
                    In general, installation should adhere to the following order,        • MCS Systems
                    assuming that physical installation of all the components, except
                    the camera, has been completed:
                1. If applicable to your setup, install MCS Printer software. See the
                   Array Imaging System Software User’s Manual and GIS 4250
                   Software User’s Manual for instructions.
                2. If printing, create Special Batch files. See “Installing Special
                   Files” on page 2-13.
                3. Install MicroVision Camera software. See “Software Installation”
                   on page 2-11.
                4. Install the camera dongle and dongle license. See “Dongle
                   Installation” on page 2-11.
                5. Install the Camera. See “Camera Installation” on page 2-1.
                6. Make any required manual Settings.ini file changes. See
                   “Settings.ini” on page 2-19.
                7. Add the Camera(s). See “Add Camera” on page 4-1.
                8. Configure Readable Images. See “Readable Image Types” on
                   page 5-1.
                9. If printing, print the job.
             Note: There may be specific instructions based upon the type of MCS
                    system you are using. Be sure to refer to “MCS Systems” on page
                    2-12 to review descriptions of your system.

Camera Installation

             Camera Placement

                    There is a variety of MCS equipment on which the MicroVision
                    camera can be installed:

                                                                                                           2-1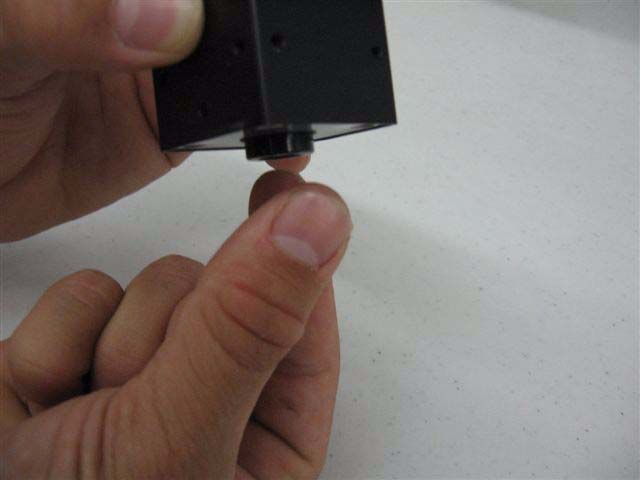
Camera Installation
Getting Started

                      •   As an input to other MCS-approved equipment
                      •   Inserters (Friction-Feeder, Swing Arm)
                      •   Card Attachers
                      •   Inkjet Transport Base
                      •   Continuous Form Transport Base
                      •   Continuous Form Rewinder
                      •   Folders
                      •   Stitchers

                      A camera is triggered by cycle count either from an encoder (electrical/software) or an
                      external trigger (physical device), depending upon camera placement and/or equipment
                      choice. For example, a Pitney Bowes FlowMaster install utilizes an onboard encoder
                      whereas a Swing Arm inserter utilizes external triggers to generate cycle and camera
                      triggers.

                      MCS provides recommendations based on the type of system you are using.

                      Inserters

                      Friction-Feeder Style
                      •   Camera Placement Option 1 - Facing down toward track, mounted above track

      User’s Manual
2-2
Camera Installation
Getting Started
• Camera Placement Option 2 - Facing up, reading each piece as it exits the feeder
• Camera Placement Option 3 - Facing up toward the track, mounted under the track
(generally requires modification to track – MCS technicians can determine whether
this is possible)
In general, when facing up or down in the track, the camera is triggered via the inserter’s
on-board encoder.
User’s Manual
2-3Camera Installation
Getting Started
When the camera is mounted facing up, reading each piece coming out of the feeder, an
external trigger source (usually a beam sensor) is used. Additionally, limitations of the
read-up configuration are dictated by the placement of the image to decode in relation to
the belts of the feeder.
Swing-Arm Style
• Camera Placement Option 1 – Facing down toward track, mounted above the track
• Camera Placement Option 2 – Facing up, reading each piece as it exits the feeder
(some limitations may occur on some feeders, as the gears and mechanics of a
typical swing arm may prevent placement of the camera on the last feeder. An MCS
technician can determine what’s available for mounting)
• Camera Placement Option 3 – Facing up toward the track, mounted under the track
(generally requires modification to track – MCS technicians can determine whether
this is possible)
User’s Manual
2-4Camera Installation
Getting Started
Swing Arm style inserters are typically set up using an external trigger source. A series
of proximity sensors are mounted near the drive shaft, in conjunction with collars that
are placed to simulate the timing effect of a cycle count, as well as the camera triggers.
An MCS technician will install these and train you on proper adjustment for different
jobs.
Attacher, Transport Bases, Rewinders, Folders, and Stitchers
Normal camera placement on these types of equipment is facing down. These types of
camera installs always require an external trigger source, which is usually each
individual piece (for cut sheet forms) or a timing mark (for continuous forms).
User’s Manual
2-5Camera Installation
Getting Started
Physical Installation
Physical installation of the camera involves attaching the camera to the device,
connecting it to the computer, and installing its driver. Equipment choice dictates
whether it will be triggered by an encoder or internal sensor.
To install the camera and camera driver:
1. Attach Camera to device.
The device can vary and placement can vary depending on the type of printing system
used. See “Camera Placement” on page 2-1.
2. Plug the USB cable connector into camera.
USB Port
Trigger Port
Note: Make sure that the USB cable is inserted correctly into the camera port. The Narrow end
of the port must match the narrow end of the cable connector.
3. Plug in Trigger cable connections as needed for your setup. See “Equipment
Connections” on page 2-7 to evaluate and complete your physical connections.
4. Plug USB cable into the computer’s USB port.
A separate USB card is recommended. A Windows Found New Hardware message pops
up and the New hardware wizard is launched.
5. Follow the wizard and select Install from Specific Location.
6. Browse to select C:Program Files>MCS Perfect Match>Driver.
7. Click OK.
8. Click Next.
The Install PM USB Driver security message appears.
9. Click Continue anyway.
10. Click Finish.
User’s Manual
2-6Camera Installation
Getting Started
Note: The lens cap must be removed from the camera before use.
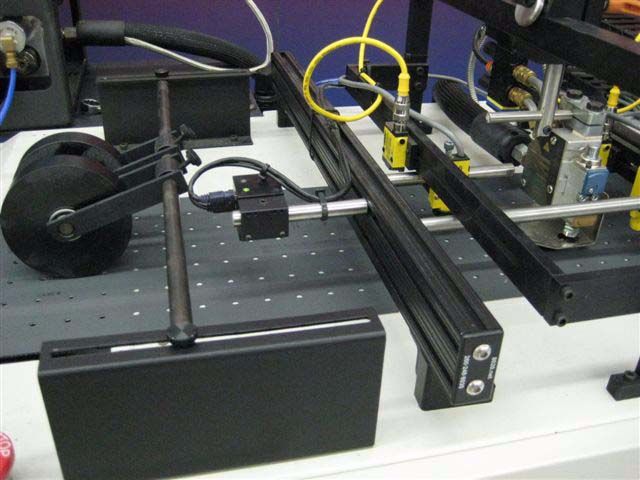
Equipment Connections
The following diagrams provide a typical description of camera connections for a
swing-arm inserter, PLC-type inserter, and an IR Track.
Note: Additional connections may be needed for inkjet setup.
User’s Manual
2-7Camera Installation
Getting Started
Swing-arm Inserter
e-stop Exit Sensor Programmable Sensor
Proximity Sensor
Transport
MicroVision Controller
Camera Dongle
Typical Windows XP PC MicroVision Camera
USB HUB
User’s Manual
2-8Camera Installation
Getting Started
PLC-type Inserter
e-stop Diverter Programmable Sensor
Transport
MicroVision Controller
PLC-Encoder Panel
Camera Dongle
Typical Windows XP PC
MicroVision Camera
USB HUB
User’s Manual
2-9Camera Installation
Getting Started
IR Track
e-stop Programmable Sensor
Transport
MicroVision Controller
Array Print Controller
Camera Dongle
Typical Windows XP PC
MicroVision Camera
USB HUB
User’s Manual
2-10Software Installation
Getting Started
Software Installation
The first installation of the camera software is done by an MCS factory trained
technician at your facility.
Minimum system requirements to perform upgrades are:
• Pentium processor
• Windows XP Professional
• 1 GB RAM
• CD ROM drive
Note: A serial COM Port connection is needed for the Perfect Match System.
There is no way to manually install or uninstall the software on a PC by deleting or
copying files. You must run Setup.exe to install the software.
To install/upgrade the software:
1. Uninstall any currently installed version using the Windows Remove Programs
mechanism.
Access this window by selecting Start>Control Panel>Add or Remove Programs and
then select the MicroVision Software. Click Remove.
2. Run Setup.exe for the version you would like to install.
3. Follow the setup wizard.
Dongle Installation
The MicroVision camera software requires a hardware dongle. A dongle is a hardware
device that allows your equipment to communicate with the MCS software. If you
attempt to use the software without the dongle installed, it will not function. You will
receive an error.
To install the dongle from the installation CD:
1. From the installation CD, double-click the file DongleInstallation/Hdd32.exe in the
Dongle installation folder.
This executable installs the drivers to operate the dongle.
2. Follow the instructions.
3. Double-click the file DongleInstallation/DongleReader.exe.
This program verifies driver installation and proper operation.
4. Insert the Dongle into a USB port.
The dongle operates in any USB port; however, an internal port is recommended for
added security.
User’s Manual
2-11System Power Up
Getting Started
5. Go to Start>Dalso Coreco>Sapeca>License Manager and click Load License.
A window appears with license numbers found.
6. Click the license number for this dongle.
7. Click Open.
System Power Up
You must power up the PC before the camera box. This order is important because the
serial connection will only look for data one time. If the PC is not powered up, camera
initialization may fail.
MCS Systems
The camera can be used with each of the MCS Systems described below:
System Description
Read and Print The Read and Print configuration of the Perfect Match system combines the camera identification process with the
functionality of an MCS inkjet printer. The camera now controls the print order.
One camera plus an MCS inkjet for printing.
Match The Perfect Match system uses the MicroVision camera to match data matrix barcodes, linear barcodes, and OCR
alphanumerics on multiple variable printed pieces.
Matches two or more printed pieces. Uses multiple cameras.
Match and Print Multiple cameras plus a inkjet printer. Matches and prints.
IR Track The MCS IR Track system can work on either a continuous form laser printer or in the continuous form bindery lines
to create match jobs with no visible automation marks. This system differs from traditional Read and Print because
there is no database associated with the IR Track. What the camera reads from the laser printed material is what is
transposed to print in invisible ink. Multiple cameras for the back of the laser printer.
Input Camera This system decodes and passes data via serial or ethernet connection to some other piece of equipment.
User’s Manual
2-12MCS Systems
Getting Started
Read and Print
The required items for this setup involve both the inkjet software and camera software.
The following text provides a brief description of the needed items.
In the Inkjet software, load the job, template, and data file and make sure your
setupmatch.cfg file is correctly set. Know your unique identifier in the data file. In the
camera software, make the necessary changes for the unique identifier in the Setup.ini
file, create/load the camera job, setup the camera and readable images, and enable the
job.
The following MicroVision Camera functions apply only to setup and operation of the
Read and Print system.
Installing Special Files
MCS has created special files that make it easier for your camera and the MCS Printer to
communicate. Once the camera and MCS Printer software have been installed, you can
install the special files.
These files copy your printer’s Setup.cfg file and make the appropriate changes to the
file needed to interact with the camera. When printing, use the file for your setup (Match
for Perfect Match or Print for Printers) to invoke the printing software.
Note: If you desire changes to your printer’s configuration file and you are using a camera, be
sure to make the changes to the .cfg file for the system, not the default Setup.cfg.
To install special files:
1. Double-click PrintPCSetup.exe.
Two icons are placed on your desktop. These files allow you to run the camera with
(SetupMatch file) or without (SetupPrint file) an inkjet. These files will be used when
running the job.
Enabling the Job
After all setup and configuration is complete, you must enable the Read and Print print
job from the camera software’s Run tab. The Print button activates the printer and uses
any existing MCS Printer settings. You must have the special files installed on your
desktop.
Missing Records
This option can be used only when your MCS Printer is being used in the system. This
option can be selected while a job is running. It creates a file that contains a list of how
many records are left to print or leftover without printing. You must set the Dupe
Checking line in the MCS Printer config file to 1 for this feature to work.
User’s Manual
2-13MCS Systems
Getting Started
Unique Identifier in the Data File
Using the standard MCS Printer data file, place the unique identifier (index number) in a
separate field in your data. Once the field is identified, the field number must be updated
in the setup file.
Note: The data mask in the settings.ini file must match the number of digits (e.g. 7 digits
equals #######).
Note: You must use leading zeros.
Six or seven digits are recommended. The number of digits must be consistent within a
file. If you have one million or more, 7 digits is necessary.
Do not use the same unique identifier within a job, even if you split the file into multiple
segments.
The Data Mask is located under the [System] group in the Settings.ini file. See
“Configuration Files” on page 7-1 for a detailed explanation of this file.
IR Track
The IR Track System fits into your current continuous print operations or continuous
form bindery line. The system can be used to apply invisible automation marks or as a
method to add security information to printed documents. It can even be used to add sort
control marks to increase productivity. No database is necessary for the invisible print to
be appended.
The system reads preprinted unique identifiers and uses that information to print
invisible unique identifiers. Once printed, invisible identifiers can be read by
User’s Manual
2-14MCS Systems
Getting Started
MicroVision cameras. This results in printed pieces with no visible automation marks
that can now be matched.
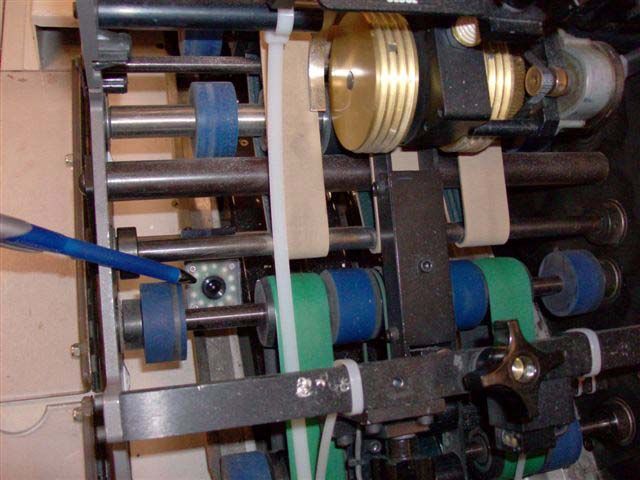
The system can mount on a continuous forms table or a forms Rewinder. The following
diagram shows the front and back view of a typical installation.
In a typical IR Track scenario, pages are printed 2-up with a trigger mark and a unique
identifier (such as a bar code) on opposite sides. The trigger/timing mark needs to be a
repeatable, detectable object that is the only thing that the sensor will detect within its
vertical path. The visible barcode is printed by your continuous laser printer. It is
User’s Manual
2-15MCS Systems
Getting Started
defined in your document-composition software (i.e., Anchor Max Designer, GMC
PrintNet). Both marks are placed in an area to be trimmed off later.
The visible barcode is defined as the combined values of the unique identifiers for both
records of the 2-up form. For instance, the name on the left may have a unique identifier
of “0000001”, while the name on the right side of the 2-up form has a unique identifier
of “0723001”. When concatenated together, the left and right side unique identifiers
would create the value “00000010723001”, which is created as the visible black barcode
in your trim area.
The position of the barcode is dependent on the placement of your timing/trigger mark.
Generally, it is easiest if they are placed along the same horizontal plane. However, a
change in the physical placement of the trigger sensor can affect a change of the
User’s Manual
2-16MCS Systems
Getting Started
placement of the barcode, thereby changing the placement of the invisible barcodes on
the form itself. (The camera that reads the laser printed barcode is immediately triggered
by the sensor. Movement of the trigger sensor allows you to move the vertical placement
of the barcode.) When the timing/trigger mark is on the same horizontal plane as the
barcode, the equipment is set up as shown.
Understanding the relationship between the trigger sensor and the camera is vital to the
concept of how the IR Track system operates. Below is an example of what happens
when the physical placement of the trigger sensor is adjusted. You can print your
invisible codes lower on the form. You need to be cognizant of this placement, so that
you do not go too far, resulting in the invisible barcodes printing on the next/wrong
form.
User’s Manual
2-17MCS Systems
Getting Started
Determining the Distance from Sensor
Define the measurements that are required to print and verify the invisible barcodes.
What you see below is considered “Starting Position”. Jog your form to this position
(with the sensor directly over the timing/trigger mark). From here, measure the distance
from the beginning of the print head to the place on the form where you would like the
invisible barcodes to be printed. This is your “Distance from Sensor” value entered in
the I/O settings. See “I/O Settings” on page 4-6 for details.
Defining Trigger Ticks Value
Measure the distance from the center of the camera (mounted behind the print head) to
the place on the form where you would like the invisible barcodes to be printed. This is
your “Trigger Ticks” value. (Be aware that the value cannot be greater than the length of
the form.) Trigger ticks are the value entered in the Settings.ini value as encoder ticks.
To define this value, calculate the number of encoder ticks time 300. So, the value
entered for encoder ticks with a 5.25 cycles would be 1575.
User’s Manual
2-18Settings.ini
Getting Started
MCS Input Camera System
This system decodes and passes data via serial or ethernet connection (e.g., 509 Caps
system as control of GBR Collator on the front of an inserter). Used in this way, the
camera decodes and then passes this information to another piece of equipment. The
camera has no control over the end use equipment.
When using the camera in this fashion, you must enter the camera settings in the
configuration file. For each camera, the following settings must be entered. The first
camera will have default setting. You can copy the lines and change the camera number
for additional cameras.
Camera.#.ComPort
Camera.#.PassResult
Camera.#.FailResult
Camera.#.ExternalDecodesOnly
Camera.#.BarCodeReadFormat
Camera.#.BarCodeNmChars
Settings.ini
The Settings.ini file contains information specific to your system setup. While .cfg files
described in “Installing Special Files” on page 2-13 are created for you, the Settings may
require some manual configuration. All settings in the file must match your exact system
configuration. For example, the Exit Sensor number in the [System] group must match
the input number on the controller box. Certain items must be set in this file and cannot
be done via the software.
For Perfect Match, these items are:
• Data Mask
See “Perfect Match System Settings.ini” on page 7-1 for a detailed explanation of this
file.
In addition, you must also change the Key Field in the TCP/IP section of the
SetupMatch.cfg file to reflect the correct field number where the unique identifier is
located. If you do set this field you may get invalid comparisons or duplicates.
For IR Track, these items are:
• Distance.inches
• Double.Trigger.Inches
• Barcode.Num.Digits
• Trigger.Ticks
• Read.Mask
• Write.Mask
• Piece.Width.Inches
• Dist.From.Sensor.Inches
User’s Manual
2-19Settings.ini
Getting Started
See “IR Track System Settings.ini” on page 7-5 for a detailed explanation of this file.
User’s Manual
2-20Chapter 3: Understanding the Interface
The MicroVision camera software is a Microsoft Windows-style In This Chapter
application. It is important to understand how the interface works
• Opening the
so that you may use the interface most effectively. Application
• The Main
Window
Opening the Application
• Title Bar
The MicroVision camera software can be opened in many ways, • Menu Bar
one of which is described here. • Toolbar
Note: Make sure your camera and dongle are connected prior to • Display Area
opening the application. • Tab Selection
Area
To open the application: • Intensity
1. Double click the MicroVision icon on your desktop. Histogram
Note: You may open the application using other Windows standard • Results Area
techniques. • Camera Zoom
• New, Open,
Save, Save As
• Debug Window
3-1The Main Window
Understanding the Interface
The Main Window
The Main Window is the primary point of entry for all tasks. This window is broken
down into many areas as annotated below. Each area is described in the sections that
follow.
Title Bar
Display Area
Menu Bar Toolbar
Results Area
Tab Selection Area Intensity Histogram
Title Bar
The Title Bar displays the name of the program, a minimize button, a maximize/restore
button, and a close button.
Menu Bar
This standard Windows feature contains pulldown menus to select functions. Functions
which cannot be used appear dimmed (gray). Items in the Menu Bar are interactive.
They change as tabs are selected in the tab selection area.
User’s Manual
3-2Toolbar
Understanding the Interface
Toolbar
The Toolbar contains rows of iconic buttons that provide quick access to common tasks.
Save
New Run
Open Add Camera
Customizing the Toolbar
The customize option allows you select which icons are shown in the toolbars.
To change icons displayed in toolbars:
1. Select Customize from the View menu and select the desired toolbar to change.
The toolbar window appears.
2. Use the Add and Remove arrow buttons to change the icons displayed.
3. Click OK.
Display Area
The display area is the area in which functions appear. When you select a tab in the tab
selection area, the display area is repopulated with that information. You then work
within the display area to execute your tasks.
Tab Selection Area
The tab selection area contains three tabs: Camera, Log, and Run. Selecting a tab
changes the display area.
The Camera tab is described in detail in “Camera Operation and Setup” on page 4-1.
The Log tab provides a history of actions performed as well as errors and warnings. The
Run tab is described below.
User’s Manual
3-3Tab Selection Area
Understanding the Interface
Run Tab
The Run tab provides status while the job is run.
Note: You can also enable a Read and Print print job from the Run tab.
Lights show read activity and camera status. Printing status lights show if on and flashes
when printing. The registration sensor flashes once per cycle. The exit sensor flashes
when it is tripped. The output sensor flashes as well when it is tripped.
The Clear button physically clears all pieces on the list while Clear Blues clears pieces
only between the exit sensor and the printer. These option are not available for IR Track
systems.
When running, the table displays only those display columns that were requested during
I/O settings configuration. See “I/O Settings” on page 4-6.
User’s Manual
3-4Intensity Histogram
Understanding the Interface
The following table describes run colors.
Color Description
Green Success
Red Failure
Yellow Duplicate Read
Pink Match so far - only pertinent with multiple cameras
reading the same image type.
Tan Invalid key. This may appear when what is passed to
the inkjet is not in the data file. It may be
misidentified in the data file.
Intensity Histogram
The Intensity Histogram is located on the bottom left of the window. It shows the
intensity of dark and white spaces for the camera to read. It adjusts peak black and white
valley use as indicated by a dividing line that specifies one side of the line is black and
the other white.
Results Area
The results area lists your current actions and details about those actions.
Camera Zoom
Camera zoom, accessible via the View menu, increases or decreases the size of the
picture shown in the display area. It does not increase or decrease the actual picture
image.
New, Open, Save, Save As
Use these settings available in File menu to create, save, and open your current camera
settings.
User’s Manual
3-5Debug Window
Understanding the Interface
Debug Window
To access most of the configuration files and troubleshooting files you need, press
CTRL-ALT-3. In addition to the files accessed via this window, you may also need to
click icons which are located on your desktop.
User’s Manual
3-6Chapter 4: Camera Operation and Setup
This section explains how to add and configure your camera(s) as In This Chapter
well as how to review its operational status.
• Add Camera
• Focusing the
Add Camera Camera
• Remove
Once your camera(s) and software are installed you must add Camera
your camera(s) to be recognized by the software. A camera can • Properties
be plugged in to the computer and the software may be open, but • I/O Settings
the camera will not be recognized until it is added. • Running the
Note: It is helpful to know the serial number of your camera(s) before Auto Setup
executing this procedure. Feature
• I/O Timing
To add a camera: • Run
1. Make sure the camera is properly installed and connected. • Stop on Error
See “Camera Operation and Setup” on page 4-1. Note that the • Decode Image
bottom right corner of the screen indicates the number of cameras • Reset Pass/Fail
available. This lets you know how many cameras are plugged Counts
into the computer that have not been added to the software. After
you add a camera, the status reads 0 cameras available.
2. Select the Camera Tab.
3. Click the Add Camera icon.
4-1Add Camera
Camera Operation and Setup
The Add Camera Window appears.
Serial
Numbers
4. Select the serial number for the camera you are adding.
If you do not know the serial number of your camera, you can select any serial number
in the list and look at the installed cameras to see which one is flashing. If the desired
camera is not flashing, select another serial number until you locate the desired camera.
5. Assign a number to the camera.
You can assign any number to the camera. Multiple numbers are listed no matter how
many cameras you have installed. We recommend that cameras are numbered according
to placement on the inserter and not based on the order they were added. Select a
number and click Assign.
6. Click Exit.
User’s Manual
4-2Add Camera
Camera Operation and Setup
The display area now shows the camera image.
Saving Camera Setup
You can save the camera assignment by modifying the MicroVision camera
configuration file.
To save current camera settings:
1. Select Save from the File menu.
2. Provide a name for the file and click Save.
You can open this file the next time you use the software.
Tip: You can save the camera setup and have it reopen with this setup active the next time
you open the camera software. To do this:
1. Press CTRL-ALT-3.
The debug window appears.
2. Click the MicroVision Settings.cfg button.
A text window appears.
3. Modify the third line to equal 1.
4. Save the file.
5. Close the MicroVision camera software.
6. Reopen the MicroVision camera software
User’s Manual
4-3Focusing the Camera
Camera Operation and Setup
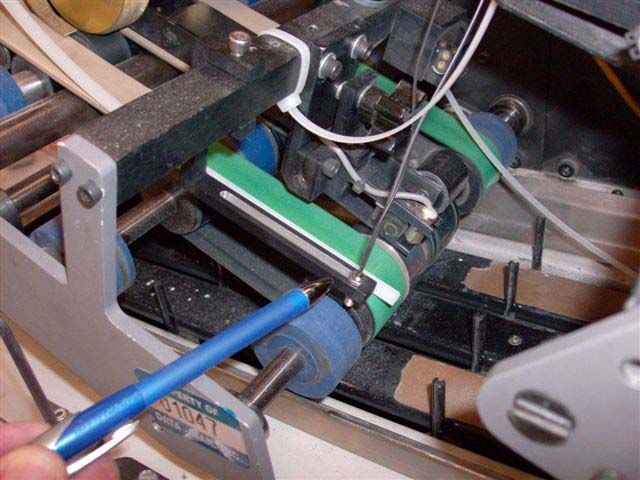
Focusing the Camera
You can focus the camera by adjusting the camera lens position. This is done using the
set screw. It is important to follow the procedure below to ensure that the screw is not
dislodged and that no damage is done to the camera or lens during this operation.
To adjust camera focus:
1. Hold the camera straight and using the tool provided, insert the tool through the set
screw access hole into the set screw.
2. Turn the tool a half turn to the right.
3. If you have successfully caught the set screw, it will turn no further. If your tool keeps
turning, you have not caught the set screw. Remove the tool and try again.
4. Once you have successfully caught the set screw, turn it a half turn counter-clockwise.
User’s Manual
4-4Remove Camera
Camera Operation and Setup
5. You may now grab the lens with your fingers and turn it as needed.
6. When your adjustment is complete, return the set screw to the locked position. Make
sure you have correctly caught the set screw as in steps 1-3 before turning.
Remove Camera
This feature, accessible from the File menu, removes a camera that had been added. The
camera may remain connected to the computer, but it will not be recognized by the
software.
Properties
The Properties window, accessible from the Camera menu, provides status on the
currently selected camera. It tells you information such as the camera’s number and
serial number.
User’s Manual
4-5I/O Settings
Camera Operation and Setup
I/O Settings
The I/O settings window allows you to specify parameters about how the camera detects
pieces on the printer. It is especially important that your Cycles From Exit settings be
correct in this window to ensure proper setup.
The MicroVision Camera software can operate with an encoder to trigger the camera or
with a physical sensor. The I/O settings window displays different options, depending
on your setup.
To enter I/O settings on a system with an encoder:
1. Select I/O Settings from the File menu.
2. Enter Cycles from Exit and Delay settings for each camera.
The number of cycles represents how many cycles of the machine are between the
camera and the exit sensor. Delay is the number of ticks in the cycle at which you want
the camera to be triggered for systems using an encoder.
For Flowmaster configurations, you can get the encoder ticks value from the timing
screen.
3. If you have a diverter, enter Diverter settings.
User’s Manual
4-6Running the Auto Setup Feature
Camera Operation and Setup
Check the box to enable the diverter. When enabled, the cycle offset is always one less
than the primary camera’s cycles from exit setting (e.g., the camera’s cycle is 12, the
diverter setting is 11).
4. For Read and Print systems, enter Printer Settings.
When enabled, display columns are the fields in the data file that you want displayed in
the Run tab. These are usually the most important fields such as the unique identifier
field for camera decoding. See “Run Tab” on page 3-4 for a description of this tab.
5. Enter Stop Conditions.
Stop conditions are settings that you can define to stop the transport. They are used to
address any need for intervention. If the numbers are sequential and you want to verify
this order, check the Stop machine if read numbers are not sequential check box. This
action is helpful to double check that there are no missing pieces. 1 indicates a high to
low read and -1 indicates a low to high read. If they are not sequential, this feature is not
applicable.
It is particularly helpful to use this feature with OCR data. Be sure to check the box
when running sequential OCR data.
Misreads and mismatches have values of 0 for off. Enter a threshold of misreads before
a stop. This field may also be used when there is no diverter.
Mismatch is used when multiple cameras are being used to tell the system to stop when
values are not equal from one camera to another.
When using a printer, the number of pieces indicates how many pieces can go past the
exit sensor without reaching the actual printer before printing will stop. This setting can
avoid a pile up at the print head. These are identified as blue lines on the Run tab. The
number entered is the maximum load plus one. For example, if the physical number of
pieces that fit is 5, the number entered is 6.
Running the Auto Setup Feature
You can also set the cycles and delay settings via the Run tab. This provides accurate
setting for these fields but can’t be done until you have installed everything else and
configured a readable image. Its important to optimize these settings so that the exit
sensor alerts at the proper time.
To get the settings:
1. Click the Run tab.
2. Press CTRL-ALT-3.
3. Click Settings.ini.
User’s Manual
4-7I/O Timing
Camera Operation and Setup
4. Go to the System group and on the first line change Setup Mode to 0. Save the file.
5. Save any current Camera software settings.
6. Close the Camera software.
7. Reopen the Camera software.
The cycles and delay information in the I/O Settings window has been updated.
I/O Timing
When pieces are running, you can look at this screen to view timing status. To display I/
O timing status, select I/O Timing from the File menu. If printing, an acknowledgement
can also be included.
Run
The Run feature, accessible from the File menu, takes the camera in and out of decode
mode.
Stop on Error
When enabled, this feature, accessible from the File menu, displays the errored image on
screen. The Clear Stop Error removes the image from the screen. This is useful when
reading OCR characters. It can help identify all characters that need training.
User’s Manual
4-8Decode Image
Camera Operation and Setup
Decode Image
When a tool is selected, you can use this option from the Camera menu to decode the
image.
Decode on Tool Update
When enabled, images are automatically decoded when updates are made to the tool.
Reset Pass/Fail Counts
This feature resets the Pass/Fail counts displayed in the Results table for each tool.
User’s Manual
4-9Reset Pass/Fail Counts
Camera Operation and Setup
User’s Manual
4-10Chapter 5: Readable Image Types
The MCS MicroVision camera software reads Data Matrix In This Chapter
barcodes, linear barcodes, and OCR alphanumerics. It is
• Printing and
recommended that you read The Bar Code Book by Roger C. Converting
Palmer (ISBN 0-911261-13-3) to gain a comprehensive Issues
understanding of bar codes. The items in this section pertain to
• Understanding
readable image type descriptions with regard to the MicroVision
the Camera Tab
camera.
• Data Matrix
Barcodes
Printing and Converting Issues • Linear
Barcodes
When using either barcodes or OCR alphanumerics, it is • OCR
important to realize that the print quality from your laser printer Alphanumerics
and your conversion process quality are critical for successful
reads with the matching system.
When you start printing a job with your laser printer, make sure
you incorporate quality control procedures regarding the barcode
or OCR alphanumerics. Look for erroneous printing of dots or
fuzzy printing. If the entire run is produced with faulty barcodes
or OCR alphanumerics, there is little you can do to make it work.
When the document is converted (cut and/or folded), it is critical
that the cut and fold be identical on every form. The camera is
looking at one spot to read the data, and if the pieces are folded
even slightly differently, the image will not be properly decoded.
Understanding the Camera Tab
The Camera tab provides access to the camera image, readable
image tools, and image refinement settings.
5-1Understanding the Camera Tab
Readable Image Types
Image Tools
Image tools decode the image that the camera sees. To configure how the tool decodes
the image, click on that tool’s icon.
Once the tool has been configured, you can modify the tool setting by clicking the Tool
Properties icon. Configured tools are listed in the tool Results area. When a tool is
correctly reading an image it is displayed white with Pass text and when it is not, it is red
with Fail status.
You can also access the tool’s configured settings by double-clicking the tool’s row in
the tool result area. To remove a tool, click the Remove tool icon. The Blue Rectangle
tool allows you to narrow the readable area from the full screen to size of the blue box.
This helps the camera software ignore the extra noise, thereby increasing decode speed.
Image Refinement Settings
The image refinements settings (exposure, gain, orientation, and trigger) adjust the
clarity of the image displayed. Expose adjusts the amount of light allowed in. Gain
adjusts the contrast based on the amount let in. It is best to leave the Exposure a bit
lower and raise the Gain if possible. Be careful not to adjust the gain too high. This will
produce a grainy image.
User’s Manual
5-2Data Matrix Barcodes
Readable Image Types
Orientation adjusts the rotation of the image. OCR requires that the image is read left to
right. It does not matter for other image types. The capture below shows an image after
image refinement has been performed.
The trigger can be set to External, which detects actions from the machine, or Internal
from the software, which executes consecutive firing.
In production mode, the trigger mode must be set to External. Decode must always be
On in production mode.
Data Matrix Barcodes
Data Matrix Barcode Template Placement
The following items provide some specifications for how to place data matrix bar codes
in the MCS Printer software template.
• Size >= ¼”,Data Matrix Barcodes
Readable Image Types
Data Matrix Symbol Sizes
Numeric Alphanumeric Symbol Size
6 3 10 x 10
10 6 12 x 12
16 10 14 x 14
24 16 16 x 16
36 25 18 x 18
44 31 20 x 20
60 43 22 x 22
72 52 24 x 24
88 64 26 x 26
124 91 32 x 32
172 127 36 x 36
228 169 40 x 40
288 214 44 x 44
348 259 48 x 48
408 304 52 x 52
560 418 64 x 64
736 550 72 x 72
912 682 80 x 80
1,152 862 88 x 88
1,392 1,042 96 x 96
1,632 1,222 104 x 104
2,100 1,573 120 x 120
2,608 1,954 132 x 132
3,116 2,335 144 x 144
10 6 8 x 18
20 13 8 x 32
32 22 12 x 26
44 31 12 x 36
64 46 16 x 36
98 72 16 x 48
Data Matrix Barcode Tool Configuration
The way the camera decodes the Data Matrix barcode image is configured via the Data
Matrix Image tool.
To configure Data matrix readability:
1. Click the Camera tab.
User’s Manual
5-4Data Matrix Barcodes
Readable Image Types
2. Click the Data Matrix tool.
The Data Matrix Tool Properties window appears.
3. If desired, enter a name for this configuration.
If you do not enter a name, a name will be provided for you.
4. Enter the decode Timeout.
The decode time sets how long the camera is given to read the image before a misread is
reported and the camera moves on to next image. Typically this is left at 50 seconds. The
number should never be increased over the speed at which you are running. For
example, if you are running at 10,000, the number should not be more than 100 (1/10000
equals .0001 which equals 100 ms).
5. Review the Character Length.
This sets how many digits are in the unique identifier. Enter the correct amount of pound
signs to match the number of digits in the unique identifier field. You can use symbols
such as (-) or (A) to skip or replace a digit. In the Test field, enter numbers equaling the
required digits to test that the correct amount of pound signs have been entered. The
results field will display what will be read if the test numbers were decoded. ##### with
test data of 12345 will display 12345 in the results field; while A#### will display
A2345 and #-### will display 1345.
6. Enter the Matrix size.
Do not use the Automatic setting. Select the correct size. To find the correct size,
count the number of black and white spaces for length and width, See “Data Matrix
Barcode Template Placement” on page 5-3 above for explanation on bar code sizes.
7. Enter Calculate Light on Dark settings.
Dark on light is used for visible barcodes. Light on Dark is used for invisible barcodes.
Note: Invisible barcodes require the use of the invisible barcode camera.
8. Click Threshold.
User’s Manual
5-5Linear Barcodes
Readable Image Types
The Threshold window appears. This window brings up the camera image and allows
you to adjust the black areas outside of the image.
9. Enter Threshold settings.
The Adaptive Global, Adaptive Local, and Fixed settings allow you to adjust the amount
of black and white space displayed around the image. Adaptive Global adjusts the circle
around the image to the maximum image allowed by the camera. Local reduces the area
closest to the image. Fixed allows you to manually adjust the area and is the most
commonly used format.
10. Click OK.
11. Check additional options.
You can enable Log reads to enter data in the log file. Checking Outline Read places a
green outline around the image based on your threshold settings. You can show the
Thresholds settings and you can enable the Calculate grade option. The Calculate grade
option provides a score on barcode matching.
Note: Do not check Calculate grade while the job is running. This is will slow down
performance.
Linear Barcodes
Some Linear barcodes may not fit in the field of view of the camera. The typical field of
view is 1.25 inches. If the bar code is larger than 1.25 inches, the camera can not read it.
Linear barcodes are configured in similar fashion to Data Matrix barcodes.
User’s Manual
5-6Linear Barcodes
Readable Image Types
To configure Linear barcode readability:
1. Click the Camera tab.
2. Click the Linear Barcode tool.
The Linear Barcode Tool Properties window appears.
3. If desired, enter a name for this configuration.
If you do not enter a name, a name will be provided for you.
4. Enter the decode Timeout.
The decode time sets how long the camera is given to read the image before a misread is
reported and the camera moves on to next image. Typically this is left at 50 seconds. The
number should never be increased over the speed at which you are running. For
example, if you are running at 10,000, the number should not be more than 100 (1/10000
equals .0001 which equals 100 ms).
5. Review the Character Length.
This sets how many digits are in the unique identifier. Enter the correct amount of pound
signs to match the number of digits in the unique identifier field. You can use symbols
such as (-) or (A) to skip or replace a digit. In the Test field, enter numbers equaling the
required digits to test that the correct amount of pound signs have been entered. The
results field will display what will be read if the test numbers were decoded. ##### with
test data of 12345 will display 12345 in the results field; while A#### will display
A2345 and #-### will display 1345.
6. Select the barcode type form the list.
7. Enter Calculate Light on Dark settings.
Dark on light is used for visible barcodes. Light on dark is used for invisible barcodes.
Note: Invisible barcodes require the use of the invisible barcode camera.
User’s Manual
5-7Linear Barcodes
Readable Image Types
8. If a checksum characters appears with your barcode, enable the Checksum Character
feature.
9. Click Threshold.
The Threshold window appears. This window brings up the camera image and allows
you to adjust the black areas outside of the image.
10. Enter Threshold settings.
The Adaptive Global, Adaptive Local, and Fixed settings allow you to adjust the amount
of black and white space displayed around the image (and is the most commonly used
format). Adaptive Global adjusts the circle around the image to the maximum image
allowed by the camera. Local reduces the area closest to the image and Fixed allows you
to manually adjust the area. The Line intensity graph tells you to draw a line completely
through the image. It then displays the intensity highs and lows. Keep drawing lines
until you end up in the middle to achieve the best readability.
11. Click OK.
You can enable Log reads to enter data in the log file. Checking Outline Read places a
green outline around the image based on your threshold settings. You can show the
Thresholds settings.
User’s Manual
5-8You can also read