Administrator's Guide - v1.2 - Directory Synchronization Client Websense Cloud Products
←
→
Page content transcription
If your browser does not render page correctly, please read the page content below
Administrator’s Guide
 Directory Synchronization Client
      Websense ® Cloud Products

                            v1.2
©1996–2015, Websense, Inc.
All rights reserved.
10900 Stonelake Blvd, 3rd Floor, Austin, TX 78759, USA
First published 2011
This document may not, in whole or in part, be copied, photocopied, reproduced, translated, or reduced to any electronic medium or machine-
readable form without prior consent in writing from Websense Inc.
Every effort has been made to ensure the accuracy of this manual. However, Websense Inc., makes no warranties with respect to this
documentation and disclaims any implied warranties of merchantability and fitness for a particular purpose. Websense Inc. shall not be liable for
any error or for incidental or consequential damages in connection with the furnishing, performance, or use of this manual or the examples herein.
The information in this documentation is subject to change without notice.
Trademarks
Websense, the Websense Logo, Threatseeker and the YES! Logo are registered trademarks of Websense, Inc. in the United States and/or other
countries. Websense has numerous other unregistered trademarks in the United States and internationally. All other trademarks are the property
of their respective owners.
Microsoft, Windows, Windows NT, Windows Server, Internet Explorer, and Active Directory are either registered trademarks or trademarks of
Microsoft Corporation in the United States and/or other countries.
The SCHEMUS software is copyright © Metanate Ltd 2006–2015.
Other product names mentioned in this manual may be trademarks or registered trademarks of their respective companies and are the sole property
of their respective manufacturers.
Contents
Chapter 1 Introducing the Directory Synchronization Client . . . . . . . . . . . . . . . . . . . . . .1
About this guide . . . . . . . . . . . . . . . . . . . . . . . . . . . . . . . . . . . . . . . . . . . . . . . . . . .1
Overview . . . . . . . . . . . . . . . . . . . . . . . . . . . . . . . . . . . . . . . . . . . . . . . . . . . . . . . .1
Address registration. . . . . . . . . . . . . . . . . . . . . . . . . . . . . . . . . . . . . . . . . . . . . .2
Group and user synchronization . . . . . . . . . . . . . . . . . . . . . . . . . . . . . . . . . . . .3
Features. . . . . . . . . . . . . . . . . . . . . . . . . . . . . . . . . . . . . . . . . . . . . . . . . . . . . . . . . .3
Basic steps . . . . . . . . . . . . . . . . . . . . . . . . . . . . . . . . . . . . . . . . . . . . . . . . . . . . . . .4
Chapter 2 Installing the Directory Synchronization Client . . . . . . . . . . . . . . . . . . . . . . . .5
Prerequisites . . . . . . . . . . . . . . . . . . . . . . . . . . . . . . . . . . . . . . . . . . . . . . . . . . . . . .5
Downloading the Directory Synchronization Client . . . . . . . . . . . . . . . . . . . . . . .6
Installation . . . . . . . . . . . . . . . . . . . . . . . . . . . . . . . . . . . . . . . . . . . . . . . . . . . . . . .6
Upgrading from an earlier version . . . . . . . . . . . . . . . . . . . . . . . . . . . . . . . . . . . . .7
After the installation . . . . . . . . . . . . . . . . . . . . . . . . . . . . . . . . . . . . . . . . . . . . . . . .7
Chapter 3 Working with your Active Directory Data . . . . . . . . . . . . . . . . . . . . . . . . . . . . .9
Relationship between users and groups . . . . . . . . . . . . . . . . . . . . . . . . . . . . . . . . .9
LDAP filter for users, groups, and email . . . . . . . . . . . . . . . . . . . . . . . . . . . . . . . .9
Multiple domains or Active Directories . . . . . . . . . . . . . . . . . . . . . . . . . . . . . . . .11
Synchronizing Dynamic Distribution Lists . . . . . . . . . . . . . . . . . . . . . . . . . . . . .11
Renaming groups in Active Directory . . . . . . . . . . . . . . . . . . . . . . . . . . . . . . . . .12
Chapter 4 Setting up the Directory Synchronization Client. . . . . . . . . . . . . . . . . . . . . . .13
Setting up synchronization types . . . . . . . . . . . . . . . . . . . . . . . . . . . . . . . . . . . . .13
Configuring log settings . . . . . . . . . . . . . . . . . . . . . . . . . . . . . . . . . . . . . . . . . . . .14
Setting the LDAP search string . . . . . . . . . . . . . . . . . . . . . . . . . . . . . . . . . . . . . .15
Setting up your cloud service connection. . . . . . . . . . . . . . . . . . . . . . . . . . . . . . .15
Chapter 5 Creating and Modifying Configuration Profiles . . . . . . . . . . . . . . . . . . . . . . .19
Starting the configuration wizard . . . . . . . . . . . . . . . . . . . . . . . . . . . . . . . . . . . . .19
Selecting a profile name and synchronization type . . . . . . . . . . . . . . . . . . . . . . .20
Selecting your data source . . . . . . . . . . . . . . . . . . . . . . . . . . . . . . . . . . . . . . . . . .21
Selecting multiple data sources . . . . . . . . . . . . . . . . . . . . . . . . . . . . . . . . . . . .22
Configuring your LDAP server . . . . . . . . . . . . . . . . . . . . . . . . . . . . . . . . . . . . . .23
Defining advanced LDAP server settings . . . . . . . . . . . . . . . . . . . . . . . . . . . .24
Setting up the LDAP search configuration. . . . . . . . . . . . . . . . . . . . . . . . . . . . . .26
Defining mail attributes. . . . . . . . . . . . . . . . . . . . . . . . . . . . . . . . . . . . . . . . . .28
Administrator’s Guide iContents
Defining group attributes . . . . . . . . . . . . . . . . . . . . . . . . . . . . . . . . . . . . . . . .28
Defining user attributes . . . . . . . . . . . . . . . . . . . . . . . . . . . . . . . . . . . . . . . . .31
Advanced user attributes . . . . . . . . . . . . . . . . . . . . . . . . . . . . . . . . . . . . . .33
Checking your search results . . . . . . . . . . . . . . . . . . . . . . . . . . . . . . . . . . . . . . . .34
Selecting groups for synchronization . . . . . . . . . . . . . . . . . . . . . . . . . . . . . . . . . .36
Setting up a data repository . . . . . . . . . . . . . . . . . . . . . . . . . . . . . . . . . . . . . . . . .37
Entering cloud service connection details. . . . . . . . . . . . . . . . . . . . . . . . . . . .38
Configuring mail domains. . . . . . . . . . . . . . . . . . . . . . . . . . . . . . . . . . . . . . . .38
Selecting a file repository location . . . . . . . . . . . . . . . . . . . . . . . . . . . . . . . . .39
Optional settings. . . . . . . . . . . . . . . . . . . . . . . . . . . . . . . . . . . . . . . . . . . . . . . . . .41
Filters. . . . . . . . . . . . . . . . . . . . . . . . . . . . . . . . . . . . . . . . . . . . . . . . . . . . . . . .41
Limits . . . . . . . . . . . . . . . . . . . . . . . . . . . . . . . . . . . . . . . . . . . . . . . . . . . . . . .42
Notification settings . . . . . . . . . . . . . . . . . . . . . . . . . . . . . . . . . . . . . . . . . . . .44
Verifying your settings . . . . . . . . . . . . . . . . . . . . . . . . . . . . . . . . . . . . . . . . . . . . .46
Setting up another synchronization type . . . . . . . . . . . . . . . . . . . . . . . . . . . . . . .47
Chapter 6 Synchronizing with the Cloud Service . . . . . . . . . . . . . . . . . . . . . . . . . . . . . . .49
Testing an update . . . . . . . . . . . . . . . . . . . . . . . . . . . . . . . . . . . . . . . . . . . . . . . . .49
Performing a synchronization update. . . . . . . . . . . . . . . . . . . . . . . . . . . . . . . . . .50
Synchronization errors . . . . . . . . . . . . . . . . . . . . . . . . . . . . . . . . . . . . . . . . . .51
Replacing your data in the cloud service . . . . . . . . . . . . . . . . . . . . . . . . . . . . . . .52
Refreshing your local data . . . . . . . . . . . . . . . . . . . . . . . . . . . . . . . . . . . . . . . . . .53
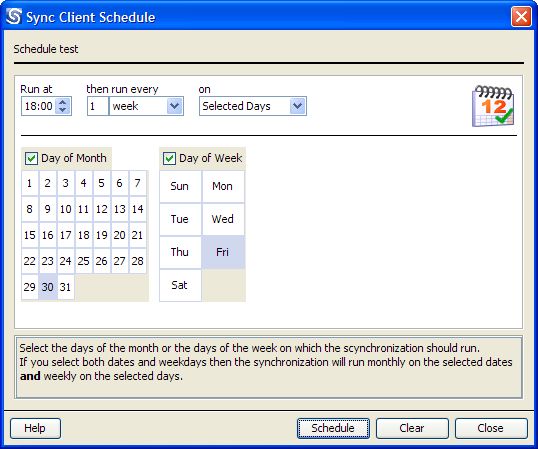
Scheduling the synchronization process. . . . . . . . . . . . . . . . . . . . . . . . . . . . . . . .53
Removing the synchronization schedule. . . . . . . . . . . . . . . . . . . . . . . . . . . . .55
Running the command-line version . . . . . . . . . . . . . . . . . . . . . . . . . . . . . . . . . . .55
Troubleshooting the synchronization process . . . . . . . . . . . . . . . . . . . . . . . . . . .56
Checking directory referrals . . . . . . . . . . . . . . . . . . . . . . . . . . . . . . . . . . . . . . . . .56
Chapter 7 Directory Synchronization Client Log Files. . . . . . . . . . . . . . . . . . . . . . . . . . .59
Appendix A Standard Regular Expression Strings . . . . . . . . . . . . . . . . . . . . . . . . . . . . . . .63
Regular expression examples . . . . . . . . . . . . . . . . . . . . . . . . . . . . . . . . . . . . . . . .65
Changing wildcard filters to regular expressions . . . . . . . . . . . . . . . . . . . . . . . . .66
Appendix B Understanding LDAP Search Filters . . . . . . . . . . . . . . . . . . . . . . . . . . . . . . . .67
Syntax . . . . . . . . . . . . . . . . . . . . . . . . . . . . . . . . . . . . . . . . . . . . . . . . . . . . . . . . . .67
Search base filter . . . . . . . . . . . . . . . . . . . . . . . . . . . . . . . . . . . . . . . . . . . . . . . . .67
Search query filter . . . . . . . . . . . . . . . . . . . . . . . . . . . . . . . . . . . . . . . . . . . . . . . .68
Appendix C Working with Java . . . . . . . . . . . . . . . . . . . . . . . . . . . . . . . . . . . . . . . . . . . . . . .69
Installing Java Runtime Environment . . . . . . . . . . . . . . . . . . . . . . . . . . . . . . . . .69
Java Certificate Store . . . . . . . . . . . . . . . . . . . . . . . . . . . . . . . . . . . . . . . . . . . . . .69
Appendix D Using Generic LDAP . . . . . . . . . . . . . . . . . . . . . . . . . . . . . . . . . . . . . . . . . . . . .71
Requirements . . . . . . . . . . . . . . . . . . . . . . . . . . . . . . . . . . . . . . . . . . . . . . . . . . . .71
ii Directory Synchronization ClientContents
Setting up the Directory Synchronization Client . . . . . . . . . . . . . . . . . . . . . . . . .73
Formats . . . . . . . . . . . . . . . . . . . . . . . . . . . . . . . . . . . . . . . . . . . . . . . . . . . . . . . . .76
Appendix E Technical Support . . . . . . . . . . . . . . . . . . . . . . . . . . . . . . . . . . . . . . . . . . . . . . .79
Sales and Feedback. . . . . . . . . . . . . . . . . . . . . . . . . . . . . . . . . . . . . . . . . . . . . . . .79
Administrator’s Guide iiiContents iv Directory Synchronization Client
1 Introducing the Directory
Synchronization Client
The Directory Synchronization Client helps you supply and maintain data required by
Websense cloud-based services.
For Websense TRITON AP-EMAIL with Email Cloud Module, the client
synchronizes registered email addresses and groups.
For Websense TRITON AP-WEB or Web Filter & Security with Web Cloud
Module, the client synchronizes users and groups information.
About this guide
This guide is for systems administrators configuring the Directory Synchronization
Client to update the information used by Websense cloud-based services.
The Directory Synchronization Client automates the process of updating your cloud
data by synchronizing your users, groups, and email data between your Active
Directory server and the cloud service’s database.
Overview
The Directory Synchronization Client extracts data from a number of directory
sources and synchronizes these with your cloud-based product. Using the Directory
Synchronization Client ensures that information from all of your sources is
synchronized with the cloud service. You can run the following processes:
Mail synchronization, which synchronizes your email addresses.
Group/User synchronization, which synchronizes group identities, users’
identities, their email addresses, and their group memberships.
The Directory Synchronization Client includes a configuration wizard that guides you
through the process of extracting data from your directory system. Once you have
created a configuration profile, you can run the synchronization process from the
Directory Synchronization Client interface or from the command line. You can also
schedule the process to run automatically. The Directory Synchronization Client can
send email notifications reporting the results of each synchronization run.
Administrator’s Guide 1Introducing the Directory Synchronization Client
The Directory Synchronization Client is a Java executable that runs either in an
interactive mode through a graphical user interface, or as a command line application.
When you run a synchronization from the Directory Synchronization Client interface,
you can choose to run a full or an incremental upload of all data. When run from the
command line, the synchronization process passes only the incremental changes since
the last run as shown in the diagram below. If you run the synchronization process
automatically from the command line but want to force a full update, you can set this
on the Directory Synchronization Setup screen in the cloud portal.
Address registration
TRITON AP-EMAIL can protect against dictionary-type spam attacks, by registering
your valid email addresses and rejecting any email destined for invalid addresses. The
Directory Synchronization Client helps you maintain your valid addresses, by
synchronizing the update of registered addresses with the cloud service. The task can
be automated and, for example, integrated with Human Resources procedures for
employees leaving or joining the company.
Registered addresses are synchronized using:
A secure HTTP-based interface to the TRITON AP-EMAIL synchronization
service.
The Directory Synchronization Client to extract address data from your directory
sources and export it via the synchronization service.
2 Directory Synchronization ClientIntroducing the Directory Synchronization Client
Group and user synchronization
Websense cloud-based products enable you to use your existing directory definitions
of users and groups within web and email security policy rules.
If you are synchronizing groups, you must also synchronize users. This is because
when you synchronize a group, you are transferring only information about the group
itself (such as the group name and any parent group) and nothing about the contents of
the group. Any user detail added to a group in your Active Directory does not get sent
to the cloud service as part of a groups synchronization; it has to be sent as part of a
users synchronization.
User synchronization includes details of the group(s) that users are members of. When
you apply a web policy or an email policy to a synchronized group, that policy is
applied to all synchronized users who are members of that group.
The Directory Synchronization Client assists you by synchronizing the update of
groups and users so that this task can be automated. This tool operates alongside the
cloud portal, which allows you to manually define, upload, and manage your groups.
Group and user information is synchronized using:
A secure HTTP-based interface to the cloud-based synchronization service.
The Directory Synchronization Client to extract user and group membership data
from your directory sources and export this data via the synchronization service.
Features
The Directory Synchronization Client provides the following features:
Wizard-based configuration - guiding you through each configuration step.
Configuration testing - checking of each wizard step, and full configuration
verification.
Filtering - allowing specific or “wild-carded” addresses to be excluded or
converted.
Safety thresholds - you can set update limits in order to detect anomalous
situations.
Reporting - comprehensive logging and optional alerting via email notifications.
Custom configuration - advanced settings to refine the LDAP operations.
Full control of automation - can be invoked from the client, from task
schedulers, or by other client tools.
Safe test mode - no modification of live data by using test output to text files.
Administrator’s Guide 3Introducing the Directory Synchronization Client
Basic steps
On the cloud portal
1. Configure directory synchronization for your account.
2. Set up authentication for the client machine. We strongly recommend that you set
up a separate username and password for the client to gain access to the cloud
service.
Refer to your product’s Help for instructions on setting up the cloud portal for
directory synchronization.
On the client
1. Download and install the Directory Synchronization Client. See Installing the
Directory Synchronization Client, page 5.
2. Set up the Directory Synchronization Client. See Setting up the Directory
Synchronization Client, page 13.
3. Create a configuration profile. See Creating and Modifying Configuration
Profiles, page 19.
4. Test the Synchronization Client to make sure it is returning the correct data from
your LDAP server. If you are an existing customer switching to LDAP for the first
time, you should compare the data with that which already exists on the portal.
See Testing an update, page 49.
5. Initiate a synchronization. See Performing a synchronization update, page 50.
6. Schedule automatic synchronization. We suggest that you schedule the
synchronization process to run twice a day. See Scheduling the synchronization
process, page 53.
4 Directory Synchronization Client2 Installing the Directory
Synchronization Client
Select a suitable machine on which to install and run the Directory Synchronization
Client. This machine must have internal network access to your directory system via
Lightweight Directory Access Protocol (LDAP), and external network access to the
cloud service via Secure Hypertext Transfer Protocol (HTTPS). This access may be
via a proxy server.
Note
You should not direct the Directory Synchronization Client through your cloud-based
web security service. If you have set up a local proxy server following the
instructions in the Websense TRITON AP-WEB Cloud Getting Started Guide, you can
use this because it is already suitably configured to send synchronization data.
The Directory Synchronization Client builds a local database to track changes to your
source data. You must use a single instance of the client to synchronize any given set
of source data. Using multiple synchronization configurations, or even using multiple
installations of the Directory Synchronization Client, can cause data on the cloud
service to be overwritten.
Prerequisites
Before starting, ensure that you have the following items on hand:
Cloud portal account details.
Address of your directory server and any authentication details you might need to
be able to perform searches on it.
Before downloading the Directory Synchronization Client from the portal, decide
whether you need the version with or without the Java Runtime Environment (JRE). If
you already have JRE 1.5 or greater, you can select either download; otherwise you
must select the download that includes the JRE.
See Working with Java, page 69, for information on how to discover which version of
JRE you are running, and the impact of installing the Directory Synchronization
Client with a JRE.
Administrator’s Guide 5Installing the Directory Synchronization Client
Downloading the Directory Synchronization Client
You can download the Directory Synchronization Client from the cloud portal.
1. Log into your cloud portal account.
2. Click Account > Directory Synchronization.
3. Select the version of the synchronization tool that applies to your selected
installation machine.
4. Save the installation executable to your hard drive.
Installation
Before starting the Directory Synchronization Client installation, ensure all other
applications on the machine are closed.
1. Double-click the installation executable that you downloaded.
2. Click Next in the welcome screen.
3. In the license agreement window, select I accept the agreement and click Next to
continue.
4. The default installation location is either “C:\Program Files\DirSyncClient” or
“C:\Program Files(X86)\DirSyncClient”. To change the installation location,
browse to the folder where you want to install the client. The installation path
changes to the folder you select, with “DirSyncClient” appended.
If you don’t want to install in the “DirSyncClient” sub-folder, change the
directory path before clicking Next.
5. Select where you want the Directory Synchronization Client shortcuts to appear
on your Windows Start menu. If you want the tool to be available to all users,
ensure that the box is checked. Click Next to continue.
6. If you want an icon to appear on the desktop in addition to the one accessible from
the Start menu, check the Create a desktop icon box.
7. Click Next to start the installation.
When the file copying is complete, the installer displays the release notes and
change logs. The release notes contain the following additional information:
Additional features which have been added since this guide was written.
Bug fixes.
Change history.
8. Click Next to continue.
A message announcing the successful completion of the installation is displayed.
9. Click Finish to exit the installer.
6 Directory Synchronization ClientInstalling the Directory Synchronization Client
Upgrading from an earlier version
When you upgrade the Directory Synchronization Client from an earlier version, the
configuration and settings files are also upgraded to the new version. Backup copies of
the original XML settings files are made in the same location as the original XML
files. The backup files are named settings.xml.old and can safely be deleted if you are
not planning to revert to the previous version of the application.
The application settings are upgraded when the application is first started. The
configuration settings are upgraded when a configuration is saved.
After the installation
Ensure your firewalls allow the necessary ports for the Directory Synchronization
Client to contact:
Your domain controllers on either port 389 or port 3268.
The cloud service on port 443.
Your mail server on port 25 (if you enable mail notifications).
Administrator’s Guide 7Installing the Directory Synchronization Client 8 Directory Synchronization Client
3 Working with your Active
Directory Data
This chapter contains useful information to take into account before you synchronize
your Active Directory data with your Websense cloud product.
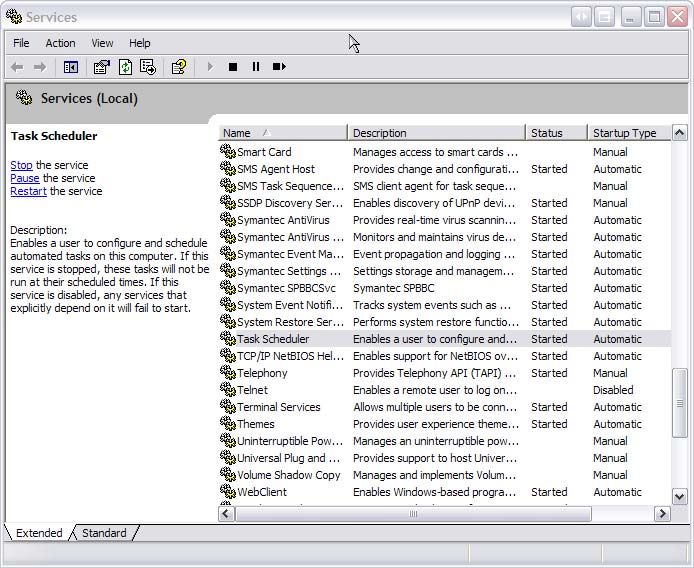
Relationship between users and groups
In a typical Active Directory setup, users are members of many groups—for example,
a user can be a member of some global groups such as ‘All Sales’, some geographical
groups like ‘London’ or ‘New York’, and they may be members of a department such
as ‘NY Telesales’ and many others.
When you are deciding which groups to synchronize, you only need to select groups
that are going to be useful in the cloud, for example to select the appropriate policy or
group-based exceptions. In the example on the following page, if members of the New
York Telesales department use a policy that gives them special permissions to access
certain Web sites, then the ‘NY Telesales’ group should be synchronized. However,
there is no need to synchronize the ‘London’ group if geographical policies are not
used in your cloud product, even though the London users might be using the cloud
service.
With this in mind, when a user is synchronized to the cloud service, they are probably
members of multiple AD groups, but you are probably synchronizing only a subset of
those groups. The cloud service is designed to accept users with references to groups
that are not on the service.
When setting up groups in the Directory Synchronization Client, you must choose
which groups to synchronize from the list returned by the LDAP search. This enables
you to limit the group list to the ones you need.
LDAP filter for users, groups, and email
In the Directory Synchronization Client, each of the three synchronization types has
its own LDAP search set up. This means there is great flexibility in selecting the
appropriate data, and the searches are completely independent of each other.
Administrator’s Guide 9Working with your Active Directory Data
For example, you can use the membership of an LDAP group attribute as a means of
selecting the users you want, even though you may not select that group itself to be
synchronized.
This is an example Active Directory schema:
Below are some examples of the synchronization choices you might make based on
this schema.
Group selection
If you require specific policies or exceptions in your cloud product for French and
English telesales staff, select the “Lndn Telesales” and “Fr Telesales” groups for
synchronization.
For more information about selecting groups, see Selecting groups for
synchronization, page 36.
User selection
If your cloud product is only currently available for your European staff, then you
should synchronize only those users. You can achieve this in one of the following
ways:
1. Set the users LDAP search filter to search on European users by group.
When setting up a users configuration, set the LDAP search base to the domain
level. Then the search filter is set to something like the following:
(&(objectCategory=person)(objectclass=user)(memberOf=CN=All
Europe,OU=Global,dc=company,dc=com)
(!(userAccountControl:1.2.840.113556.1.4.803:=2)) )
This selects users that are members of the global Europe group, and that are
enabled (strictly, that have accounts that are not disabled).
For more information about LDAP search filters, see Setting up the LDAP search
configuration, page 26.
2. Select users from the relevant OUs by setting up multiple data sources for the
LDAP search.
10 Directory Synchronization ClientWorking with your Active Directory Data
When setting up your users configuration, on the Configure data source window
check the Advanced box. Select another source, and then set the LDAP search
base to be one of the European OUs (for example London or Paris). Leave the
search filter as the default to load all users from that OU.
Once you have configured that data source, repeat the process for each OU that
you want to include. The Directory Synchronization Client merges all of the users
from the various OU sources and synchronizes them with the portal.
For more information on multiple data sources, see Selecting multiple data
sources, page 22.
Email selection
The valid email address list can be created from a completely different LDAP search.
This gives the flexibility of synchronizing different employees’ addresses if required,
and also handling leavers in 2 different ways.
For example, when an employee leaves the company, you are likely to disable their
account immediately upon departure. If you use the default filter in the users
synchronization, this removes them from the cloud service as disabled accounts are
not synchronized. However, you might want to allow emails to be received for a while
after the employee’s departure, so the email synchronization should still include the
employee’s address.
To include European email addresses from the above example and also include leavers
in the valid address list, set the LDAP search base to the company domain, and set the
search filter to:
(&(objectCategory=person)(objectclass=user)(memberOf=CN=All
Europe,OU=Global,dc=company,dc=com)
Multiple domains or Active Directories
In AD structures such as Forests, or where two separate ADs contain employee data,
you can use the multiple data source option to synchronize data from more than one
directory. The Directory Synchronization Client searches the multiple sources and
merges the data before sending it all to the cloud service.
For more information on multiple data sources, see Selecting multiple data sources,
page 22.
Synchronizing Dynamic Distribution Lists
If you have set up a Dynamic Distribution List in Microsoft Exchange 2007, the
default mail synchronization filter does not synchronize the email address of this list.
If you want to include the address of a Dynamic Distribution List in your
synchronization, change your mail synchronization filter to:
Administrator’s Guide 11Working with your Active Directory Data
(|(&(mailnickname=*)(objectCategory=person)(objectClass=user
))(objectCategory=group)(objectClass=msExchDynamicDistributi
onList))
Note that (objectClass=msExchDynamicDistributionList) has been added
into the ‘or’ part of the filter.
Renaming groups in Active Directory
Once you have synchronized your groups with the cloud service, we recommend that
you do not rename them in Active Directory. If you do rename a synchronized group,
the new group name is automatically sent to the cloud service on the next
synchronization. However, if you have set up any group-based black and white list
settings for TRITON AP-EMAIL, you need to manually reapply those settings to the
new group name in the portal.
12 Directory Synchronization Client4 Setting up the Directory
Synchronization Client
This section provides procedures for setting up the Directory Synchronization Client.
You can view and edit the following:
Synchronization types available for configuration
Log settings
LDAP search string
Cloud service connection details
Setting up synchronization types
The Directory Synchronization Client includes 3 synchronization types:
Mail - synchronizes email addresses with your cloud-based product.
Groups - synchronizes groups in your organization’s hierarchy with your cloud-
based product. Groups can contain email addresses of users in your organization
as well as other groups.
Users - synchronizes users in your organization’s hierarchy with your cloud-based
product.
If you want to synchronize groups, you must also synchronize users, and vice versa.
The first time you run the Directory Synchronization Client, it prompts you to specify
the synchronization type(s) that you plan to use.
Administrator’s Guide 13Setting up the Directory Synchronization Client
Check the relevant box(es), then click OK. When you create a new configuration, the
selection you make in this window enables the Directory Synchronization Client to
prompt you on the configuration type.
If you want to change this setting at a later date, open the Directory Synchronization
Client, select Edit > Settings and select Synchronizations.
Configuring log settings
To define the log file details and the maximum number of days that logs are retained
before they are automatically deleted:
1. Open the Directory Synchronization Client.
2. Select Edit > Settings.
The Settings window is displayed.
3. In the left panel, select Log Settings.
4. Under Log Detail, use the sliders to determine the level of detail held in the log
files.
5. Under Log Lifetime, enter the number of days to keep log files. To hold the log
files indefinitely, set this number to “0”. If you do this, please check periodically
that you have adequate disk space to allow new logs to be created.
6. Click OK.
For more information about logging, see Directory Synchronization Client Log Files,
page 59.
14 Directory Synchronization ClientSetting up the Directory Synchronization Client
Setting the LDAP search string
To view the LDAP search string:
1. Open the Directory Synchronization Client.
2. Select Edit > Settings.
The Settings window is displayed.
3. In the left panel, select LDAP.
This string is used to search for LDAP server entries when setting up the LDAP search
options.
You should not need to edit this string. If you do want to edit the string, see
Understanding LDAP Search Filters, page 67.
Setting up your cloud service connection
The Directory Synchronization Client connects to your cloud account using HTTPS.
When you first run the Directory Synchronization Client, we recommend that you
synchronize to a file. This enables you to confirm that the synchronization is
configured to your requirements before you upload your data to the cloud portal.
We strongly recommend that you create a separate administrator account in the cloud
portal for synchronization purposes. The account must have directory synchronization
permissions. This enables you to set up a password expiration date for the client that
spans a longer period than other accounts, to avoid having to regularly update it. For
more information, see the section Working with LDAP Directories in your product’s
Help.
Administrator’s Guide 15Setting up the Directory Synchronization Client
To set up your connection:
1. Open the Directory Synchronization Client.
2. Select Edit > Settings.
The Settings window is displayed.
3. In the left panel, select Portal.
4. In the Access URL field, do not change the default value unless instructed to do
so. If necessary, you can click Reset Defaults to put the original value back into
this field.
5. Enter your cloud portal administrator account username and password, then click
Apply.
When you click Apply, the Directory Synchronization Client attempts to connect to
the cloud service using your settings. If you receive an error message after clicking
Apply, your local network may be set up to prohibit direct access to the Internet for
secure HTTP communication, and you need to define proxy settings.
16 Directory Synchronization ClientSetting up the Directory Synchronization Client
1. From the HTTPS Proxy drop-down list, select Manual.
2. Enter the connection details for your proxy server.
3. Click OK.
Note
In some rare cases, the proxy server supplies its own
certificate in order to decrypt and monitor the traffic
between the client and the server. If this is the case, see
Java Certificate Store, page 69 for further information.
Administrator’s Guide 17Setting up the Directory Synchronization Client 18 Directory Synchronization Client
5 Creating and Modifying
Configuration Profiles
Before you can use the Directory Synchronization Client, you need to create a
configuration profile specifying details of the data source and destination systems.
Your configuration profile can contain more than one synchronization type. If you
selected both Mail and Groups and Users when you first ran the Directory
Synchronization Client, you can select a synchronization type, go through all the steps
in the wizard, save your settings, and then return to the first step to select another type
to configure.
Starting the configuration wizard
The Directory Synchronization Client includes a configuration wizard that leads you
through the configuration process. As well as creating new configuration profiles, you
can use the configuration wizard to edit existing configurations.
To create a configuration profile, either click the New button located to the right of the
Configuration drop-down list, or select File > New.
To modify an existing configuration profile:
1. Select View > Configuration.
2. From the Configuration drop-down list, select your configuration.
Administrator’s Guide 19Creating and Modifying Configuration Profiles
3. If your configuration contains multiple synchronization types, click the tab for the
type you want to edit.
4. Click Modify.
Whether you are creating a new profile or modifying an existing one, the
configuration wizard opens at the first page.
Selecting a profile name and synchronization type
1. In the Configuration Name text box, enter a name for your configuration profile.
20 Directory Synchronization ClientCreating and Modifying Configuration Profiles
The name should be unique within the Directory Synchronization Client. When
you run the tool from the command line, the name is used to specify the
configuration that you are using. For this reason it is best to use only
alphanumeric characters so that the name can easily be given as a command-line
parameter.
You can make a copy of an existing profile by entering a new name and clicking
Save.
2. From the Synchronization Type drop-down list, select the type of
synchronization you want to configure in the profile.
Note
If you selected only the Mail synchronization type when you first ran the Directory
Synchronization Client, the Synchronization Type drop-down list is not available
on this window.
Existing configurations appear in the list with the appended text (configured). If
you want to delete the current configuration for a specific synchronization type,
first select the entry from the drop-down list, then click Remove.
3. Click Next to continue.
Selecting your data source
Note that your configuration profile name now appears at the top of the left panel, and
is followed by your synchronization type in brackets.
Each synchronization type can have a single data source or multiple sources. The
example above shows a single data source.
Administrator’s Guide 21Creating and Modifying Configuration Profiles
Selecting multiple data sources
For more complex configurations, for example those using multiple directories or
searching in multiple separate areas of a single LDAP database, you might need to
configure additional data sources. If you have multiple data sources, the Directory
Synchronization Client consolidates all of your source data before sending the data to
the cloud service, avoiding the need for multiple synchronizations.
1. Check the Multiple Sources box.
2. In the Source drop-down list, select .
The source name defaults to the source type and a number, for example “Mail
source 1” or “Group source 3”. You can change these names.
3. In the Source Type drop-down list, select a data source.
Using the wizard, associate each source with its own server name and port, the top of
the search point in the directory tree, and attributes to retrieve from the server. You
must complete these fields for each data source before you can add further sources.
Once you have defined multiple sources, the Multiple Sources box is disabled and
you cannot switch back to the single data source definition window unless you delete
the additional data source definitions. To delete a data source definition, select it from
the Source drop-down list and click Remove.
Note
You cannot remove all data sources.
22 Directory Synchronization ClientCreating and Modifying Configuration Profiles
Configuring your LDAP server
The example below shows the LDAP configuration details for a Microsoft Active
Directory server.
To set up your LDAP server:
1. In the Host name field, enter the host name of your LDAP server. You can enter
the address in the format “exampleserver.examplecompany.com”, or the format
“192.168.0.135”.
2. Unless you know otherwise, leave the Port number field as the default value 389,
which is the number used for communicating with an LDAP server in plain text
mode. Do not change this unless you communicate with your LDAP server on a
non-standard port.
Note
If your server is a Global Catalog server, you can specify port 3268 for a plain
connection, or port 3269 for SSL. Some required attributes may be unavailable when
searching the Global Catalog.
3. From the Authentication drop-down list, select one of the following:
Anonymous - No authentication details are required to access the LDAP
server. Note that some servers restrict the results returned to anonymous
users.
Simple - If you select this option, enter the username for your server, and
optionally the password.
Strong - If you select this option, enter the username and password for your
server.
Administrator’s Guide 23Creating and Modifying Configuration Profiles
Strong/Certificate - If you select this option, enter or browse to the location
of your certificate, and enter the certificate’s password.
Note
To retrieve data from Active Directory, we recommend that the user identity has
read-only privileges equivalent to those of a domain administrator.
4. Select one of the following encryption types:
Plain - Sends unencrypted text over the connection. You cannot select this
option for Strong/Certificate authentication.
SSL - Secure Socket Layer. This provides a cryptographically secure
communication. It uses a certificate that has been signed by a trust point
already held in the cacerts file, which holds all trusted certificate authorities.
Alternatively it can use a self-signed certificate that has been imported into
the Java cacerts directory.
Note
To locate your Java cacerts directory, go to the directory where you installed the
Directory Synchronization Client, then navigate to /jre/lib/security.
TLS - Transport Layer Security. This a different way of sending data than
SSL, and requires a certificate.
Note
Further documentation is available on the Sun Web site at http://java.sun.com/j2se/
1.5.0/docs/tooldocs.
5. Either click Advanced to define further LDAP settings (see Defining advanced
LDAP server settings below), or click Next to continue to the LDAP search
configuration.
If there are problems with your LDAP connection details, an error is shown in red at
the bottom of the window. If an error occurs, click Back to amend your LDAP server
settings.
Defining advanced LDAP server settings
Click Advanced to specify:
Paging. Some directory servers may be configured to limit the maximum number
of results that can be returned at one time. The paging facility overcomes this. For
a server that has 220 results, a page size of 100 would retrieve entries 1 to 100 the
first time, 101 to 200 the second time, and 201 to 220 the third time. The
Directory Synchronization Client simply displays 220 results as if returned at one
time.
Referral settings. An LDAP server can contain referrals to other points on the
server, or to points on other LDAP servers. You can specify what the Directory
24 Directory Synchronization ClientCreating and Modifying Configuration Profiles
Synchronization Client does when it encounters a referral on an LDAP server, or
if a referred server is not available.
To enable paging:
1. In the Paging type drop-down list, select page.
2. In the Page Size text box, enter the number of results to retrieve.
The default page size is 100 results. This means that a maximum of 100 results are
retrieved from the LDAP server at one time.
Note
Not all LDAP servers support paging. If paging is unavailable, you get an error
during the synchronization process.
To define how to handle referrals, in the Action drop-down list, select one of the
following:
Follow - by default, the Directory Synchronization Client follows any referrals to
continue retrieving results.
Ignore - the Directory Synchronization Client ignores the referral and continues
the synchronization process.
Abort update - the Directory Synchronization Client ends the synchronization
process and logs this fact.
If you notice that a referral server is only intermittently available, you can set
threshold limits to ensure that the update does not continue if there is a noticeable
difference in the number of results returned. This means that if a referred server is not
available, the threshold limit stops the update and prevents the potential loss of data
from an entire server. For more information, see Limits, page 42.
Note that the DNS name or IP address followed by the Directory Synchronization
Client is the one seen by the machine running the Directory Synchronization Client. If
you experience problems with the Directory Synchronization Client after referrals,
Administrator’s Guide 25Creating and Modifying Configuration Profiles
ensure you are able to contact the referred servers by using an application such as
“ping”.
Setting up the LDAP search configuration
The example below shows the LDAP search configuration window when configuring
mail synchronization. You can select the level to search in the hierarchical tree
structure on the LDAP server.
The text in the Search filter field may differ from the example shown below
depending on your configured data source.
The following fields are common to both mail configurations and groups and users
configurations:
Search base
Search scope
Search filter
The Search base field and the drop-down list below it let you navigate through the
LDAP directory. Some LDAP servers do not allow you to search for entries at their
root, and you may need to enter a search base manually before you can browse further.
Note
The criteria for the returned object classes are defined in the LDAP search base filter.
For more information, see Search base filter, page 67.
To set up your search configuration for mail synchronization:
1. Do one of the following:
26 Directory Synchronization ClientCreating and Modifying Configuration Profiles
In the Search base field, enter your search starting point in the LDAP server
tree structure.
Select an entry in the drop-down list. That entry appears in the Search base
field.
The drop-down list now contains all the entries at the directory level specified in
the Search base field. To move up the tree, click on the first item in the drop-
down list.
2. From the Search scope drop-down list, select one of the following:
Object - searches for a single object specified by the search base.
One level - searches for all objects at the level specified in the Search base
field.
Sub-tree - searches the LDAP server from the level specified in the Search
base field downwards until the server restricts the results or the search
reaches the bottom of the tree. Use this option to return the most results.
3. The Search filter field defines the type of object to return data on. You can leave
the default filter or create your own.
See Search query filter, page 68 for a description of the filter syntax and how to
specify a different search filter from the ones available.
To revert to the original search settings or to return to the top of your LDAP server’s
tree, click Defaults.
To define specific attribute settings for your current synchronization type, click
Advanced.
Administrator’s Guide 27Creating and Modifying Configuration Profiles
Defining mail attributes
For mail configurations, click Advanced to display and edit the mail search attributes.
The default settings for these attributes are taken from your data source.
The Primary Mail field contains the mail address attributes within the object returned
by the search filter.
If your LDAP data does not include users’ email addresses, you can change the default
attribute for the primary mail value in the Directory Synchronization Client as
follows:
1. When creating or modifying the Users part of your configuration profile, go to the
Data source > LDAP search page in the wizard. Click Advanced to display the
Search attributes page.
2. In the Primary Mail field, replace %mail% with another attribute.
For example, you could use %userPrincipalName% if configured, or create a
‘fake’ email address using the sAMAccountName such as
%sAMAccountName%@mydomain.com.
Optionally, you can enter alternatives to the mail attribute in the Mail Aliases field. If
an email address returned from this attribute is prepended with “smtp:”, this is
automatically removed.
To view and select from a list of mail attribute examples, click in the Mail Aliases
field and then click Examples.
Defining group attributes
For group configurations, there is an additional field on the LDAP search
configuration window. The Name field defines a rule for constructing a textual name
28 Directory Synchronization ClientCreating and Modifying Configuration Profiles
that is used to represent individual users and groups. The name can be constructed
from other LDAP attributes using simple template replacement strings.
Note
If you want to synchronize groups with the same name from different domains (for
example, domain1/Admins and domain2/admins), you must change the string in
the Name field from the default %CN% to %DC%/%CN%.
Attribute names are delimited by percent (%) symbols. The special attributes DN[n]
and DC[n] allow part of the object class distinguished name to be used. Anything not
enclosed between % symbols is treated as literal text.
The number (n) following the DN or DC attribute is an index, starting from 1, from
the least significant component. When used with DN, the index refers to all
components of the distinguished name. When used with DC, the index refers to only
the DC components of the distinguished name. If the number exceeds the actual
number of components, an empty string is substituted. If n is a negative value, it refers
to the components starting with the most significant component first.
For example, for the following object class:
dn: cn=Marketing, ou=Security, dc=Websense, dc=com
objectClass: group
Name: SecureMarketing
SamAccountName: SecurityMarketingServices
The template %Name%\%DN[-2]%.%DN[-1]% resolves to
SecureMarketing\Security.Marketing
The template %DN[1]%\%SamAccountName% resolves to
com\SecurityMarketingServices
The template %Name%\%DC[1]%SamAccountName% resolves to
Com\SecurityMarketingServices
The template %DC[-1]%\%SamAccountName% resolves to
Websense\SecurityMarketingServices
Administrator’s Guide 29Creating and Modifying Configuration Profiles
To see a list of examples that you can use for the name template, click Examples.
Click Advanced to edit the group attributes.
You can edit the following attributes:
GUID - a unique identifier maintained by the LDAP server. Use this attribute if it
is available on your server. Microsoft Active Directory supports GUID, but it is
not supported by all servers. If you omit this attribute, the Directory
Synchronization Client derives an identifier from the distinguished name (DN) of
the object class.
The disadvantage of using a DN is that if the group is renamed, the group entry is
removed and re-added instead of modified. This means that any group
associations in the cloud service are broken and must be re-established.
Group Token - an optional attribute that holds the number this group is in. The
value may be referred to by the “Primary Group attribute” in the user object class
settings. If a user’s primary group is set to a particular group token, then the user
is part of that group. The group token is specific to Active Directory so may be
unavailable in other directories. If unavailable, it should be left blank.
Group Parents - used to relate a group to its parent group, if it exists. The
optional attribute retrieved from the directory may consist of a single DN that
contains the parent group.
Group Members - a multiple-value attribute that holds the users (in DN form)
who are part of this group.
Active Directory maintains membership lists on both group and user objects so
the Group Members attribute of the group object class lists all the users for the
group and the Other Groups and Primary Group attributes list all the groups to
which the user belongs. In theory, these should be equivalent. In practice, when
30 Directory Synchronization ClientCreating and Modifying Configuration Profiles
the directory is modified, some tools may update one list but not the other.
Specifying both attributes causes the lists to be merged.
Note
Group membership can be represented in the directory by
use of either:
Group Members—a list of users/groups belonging to a
group.
Group Membership—a list of groups to which a group/
user belongs.
The client allows either convention. For users to be
correctly associated with groups one of these must be
specified. The Group Membership attribute is labelled
Group Parents for group objects and both Primary Group
and Other Groups for user objects.
Defining user attributes
Note
Ensure you set up a users search filter that includes the users for the groups you are
synchronizing. Before you synchronize with the cloud service for the first time, we
recommend that you test your synchronization by sending the results to a local
repository file and carefully checking that the contents match your requirements.
The NTLM Identity field defines a template for constructing the NTLM identity of
the user. The default is the format “domain\username”.
The Name field defines a template for constructing a name that is used by the cloud
service to identify users. This is not required if the Relative Distinguished Name
(RDN) of the user is a Common Name (CN), as that will be automatically be included.
Administrator’s Guide 31Creating and Modifying Configuration Profiles
The Distinguished Name (DN) can be seen on the test page by selecting Show Detail
or hovering over one of the results: the RDN is the first naming component of the DN.
Including only enabled user accounts
In Active Directory, it is possible to mark user accounts as disabled. You might do this
if an employee is away for a short period of time. If you want to prevent disabled user
accounts from being uploaded to the cloud service, you can filter them out of the
search by searching for only enabled user accounts. At the next synchronization, any
disabled user accounts are removed from the cloud service.
To search for enabled accounts only, add the following to the filter in the Search filter
field:
(!(userAccountControl:1.2.840.113556.1.4.803:=2))
The complete filter might then look like this:
(&(objectCategory=person)(objectClass=user)(!(userAccountCon
trol:1.2.840.113556.1.4.803:=2)))
32 Directory Synchronization ClientCreating and Modifying Configuration Profiles
Advanced user attributes
Click Advanced to edit the user attributes.
You can edit the following attributes:
Primary Mail - used to retrieve a user’s email address.
Mail Aliases - any aliases set up for a user. To view and select from a list of mail
attribute examples, click in the Mail Aliases field and then click Examples.
Primary Group - the token number attributed to a user. If this matches a group’s
Group Token value, it places this user in that group. This attribute should be
considered as an extension to the Other Groups attribute for placing a user in a
particular group. Not all LDAP directories offer support for it.
Other Groups - the attribute name that describes the group or groups this user
belongs to. For Active Directories this is symmetrical to the Group Parent
attribute for the group object class that points from each group to its users. If you
omit this attribute, or your directory does not support this feature, the Directory
Synchronization Client searches for each user in the entire list of groups.
For users to be correctly associated with groups, one of the following must be
true:
a. The Group Parent attribute exists, and the user GUID and group GUID
attributes do not.
b. The Group Members attribute exists.
GUID - a unique identifier assigned to each user in a similar manner to the GUID
attribute for groups. If you omit this attribute, you should also omit the group
GUID attribute.
Administrator’s Guide 33Creating and Modifying Configuration Profiles
Checking your search results
Click Next to test your search settings.
If you have changed any of the default attributes used for the LDAP search, you can
use the test window to confirm that you have correctly retrieved the attribute you were
expecting. To view full details of groups and users on this window, check the Show
detail box.
Note
There is no Show detail option for mail configurations.
You can reorder columns in the table by clicking and dragging the top of the column.
For groups, each line includes:
34 Directory Synchronization ClientCreating and Modifying Configuration Profiles
The result from the name template after it has been changed using any template
rules.
The GUID. If there is no group GUID attribute, this is derived from the DN.
The Group Token, retrieved using the Group Token attribute.
The DN automatically retrieved by the Directory Synchronization Client.
The number of parents that this group belongs to (normally 0 or 1) and the DN of
the first of these groups. This is retrieved using the Group Parents attribute.
The number of users in this group and the DN of the first of these users. This is
retrieved using the Group Members attribute.
For users, each line includes:
The result from the name template after it has been changed using any template
rules.
The GUID. If there is no user GUID attribute, this is derived from the DN.
The email address retrieved using the Primary Mail attribute.
The Primary Group retrieved using the Primary Group attribute.
Groups that the user belongs to.
The DN automatically retrieved by the Directory Synchronization Client.
For both groups and users, if the name, the GUID, or the DN is blank, you should
correct the attribute names before starting a synchronization.
If you see no results in this window, check that:
The source type on the Configure data source window is correct. For
information on configuring multiple data sources and advanced details, see
Selecting your data source, page 21.
The Search scope field on the LDAP search configuration window is set to
Sub-tree. This returns the most results.
The Search base field on the LDAP search configuration window is set to a
suitable level in your LDAP server’s hierarchy to find the mail addresses or
groups and users that you want.
The location specified in the Search base field exists in the LDAP server
directory. If in doubt, return to the top of the LDAP server tree and then navigate
to the location you want.
You haven’t changed the Search filter field. Click Defaults to reset this field
setting.
Your authentication settings are sufficient to return details from the LDAP server.
If you selected anonymous from the Authentication drop-down list and no
results are returned, try selecting simple and entering a username and password.
For users and groups, the search results display the names constructed from the Name
template field. Check that these are representative names. For example, for users in a
Microsoft environment, the names should represent the “domain\username” identity
of individual users.
Click Next to continue.
Administrator’s Guide 35Creating and Modifying Configuration Profiles
Selecting groups for synchronization
For the group synchronization type, you must specify which groups in your data
source are to be synchronized.
By default, no groups are synchronized. To include a group in the synchronization,
select the group in the Available Groups list, and then click > to move it to the
Groups to Include list.
Note
You do not have to synchronize all of your Active Directory groups. You only need
to select the groups that you plan to use in policy assignment and/or exceptions in the
cloud portal.
To filter a group list, enter text in the field below the list. For example, in the
screenshot above, if you enter “dhcp” in the field below the Available Groups list,
only the groups DHCP Administrators and DCHP Users are displayed.
36 Directory Synchronization ClientCreating and Modifying Configuration Profiles
Setting up a data repository
There are 2 types of data repository:
Portal - Your data is synchronized to and held on the cloud portal. See Entering
cloud service connection details, page 38 for details of the next step.
File - Your data is held in a text file on your local system. See Selecting a file
repository location, page 39 for details of the next step.
Note
We recommend you select File when you are setting up the Directory
Synchronization Client for the first time. This enables you to test the connection to
your LDAP server and ensure the results are correct before setting up the connection
to the portal.
Select an option from the Repository Type drop-down list, then click Next to
continue the repository setup.
Administrator’s Guide 37You can also read