Building an iOS application with application programming interfaces - Nikita Kechin Bachelor's thesis Information Technology 2018 - Theseus
←
→
Page content transcription
If your browser does not render page correctly, please read the page content below
Nikita Kechin

 Building an iOS application with
application programming interfaces
             Bachelor’s thesis
         Information Technology

                 2018
Author (authors)                             Degree                  Time

Nikita Kechin                                Bachelor of             May 2018
                                             Engineering
Thesis title
                                                                    45 pages
Building an iOS application with application programming
interfaces
Commissioned by

Supervisor

Reijo Vuohelainen
Abstract
The main goal of this thesis was to study common technologies using in an iOS
development and then to get fimiliar with application programming interfaces on practice.
This work was logically split into theory and implementation parts. Each part allowed taking
a look on application development issues from different points of view.

The theory part of this work covered core classes of the UIKit framework such as UIView,
UIViewController and UITableViewController. Also, view geometry and coordinate system
were explained in order to go deeper into more hardware related lower abstract levels from
higher abstract software-related UIKit framework. In conclusion of the theory part,
application programming interfaces used in implementation part were covered.

As for implementation part, the main idea was to go partly throuth the life cycle of a mobile
app development, while developing the practice project. This cycle included app
prototyping, designing UI, designing an app’s logic, etc. The practice project was map-
based iOS application called FindSpot. The FindSpot app was designed to help people to
search and share places in the nature for outdoor activities.

As a result, the map-based iOS app prototype was created. During the development
process, huge amount of experience in programming, user interface design and software
design was received.

Keywords

iOS programming, Firebase, APIs, Google Maps APIs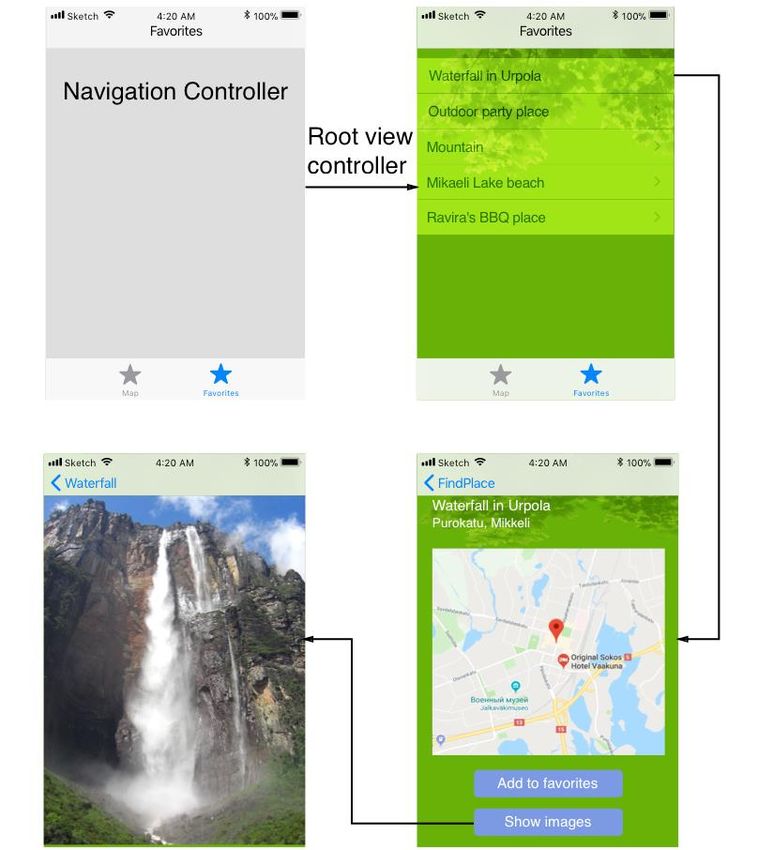
3

CONTENTS

1     INTRODUCTION ............................................................................................ 5

2     THEORY PART .............................................................................................. 6

    2.1    UIView and view hierarchy ...................................................................... 7

    2.2    View geometry and coordinate system ................................................... 10

    2.3    View controllers ...................................................................................... 12

      2.3.1     Types of view controllers .................................................................. 14

    2.4    Table view .............................................................................................. 16

    2.5    Application programming interfaces (APIs) ............................................ 19

      2.5.1     Google Maps APIs and Google Maps iOS SDK ............................... 20

      2.5.2     Firebase database, storage and authentication API ......................... 21

3     IMPLEMENTATION PART ........................................................................... 23

    3.1    User interface design ............................................................................. 24

    3.2    Application navigation ............................................................................ 26

    3.3    MVC implementation .............................................................................. 28

    3.4    Firebase realtime database and storage ................................................ 29

    3.5    App managers ........................................................................................ 31

      3.5.1     GoogleApi manager ......................................................................... 31

      3.5.2     Database manager ........................................................................... 32

      3.5.3     Photo manager ................................................................................. 33

      3.5.4     Error manager .................................................................................. 34

    3.6    Authentication process ........................................................................... 35

    3.7    Searching for spots and displaying results ............................................. 36

    3.8    Creating a new spot ............................................................................... 39

4     CONCLUSION ............................................................................................. 40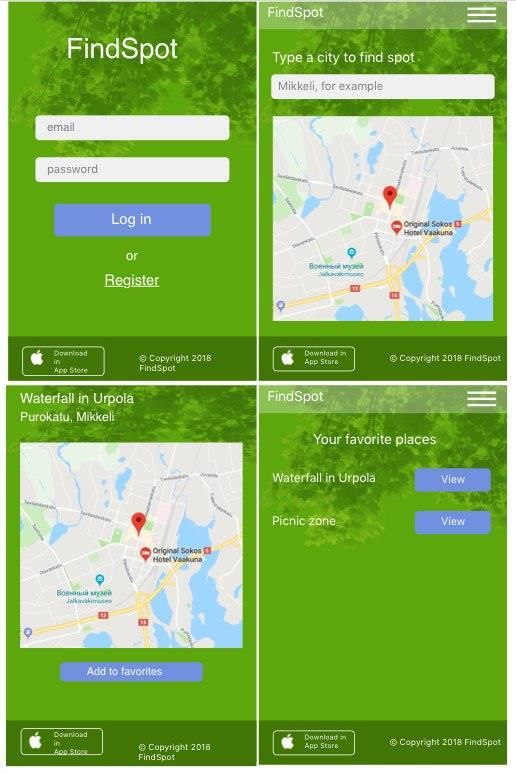
4

REFERENCES .................................................................................................... 42

LIST OF FIGURES .............................................................................................. 45

5

1   INTRODUCTION

It is clearly seen that the development of smartphones has forced humanity to
change the perception and understanding of many common things in daily life.
The fact that nowadays each person can have a portative, palm-sized computer,
which is thousand times more powerful than all Nasa’s computers that were used
in the Apollo 11 mission in 1969, has been changing our world in different fields.
It is hard to believe that some things in medicine, in finance or in social life used
to be done in another way in the past.

According to the The 2017 Mobile App Market: Statistics, Trends, and Analysis
(2017) along with smartphones’ hardware, which made this possible, software
also has made a great step forward. New programming patterns were created,
the user interface was significantly improved and became more user friendly.
Because of the increasing investments in the mobile market segment, the market
is expanding, which allows market leaders such as Apple and Samsung to invest
in the development of technology and training of highly qualified specialists more
and more funds. All mentioned above facts have been making mobile
development more and more complex and requiring advanced knowledge in
software engineering, 2D and 3D graphics.

On the other hand, a wide availability of the Internet access for smartphones and
rapid development of cloud computing services led to the expansion of the
application programming interfaces market and increasing of an interest of
developers to it. Application programming interfaces which will be explained in
details later in this work have opened boundless opportunities for the mobile app
development, since heavy computing tasks affecting performance can be done
using cloud services or other external technologies.

Therefore, the purpose of my thesis work is to at first understand and summarize,
in my opinion, the most important elements of an iOS platform, and then to study
the most suitable for me application programming interfaces related to geocoding
and realtime databases. The final goal is to build an iOS application,
implementing gained knowledge in practice. This work is going to be a synthesis

6

of all my half-year experience in iOS development. It is important to note that due
to huge amount of information which potentially could have been used in given
work, I focused on things which are directly related to my practical project. That is
why I consciously missed some basic information such as the description of
Xcode (environment of iOS development) or the description of Swift or Objective-
C and the like. Thus, this work can be interpreted as an overview on building the
first real iOS application where background knowledge would be transformed into
a real product.

2   THEORY PART

This chapter is a theory basis of my thesis work. It covers the most important
technologies used in the practice project. A certain core classes of a UIKit
framework will be explained in details first, and, then, an application programming
interface concept in general and particular ones used in the implementation part.

However, before talking about UIKit classes, it is important to determine what
UIKit is and its role in an iOS. According to the Apple Developer Documentation
the UIKit framework is a mediator between an iOS and users. It provides the
required infrastructure for handling touches and multitouches of users. The UIKit
framework is responsible for displaying the result of a user’s activity on the
screen using the window and view architecture. It allows developers using many
default classes which are interfaces between the application and an iOS. These
classes are connected between each other through the inheritance concept of the
Object-Oriented Programming paradigm.

Thus, each class in the hierarchy, inherits a certain methods and properties from
the previous one. The base class of the UIKit class hierarchy is a NSObject class.
Since UIKit was originally designed for the Objective-C language, the NSObject
class is a must because it defines a certain runtime mechanisms needed for a
memory managment and compiling a user interface. For now, although Swift
which is a new iOS language introduced by Apple uses quite different runtime
mechanisms, the NSObject class still exists because it is compatable with Swift
and acts as a mediator between old-fasioned Objective-C libraries and new Swift
7
ones. (Cyon 2016.) Simplified version of the UIKit class hierarchy related to this
work can be seen on Figure 1.
Figure 1. UIKit structure of main classes
2.1 UIView and view hierarchy
The description of the meaning of UIView objects in this chapter bases on the
information on View Programming Guide for iOS View (2014). Actually, all objects
that users can see on the screen or interact with are view objects known as
views. Views are objects of the UIView class or its subclasses. In iOS, all user
interface objects such as buttons, images, labels, sliders and others are also
considered as views. By itself, view is a rectangular with certain width and height.
Each view by default can react to user interaction. That makes UIView a central
element of UIKit Framework, because it is responsible for interaction between
users and applications.
However, the responsibilities of view are much wider than just the interaction with
the user. View objects are also responsible for:
Event response. Views are subclass of UIResponder and can respond to
users’ touches.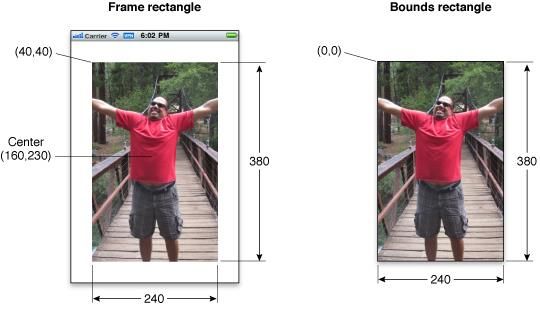
8
Holding gesture recognizers. They transfer user touches to a specific
gesture like tap gesture or pinch gesture and others.
Animation. Allows creating simple animation changing some view
properties.
Drawing. Allows drawing complex views.
Subview management. Allows views to be a part of the View hierarchy and
act correspondingly to its role.
Layout. Defines how views should be displayed on different screen sizes.
When talking about UIView, another related concept should not be overlooked –
view hierarchy. In iOS environment one view object can contain another. In other
words, view can act as a container for other view objects in addition to have its
own content. Accordingly, a containing view object becomes a parent-view (also
known as a super-view) and a view object, which is contained, becomes a child-
view (also known as a subview). Thus, parent-child relationships create a
hierarchy. Each view hierarchy is managed by its own view controller, which will
be covered in detail later. Example of a view hierarchy can bee seen in Figure 2.
According to the Cocoa Application Competencies for iOS (2013), each parent-
view stores its child-view in an ordered array, and the order is the same as when
child-views were added to a parent-view. In case of child-views overlapping, an
user will see the view that is the last child view in a parent view array. The same
principle works with the whole view hierarchy – users always see the most
bottom view in the hierarchy first.
Figure 2. Exampe of a view hierarchy
9

Technically, going deeper into an iOS implementation of views, it is important to
note that iOS has a mediator between the hardware device screen and the
software representation of the screen. The UIScreen class provides such
functionality. A UIScreen object acts like interface of the hardware screen and
also contains information about the device display: its bounds, mode, and
brightness.
Another important class, acting as a main window of app is the UIWindow class
(which is also subclass of UIView). Actually, the UIWindow object, or as it is
called – window, has nothing to display by itself. It works as backdrop or initial
view of application. A window displays content provided by its root controller. For
device screen, there is only one default window configured by UIKit. (Ostrovskiy
2017.)

Among other things, UIWindow is responsible for receiving events such as user
touches from UIKit and forwarding them to its root controller. According to the
UIKit tree of classes, UIView and UIViewController are subclass of UIResponder
class – the abstract class defining the handling events. It means that by default,
all objects of these classes are considered as responder objects or just
responders. In iOS all responders are placed to a specific array called Responder
chain. To simplify, Responder chain is a responder’s hierarchy defining which
responder will handle the event if the previous one failed. Responder chain can
be customized to provide more flexibility. (Hanukaev 2014.)

Therefore, when the user has interacted with user interface and UIKit received
this touch event, the process goes the following way:
   1.           UIKit sends touch event to its window, then window performs hit-
                testing process using its root view controller view hierarchy. Hit-
                testing is used to determine, which view in the View hierarchy is
                the frontmost one under the user’s finger.
   2.           Then, this view becomes the first responder. If it does not handle
                touch event (methods for handling are not implemented), the next
                responder in Responder chain will handle touch event. From view
                hierarchy perspective, the next responder is a super view of the
                current view so, responders in the chain climb up view hierarchy.
   3.           In case if all views in view hierarchy cannot handle touch events,
                a root view controller will do it. And if it also fails, touch event will
                be passed on to the window.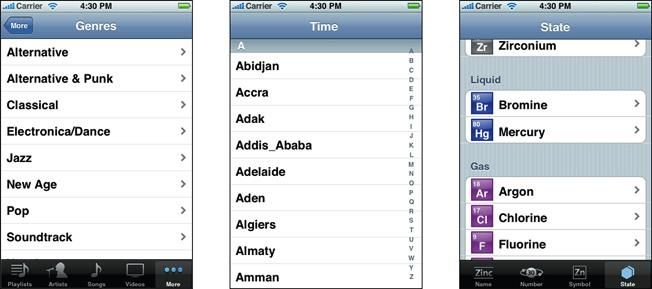
10

      4.           If all responders in the Responder chain fail handling, touch event
                   will be discarded.

2.2        View geometry and coordinate system

The description of the meaning of a view coordinate system in this chapter bases
on the information on Drawing and Printing Guide for iOS (2012). It is important
to understand that all view objects in iOS exist in two dimensional space. Thus,
each view except dimensions also has x and y coordinates. The UIKit framework
provides a default application coordinate system. It is known as upper-left-origin
coordinate system (ULO), in which the origin point is at the upper-left corner of
the screen. Therefore, x-axis goes down and y-axis goes right. Although ULO is a
common coordinate system used in iOS, there is another one called a lower-left-
origin coordinate system (LLO) used by Core Graphics framework. But it is
beyond the scope of given thesis.

According to the Cocoa Drawing Guide (2012), since each view may be a super-
view and a subview simultaneously, UIKit provides two independent coordinate
systems. So, as a subview, it is in the super-view’s coordinate system where
defined relative to its super-view. And as a super-view, it is in the local coordinate
system where it is defined relative to itself.
Depending on which coordinate system is taking into account, the rectangular of
view can be frame or bound. The frame is a rectangle, specifying the size and
location of the view in its superview’s coordinate system. The bound is the
rectangular of bounds, specifying the size of the view in its local coordinate
system. The coordinates of view in its local coordinate system is always {0, 0}.
Relationship between a frame and a bound can be seen in Figure 3.
11
Figure 3. Frame and bound
A coordinate in iOS is a point lying in coordinate system of a view. It has certain
value on the x-axis and y-axis using floating-point numbers. However, the role of
points in iOS is much more complex than just coordinating. Points are abstract
units to represent coordinate values and to measure distances, which makes
most views vector-based drawing models where all coordinates are defined using
points. Points only have sense at the mathematical point-based measuring
system called user coordinate space. From software point of view, all geometry
and computations of views in iOS are done in user coordinate space. The
purpose of using user coordinate space while designing an user interface is to
provide a resolution-independent user interface for target devices. Thus,
graphical content will be properly shown both on low-resolution and high-
resolution target devises.
When view is ready to appear on the device display, from hardware point of view,
view must be transformed from point-based user coordinate space to pixel-based
device coordinate space. This process is called rasterization and handled by the
system. To perform rasterization, the system needs to know scale factor. Scale
factor defines how many pixels are in one point. Scale factor depends on screen
resolution of the device. For example, iPhone X has high-resolution Super Retina
display, whose screen resolution is 2436 x 1125 pixels, and its scale factor is 3x.12
Whereas, iPhone 6 has high-resolution Retina display whose screen-resolution is
1136 x 640 and its scale factor is 2x. (Kearney 2015.)
The rasterization process performed for iPhone X screen would be the following
way:
1. While designing, by default the screen size of iPhone X is 812 x
375 points. Therefore all views are user coordinate space where
the maximum possible value on x-axis is 818, and on y-axis 375.
Rasterization is starting.
2. Rasterization takes screen size and multiplies it on scale factor.
In case of iPhone X with scale factor of 3x, it would be (812 x 3) x
(375 x 3) pixels.
3. According to the device coordinate space, which is 2436 x 1125
pixels, all views are rendered accordingly. Rasterization is
finishing.
Now view can be shown on the hardware screen.
2.3 View controllers
The description of the meaning of view controller in this chapter bases on the
information on View Controller Programming Guide for iOS (2015). The
UIViewController class is a core element of the UIKit framework. Objects of this
class play a great role in each application which makes view controllers one of
the most important elements in an iOS environment. They are responsible for:
Managing its view hierarchy
Handling user interaction events
Memory management
Exchanging data between data models and views
Providing content for the main window
Logically completed representation of some portion of UI of the
application
Adapting content for different device display sizes and orientations.
By themself, view controllers are light-weight objects. They contain heavy-weight
views. Each view controller has its own root view. It might have a child-view, and
child-view might have its own child-view that ultimately form the view hierarchy
for the current view controller. It can bee seen in Figure 4.13
Each view controller can be set as a root view controller of the window. The root
view controller defines the initial content seen by the user. It allows the window to
display root view controller’s content and also to forward touch events to be
handled. It is possible to set only one root controller at a time. When another root
view controller is set, the previous one’s content is replaced with the new one.
Figure 4. View controller and its view hierarchy
Every time a view controller is going to be shown on the screen, it follows a
specific pattern known as lifecycle. This pattern includes the calling of methods,
meaning a certain event in the lifecycle of view controller. These methods are the
following:
viewDidLoad method. It is called when the root view of a view controller
is already created. This method is always called once in the lifecycle.
viewWillAppear method. It is called each time when a root view is
about to be shown on the device screen.
viewDidAppear method. It is called each time when a root view is on
the screen.
viewWillDisappear method. It is called each time right before the
transition to the next view controller.
viewDidDisappear method. It is called after an old view controller has
been removed from the screen.
didReceiveMemoryWarning method. It is called when the device
almost runs out of memory.14
Methods mentioned above are methods of the UIViewController class. They are
called automatically by iOS. In practice, when one view controller is replaced by
another one, these methods are called in the following order:
1. viewDidLoad method. The new root view of view controller is
created and waiting to be shown on the screen.
2. viewWillDisappear method. The root view of old view controller is
about to be removed from the screen.
3. viewWillAppear method. The root view of new view controller is
about to be shown on the screen.
4. viewDidDisappear method. The root view of old view controller
was completely removed from the screen.
5. viewDidAppear method. The root view of new view controller was
successfully shown on the screen.
It is important to note that these methods are optional. The application will work
properly without their implementation. But these methods are quite useful and
widely used due to their features. (Kumar 2017.)
2.3.1 Types of view controllers
According to the View Controller Programming Guide for iOS (2015) in iOS there
are two types of view controllers – content view controllers and container view
controllers. Despite the similar name, their functionality is quite different. Unlike
content view controllers, container view controllers manage other view
controllers, known as child view controllers, mixing their content in certain way to
create complex UI. In UIKit these view controllers are presented by
UISplitViewController, UITabBarController, UIPageViewController and
UINavigationController classes. In most cases, they are often set as a root view
controller of the window.
One of the examples of container view controllers mentioned above is
UINavigationController which is one of the most widely used. In iOS this default
class is a powerful tool for creating complex UI which requires many animated
transitions between child view controllers. According to the View Controller
Catalog for iOS (2014), UINavigationController object by itself manages its own
content presented by a navigation bar, usually placed at the top of the interface
and an optional toolbar placed at the bottom of the interface. They are used to
switch between child view controllers to display their content accordingly. The15
navigation controller dynamically updates its navigation bar or tab bar content
according to the currently shown child view controller.
Like all container view controllers do, the UINavigationController object also
manages its child view controllers, which are placed into a special array called
navigation stack. It can be seen on Figure 5. Only one content of child view
controller can be displayed at the time on the screen.
Figure 5. Navigation stack
Initially, a navigation view controller has only one view controller in the navigation
stack known as a root view controller. It is an initial content of the navigation view
controller which cannot be removed from the navigation stack.
Technically, it can be divided into two process. When a user goes deeper into UI
hierarchy, the process is the following:
1. A new child view controller is added into the navigation stack. So,
the current view controller is always the last one in the stack.
2. The added child view controller appears on the screen, when its
view hierarchy is initialized and created.
When a user comes back to the previous view controller, the process is the
following:16
1. Current view controller is completely removed from navigation
stack. It means that it is also deallocated from the memory and
now no longer exists.
2. Previous view controller becomes the last in the stack and
appears on the screen.
It is important to note that view controllers, currently waiting to be retrieved from
the navigation stack, are ready to use objects. They do not need to be
reinitialized or reallocated. (Orlov 2017.)
2.4 Table view
The description of the meaning of table view controller in this chapter bases on
the information on Table View Programming Guide for iOS (2013). Table
presentation of data has been used for thousands of years. In an iOS
environment this concept was implemented in a UITableView class, a subclass of
UIView. A UITableView object known as table view is a user interface object,
presenting data in a vertically scrollable one-column table in such a way that
each row contains a portion of data. Different examples of table view can be seen
on Figure 6. Some rows may be united into sections. From developer’s point of
view, a table view can be used for:
navigation through an application’s data hierarchy.
presenting data from an array, according to the array index.
simple deleting, inserting and moving data in real time through installed
UI features.
designing complex UI hierarchies.
Figure 6. Table views17
In fact, a table view manages its rows content. Each row space is considered as
a separate view. This view is called the cell of table view and managed by the
UITableViewCell class. Cells contain visible content such as labels, images,
buttons, and other views. Each cell can be selected by user touch, and when it is
selected, it becomes highlighted with color.
Being placed into a table view, cells have their own matrix-like index called index
path in order to work with a particular cell. Index path is a structure consisting of
two integer values. The first one represents the section of the cell, and the
second one represents the row of the cell in the section. Like in the arrays, the
index starts with 0, not 1. For example, the first cell in first sector would have {0,
0} index path. (Knopper 2017.)
According to Table View Programming Guide for iOS (2013), UIKit defines two
types of cell:
Static cells. They are usually used in small table views, when the final
number of rows is known in advance. Each static cell usually has its own
layout and design.
Dynamic cell. It is custom template of a cell, used as prototype to create all
further cells in the table view. Dynamic cells have their own unique
identifier known as “reuse identifier” to distinguish custom cells from each
other.
It is important to note that table view can work only with one type of cells. For iOS
version 11.0 and older, it is not possible to mix dynamic and static cells in one
table view.
By its nature, a table view is a view, so it cannot exist without corresponding view
controller. By itself a table view cannot build and maintain its content. A table
view delegates its view controller to build and fill its content. The UIKit framework
provides two protocols for these purposes. They are UITableViewDelegate
protocol and UITableDataSource protocol. Each view controller must adopt and
conform to these two protocols to manage its table view. In other words, it must
be set up as a delegate of a table view. Conforming and adopting in this context
means implementing all the required methods of UITableViewDelegate and
UITableDataSource protocols. In iOS, there is a specific view controller of18
UITableViewController class focused on working with a table view. It is set up as
its table view by default.
Thus, following Nannestad (2016), the process of building a table view is the
following:
1. The process starts right after executing of the viewDidLoad
method.
2. The numberOfSections method is called. It lets a table view know
how many sections are going to be.
3. The numberOfRowsInSection method is called. It lets a table view
know how many rows are going to be in each section.
4. The cellForRow method is called. Depending on “reuse identifier”,
different cells are created inside this method. This method is
called as many times as there are rows in the table. It returns a
cell with data for each row.
5. A table view is ready to be shown.
Above process refers to table views with dynamic cells.
Using dynamic cells also allows taking advantages of a very useful feature known
as reusing cells. A table view can display only certain number of cells without
scrolling. Therefore, from the resource usage point of view, it is pointless to store
more cells than this number in the memory. Thus, while scrolling, for example, in
the down direction, when an old cell becomes hidden, and a new one is about to
appear, the table view reuses that hidden cell, removing old content and placing
new content through calling the cellForRow method. As a result, the number of
cells on the screen and in the device memory is constantly the same. This feature
allows dramatically reducing the usage of resources in the applications.
(Gonzalez 2015.)
Usually, according to iOS Human Interface Guidelines, a view controller
managing a table view is a root view controller of a navigation controller. From
the design point of view, this pattern is an great tool to represent the data
structure of an application. The most common data structure used in application
is Tree data structure. Trees are non-linear data structures. They organize data
split into portions called nodes in a hierarchical way. The topmost node is called a
root. Other nodes connected with the root node but placed under it are called
child nodes. The last nodes in a tree without a child are called leaf nodes. Thus,19
there are two optiones of using a table view. The first one is when each cell of
table view represents a new portion of data contained in the corresponding new
view controller. And the second one is when each cell of table view is a leaf node
which goal is just to show static content of the table view without any interaction
with users. (James 2017.)
2.5 Application programming interfaces (APIs)
The description of the meaning of application programming interface in this
chapter bases on the information on Wikipedia. Application programming
interfaces or APIs are sets of methods or functions providing access to the
functionality of a certain program, module or library in software engineering. By
their nature, APIs are high-level abstractions. Therefore, an object which uses a
certain API knows only the abstract functionality of the used API and does not
know how exactly API is implemented. Thus, APIs can be defined as separate
self-contained modules. APIs can be divided into two groups according to their
usage. The first group is public APIs. Their functionality can be used by any
developers for free or for money. These APIs are focused on interaction with end-
user. The second group is private or internal APIs. They can be only used by
small groups of developers belonging to a certain company which owns these
APIs. Private APIs used to be much more popular than public ones in the past.
(Wikipedia.)
However, taking into account the rapid development of cloud services and wide
usage of smartphones, which are becoming cheaper, it can be definitely said that
most APIs are becoming public cloud service products, which are sold to
companies and engineers. Nowadays, public APIs are goods in the huge
software market. Today more than nine million software engineers are involved in
developing all types of APIs (Murphy & Sloane 2016). Moreover, IT experts say
that there will be more than one million public APIs available by the end of the
decade (Dignan 2017).
On the other hand, public APIs have some disadvantages such as:
Security vulnerabilities. Using APIs adds new attack surface to application.20
Performance. Since using public APIs requires Internet connection, the
total application performance will depend on quality of Internet connection,
which is quite different around the world.
Availability. Although APIs providers have high-availability fault-tolerant
systems installed, there is always a chance of unexpected fault, which can
lead to financial losses.
Dependence on APIs. Using APIs is a double-edged tool. On the one
hand, companies do not need to invest huge resources in their own
software. On the other hand, they becomes dependent on these APIs.
To sum up all these facts, it is clear that each developer should pay attention on
APIs and get familiar with them. Further, I will explain in detail some APIs which
are planned to be used in this work. (Murphy & Sloane 2016.)
2.5.1 Google Maps APIs and Google Maps iOS SDK
The description of the meaning of Google Maps APIs in this chapter bases on the
information on Google Documentation. Google Maps is a well-known geolocation
service designed and maintained by Google. Google Maps APIs are cloud
services based on Google Maps functionality. Depending on consumption of
computing resources, they can be free or paid. In this work, I decided to use two
Google Maps APIs which are Google Maps Direction API and Google Maps
Geocoding API. According to the Google Maps Geocoding API provides
geocoding and reverse geocoding. In other words, it allows converting
geographic coordinates in a form of latitude and longitude into addresses with
certain accuracy and viceverca. As for Google Maps Direction API, it builds a
route from start and finish points, taking into account details such as type of
transport, type of roads and the like. Also, it counts approximate time and the
distance of the route.
These APIs base on the same request-response concept. A client application
sends a request in HTTPS or HTTP form to the Google Maps server. The server
computes request, and sends back data in HTPS or HTTP response. Each
application using Google Maps APIs must have a unique API key which is
created during the activation process. This key is built into a client application21 request URL to let Google know which application made a request and which tariff plan should be applied to this request. Unlike the cloud-based Google Maps APIs service, Google Maps iOS SDK is mostly an offline framework for an iOS environment. It is installed inside an application. Google Maps iOS SDK allows creating map objects, adding map markers, polylines and map recognizers of gestures such as clicks and drags. SDK has a variety of functions, classes and delegates to provide such functionality. 2.5.2 Firebase database, storage and authentication API According to the Google Documentation. Firebase is a cloud-based mobile and web app development platform backed by Google Cloud Platform. It provides many real-time functionality services, APIs and tools for software engineering. Firebase solutions require both client and server sides. The client-side is represented by the Firebase built-in SDK framework, installed and set up inside the application. The server-side is represented by Firebase cloud-services. Firebase SDK provides classes and functions to make management and configuration of its cloud-based services easier. In addition, developers can manage their projects using a Firebase console. Thus, Firebase services are out- of-box solutions allowing using secure high-performance development tools without any backend knowledge. The Firebase mechanism can be seen in Figure 7. The next topics to explain are Firebase authentication, realtime database and storage in details.
22

                                Figure 7. Firebase services

Firebase authentication is secure multi-platform cloud-based authentication,
supporting email and password accounts, phone authentication, Google, Twitter
and Facebook login. Developers can keep track of each login in a Firebase
console. Firebase authentication also provides different templates for user
notification by email. For example, it can be configured so that notification
messages will be sent to user email address right after user registration or
changing the password. After a successful login or registration of a user,
Firebase authentication builds a unique user identifier sent back to client-side.
This identifier is an authentication token to verify the identity of users. Further, it
can be used to access Firebase services.

Firebase realtime database is a cloud-hosted NoSQL database allowing storing
and syncing JSON-like data between client-sides in real time. It is based on Web-
Sockets which is advanced client/server web technology. According to the
WebSockets vs. Regular Sockets (2013), web-sockets provides bi-directional, full
duplex long-term TCP connection between a client and a server. Due to little
overhead of packets containing data, connection latency is very low. From the
database point of view, it means that this is no concept of "querying" in the
Firebase database. A user subscribes to a certain channel which is represented
by a certain database entity. While subscribing to a channel, new Web-Socket
TCP connection between the client and the database is created. Thus, the
23 database is notified that a certain entity must be synced with user client-side. When this entity is updated, the database immediately pushes updated data to the client-side over the established connection. The client-side will listen to the database channel updates until it initiates the termination of established connection. As for Firebase storage, it is a cloud storage which is an autonomous solution for downloading and uploading a user-generated content from mobile clients over Firebase SDK. It is based on a Google Cloud Storage. Firebase storage uses a user-friendly folder/file data structure. Storage may require users to be authorized in order to access the storage. Storage security rules are responsible for that. Security rules are used to determine a storage security policy, according to which users are granted access to read and write or not. 3 IMPLEMENTATION PART Before starting this work, I have already had a concept of what I would like to implement as a thesis project. Having read many articles related to iOS development, and collected information about the most frequently used iOS technology and frameworks, I realized that the most convenient way would be to create an iOS map-based application. Thus, I could have easily presented this project as my portfolio application. Therefore, the decision was to implement this project in cooperation with Andrew Donchenko who is a fourth-year student of South-Eastern University of Applied Science. His field is web development. Our cooperation boils down to the development of a cross platform application, using the same server-end part and partly a similar app design with amendments to the platform used. Our application is called FindSpot. (Donchenko 2018, 20-21.) Further, in this work, the meaning of the word "spot" will be the place in the nature or outdoor place. The idea of the app is to help people who love nature, outdoor activities such as picnics and outdoor parties to find a spot for doing this. Each user can also add a new spot into an application to share his/her favorite place with other users. FindSpot will provide users with the geolocation of the spot, its name, its short
24

description and some photos of this place. We also came up with the idea that
users would have their own user accounts, containing a user name, password,
user nickname and a favorites array with spots which have ever been added by
users.

Therefore, this chapter covers the most important software solutions which I
implemented during the development of the application. The chapter is divided
into sections to explain specific software solutions. The last one explains the
whole algorithm of FindSpot.

3.1   User interface design

While developing the design in general, we came up to idea that the most
convenient way would be to use the design layout of the mobile version of the
web application also as an iOS app design layout. The early design prototype can
be seen on Figure 8.

                         Figure 8. Early user interface prototype
25
However, comparing with the mobile web-app, an iOS app had some features
which required changes in the prototype in order to suit iOS design patterns. The
main “stumbling block” was completely different navigation through the app
content used in the iOS app. According to the iOS Human Interface Guidelines,
using navigation bars and tab bars in mobile design allows saving screen space,
moving some important UI elements such as buttons and labels to these bars.
This feature comes from the nature of navigation controllers and tab bar
controllers which contain these bars. Thus, obviously this prototype did not
provide the required navigation patterns, in other words this layout could be used
only as a general design concept.
Then, the second finished prototype based on the previous one created. During
designing the new prototype, I had been trying to implement some design
concepts recommended by iOS Human Interface Guidelines. In my opinion, this
allowed increasing the usability and appeal of the application. The example of
second finished prototype applied in iOS application can be seen in Figure 9.
Since the goals of this work are not related to the deeper understanding of UI
design, the next section move on to structure of application navigation.
Figure 9. Second prototype26
3.2 Application navigation
According iOS Human Interface Guidelines the easy and understandable
navigation through content is one of the key element, which makes application
user friendly. As it was mentioned earlier in Chapter 2.4, the tree data structure is
usually used in iOS apps and this project is not an exception. I decided to use the
UIKit tool called navigation controller which would allow users to travel through
the content of the app from a root node to a leaf node and back to the root one.
However, while designing the app data hierarchy, I came up with the idea that it
is reasonable to split data content of the app into two logical portions or
“branches” (Map branch and Favorites branch) with the same root node,
according to the Tree data structure theory. The Map portion would logically
represent the current map with spots and the entire functionality related to it. The
Favorites branch would do the same but with the favorite spots of the current
user. As for root node, I chose tab bar controller for this role. It has two tabs, and
each tab contains navigation controller with its own navigation stack with view
controllers. Thus, choosing a tab, users can move from the root node to a certain
branch and travel through the branch's nodes to desirable content. This can be
seen in Figure 10.
Figure 10. FindSpot navigation structure27
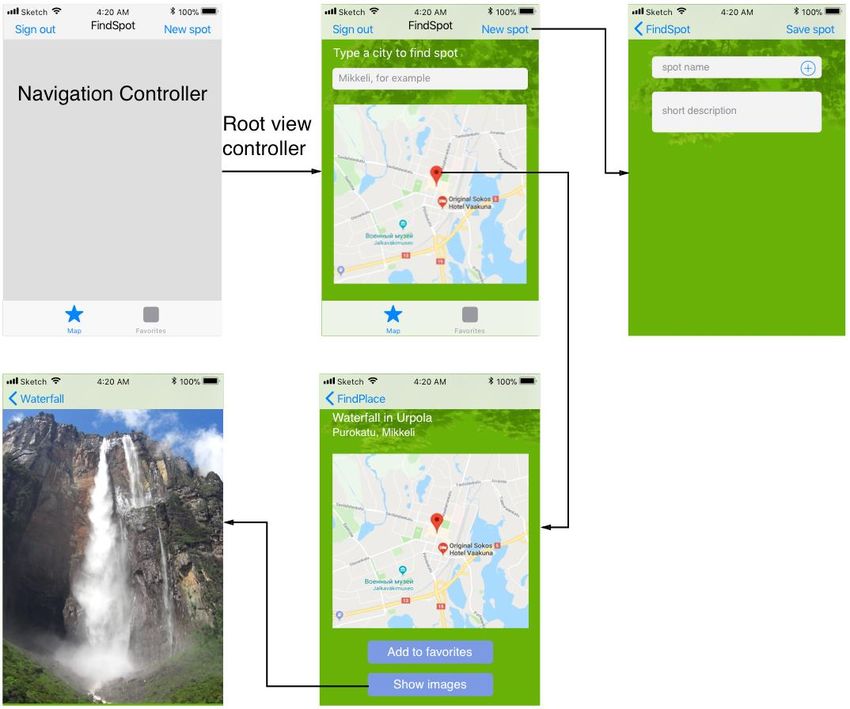
The further navigation through the content of the app from the perspective of
each logical portion of content can be seen in Figures 11 and 12.
Figure 11. Content navigation of Map branch
Figure 12. Content navigation of Favorites branch28
3.3 MVC implementation
One of the main requirement to application design was implementation of Model-
View-Controller design pattern. However, in my case I used more advanced
version of MVC called MVC-N (Model-View-Controller-Network). The main goal
of MVC-N is to separate all network functionality from the rest of application. Also
according to that pattern, Network “layer” always executes its tasks on
background thread, but View Controller and View always execute their tasks on
main thread. Results of Network “layer” is returned to main thread using
callbacks. So, I implemented this in the following way.
First, I created three folders, which would contain models, views and controllers
of each module. Network “layer” files were placed in separate from other
modules folder called “App’s managers”. It can be seen in Figure 13.
Figure 13. Example of MVC structure of Place window
In order to follow the MVC pattern, I have implemented the following design
concept:
There are view classes which are responsible for creating views, their
configuration and further layout. The example of one of these classes can
be seen in Figure 14.
A view controller creates an object of the view class during the
viewDidLoad() method and then assigns the view object’s interface
properties to its local variables in order to directly take control of the view
object.29
All data is stored and computed in classes separated from views. The
content of UI is updated only by view controllers. Therefore, view
controllers act as mediators between data and views.
All network operations are executed in Singleton classes in background
threads, so, that data, views or controllers are separated from network
“layer”.
Figure 14. Code example of PlaceView class
Thus, each object is responsible for its tasks and does not “know” about other
objects and what is outside. This comes from the Single Responsibility Principle
whose main idea is almost the same as I have done. This design leads to
releasing view controllers from non-related tasks and increase in code readability
and code flexibility.
3.4 Firebase realtime database and storage
To simplify back-end part, we decided to use Firebase database and storage.
Firebase database is a realtime database designed to store light-weight string
objects. This is an “out of the box” solution by Google. I installed a Firebase
framework using the CocoaPods dependency manager. Since maintaining two
databases required paid-account, we came up with the creating realtime
database containing two main directories which were “Places” and “Users”. The
Places directory contains all available spots, and the Users directory contains
users’ folders, storing users’ nicknames and favorites. It can be seen in Figure
15.30
Figure 15. Database data structure
The main “unit” of database is a place (in a meaning of spot). It has the following
structure:
City. A string containing name of the city, where spot is located.
Coordinates. A latitude and a longitude of the spot.
Description. A short text about the spot.
Name. It is name of the spot given by a user.
Photos. It is an array of URLs, containing links to download images from
Firebase storage.
The structure of place can be seen in Figure 16. The FindSpot client application
provides mechanism of creating unique names for each place. Name of place is a
latitude of spot coordinates converted into String format with cut symbols such as
minus or dot. The same mechanism is used for a unique storage folder name
creation. Since latitude value is a double number with a millionth fractional part,
the probability of uniqueness of the place is quite high.31
Figure 16. Place entity structure
As for Firebase Storage, it is used as an images storage in FindSpot. Images
related to a certain spot are stored in the unique folder. According to the both app
architecture and performance issues, each spot must have up to four images,
with size of six Mb each.
Both database and storage have security policy. According to that, each access
to files must be authorized by Firebase. In other words, only authorized users are
eligible to access the database or storage files.
3.5 App managers
As it has been already mentioned, the App managers are elements of the
Network “layer” in this application. There are four managers – GoogleApi
manager, Database manager, Photo manager, Error manager. Each manager is
a Singleton class, implementing certain network functionality. They are isolated
from each other. Further, each manager is explained in details.
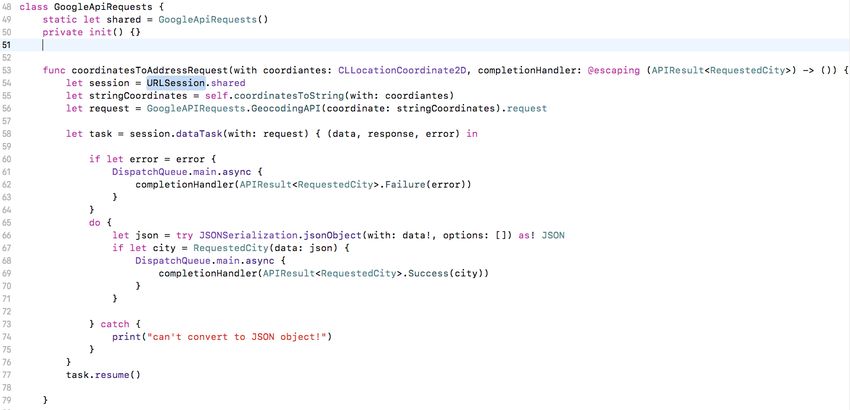
3.5.1 GoogleApi manager
It is responsible for sending requests to Google Map APIs. FindSpot uses Google
Maps Directions and Geocoding APIs. It has two public functions to build and
then to send requests to these APIs. The first one is the
coordinateToAddressRequest() function which takes current user coordinates
and send them in the HTTPS request to Geocoding API. It performs a reverse32
geocoding and sends back the address in JSON. The second one is the
getRouteRequest() function which takes a start coordinate and a finish coordinate
and sends them in the HTTPS request to Directions API. It builds the most
appropriate route between these points according to the configuration sent in the
request. Then, it sends back a JSON array with route details and a path coded
into the polyline string.
Figure 17. Code example of the GoogleApi manager class
These functions are executed in background thread to avoid any “frizzing” of UI.
When result is received, it initiates calling the callback with parameter where
actually JSON data is stored. Since parsing JSON goes beyond the functional of
GoogleApi manager, the new object of corresponding model class is created. It
parses a JSON data and assigns decoded data to its properties. Then, this object
will be encapsulated into the completion handler of the function and sent to main
thread as a callback related to the object which called this function initially.
3.5.2 Database manager
It is responsible for uploading, downloading, deleting and adding spots within
Firebase database entities. This manager provides such a functionality through
five functions. These functions are getPlacesWithinCity(), getUserFavorites(),
saveNewPlace(), deleteDatabaseValue() and addPlaceToFavorites(). Despite of
different functionality, they have the same principle of interaction with the33 database. It bases on database references used as a path to desired entity in the database. The database manager needs three database references to provide connection with the database. The first one is the reference to the database directory containing all available spots. It is used by the getPlacesWithinCity() function which fetches all spots having city entity equals to string taken by this function. The second one is the reference to the unique database directory containing current user files. It is used by the getUserFavorites() function which fetches user favorites. The third one is the computed reference built especially for a certain entity in the user folder within database when users want to add new spot or delete existing one. It is used by saveNewPlace(), deleteDatabaseValue() and addPlaceToFavorites() functions. In such a functions as getPlacesWithinCity() and getUserFavorites(), the data is returned in the JSON format after the fetching from the database. The database manager is not responsible for parsing JSON data thus, it creates the object of the Place class and passes the JSON data to it while the initialization process. Then, the object parses JSON and assigns the decoded data to its properties. If JSON is successfully decoded, the object containing database data will be encapsulated into the completion handler of the function and sent to main thread as callback related to the object which called this function initially. In case of saving new entity in the database, like it is done in the saveNewPlace() function, the data from an original format must be converted to JSON. Since each spot in the app is encapsulated into the object of the Place class, it is a quite easy process, because the variables of the Place class logically are the same as in the database. The Place class has the convertToJSON() function which builds JSON file from the original object of the Place class. 3.5.3 Photo manager It is responsible for downloading and uploading images used in FindSpot. All images of spots are stored in the Firebase storage. The Photo manager has two functions for interaction with the storage. The first one is the
34

getPhotoFromStorage() function taking the array of URLs as an argument and
then downloads images asynchronously to decrease downloading time using
these URLs. Since downloading is executed asynchronously, it is not possible to
place each image to the array, because it might cause the data corruption due to
simultaneous access to the memory of the array. In software engineering, this
problem is called race condition. To solve it, I implemented the Photo class
containing thread-safe array and function to append new elements in this array.
This function synchronously adds new images to the array, allowing only one
object to access an array’s memory at the same time. When downloading is
successfully completed, the object of the Photo class will be encapsulated into
completion handler of the getPhotoFromStorage() function and sent to main
thread as callback related to the object which called this function initially.

                   Figure 18. Code example of the Photo manager class

Another function is uploadPhotos(). It takes an array of images as parameter.
Before the uploading process, the function creates a metadata object, which
contains a type of uploaded images and builds a reference to the new storage
folder, which will store images. Then, each image from the array is
asynchronously uploaded into the storage folder specified in the storage
reference. Storage will return a metadata object containing URLs in HTTPS
format for further downloading of this files.

3.5.4 Error manager

It is responsible for error handling occurring in the application during the runtime.
It has the showErrorMessage() function. It takes the object of the Error class and
35
view controller, where error massage should be displayed. The Error object is
usually generated by the app when the error occurred while fetching data from
the database, downloading or uploading images, user authentication process and
requesting to Google Maps APIs. In some cases such as authentication process,
The Error object with the error description is created by server-side. In other
cases, the app generates the Error object, taking into account a situation and a
receiver of the error. The UIAlertController view controller displayed on the device
screen can be seen in Figure 19.
Figure 19. The Error message
3.6 Authentication process
FindSpot authentication bases on Firebase Authentication. It is one of the easiest
and reliable tool to secure a user authentication process. The application starts
working with an appearance of view controller called LoginViewController on the
screen, where user can choose the next action. User can login with an existing
account or create the new one. All these actions are managed by Firebase
functions: auth.signIn() and auth.createUser() which called after pressing on
buttons. These functions are executed in the Firebase back-end part and then a
server response are returned. This response is received in the function’s
callback, thus it is most likely that the rest of the function is no longer stored in
the memory except of this callback.36
Figure 20. Implementation of the loginActionMethod() function
The tesponse of auth.signIn() and auth.createUser() functions stores two
variables. The first one contains user which has just made login, and the second
one contains the error description in case of the failed login. First, I check the
error variable against nil in the callback. If it is not nil, this means that the error
occurred, and the error’s description will be displayed to user using the Error
manager. Otherwise, the authentication process is finished and
LoginViewController is dismissed, at the same time the new view controller called
MapViewController will start loading.
3.7 Searching for spots and displaying results
In the iOS version of FindSpot, Google Maps SDK is responsible for map objects
and interactions between maps and the rest of application. In other words, it
provides interface to map objects via its delegate in order to communicate with
the map objects while runtime. I installed Google Maps SDK using the
CocoaPods dependency manager.
According to application design, MapViewController (later MVC) manages view
containing a map, which in context of my app is called Map view. Map view is
initialized during the controller’s viewDidLoad method. Map view is assigned to
local variable of MVC, which, in its turn, set up as delegate of Map view.
However, the main job of MVC is to activate the chain of the executions of
functions leading to getting an array of available spots in the desired city from the
database. Since the application has been designed according to the Model-View-
Controller pattern, MVC does not directly execute any tasks related to data and
APIs requests. As it has been already explained, the App managers are
responsible for that. During the execution of the viewDidLoad method, MVC tries37
to retrieve the current geolocation of the device. If the geolocation is valid, MVC
calls the coordinateToAddressRequest() function of the GoogleAPI manager.
Then, if the returned city is not nil, MVC calls the next function in the chain that is
the getPlacesWithin() function of the Database manager. If the received spot’s
array is not empty, which could have meant that no spots had been added yet,
MVC calls the showFoundPlace() function in for-loop in order to call it for each
spot in the array. This function takes the coordinates and the name of the spot as
parameters. As a result of its execution, MVC creates as many markers on the
Map view as there are spots in the array.
Figure 22. The order of the execution of the Network stack functions
FindSpot also provides an alternative way of finding spots. Instead of
automatically defining the current city, user can enter a new city into the text field.
In this case, MVC does not call the coordinateToAddressRequest() function, but
calls the getPlacesWithin() function. The rest of the algorithm is the same.
Users can get more details about desired spots by tapping on the marker on the
map. The tapping action causes the calling of the didTapMarker() function called
via the Map view delegate. While executing this function, it is first defined which
spot is corresponding to the tapped map marker, and then a new view controller
called PlaceViewController (later PVC) is created. MVC transfers data to PVC.You can also read


