Cablabel S3 - Operator's Manual - cab Produkttechnik GmbH

Page created by Bryan Patterson
 
CONTINUE READING
Cablabel S3 - Operator's Manual - cab Produkttechnik GmbH
Operator's Manual

cablabel S3
Cablabel S3 - Operator's Manual - cab Produkttechnik GmbH
2 Operator's Manual                                                                                                                        2
  for the following products

   Family                                           Art. Nr       Type
                                                   5588000        cablabel S3 Lite
                                                   5588009        cablabel S3 Demo
   Labelling Software cablabel S3
                                                   5588001        cablabel S3 Pro
                                                   5588010        cablabel S3 Pro Laser

  Edition: 01/2019 - Part. No.: 9009606

  Copyright
  This documentation as well as translation hereof are property of cab Produkttechnik GmbH & Co. KG.
  The replication, conversion, duplication or divulgement of the whole manual or parts of it for other intentions than its original
  intended purpose demand the previous written authorization by cab.
  Trademark
  Microsoft® is a registered trademark of the Microsoft Corporation.
  Windows® is a registered trademark of the Microsoft Corporation.
  TrueTypeTM is a registered trademark of the Apple Computer, Inc.
  Editor
  Regarding questions or comments please contact cab Produkttechnik GmbH & Co. KG.
  Topicality
  Due to the constant further development of our products discrepancies between documentation and product can occur.
  Please check www.cab.de for the latest update.
  Terms and conditions
  Deliveries and performances are effected under the General conditions of sale of cab.

  Germany                              USA                           Taiwan                             China
  cab Produkttechnik GmbH & Co KG      cab Technology, Inc.          cab Technology Co., Ltd.           cab (Shanghai) Trading Co., Ltd.
  Karlsruhe                            Chelmsford, MA                Taipei                             Guangzhou
  Phone +49 721 6626 0                 Phone +1 978 250 8321         Phone +886 (02) 8227 3966          Phone +86 (020) 2831 7358
  www.cab.de                           www.cab.de/us                 www.cab.de/tw                      www.cab.de/cn

  France                               Mexico                        China                              South Africa
  cab technologies s.à.r.l.            cab Technology, Inc.          cab (Shanghai) Trading Co., Ltd.   cab Technology (Pty) Ltd.
  Niedermodern                         Juárez                        Shanghai                           Randburg
  Phone +33 388 722 501                Phone +52 656 682 4301        Phone +86 (021) 6236 3161          Phone +27 11 886 3580
  www.cab.fr                           www.cab.de/es                 www.cab.de/cn                      www.cab.de/za

  Representatives in other countries on request.
Cablabel S3 - Operator's Manual - cab Produkttechnik GmbH
Table of contents                                                                                                                                                          3

1         Introduction............................................................................................................................................. 5
1.1       Instructions................................................................................................................................................ 5
1.2       System requirements................................................................................................................................ 5
1.3       cablabel S3 specifications......................................................................................................................... 6

2         Installation............................................................................................................................................... 7
2.1       Installing on computer............................................................................................................................... 7
2.2       Program starting........................................................................................................................................ 9
2.3       Activation................................................................................................................................................. 10
2.3.1         Online activation.................................................................................................................................11
2.3.2         File activation.....................................................................................................................................11

3      Overview................................................................................................................................................ 12
3.1    Main interface.......................................................................................................................................... 12
3.2    Designer.................................................................................................................................................. 13
3.2.1     Drawing toolbar................................................................................................................................. 14
3.2.2     Special toolbar................................................................................................................................... 14
3.2.3     Edit toolbar........................................................................................................................................ 14
3.2.4     Font toolbar....................................................................................................................................... 15
3.2.5     Fill / Outline toolbar........................................................................................................................... 15
3.2.6     Arrange toolbar.................................................................................................................................. 16
3.2.7     Database toolbar............................................................................................................................... 17
3.2.8     View toolbar....................................................................................................................................... 17
3.2.9     Objects properties............................................................................................................................. 17
3.2.10    Layers................................................................................................................................................ 18
3.2.11    Status bar.......................................................................................................................................... 19

4     Configuration......................................................................................................................................... 20
4.1   Global settings........................................................................................................................................ 20
4.1.1    General tab........................................................................................................................................ 20
4.1.2    Expert mode...................................................................................................................................... 20
4.1.3    Grid tab.............................................................................................................................................. 21
4.1.4    Object tab.......................................................................................................................................... 21
4.1.5    Background tab................................................................................................................................. 22
4.1.6    Fill & outline....................................................................................................................................... 22
4.1.7    Color management............................................................................................................................ 23
4.2   Devices................................................................................................................................................... 24
4.2.1    Add a device...................................................................................................................................... 24
4.2.2    Delete a device.................................................................................................................................. 25
4.2.3    Rename a device.............................................................................................................................. 25
4.2.4    Configure a device............................................................................................................................ 25
4.2.5    Device options................................................................................................................................... 26
4.2.6    System devices / Document devices................................................................................................. 26

5       Use.......................................................................................................................................................... 27
5.1     New label creation................................................................................................................................... 27
5.1.1      New blank label................................................................................................................................. 27
5.1.2      New label using the wizard................................................................................................................ 28
5.1.3      New label from an existing label........................................................................................................ 28
5.2     Inserting objects in the document........................................................................................................... 28
5.2.1      Object settings................................................................................................................................... 29
5.2.2      Object Fill & outline........................................................................................................................... 29
5.2.3      Inserting texts.................................................................................................................................... 30
5.2.3.1          Negative text................................................................................................................................ 30
5.2.3.2          Visual information about the font properties................................................................................ 31
5.2.3.3          Highlighting keywords.................................................................................................................. 31
5.2.3.4          Text tags...................................................................................................................................... 32
5.2.3.5          Hyphenation................................................................................................................................. 33
5.2.3.6          Interpretation of Unicode syntax.................................................................................................. 33
5.2.3.7          Multi line and max width.............................................................................................................. 34
Cablabel S3 - Operator's Manual - cab Produkttechnik GmbH
4   Table of contents                                                                                                                                                         4

    5.2.4      Inserting pictures............................................................................................................................... 35
    5.2.5      Inserting graphical objects................................................................................................................. 36
    5.2.6      Inserting barcodes............................................................................................................................. 36
    5.2.7      Inserting datasource.......................................................................................................................... 37
    5.2.7.1        Prompt fields................................................................................................................................ 37
    5.2.7.2        Counter........................................................................................................................................ 39
    5.2.7.3        Datetime fields............................................................................................................................. 40
    5.2.7.4        Formula........................................................................................................................................ 42
    5.2.7.5        Variables...................................................................................................................................... 44
    5.2.7.6        Database..................................................................................................................................... 45
    5.3     Document settings.................................................................................................................................. 45
    5.4     Label printing........................................................................................................................................... 46
    5.4.1      Printing on a two color printer............................................................................................................ 48
    5.4.2      Printing on a double sided printer...................................................................................................... 48
    5.5     Save a label on a memory card.............................................................................................................. 49
    5.5.1      Saving to a printer, a card reader or a file......................................................................................... 49
    5.5.2      Saving in a database......................................................................................................................... 50
    5.6     Keyboard shortcuts................................................................................................................................. 51

    6         Plugins................................................................................................................................................... 53
    6.1       Printer spooler......................................................................................................................................... 54
    6.1.1         Managing print jobs and printer functions......................................................................................... 54
    6.1.2         Printer status..................................................................................................................................... 55
    6.1.3         Memory card management .............................................................................................................. 55
    6.1.4         Printer display ................................................................................................................................... 56
    6.2       JScript code viewer................................................................................................................................. 56
    6.3       Variable information................................................................................................................................ 57
    6.4       Character map........................................................................................................................................ 57
    6.5       Compound prompts................................................................................................................................. 58
    6.6       Barcode wizards...................................................................................................................................... 59
    6.6.1         GS1/EAN/UCC-128 and GS1 Datamatrix wizard.............................................................................. 59
    6.6.2         FACT/MH10 wizard........................................................................................................................... 60
    6.6.3         QR wizard.......................................................................................................................................... 61
    6.7       ABC code................................................................................................................................................ 62
    6.8       Database wizard..................................................................................................................................... 63
    6.9       Layout table management....................................................................................................................... 65
    6.10      Keywords................................................................................................................................................ 66

    7         Appendix................................................................................................................................................ 68
    7.1       Installation parameters............................................................................................................................ 68
    7.2       Start parameters..................................................................................................................................... 70
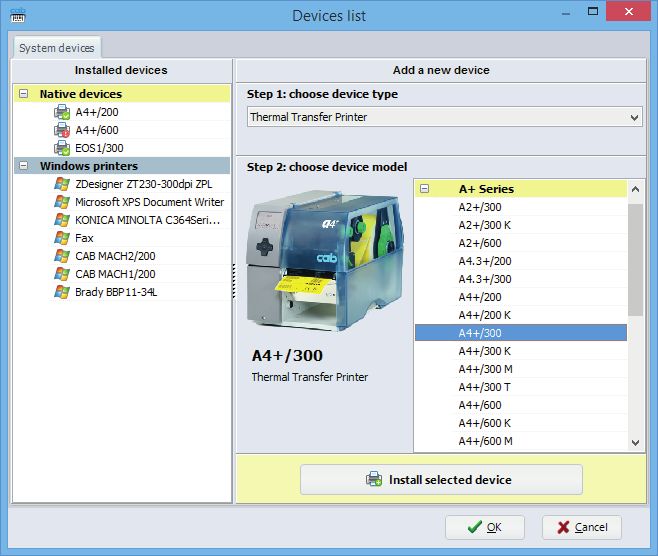
Cablabel S3 - Operator's Manual - cab Produkttechnik GmbH
1          Introduction                                                                                            5

1.1        Instructions
           Important information and instructions in this documentation are designated as follows:

               Danger!
               Draws your attention to an exceptionally grave, impending danger to your health or life.

               Warning!
      !        Indicates a hazardous situation that could lead to injuries or material damage.

               Attention!
    !          Draws attention to possible dangers, material damage or loss of quality.

           Notice!
      i    Gives you tips. They make a working sequence easier or draw attention to important working processes.

           Environment!
         Gives you tips on protecting the environment.
    

          Handling instruction.

          Reference to section, position, illustration number or document.

          Option (accessories, devices, special fittings).

    Hour   Information in the display.

1.2        System requirements
           •     PC with 2 GHz Processor or higher
           •     32/64 bit Microsoft® Windows® operating system with latest updates:
                    Windows Vista 							Server 2008
                    Windows 7 									Server 2008 R2
                    Windows 8 									Server 2012
                    Windows 8.1 								Server 2012 R2
                    Windows 10
           •     1 GB available RAM (depending on the system)
           •     500 MB available hard disk space
           •     Administrator rights on local computer for installation and activation
Cablabel S3 - Operator's Manual - cab Produkttechnik GmbH
6 1     Introduction                                                                                                                  6

  1.3   cablabel S3 specifications
                                                                                                                           Print
                                                                                            Lite      Pro       Print
                                                                                                                          Server(1)
              General functions
              Languages:
              English, French, German, Spanish, Italian, Polish                                                           
              Chinese (simplified and traditional), Korean
              Creating labels with layers management                                                  
              Wizard-based user interface                                                             
              cab labels formats                                                                      
              Printing labels                                                                                             
              JScript code viewer                                                                      
              Unicode support                                                                                             
              True WYSIWYG                                                                                                
              Multiline texts, paragraph                                                                                  
              TrueType fonts                                                                                              
              Text alignment and decimals formatting                                                  
              Max width of text and hyphenation                                                                            
              Text box with various markups (e.g. for highlighting allergens)                                              
              Graphic import Raster (bmp, jpg, tif, ...)                                              
                                 Vector (dxf, plt, svg, ...)                                           
              Color support                                                                                               
              Background image or color                                                                                   
              Linear, 2D, GS1 and composite types of barcodes                                 (2)                         
              Barcode wizard GS1/EAN/UCC-128, FACT/MH10 and QR                                         
              Prompt fields      free                                                                                     
                                 with input mask and choice list                                                           
              Barcode verifier and compound prompts                                                                        
              Date and time including offsets and format wizards                                                
              Counter            basic (numeric and increment +/-1)                                            
                                 advanced (alphanumeric, increment +/-n, reset, ...)                            
              Formula: mathematical operations, manipulate strings, ...                                
              Laser devices support                                                                    (3)      (3)
              ABC basic compiler support with code library                                             
              Variable graphics and character map                                                      
              Variables: datasources with information about the label, the printer, ...                                    
              View and control of the printer display(4)                                                                  
              Database functions
              OLE DB, ODBC, ASCII                                                                               (5)        (5)
              Database Connector                                                                       
              Query editor                                                                             
              Multiple tables and databases                                                                     (5)        (5)
              Import / export functions
              Print to file                                                                           
              Export to graphic PNG                                                                    
              Export to PDF                                                                            
              Import of LBL JScript files                                                              
              Printing functions
              Interfaces: serial, parallel, USB, Ethernet, WLAN                                                           
              Number of native cab printers                                               unlimited unlimited unlimited      (6)

              Printer spooler                                                                                             
              Bidirectional communication                                                                                 
              Standalone mode                                                                                             
              Network printer (TCP/IP)                                                                                    
              Windows printer                                                                                              
        Table 1         Specifications
        (1)
            In progress														(4) Depending on printer model and used port
        (2)
            Except EAN 18/128 barcodes						(5) Run queries only
        (3)
            Specific version												 (6) Depending on license
Cablabel S3 - Operator's Manual - cab Produkttechnik GmbH
2          Installation                                                                                                 7

2.1        Installing on computer
           Notice!
      i    It is possible to do a silent installation of cablabel S3 directly in command line.
            7.1 Installation parameters.

           XX Insert the delivered CD-Rom in your computer, the installation should start automatically.
              If the autorun does not start or if you have downloaded the installation file, double-click on the file
              « cablabelS3_XXXX_Setup.exe » to begin the installation (where XXXX matches your version).
           XX Select the installation language of the program.

           Figure 1    Select installation language

           XX Start installation and read the user license.

Figure 2    Start of installation program                            Figure 3    License agreement
Cablabel S3 - Operator's Manual - cab Produkttechnik GmbH
8 2          Installation                                                                                               8

             XX Enter user information.

  Figure 4    User information

             XX The program will be installed by default in the displayed folder, you can change it only if required.

  Figure 5    Choose of target folder                                Figure 6    Choose of start menu folder
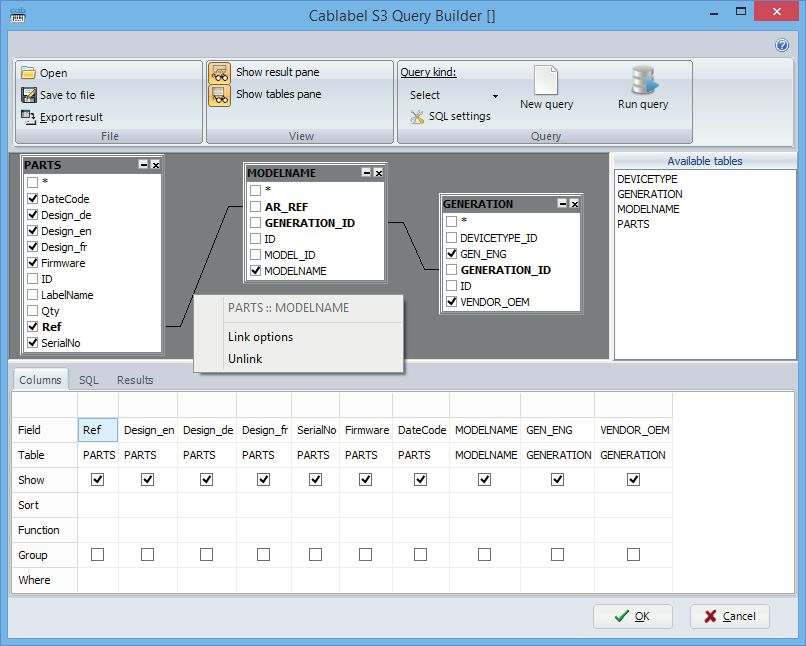
Cablabel S3 - Operator's Manual - cab Produkttechnik GmbH
2          Installation                                                                                                             9

           XX Select the additional tasks to be done by the installation program and check the selected options summary.
           XX Click on Install.

Figure 7    Additional tasks                                     Figure 8    Installation summary

           XX Wait until the end of the installation.

Figure 9    Installation progress                                Figure 10 End of installation

2.2        Program starting
           After installing cablabel S3, an icon of the program is placed on the user desktop and/or in the start menu (depending
           on selected installation options).
           XX Start the program by double clicking on one of these icons.
Cablabel S3 - Operator's Manual - cab Produkttechnik GmbH
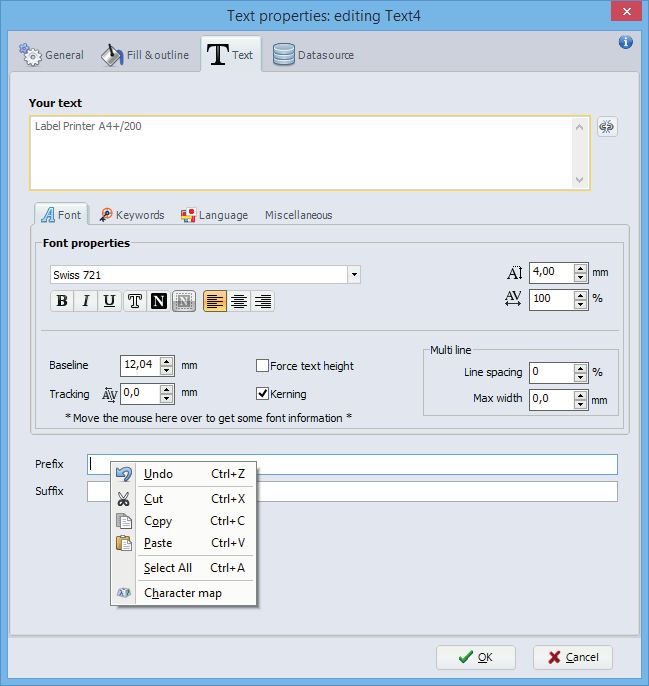
10 2       Installation                                                                                  10

   2.3     Activation
           Depending on the installed version, an activation is needed before you can use the program.
            Attention!
       !    Except the Lite version, the program cannot be used without being activated.

           At the first start, a message will ask you to activate the program.

           Figure 11   Program activation

           After clicking on yes, the activation wizard starts.

           Figure 12   Activation wizard
2       Installation                                                                                                              11

2.3.1   Online activation

        Figure 13   Online activation

        XX Enter product key provided with your purchase.
        XX Click on the Activate button.
           The software will be automatically activated after some seconds through internet.
        Notice!
    i   An internet access is required for online activation.
        Otherwise you will have to use the file activation.

2.3.2   File activation

        Figure 14   File activation

        If you don't have an internet access or if online activation did not work, it is possible to use this alternate method.
        An activation request will be sent after a few steps.
        In this case, after entering your product key by clicking on the Request button an email will be prepared for sending
        to our activation service. The activation file will be returned to you by email once generated.
        This file must be transferred to the computer where cablabel S3 is installed.
        XX Select the received activation file with the suited button.
        XX Click on the Activate button.
        XX After activation, the software will restart automatically.
12 3         Overview                                                                                                  12

   3.1       Main interface
             After activation and restarting, the welcome page appears:

         2                       1
                                                                                                                  10   11

                                                                                                           3

                                                                          4

                                                 5

                                                 6

                                                                              8

                                                                                            9
                                       7

             Figure 15    cablabel S3 welcome page

              1.    Quick access bar             Quick access to the most common commands (open, save ...)
              2.    Main button                  Access to main software commands
              3.    Toolbar                      Access to different objects and properties of selected ribbon
              4.    Welcome page                 Starting page
              5.    New label                    Create a new label
              6.    Open label                   Open an existing label
              7.    Status bar                   Status and information
              8.    Recent files                 List of last opened labels, with favorites pinning possibility
              9.    File information             Preview and information of the selected label
              10.     /                          Show / hide the toolbar
              11. Help button                    Access to the operator's manual you are currently reading
3         Overview                                                                                                         13

3.2       Designer
          The Designer let you create a label and place different objects on it.

                                                                   1
                                            2

                                        3                                                             4

                                                                       5

          Figure 16     Designer

           1.   Opened labels                   Tab with the opened labels
           2.   Layout orientation              Portrait / Landscape (orientation without objects by holding "Ctrl" key)
           3.   Layers                          Layers with the different objects
           4.   Prompt list                     List with the different prompt fields of Formular type
           5.   Label                           Label with the different objects

          Notice!
      i   The Layers (3) and the Prompt list (4), are available under the Display options button in the Designer
          ribbon.  5.3 Document settings
          The properties of the different prompts are also available by right-clicking in the Prompt list (4).
14 3       Overview                                                                                                   14

   3.2.1   Drawing toolbar
           The Drawing toolbar is composed of the most used objects on a label.

                       1              2       3       5              1.   Selection cursor
                                                                     2.   Text
                                                                     3.   Picture
                                                              7      4.   Line
                                                                     5.   Rectangle and square
                                                                     6.   Polygon
                                                                     7.   Circle and ellipse
                                  4                   6

            Figure 17 Drawing toolbar

           Notice!
       i   "Ctrl" key allows to draw the objects with a free angle, instead of an horizontal or vertical alignment.
           "Alt" key allows to draw the objects starting from the center, instead of the top left corner.

   3.2.2   Special toolbar
           The Special toolbar is composed of special objects to insert a barcode or a datasource.
                              1           2 3                        1.   Barcode
                                                          5          2.   Prompt field
                                                          6
                                                                     3.   Date / time
                                                                     4.   Formula
                                                                     5.   Counter
                                                                     6.   ABC code
                                              4

            Figure 18 Special toolbar

   3.2.3   Edit toolbar
           The Edit toolbar is composed of basic edition commands.
                                                                     1.   Paste
                              1           2       3                  2.   Cut
                                                                     3.   Delete
                                                                     4.   Undo
                                                      6
                                                                     5.   Redo
                                                                     6.   Copy

                                          4       5

            Figure 19 Edit toolbar
3       Overview                                                                                                          15

3.2.4   Font toolbar
        The Font toolbar is composed of different text formatting commands.
                                                              1.   Font face
                                                              2.   Font size (height) in mm
                        1                       2
                                                              3.   Bold
                                                              4.   Italic
                                                              5.   Underline
                                                              6.   Left alignment
                                                              7.   Center alignment
            3   4   5           6   7   8       9       10    8.   Right alignment
                                                              9.   Font width
                                                              10. Advanced properties  5.2.3 Inserting texts
        Figure 20 Font toolbar

3.2.5   Fill / Outline toolbar
        The Fill / Outline toolbar is composed of the different commands to change the filling and outline of a drawing
        object.
                            1               3   5             1.   Fill color
                                                              2.   Fill style
                                                              3.   Outline color
                                                              4.   Outline width
                                                              5.   Outline style
                                                              6.   Advanced properties  5.2.2 Object Fill & outline
                            2               4       6

        Figure 21 Fill / Outline toolbar
16 3       Overview                                                                                                            16

   3.2.6   Arrange toolbar
           The Arrange toolbar is composed of different commands to adjust the objects position.
                                                                 1.   Alignment of selected objects
                              1          2
                                                                 2.   Arrangement of selected objects

                      Figure 22   Arrange toolbar

                                                                 1.   Horizontal alignment of selected objects
                                                                 2.   Vertical alignment of selected objects
                                                 1
                                                                 3.   Centering of selected objects in the label
                                                                 4.   Rotation of selected objects

                                                 2

                                                 3

                                                 4

           Figure 23 Alignment options

                                                                 1.   Objects stack up position in the label (front)
                                             1
                                                                 2.   Objects stack up position in the label (back)
                                                                 3.   Group / ungroup selected objects
                                             2                        Selected objects are only displayed as grouped, but
                                                                      sent individually to the printer.
                                                                 4.   Pack / unpack selected objects
                                             3                        Selected objects are merged and sent to the printer as
                                                                      one picture.

                                             4

           Figure 24 Arrange options
3        Overview                                                                                                 17

3.2.7    Database toolbar
         The Database toolbar is composed of the different commands to connect and use a database.

                                                                    1.   Create / change database connection
                                                                    2.   Display the result of the query
                 1
                                                                    3.   First record
                 2
                                                                    4.   Previous record
                                                                    5.   Actual record position
                                                                    6.   Next record
                      3    4         5          6   7               7.   Last record

          Figure 25 Database toolbar

  Notice!
    i
  The database toolbar appears only when the database plugin is loaded.  6.8 Database wizard
 This plugin is not available in every versions of cablabel S3.

3.2.8    View toolbar
         The View toolbar is composed of the different visual commands.
                                                                    1.   Display view settings
                                                        1
                                                                    2.   Label and paper properties
                                                        2

          Figure 26 View toolbar

         Notice!
    i    It is possible to set a picture to the label background in the display options.
         If you use pre-printed labels, this background picture can for example display your pre-printed label.
         So you have a real view of your resulting label when placing objects on it.

3.2.9    Objects properties
         Different options are also available by right-clicking on the objects from label or layers:

          Figure 27 Objects properties
18 3        Overview                                                                                                                        18

   3.2.10   Layers
            Layers contain all different objects composing a label.
            Each layer can be hide or locked. Each object on the layer can also be individually hide or locked in order to prevent
            moving.
            A layer can also be assigned to a pre-defined printing resolution. For example one layer for a 300 dpi resolution.

                                                                        1.   Add a new layer
                                                        4 5             2.   Delete selected layer
                                                                        3.   Expand / Collapse all layers
              1           2                  3                          4.   Pin layers window
              6                                               12        5.   Close layers window
                                                                        6.   Edit / lock layer
                                                                        7.   Object visible / invisible on display and printing
              7
                                                                        8.   Object lock
                                                              13        9.   Object invisible only on printing but sent to the device
                                                                        10. Layer visibility
                                                                        11. Object locked by the layer
                                                                        12. Neutral layer
              8                                               14        13. Object preview on label
                                                                        14. Object linked to another (for example linked to a datasource)
                                                                        15. 300 dpi layer
              9
                                                                        16. Barcode verifier enabled

              10                                              15

              11

                                                              16

             Figure 28 Layers

            Notice!
       i    Layer objects assigned to a specific resolution, will only be printed on devices supporting the same resolution.
            For example objects from a 200 dpi layer, will not be printed on a 300 or 600 dpi device.
            This can be useful to display the real size of a barcode.
3             Overview                                                                                                                          19

              Different options are available by right-clicking on the layers:
                                                                         1.      Display the default objects properties window
         1
                                                                         2.      Apply the properties to all objects of the selected layer
         2
                                                                         3.      Apply the properties to the selected object
         3
                                                                         4.      Show a preview of the object in the label
         4
                                                                         5.      Neutral layer device-independent
         5
                                                                         6.      Layer forced for 200 dpi devices
         6
                                                                         7.      Layer forced for 300 dpi devices
         7
                                                                         8.      Layer forced for 600 dpi devices
         8
                                                                         9.      Layer forced for laser devices
         9
                                                                         10. Force printing layer for the corresponding print resolution
         10                                                              11. If printing is not allowed, the objects in the layer are visible
         11                                                                  on the screen but are not sent to the device
         12                                                              12. Allow to rename selected layer
         13
                                                                         Only if there are several layers in the document:
         14
                                                                         13. Bring the selected layers forward

         15
                                                                         14. Bring the selected layers to front
                                                                         15. Send the selected layers to back
         16
                                                                         16. Send the selected layers backward
               Figure 29 Layers properties

3.2.11        Status bar
              The status bar display different states and information of the active label.
                            2       4       6                                                                     11 13    15       16

                 1              3       5        7      8         9       10                                       12 14                 17

              Figure 30    Status bar

               1.    Cursor coordinates (in mm) on label
               2.    Show / hide dot grid
               3.    Show / hide line grid
               4.    Enable / disable snap to grid
               5.    Show / hide cursor guide
               6.    Enable / disable last object repetition
               7.    Current time
               8.    Switch to printer spooler
               9.    Num Lock status
               10. Caps Lock status
               11. View adjust to the page width
               12. View adjust to the whole page
               13. Enable / disable automatic resizing of the page when the window is resized
               14. Zoom on selection
               15. Zoom level
               16. Zoom level slider
               17. cablabel S3 version
20 4            Configuration                                                                                                             20

   4.1          Global settings

                cablabel S3 settings are available under the Settings        button in the General ribbon. You can for
                example change the software language or style (color theme).

                 Attention!
       !         These settings are the default settings which will be applied when creating a new label.

   4.1.1        General tab
                In this tab you will find the parameters related to the program.
                                                                                   1.   Application style (color theme)
                                                                                   2.   Application language
                                                                                   3.   Show / hide the Label Creator Wizard
           1                                                                       4.   Show / hide the display of tooltips on objects
           2
                                                                                   5.   Enable / disable the Expert mode
                                                                                   6.   Enable / disable the creation of a backup file
           3
                                                                                   7.   Includes or not the layout name in the picture
           4
                                                                                        name calculation generated for a printer
           5
           6                                                                       8.   Do not resend font or image if it can be found
           7                                                                            locally on the device
           8                                                                       9.   Default search folder where pictures are stored
                                                                                   10. Default extension for picture files
           9
           10

                 Figure 31 General global settings

   4.1.2        Expert mode
                The Expert mode allows access to some features reserved for advanced users.
                It allows:
                - to print documents without correction even if the parameters are outside the device specifications
                   Notice! 5.4 Label printing
                - in standalone mode, to disable the automatic TrueType font uploading of fixed texts
                   5.5 Save a label on a memory card
                - to display the System devices tab when configuring a device if a document is opened
                   4.2.6 System devices / Document devices
                - to access the Color management for each object  5.2.2 Object Fill & outline
4       Configuration                                                                                                            21

4.1.3   Grid tab
        In this tab you will find the display-related settings.

                                                                       1.   Grid type (none, dots or lines)
                                                                       2.   Grid color
    1                                                       2          3.   Grid size
    3                                                       4          4.   Group settings
                                                                       5.   Enable / disable automatic alignment of objects on
                                                                            the grid
                                                                       6.   Show / hide the cursor guide
                                                            5
                                                                       7.   Show / hide the rulers
                                                            6
                                                                       8.   Show / hide numbers on rulers
    7                                                       10         9.   Origin position of the rulers
    8                                                       11         10. Rulers color
    9
                                                                       11. Rulers size

         Figure 32 Global grid settings

4.1.4   Object tab
        In this tab you will find the parameters related to objects.

                                                                       1.   Settings on mouse over an object on the label
                                                                       2.   Settings when selecting an object on the label
    1                                                             2

         Figure 33 Global objects settings
22 4           Configuration                                                                                                                    22

   4.1.5       Background tab
               In this tab you will find the settings related to the background.

                                                                                   1.   Background color
                                                                                   2.   Label background color
                                              1                                    3.   Path and name of the label background picture file
                                                                                   4.   Browse your computer to select a picture file
                                              2                                    5.   Delete the label background picture
                                                                4 5
                                                                                   6.   Show / hide the label background picture
           3
                                                                                   7.   Enable / disable the transparency of the label
           6                                                              10
                                                                                        background picture (if this picture supports
           7                                                              11            transparency)
           8
                                                                                   8.   Enable / disable saving the picture in the label file
           9
                                                                                   9.   Specify the picture position
                                                                                   10. Picture offset in horizontal direction
                                                                                   11. Picture offset in vertical direction

                Figure 34 Global background settings

   4.1.6       Fill & outline
               In this tab you will find the parameters related to the filling and outline of objects as well as text fonts.

                                                                                   1.   Objects fill settings
                                                                                   2.   Objects outline settings
           1                                                          2
                                                                                   3.   Font type and size
                                                                                   4.   Font style
                                                                                   5.   Color management for color printers  page 23
           3
                                                                      4

           5

                Figure 35 Global fill and outline
4           Configuration                                                                                                                 23

4.1.7       Color management

    i       Notice!
            Picture split color settings are only used when printing on a two color printer.

            When printing on a two color printer (XC ...), you can specify the secondary color to print.
            For this you can select a color from the list or pick it directly on the screen or in your label using the eyedropper tool.
            The objects defined with this color will then automatically send to the secondary color printhead.
            Different settings to adjust the tolerance of this color are also available.
            The gamma correction allows you to change the rendering of the lightest colors.
            Colors auto levels redefines the color scale by applying the lightest pixel to the white color and the darkest one to the
            black color.

                                                                              1.   Show / hide the help panel
                                                                          1
                                                         3                    2.   Picture split color
        2                                                                     3.   Pick color from screen
                                                                              4.   Hue and saturation tolerance ranges
        4
                                                                              5.   Enable / disable separation on head 1
                                                                              6.   Enable / disable gamma correction
                                                                              7.   Enable / disable automatic correction of color
        5
                                                                                   levels

        6

        7

             Figure 36 Color management
24 4           Configuration                                                                                                                24

   4.2         Devices
               All cab devices drivers are build-in in cablabel S3.
               Devices are installed in the main application and their print settings will be saved in the document after the first
               printing.
                Attention!
       !        Unlike other labelling software, in cablabel S3 the label is created regardless of the device or resolution.
                The label can then be printed on any device.
                So, there is no default or active device.

   4.2.1       Add a device
               To add a new device click on the Configure printers list button                      in the general ribbon or click on the
               Printers tab on the welcome page.
               XX Select the device type (1) and device model (2) to install from the right list.
               XX Double-click on selected model (2) or click on Install selected device button (3) to install it.
                  It will be added on the left in the installed devices (4).
               XX Validate with the OK button (5).

           4
                                                                            1                Attention!
           6                                                                         !       With cablabel S3 Pro, it is possible
                                                                                             to use any other non native device
                                                                                             (6), provided that it is detected and
                                                                                             installed as a printer on Windows.

                                                                            2                However, standalone mode and
                                                                                             "Replace" cannot be used on these
                                                                                             devices, and the data integrity is not
                                                                                             guaranteed on the printout.

                                                                            3

                Figure 37 Devices list                    5

                                                                         After adding a device, the port selection window opens
                                                                         automatically.
           1                                                             XX Select port type (1) and port settings (2).
           2
                                                                                     Notice!
                                                                                i    The available port types depend on the selected
                                                                                     device.

                Figure 38 Port settings
4       Configuration                                                                                                               25

4.2.2   Delete a device
        XX Select device model to delete in the installed devices list on the left.
        XX Right-click on it and select the Remove device command.

4.2.3   Rename a device
        Each device is installed with a default name.
        To change this name:
        XX Select device model in the installed devices list on the left.
        XX Right-click on it and select the Rename device command.
        XX Enter new name.

4.2.4   Configure a device
                                                                  To configure a device :
                                                                  XX Select the device to configure in the installed devices list
                                                                     on the left.
                                                                  XX Double-click on this device or right-click and select
                                                                     Configure device.
                                                                  XX Change the wished settings.
                                                                  XX Validate with the OK button.

                                                                              Notice!
                                                                       i      A non native device can be configured in the
                                                                              same way from cablabel S3 Pro, with the help of
                                                                              the Windows driver provided with this one.

         Figure 39 Device settings
26 4       Configuration                                                                                                             26

   4.2.5   Device options
                                                                   To add a device option :
                                                                   XX Select the device to configure in the installed devices list
                                                                      on the left.
                                                                   XX Double-click on this device or right-click and select
                                                                      Configure device.
                                                                   XX Go to Options tab.
                                                                   XX Select connected option in the list.
                                                                   XX Change the wished settings.
                                                                   XX Validate with the OK button.

            Figure 40 Device options

   4.2.6   System devices / Document devices
           When a document is printed, system devices settings are automatically copied into it.
           By next printing these document settings are automatically recalled.

           Figure 41   System / document devices list

           Notice!
       i   The System devices tab is only displayed in Expert mode.
           By default it is the Document devices tab which is displayed.

            Attention!
       !    An already printed document will use the device settings saved into it.
            To change these settings, you have to change them in the device settings of this document and not in the
            system settings.
5       Use                                                                                                      27

5.1     New label creation
        There are 3 possibilities to create a new label on the welcome page.

        Figure 42   Welcome page

5.1.1   New blank label
        XX Click on the New label button to start the wizard.
        XX Set the information of your label and its layout.
        XX Click on the Next button.

                                                                                    Attention!
                                                                               !    Label width (1)
                                                                                    always correspond
                                                                                    to the printing width,
                                                                                    regardless to its
                                                                                    orientation.
                                                                        1

                                                                                   Notice!
                                                                               i   The layout country of label
                                                                                   (2) is used for:
                       2                                                           - the text language
                                                                                    Hyphenation
                                                                                   - the datetime fields in
                                                                                   regional format
                                                                                    Datetime fields
                                                                                   - the printing of numbers
                                                                                   with decimal separator

         Figure 43 Label Creator Wizard
28 5         Use                                                                                                                       28

   5.1.2     New label using the wizard
             The Label Creator Wizard allows you, for example, to create your label from a pre-defined format among many
             existing references.

              Figure 44 Label Creator Wizard for new labels              Figure 45 Pre-defined label formats

   5.1.3     New label from an existing label
             This option allows you to easily duplicate a label. You can choose to keep its content or only the label layout, the
             printing and databases settings.

             Figure 46   Duplicate a label

   5.2       Inserting objects in the document
             Notice!
         i   Different settings are available for the objects. They are described in the help panel on the right, which is hidden by
             default. You can display this panel by clicking on the "i" icon (1) at the top right of the object properties window.

                                     1

              Figure 47 Show / Hide help                                   Figure 48 Help panel
5           Use                                                                                                                             29

5.2.1       Object settings
            In the General tab you will find the general settings of an object.

                                                                                                                Attention!
                                                                                                        !       The object name (1)
                                                                                                                and the JScript name
        1
                                                                                                                (2) are limited to 32 non
        2
                                                                                                                special characters.
        3
                                                                                                                They must also be
                                                                                                                unique on the label.

                                                                                                            Notice!
        4                                                                                               i   Depending on the object,
                                                                                                            some size and position
                                                                                                            settings (4) are calculated
                                                                                                            automatically or cannot be
        5                                                                                                   changed.

        6

             Figure 49 General settings of an object

             1.   Name of the object to identify it in cablabel S3       2.   Name used on printer for example in standalone mode
                  (layers, datasource, etc.)
             3.   Free text available for the user                       4.   Size and Position of the objet in the label
             5.   Rotation of the object                                 6.   Allows to format a number with decimal separator

5.2.2       Object Fill & outline
            In this tab you will find the parameters related to the filling and outline of an object.

                                                                                                            Notice!
                                                                                                        i   The option (2) extracts the
                                                                                                            lightness value from
                                                                                                            the fill color and convert
                                                                                                            it to corresponding dot
        1                                                                 3                                 density (0%, 6%, 12%,
                                                                                                            25%, 38%, 50%, 100%).
        2                                                                 4                                 This allows to print a filled
                                                                                                            shape in grayscale.
                                                                                                            The custom Color
                                                                                                            management for each
        5
                                                                                                            object (6) is only displayed
                                                                                                            in Expert mode.

        6

             Figure 50 Fill and outline parameters of an object

             1.   Fill color and style of the object                          2.   Use the lightness of color
             3.   Outline color and style of the object                       4.   Outline width
             5.   Specific parameters depending on the object type            6.   Custom color management for this object
30 5           Use                                                                                                                             30

   5.2.3       Inserting texts
               To insert a text:
               XX Select the Text object in the toolbar  3.2.1 Drawing toolbar
               XX Click somewhere in the label where you want to insert the object
               XX Enter the wished text in the edit field (1)
               XX Select the different options related to the text (2) such as font, size ...
               XX Validate by clicking on the OK button (9)

                                                                                                               Notice!
                                                                                                        i      Move the mouse over the
           1                                                                                                   kerning (5) and the text (6)
                                                                                                               to get some
                                                                                                                Visual information about
                                                                                                               the font properties.
                                                                                                               The Multi line options
                                                                                                               (7) allow you to set the
           2                                                                                                   display of a long text or
                                                                                                               with a dynamic content
                                                                                                               For more information.
                                   3   4
                                                                                                                Multi line and max width
                                                                                                               It is possible to insert
                                                                                                   7
                                            5                                                                  special characters in
           6                                                                                                   a visual form, by right-
                                                                                                               clicking (8) in an editable
                                                                                                               field of a text, a formula or
                                                                                                               a barcode.
                                                                                                               For more information
                                                                                                                6.4 Character map

           8

                Figure 51 Inserting texts                                  9

   5.2.3.1     Negative text
               It is also possible to put a text in negative and to specify the size of the frame around this text. To do this:
               XX Enable the negative option by clicking on the button (3)
               XX Define the size of the frame by clicking on the button (4)

               Figure 52    Text in negative

               XX Validate by clicking on the OK button
5         Use                                                                                                                        31

5.2.3.2   Visual information about the font properties

           Figure 53 Font properties                                                             Figure 54 Kerning

           Height     : size of font in mm                               Squeeze       : width of text in %
           MaxWidth : max width of paragraph in mm                       LineSpacing : line spacing for a paragraph in %
           BaseLine : baseline for the characters in mm                  Tracking      : letter spacing for the characters in mm

5.2.3.3   Highlighting keywords
          You can highlight (bold, italic ...) automatically specific words in a sentence or a text (ex allergens).
          For this, cablabel S3 has a built-in list of pre-defined keywords containing the most common allergens in different
          languages. You can also create your own custom list of keywords.  6.10 Keywords

          When creating or editing a text:
          XX Select the Keywords (1) tab
          XX Enable the option Keywords formatting (2)
          XX Choose the type of settings to use (3)
          XX Validate by clicking on the OK button

          For specific settings:
          XX Select the wished language(s) from the dropdown list (3)
          XX Select the type of formatting (bold, italic...) (4)

                           1
                                                                                                          Attention!
      2
                                                                                                  !       If the option Keywords
                                                                                                          formatting (2) is
      3                                                                                                   used, the text object is
                                                                                                          sent to the printer as a
                                                                                                          picture.

                                                        4

           Figure 55 Keywords formatting
32 5         Use                                                                                                                      32

   5.2.3.4   Text tags
             The tags allow you to change manually the formatting of a text part. They often work in pairs, with an opening tag and
             a closing tag, and they can also overlap.

              Attention!
       !      If text tags are used, the text object is sent to the printer as a picture.

              Figure 56 Text with tags                                                              Figure 57 Result on printout

              Opening tag             Closing tag              Description
                                                        Bold
                                                        Italic
                                                        Underline
                                                        Empty frame around the characters
                                      Characters color with the value of the color in hexadecimal format
                                                               (rr, gg, and bb from 00 to FF)
                                                Converts the characters to uppercase letters
                                                Converts the characters to lowercase letters
                                          Full frame around the characters with the filling color in
                                                               hexadecimal format (rr, gg, and bb from 00 to FF)
                                                    Characters in negative
                                              Size of font with the height h in mm
                                                 Aligns the characters of a line to the left of the text area
                                       Aligns the characters of a line to the center of the text area
                                                Aligns the characters in a line to the right of the text area
                                                           Inserting a line break
             Table 2   Tags list
5           Use                                                                                                                         33

5.2.3.5     Hyphenation
            When creating a text, you can select to enable or not the word hyphenation at end of line in a paragraph with a
            maximum defined width.

            When creating or editing a text:
            XX Select the Language tab (1)
            XX Select the language for the text in the list (2)
            XX Enable / disable Hyphenation by clicking on the checkbox (3)
            XX Validate by clicking on the OK button

                                                                                                         Notice!
                                                                                                  i      The text language (2) is
                                                                                                         selected by default:
                                        1
                                                                                                         - first depending on the
                                                                                                         layout country of label
                                                                                                          New blank label
                                                                                                         - or else depending on the
                                                                                                         application language
                                                            2                                             Global settings
                                                            3

             Figure 58 Hyphenation

5.2.3.6     Interpretation of Unicode syntax
            When creating a text, you can select to enable or not the interpretation of Unicode syntax, for the characters entered
            manually or inserted from the character map.
            If checked, the [U:x] syntax is directly interpreted, in order to see in cablabel S3 the rendering of Unicode characters,
            as they will then be reproduced on printout or with a barcode reader.

             Attention!
    !        Depending on the characters, it is sometimes necessary to disable the interpretation. For example using a
             text object containing a carriage return as a datasource for a barcode.

            When creating or editing a text:
            XX Select the Miscellaneous tab (1)
            XX Enable / disable Interpretation of Unicode syntax by clicking on the checkbox (2)
            XX Validate by clicking on the OK button

                                                                                                       With interpretation:

                                                1

                                                                                                      Without interpretation:
        2

             Figure 59 Interpretation of Unicode syntax                                         Figure 60 Result in cablabel S3
34 5         Use                                                                                                                        34

   5.2.3.7   Multi line and max width
             By default a text without carriage return is always displayed on a single line. A long text or with a dynamic content,
             requires then a fixed paragraph width.

             To define a paragraph width:
             XX Select the Font tab (1)
             XX Increase / Decrease the Line spacing (2) which is specific to each font
             XX Specify the Max width of paragraph (3) at which a line break will then automatically be done

                                                                                                           Attention!
                                                                                                   !       The automatic line
                                                                                                           break does not work
                                                                                                           in standalone mode,
                                                                                                           because each line of
                                                                                                           a paragraph is sent
                                                                                                           individually to the
         1                                                                                                 printer.
                                                                                                           And if the contents
                                                                                                           of the paragraph is
                                                                                                           dynamic, the text object
                                                                                                           is sent to the printer as
                                                                                                           a picture.

                                                                                               2
                                                                                               3

              Figure 61 Multi line

             It is also possible to use the max width options:
             XX Select the Miscellaneous tab (4)
             XX Enable the option Reduce font size (5) to reduce automatically the size of text, as long as it exceeds the Max
                width of paragraph (3).
                And when the Minimum size limit (6) is reached, a line break is then done.
             XX Enable the option Truncate (7) to cut the characters beyond the Max width of paragraph (3) and to not do a
                line break
             XX Validate by clicking on the OK button

                                                                                                           Attention!
                                                                                                   !       If the option Reduce
                                                                                                           font size (5) is used,
                                                                                                           the text object is sent to
                                                                                                           the printer as a picture.

                                                 4
                                                                                                          Notice!
                                                                                                   i      It is possible to combine
                                                                                                          the Reduce font size
                                                                                                          (5) and Truncate (7)
                                                                                                          options. In this case,
                                                                                                          the text is first reduced
                                                                                                          until the minimum size,
         5
                                                                    6                                     then truncated if it still
                                                                                                          exceeds the max width of
         7
                                                                                                          paragraph.

              Figure 62 Max width options
5           Use                                                                                                                       35

5.2.4       Inserting pictures
            To insert a picture:
            XX Select the Picture object in the toolbar  3.2.1 Drawing toolbar
            XX Click somewhere in the label where you want to insert the object and draw the frame containing the picture at the
               required size
            XX Select a picture file (1) on your computer
            XX Validate by clicking the Open button (2) to insert the object

            Figure 63    Inserting pictures                                          1               2

            You can edit the properties of the picture to adjust various parameters, for this:
            XX Right click on the previously inserted picture and select Properties or double click on the picture
            XX Adjust the different parameters

                                                                                                         Notice!
                                                                                                 i       It is possible to use in
        1                                                                                                the filename (1) the
                                                                                                         environment variables of
                                                                                                         Windows.
                                                                                                         For example %PUBLIC%
                                                                                                         instead of C:\User\Public.
                                                                                                         The vector picture
                                                                                                         properties (2) are only
                                                                                                         used for some vector
        2
                                                                                                         pictures, as for example
                                                                                                         DWG, DXF, PLT, SVG.

             Figure 64 Picture properties
36 5           Use                                                                                                                  36

   5.2.5       Inserting graphical objects
               To insert a graphic:
               XX Select the graphical object (line, rectangle...) in the toolbar  3.2.1 Drawing toolbar
               XX Click somewhere in the label where you want to insert the object and draw the graphic
               XX Click again to insert the object

   5.2.6       Inserting barcodes
               It is possible to select between many type of linear (1D) and two-dimensional (2D) barcodes.

               To insert a barcode:
               XX Select the Barcode object in the toolbar  3.2.2 Special toolbar
               XX Click somewhere in the label where you want to insert the object
               XX Select barcode type (1)
               XX Set its properties (2)
               XX Specify a fixed value by using the input mask (3) or, depending on the barcode type, use the barcode wizard (4)
                   6.6 Barcode wizards
               XX Validate by clicking the OK button (5)

           1
                                       2

                                                                                                      Attention!
                                                                   6                             !    The Verifier (6) only works
                                                                                                      on one barcode per label.

                                                                                             7

                                                                           4

           3

                Figure 65 Barcode                                 5                       Figure 66 Barcode verifier

                Attention!
       !        The properties (2), the input mask of the barcode value (3), the wizard (4) or the Mode of the verifier (7) are
                depending on the selected barcode type.

               You can edit the properties of the barcode to adjust other parameters, for this:
               XX Right click on the previously inserted barcode and select Properties or double click on the barcode
               XX Adjust the different parameters
5            Use                                                                                                                             37

5.2.7        Inserting datasource
             Notice!
    i        Most of special objects are composed of two elements: the object itself acting as a datasource and a linked text
             taking resulting content.

5.2.7.1      Prompt fields
             A prompt field allows the user to enter data before printing without modifying the layout.
             To insert a prompt field:
             XX Select the prompt field object  3.2.2 Special toolbar
             XX Adjust the different parameters

             There are two types of prompt fields (2) :
             •     Standalone: the prompt is asked for on the printer's display and the user fills it directly on the printer.
             •     Formular: the user fills the prompt in the software, before the printing starts or in the prompt list.
                                                                            1.  Activate / deactivate the prompt field
                                                                            2.  Type of prompt field
                                                                            3.  Prompt text displayed to the user for the input
        1                                                                   4.  Optional value proposed to the user, with the
                                                               2                possibility to create a choice list  page 38
                                                               3
                                                               4            5. Text displayed only in the software, if there is no
                                                               5                default value or current value.
                                                               6                This text is necessary to place and to set the prompt
                                                               7                field in the label.
                                                               8            6. Length of the input line (0 = no length limitation)
        9                                                                   7. Filters the input values. This is useful to avoid the
        10
                                                                                input of wrong values  page 38
        11
                                                                            8. It will be asked again for this prompt each "n" labels in
        12                                                                      standalone mode (0 = it will be asked for this prompt
                                                                                only at the beginning of the print job)
                                                                            9. Deletes the input value between repeated prompts
                                                                            10. It will be asked again for this prompt at each iteration
                                                                                in standalone mode during a printing loop
                                                                            11. It will be asked again for this prompt, if no record could
                                                                                be found in a database connected in standalone mode
                 Figure 67 Prompt field                                     12. Edit the Compound prompts list
                                                          13
                                                                                 6.5 Compound prompts

             XX Validate by clicking on the OK button (13)
             XX Click somewhere in the label where you want to insert the object

                                                                                                       Notice!
                                                                                                 i     The display of several prompts,
                                                                                                       is ordered according to their
                                                                                                       positions in the layers.

                                                                                                         Attention!
                                                                                                !        Depending to their
                                                                                                         embedding, in for example a
                                                                                                         formula or a query, the order
                                                                                                         will be defined automatically.

                 Figure 68 Layers                      Figure 69 Prompt list
38 5           Use                                                                                                                         38

               •     Choice list with fixed content
                                                                          1.   Select the Fixed list type
           1                     5                                        2.   Enter the text to add to the list
                                                                          3.   Click the Add button to add the text to the list (4)
           4                                                              4.   You can also choose to Sort the list (5)
                                                                               alphabetically
                                                                          5.   Validate by clicking on the OK button (6)

                                         3

           2

                                             6

                   Figure 70 Fixed choice list

               Notice!
       i       When the type of prompt field is set to Standalone, the operation will depend on the printer model.
               Only printers with touchscreen support this feature.

               •     Choice list with dynamic content
                                                                          When the type of prompt field is set to Formular, it is
                                 4                                        possible to select a choice list with a dynamic content
           1                     5                                        from a dataset of a database.
                                                                          1.   Select the Dataset list type
                                                                3
                                                                          2.   Select the index field, used for the search and the
           2                                                                   positioning
                                                                          3.   Select the listed field(s), with at least the index field
                                                                          4.   You can also choose to Sort the list
                                                                               alphabetically
                                                                          5.   The user can enter other data than those listed by
                                                                               disabling Fixed list
                                                   6
                                                                          6.   Validate by clicking on the OK button

                   Figure 71 Dataset choice list

               •     Input mask
                                                                          1.   Length of the input line (0 = no length limitation)
                                                                          2.   Type of allowed character
           1                                                              3.   Allow or not the space character
                                         4                                4.   Type of allowed case
           2
                                                                          5.   Validate by clicking on the OK button
           3

                                                                                     Notice!
                                                                               i     For a prompt field of Formular type, the
                                                                                     input value is automatically converted to the
                                                                                     selected case type (4).

                                     5

                   Figure 72 Mask settings
5             Use                                                                                                                      39

5.2.7.2       Counter
              A counter allows to create an automatic counting during printing.
              To insert a counter:
              XX Select the counter object  3.2.2 Special toolbar
              XX Adjust the different parameters

                                                                       1.   Kind of counter, numeric, alphabetic, alphanumeric or
                                                                            hexadecimal.
                                                                       2.   After printing, the counter is reset to its start value.
                                           1
          2
                                                                       3.   The current counter value is saved on the memory
          3                                                                 card of printer.
                                                                            Allows for example to continue the counting on
          4                                                                 multiple print jobs in standalone mode.
                                                                       4.   The current counter value is saved to a file on the
          5                                                                 computer.
          6                                                                 Allows for example to continue the counting on
          7                                                                 multiple print jobs from different computers.
          8
                                                                       5.   Start value, then current value of the counter.
                                                                       6.   Maximum value of the counter and number of digits
                                                                            for the text mask. The counter will restart at 0 after
                                                                            reaching this value.
                                                                       7.   Increment value which can be positive or negative
                                                                       8.   Number of labels to print between each increment

                                                                                    Attention!
               Figure 73 Counter
                                                          9                 !       The option Save the value in the
                                                                                    printer (3) only works on one counter per
                                                                                    label.

              XX Validate by clicking the OK button (9)
              XX Click somewhere in the label where you want to insert the object
40 5           Use                                                                                                                            40

   5.2.7.3     Datetime fields
               A datetime field allows to do a timestamp during printing.
               To insert a datetime field:
               XX Select the datetime object  3.2.2 Special toolbar
               XX Adjust the different parameters

                                                                             1.   Select the wished datetime format from the list of
                                                                                  predefined formats
                                                                             2.   Tabs of date, time and offsets parameters
                                                                             3.   Wizard to create a custom datetime format or datetime
                                                                                  offsets
                                                             1
                                                                             4.   Allows to insert a char in the custom format, which can
           2
                                                                                  for example be used as a separator.
                                                                                  Enter wished char in the editable field, and click on the
                                                                                  Add button to insert it.
                                                             3               5.   Allows to define or modify a custom format, either:
                                                                                  - by using the wizard in the date / time tabs.
           4                                                                      - by entering in the editable field the different
                                                                                  date / time parameters listed below.
           5                                                 6                    - by clicking on the "..." button to select a datasource
                                                                                  containing the date / time parameters.
           7
                                                                             6.   Deletes the custom format or the link to datasource
                                                                             7.   Use the computer's clock instead of the printer's clock.
                                                                                  If checked, the datetime fields will not be updated in
                                                                                  standalone mode.

                Figure 74 Datetime field

               Date parameters:
               - d: numeric day in 1 or 2 digits, 1-31
               - dd: numeric day always in 2 digits, 01-31
               - dd2: first 2 letters of day in regional format (ex: th for thursday)
               - ddd: first 3 letters of day in regional format (ex: thu for thursday)
               - dddd: complete weekday name in regional format (ex: thursday)
               - d1: numeric day of the year always in 3 digits, 001-366 (ex: 045 for the 14th of february)
               - w or ISOWDay: numeric day of the week in ISO standard format, 1-7 with 7 for sunday
               - w0: numeric day of the week, 0-6 with 0 for sunday
               - ww: numeric week in 1 or 2 digits, 1-53
               - ww2: numeric week always in 2 digits, 01-53
               - m: numeric month in 1 or 2 digits, 1-12
               - mm: numeric month always in 2 digits, 01-12
               - mmm: first 3 letters of month in regional format (ex: Jan for january)
               - mmmm: complete month name in regional format (ex: January)
               - yy: numeric year in 2 digits
               - yyyy: numeric year in 4 digits
               - Date: date with separators in regional format
               - ISODate: numeric date in ISO standard format (ex: yyyymmdd)
               - ISOOrdinal: numeric date in ISO ordinal format (ex: yyyyd1)

               Notice!
       i       The weekday name, the month name and the date with separators in regional format, will be printed depending on
               the layout country of label or the country of device  5.1.1 New blank label.
You can also read