10 Laps around Silverlight 5 - Author: Michael Crump Sponsored by Telerik www.telerik.com
←
→
Page content transcription
If your browser does not render page correctly, please read the page content below
10 Laps around Silverlight 5

   Author: Michael Crump

        January 2012
 Published by SilverlightShow
     ©2012 SilverlightShow

      Smashwords Edition

    Sponsored by Telerik
      www.telerik.com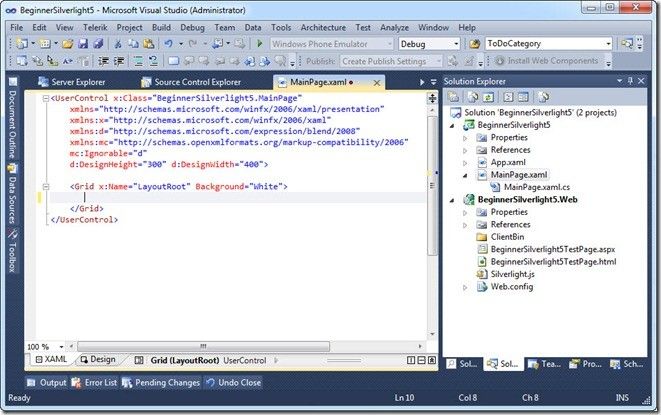
Table of Contents
Chapter 1: Introduction to Silverlight 5

       Introduction

       Why read this ebook over other resources?

       A (very) Brief Introduction to Silverlight

       The Roadmap for this Ebook

       Let’s Begin with the History of Silverlight

       Downloading the Bits

       After everything is installed…

       Next Steps…

       Conclusion

Chapter 2: Binding

       Let’s Begin with Ancestor RelativeSource Binding

       Adding onto our existing project.

       Let’s take a look at Implicit Data Templates

       What else relating to binding should we know about?

       Conclusion

Chapter 3: Graphics

       What exactly is XNA?

       Let’s Begin with XNA Visual Studio Templates

       Let’s run it.

       But how exactly does this work?

       Sample Source Code for XNA projects.

       Conclusion

Chapter 4: Media

       Let’s Begin with Low-Latency Sound using XNA SoundEffect

       Start with a new Silverlight 5 Project

       SilverlightShow.net – Powered by CompletIT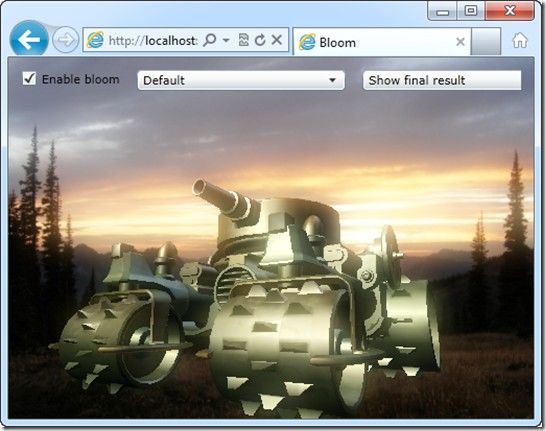
Remote Control and Media Command (Keys) Support

       Let’s get started.

       Conclusion

Chapter 5: Text

       Linked and Multi-Column Text

       Character Spacing

       Open-Type Font

       Pixel Snapped Text and TextOptions

       Conclusion

Chapter 6: Operating System Integration Part 1

       P/Invoke or Platform Invocation

       Multiple Window Support

       Unrestricted File System Access in Full Trust

       Conclusion

Chapter 7: Operating System Integration Part 2

       Default Filename for SaveFileDialog

       64-bit browser support

       Power Awareness for Media Apps

       Conclusion

Chapter 8: Productivity and Performance

       XAML Binding Debugging

       Productivity and Performance Improvements

       Conclusion

Chapter 9: Controls

       Double and Triple Click Support

       PivotViewer

       Combo-Box Type Ahead

       Conclusion

       SilverlightShow.net – Powered by CompletIT
Chapter 10: Other items

       In-Browser HTML

       PostScript Vector Printing

       Tasks Parallel Library (TPL)

       Conclusion

About the Author

      SilverlightShow.net – Powered by CompletIT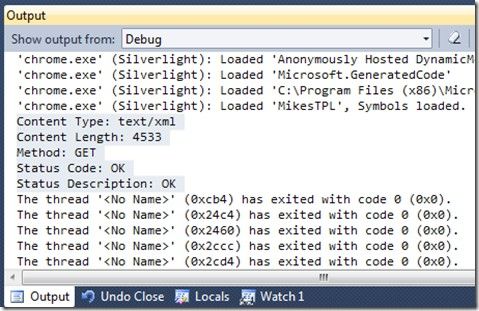
Chapter 1: Introduction to Silverlight 5

Introduction
In this ebook we’ll cover the new and exciting features in Silverlight 5. I am going to guide you step-by-
step through the process of getting started with Silverlight 5 and then we will dive into the features that
are the most important to you.

But first, we are going to:

   •   Explain why you should read this ebook over other Silverlight 5 resources.
   •   We will give a very brief introduction to Silverlight.
   •   Take a look at the Roadmap for this series.
   •   Review Silverlight’s history.
   •   Download the bits required to develop a Silverlight 5 application.
   •   Become familiar with creating a new Silverlight 5 application.

Why read this ebook over other resources?
I’m sure you have seen a lot of Silverlight 5 information on the web and are wondering what makes this
ebook different, so I will go ahead and tell you.

   •   Individual blog posts about Silverlight 5 are scattered all over the internet, it takes time to
       research and find relevant information. In this ebook, all information will be grouped together and
       easily referenced.
   •   Post-beta, Microsoft changed RichTextBox to RichTextBlock. Many samples on the web are still
       showing the old version and have never been updated.
   •   Breaking changes in Silverlight 5 that have happened recently will be included.
   •   I am a Silverlight MVP / Silverlight Insider and XAML Advocate. I have spent the last few years
       of my life specializing in Silverlight and sharing the information to others.

A (very) Brief Introduction to Silverlight
Microsoft Silverlight is an application framework for writing Rich Internet Applications. The run-time
environment is available as a plug-in for most web browsers and works on a variety of operating systems
including Windows, Mac and Linux. While most people know Silverlight for the media capabilities, it
has quickly turned into a solution for many Line-of-Business applications. Silverlight 5, which is
expected at the end of this year, includes many new features that were not included in the previous
version.

The Roadmap for this Ebook
I’ve included the Roadmap for the ebook below as you may want to visit other sections as you learn
Silverlight 5. I picked the following features as I thought that you may find them useful in your day-to-
day work.

1) Introduction to SL5 – This chapter which provides a brief history of Silverlight and relevant links.

       SilverlightShow.net – Powered by CompletIT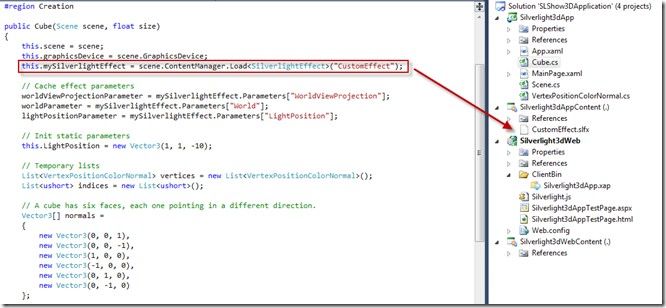
2) Binding- Ancestor Relative Source Binding and Implicit Data Templates.

3) Graphics –XNA 3D API and Improved Graphics Stack.

4) Media - Low-Latency Sound using XNA and Remote Control and Media Command (Keys) Support.

5) Text - Text Tracking and Leading, Linked and Multi-column Text, OpenType Support, Pixel Snapped
Text and TextOptions.

6) Operating System Integration - Part 1 - P/Invoke, Multiple Windows and Unrestricted File System
Access in Full Trust.

7) Operating System Integration - Part 2 - Default Filename for SaveFileDialog, 64-bit browser support
and Power Awareness.

8) Productivity and Performance - XAML Binding Debugging, Parser Performance Improvements and
Multi-core JIT for improved start-up time.

9) Controls - Double and Triple click support, PivotViewer and ComboBox Type-Ahead.

10) Other items - In-Browser HTML, PostScript and Tasks for TPL.

Let’s Begin with the History of Silverlight

Before diving into Silverlight 5, let’s take a brief look at where Silverlight started and where it is now.

Silverlight 1 (released 2007)

   •   Developed under the codename WPF/E which stands for Windows Presentation Foundation /
       Everywhere.
   •   Started by invoking the Silverlight control from the HTML page, which then loads up a XAML
       File.
   •   Silverlight exposes a DOM (API), which is limited to JavaScript running in the browser.
   •   Data formats are limited to XML and JSON.

Silverlight 2 (released 2008)

   •   Included a version of the .NET Framework, implementing the CLR as 3.0.
   •   Can execute programs written in any .NET language.
   •   XAML Markup, as well as the code, is compiled into .NET assemblies which are then
       compressed using ZIP and stored in a .XAP File.
   •   Included classes for data access over web services, REST, WCF Services and ADO.NET Data
       Services.
   •   Several Media features included.

Silverlight 3 (released 2009)

   •   Silverlight has gained a lot of traction against competitors of RIA.

       SilverlightShow.net – Powered by CompletIT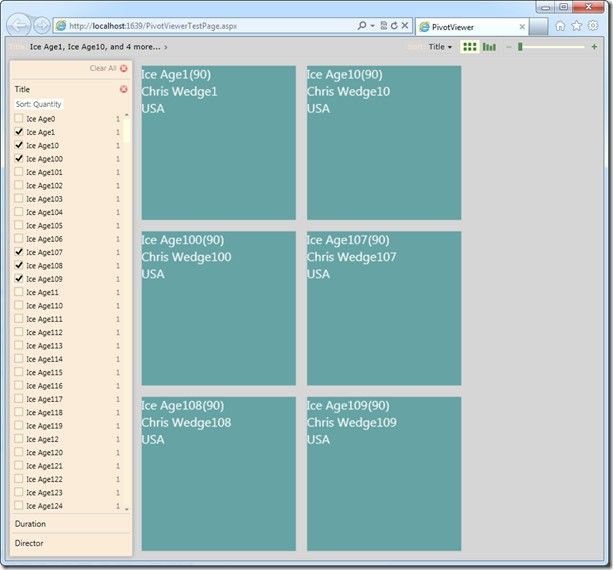
•   UI Elements supports element-to-element binding.
   •   Can save files anywhere on the system via the SaveFileDialog.
   •   Supports Out-of-Browser Applications.
   •   Can check for updates on every launch and updates are automatically installed

Silverlight 4 (released 2010)

   •   Microsoft continues to add features to enhance Silverlight.
   •   Web cam and microphone support.
   •   Printing Support
   •   Clipboard and drag and drop support.
   •   WCF Rich internet application Services
   •   Component Object Model Support

Silverlight 5 (released 2011)

   •   Continues as a mature platform for developing LOB Applications. (Many new features added)
   •   Debug Data-Binding Expressions.
   •   XNA 3D API & Built-in 3D Graphics Support.
   •   Many Text Improvements.
   •   P/Invoke Support.
   •   In-Browser HTML.
   •   64-bit browser Support.

*Referenced Wikipedia Silverlight History

As you can see, a new version of Silverlight has been released every year. Every year Silverlight is also
becoming more feature rich and expanding upon the previous version. With Silverlight 5, we see that it
continues as being a mature platform for developing LOB applications. Now that we have learned a little
more about Silverlight, let’s begin by downloading the bits necessary to build a Silverlight 5 application.

Downloading the Bits

Below you will find the download links necessary to build a Silverlight application.

Note: You can install the beta on top of the final release of Silverlight 4.

   •   Visual Studio 2010 SP1 or Visual Web Developer Express 2010 SP1 is required to develop
       Silverlight 5 Applications. Visual Studio 2010 SP1 or Visual Web Developer Express 2010 SP1.
   •   After you have installed VS2010 SP1 or Visual Web Developer Express 2010 SP1 then you will
       need to download and install theSilverlight 5 Tools for Visual Studio 2010 SP1.
   •   This download will install all components necessary for Silverlight 5 development:
           o Silverlight 5 Developer Runtime
           o Silverlight 5 SDK (software development kit)
           o Update for Visual Studio 2010 Service Pack 1 and Visual Web Developer Express 2010
               Service Pack 1 (KB2502836)
           o Microsoft WCF RIA Services V1.0 SP2 RC
   •   Download the Silverlight 5 Toolkit for additional templates.

       SilverlightShow.net – Powered by CompletIT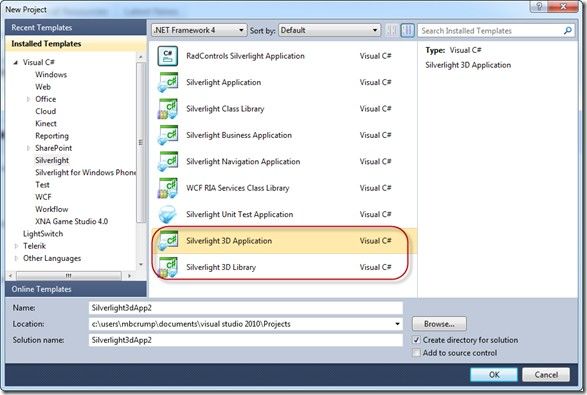
•   You should also install the Expression Blend Preview for Silverlight 5. The current version of
       Expression Blend 4 will not allow you to make changes to your Silverlight 5 UI.
   •   I always like to have a local copy of the help documentation on my hard drive in case I need to
       read it while on a flight or if my internet is down. So, I would recommend downloading
       the Silverlight 5 SDK CHM Help documentation. It is around ~75MB, but well worth it in those
       tight situations.

A couple of optional files are located below. Most of these tools are automatically installed when you
installed the Silverlight 5 Tools.

   •   For reference purposes, the developer runtimes are available here for Windows and Mac OS.
   •   The WCF RIA Services v1 SP2 RC can be found here but as mentioned earlier it is installed with
       the Silverlight 5 Tools.
   •   I found the Silverlight 5 Features list helpful for understanding what is and isn’t included in the
       release.
   •   You can also download the Silverlight 5 SDK but it is also installed with the Silverlight 5 Tools.

Note: If you are planning on developing Silverlight LOB Applications and want a jump start on
developing then I would also recommend downloading and installing Telerik’s Silverlight Controls. They
have a free trial available with absolutely no commitment.

After everything is installed…
Launch Visual Studio 2010 and select File –> New Project. Then select Silverlight –> Silverlight
Application –> Give it a name and hit OK.

On the New Silverlight Application Screen, you will see under “Options” that you may select which
version of Silverlight that you want to use. Silverlight 5 is selected by default from this screen.

       SilverlightShow.net – Powered by CompletIT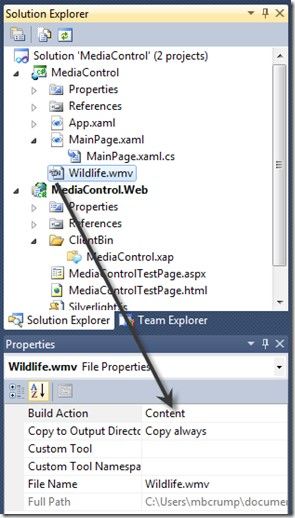
NOTE: You also have the ability to select Silverlight 3 or 4 from this drop-down.

Go ahead and hit “OK”.

Next Steps…
We now have a blank canvas to be working from. Next we’ll begin to dive into the new binding features
in Silverlight 5.

       SilverlightShow.net – Powered by CompletIT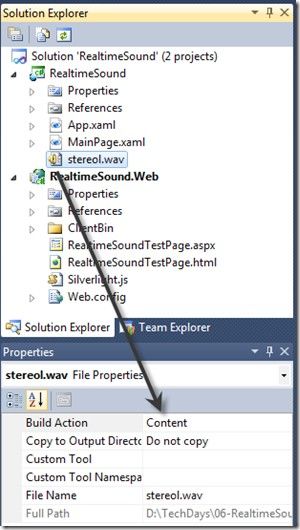
Conclusion

We have briefly discussed what Silverlight is, seen the roadmap for this ebook, looked at the history of
Silverlight, downloaded the required bits and became familiar with a new Silverlight 5 project. In the
next chapter of the ebook, we are going to take a look at several new binding features such as Ancestor
Relative Source Binding and Implicit Data Templates.

       SilverlightShow.net – Powered by CompletIT
Chapter 2: Binding
In this chapter, I am going to show you how to use Ancestor Relative Source Binding and Implicit Data
Templates using Silverlight 5.
Let’s Begin with Ancestor RelativeSource Binding
A new addition to the binding engine in Silverlight is called Ancestor RelativeSource Binding. This was
previously available in WPF, but is new to Silverlight 5. With Ancestor RelativeSource Binding you can
now bind a child object property to a parent object property. It comes with additional properties to
determine the type of parent object and how many levels up it is from the child.
Let’s begin today by looking at a sample ported over from WPF which shows how to retrieve the
FontFamily and FontSize for a given TextBlock.
Adding onto our existing project.
Hopefully you have completed chapter 1 of the series. If not then create a new Silverlight 5 project and
name it “BeginnerSilverlight5”, and look under Solution Explorer. Double click the file named
MainPage.xaml and replace the grid with the following code:
1:
2:
3:
4:
5:
6:
7:
8:
If we go ahead and run this project then we will see that by setting the RelativeSource to self and the Path
to FontFamily or FontSize then we were able to determine the FontFamily and FontSize of the TextBlock
with no code-behind.
But that is not all that we can do. The Ancestor Relative Source contains a property called AncestorType
where we can specify what to bind to. Let’s go ahead and see a sample of the AncestorType being set. Go
ahead and remove the code you added earlier with the following code snippet shown below:
SilverlightShow.net – Powered by CompletIT1:
2:
3:
4:
5:
6:
7:
In this sample, we see the AncestorType being set to StackPanel and the Path to Orientation. When the
application runs, it displays the word Horizontal. If we switch the StackPanel’s Orientation to Vertical
then it would have displayed Vertical.
Finally, we will take a look at both AncestorType and AncestorLevel. Go ahead and remove the code you
added earlier with the following code snippet shown below:
1:
2:
3:
4:
5:
As you can see from the following code, we set the AncestorType to the Grid (What Element to Bind)
and AncestorLevel to 1. We also specified the Path to Margin. The Margin of the grid is then displayed
when the application is executed.
Let’s see what you have learned so far today.
Question: What would have happened if the AncestorLevel were set to 2 in the last example?
Answer: Nothing would have been displayed as it would not have found the Grid on Level 2.
Question: What would have happened if the Path was set to VerticalAlignment in the last example?
Answer: Then the word, “Stretch” would have been displayed in the window.
SilverlightShow.net – Powered by CompletITLet’s take a look at Implicit Data Templates
Another new addition to the binding engine in Silverlight is called Implicit Data Templates. This was also
previously available in WPF, but is new to Silverlight 5. Using Implicit Data Templates we have the
ability to produce a DataTemplate that will be implicitly associated with a particular data type.
Let’s dive straight into an example (Go ahead and create a new VS2010 Project and give it the name
SLShowImplicitDataTemplateDemo):
I have two classes in my project.
1. Podcast.cs – Which contains the Description, ReleaseData and a Link to the Podcast.
2. PodcastAuthor.cs – This class will inherit from Podcast and add the author of the Podcast.
They should look like this:
1: public class Podcast
2: {
3: public string Description { get; set; }
4: public DateTime ReleaseDate { get; set; }
5: public Uri Link { get; set; }
6: }
1: public class PodcastAuthor : Podcast
2: {
3: public string Author { get; set; }
4: }
Let’s switch over to MainPage.xaml now.
The first thing we are going to need to do is setup a clr-namespace to our local project. In my sample
below, I gave it the name of local and simply pointed it to my current project name.
1: xmlns:local="clr-namespace:SLShowImplicitDataTemplateDemo"
Now we will define our DataTemplates in a UserControl as shown below:
1:
2:
3:
4:
5:
6:
7:
8:
9:
10:
11:
12:
13:
14:
15:
16:
17:
18:
SilverlightShow.net – Powered by CompletITThe thing to notice here is that the DataTemplate is getting a DataType set to the particular class that we
want to use. This will allow us to style our Templates differently depending on the data. If this is still not
clear, then continue following along and you will see a screenshot of it in action.
Finally, let’s add a ListBox to the grid and give it the name of listBox1.
1:
2:
3:
Double click on MainPage.xaml.cs and add the following code snippet:
1: public MainPage()
2: {
3: InitializeComponent();
4: Loaded += new RoutedEventHandler(MainPage_Loaded);
5: }
6:
7: void MainPage_Loaded(object sender, RoutedEventArgs e)
8: {
9: var Podcast = new List();
10:
11: Podcast.Add(new Podcast()
12: {
13: Description = "This Developer's Life - Typo",
14: ReleaseDate = new DateTime(2011, 9, 19),
15: Link = new Uri("http://www.thisdeveloperslife.com/post/2-0-5-typo",
UriKind.Absolute)
16: });
17:
18: Podcast.Add(new PodcastAuthor()
19: {
20: Author = "Scott Hanselman",
21: Description = "Digging into the Kinect SDK with Dan Fernandez",
22: ReleaseDate = new DateTime(2011, 7, 14),
23: Link = new Uri("http://hanselminutes.com/275/digging-into-the-kinect-sdk-with-dan-
fernandez", UriKind.Absolute)
24: });
25:
26: listBox1.ItemsSource = Podcast;
27: }
In this code snippet, you will see that we created a Loaded event and and added data to our application.
We then set the ItemSource on our ListBox to the generic list called Podcast.
If you run the project you will see the following:
SilverlightShow.net – Powered by CompletITNotice how the Description of the second item is in red? That’s because we used an Implicit Data
Template on the PodcastAuthor class. Easy enough!
What else relating to binding should we know about?
Silverlight 5 has a lot of new features related to binding to cover. I decided to give a quick definition and
and links to further information.
ICustomTypeProvider – This enables data binding to objects the structure of which cannot be known
until runtime.
Links for further information:
MSDN Documentation on ICustomTypeProvider
Using ICustomTypeProvider in Silverlight 5 by Damon Payne
Using ICustomTypeProvider in Silverlight 5 to Display JSON Data by Jeremy Likness
Custom Markup Extensions – They allow custom code to be run at XAML parse time for both
properties and event handlers. You are probably already familiar with Markup Extensions in Silverlight 4
(Binding, StaticResource, TemplateBinding, NullExtension and RelativeSource).
The Binding statement below is a MarkupExtension in Silverlight 4.
1:
MSDN Documentation on Markup Extensions
Silverlight 5 Rough Notes – Markup Extensions by Mike Taulty
Using Custom Markup Extensions in Silverlight 5 by Jeff Prosise
Binding in Style Setters – You can use any type of markup extension inside of the style setter.
MSDN Documentation on Style Setters
Binding on Style Setter in Silverlight 5 by Kunal Chowdhury
Silverlight 5 – Binding Style’s Setter.Value by Muhammad Shujaat Siddiqi
DataContextChanged Event – Occurs when the DataContext object for a control changes.
SilverlightShow.net – Powered by CompletITMSDN Documentation for DataContextChanged Event.
PropertyChanged now an UpdateSourceTrigger option – This updates the binding source
immediately whenever the binding target property changes.
MSDN Documentation for UpdateSourceTrigger Enumeration
Conclusion
At this point, we have seen how you would use Ancestor Relative Source Binding and Implicit Data
Templates in your Silverlight 5 Applications. We have also discussed a few other features included with
the new binding engine in Silverlight 5. In the next chapter of the ebook, I am going to take a look at the
new and improved Graphics stack in Silverlight 5 including the XNA 3D API and much more.
SilverlightShow.net – Powered by CompletITChapter 3: Graphics
To recap what we learned in the previous chapter:
• We created a sample project for Ancestor Relative Source Binding and Implicit Data Templates.
• We took a look at other binding features that are included with Silverlight 5 and provided a
definition and relevant links.
In this chapter, we are going to take a look at the new XNA 3D API and Improved Graphics Stack.
What exactly is XNA?
Before we get started diving into XNA, it’s important to understand what it is first:
Microsoft XNA is a set of tools with a managed runtime environment provided by Microsoft that
facilitates video gamedevelopment and management. XNA attempts to free game developers from
writing "repetitive boilerplate code"[1] and to bring different aspects of game production into a single
system.[2]
Source: WikiPedia
As you can see XNA got its roots for video game development. So you may be asking, “What is it doing
in Silverlight 5?” Developers have realized for a long time that things like 3D Graphics inside of a web
browser would be beneficial for many applications including: medical, transportation, government and of
course gaming. They requested the feature using Microsoft’s UserVoice and Microsoft added it as part of
Silverlight 5. Silverlight 5 implementation of 3D is the most powerful yet running inside of a web
browser.
Now that we know a little more about XNA, let’s get started…
Let’s Begin with XNA Visual Studio Templates
Creating 3D application with Silverlight 5 requires some familiarity with concepts such as vertex shaders,
sprites, DrawingSurface and others. If you are like me and have a majority of your experience developing
Line of Business Applications then the road to XNA will be somewhat challenging. There is good news
though as the latest Silverlight 5 Toolkit provides XNA Templates. Since I assume that most readers of
this series are LOB developers, we will begin with a template. You may customize the template as
needed later.
Let’s get started…
Install the Silverlight 5 Toolkit and open Visual Studio 2010 and create a new Silverlight project. You
should see the following new templates.
SilverlightShow.net – Powered by CompletITSelect “Silverlight 3D Application” and give it any name that you want.
You will notice when the project loads up, we will have 4 projects inside our solution.
SilverlightShow.net – Powered by CompletITHere is a breakdown of the projects:
• Silverlight3dApp – Our main Silverlight project. (Did you notice that using this template that
you did not have to select which version of Silverlight to target?)
• Silverlight3dAppContent – The content project attached with the main Silverlight Project. It
contains Microsoft.Xna.Framework.Content.Pipeline references as well as CustomEffect.slfx.
This extension stands for Silverlight Effect.
• Silverlight3dWeb – Our standard website that host the 3D Application.
• Silverlight3dWebContent – The content project attached with the web application. It also
contains Microsoft.Xna.Framework.Content.Pipeline references.
Let’s run it.
Now that we have a brief understanding of what makes up the application, let’s go ahead and run it by
hitting F5. We should see the following cube rotating inside of our browser.
But how exactly does this work?
Part 1: The Silverlight Application
References
The first thing that you may notice is the new references to XNA as shown below:
SilverlightShow.net – Powered by CompletITThe files highlighted are not found in the standard Silverlight 5 application template. They are only added
to a 3D Silverlight 5 application that uses XNA. They are necessary to perform complex calculations that
things like 3D requires.
Cube.cs
If you open this class then you will see several regions such as Fields, Properties, Creation and Methods.
The one that you want to pay special attention to is the “Creation” region.
Go ahead and double click on Cube.cs and expand it and you will see that it uses ContentManager to
retrieve a slfx file from the content project. You can create your own silverlight effect files and add them
to the ContentManager this way.
SilverlightShow.net – Powered by CompletITWe won’t dive deep into these classes as we are just looking for an overview. I encourage you to review
the other regions inside the Cube/Scene/VertexPositionColorNormal classes.
Scene.cs
The scene actually creates the ContentManager and registers for a size changed event to update the aspect
ratio.
MainPage.xaml
The MainPage.xaml contains a new control called DrawingSurface. You can see that they only added a
name and gave it an event named myDrawingSurface_Draw which we will look at in a moment.
1:
2:
3:
4:
7:
MainPage.xaml.cs
A fairly simple class as it checks to see if the GPU is on, then creates the scene which will render in the
users web browser.
1: public partial class MainPage
2: {
3: Scene scene;
4:
5: public MainPage()
6: {
7: InitializeComponent();
8: }
9:
10: private void myDrawingSurface_Draw(object sender, DrawEventArgs e)
11: {
12: // Render scene
13: scene.Draw();
14:
15: // Let's go for another turn!
16: e.InvalidateSurface();
17: }
18:
19: private void UserControl_Loaded(object sender, RoutedEventArgs e)
20: {
21: // Check if GPU is on
22: if (GraphicsDeviceManager.Current.RenderMode != RenderMode.Hardware)
23: {
24: MessageBox.Show("Please activate enableGPUAcceleration=true on your Silverlight
plugin page.", "Warning", MessageBoxButton.OK);
25: }
26:
27: // Create the scene
28: scene = new Scene(myDrawingSurface);
SilverlightShow.net – Powered by CompletIT29: }
30: }
Part 2: The Web Application
The main thing to notice here is that the following line has been added to both the .html and .aspx pages
inside of the Silverlight object data.
1:
If this tag is missing, then Silverlight will display the following error message.
Also as stated earlier, we have a Silverlight3dWebContent project that includes the following
references:
At this point, we have taken a quick look at XNA in Silverlight 5. But our journey doesn’t have to end
here. Microsoft included a ton of sample projects that will get you up to speed quickly.
Sample Source Code for XNA projects.
You can find sample source code for many XNA projects located in your C:\Program Files
(x86)\Microsoft SDKs\Silverlight\v5.0\Toolkit\Sep11\Source directory. Simply extract the zip file and
navigate to XNA.
Conclusion
At this point, we have seen how you would use the XNA 3D API in your Silverlight 5 Applications. We
have also discussed a few other features included with the improved graphic stack engine in Silverlight 5.
In the next chapter of the ebook, I am going to take a look at the new media features in Silverlight 5
including: Low-Latency Sound using XNA and Remote Control and Media Command (Keys) Support
and much more.
SilverlightShow.net – Powered by CompletITChapter 4: Media
To recap what we learned in the previous chapter:
• We briefly discussed what XNA is.
• We looked at the templates available for new XNA Silverlight 5 projects.
• We dissected the 3D XNA Template to learn more about its makeup.
• Pointed out where other sample projects for XNA were located on your hard disk.
In this chapter, I am going to discuss media features such as low-latency sound using features right out of
XNA. We will also discuss Remote Control and Media Command (Keys) support using Silverlight 5.
Let’s Begin with Low-Latency Sound using XNA SoundEffect
A new addition to Silverlight 5 is the ability to play low-latency sounds using the XNA SoundEffect
class. This is very useful for kiosk or even games that need to play a certain sound over and over. In
Silverlight 5, this is much easier than before (where people used various MediaElement hacks). You can
now simply borrow the SoundEffect / SoundEffectInstance class from XNA.
Start with a new Silverlight 5 Project
Launch Visual Studio 2010 and select File –> New Project. Then select Silverlight –> Silverlight
Application –> Give it a name and hit OK.
On the New Silverlight Application Screen, you will see under “Options” that you may select which
version of Silverlight that you want to use. We will select Silverlight 5 for this option. If you don’t see
Silverlight 5 as an option then follow the guide here.
The first thing you are going to want to do is to find a .wav file on the net that is PCM-encoded. They are
very easy to find with a quick Google search. I am not going to include one for copyright reasons.
Now, right-click your Silverlight 5 project and select “Add”, then “Existing Item.” You can also easily
access this screen by hitting “Shift-Alt-A” together. Navigate to wherever you downloaded the .wav file
and select the file.
At this point, make sure the .wav file has a build action set to “Content”, as shown below.
SilverlightShow.net – Powered by CompletITOnce this is complete, we will need to make a minor adjustment to our MainPage.xaml file to include a
button to play the file for this demo.
1:
2:
3:
The only thing that we added to our MainPage.xaml file was a button inside of the Grid that has an event
handler when the user clicks the button.
We can navigate over to our MainPage.xaml.cs file and add the following code snippet:
1: private void btnPlaySound_Click(object sender, RoutedEventArgs e)
2: {
3: var soundStream =
4: Application.GetResourceStream(
5: new Uri("stereol.wav", UriKind.RelativeOrAbsolute));
6:
7: var effect = SoundEffect.FromStream(soundStream.Stream);
8:
9: SoundEffectInstance engineInstance = effect.CreateInstance();
10:
11: engineInstance.IsLooped = true;
SilverlightShow.net – Powered by CompletIT12: engineInstance.Pitch = -1.0f;
13: engineInstance.Volume = 0.75f;
14:
15: engineInstance.Play();
16: }
In this code snippet, we are using several new features. Let’s examine the code snippet line by line:
• Lines 3-5 creates our resource stream from the wav file that added earlier.
• Lines 7-9 is initializing the SoundEffectInstance class that is going to perform special effects for
the .wav file.
• Lines 11-13 is creating a looped wav file that sets the pitch and the volume.
• Lines 15 simply plays the files.
Don’t forget to add the proper namespace and reference to your project.
1: using Microsoft.Xna.Framework.Audio;
If you load the application now, you will hear your .wav file being played over and over again. The pitch
and volume has also been adjusted. Easy enough!
Let’s move onto Remote Control and media keys support.
Remote Control and Media Command (Keys) Support
One of the new improvements in Silverlight 5 is the ability to support Remote Control and Media
Commands from various hardware manufactures. Below is a sample keyboard and remote control that
has buttons for features such as (fast forward, stop, play, rewind, etc). Now we are able to make use of
those buttons in Silverlight 5 with a few lines of code.
SilverlightShow.net – Powered by CompletITLet’s get started.
Launch Visual Studio 2010 and select File –> New Project. Then select Silverlight –> Silverlight
Application –> Give it a name and hit OK.
On the New Silverlight Application Screen, you will see under “Options” that you may select which
version of Silverlight that you want to use. We will select Silverlight 5 for this option. If you don’t see
Silverlight 5 as an option then follow the guide here.
The first thing you are going to want to do is to find a .wmv file that you can use for this application. I
decided to use thewildlife.wmv file available on every Windows 7 PC. Just like before, I am not going to
include it due to copyright reasons.
Now, right-click your Silverlight 5 project and select “Add”, then “Existing Item.” You can also easily
access this screen by hitting “Shift-Alt-A” together. Navigate to wherever you downloaded the .wmv file
and select the file.
At this point, make sure the .wmv file has a build action set to “Content”, as shown below.
SilverlightShow.net – Powered by CompletITOnce this is complete, we will need to make a few minor adjustments to our MainPage.xaml file to play a
video.
1:
2:
4:
5:
6:
7:
10:
We added the following items to our MainPage.xaml file:
• MediaElement control – This will play the video and give us the ability to stop/start/pause the
video using the Media Controls on our keyboard/remote control.
• TextBlock control – To display which MediaCommand code is being executed. (Excellent for
debugging)
• Button control – To toggle between FullScreen mode.
SilverlightShow.net – Powered by CompletITWe can navigate over to our MainPage.xaml.cs file and add the following code snippet:
1: public MainPage()
2: {
3: InitializeComponent();
4: this.MediaCommand += new MediaCommandEventHandler(MainPage_MediaCommand);
5: }
6:
7: private void MainPage_MediaCommand(object sender, MediaCommandEventArgs e)
8: {
9:
10: txtMediaKey.Text = e.MediaCommand.ToString();
11:
12: switch (e.MediaCommand)
13: {
14: case System.Windows.Media.MediaCommand.Play:
15: videoPlayer.Play();
16: return;
17: case System.Windows.Media.MediaCommand.Pause:
18: videoPlayer.Pause();
19: return;
20: case System.Windows.Media.MediaCommand.Stop:
21: videoPlayer.Stop();
22: return;
23: case System.Windows.Media.MediaCommand.TogglePlayPause:
24: if (videoPlayer.CurrentState == MediaElementState.Paused ||
25: videoPlayer.CurrentState == MediaElementState.Stopped)
26: videoPlayer.Play();
27: else if (videoPlayer.CurrentState == MediaElementState.Playing)
28: if (videoPlayer.CanPause)
29: videoPlayer.Pause();
30: return;
31: case System.Windows.Media.MediaCommand.IncreaseVolume:
32: videoPlayer.Volume += 5;
33: return;
34: case System.Windows.Media.MediaCommand.DecreaseVolume:
35: videoPlayer.Volume -= 5;
36: return;
37: case System.Windows.Media.MediaCommand.ChannelUp:
38: // Channel up
39: return;
40: case System.Windows.Media.MediaCommand.ChannelDown:
41: // Channel down
42: return;
43: default:
44: return;
45: }
46: }
47:
48: private void FullScreen_Click(object sender, RoutedEventArgs e)
49: {
50: Application.Current.Host.Content.IsFullScreen = !Application.Current.Host.Content.IsFullScreen;
51: }
Let’s examine the code snippet line by line:
SilverlightShow.net – Powered by CompletIT• Line 4 creates our MediaCommand event handler. This is going to hook up to our media
commands case statement.
• Line 10 will simply display which MediaCommand the user has pressed into a TextBlock on the
right hand side of the screen. This is useful for debugging applications that use the Media Features
in Silverlight 5.
• Lines 12-44 is our switch statement that will trigger the respective action on the MediaElement
control.
• Lines 48-51 will simply check to see if the screen is in FullScreen mode and toggle it
accordingly.
Note: I didn’t list all of the MediaCommand enums that are available. You can review a complete
list here.
If we run the application our video starts playing:
If we hit the “Play/Pause” media button on our keyboard (If your hardware supports it) then you will see
the video is now paused and the word “TogglePlayPause” is located in the bottom right hand corner of
our screen.
SilverlightShow.net – Powered by CompletITIf you hit other media keys then the MediaElement will respond accordingly. You can even try out your
WMC remote control if you have one available.
Please note: If you ever have an issue with the keys responding, then switch to FullScreen mode (by
clicking the button) and try again. I’ve found several instances where the Silverlight application loses
focus.
Notice how easy it was to add support for Media Keyboards and Remotes? Silverlight is already known
for having an excellent media player and this just enhances it even more!
Conclusion
At this point, we have seen how you would use Low-Latency Sound using XNA and Remote Control and
Media Command (Keys) Support in your Silverlight 5 Applications. We have also discussed a few other
features in Silverlight 5. In the next chapter of the ebook, I am going to take a look at the new text
improvements in Silverlight 5 including: Text Tracking and Leading, Linked and Multi-column Text,
OpenType Support, Pixel Snapped Text and TextOptions.
SilverlightShow.net – Powered by CompletITChapter 5: Text
To recap what we learned in the previous chapter:
• We discussed the new media features included with Silverlight 5.
• We looked at using Low-Latency Sound with XNA SoundEffect and SoundEffectInstance
classes.
• We also learned how to use remote control and media command (keys) support.
In this chapter, I am going to discuss the new text improvements in Silverlight 5 including: Text Tracking
and Leading, Linked and Multi-column Text, OpenType Support, Pixel Snapped Text and TextOptions.
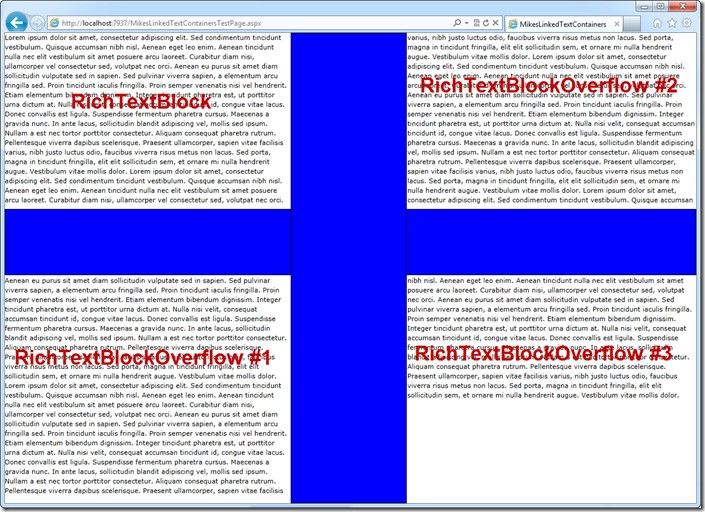
Linked and Multi-Column Text
We will use an example that I’ve demonstrated in the past that many have found helpful. The Linked and
Multi-Column Text feature enables the text of a RichTextBlock control to overflow from one into the
next. Multiple RichTextBlockOverflows can be chained together to spread text across a layout. Let’s go
ahead and take a look at a screenshot of a RichTextBlock with a RichTextBlockOverflow working
together.
SilverlightShow.net – Powered by CompletITAs you can see from this screenshot, we had a RichTextBlock in the upper left and its content overflowed
onto the RichTextBlockOverFlow #1, #2 and #3. You can think of this as something that is similar to a
newspaper article. As the browser expands or contracts the content fills the available area.
Let’s check out the code that made it happen:
1:
3:
4:
5:
6:
7:
8:
9:
10:
11:
12:
13:
18:
23:
28:
29: Lorem ipsum dolor sit amet, consectetur adipiscing elit. Sed condimentum tincidunt
vestibulum. Quisque accumsan nibh nisl. Aenean eget leo enim. Aenean tincidunt nulla nec elit vestibulum
sit amet posuere arcu laoreet. Curabitur diam nisi, ullamcorper vel consectetur sed, volutpat nec orci.
Aenean eu purus sit amet diam sollicitudin vulputate sed in sapien. Sed pulvinar viverra sapien, a
elementum arcu fringilla sed. Proin tincidunt iaculis fringilla. Proin semper venenatis nisi vel
hendrerit. Etiam elementum bibendum dignissim. Integer tincidunt pharetra est, ut porttitor urna dictum
at. Nulla nisi velit, consequat accumsan tincidunt id, congue vitae lacus. Donec convallis est ligula.
Suspendisse fermentum pharetra cursus. Maecenas a gravida nunc. In ante lacus, sollicitudin blandit
adipiscing vel, mollis sed ipsum. Nullam a est nec tortor porttitor consectetur. Aliquam consequat
pharetra rutrum. Pellentesque viverra dapibus scelerisque. Praesent ullamcorper, sapien vitae facilisis
varius, nibh justo luctus odio, faucibus viverra risus metus non lacus. Sed porta, magna in tincidunt
fringilla, elit elit sollicitudin sem, et ornare mi nulla hendrerit augue. Vestibulum vitae mollis dolor.
30: Lorem ipsum dolor sit amet, consectetur adipiscing elit. Sed condimentum tincidunt
vestibulum. Quisque accumsan nibh nisl. Aenean eget leo enim. Aenean tincidunt nulla nec elit vestibulum
sit amet posuere arcu laoreet. Curabitur diam nisi, ullamcorper vel consectetur sed, volutpat nec orci.
Aenean eu purus sit amet diam sollicitudin vulputate sed in sapien. Sed pulvinar viverra sapien, a
elementum arcu fringilla sed. Proin tincidunt iaculis fringilla. Proin semper venenatis nisi vel
hendrerit. Etiam elementum bibendum dignissim. Integer tincidunt pharetra est, ut porttitor urna dictum
at. Nulla nisi velit, consequat accumsan tincidunt id, congue vitae lacus. Donec convallis est ligula.
Suspendisse fermentum pharetra cursus. Maecenas a gravida nunc. In ante lacus, sollicitudin blandit
adipiscing vel, mollis sed ipsum. Nullam a est nec tortor porttitor consectetur. Aliquam consequat
pharetra rutrum. Pellentesque viverra dapibus scelerisque. Praesent ullamcorper, sapien vitae facilisis
varius, nibh justo luctus odio, faucibus viverra risus metus non lacus. Sed porta, magna in tincidunt
fringilla, elit elit sollicitudin sem, et ornare mi nulla hendrerit augue. Vestibulum vitae mollis dolor.
SilverlightShow.net – Powered by CompletIT31: Lorem ipsum dolor sit amet, consectetur adipiscing elit. Sed condimentum tincidunt
vestibulum. Quisque accumsan nibh nisl. Aenean eget leo enim. Aenean tincidunt nulla nec elit vestibulum
sit amet posuere arcu laoreet. Curabitur diam nisi, ullamcorper vel consectetur sed, volutpat nec orci.
Aenean eu purus sit amet diam sollicitudin vulputate sed in sapien. Sed pulvinar viverra sapien, a
elementum arcu fringilla sed. Proin tincidunt iaculis fringilla. Proin semper venenatis nisi vel
hendrerit. Etiam elementum bibendum dignissim. Integer tincidunt pharetra est, ut porttitor urna dictum
at. Nulla nisi velit, consequat accumsan tincidunt id, congue vitae lacus. Donec convallis est ligula.
Suspendisse fermentum pharetra cursus. Maecenas a gravida nunc. In ante lacus, sollicitudin blandit
adipiscing vel, mollis sed ipsum. Nullam a est nec tortor porttitor consectetur. Aliquam consequat
pharetra rutrum. Pellentesque viverra dapibus scelerisque. Praesent ullamcorper, sapien vitae facilisis
varius, nibh justo luctus odio, faucibus viverra risus metus non lacus. Sed porta, magna in tincidunt
fringilla, elit elit sollicitudin sem, et ornare mi nulla hendrerit augue. Vestibulum vitae mollis dolor.
32: Lorem ipsum dolor sit amet, consectetur adipiscing elit. Sed condimentum tincidunt
vestibulum. Quisque accumsan nibh nisl. Aenean eget leo enim. Aenean tincidunt nulla nec elit vestibulum
sit amet posuere arcu laoreet. Curabitur diam nisi, ullamcorper vel consectetur sed, volutpat nec orci.
Aenean eu purus sit amet diam sollicitudin vulputate sed in sapien. Sed pulvinar viverra sapien, a
elementum arcu fringilla sed. Proin tincidunt iaculis fringilla. Proin semper venenatis nisi vel
hendrerit. Etiam elementum bibendum dignissim. Integer tincidunt pharetra est, ut porttitor urna dictum
at. Nulla nisi velit, consequat accumsan tincidunt id, congue vitae lacus. Donec convallis est ligula.
Suspendisse fermentum pharetra cursus. Maecenas a gravida nunc. In ante lacus, sollicitudin blandit
adipiscing vel, mollis sed ipsum. Nullam a est nec tortor porttitor consectetur. Aliquam consequat
pharetra rutrum. Pellentesque viverra dapibus scelerisque. Praesent ullamcorper, sapien vitae facilisis
varius, nibh justo luctus odio, faucibus viverra risus metus non lacus. Sed porta, magna in tincidunt
fringilla, elit elit sollicitudin sem, et ornare mi nulla hendrerit augue. Vestibulum vitae mollis dolor.
33: Lorem ipsum dolor sit amet, consectetur adipiscing elit. Sed condimentum tincidunt
vestibulum. Quisque accumsan nibh nisl. Aenean eget leo enim. Aenean tincidunt nulla nec elit vestibulum
sit amet posuere arcu laoreet. Curabitur diam nisi, ullamcorper vel consectetur sed, volutpat nec orci.
Aenean eu purus sit amet diam sollicitudin vulputate sed in sapien. Sed pulvinar viverra sapien, a
elementum arcu fringilla sed. Proin tincidunt iaculis fringilla. Proin semper venenatis nisi vel
hendrerit. Etiam elementum bibendum dignissim. Integer tincidunt pharetra est, ut porttitor urna dictum
at. Nulla nisi velit, consequat accumsan tincidunt id, congue vitae lacus. Donec convallis est ligula.
Suspendisse fermentum pharetra cursus. Maecenas a gravida nunc. In ante lacus, sollicitudin blandit
adipiscing vel, mollis sed ipsum. Nullam a est nec tortor porttitor consectetur. Aliquam consequat
pharetra rutrum. Pellentesque viverra dapibus scelerisque. Praesent ullamcorper, sapien vitae facilisis
varius, nibh justo luctus odio, faucibus viverra risus metus non lacus. Sed porta, magna in tincidunt
fringilla, elit elit sollicitudin sem, et ornare mi nulla hendrerit augue. Vestibulum vitae mollis dolor.
34:
35:
36:
37:
42:
46:
47:
51:
52:
53:
The key thing to remember here is that a RichTextBlock contains OverflowContentTarget which will
allow you to bind to a special control called RichTextBlockOverflow.
SilverlightShow.net – Powered by CompletITNOTE: Post-beta, Microsoft changed this to use the non-editable RichTextBlock instead of
RichTextBox. So a word of warning, many post-beta demos of this functionality on the web will no
longer work. Good thing you are reading this guide, right? =)
Character Spacing
The TextBox and TextBlock controls provide a way to control the spacing of letters inside the text very
easily. Let’s go ahead and take a look at a screenshot of the various character spacing inside of a
TextBlock.
Let’s look at the code:
1:
2:
3:
5:
7:
9:
11:
13:
14:
As you can see, we just set the CharacterSpacing property of the TextBlock control. Please note that you
may use a negative number to “squish” text together.
Open-Type Font
Silverlight 5 provides many new options for the Typography class inside of a TextBlock. They have so
many improvements that the best way to see everything is to explore the class. Let’s look at two new
features:
1. ContextualAlternates - Gets or sets a value that determines whether custom glyph forms can be
used based upon the context of the text being rendered.
2. StylisticSets - Gets or sets a value that indicates whether a stylistic set of a font form is enabled.
(20 StylisticSets are available)
Let’s look at a sample that uses ContextualAlternates and StylisticSets.
SilverlightShow.net – Powered by CompletITThe code looks like the following:
1:
Pixel Snapped Text and TextOptions
Silverlight 5 provides many new options for the TextOptions property inside of a TextBlock.
1. TextFormattingMode – Gets the TextFormattingMode for the element
2. TextHintingMode – Gets or sets a value that indicates whether text rendering is optimized for
readability or animation.
3. TextRenderingMode - Sets the TextRenderingMode for the element. 4 options are available:
Aliased, Auto, ClearType and Grayscale.
Let’s look at a sample that uses all of them together (Display, Fixed and Aliased). It may be hard to see
in this demo, so try this one in your own application.
The code looks like the following:
1:
Conclusion
At this point, we have seen how you would use Text Tracking and Leading, Linked and Multi-column
Text, OpenType Support, Pixel Snapped Text and TextOptions in your Silverlight 5 Applications. We
have also discussed a few other features in Silverlight 5. In the next chapter of the ebook, I am going to
take a look at the new operating system integrations including: P/Invoke, Multiple Windows and
Unrestricted File System Access in Full Trust.
SilverlightShow.net – Powered by CompletITChapter 6: Operating System Integration Part 1
To recap what we learned in the previous chapter:
• We spend the entire “lap” discussing improvements in text in Silverlight 5.
• We discussed Linked and Multi-Column Text and where it might be useful in your next
Silverlight application.
• We also looked at character spacing, open-type font, pixel snapped text and TextOptions.
In this chapter, I am going to discuss several new operating system integration features in Silverlight 5
including: P/Invoke, Multiple Windows and Unrestricted File System Access in Full Trust.
P/Invoke or Platform Invocation
Before we dive into an example, let’s first answer the question: What is it? Platform Invocation
Services, commonly referred to as P/Invoke, is a feature of Common Language
Infrastructure implementations, like Microsoft's Common Language Runtime, that enables managed
code to call native code.
*Reference to Wiki
This feature is new to Silverlight 5 and we will take a look at how to use it in your own applications.
In order to create a new P/Invoke application in Silverlight 5, we will need to enable “Require elevated
trust” in Silverlight 5. We can also use the functionality in-browser or out-of-browser. Let’s begin.
Fire up a new Silverlight 5 project and right click on our project and select Properties. Put a check in
“Enable running application out of the browser” as shown below.
SilverlightShow.net – Powered by CompletITAfter you put a check in “Enable running application out of the browser”, go ahead and click the button.
Now put a check in “Require elevated trust when running outside the browser”.
Switch back over to the MainPage.xaml and add in the following code:
SilverlightShow.net – Powered by CompletIT1:
2:
3:
This simply puts a button on our page that when the user clicks it the pc will make a beep sound.
Go ahead and add a new class to the project named PlatformInvokeTest.cs and add the following code.
1: using System;
2: using System.Runtime.InteropServices;
3:
4: namespace PInvoke
5: {
6: public class PlatformInvokeTest
7: {
8: [DllImport("kernel32.dll")]
9: public static extern bool Beep(int frequency, int duration);
10:
11:
12: public static void PlaySound()
13: {
14: Random random = new Random();
15: for (int i = 0; i < 50; i++)
16: {
17: Beep(random.Next(10000), 100);
18: }
19: }
20:
21: }
22: }
Let’s switch back over to the MainPage.xaml.cs and add the following code to our button event handler:
1: private void click_Click(object sender, RoutedEventArgs e)
2: {
3: PlatformInvokeTest.PlaySound();
4: }
If we run the application now, we will hear our PC beep many times. There are many other things you
can do with P/Invoke such as Detecting if the user inserted a USK Key into their computer, opening the
run dialog box and much much more! Very cool stuff!
Multiple Window Support
With Silverlight 5, we now have the ability to spawn multiple windows from an Out-of-Browser
application with elevated trust with just a couple of lines of code.
A few things to note about Multiple Window Support though:
• If the main window closes, then all spawned windows close.
• You need to be running your application “Out-of-Browser” as well as in Elevated Trust mode.
SilverlightShow.net – Powered by CompletITIf you followed the P/Invoke guide before then you will need to do the same thing for Multiple Window
Support. That is, make this an out-of-browser application and add Elevated Trust.
After that is complete then go ahead and double click on your MainPage.xaml.cs file and add the
following code:
1: public MainPage()
2: {
3: InitializeComponent();
4: Loaded += new RoutedEventHandler(MainPage_Loaded);
5: }
6:
7: void MainPage_Loaded(object sender, RoutedEventArgs e)
8: {
9: for (int i = 0; i < 5; i++)
10: {
11: new Window()
12: {
13: Height = 400,
14: Width = 600,
15: Top = 24,
16: Left = 30,
17: Title = "Silverlight Show New Window",
18: Content = new Button() { Content = "Can be any Framework Element" },
19: Visibility = Visibility.Visible
20: };
21: }
22:
23: }
This application will spawn 5 windows when you run it. Below is a sample screenshot from the
application with 2 additional windows showing. The other windows are closed for demonstration
purposes.
SilverlightShow.net – Powered by CompletITUnrestricted File System Access in Full Trust
Have you ever wanted to write a file anywhere on a users computer in earlier versions of Silverlight but
found out that you couldn’t? Well in Silverlight 5 you can.
Just like the earlier samples make this an out-of-browser application and add Elevated Trust. (See the
P/Invoke demo at the beginning of this article for a quick-how to.)
Switch over to the MainPage.xaml and add in the following code:
1:
2:
3:
Let’s switch back over to the MainPage.xaml.cs and add the following code to our button event handler:
1: private void click_Click(object sender, RoutedEventArgs e)
2: {
3: // Create a Directory on the Root of C
4: var tempDirectory = @"c:\michaelcrump";
5: if (!Directory.Exists(tempDirectory))
6: {
7: Directory.CreateDirectory(tempDirectory);
8: }
9:
10: // Give it a FileName
11: var filename = string.Format("slshowrocks.txt");
12: var fullPath = System.IO.Path.Combine(tempDirectory, filename);
13:
14: // Write Something in the File!
15: using (FileStream fs = File.Create(fullPath))
16: using (StreamWriter sr = new StreamWriter(fs, Encoding.UTF8))
17: {
18: sr.WriteLine("Hello World");
19: }
20: }
This will create a directory on our C:\ called michaelcrump. Then it will create a file named
“slshowrocks.txt” and give it some content. If you run the application and click on the button then you
should have the new folder/file created on your root hard disk.
If Visual Studio 2010 is complaining of any missing namespaces then just make sure you add the
following:
1: using System.IO;
2: using System.Text;
Very easy to accomplish and it is not limited to writing files. You can also read files from anywhere on
the hard disk! In the next part of this series, we will look at letting the user specify the location of the
saved file.
SilverlightShow.net – Powered by CompletITConclusion
At this point, we have seen how you would use P/Invoke, Multiple Windows and Unrestricted File
System Access in Full Trust in your Silverlight 5 Applications. We have also discussed a few other
features in Silverlight 5. In the next chapter of the ebook, I am going to take a look at more new operating
system features including: Default Filename for SaveFileDialog, 64-bit browser support and Power
Awareness.
SilverlightShow.net – Powered by CompletITChapter 7: Operating System Integration Part 2
To recap what we learned in the previous chapter:
• We spent some time building an application that uses P/Invoke or Platform Invocation to get
familiar with Elevated Trust and Out of Browser applications. We also reviewed that P/Invoke
allows managed code to call native code.
• We then took a look at how to create a Silverlight 5 application that uses multiple windows that
are separate from the main Silverlight window. We discussed how that if you close one of the
newly spawned windows then it only closes that instance.
• We wrapped up with creating an application that uses unrestricted file access to demonstrate
creating a folder and placing a file inside of it with some content.
In this chapter, I am going to discuss a few more operating system integration features in Silverlight 5
including: Default Filename for SaveFileDialog, 64-bit browser support and Power Awareness for Media
Applications.
Default Filename for SaveFileDialog
In previous version of Silverlight, you could not specify the default filename for the SaveFileDialog
message. In Silverlight 5 you can very easily.
Fire up a new Silverlight 5 project and give it any name that you want. We are going to create a simple
application that contains one button and when the user clicks it the SaveFileDialog will appear with a
default filename.
Switch over to the MainPage.xaml and add in the following code:
1:
2:
3:
Let’s switch back over to the MainPage.xaml.cs and add the following code to our button event handler:
1: private void btnSaveFile_Click(object sender, RoutedEventArgs e)
2: {
3: var saveFileDialog1 = new SaveFileDialog
4: {
5: Filter = "JPeg Image|*.jpg|Bitmap Image|*.bmp|Gif Image|
*.gif",
6: DefaultFileName = "YouCanNowHaveADefaultFileName.jpeg"
7: };
8: saveFileDialog1.ShowDialog();
9: }
If we run the application now, we will see the following prompt.
SilverlightShow.net – Powered by CompletIT(Note: You could run this application in elevated trust to remove the security warning, see this post for
details)
Go ahead and select OK and you will see the following screen:
You should notice that the File name field is filled in for us with a default save as type as Jpeg. Of course,
if you didn’t want the user to see the security warning then you could run this application in elevated trust
as mentioned under the image.
64-bit browser support
64-bit browser support is also new to Silverlight 5. If you have installed Windows 7 x64 then you already
have a 64-bit version of Internet Explorer. You can find it by going to the “search program and files”
prompt and typing Internet Explorer as shown below.
SilverlightShow.net – Powered by CompletITIf you launch Internet Explorer x64 and visit a site built with Silverlight 5 then you will see the following
message:
After you click on the hyperlink then it will take you to a page that says the following:
(Please note this message will change after the final version of Silverlight 5 is released.)
Don’t worry about this prompt, just go ahead and click “Install for Windows” and you will now be able
to run Silverlight 5 applications inside of a browser running in 64-bit mode. Pretty sweet stuff!
SilverlightShow.net – Powered by CompletITYou can also read