SOS MOBILE Instruction Manual - App Version 2.6.3 | June 2019 - Swissphone
←
→
Page content transcription
If your browser does not render page correctly, please read the page content below
SOS MOBILE

                           Instruction Manual

                    App Version 2.6.3 | June 2019

Swissphone Wireless AG - Fälmisstrasse 21 - CH-8833 Samstagern - Tel. +41 44 786 77 70
                                                                                         www.swissphone.com
SOS Mobile Instruction Manual

Document versions
Version   Date        Description                              Author

V2.5.0    July 2018   Published                                LIJ

V2.5.1    July 2018   Minor corrections                        LIJ

V2.6.3    June 2019   Adjustments App Version 2.6.3            MFU
                      Chapter 5.7 Connectivity settings
                      Chapter 4.2.1 and       4.2.2   Manual
                      emergency calls
                      Chapter 9 and 3.5 upgrade
                      Minor corrections

                               Page 2 of 46
SOS Mobile Instruction Manual

Table of contents
1.   Introduction ................................................................................................................ 7
     1.1     Please read this first .......................................................................................................... 7

2.   Installation and registration ......................................................................................... 7
     2.1     Registration ....................................................................................................................... 8

3.   Overview of the main display ...................................................................................... 9
     3.1     Demo version (Limited Edition) ......................................................................................... 9
     3.2     The side menu ................................................................................................................. 10
     3.3     Test emergency call icon................................................................................................. 10
     3.4     App mode icon ................................................................................................................ 11
     3.5     Speaker icon ................................................................................................................... 11
     3.6     Status overview ............................................................................................................... 11
             3.6.1 INACTIVE mode ................................................................................................. 12
             3.6.2 ACTIVE mode..................................................................................................... 12
             3.6.3 Status icons ........................................................................................................ 12
                     3.6.3.1      Beacon tracking ............................................................................... 12
                     3.6.3.2      GPS tracking .................................................................................... 13
                     3.6.3.3      Lifecheck .......................................................................................... 13
                     3.6.3.4      Mandown detection .......................................................................... 14
                     3.6.3.5      SOS Button ...................................................................................... 14

4.   Emergency call variants ........................................................................................... 14
     4.1     Making a test emergency call .......................................................................................... 15
     4.2     Manual emergency calls.................................................................................................. 15
             4.2.1 Audio output during pre-alarm ............................................................................ 16
             4.2.2 Audio output during alarm .................................................................................. 17
     4.3     Automatic emergency calls ............................................................................................. 18
             4.3.1 Mandown detection ............................................................................................ 18
                   4.3.1.1     Mandown detection non-movement alarm ....................................... 19
                   4.3.1.2     Mandown detection with enabled Rest position............................... 19
             4.3.2 LifeCheck ............................................................................................................ 19
                   4.3.2.1     LifeCheck as a time alarm ............................................................... 20
                   4.3.2.2     LifeCheck in case of connection loss ............................................... 20
     4.4     Map.................................................................................................................................. 20
             4.4.1 Beacon location tracking .................................................................................... 21
                      4.4.1.1           iBeacon position transmitter............................................................. 21
             4.4.2 Beacon viewer .................................................................................................... 21
                      4.4.2.1           iBeacons and building plans ............................................................ 22
     4.5     Alarm display / open emergency calls ............................................................................. 22
             4.5.1 Alarm display ...................................................................................................... 22
                    4.5.1.1     Position type/alarm location ............................................................. 22
                    4.5.1.2     Alarm status ..................................................................................... 23
                    4.5.1.3     Show own alarms ............................................................................. 23
             4.5.2 Emergency call handling .................................................................................... 23

                                                                Page 3 of 46
SOS Mobile Instruction Manual

                          4.5.2.1    Emergency call process ................................................................... 23
                          4.5.2.2    Localization ...................................................................................... 24
                          4.5.2.3    Emergency call details ..................................................................... 24
              4.5.3       Reading the rescue plan .................................................................................... 25
              4.5.4       Sending the log entry ......................................................................................... 25
              4.5.5       Closing the emergency call ................................................................................ 26

5.   Settings .................................................................................................................... 26
     5.1      Overview of application settings ...................................................................................... 26
              5.1.1 Restricted user administration ............................................................................ 27
              5.1.2 Master configuration ........................................................................................... 27
     5.2      Profile .............................................................................................................................. 27
              5.2.1 Cloud synchronisation ........................................................................................ 28
     5.3      Location tracking ............................................................................................................. 28
              5.3.1 GPS tracking settings ......................................................................................... 29
              5.3.2 Beacon tracking settings .................................................................................... 30
              5.3.3 Beacon tracking planning ................................................................................... 30
                      5.3.3.1      Beacon mode: Room vs. Gate ......................................................... 31
     5.4      MANDOWN Settings ....................................................................................................... 32
              5.4.1 Sensitivity ........................................................................................................... 32
              5.4.2 Mandown detection Rest position ...................................................................... 33
                    5.4.2.1      Charging in combination with Mandown detection .......................... 33
                    5.4.2.2      Rest position settings ....................................................................... 33
     5.5      LifeCheck settings ........................................................................................................... 34
              5.5.1 Last known position for LifeCheck ...................................................................... 35
     5.6      Alerting settings ............................................................................................................... 35
              5.6.1 Automatic voice calls .......................................................................................... 36
     5.7      Connectivity settings ....................................................................................................... 36
              5.7.1 Product package selection ................................................................................. 37
                    5.7.1.1       Protected product package .............................................................. 38
                    5.7.1.2       Connected product package ............................................................ 38
                    5.7.1.3       BGR-139 product package .............................................................. 38
              5.7.2 Selecting app modes .......................................................................................... 38
                    5.7.2.1       Standard........................................................................................... 39
                    5.7.2.2       Manual ............................................................................................. 39
                    5.7.2.3       Always Active ................................................................................... 39
                    5.7.2.4       Beacon Control ................................................................................ 39
                    5.7.2.5       Temporarily Inactive ......................................................................... 39
                    5.7.2.6       Inactive ............................................................................................. 39
     5.8      BGR-139 function test ..................................................................................................... 40
              5.8.1 Performing a function test .................................................................................. 40
     5.9      SOS Button settings ........................................................................................................ 41
              5.9.1 Automatic connection after app start .................................................................. 41
     5.10 Alarm View settings ......................................................................................................... 42
     5.11 Autostart settings ............................................................................................................. 42

6.   Group function (option) ............................................................................................. 43

                                                                 Page 4 of 46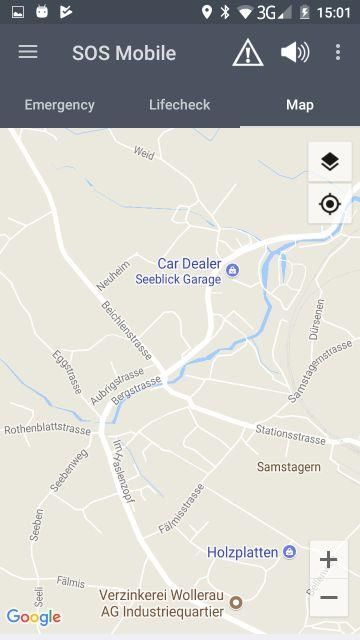
SOS Mobile Instruction Manual

7.    About us ................................................................................................................... 44

8.    Quit .......................................................................................................................... 44
      8.1       Quit SOS Mobile .............................................................................................................. 44
      8.2       Stop SOS Mobile ............................................................................................................. 45

9.    Terms of use ............................................................................................................ 45
      9.1       General recommendations and important information .................................................... 45
      9.2       Terms of use ................................................................................................................... 46
      9.3       Liability............................................................................................................................. 46
      9.4       Applicable law and place of jurisdiction ........................................................................... 46

List of illustrations
Illustration 1: Google Play App Store ................................................................................................. 7
Illustration 2: SOS Mobile app registration ......................................................................................... 8
Illustration 3: The main display of the SOS Mobile app in demo mode ............................................. 9
Illustration 4: Side menu display ...................................................................................................... 10
Illustration 5: Test emergency call icon ............................................................................................ 10
Illustration 6: App mode icon ............................................................................................................ 11
Illustration 7: Speaker icon ............................................................................................................... 11
Illustration 8: Status overview in Inactive mode ............................................................................... 12
Illustration 9: Status overview in Active mode .................................................................................. 12
Illustration 10: Making a test emergency call ................................................................................... 15
Illustration 11: Activating a manual emergency call ......................................................................... 16
Illustration 12: Cancelling a manual emergency call ........................................................................ 16
Illustration 13: LifeCheck automatic emergency call ........................................................................ 19
Illustration 14: Map display of GPS location tracking ....................................................................... 20
Illustration 15: Beacon viewer display .............................................................................................. 21
Illustration 16: View of the alarm display with feedback ................................................................... 22
Illustration 17: Emergency call process handling ............................................................................. 23
Illustration 18: Emergency call processing with display of position data ......................................... 24
Illustration 19: Emergency call processing with display of detailed information .............................. 24
Illustration 20: Emergency call processing - Read rescue plan ....................................................... 25
Illustration 21: Emergency call processing - Write log entry ............................................................ 25
Illustration 22: Emergency call processing - Completing emergency call processing ..................... 26
Illustration 23: Overview of application settings ............................................................................... 26

                                                                   Page 5 of 46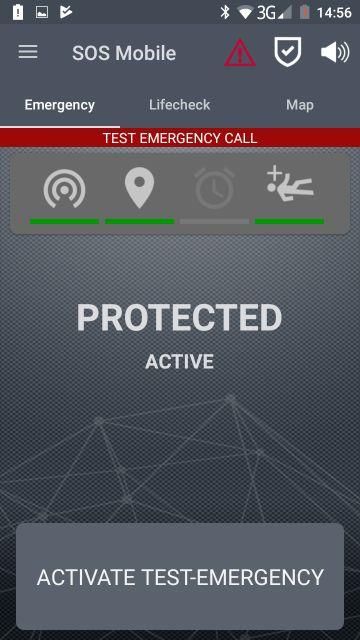
SOS Mobile Instruction Manual

Illustration 24: restricted user administration ................................................................................... 27
Illustration 25: User profile settings .................................................................................................. 27
Illustration 26: Save and restore a configuration .............................................................................. 28
Illustration 27: Location tracking settings ......................................................................................... 28
Illustration 28: GPS tracking settings ............................................................................................... 29
Illustration 29: Beacon tracking settings........................................................................................... 30
Illustration 30: Beacon mode: Room ................................................................................................ 31
Illustration 31: Beacon mode: Gate .................................................................................................. 31
Illustration 32: Mandown detection settings ..................................................................................... 32
Illustration 33: Mandown detection sensitivity settings .................................................................... 32
Illustration 34: Activation of Mandown detection with Rest position ................................................ 33
Illustration 35: Mandown detection during charging ......................................................................... 33
Illustration 36: Mandown detection Rest position settings ............................................................... 34
Illustration 37: LifeCheck settings in case of disconnection ............................................................. 34
Illustration 38: Alarm settings ........................................................................................................... 35
Illustration 39: Connectivity settings ................................................................................................. 36
Illustration 40: Timeline during a connection interruption................................................................. 37
Illustration 41: BGR-139 product package ....................................................................................... 38
Illustration 42: App modes symbol ................................................................................................... 38
Illustration 43: FT-Pending ............................................................................................................... 40
Illustration 44: Performing a FT ........................................................................................................ 40
Illustration 45: SOS Button settings ................................................................................................. 41
Illustration 46: Alarm view settings ................................................................................................... 42
Illustration 47: Autostart settings ...................................................................................................... 42
Illustration 48: Group size settings ................................................................................................... 43
Illustration 49: About SOS Mobile .................................................................................................... 44
Illustration 50: Exit SOS Mobile ........................................................................................................ 44
Illustration 51: Stopped SOS Mobile ................................................................................................ 45

                                                               Page 6 of 46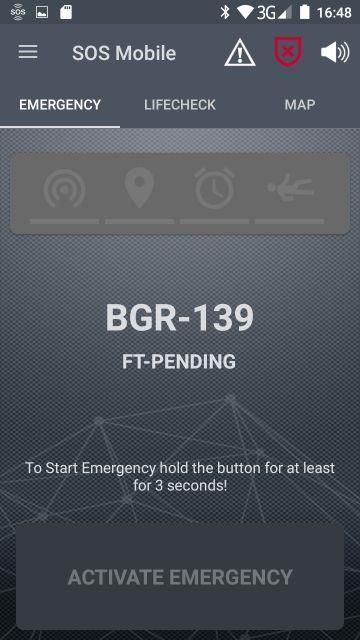
SOS Mobile Instruction Manual

1.        Introduction
The emergency call application SOS Mobile allows for lone working in dangerous workplaces, as
the application can independently send an emergency call (including positional data) in dangerous
situations. Moreover, there is an audible alarm feature which makes it easier to find the affected
person. If the latter is still able to act, he or she can also trigger an emergency call by pressing the
emergency signal button. If the emergency call is not accepted, the situation can be escalated up
to the point of initiating assistance measures. With the help of GPS and Beacons in-house and
outdoor localization is possible.

1.1       Please read this first
Read through this manual first before using the SOS Mobile App in order to ensure the safe and
proper use of the SOS Mobile application.
    • The images in this user guide are based on the RG730 model.
    • Depending on the manufacturer (e.g. Apple) and the mobile device model on which the
        SOS Mobile app is installed, some functions and illustrations may not be displayed and
        deployed as described in this user guide.
    • All functions are based on the standard settings of the device. If the settings and permis-
        sions recommended by the SOS Mobile app are not assumed, some functions (such as lo-
        cation tracking and automatic calls) cannot be guaranteed.

2.        Installation and registration
The 'SOS Mobile' app is available for download in app stores under the search term 'SOS Mobile'
in English and German.

The app is available for free-of-charge download for both iPhone (iTunes App Store) and Android
(Google Play App-Store) smartphones.

                                Illustration 1: Google Play App Store

                                              Page 7 of 46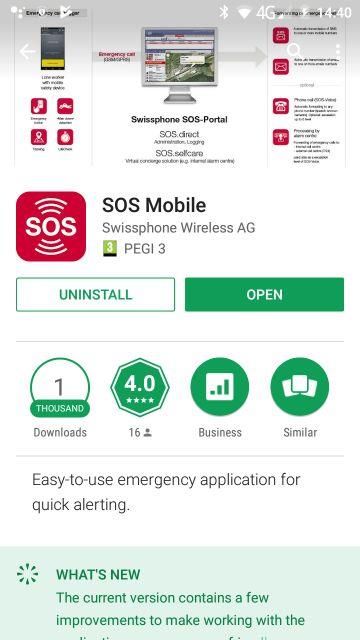
SOS Mobile Instruction Manual

2.1      Registration
After the SOS Mobile App has been installed and started, the user will be prompted to register the
app. The registration is necessary to connect the application to the corresponding SOS Portal
server in the desired region (country). The assignment to the desired SOS Portal can be adjusted
subsequently in the app profile settings at any time.

                                                 •   First name Enter your first name.

                                                 •   Last name Enter your surname.

                                                 •   Organisation Enter your company name.

                                                 •   Email Enter a valid email address.

                                                 •   Mobile Enter your mobile number. This automati-
                                                     cally gives you up-to-date information about your
                                                     emergency calls.

                                                 •   Country Select the desired country in which you
                                                     would like to use the SOS Mobile app.

                            Illustration 2: SOS Mobile app registration

Once you have entered all the information, press the REGISTRATION button. The SOS Mobile
app then automatically connects to the corresponding SOS Portal. The app is now automatically
operational in demo mode.

            Note: The registration data is used for internal statistical
            purposes as well as for the technical administration of the
            SOS Mobile app. Your personal data will not be trans-
            ferred to third parties.

                                            Page 8 of 46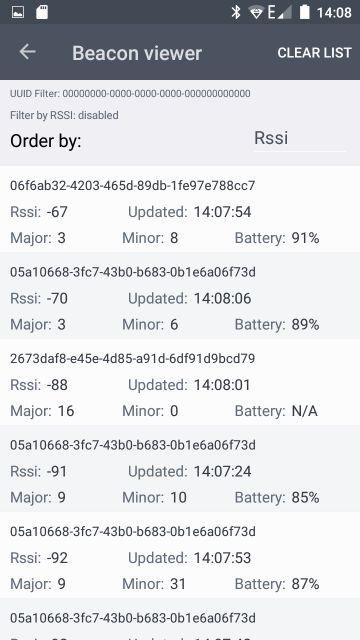
SOS Mobile Instruction Manual

3.         Overview of the main display
The main display of the SOS Mobile app is divided into three sections. The menus can be changed
by swiping or selected by clicking on the corresponding menus.

                                                 •    EMERGENCY CALL The emergency call
                                                      menu always shows all the functions and the
                                                      most important settings at a glance.

                                                 •    LIFECHECK The LifeCheck menu is required
                                                      for setting up the LifeCheck (time alarm) inter-
                                                      val and for enabling LifeCheck monitoring.

                                                 •    MAP Your current location is displayed in the
                                                      map menu at all times. Note: Positional data is
                                                      relayed by the app to the server only in case
                                                      of an emergency.

                                                 •    ACTIVATING AN EMERGENCY CALL By
                                                      pressing the emergency call button, you can
                                                      activate a manual emergency call at any time
                                                      and transfer it to the SOS Portal for further
                                                      processing.

                Illustration 3: The main display of the SOS Mobile app in demo mode

3.1        Demo version (Limited Edition)
The app will be in demo mode once you have successfully registered your app. Most of the app
functions are unlocked in demo mode and can be tested. However, indoor positioning based on
iBeacons, for example, is not available.

Contact our customer service if you would like to try out the full functionality of the SOS Mobile app
and gain access to the SOS Portal (WEB Portal). We will be happy to provide you with a free trial
account for a three-month testing period.

     Additional information on the SOS Portal can also be found on our website.
     https://www.swissphone.com/ch/product/notrufsystem-alleinarbeiter/

     Hotline: +41 848 88 99 99 / Email: info@swissphone.com

                                             Page 9 of 46
SOS Mobile Instruction Manual

3.2      The side menu
Touch the ≡ icon to display the side menu.

                                                  •    HOME The Home menu always brings you
                                                       back to the main screen.

                                                  •    SETTINGS The Settings menu opens an
                                                       overview with all available app settings.

                                                  •    ABOUT The About menu opens a window
                                                       with current information about the SOS Mobile
                                                       App.

                                                  •    QUIT The Quit menu allows you to fully exit
                                                       the app.

                                  Illustration 4: Side menu display

See Chapter 5 Settings for a detailed description of all the app settings options.

3.3      Test emergency call icon
Touch the test emergency call icon in order to temporarily change to the test mode and to issue a
test emergency call. Test emergency calls can be used to check the emergency call chain without
alerting emergency services.

                               Illustration 5: Test emergency call icon

             Note: A test emergency call should be carried out at
             regular intervals in order to be able to guarantee a stable
             and cohesive emergency call chain of the entire Swis-
             sphone emergency call system.

                                             Page 10 of 46
SOS Mobile Instruction Manual
3.4 App mode icon
Tap on the app mode icon in order to switch between the different app modes. The available app
modes are dependent on the current app configuration. The configuration of the app modes is done
in Settings – Connectivity. (see chapter 5.7.2 Selecting app modes for details)
Illustration 6: App mode icon
3.5 Speaker icon
Illustration 7: Speaker icon
The speaker icon has different states:
State Android iOS Note
Alarm and pre-alarm Deactivate by pressing this icon
hearable
Alarm and pro-alarm Deactivate by pressing this icon
mute
System volume level 0 = With volume control at Android
loudness 0 media playback level
Soundless mode Menu «Settings – Alerting» op-
tion «soundless mode»
Tap on the speaker icon in order to temporarily mute the volume of the smartphone. This will pre-
vent notifications and alarm sounds from being played.
The behaviour of the different system volumes (volume-button, media playback level) is described
in the chapters 4.2.1 and 4.2.2 Manual emergency calls.
If you wish to mute the volume permanently, switch to the Settings – Alerting menu and enable the
silent mode option. (see chapter 5.6 Alerting settings)
Note: In the mute or the soundless mode is the
acoustic localization deactivated.
3.6 Status overview
The status overview in the Emergency Call (HOME) tab provides an overview of the available
emergency services (Emergency call button, Mandown detection and LifeCheck) as well as the
different location tracking variants (GPS location tracking and beacon location tracking).
Page 11 of 46SOS Mobile Instruction Manual
3.6.1 INACTIVE mode
All services are disabled in 'INACTIVE' mode. The status icons are greyed out accordingly. The
meaning of the status icons is described in the following sub-chapters.
Illustration 8: Status overview in Inactive mode
3.6.2 ACTIVE mode
In 'ACTIVE' mode, either single or all services and location tracking options are enabled, depend-
ing on the selected settings. Icons are underlined in green for the enabled services. Services un-
derlined in red are primarily enabled, but temporarily unavailable (due to an error, for example).
Illustration 9: Status overview in Active mode
Current status information on the corresponding function will be temporarily displayed by clicking
on the icons.
3.6.3 Status icons
The status overview contains four different status icons for displaying current status information
(there are five with the SOS Button option enabled). In addition to the various icons, additional sta-
tus information is displayed with a coloured line beneath the icon.
3.6.3.1 Beacon tracking
The beacon tracking icon signals the current status of the indoor position-
ing. If beacon tracking is disabled, the icon is greyed out. If beacon location
tracking is enabled, the icon is activated and underlined with a green line.
Current status information (snapshot) will be temporarily displayed by clicking on the beacon icon.
The corresponding icon must be clicked on again in order to update the status information.
Status information:
Beacon tracking: On / Off
Major.Minor: Beacon ID
RSSI: Signal strength of the beacon signal
Actualized: Timestamp of the last beacon identifier
Page 12 of 46SOS Mobile Instruction Manual
3.6.3.2 GPS tracking
The GPS tracking icon signals the current status of the outdoor positioning. If
GPS tracking is disabled, the icon is greyed out. If GPS location tracking is
enabled, the icon is activated and underlined with a green line. If the location
permission has been disabled by the user, the corresponding GPS icon will
be underlined with a red line.
The 'Permanent' option can be enabled as an additional function. This func-
tion is depicted by a corresponding icon. In the case of permanent location
tracking, regular positional data is recorded using predefined intervals. This
information can be referred to in the case of an emergency call without valid
positioning.
The 'GPS Accuracy' option can be enabled as an additional func-
tion. This function is also depicted by a corresponding icon. If the
location accuracy information does not match the predefined accu-
racy, the corresponding GPS icon will be underlined with an or-
ange line.
The 'GPS Accuracy' icon is displayed if the 'Permanent' option
and 'GPS Accuracy' are enabled at the same time.
Current status information (snapshot) on GPS tracking will be temporarily
displayed by clicking on the GPS icon. The corresponding icon must be
clicked on again in order to update the status information.
Status information:
GPS Localization: On / Off
Location: During the emergency call
GPS accuracy: On (xx m) / Off
Actualized: Timestamp of the last GPS identifier
3.6.3.3 Lifecheck
The Lifecheck icon signals the current status of the Lifecheck monitoring. If
Lifecheck is disabled, the icon is greyed out. If Lifecheck is enabled, the icon
is activated and underlined with a green line.
The 'Lifecheck on Disconnection' option can be enabled as an additional
function. This function is also depicted by a corresponding icon.
Current status information (snapshot) on Lifecheck will be temporarily dis-
played by clicking on the Lifecheck icon. The corresponding icon must be
clicked on again in order to update the status information.
Status information:
Lifecheck: On / Off
Remaining: Duration until the end of the Lifecheck
Page 13 of 46SOS Mobile Instruction Manual
3.6.3.4 Mandown detection
The Mandown Detection icon indicates the current status of the Mandown
identification. If Mandown detection is disabled, the icon is greyed out. If
Mandown detection is enabled, the icon is activated and underlined with a
green line. If Mandown detection is temporarily disabled (e.g. in the charging
unit), the corresponding Mandown icon will be underlined with a red line.
The 'Rest position' option can be enabled as an additional function. This
function is also depicted by a corresponding icon.
Current status information (snapshot) on Mandown detection will be tempo-
rarily displayed by clicking on the Mandown icon. The corresponding icon
must be clicked on again in order to update the status information.
Status information:
Mandown: On / off
Rest position: On / off
Deviation: Small / Mean / High
Sensitivity: High / Medium / Low
3.6.3.5 SOS Button
The SOS Button icon indicates the current status of the detached Bluetooth
SOS Button. (Not to be confused with the integrated emergency call button
on some smartphones like ecom or isafe-Mobile); it is only displayed if the
corresponding option is enabled. As soon as an SOS Button is connected
(coupled) to the smartphone, the icon will be underlined with a green line.
If the SOS Button is temporarily still not re-connected to the smartphone
(e.g. after restarting the smartphone), the corresponding SOS Button icon
will be underlined with a red line.
Current status information (snapshot) on the SOS Button will be temporarily
displayed by clicking on the SOS Button icon. The corresponding icon must
be clicked on again in order to update the status information.
Status information:
SOS Button: Connected / Disconnected
SOS Button address: Button address:
4. Emergency call variants
The SOS Mobile App has integrated all essential emergency call functions, and thus it not only
makes it possible to trigger a manual emergency call via a button but also a so-called automatic
alarm. An automatic personal alarm occurs automatically when an employee is no longer able to
issue an alarm independently due to an accident. A distinction is made between a mandown, non-
movement and time alarm.
Page 14 of 46SOS Mobile Instruction Manual
4.1 Making a test emergency call
If you press the test emergency alarm icon once,
the colour will change to red. A test emergency call
can be made as long as the icon appears in red.
You can quit the test mode by pressing on the icon
again. The icon thus changes colour to white again.
If you forget to quit the test mode again, the system automatically switches back to the standard
mode after approx. 30 seconds.
• MAKING A TEST EMERGENCY CALL Press
the manual emergency call button in the main
menu of the SOS Mobile application or, if
available, the dedicated emergency call button
on your smartphone in order to make a TEST
emergency call.
•
In contrast to a real emergency call,
1) there will be no subsequent location track-
ing initiated during the test emergency call.
2) transmission to the SOS Portal will not be
repeated if there is no internet connection dur-
ing the test emergency call.
Illustration 10: Making a test emergency call
A TEST Emergency call is a one-time and — after its implementation — completed activity. Ac-
cordingly, a test emergency call can be neither cancelled nor stopped.
4.2 Manual emergency calls
To issue a manual alarm, the user must press the emergency call button. Some devices have a
dedicated emergency call button (e.g. a red button) for this purpose, which triggers an emergency
call. To protect against accidental triggering, the manual emergency call function is safeguarded by
a three second pre-alarm. This means that the button must be held for at least three seconds. An
audible signal (beeping sound) rings out during the pre-alarm.
Page 15 of 46SOS Mobile Instruction Manual
• ACTIVATING A TEST EMERGENCY CALL
Press the manual emergency call button in the
main menu of the SOS Mobile application or, if
available, the dedicated emergency call button
on your smartphone.
Illustration 11: Activating a manual emergency call
• EMERGENCY CALL Duration After an
emergency call has been activated, continu-
ously-updated status information about the
current emergency call (such as the start time
and duration) will be displayed in the viewer
window.
• STOP AN EMERGENCY CALL Similarly, you
can stop an active emergency call by pressing
on the emergency call button.
Illustration 12: Cancelling a manual emergency call
Note: A dedicated emergency call button is available, for
example, on smartphones from the company ecom (Pep-
perl+Fuchs) or ISAFE Mobile. (ATEX versions are also
available.)
4.2.1 Audio output during pre-alarm
To avoid an alarm, the pre-alarm will be hearable on the headphone, if a headphone is connected,
except the loudness is set to 0 ( ). The soundless or the mute-mode deactivates the pre-alarm
(see chapter 3.5 Speaker icon).
Pre-alarm
Connected Without headphone Headphone (Jack + BLE)
iSafe IS520.x
(Android 7.1.2) Loudspeaker: pre-alarm at full
(SOS Mobile App volume. Volume setting 0 is Only headphone with preset
2.6.3.3016) overridden. volume.
iPhone 6
(iOS 12.2) Loudspeaker: pre-alarm at full
(SOS Mobile App volume. Volume setting 0 is Only headphone with preset
2.6.3.3016) overridden. volume.
Page 16 of 46SOS Mobile Instruction Manual
The audio output of the pre-alarm with a telephone call at the same time is the following:
Telephone call and pre-alarm
Connected Without headphone Headphone (Jack + BLE)
iSafe IS520.x
(Android 7.1.2)
(SOS Mobile App Pre-Alarm on maximum volume Pre-alarm on media-volume on
2.6.3.3016) in the earpiece. the headphone.
iPhone 6
(iOS 12.2)
(SOS Mobile App Pre-alarm on reduced media- Pre-alarm on media-volume on
2.6.3.3016) volume in the earpiece. the headphone.
The audio output of the pre-alarm with simultaneous music operation is the following:
Music playback and pre-alarm
Connected Without headphone Headphone (Jack + BLE)
iSafe IS520.x
(Android 7.1.2) Music and pre-alarm on prede-
(SOS Mobile App Loudspeaker: Music and pre- fined volume only on the head-
2.6.3.3016) alarm on maximum volume. phone.
iPhone 6
(iOS 12.2) Loudspeaker: pre-alarm on Only headphone with prede-
(SOS Mobile App maximum volume, music play- fined volume.
2.6.3.3016) back stopped. Music playback stopped.
The requirement for the music playback is that the player software can play the music also in the
background. These readings to the audio output and the pre-alarms are just for information and
have no specific character.
On Android, the loudness-symbol has no effect to the music playback. The mute function ( ) has
no effect to the music playback (see chapter 3.5 Speaker icon).
4.2.2 Audio output during alarm
The alarm will be hearable on the loudspeaker to offer an acoustic localization. If there is no other
declaration, the alarm-volume is adjustable by the volume-buttons (media-volume). The soundless
or the mute-mode deactivates the pre-alarm (see chapter 3.5 Speaker icon).
Alarm
Connected Without headphone Headphone (Jack + BLE)
iSafe IS520.x Only loudspeaker: Alarm on
(Android 7.1.2) maximum volume.
(SOS Mobile App Loudspeaker: Alarm on maxi- Volume not adjustable with vol-
2.6.3.3016) mum volume. ume-buttons.
iPhone 6
(iOS 12.2)
(SOS Mobile App Loudspeaker: Alarm on maxi- Only loudspeaker: Alarm on
2.6.3.3016) mum volume. maximum volume.
Page 17 of 46SOS Mobile Instruction Manual
The audio output of an alarm with a simulating telephone call is the following:
Telephone call and alarm
Connected Without headphone Headphone (Jack + BLE)
iSafe IS520.x
(Android 7.1.2)
(SOS Mobile App Alarm in maximum volume in Alarm in maximum volume in
2.6.3.3016) the earpiece. the earpiece.
Alarm in reduced media-volume
iPhone 6 in the earpiece. When cancel- Alarm in reduced media-
(iOS 12.2) ing the phone call, alarm on volume in the earpiece. When
(SOS Mobile App loudspeaker on maximum vol- canceling the phone call,
2.6.3.3016) ume. alarm on the loudspeaker.
The audio output of an alarm with a simulating music playback is the following:
Music playback and alarm
Connected Without headphone Headphone (Jack + BLE)
iSafe IS520.x
(Android 7.1.2)
(SOS Mobile App Loudspeaker: Alarm and music Only loudspeaker: Alarm and
2.6.3.3016) on maximum volume. music on maximum volume.
iPhone 6
(iOS 12.2) Loudspeaker: Alarm on maxi- Only loudspeaker: Alarm on
(SOS Mobile App mum volume. Music playback maximum volume. Music
2.6.3.3016) stopped. playback stopped.
The requirement for the music playback is that the player software can play the music also in the
background. These readings to the audio output and the alarms are just for information and have
no specific character.
On Android, the loudness-symbol has no effect to the music playback. The mute function ( ) has
no effect to the music playback (see chapter 3.5 Speaker icon).
4.3 Automatic emergency calls
An automatic alarm will be set off automatically by the SOS Mobile app after a predetermined peri-
od of time. This is carried out either through the Mandown detection or the time alarm (LifeCheck)
functions. To protect against accidental triggering, the automatic emergency call function is also
safeguarded with a pre-alarm. The user can cancel the alarm from setting off at any time during the
pre-alarm. This is done either by pressing the Cancel Emergency Call button, or by gently shaking
the smartphone in case of a Mandown alarm.
4.3.1 Mandown detection
The Mandown detection in the SOS Mobile application is either a typical non-movement alarm, or a
combination of a non-movement alarm and a mandown alarm. For detailed settings options, see
Chapter 5.4 MANDOWN Settings.
Page 18 of 46SOS Mobile Instruction Manual
4.3.1.1 Mandown detection non-movement alarm
By definition, Mandown detection (a non-movement alarm) is triggered after a predetermined peri-
od of time in case the device (the smartphone) is immobile. In order to prevent false alarms, an
audible pre-alarm always sounds before an alarm is triggered. This gives the user the option of
cancelling the alarm before it is sent to the SOS Portal.
4.3.1.2 Mandown detection with enabled Rest position
A Rest position is a position area of the device which is exempt from Mandown detection. This can
be used to bring the device, e.g. during a break or a session, into a position range (Rest position)
without triggering an alarm. In this respect, the user can define any position as a Rest position and,
at the same time, set a tolerance range as to how large the deviation may be from the resting posi-
tion. (See also Chapter 5.4.2)
This means: the conditions for a non-movement alarm (immobility) as well as the conditions for a
mandown alarm (specific location) must be met in order to trigger a Mandown alarm with an ena-
bled Rest position. The alarm is issued after the end of the pre-alarm only if both criteria occur sim-
ultaneously at a certain time.
4.3.2 LifeCheck
Another variant of an automatic emergency call is the LifeCheck feature. After a preselected period
of time (countdown), the LifeCheck emergency call is enabled automatically if the user does not
renew the time alarm in advance (Reset LifeCheck) or stop the LifeCheck monitoring.
• LifeCheck Duration With LifeCheck monitor-
ing (time alarm), the user can choose a period
of time from a selection of predefined time in-
tervals.
• START LIFECHECK The user must press the
START LifeCheck button in order to enable
LifeCheck. This will start the countdown.
Illustration 13: LifeCheck automatic emergency call
The activation of a LifeCheck (START LIFECHECK) is always transmitted automatically to the SOS
Portal. The countdown on the SOS Portal is synchronised with the time alarm on the device. Before
the countdown ends, a pre-alarm sounds at several intervals (5 min, 3 min, 1 min and 30 sec).
Unless the LifeCheck monitor is stopped or restarted before the end of the countdown, an emer-
gency call is made automatically. The emergency call sound (siren) is also played alongside the
activation of the emergency call.
Page 19 of 46SOS Mobile Instruction Manual
4.3.2.1 LifeCheck as a time alarm
By definition, a time alarm is set off automatically in the absence of confirmation (acknowledge-
ment) by the user after a given time.
4.3.2.2 LifeCheck in case of connection loss
A particular LifeCheck feature is the variant 'LifeCheck in case of disconnection'. In order to acti-
vate this version of LifeCheck, the corresponding option must be enabled in the settings. (See
Chapter 5.5 LifeCheck settings.)
LifeCheck monitoring commences as soon as the user lingers in an area without internet connec-
tion for a longer period of time (longer than approx. 3 minutes). In such a case, LifeCheck monitor-
ing is then automatically started on the SOS Portal as well.
Note: The failure of the Internet connection in the device
(based on the status messages) is also recognised au-
tomatically on the SOS Portal, and a LifeCheck with the
same time duration is started synchronously.
4.4 Map
The user is always shown his/her current position in the map menu. This allows the user to check
at any time whether his/her current location is in the reception range of the GPS satellites, so that
the exact position can be transmitted in case of an emergency.
• Click on the map icon to select from
among the different map types, e.g. the
standard map (Google Maps) or
OpenRailwayMap (based on Open-
StreetMap).
• Map layer Various map layers are avail-
able. For the standard map (Google
Maps), this includes: street, satellite and
hybrid.
• Centering To centre the map view on
the current location at any time, click on
the corresponding icon.
Illustration 14: Map display of GPS location tracking
Note: In case of a real emergency event, the GPS location track-
ing is the basis for quickly locating the person affected by the ac-
cident. However, pinpoint positioning is often only possible out-
side of buildings, within the field of view of GPS satellites.
Page 20 of 46SOS Mobile Instruction Manual
4.4.1 Beacon location tracking
Beacon location tracking offers another possibility for (indoor) location tracking. In order to use the
possibilities of beacon location tracking, the corresponding option must be enabled in the settings
(see Chapter 5.3.2 Beacon tracking settings). Indoor beacon location tracking is based on iBeacon
(BLE) technology.
4.4.1.1 iBeacon position transmitter
The 'iBeacon' functional principle can be described as follows. (Source: Wikipedia)
Definition: The iBeacon functional principle is based on a transmitter/receiver principle. For
this purpose, small transmitters (beacons) are placed in the room as signal generators, and
they send signals at fixed time intervals. If a receiver (e.g. a smartphone with an installed
mobile app which is configured to receive iBeacon signals) comes within the range of a
transmitter, the Universally Unique Identifier (UUID) as well as the major and minor values of
the transmitter can be identified and its signal strength can be measured.
4.4.2 Beacon viewer
Click on the menu button ≡ (top right) on the Map tab to display the beacon viewer.
The beacon viewer automatically displays all iBeacon position transmitters located within the re-
ception range of the smartphone. A position transmitter can be classified based on its identification
number (major-minor value). Additionally, iBeacons can also be identified by their UUID.
• UUID The UUID in iBeacon location tracking
can be used to filter the display. For example,
the UUID can represent your company. That
is, only iBeacons with the same UUID are tak-
en into consideration in the location tracking.
A UUID of 000000.0000... is used as a wild-
card ID (no filter function).
• Major.minor The major-minor distinction is
used primarily for the unambiguous classifica-
tion of various locations (floors, rooms, tun-
nels, etc.).
• RSSI The distance to the iBeacon can be cal-
culated based on the RSSI value.
• Battery Based on the battery charge, the
maintenance of the iBeacons can be opti-
mised and controlled through appropriate
monitoring (SOS Portal).
Illustration 15: Beacon viewer display
Page 21 of 46SOS Mobile Instruction Manual
4.4.2.1 iBeacons and building plans
A unique location can be assigned to each iBeacon (based on major-minor assignment) in combi-
nation with the SOS Portal. Moreover, the user can assign any building plan to each location (iBea-
con) in the form of a PDF or image file. In case of an emergency call, the location information
(building plans, description) is automatically displayed alongside this additional information.
In addition, each location (beacon position) can also be referenced with a static GPS position. This
ensures accurate GPS location tracking of beacon positions at all times.
4.5 Alarm display / open emergency calls
The 'Alarms' menu is an optional tab and is only displayed if the corresponding function is enabled
(See 5.10 Alarm View settings). The current alarms (emergency calls) are shown on this display.
This display allows the user to perform mobile alarm processing. This gives the user the opportuni-
ty to acquire new alarms, to read rescue plans, to log alarms and to shut them down again after-
wards.
4.5.1 Alarm display
All pending alarms are displayed in the list on the alarms main menu. Information about the alarm
location, the alarm status and the personal details of the person affected by the accident are dis-
played in the alarm overview.
• ALARMS In the 'ALARMS' view, all emergen-
cy calls of the assigned organisation are dis-
played in a list. You can switch over to a de-
tailed view by clicking on the alarm.
• Alarm status (Open / Processing)
• Position type Display of the current position
type (Indoor / Outdoor).
• Alarm location Display of the addressable
location associated with a GPS location: e.g.
Fälmisstrasse 21, 8833 Samstagern, Switzer-
land. The name of the beacon position is dis-
played here in the case of an indoor position.
• Max Muster First name / last name
• Own Alarms Own Alarms are indicated with a
corresponding profile Icon.
Illustration 16: View of the alarm display with feedback
4.5.1.1 Position type/alarm location
The alarm location is indicated by a corresponding icon
(indoor/outdoor). The corresponding beacon description
is displayed for indoor (beacon) positions.
In case of outdoor (GPS) positions, the 'Next Addressa-
ble Location' is displayed instead of the coordinates for
better readability.
Page 22 of 46SOS Mobile Instruction Manual
4.5.1.2 Alarm status
The alarm status icon actively shows whether or not the current
alarm has been issued with assistance, or whether the emer-
gency call is already in progress.
As long as an emergency call has the status of being pro-
cessed, the rescue plan can be read and additional log entries
can be made.
4.5.1.3 Show own alarms
If the option “Show own Alarms” is enabled, the user can also
see alarms created by his own device.
4.5.2 Emergency call handling
By clicking on a current emergency call from the alarm list, additional information on the emergency
call is displayed. The “Emergency details” dialog is divided into two areas. The "Emergency call
processing" is shown in the upper part of the display and the detailed "Emergency call information"
in the lower part.
The next chapters describing the handling process of “accept emergency”, “review rescue
plan”, “send protocol”, “close emergency”. Depending on the configuration of the sos por-
tal, these steps are not available.
4.5.2.1 Emergency call process
A pre-defined emergency call process allows the user to clearly follow the various emergency call
process stages.
• EMERGENCY PROCESS Emergency
call processing handling from emergency
call "Accept" until emergency call "Close.
Illustration 17: Emergency call process handling
Page 23 of 46SOS Mobile Instruction Manual
4.5.2.2 Localization
All available position information is displayed in the "Localization" menu.
• Show all locations. This option enables the
display of all location data (including repeated
localizations) on the map. The automatic post-
localization updates this information with the
current position information during an emer-
gency call.
• All positions / Only beacon positions This
option allows the user to display only the bea-
con positions. All GPS based positions are
hidden.
• Positions Displays the list of all position data
with date and time stamp.
Illustration 18: Emergency call processing with display of position data
4.5.2.3 Emergency call details
In the "Details" menu, additional information regarding the current emergency call is displayed.
• Emergency call In this section you will find
the most important information (Event type,
Name of the person and Event timestamp)
about the present event.
• Protocol The current log information is always
displayed in this area.
Illustration 19: Emergency call processing with display of detailed information
Page 24 of 46SOS Mobile Instruction Manual
4.5.3 Reading the rescue plan
The stored rescue plan can be displayed once an emergency call has been accepted.
Illustration 20: Emergency call processing - Read rescue plan
By storing the rescue plans, the SOS-Administrator should take care of the display on
smartphones. Recommendable is to use an adequate script-size and to reduce the Infor-
mation to the needed basics.
4.5.4 Sending the log entry
Log entries can be written down once the rescue plan has been read.
Illustration 21: Emergency call processing - Write log entry
Page 25 of 46SOS Mobile Instruction Manual
4.5.5 Closing the emergency call
The rescue plan can also be opened again at any time or, respectively, additional log entries can
be written down. To complete the emergency call, at least one log entry must be written.
Illustration 22: Emergency call processing - Completing emergency call processing
5. Settings
5.1 Overview of application settings
You will find an overview of all possible application settings in the side menu settings.
• PROFILE Settings for the user profile can be
adjusted via the profile menu.
• LOCATION Settings for GPS and beacon lo-
cation tracking can be adjusted via the loca-
tion tracking menu.
• MANDOWN The configuration for mandown
detection can be adjusted via the Mandown
menu.
• LIFECHECK Additional LifeCheck options can
be enabled via the LifeCheck menu.
• ALERTING Various settings regarding alarm-
ing in case of an emergency call event.
• CONNECTIVITY All settings regarding the
app mode and connection parameters.
• SOS BUTTON Settings for the connection of
an SOS Button (BLE) to activate the emer-
gency call button.
• ALARM VIEW Alarm view display settings
(Optional Menu)
• AUTOSTART Settings for Autostart (Only
supported for Android)
Illustration 23: Overview of application settings
Page 26 of 46SOS Mobile Instruction Manual
5.1.1 Restricted user administration
A special feature of the configuration settings is the 'Restricted User Administration' option. If this
option is enabled, the user can no longer change the local settings. The option can only be enabled
in the SOS Portal.
5.1.2 Master configuration
Another variant of the configuration settings is Master Configuration. This function is only possible
in combination with the restricted user administration and is likewise controlled by the SOS Portal.
An individual configuration set of an employee can be preselected as a master configuration for this
purpose, and automatically distributed to all employees of the same organisation. In order for a
master configuration to be selected, the local configuration of a selected employee must first be
saved. (See Chapter 5.2.1 Cloud synchronisation)
• Master configuration and restricted user administra-
tion If the additional options are enabled, this will be dis-
played in the settings menu.
Illustration 24: restricted user administration
5.2 Profile
The user-specific data can primarily be adjusted in the profile settings. In addition, however, the
complete device configuration can also be saved.
• The 'Cloud Synchronization' menu function allows
the user to manage the device configuration.
• COUNTRY You can determine with which SOS Portal
entity you wish to link your app based on the country se-
lection.
• FIRST NAME It is preferable for users to personalize the
app. Enter your first name here.
• LAST NAME Enter your surname here.
• MOBILE Up-to-date information can be sent via SMS
forwarding directly to this number.
• ORGANIZATION Displays the name of the organization
to which you are assigned on the SOS Portal. This as-
signment cannot be changed by the end user.
• UPDATE Finally, press the Update button to synchronize
the profile settings on the SOS Portal Server with your
account.
Illustration 25: User profile settings
Page 27 of 46You can also read