INavigator 3-Wire System Manual - Polara
←
→
Page content transcription
If your browser does not render page correctly, please read the page content below
iNavigator 3-Wire System Manual
                                                          350-058
                                                Revision N - 4/5/2021

Polara

iNavigator 3-Wire System Manual
350-058 Rev. N
4/5/2021

                                                      Page 1 of 63
iNavigator 3-Wire System Manual
                                                                                                                                                                              350-058
                                                                                                                                                                                Revision N - 4/5/2021

Contents
1.          Safety Information ............................................................................................................................................... 5
2.          System Description .............................................................................................................................................. 5
     2.1 iN3 Accessible Pedestrian Signal Station .................................................................................................................. 5
       2.1.1 Technical Specification ............................................................................................................................................................... 6
     2.2 iPHCU3W – PED Head Control Unit 3-Wire ............................................................................................................... 6
       2.2.1 Technical Specifications ............................................................................................................................................................. 6
3.          System Installation .............................................................................................................................................. 7
     3.1 iN3 ........................................................................................................................................................................................... 7
       3.1.1 Connecting an External Button ............................................................................................................................................... 8
     3.2 iPHCU3W ............................................................................................................................................................................. 10
4.          Technical Support Contact .............................................................................................................................. 11
5.          Using the Polara Field Service App for iOS to Change PBS Settings .................................................. 11
     5.1        Bluetooth Connection ..................................................................................................................................................... 11
     5.2        Auto-Login .......................................................................................................................................................................... 13
     5.3        Interval Status ................................................................................................................................................................... 13
     5.4        Changing the PBS Password ......................................................................................................................................... 14
     5.5        Assigning a Name to a PBS ............................................................................................................................................ 15
     5.6        Setting the PBS Time and Date .................................................................................................................................... 15
     5.7        PBS Configuration Options ........................................................................................................................................... 16
     5.8        Button Counters................................................................................................................................................................ 19
     5.9        Quiet Time .......................................................................................................................................................................... 20
     5.10       Wireless Sync..................................................................................................................................................................... 21
     5.11       Viewing iN3 Button Information ................................................................................................................................ 22
6.          Using the Polara Field Service App for iOS to Upload Audio Files..................................................... 23
     6.1        Preparing Audio Files ..................................................................................................................................................... 23
     6.2        Download Audio Files from Polara.com .................................................................................................................. 24
     6.3        Sending Audio Files to iNav Device............................................................................................................................ 26
     6.4        Extract Audio Files........................................................................................................................................................... 28
7.          Using the Polara Field Service App for iOS to Access the Health Log ............................................... 29
8.          Using the Polara Field Service App for iOS for Firmware Updates ................................................... 30
9.          Using the Polara Field Service App for iOS to Program Calendar Features ................................... 32
10.         Using Polara Field Service App for PC to Change PBS Settings ........................................................... 33
     10.1       Download Polara Field Service App for PC (Intelligent Config) Application .............................................. 33
     10.2       iN-DGL BLE Dongle .......................................................................................................................................................... 33
     10.3       Application Installation ................................................................................................................................................. 33
     10.4       Running the Application ................................................................................................................................................ 34
     10.5       Bluetooth Connection ..................................................................................................................................................... 35

                                                                                                                                                                                            Page 2 of 63
iNavigator 3-Wire System Manual
                                                                                                                                                                              350-058
                                                                                                                                                                                  Revision N - 4/5/2021

   10.5.1 Auto-Login .....................................................................................................................................................................................35
   10.5.2 Initial System Setup ...................................................................................................................................................................36
 10.6 Status Page ......................................................................................................................................................................... 36
   10.6.1 Assigning a Name to a PBS ......................................................................................................................................................36
   10.6.2 Button Counts ...............................................................................................................................................................................37
 10.7 Changing the PBS Password ......................................................................................................................................... 38
 10.8 Setting the PBS Time and Date .................................................................................................................................... 39
 10.9 Settings ................................................................................................................................................................................ 40
   10.9.1 Adjusting Push Force .................................................................................................................................................................41
 10.10 Quiet Time .......................................................................................................................................................................... 41
 10.11 Wireless Sync..................................................................................................................................................................... 43
 10.12 Calendar Events ................................................................................................................................................................ 44
 10.13 Diagnostics ......................................................................................................................................................................... 47
 10.14 Health Log ........................................................................................................................................................................... 48
11.     Using the Polara Field Service App for PC to Upload Audio Files ...................................................... 49
 11.1 Audio Update ..................................................................................................................................................................... 49
 11.2 Convert Audio Files ......................................................................................................................................................... 50
 11.3 Extract Audio Files........................................................................................................................................................... 51
12.     Firmware Update................................................................................................................................................ 52
13.     Keeping Up to Date ............................................................................................................................................ 53
14.     Configuration Settings Details ....................................................................................................................... 54
 14.1 Volume Settings ................................................................................................................................................................ 54
   14.1.1 Locate Volume ..............................................................................................................................................................................54
   14.1.2 Information Message Volume ................................................................................................................................................54
   14.1.3 Standard Walk Volume .............................................................................................................................................................54
   14.1.4 Extended Walk Volume ............................................................................................................................................................54
   14.1.5 Volume Over Ambient ...............................................................................................................................................................54
   14.1.6 Locate Volume Over Ambient ................................................................................................................................................55
 14.2 Walk Interval Settings .................................................................................................................................................... 55
   14.2.1 Walk Mode Sound .......................................................................................................................................................................55
   14.2.2 Walk Sound Pause ......................................................................................................................................................................55
   14.2.3 Walk Sound Trigger ...................................................................................................................................................................55
   14.2.4 Maximum Walk Time ................................................................................................................................................................55
   14.2.5 Sound/Vibrate Timer ................................................................................................................................................................56
   14.2.6 Sound/Vibrate Re-Trigger.......................................................................................................................................................56
 14.3 Clearance Interval Settings........................................................................................................................................... 57
   14.3.1 Cancel on Clearance ...................................................................................................................................................................57
   14.3.2 Clearance Mode Sound..............................................................................................................................................................57
   14.3.3 Clearance Tone Pause ...............................................................................................................................................................57
 14.4 Don’t Walk Interval Settings ........................................................................................................................................ 57
   14.4.1 Locate Sound .................................................................................................................................................................................57

                                                                                                                                                                                              Page 3 of 63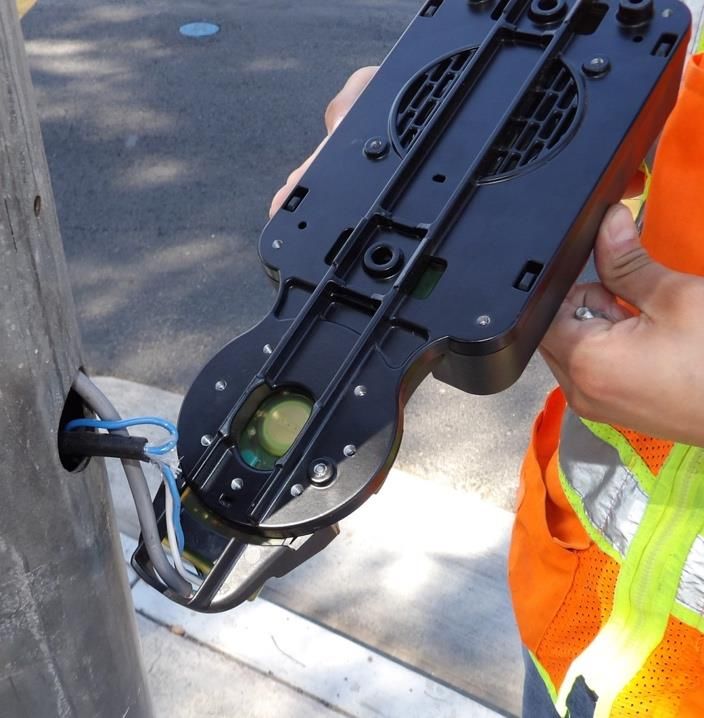
iNavigator 3-Wire System Manual
                                                                                                                                                                                350-058
                                                                                                                                                                                   Revision N - 4/5/2021

   14.4.2 Locate Tone Time........................................................................................................................................................................57
   14.4.3 Wait Message ................................................................................................................................................................................58
   14.4.4 Direction Message.......................................................................................................................................................................58
   14.4.5 Information Message .................................................................................................................................................................58
   14.4.6 Push Confirm Message ..............................................................................................................................................................58
 14.5 Other Settings .................................................................................................................................................................... 59
   14.5.1 Button Push Force ......................................................................................................................................................................59
   14.5.2 Cancel on Walk .............................................................................................................................................................................59
   14.5.3 Extended Push Time ..................................................................................................................................................................59
   14.5.4 Second Language .........................................................................................................................................................................59
   14.5.5 Ping Pong ........................................................................................................................................................................................60
   14.5.6 External Speaker Option ..........................................................................................................................................................60
   14.5.7 Double Walk ..................................................................................................................................................................................60
   14.5.8 Limit Push Recall .........................................................................................................................................................................60
   14.5.9 Pilot LED Recall............................................................................................................................................................................61
15.     Fail Safety .............................................................................................................................................................. 62
16.     Regulatory Notice ............................................................................................................................................... 62
17.     iNav Mounting Hole Diagram ......................................................................................................................... 63

                                                                                                                                                                                                Page 4 of 63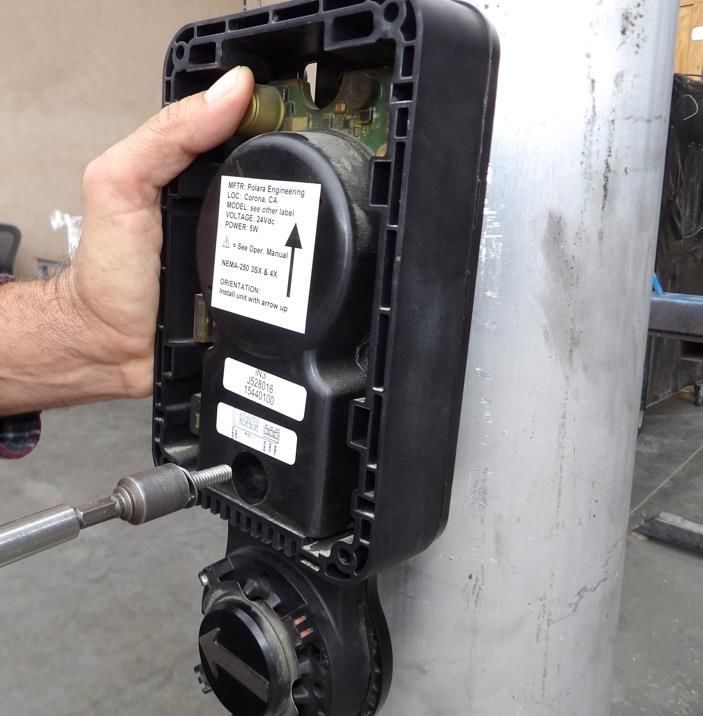
iNavigator 3-Wire System Manual
                                                                                                                   350-058
                                                                                                           Revision N - 4/5/2021

1. Safety Information

        Caution! The equipment covered in this manual must be installed and operated as specified in this manual. If the
equipment is used in a manner not specified by the manufacturer, the protection provided by the equipment may be
impaired.

       Caution! Risk of electric shock. The installer must be aware of the presence of hazardous voltage levels which
may be exposed during the installation of this equipment.

For personal safety, the use of insulating gloves and safety glasses is recommended.

2. System Description
2.1 iN3 Accessible Pedestrian Signal Station
The iN3 is an Accessible Pedestrian Signal pushbutton station (PBS). These PBSs are typically used in pairs, mounted on
poles at each end of a pedestrian crosswalk. Its purpose is to transmit a request for a Walk Sign to a traffic signal
controller by pressing its pushbutton, then to provide audible and vibro-tactile feedback to the pedestrian, indicating the
current status of the pedestrian signal sign. The iN3 is designed for operation with the iPHCU3W. Each iN3 / iPHCU3W
operates independently of any other with the exception that units with their (PED call) button terminals connected in
parallel are all activated by a single button push. Alternatively, the iN3 has a Wireless Sync feature to provide a link
between PBSs on the same PED phase, such that a button press on one unit enables Walk and Clearance sounds on the
linked unit. Wireless Sync supports both standard and extended push modes. Configuration of the iN3 via Bluetooth may
only be performed on a single PBS at a time.

                                                                                                                   Page 5 of 63
iNavigator 3-Wire System Manual
                                                                                                               350-058
                                                                                                     Revision N - 4/5/2021

2.1.1    Technical Specification

Operating Voltage/Current: 24 VDC / 0.3 A max

External Connections:

         3 wires to iPHCU3W, optional 2 wires to cabinet PED call inputs

         Maximum voltage across PED wires (from PED call inputs): 20VDC or 15VAC rms

         Bluetooth Low Energy for setup and maintenance

Operating Temperature Range: -34°C to +74°C

Relative Humidity: 95% for Operating Temp.

Storage Temperature Range: -40°C to +85°C

Ingress Protection: NEMA 4X (IP65), follow instructions for proper protection

Pushbutton Operating Force Range: 1 to 3 lbs.

Maximum Audio Output Level: 100 dBA @ 1 meter

Dimensions W x D x H: 128 x 55 x 343 (mm)

Weight: 4 lbs.

Designed for Outdoor Use, Wet Location and Overvoltage Category: NEMA 250 4X

2.2 iPHCU3W – PED Head Control Unit 3-Wire
2.2.1    Technical Specifications

Input Voltage / Current: 120VAC / 18VA MAX

Output: 24 VDC / 0.2 A continuous, 0.3 A surge

Operating Temperature Range: -34°C to +74°C

Relative Humidity: 95% for Operating Temp.

Storage Temperature Range: -40°C to +85°C

Dimensions W x D x H: 188 x 39 x 96 (mm)

Weight: 0.6 lbs.

Mounted in an all-weather enclosure provided by the customer. Designed for PED Head Enclosure indoor use,
Overvoltage Category: NEMA 250 Type 1

Main Supply Voltage Fluctuation ±10% of rated voltage

Circuit Breaker Specification

Voltage Rating: 120VAC

Current Rating: 1A

Time Characteristics: Medium Time Large

                                                                                                             Page 6 of 63
iNavigator 3-Wire System Manual
                                                                                                                    350-058
                                                                                                             Revision N - 4/5/2021

3. System Installation
Prior to system installation, a 3-wire cable must be installed between the Pedestrian Signal Head and the pole where the
PBS will be mounted. AWG 18 wire is recommended for this installation and should meet all applicable regulatory
requirements. 3-wire cable can be purchased when ordering your iN3 system, if desired.

Removing power from the pedestrian signal head during installation is recommended for protection from electric shock.

INSTALLATION NOTE: To complete this installation, you MUST install the Polara Field Service App on your iOS
or Android device or the Intelligent Config PC App on a laptop with the Polara iN-DGL Bluetooth dongle. Polara
suggests downloading it at this time. If using an Android device, please refer to the “iN3 Polara FS Android
Application Manual” when using the FS App.
 - All of the available setup and maintenance procedures MUST be performed using a compatible iOS device or
    Android device or PC with iN-DGL. Your device must have iOS version 9.0 or higher or Android 5.0 (Lollipop) or
    higher.
 - The Polara FS App will need to be installed on your device. It is available on the Apple App Store and the Google
    Play Store. The Intelligent Config PC App is available at www.polara.com.
 - For more information on installation, please visit Polara’s web site - www.polara.com.

3.1 iN3
The iN3 PBS has two mounting holes vertically spaced at 6.0 inches. The mounting is compatible with standard
pushbutton frames with 6 inch mounting holes and a wiring hole at least 3.5 inches below the lower mounting hole. The
suggested mounting height is 42 inches from ground level to the center of the arrow button. The iN3 PBS must be
mounted only in the normal upright orientation, with the connection terminals at the bottom. Any other mounted
orientation will void the warranty as moisture could collect inside the unit.

Before mounting the PBSs on their poles, go to the traffic signal controller cabinet and set the PED phases to recall.
Remove existing buttons/frames from poles. Check holes for mounting fit and drill and tap ¼-20 as needed. Route the
3-wire cable between the pedestrian signal head and the pole. Refer to iN3-Cable cut-sheet for cable specification
(General cable C2831 or equivalent.)

If the PBS has a label with street names, the first name (before @) indicates the street being crossed. Locate the unit in
accordance with the label.

Remove 3 screws from the lower cover surrounding the pushbutton, using a Torx T15 security driver bit. Lift off the lower
cover. Remove all screws securing the sign and sign plate if present. Verify the arrow on the button is oriented toward the
associated crosswalk. If necessary, the button / diaphragm assembly may be pulled off and rotated as needed. Please
use caution as the metal diaphragm is sharp.

With the sign and lower cover removed, position the PBS against the pole and route the wires forward through the
opening at the bottom end of the module. Position the wire such that 3 or 4 inches of wire is available at the bottom of the
PBS. Attach the PBS to the pole using the provided ¼-20 bolts with washers.

NOTE: The use of a speed wrench or short socket is recommended. Insert the bottom bolt with washers on bolt
before holding the iN3 PBS to the pole to prevent the washers from falling into the unit.

                                                                                                                     Page 7 of 63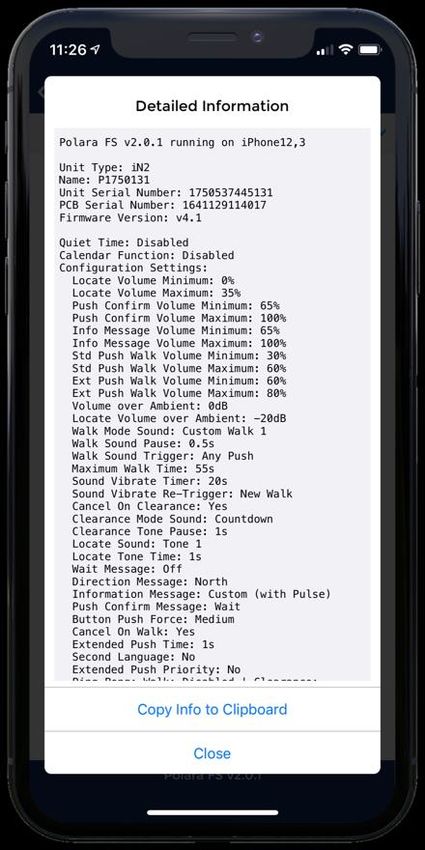
iNavigator 3-Wire System Manual
                                                                                                                       350-058
                                                                                                                Revision N - 4/5/2021

Connect the two wires from the traffic signal cabinet (if available) to the terminals of the larger black terminal block labeled
BUTTON/PLC. Wire polarity is not important. Connect the three wires from the iPHCU3W to the terminal block on the
right. Make sure the wiring matches at both ends according to the Data, GND, and PWR labels at the terminals. With the
power on, check that the PBS is operational. Recheck tightness of all connections.

3.1.1   Connecting an External Button

The iN3 PBS supports connection of an external button such as the Polara Bulldog BDSP-014. Pressing the external
button is equivalent to pressing the iN3 button, but without the associated push confirmation sound. The button wire pair
should connect to the large terminal block labeled “Button/PLC” with one wire to each terminal. Polarity is not
important. The external button would be connected in parallel with the button wires to the traffic signal cabinet. More than
one external button is acceptable.

                                                                                                                        Page 8 of 63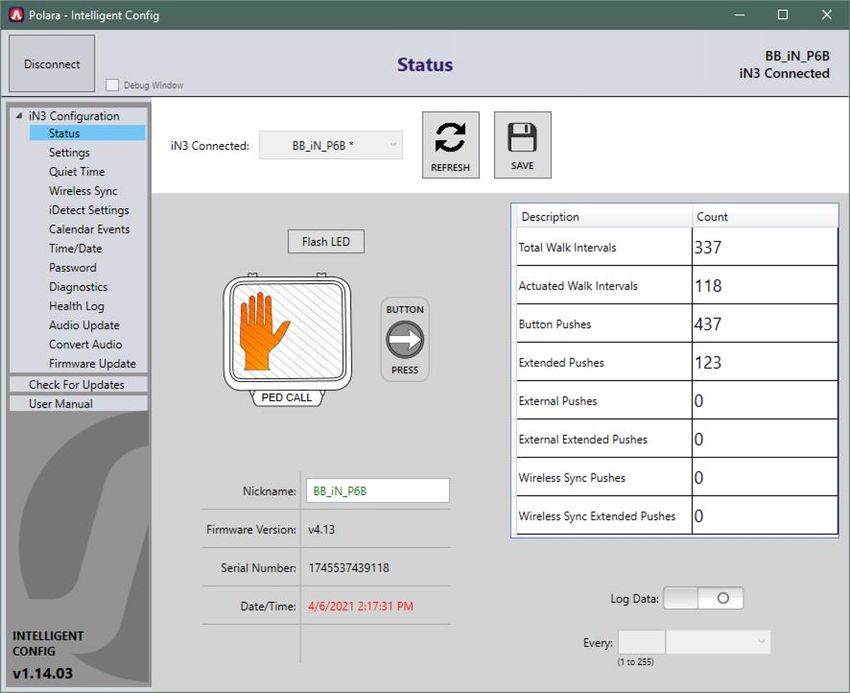
iNavigator 3-Wire System Manual
                                                                                                                    350-058
                                                                                                             Revision N - 4/5/2021

                                                 Pole-mounted iN3 PBS

Re-install the lower cover and the sign. Additional environmental protection can be gained by adding rubber washers or
grommets on the sign screws, or with the use of a silicone sealant.

Safety protection may be compromised if installed or utilized in a configuration not stated in this system manual.
Disconnect input power to iN3 before field installation.

For programming and configuration of the iN3 PBS, launch the Polara Field Service App and complete the sections of this
User Manual listed below:

Section 5.4 – Changing the PBS Password

Section 5.5 – Assigning a Name to a PBS

Section 5.6 – Setting the PBS Time and Date

The iN3 PBS is now ready to use. If you wish to customize more available settings, please review Section 5.7.

You may also change configurations and settings with the Intelligent Config App for PC (Section 10 of this manual).

                                                                                                                     Page 9 of 63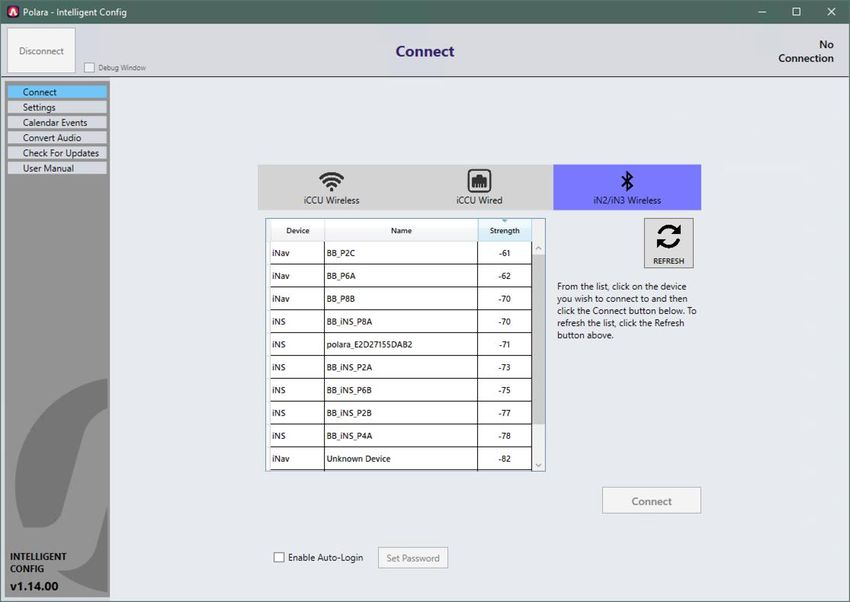
iNavigator 3-Wire System Manual
                                                                                                                    350-058
                                                                                                             Revision N - 4/5/2021

                                    iPHCU3W and iN3 PBS Wiring (Reference Only)

3.2 iPHCU3W
The iPHCU3W normally installs inside the Pedestrian Signal Head (PED Head). It is supplied with a hardware kit which
includes a mounting plate and associated screws and nuts. The photo shows an example of a typical installation.
Typically, tapped ¼-20 holes are present. If they are not, a hole (or holes) to match the mounting plate needs to be drilled
and tapped. While a single screw is sufficient to secure the iPHCU3W bracket to the PED Head, a second screw may be
used for additional stability. Distance between holes should be 9.3”.

Attach the iPHCU3W to the mounting plate with the supplied hardware. Insert the 6-32 screws from the back of the
assembly and secure with the 6-32 nuts. The nuts should be on the top of the assembly as seen in the photo below.

Fasten the assembly to the ped head with the ¼-20 screws.

                                                                                                                    Page 10 of 63
iNavigator 3-Wire System Manual
350-058
Revision N - 4/5/2021
iPHCU3W Installed in PED Head
Install jumper wires to connect the light power terminal block to the iPHCU3W input power terminal block. There should be
jumper wires for AC Neutral, Walk, and Don’t Walk. AWG 18 wire is recommended for this installation and should meet all
applicable regulatory requirements.
Connect the wires from previously installed 3 wire cable to the output terminal block of the PHCU3W.
4. Technical Support Contact
Polara
714-521-0900 or 888-340-4872
The latest version of this manual is available in PDF format at www.polara.com.
5. Using the Polara Field Service App for iOS to Change PBS Settings
All of the available setup and maintenance procedures may be performed using a compatible iOS device. Your device
must have iOS version 9.0 or higher.
The Polara Field Service App will need to be installed on your device. For more information on installation, please visit
Polara’s web site - www.polara.com.
5.1 Bluetooth Connection
Before starting the Polara Field Service App, make sure your device has Bluetooth set to ON in Settings. Start the app.
Upon first run of the Polara FS app, you will be prompted with two iOS dialogs for granting access. The Polara FS app
needs access to iOS Location Services in order to gain access to the WiFi network information allowing the app to detect
and connect to iCCU units. The app also needs access to Bluetooth in order to communicate with iNavigator units. Tap
the appropriate action to allow the app to access these resources.
Page 11 of 63iNavigator 3-Wire System Manual
350-058
Revision N - 4/5/2021
Note: Location is never tracked in the app and is never run in the background. Access to this feature is only necessary to
gain the name of the connected WiFi network in order to detect iCCU units.
Tap the refresh symbol at the top right or pull down to refresh. This will display a list of all available devices within range.
Tap a name to select, enter the password (factory default is 1234), then tap “Connect”. This will display the main menu.
Enabling Location Services, Bluetooth and Device Connection Screens
Note: If the password is
unknown, the password can
be reset to factory default by
tapping the Reset button on
the password prompt dialog.
Call Polara at the number
listed on the reset dialog
and request a password
reset verification code.
Enter the new verification
code into the dialog box and
the password will be reset to
1234. Enter the default
password at the prompt and
then follow the below
instructions to change the
password from default and
continue configuring the
device.
Password Prompt, Password Reset, and Main Menu
Page 12 of 63iNavigator 3-Wire System Manual
350-058
Revision N - 4/5/2021
5.2 Auto-Login
For customers where the majority or all of the intersections used within an area have
the same password, a feature is available to enable logging in without having to re-
enter the password. After tapping on a device in which to connect, at the password
prompt, flip the switch for Auto-Login and a prompt will appear for a password that will
be stored. Once this password has been stored, upon any new connections, that
password will automatically be tried. If that password fails, then the default password
of 1234 will be attempted. If both password attempts fail, then the standard password
prompt will appear.
To change a previously stored password, turn off the Auto-Login switch and then turn it
back on.
5.3 Interval Status
On the Status screen, the information is shown live from what is occurring in the
PBS.
Tapping on the Flash button will flash the pilot LED on the PBS for a few
seconds.
Page 13 of 63iNavigator 3-Wire System Manual
350-058
Revision N - 4/5/2021
5.4 Changing the PBS Password
Each unit will require that the password be changed from default in order to avoid the repeating “Change Password” voice
message. At the main menu, tap “PBS Configuration. Tap “Password” at the bottom of the screen. Tap in the boxes and
enter the old and new passwords as shown on the screen below. Tap “Save” in the upper right corner.
Page 14 of 63iNavigator 3-Wire System Manual
350-058
Revision N - 4/5/2021
5.5 Assigning a Name to a PBS
Each PBS may be given a name to help identify it while performing configuration and updates. You may want to use a
name that will include the location. While viewing the home page, tap on the current name at the bottom of the page. Tap
in the name box and type a new name as desired, then tap “Rename”.
Note: The name can
also be changed in
the Info/Diagnostics
screen within the PBS
Configuration menu.
PBS Name/ID
5.6 Setting the PBS Time and Date
While viewing the main menu, select PBS Configuration, then select Date/Time. Tap to
choose a method of obtaining the time, then tap on “Save” to update the PBS clock.
Page 15 of 63iNavigator 3-Wire System Manual
350-058
Revision N - 4/5/2021
5.7 PBS Configuration Options
From the main menu, select PBS Configuration and select Settings. This presents an extensive list of operational settings
that may be adjusted according to desired operation. You can swipe the list up and down to find the setting to be
changed. To the right of each setting title is an information button. Tap this button for a description of the setting.
Info
Tap in the option box to access the options for that setting. Swipe up or down to select an option. Press “Done” to select a
new option or “Cancel” to proceed without any change. Tap the “i” (info button) for more information regarding the setting.
Page 16 of 63iNavigator 3-Wire System Manual
350-058
Revision N - 4/5/2021
Options for selecting sounds have a button with a speaker symbol. To listen to sounds, use the slider to Enable Audio
Playback. Then, tap the speaker symbol to listen to a sample of the sound. Sounds will play out of the PBS’s speaker. For
safety, the unit will need to go into Maintenance Mode and the LED will perform a three-flash pattern. Press Yes on the
confirmation dialog to enable Maintenance Mode. In this mode, the unit’s main button will not operate or respond to
interval changes so a pedestrian cannot use it.
Tap the speaker symbol to listen to the selected sound. Sounds will play out of the PBS’s speaker. Turn off the Enable
Audio Playback switch to resume the unit’s normal operation.
When you are finished selecting desired settings, tap the Write button to write the settings to the connected button. Tap
the menu symbol at the top right to access additional options. After saving new settings to buttons, walk the entire
intersection to test each PBS for proper operation to verify that the new settings work as intended.
Page 17 of 63iNavigator 3-Wire System Manual
350-058
Revision N - 4/5/2021
The currently displayed settings may be saved to a file and recalled for later uploading to other PBSs. Tap “Save As File”
from the options menu and enter a file name to create a file.
Tap “Load From File” to browse previously saved configuration files. Tap a file name and then tap “Select File” to load the
settings into the iOS device’s clipboard. Tap the to select the device configuration and then tap WRITE to save
settings to the PBS.
Note: The configuration files only save the PBS Settings listed on this screen and do not apply to additional parameters on
other screens such as Quiet Time or Wireless BLE Sync and also do not save audio files. Audio files must be extracted
and uploaded separately.
While in the File Browser, you can delete files, if necessary. To delete files, swipe from the right to the left to show the
Delete button, then tap the Delete button. The configuration files are the same between all apps (iOS, Android, & PC) and
can be used interchangeably.
Load From File
Save Dialog Swipe to Delete File File Options
To email a file to another device, tap “Email File”. Enter an email address and tap “Send”.
The button push force can also be adjusted from the PBS Configuration screen. Scroll down the page to find “Button Push
Force”. Tap inside the setting box. Swipe to select Light, Medium, or Firm, then tap “Done”. Save the new setting as
described previously.
Page 18 of 63iNavigator 3-Wire System Manual
350-058
Revision N - 4/5/2021
5.8 Button Counters
From the Main Menu, select PBS Configuration, then select Counters. Each PBS keeps a count of events that have
occurred in the button from the date of manufacture. These numbers act as a kind of odometer for the unit and cannot be
reset. The counts are:
• Total Walk Intervals
o The number of walk intervals the unit has received. This includes walk
intervals which have been initiated by this PBS as well as walk intervals
that occur while the intersection is in recall.
• Button Pushes
o The total number of button pushes that have been detected by the PBS’s
arrow button. This does not include any detected button pushes that
were caused by other PBSs on the same phase.
• Actuated Walk Intervals
o The number of walk intervals which occurred following an internal button
push. If the walk audio and button vibration occurred during a walk
indication, then this counter is incremented.
• Extended Pushes
o The number of extended pushes the PBS has detected on the arrow
button.
• External Pushes / External Extended Pushes
o Presses originating from another unit connected to the same button
terminals. Short presses are listed as External Pushes, and long presses
are listed as External Extended Pushes.
• Wireless Sync Pushes / Wireless Sync Extended Pushes
o Short and Extended presses originating from a unit connected via the
Wireless Sync feature.
In order to relate the above data to relative time, a logging feature is included which will add health log entries including all
counters along with a timestamp at specific intervals. For example, if you want to log the data to find out how the counts
change in a week, then enable Log Data Every and enter 168 hours. Tap Save in the upper right corner. Then, once a
week, log entries will be added which include the counters.
Page 19 of 63iNavigator 3-Wire System Manual
350-058
Revision N - 4/5/2021
5.9 Quiet Time
The iN3 PBS has a feature to easily allow the button to become quieter at a specified time of day. This is useful, for
example, when a residential street experiences a lot of traffic during the day, but very little in the evening. In this scenario,
it may be useful to have the iN3 PBS set loud enough to be heard over traffic during the day, but be nearly inaudible in the
evening hours, as not to disturb residents living nearby. Quiet Time allows for a reduction in volume between a specified
time interval within a 24-hour day.
The details of the feature’s operation is such that if the current time of day falls between the selected start and end time of
the Quiet Time period, then all Minimum and Maximum volume settings will be reduced by the specified reduction amount.
Note: The “Minimum” volume setting can be reduced down to 0%, but the “Maximum” volume setting will only be reduced
down to 25%. This follows what is settable in the configuration parameters or settings screen.
The table below shows what the effective volume settings would be with the Quiet Time set to reduce the volume by 30%.
With the values set as shown in the screenshots, between the hours of 9:00am and 7:59pm, the volume will be as set
configured in settings (shown in the “set value” column). At 8:00pm to 8:59am the following morning, the volumes will be
reduced as shown in the “reduced value” column.
Setting Name Set Value Reduced Value
Locate Volume Minimum 0% 0%
Locate Volume Maximum 50% 25%
Information Message Minimum 65% 35%
Information Message Maximum 100% 70%
Std Walk Minimum 30% 0%
Std Walk Maximum 60% 30%
Ext Walk Minimum 60% 30%
Ext Walk Maximum 80% 50%
From the PBS Configuration Menu, select the Quiet Time icon at the bottom right of the page. Enter the desired settings,
then tap the Save button.
Page 20 of 63iNavigator 3-Wire System Manual
350-058
Revision N - 4/5/2021
5.10 Wireless Sync
Use this feature to configure PBS to PBS wireless links for units that do not have PED
call wiring to the traffic signal controller. This function provides a link between PBSs on
the same PED phase such that a button press on one unit enables the Walk and
Clearance sound on the other units. Both standard and extended push status is
transmitted.
When the Wireless Sync feature is active, the PBS will not accept Bluetooth
connections via an iOS device or PC. However, 5 seconds after an Extended Push, the
PBS will accept connections until the start of the next Clearance cycle.
Display the main Configuration page. Tap ‘Information’ at the bottom of the screen. On
the Information screen, tap ‘Wireless Sync’.
Enable this function by tapping the ‘Wireless Sync’ switch at the top of the screen.
The Intersection ID is used to prevent any possible interference between nearby
intersections which are also using this feature. Tap the ‘Intersection ID’ box and enter a
number between 0 and 65535 and tap ‘Save’. Any number is acceptable as long as it is
different from that used on any nearby intersection. In the same manner, enter the PED
phase number for this PBS. Each PBS should be configured using the same procedure.
PBS units with the same Intersection ID and Phase numbers will exchange button push
information.
When the Remote Ped Call option is enabled, if that unit receives a button push
indication from a Wireless Sync transmission, then it will also cause a Ped Call indication in the form of a contact closure
on the terminal block wires to the traffic cabinet. This can be useful if one side of intersection has button wires to the traffic
cabinet but the other side does not. Then any button pushed form the unit without wires can transmit the button press
status wirelessly to the other unit causing a Ped Call to be asserted. In this situation, only the units with button wires going
to the traffic cabinet should have this option enabled.
Page 21 of 63iNavigator 3-Wire System Manual
350-058
Revision N - 4/5/2021
5.11 Viewing iN3 Button Information
Tap on Info/Diagnostics when viewing the PBS Configuration menu and you will be presented with the PBS Information
screen. In this screen, you can view the serial number, ID, and Firmware version of the iNav unit. You can rename the unit
by tapping on the name. If you tap on the “View All Unit Information” button, you will be presented with a dialog containing
all information about the factory and user-settable settings within the unit. Note: This information is also prepended to the
health log when exported to file.
Page 22 of 63iNavigator 3-Wire System Manual
350-058
Revision N - 4/5/2021
6. Using the Polara Field Service App for iOS to Upload Audio Files
6.1 Preparing Audio Files
The audio files which are played in the iNav units are encoded using the open-source Ogg Vorbis codec. Polara provides
professionally recorded custom audio files on the website. Go to Polara.com and click on the Audio Library option. You
can search for audio files which have already been recorded if the streets on the desired intersection are common.
However, you can also request to have messages recorded for you by clicking on the Request Custom Message option
and filing out the form on the website.
If you wish to record your own messages or already have messages in another format (such as .wav or .mp3), these
messages can be converted to the specific Ogg Vorbis format needed by the iNav devices by downloading the Intelligent
Config application (also available on the Polara.com website) and using the Convert Audio option.
Note: Customer-recorded audio messages must use the Intelligent Config app to convert to the proper audio format. The
built-in Ogg compressor in other audio programs will not use the proper settings and the audio will sound garbled when
installed in an iNavigator.
Once you have your .ogg files prepared, they must be transferred onto your iOS device. Files can be transferred to the
Polara FS app using a variety of methods:
• E-mail the file to an account on your iOS device and tap the file, then choose Open in Polara FS. Note: This
works best in either the built-in Mail app. Some apps like Microsoft Outlook do not offer the option to open the file
in the Polara FS app. If this is the only mail application available, use one of the alternative methods to import the
file.
• Store the file or files using a cloud-based storage utility such as Dropbox, iCloud Drive, Google Drive, Microsoft
OneDrive, and others. Then use the iOS “Files” app to copy the files into the Polara FS audio directory or access
the Share feature of the file to open the file in Polara FS. This method can be used to import large groups of
messages into the Polara FS app.
• Download the ogg file from the Polara.com website into the iOS Downloads directory and then import it using iOS
the Files app. This method is demonstrated in detail in the following pages.
• Within the Polara FS app while not connected to a device, tap the three dots in the upper left corner and select
Audio Files, then tap the Import button in the upper right corner of the File Browser. This will open a system file
browser that will allow you to select files that have been downloaded into the iOS file system and access files
from cloud-based storage apps.
Page 23 of 63iNavigator 3-Wire System Manual
350-058
Revision N - 4/5/2021
6.2 Download Audio Files from Polara.com
The following procedure is demonstrated using iOS 13. Other versions of iOS may behave differently.
Open the Safari app and browse to Polara.com, then zoom in and tap the Audio Library link on the top left of the page.
Search for the audio message(s) of your chose. Then zoom in and tap the Download button. A confirmation box will
appear. Tap the Download button. The file will download, and a new button will appear in the top left of the screen with
file transfer status. Tap the download button for other audio messages until all the desired messages have been
transferred to the Downloads folder.
Tap the icon with the circle and down arrow to access the Downloads folder and tap the magnifying glass next to one of
the files.
View
downloaded
files
View file
browser
Page 24 of 63iNavigator 3-Wire System Manual
350-058
Revision N - 4/5/2021
A file browser will open to the Downloads folder. Tap the Select button in the upper right corner of the screen, then tap on
each file you wish to import into the Polara FS app.
Tap the folder icon at the bottom center of the screen. This will bring up another browser which allows you to select the
destination folder for the files. Tap to expand the On My iPhone folder, then select Polara FS and choose the audio
folder. Then tap the Copy button in the upper right corner.
This will copy all selected files into the Polara FS app.
Open the Polara FS app and open the Audio Files browser and the imported files will appear.
Select multiple files Copy files into the Polara FS app
Select copy destination
Page 25 of 63iNavigator 3-Wire System Manual
350-058
Revision N - 4/5/2021
6.3 Sending Audio Files to iNav Device
From the Polara App main menu, Tap on “Audio Update”.
To add a new Information Message file, tap on “Information Message”. This displays a list of available voice files loaded
into the Polara FS App. Tap on the name of the file you wish to load as the Information Message sound in the PBS. Then
tap the Select File button. You can also preview the file by pressing Play File or Share the file through E-Mail and other
services. To delete files, swipe from the right to the left to show the delete button, then tap the Delete button.
Note: Files ending with the suffix VOL should be loaded as an Information Message and files with the suffix WALK should
be loaded as Custom Walk.
Page 26 of 63iNavigator 3-Wire System Manual
350-058
Revision N - 4/5/2021
As soon as the Select File button is tapped, the file will begin to upload. Once the file has completed uploading, press OK
on the dialog box to return to the Audio Update screen.
Repeat this process for each file to be uploaded. Typically, a custom set will include two files, one for Information
Message and one for Custom Walk #1. To enable these new custom files, go to PBS Configuration and set the
Information Message option to “Custom”, and set the Walk Mode Sound option to
“Custom Walk #1”.
Finish by walking the intersection to confirm the system is both operating
properly and playing correct messages.
Additional sounds can be modified for specific circumstances. The following view shows
the additional sounds that can be uploaded using the iOS app by tapping the Advanced
tab.
If additional audio sound customization is required beyond what is listed in the Audio
Update screen, use the Intelligent Config PC Application for more audio upload options,
including adding additional second language audio files or replacing Countdown files. An
iN-DGL dongle is required for connection to an iNav unit using the PC. Contact your
distributor to obtain an iN-DGL if you do not already have one.
Page 27 of 63iNavigator 3-Wire System Manual
350-058
Revision N - 4/5/2021
6.4 Extract Audio Files
The same messages that are available to be changed via Audio Update can be extracted from the PBS. This feature
requires firmware version v3.199 or greater in the iNav unit.
From the Polara App main menu, Tap on “Audio Update”
Tap the “Extract” button in the upper right corner of the Audio Update screen.
All options on screen should change to add the word “Extract” to the front to indicate that you will be extracting the
selected message from the unit.
It is recommended that you listen to the message prior to extracting it so you know how the message should be named.
Perform an extended push on the unit to hear the Information Message and then wait to hear the Walk message, or use
the sound play feature in the Settings screen.
To extract the Information Message, tap the Extract Information Message option.
You will be prompted to add a filename for the extracted file. Name the file appropriately for the intersection streets. For
example, the intersection of Broadway and Main would have an information message named “Broadway_Main_VOL” and
the corresponding walk message would be “Broadway_WALK”.
Tap Save to begin extraction.
Once extraction is complete, you can extract additional messages from the unit or tap the Upload button to switch to
upload mode.
You can view the extracted messages by disconnecting from the iNav unit and tapping on the three dots in the upper left
corner of the screen and selecting the “Audio Files” option. From this screen you can play the audio files or send them to
another application, such as e-mail or Dropbox.
Page 28 of 63iNavigator 3-Wire System Manual
350-058
Revision N - 4/5/2021
7. Using the Polara Field Service App for iOS to Access the Health Log
The Health Log contains a list of events, including both normal conditions and error conditions. Each PBS maintains a
separate log. These can be very useful for troubleshooting.
Select “Health Log” in the Polara App main menu. The Name / ID of the currently connected device is visible at the top. To
read the Health Log from this device tap “Read”. The current log is downloaded and displayed. Swipe the screen to
browse through the log. Tap the menu symbol at the top right to access a list of actions. The menu symbol is shown as
three dots. You can choose to clear the log, export the log to an email address, or access diagnostics. For help with a
particular issue, or a message of concern, email the log to support@polara.com. Note: You must tap the Read button
prior to exporting the health log, otherwise the health log export will only include device information and not the entire
health log of the unit.
Selecting “Diagnostics” will show some
self-testing and maintenance options as
shown in the sample screens below.
This screen is also accessible by
tapping the Diagnostics button in the
Info/Diagnostics screen.
Page 29 of 63iNavigator 3-Wire System Manual
350-058
Revision N - 4/5/2021
8. Using the Polara Field Service App for iOS for Firmware Updates
Firmware files are automatically bundled with the Polara Field Service App. The latest firmware at the time of App release
is ready and pre-installed for updating.
The iOS App also has the ability to connect to polara.com to check for new updates directly from within the App. Your
device must be connected to the internet in order to perform the check. While disconnected from any units, tap the three
dots on the upper left of the connection screen. Tap on the Firmware Files option to browse all firmware files on your iOS
device. Tap the three dots in the upper right corner of the File Browser screen. Tap the Check For Updates button. The
device will connect to the internet and check for the latest firmware files from polara.com and provide them for download.
You can tap on View Release Notes to see what the changes are from the previous version or tap the Download button to
download the file to your device.
Firmware files to be uploaded can also be received as an email attachment on your iOS device. With the email app open
and the message displayed, tap on the attachment, then tap “Open in Polara”.
Page 30 of 63iNavigator 3-Wire System Manual
350-058
Revision N - 4/5/2021
To update the firmware of the connected device, tap the Update Firmware button. The list of available firmware update
files will appear. Tap the file you wish to upload and tap Select File to begin the firmware update process. When the
process is complete, a message is displayed confirming the success. To delete files, swipe from the right to the left to
show the delete button, then tap the Delete button.
Page 31 of 63iNavigator 3-Wire System Manual
350-058
Revision N - 4/5/2021
9. Using the Polara Field Service App for iOS to Program Calendar
Features
The calendar feature can no longer be used via the iOS Application. Due to the complexity of the feature, it must be
enabled and configured using the PC application only.
Page 32 of 63iNavigator 3-Wire System Manual
350-058
Revision N - 4/5/2021
10. Using Polara Field Service App for PC to Change PBS Settings
10.1 Download Polara Field Service App for PC (Intelligent Config) Application
The Intelligent Config application is available for download from www.polara.com.
10.2 iN-DGL BLE Dongle
The Intelligent Config application requires the use of the Polara iN-DGL BLE dongle to communicate with the Polara iN3
PBS.
10.3 Application Installation
Your computer must be running Windows 7, 8, 8.1, or Windows 10. Also, you must have .NET Framework 4.0 or higher
installed in order for the application to run. The installation process will include this step if necessary, however your
computer must be connected to the internet to access those installation files. A driver program for the BLE dongle will be
installed as needed. Locate the downloaded installation file, extract the IntelligentConfigSetupVxxxx.exe file if necessary,
then double-click to begin. Follow the on-screen instructions to complete the installation.
Page 33 of 63iNavigator 3-Wire System Manual
350-058
Revision N - 4/5/2021
10.4 Running the Application
Make sure you have a Polara iN-DGL BLE Dongle connected to a USB port on your computer. Click on the Intelligent
Config icon in the Start Menu to run the application.
A screen similar to this should appear.
Page 34 of 63iNavigator 3-Wire System Manual
350-058
Revision N - 4/5/2021
10.5 Bluetooth Connection
Click on the name of the target unit and click ‘Connect’. This will take you to the login page.
Login Page
Type in the password (Factory default is 1234) and click ‘Login’. You may click ‘Disconnect’ to cancel or click ‘Reset
Password’ if the password is unknown. You will be prompted to call Polara for assistance in resetting the password.
After login, the Status page will appear.
10.5.1 Auto-Login
[New Feature in v1.14.00] At the bottom of the connection screen is a new checkbox to enable Auto-Login.
For customers where the majority or all of the intersections used within an area have the same password, a feature is
available to enable logging in without having to re-enter the password. Click the checkbox to enable the feature and you
will be presented with a dialog box for the desired password to attempt upon connection to a device. Once this password
has been stored, upon any new connections, that password will automatically be tried. If that password fails, then the
default password of 1234 will be attempted. If both password attempts fail, then the standard password prompt will
appear. To change a previously stored password, click the Set Password button. Note: When the Auto-Login feature is
disabled, the stored password is immediately deleted and must be re-entered when enabling the feature.
Page 35 of 63You can also read