NVIDIA Tesla S1070 Computing System - NVIDIA Tesla S1070 Installation Guide
←
→
Page content transcription
If your browser does not render page correctly, please read the page content below
NVIDIA® Tesla™ S1070
  Computing System

     NVIDIA Tesla S1070
       Installation Guide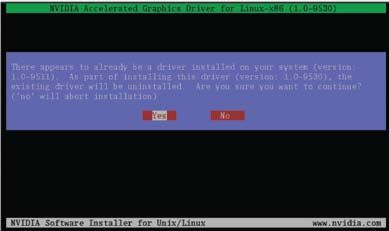
Table of Contents

Introduction                                             1
About This Guide                                         1
Minimum System Requirements                              2

Unpacking                                                3
Equipment                                                3

Hardware Installation                                    5
Safety Instructions                                      5
Before You Begin                                         5
Optional Low Profile Bracket                             6
Tesla S1070 Installation                                 7
   Mounting the Tesla System in a Rack                   7
   Connecting to the Host System                        10

Software Installation                                   13
Driver Installation                                     13
CUDA Toolkit                                            16
CUDA Software Developer’s Kit (SDK)                     16
Verifying Installation if Running X Server              17
Verifying Linux Installation if Not Running X Server    18

References and Resources                                21
Getting Driver Updates                                  21

Registration, Warranty, and Support                     22
Registering Your Tesla S1070                            22
Warranty and Support                                    22

Compliance and Certifications                           23

Important Safety Information                            30
Precautions for Installing System Unit in Racks         37
   Stability                                            37
   Manual Material Handling                             38

Tesla S1070 Installation Guide                               i
Introduction

         The NVIDIA® Tesla™ computing system simplifies adding GPU
         computing to rack-mount installations. With Tesla, you can tackle
         massive problems with the unprecedented performance of the
         many-core architecture and the C programming enabled by a suite
         of developer tools. Tesla enables you to solve problems faster.

          Note:     It is important to register your Tesla S1070 in order to
                    receive NVIDIA Customer Care online and phone support.
                    To register, please visit: www.nvidia.com/register.

About This Guide
         This installation guide provides instructions to connect the Tesla S1070 to
         an NVIDIA-tested host system in a rack- mount environment. For a list
         of NVIDIA-tested host systems, of for information on using the system
         with applications, refer to the NVIDIA web site at www.nvidia.com/tesla.

Tesla S1070 Installation Guide                                                     1
Introduction
Minimum System
Requirements
Prior to unpacking your new NVIDIA Tesla system, confirm that your
host system meets all the system requirements for a smooth installation.
System and Platform
àà NVIDIA-tested system or platform
Operating System
àà Linux 32-bit or 64-bit (Red Hat Enterprise
Linux 3, 4, and 5; SUSE 10.3)
Processor
àà Intel Pentium 4 or Xeon processor or higher
àà AMD Opteron processor or higher
RAM
àà 2 GB minimum, 4 GB recommended
System Interface
àà PCI Express x16 slot
àà PCI Express x8 slot if you are using the optional x8 interface card
Tesla S1070 Installation Guide 2Unpacking
Equipment
Check that you have all of the items you need for installing your
Tesla system. Depending on which Tesla product you purchased
and from whom you purchased it, some accessories may have
been ordered and shipped separately. You should have:
One (1) Tesla S1070 chassis:
The 1U chassis includes four (4) Tesla T10 GPUs.
Two (2) NVIDIA Interface Cards:
Installs into the PCI Express x16 slot in the host system. The card
comes with the standard ATX-height bracket attached. A low-
profile bracket is also provided and can replace the standard bracket
on the card. Your solution provider may have already configured
your cards, brackets and cables to your specific installation needs.
Two (2) Low-Profile Brackets:
Used to replace the standard ATX (long) bracket shipped
attached to the interface card. Your solution provider
may have already configured your cards, brackets,
and cables to your specific installation needs.
Two (2) Interconnect Cables:
Connects from the interface card in the
host system to the Tesla S1070.
Power Cords:
Used to supply power to the Tesla S1070. The host system controls
the power. Your solution provider may have already configured
your cards, brackets, and cables to your specific installation needs.
Tesla S1070 Installation Guide 3Unpacking
One (1) Rail Kit:
Each rail kit includes two (2) rails for use with a
standard 4-post 19 inch, EIA compliant rack.
Also included should be:
Registration Card:
Register to gain priority access to NVIDIA’s Customer Care.
Installation CD:
Contains this file (Installation Guide) and all the
necessary drivers to enable the Tesla system. To keep
your drivers current, visit http://developer.nvidia.com/
object/cuda.html and download the latest drivers.
Quick Start Guide:
Provides the basic procedures necessary to
install and bring up the Tesla S1070.
Tesla S1070 Installation Guide 4Hardware Installation
Installing the NVIDIA Tesla S1070 hardware involves opening up your
computer. Follow all of the safety instructions provided here to ensure
that there is no damage to you, your host system, or the Tesla unit.
Note: All hardware must be installed prior to installation of software.
Safety Instructions
To reduce the risk of fire, electric shock, and injury
always follow basic safety precautions.
Remember to remove power from your host system by disconnecting
the AC main source before installing any equipment into the host
system chassis. For more information regarding important safety
instructions, refer to the Important Safety Information section.
Before You Begin
The Tesla system must be connected to a host system. The host system
accessing the Tesla system must have one or more open PCIe slots. Any
NVIDIA graphics drivers on your host system should be uninstalled prior
to installing the hardware and software associated with the Tesla system.
Tesla S1070 Installation Guide 5Hardware Installation
Optional Low-Profile
Bracket
Before beginning the installation, determine if you are going to
need the Tesla interface card with the standard (full-height ATX)
bracket or the shorter low-profile bracket. If you require the low-
profile bracket, use the following instructions to replace the standard
bracket. Replacing the bracket requires a Philips #2 screwdriver.
1. Remove the two (2) screws holding the bracket to the card.
2. Re-use those screws to attach the new bracket.
Tesla S1070 Installation Guide 6Hardware Installation
Tesla S1070 Installation
Mounting the Tesla
System in a Rack
Plan your rack configuration to ensure you have the proper cables to
reach from the Tesla system to your host system. The Tesla system ships
with 0.5-meter cables by default. An optional 2-meter cable is available.
The Tesla system also ships with rails to fit a 4-post 19-
inch EIA rack as the default configuration.
If installed in a closed or multi-unit rack assembly, the operating
ambient temperature of the rack environment may be greater than
room ambient temperature. Therefore, consideration should be
given to installing the equipment in an environment compatible
with the manufacturer’s maximum rated ambient temperature
(Tmra). The maximum operating ambient temperature is 35 ºC.
Tesla S1070 Installation Guide 7Hardware Installation
1. Remove one of the rails from the packing box.
2. Remove the mounting screws attached to either end of the rail. Set
aside as you will need these to secure the rail to the rack at the end of
the steps.
Figure 1 Detail of rail for rack mounting
3. Choose either the front or the rear of the
rack to start your rail installation.
4. Slide the rail into the side of the rack, and adjust the length
accordingly. Make sure the flare end of the rail is positioned at the
front of the rack.
Figure 2 Detail of putting rail into rack
Slide
rails to
align the
screw
holes
Front of rack
Tesla S1070 Installation Guide 8Hardware Installation
5. Slide the rail onto rack post. The studs in the front and
back should hold the rail in place temporarily.
6. Use the supplied screws to secure the rails to the rack firmly.
Figure 3 Detail of securing rails in rack
Attach rail to rear
Attach rail to front mounting brackets
mounting brackets
7. Repeat Step 1 through Step 7 to install the other rail.
8. Unpack the Tesla system.
9. Align the Tesla system with the installed rails and slide it into the rack.
Tesla S1070 Installation Guide 9Hardware Installation
Figure 4 Slide the system onto the rails
Align system with
installed rails
LED display located
on the right side of the
front panel
10. Make sure the status LED on the front panel of the system
is located on the right side for proper installation.
11. Tighten the thumb screws on the front of the unit
to secure the Tesla system to the rack system.
Connecting to the
Host System
Use the following procedures to connect the Tesla S1070
system to a host system. Before you begin, make sure you
disconnect the power cord to the host system.
1. Install the NVIDIA Interface Card in an open PCIe slot. If your
host system requires a low-profile bracket on the card, replace
the standard bracket with the low profile bracket provided in the
box. Refer to bottom of page 9 of this document for more info.
2. Connect one end of one of the PCIe cables supplied with your
system.
Tesla S1070 Installation Guide 10Hardware Installation
Figure 5 Connecting cable to host system
3. Connect the other end of the cable to the back of
the Tesla system. The thumb tabs on the cable should
face outward for the cable to engage properly.
Figure 6 Connecting PCIe cable to Tesla system
Interconnect cable
connections on the back of
the Tesla System
Thumb tab should always
be located on the outside of
the connector
Note: There is no specific order when connecting the interconnect
cables between the host system and the Tesla system.
4. Connect the power cord to the Tesla system.
Tesla S1070 Installation Guide 11Hardware Installation
5. Plug the power cord from the Tesla system to an AC outlet (it
is recommended to use a power surge protected outlet).
6. Reconnect the power cord to your host system. The
host power cord should have been unplugged at the
beginning of the whole installation process.
7. Power on the host system. At this time, power is also applied to the
Tesla system.
Note: The power-on state of the Tesla system is controlled
by the host system. The Tesla system is powered
on only when the host system is powered on.
Tesla S1070 Installation Guide 12Software Installation
This section contains the instructions to install the
software drivers within a Linux environment.
In addition to the NVIDIA drivers located on the Installation
CD included with your computing board, the drivers can be
downloaded from the NVIDIA web site at www.nvidia.com.
The driver follows a unified architecture model in which a single driver
set is used for all supported NVIDIA GPUs. Your previous NVIDIA
unified driver may not support your Tesla board. In that case, you will need
to install the drivers from the CD or download from www.nvidia.com.
Driver Installation
Before you begin the installation, you should exit the X server and
close all OpenGL applications (it is possible that some OpenGL
applications persist even after the X server has stopped). You should
also set the default run level on your system such that it will boot to
a VGA console and not directly to X. Doing so will make it easier
to recover if there is a problem during the installation process.
Note: Refer to readme.txt located at /usr/share/doc/NVIDIA_
GLX-1.0/README.txt for more detailed information
regarding the linux driver installation.
1. Download the 32-bit or 64-bit Linux driver (the driver will
have a name similar to “NVIDIA-Linux-x86-100.14.11-pkg1.
run” or “NVIDIA-Linux-x86_64-100.14.11-pkg2.run”).
2. Change to the directory containing the downloaded file.
Tesla S1070 Installation Guide 13Software Installation
3. Run as root the NVIDIA-Linux*.run file downloaded in Step 1.
As the root user you can run the following executables:
In the cd.download_directory, choose either NVIDIA-Linux-x86-
100.14.11-pkg1.run or NVIDIA-Linux-x86_64-100.14.11-pkg2.run
The NVIDIA-Linux*.run file is a self-extracting archive. When executed,
it extracts the content of the archive and runs the contained nvidia-
installer utility, which provides an interactive interface to walk you
through the installation. nvidia-installer will also install itself to /
usr/bin/nvidia-installer, which may be used at some later time
to uninstall drivers, auto download updated drivers, etc.
4. Select Accept to accept the License Agreement.
5. Select Yes if a warning window displays indicating that there are
drivers already installed. Selecting Yes tells the installation process to
overwrite the previously installed drivers.
6. Select Yes when the Kernel Interface window displays. When
the installer runs, it will check for a precompiled kernel
interface. If it does not find one, it will attempt to locate an
interface on the NVIDIA ftp site and then download it.
7. Select OK to compile a kernel interface. If a kernel interface cannot be
downloaded, either because the FTP site cannot be reached or because
one is not provided, the installer will check your system for the
Tesla S1070 Installation Guide 14Software Installation
required kernel sources and compile the interface for you. You must
have the source code for your kernel installed for compilation to work.
On most systems this means that you will need to locate and install the
correct kernel source, kernel headers or kernel development package.
Linking of the kernel interface (in the case that the interface
downloaded or compiled at installation) required you to have a linker
installed on your system. The linker, usually /usr/bin/ld is part of
the binutils package. If a precompiled kernel interface is not found,
you must install a linker prior to installing the NVIDIA driver.
8. Run the nvidia-xconfig utility. nvidia-xconfig will find the X
configuration file and modify it to use the NVIDIA X driver.
If you have an NVIDIA device that is graphics output capable,
you can answer Yes when the installer asks if it should run it.
If you have no device capable of displaying graphics output,
answer No. If you need to reconfigure your X server later, you
can run nvidia-xconfig again from a terminal. nvidia-xconfig will make
a backup copy of your configuration file before modifying it.
9. Installation is now complete.
Note: The X server must be restarted for configuration
file changes to take effect. More information about
nvidia-xconfig can be found in the nvidia-xconfig
manual page by running: %man.nvidia.config.
Tesla S1070 Installation Guide 15Software Installation
CUDA Toolkit
1. If desired, download the CUDA Toolkit from
http://www.nvidia.com/object/cuda_get.html.
2. Change to the directory containing the downloaded file.
3. Run, as root, the NVIDIA_CUDA_TOOLKIT*.run file downloaded in Step 1.
4. You can either take the default location or installation or
change to the directory of your choice. This document
will assume installation in the default location.
5. Installation of the TOOLKIT is now complete.
CUDA Software
Developer’s Kit (SDK)
1. If desired, download the CUDA SDK from
http://www.nvidia.com/object/cuda_get.html.
2. Change to the directory containing the downloaded file.
3. Run, as root, the NVIDIA_CUDA_SDK*.run file downloaded in Step 1.
4. You can either take the default location or installation or
change to the directory of your choice. This document
will assume installation in the default location.
5. Installation of the SDK is now complete.
Tesla S1070 Installation Guide 16Software Installation
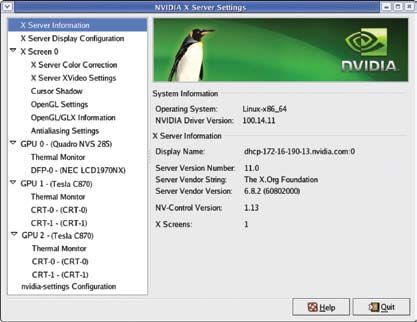
Verifying Installation
if Running X Server
1. Run nvidia-settings to display the server settings window.
2. Verify that the information displayed is correct,
indicating proper functioning.
3. Run an application to verify that your Tesla system is working.
Tesla S1070 Installation Guide 17Software Installation
Verifying Linux
Installation if Not
Running X Server
1. As root, execute the command: nvidia-bug-report.shd: nvidia-bug-
report.sh
This will create a log file called nvidia-bug-report in your present
working directory. Under the section called lspci in the log file, verify
that there are two GPUs per PCI Express connection. The output
should look something like the example below with the GPUs clearly
identified as NVIDIA Corporation devices, but the device ID may be
different depending on the generation of Tesla system you have:
16:00.0 3D controller: nVidia Corporation: Unknown device 0197 (rev a2)
18:00.0 3D controller: nVidia Corporation: Unknown device 0197 (rev a2)
2. Make sure that the following locations of the library files and
NVIDIA compiler are included in your $PATH. The .bashrc file may
need to be modified if the $PATH does not point to the correct files.
These are assuming the default locations were used.
PATH=$PATH:/usr/local/cuda/bin
export PATH
LD_LIBRARY_PATH=/usr/local/cuda/lib
export LD_LIBRARY_PATH
3. Go to the directory or folder that contains the CUDA SDK samples.
In Linux, the default path is: /root/NVIDIA_CUDA_SDK
4. Compile the SDK samples by typing make make from this working
directory.
Tesla S1070 Installation Guide 18Software Installation
5. As root, run the sample file called deviceQuery. The user may need
to change to the directory where the NVIDIA SDK files are located.
Usually these are located at /NVIDIA_CUDA_SDK/bin/linux/
release.
For Tesla systems, there are two GPUs per PCI Express connection.
Only two devices (Device 0 and Device 1) are shown. Output should
look something like the example below:
Device 0: “Tesla S1070”
Major revision number: 1
Minor revision number: 0
Total amount of global memory: 4294268245 bytes
Total amount of constant memory: 65536 bytes
Total amount of shared memory per block: 16384 bytes
Total number of registers available per block: 8192
Warp size: 32
Maximum number of threads per block: 512
Maximum sizes of each dimension of a block: 512 x 512 x 64
Maximum sizes of each dimension of a grid: 65535 x 65535 x 1
Maximum memory pitch: 262144 bytes
Texture alignment: 256 bytes
Clock rate: 1440000 kilohertz
Device 1: “Tesla S1070”
Major revision number: 1
Minor revision number: 0
Total amount of global memory: 4294268245 bytes
Total amount of constant memory: 65536 bytes
Total amount of shared memory per block: 16384 bytes
Total number of registers available per block: 8192
Tesla S1070 Installation Guide 19Software Installation
Warp size: 32
Maximum number of threads per block: 512
Maximum sizes of each dimension of a block: 512 x 512 x 64
Maximum sizes of each dimension of a grid: 65535 x 65535 x 1
Maximum memory pitch: 262144 bytes
Texture alignment: 256 bytes
Clock rate: 1440000 kilohertz
Test PASSED
Press ENTER to exit...
6. As root, run the sample file called bandwidthTest. The user may need
to change to the directory where the NVIDIA SDK files are located.
Usually they are located at /NVIDIA_CUDA_SDK/bin/linux/
release. Output should look something like the example below, but
bandwidth will be higher if your host supports PCIe Gen2 speeds:
Quick Mode
Host to Device Bandwidth for Pageable memory
Transfer Size (Bytes) Bandwidth(MB/s)
33554432 999.4
Quick Mode
Device to Host Bandwidth for Pageable memory
Transfer Size (Bytes) Bandwidth(MB/s)
33554432 720.8
Quick Mode
Device to Device Bandwidth
Transfer Size (Bytes) Bandwidth(MB/s)
33554432 57204.1
&&&& Test PASSED
Press ENTER to exit...
Tesla S1070 Installation Guide 20References and Resources
Getting Driver Updates
During NVIDIA software installation, the installation wizard provides
an option to check for updated software online. You can also download
software updates by visiting: http://www.nvidia.com/cuda.
Tesla S1070 Installation Guide 21Registration, Warranty, and
Support
Registering Your
Tesla S1070
Registering your Tesla system gives you priority access to the
NVIDIA Customer Care support center. Once you have completed
registration, you will be given a user ID and password for online
Customer Care. You can also elect to receive automatic email
notification of special promotions and software updates to
ensure that your Tesla system continues to operate optimally.
Warranty and Support
The Tesla S1070 is covered by a 36-month warranty. Complete
warranty details are available at www.nvidia.com/warranty.
For support, please visit the Customer Care center at www.nvidia.com/
support. The site offers access to a broad range of product information.
Tesla S1070 Installation Guide 22Compliance and
Certifications
The NVIDIA Tesla S1070 is compliant with the relevant
regulations and has received the required certifications from:
Bureau of Standards, Metrology, and Inspection (BSMI)
Australian Communications Authority (C-Tick)
Conformité Européenne (CE)
Federal Communications Commission (FCC)
IECEE CB Scheme (CB)
Industry Cananda Interference-Causing Equipment Standard (ICES)
Ministry of Information and Communication (MIC)
Russian System GOST R (GOST-R)
Underwriters Laboratories (UL, CUL)
Voluntary Control Council for Interference (VCCI)
Tesla S1070 Installation Guide 23Compliance and Certifications
U.S. Federal Communications
Commission Compliance
Title 47 of Code of Federal Regulation (CFR) part 15 - Radio
frequency devices; Subpart B - Unintentional Radiator
CAUTION: Changes or modifications to this unit not
expressly approved by the party responsible for compliance
could void the user’s authority to operate the equipment.
Note: This equipment has been tested and found to comply with the
limits for a Class A digital device, pursuant to Part 15 of the
FCC Rules. These limits are designed to provide reasonable
protection against harmful interference when the equipment
is operated in a commercial environment. This equipment
generates, uses, and can radiate radio frequency energy and, if
not installed and used in accordance with the instruction manual,
may cause harmful interference to radio communications.
Operation of this equipment in a residential area is likely to
cause harmful interference, in which case the user will be
required to correct the interference at his own expense.
Canada Compliance
Industry Canada
ICES-003 - Digital Apparatus: Spectrum
Management and Telecommunications Policy;
Interference-Causing Equipment Standard
This Class A digital apparatus complies with Canadian ICES-003
Cet appareil numérique de la classe A est conforme à la norme NMB-003 du Canada.
Tesla S1070 Installation Guide 24Compliance and Certifications
Australia and New Zealand Compliance
C-Tick - The Australian Communications Authority (ACA) and the
Radio Spectrum Management Group (RSM) of New Zealand
AS/NZS CISPR 22:2006 standard – Information
technology equipment-Radio disturbance characteristics-
limit and methods of measurement
ATTENTION: This is a Class A product. In a domestic
environment this product may cause radio interference in which
case the user may be required to take adequate measures.
Japan Compliance
VCCI - Voluntary Control Council for Interference
by Information Technology Equipment
V-1/07.04: Agreement of Voluntary Control Council for
Interference by Information Technology Equipment
V-2/07.04: Rules for Voluntary Control Measures
V-3/07.04: Normative Annex 1 Technical Requirements
V-4/07.04: Normative Annex 1-1 Supplementary
Test Conditions for Equipment under Test
Tesla S1070 Installation Guide 25Compliance and Certifications
Korea Compliance
MIC - Ministry of Information and Communication
KN 22 (CISPR 22): Information technology equipment-Radio
disturbance characteristics - limit and methods of measurement
KN 24 (CISPR 24): Information technology equipment -
immunity characteristics-limit and methods of measurement
Taiwan Compliance
BSMI - Bureau of Standards, Metrology and Inspection
CNS 13438 (CISPR 22): Information technology equipment-Radio
disturbance characteristics-limit and methods of measurement
CNS 14336 (IEC 60950-1): Information Technology
Equipment – Safety - Part 1: General Requirement
Tesla S1070 Installation Guide 26Compliance and Certifications
European Union Compliance
The equivalent international standards are in parentheses:
CE - European Conformity (Conformite Europeene)
Product complies with both the EMC Directive (2004/108/
EC) and the Low Voltage Directive (2006/95/EC) issued
by the Commission of the European Community.
Compliance with these directives implies conformity
to the following European Norms
EN-55022 (CISPR 22): Information technology equipment-Radio
disturbance characteristics - limit and methods of measurement
EN 55024 (IEC 61000-4-2, 3, 4, 5, 6, 8, 11): Information
technology equipment - immunity characteristics-
limit and methods of measurement
EN 61000-3-2 (IEC 61000-3-2): Electromagnetic compatibility
(EMC)-Part 3-2: Limits-Limits for harmonic current
emissions (equipment input current ≤16 A per phase)
EN 61000-3-3 (IEC 61000-3-3): Electromagnetic compatibility
(EMC)-Part 3-3: Limits-Limitation of voltage changes,
voltage fluctuations and flicker in public low-voltage
supply systems, for equipment with rated current ≤16 A
per phase and not subject to conditional connection)
EN 60950-1 (IEC 60950-1): Information Technology
Equipment-Safety-Part 1: General Requirement
WARNING: This is a Class A product. In a domestic environment
this product may cause radio interference in which case the
user may be required to make adequate measures.
Tesla S1070 Installation Guide 27Compliance and Certifications
Russia Federal Compliance
GOST-R - Russian System GOST R
GOST R IEC 60950-1: Information technology
equipment – Safety –Part 1: General Requirement
GOST R 51318.22-99: Information technology equipment – Radio
disturbance characteristics - limit and methods of measurement
GOST R 51318.24-99(IEC 61000-4-2, 3, 4, 5, 6, 8,
11): Information technology equipment – immunity
characteristics - limit and methods of measurement
GOST R 51317.3.2-2006(passage 6 and 7) (IEC 61000-
3-2): Electromagnetic compatibility(EMC) - Part
3-2: Limits - Limits for harmonic current emissions
(equipment input current ≤ 16A per phase)
GOST R 51317.3.3-99(IEC 61000-3-3): Electromagnetic
compatibility(EMC)- Part 3-3: Limits-Limitation of voltage
changes, voltage fluctuations and flicker in public low-voltage
supply systems, for equipment with rated current ≤ 16A
per phase and not subject to conditional connection)
“Class A” Equipment(Business purpose info/
telecommunications equipment)
Tesla S1070 Installation Guide 28Compliance and Certifications
UL, CUL Compliance
UL60950-1:2006: Information technology equipment
- Safety - Part 1: General requirement
CSA C22.2 No. 60950-1:2006: Information Technology
equipment - Safety - Part1: General requirement
CB Scheme
IEC 60950-1:2001: Information technology equipment
– Safety – Part 1: General requirement
Tesla S1070 Installation Guide 29Important Safety
Information
NVIDIA products are designed to operate safely when installed and
used according to the product instructions and general safety practices.
The guidelines included in this document explain the potential risks
associated with computer operation and provide important safety
practices designed to minimize these risks. By carefully following
the information contained in this document and the specific
instructions provided with your product, you can protect yourself
from hazards and create a safer computer work environment.
The product is designed and tested to meet IEC-60950, the
Standard for the Safety of Information Technology Equipment.
This also covers the national implementation of IEC-60950
based safety standards around the world (e.g., UL-60950). These
standards reduce the risk of injury from the following hazards:
Electric shock: Hazardous voltage levels
contained in parts of the product.
Fire: Overload, temperature, material flammability.
Mechanical: Sharp edges, moving parts, instability.
Energy: Circuits with high energy levels (240 volt-
amperes) or potential as burn hazards.
Heat: Accessible parts of the product at high temperatures.
Chemical: Chemical fumes and vapors.
Radiation: Noise, ionizing, laser, ultrasonic waves
Neutral Fusing: CAUTION - DOUBLE
POLE/NEUTRAL FUSING
To reduce the risk of bodily injury, electric shock, fire and damage
to the equipment, observe all precautions included in this guide.
Tesla S1070 Installation Guide 30Important Safety Information
Symbols on Equipment
This symbol in conjunction with any of the following symbols
indicates the presence of a potential hazard. The potential
for injury exists if warnings are not observed. Consult your
documentation for specific details.
This symbol indicates the presence of hazardous energy
circuits or electric shock hazards. Refer all servicing to
qualified personnel.
WARNING: To reduce the risk of injury from electric shock
hazards, do not open this enclosure. Refer all maintenance,
upgrades and servicing to qualified personnel.
This symbol indicates the presence of electric shock
hazards. The area contains no user or field service able
parts. Do not open for any reason.
WARNING: To reduce risk of injury from electric shock
hazards, do not open this enclosure.
This symbol indicates the presence of a hot surface or hot
component. If this surface is contacted the potential for
injury exists.
WARNING: To reduce the risk of injury from a hot
component, allow the surface to cool before touching.
This symbol indicates that the component exceeds the
recommended weight for one individual to handle safety.
WARNING: To reduce the risk of personal injury or damage to
the equipment, observe local occupational health and safety
require and guidelines for manual material handling.
This symbol indicates the presence of a sharp edge or object
that can cause cuts or other bodily injury.
WARNING: To prevent cuts or other bodily injury, do not
contact sharp edge or object.
This symbol indicates the presence of mechanical parts that
can result in pinching, crushing or other bodily injury.
WARNING: To avoid risk of bodily injury, keep away from
moving parts.
This symbol indicates the presence of a potential tip over
hazard that can result in bodily injury.
WARNING: To avoid risk of bodily injury, follow all
instructions for maintaining stability of the equipment during
transport, installation.
Tesla S1070 Installation Guide 31Important Safety Information
General Precautions
To reduce the risk of personal injury or damage to the equipment:
Shut down the product and disconnect all AC
power cords and cables before installation.
Do not connect or disconnect any cables when
performing installation, maintenance, or reconfiguration
of this product during an electrical storm.
Never turn on any equipment when there is evidence
of fire, water, or structural damage.
Place the product away from radiators, heat registers, stoves,
amplifiers, or other products that produce heat.
Never use the product in a wet location.
Use only with a rack, cart, stand, tripod, or bracket recommended
by NVIDIA, or sold with the product. Or it will cause
serious bodily injury and serious damage to the product.
Avoid inserting foreign objects through openings in the product.
Do not use conductive tools that could bridge live parts.
Do not make mechanical or electrical modifications to the equipment.
Use the product only with approved equipment.
Follow all cautions and instructions marked on the equipment.
Do not attempt to defeat safety interlocks (where provided).
If the product sustains damage requiring service, disconnect the product
from the AC electrical outlet and refer servicing to an NVIDIA authorized
service provider. Examples of damage requiring service include:
The power cord, extension cord or plug has been damaged.
Liquid has been spilled on the product or an
object has fallen into the product.
The product has been exposed to rain or water.
The product has been dropped or damaged.
Noticeable signs of overheating.
Tesla S1070 Installation Guide 32Important Safety Information
Precautions for
Installation, Maintenance
and Servicing
To reduce the risk of electric shock or damage to the
equipment when installing, maintaining or servicing
products, observe the following precautions.
Installation
Follow the pre- and post-installation procedures
in other parts of the manual.
Follow the installation and configuration instructions in the manual.
In some geographical areas it may be advisable to
install lightning protection for product.
Ensure reliable grounding of rack mounted
equipment have been maintained.
Maintaining and Servicing:
Product contains power supplies that are capable of producing
hazardous energy levels. The installation of internal options
and routine maintenance and service of this product
should be performed by individuals who are knowledgeable
about the procedures, precautions, and hazards associated
with equipment containing hazardous energy levels.
Do not exceed the level of repair specified in the procedures
in the product documentation. All troubleshooting and repair
procedures are detailed to allow only subassembly or module-
level repair. Because of the complexity of the individual
boards and subassemblies, do not attempt to make repairs at
the component level or to make modifications to any printed
wiring board. Improper repairs can create a safety hazard.
Tesla S1070 Installation Guide 33Important Safety Information
Verify that the AC power supply branch circuit that provides
power to the rack is not overloaded. This will reduce the risk
of personal injury, fire, or damage to the equipment. The total
rack load should not exceed 80 percent of the branch circuit
rating. Consult the electrical authority having jurisdiction
over your facility wiring and installation requirements.
The covers should remain locked during normal operation.
The system should be installed in a controlled access location
where only qualified personnel have access to the system.
Upon completion of any services or repairs to the product,
have your authorized service provider perform any safety
checks required by the repair procedure or by local codes to
determine that the product is in proper operating condition.
Power down the equipment and disconnect all AC power
cords and cable before removing any access covers.
Do not replace components while power is applied to the product.
First, shut down the product and disconnect all AC power cords.
Allow the product to cool before removing covers
and touching internal components.
Move products with casters carefully. Avoid
quick stops and uneven surfaces.
Do not block the opening used for ventilation, since these ensure
reliable operation of product and protect it from overheating.
And opening should be kept free of dust and debris.
Allow sufficient air circulation around and prevent
direct exposure to radiant heat sources.
Before cleaning, unplug the product from the
power source Use a damp cloth for cleaning. Do
not use liquid cleaners or aerosol cleaners.
Tesla S1070 Installation Guide 34Important Safety Information
Precautions for
Power Connection
Power Cords
To reduce the risk of electric shock or damage to the equipment:
Use power cables provided with this product.
If you have to change the power cords for any
reason, use an approved power cord.
Not all power cords have the same current ratings. If
you have questions about the type of power cord to
use, contact an authorized service provider.
You must use a power cord rated for your product and for the
voltage and current marked on the electrical ratings label of the
product. The voltage and current rating of the cord must be greater
than the voltage and current rating marked on the product.
Make sure that the total amperage rating of all products plugged
into an extension cord or power strip does not exceed 80 percent
of the ampere ratings limit for the extension cord or power strip.
The product is equipped wit a three-wire electrical
grounding type plug that has a third pin for ground. This
plug only fits into a grounded electrical power outlet.
Plug the power cord into a grounded (earthed) electrical
outlet that is easily accessible at all times.
Do not disable the power cord grounding plug. The
grounding plug is an important safety feature.
Do not place objects on AC power cords or cables. Arrange them
so that no one may accidentally step on or trip over them.
Tesla S1070 Installation Guide 35Important Safety Information
Do not pull on a cord or cable. When unplugging from
the electrical outlet grasp the cord by the plug.
When possible, use one hand only to connect or disconnect cables.
Do not modify power cables or plugs. Consult a licensed
electrician or your power company for site modifications.
àà For Finland: Laite on liitettävä suojamaadoituskoskettimilla
varustettuun pistorasiaan
àà For Norway: Apparatet må tilkoples jordet stikkontakt
àà For Sweden: Apparaten skall anslutas till jordat uttag
Power Supply
Ensure that the voltage and frequency of your power source
match the voltage and frequency inscribed on the equipment’s
electrical rating label. If you have the question about the type
of power source to use, contact your authorized service.
Connect to a properly wired and grounded electrical outlet.
Always follow your local/national wiring rules.
The socket-outlet shall be installed near the
equipment and shall be easily accessible.
If want to help protect your system from sudden, transient
increases and decreases in electrical power, a surge
suppressor, line conditioner and so on could be used.
This system is suitable for connection to an IT power system.
Tesla S1070 Installation Guide 36Important Safety Information
Precautions for
Communication Cable
To reduce the risk of exposure to shock hazard from communication cable:
Do not connect communication cable during a lightening storm.
There may be a remote risk of electric shock from lightening.
Do not connect or use communication cable in a wet location.
Disconnect the communication cable before opening a product
enclosure, touching or installing internal components.
Precautions for Installing
System Unit in Racks
Stability
To reduce the risk of personal injury or damage
to the equipment, be sure that:
The rack is properly stabilized and supported before installing.
The leveling jacks are extended to the floor.
The full weight of the rack rests on the leveling jacks.
The stabilizing feet are attached to the rack
if it is a single-rack installation.
The racks are coupled together in multiple-rack installations.
Only one component is extended at a time. A rack may become
unstable if more than one component is extended for any reason.
You load the rack from the bottom up and load
the heaviest item into the rack first.
Tesla S1070 Installation Guide 37Important Safety Information
You do not attempt to move a fully loaded equipment rack.
Remove equipment from the rack before moving the rack.
The product is properly mated with the rails. Products that
are improperly mated with the rails may be unstable.
No objects are placed on top of a rack-mounted device.
Installation of the equipment in a rack should be
such that the amount of airflow required for safe
operation of the equipment is not compromised.
Reliable earthing (grounding) of rack-mounted equipment
should be maintained. Particular attention should be given
to supply connections other than direct connections to
the branch circuit (for example, use of a power strip).
Manual Material Handling
To reduce the risk of personal injury or damage to the equipment:
Observe local occupational health and safety requirements
and guidelines for manual materials handling.
Obtain adequate assistance to lift and stabilize the product during
installation or removal. Do not move large racks by yourself.
Remove all pluggable power supplies and modules
to reduce the weight of the product.
Use caution when pressing the component rail release
latches and sliding a component into the rack.
The slide rails could pinch your fingers.
Do not extend the components from the rack too quickly as
the moving weight may damage the supporting rails.
Mounting of the equipment in the rack should be such that a hazardous
condition is not achieved due to uneven mechanical loading.
Tesla S1070 Installation Guide 38Notice
ALL NVIDIA DESIGN SPECIFICATIONS, REFERENCE BOARDS, FILES,
DRAWINGS, DIAGNOSTICS, LISTS, AND OTHER DOCUMENTS (TOGETHER
AND SEPARATELY, “MATERIALS”) ARE BEING PROVIDED “AS IS.” NVIDIA
MAKES NO WARRANTIES, EXPRESSED, IMPLIED, STATUTORY, OR
OTHERWISE WITH RESPECT TO THE MATERIALS, AND EXPRESSLY
DISCLAIMS ALL IMPLIED WARRANTIES OF NONINFRINGEMENT,
MERCHANTABILITY, AND FITNESS FOR A PARTICULAR PURPOSE.
Information furnished is believed to be accurate and reliable. However, NVIDIA
Corporation assumes no responsibility for the consequences of use of such
information or for any infringement of patents or other rights of third parties that
may result from its use. No license is granted by implication or otherwise under
any patent or patent rights of NVIDIA Corporation. Specifications mentioned
in this publication are subject to change without notice. This publication
supersedes and replaces all information previously supplied. NVIDIA Corporation
products are not authorized for use as critical components in life support
devices or systems without express written approval of NVIDIA Corporation.
Trademarks
NVIDIA and the NVIDIA logo are trademarks or registered trademarks
of NVIDIA Corporation in the United States and other countries.
Other company and product names may be trademarks of the
respective companies with which they are associated.
Copyright
© 2008 NVIDIA Corporation. All rights reserved.
NVIDIA Corporation
2701 San Tomas Expressway
Santa Clara, CA 95050
www.nvidia.comYou can also read