Oracle FLEXCUBE Universal Banking - Nostro Reconciliation User Guide Part No. E94300-01 - Oracle Docs
←
→
Page content transcription
If your browser does not render page correctly, please read the page content below
Nostro Reconciliation User Guide
Oracle FLEXCUBE Universal Banking
Release 14.1.0.0.0

Part No. E94300-01

May 2018

Nostro Reconciliation User Guide
Oracle Financial Services Software Limited
Oracle Park

Off Western Express Highway
Goregaon (East)
Mumbai, Maharashtra 400 063
India
Worldwide Inquiries:
Phone: +91 22 6718 3000
Fax: +91 22 6718 3001
https://www.oracle.com/industries/financial-services/index.html

Copyright © 2007, 2018, Oracle and/or its affiliates. All rights reserved.

Oracle and Java are registered trademarks of Oracle and/or its affiliates. Other names may be trademarks of their respective
owners.

U.S. GOVERNMENT END USERS: Oracle programs, including any operating system, integrated software, any programs installed
on the hardware, and/or documentation, delivered to U.S. Government end users are “commercial computer software” pursuant to
the applicable Federal Acquisition Regulation and agency-specific supplemental regulations. As such, use, duplication, disclosure,
modification, and adaptation of the programs, including any operating system, integrated software, any programs installed on the
hardware, and/or documentation, shall be subject to license terms and license restrictions applicable to the programs. No other
rights are granted to the U.S. Government.

This software or hardware is developed for general use in a variety of information management applications. It is not developed or
intended for use in any inherently dangerous applications, including applications that may create a risk of personal injury. If you use
this software or hardware in dangerous applications, then you shall be responsible to take all appropriate failsafe, backup,
redundancy, and other measures to ensure its safe use. Oracle Corporation and its affiliates disclaim any liability for any damages
caused by use of this software or hardware in dangerous applications.

This software and related documentation are provided under a license agreement containing restrictions on use and disclosure and
are protected by intellectual property laws. Except as expressly permitted in your license agreement or allowed by law, you may
not use, copy, reproduce, translate, broadcast, modify, license, transmit, distribute, exhibit, perform, publish or display any part, in
any form, or by any means. Reverse engineering, disassembly, or decompilation of this software, unless required by law for
interoperability, is prohibited.
The information contained herein is subject to change without notice and is not warranted to be error-free. If you find any errors,
please report them to us in writing.

This software or hardware and documentation may provide access to or information on content, products and services from third
parties. Oracle Corporation and its affiliates are not responsible for and expressly disclaim all warranties of any kind with respect
to third-party content, products, and services. Oracle Corporation and its affiliates will not be responsible for any loss, costs, or
damages incurred due to your access to or use of third-party content, products, or services.

Contents

1.   Preface ...................................................................................................... 1-1
     1.1     Introduction..............................................................................................................   1-1
     1.2     Audience..................................................................................................................   1-1
     1.3     Documentation Accessibility....................................................................................              1-1
     1.4     Organization ............................................................................................................    1-1
     1.5     Related Documents .................................................................................................          1-2
     1.6     Glossary of Icons.....................................................................................................       1-2
2.   Reconciliation an Overview .................................................................... 2-1
     2.1     Introduction ............................................................................................................. 2-1
     2.2     Features .................................................................................................................. 2-1
3.   Defining a Reconciliation Class ............................................................. 3-1
     3.1     Introduction..............................................................................................................   3-1
     3.2     Reconciliation Class Definition screen ....................................................................                  3-1
             3.2.1 Invoking the ‘Reconciliation Class Maintenance screen.............................                                     3-1
             3.2.2 Assigning Reconciliation Class a Code ......................................................                           3-2
             3.2.3 Description..................................................................................................          3-3
             3.2.4 Specifying the Adjustment GL ....................................................................                      3-3
             3.2.5 Indicating the Reconciliation Class Type....................................................                           3-3
             3.2.6 Indicating the Sequence in which Match Rules should be
                     made Applicable .........................................................................................            3-4
             3.2.7 Assigning Rule Sequence Number.............................................................                            3-4
             3.2.8 Specifying Parameters for the Manual Matching of Reconciled Entries .....                                              3-4
4.   Defining Matching Rules ......................................................................... 4-1
     4.1     Introduction.............................................................................................................. 4-1
     4.2     Maintaining Reconciliation Rule .............................................................................. 4-1
     4.3     Features of the Reconciliation Rule Definition Screen ............................................ 4-2
5.   Defining External Accounts .................................................................... 5-1
     5.1     Introduction.............................................................................................................. 5-1
     5.2     Reconciliation External Account Definition Screen.................................................. 5-1
     5.3     Features of the External Account Definition Screen................................................ 5-2
6.   Manually Entering an External Statement ............................................. 6-1
     6.1     Introduction..............................................................................................................   6-1
     6.2     Reconciliation External Statement Input Screen .....................................................                         6-1
     6.3     Features of the External Statement Input Screen ...................................................                          6-2
     6.4     The Statement Details Screen.................................................................................                6-2
     6.5     Viewing the Overrides that were Encountered ........................................................                         6-3
     6.6     Viewing Fields .........................................................................................................     6-4
7.   Uploading an External Statement .......................................................... 7-1
     7.1     Introduction..............................................................................................................   7-1
     7.2     The Procedure.........................................................................................................       7-1
     7.3     Reconciliation External Statement Upload Screen..................................................                            7-2
     7.4     Features on the External Upload Screen ................................................................                      7-2
8.   Matching Internal and External Statements .......................................... 8-1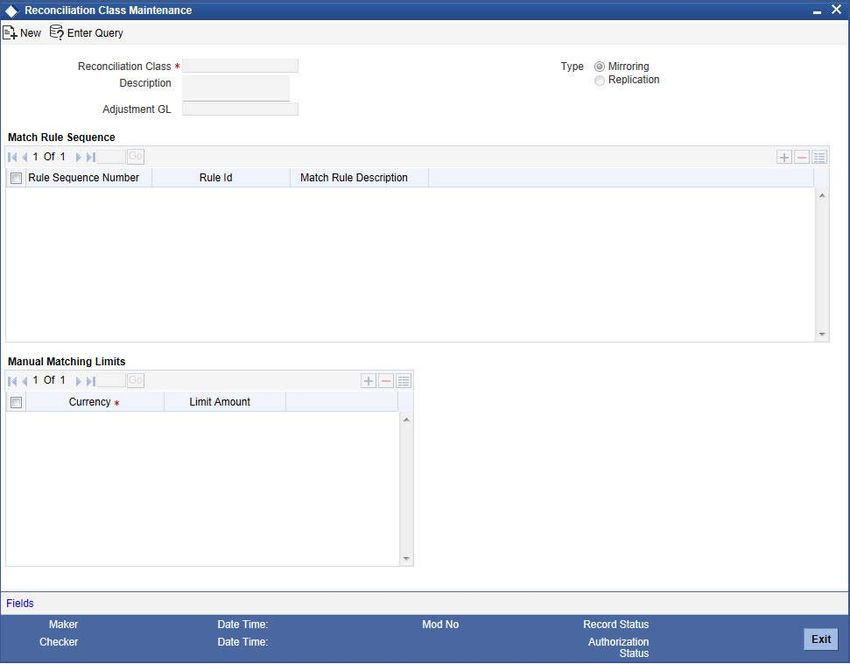
8.1    Introduction.............................................................................................................. 8-1
      8.2    Manual Matching of Entries ..................................................................................... 8-1
9.    Reports ..................................................................................................... 9-1
      9.1    Introduction.............................................................................................................. 9-1
      9.2    Reconciliation System Unmatched Items Report .................................................... 9-1
             9.2.1 Contents of Report ..................................................................................... 9-3
      9.3    Matched Items Report ............................................................................................. 9-5
             9.3.1 Selection Options ....................................................................................... 9-6
             9.3.2 Contents of the Report ............................................................................... 9-7
      9.4    Upload Exception Report......................................................................................... 9-9
             9.4.1 Selection Options ....................................................................................... 9-9
             9.4.2 Contents of the Report ............................................................................. 9-10
      9.5    Capture Exception Report ..................................................................................... 9-11
             9.5.1 Selection Options ..................................................................................... 9-11
             9.5.2 Contents of the Report ............................................................................. 9-12
      9.6    Match Exception Report ........................................................................................ 9-14
             9.6.1 Selection Options ..................................................................................... 9-14
             9.6.2 Contents of the Report ............................................................................. 9-14
      9.7    RE External Statement Report .............................................................................. 9-15
             9.7.1 Contents of Report ................................................................................... 9-16
      9.8    Manual Matching Report ....................................................................................... 9-17
             9.8.1 Contents of Report ................................................................................... 9-18
      9.9    Exception Report ................................................................................................... 9-21
             9.9.1 Contents of Report ................................................................................... 9-21
10. Function ID Glossary ............................................................................. 10-1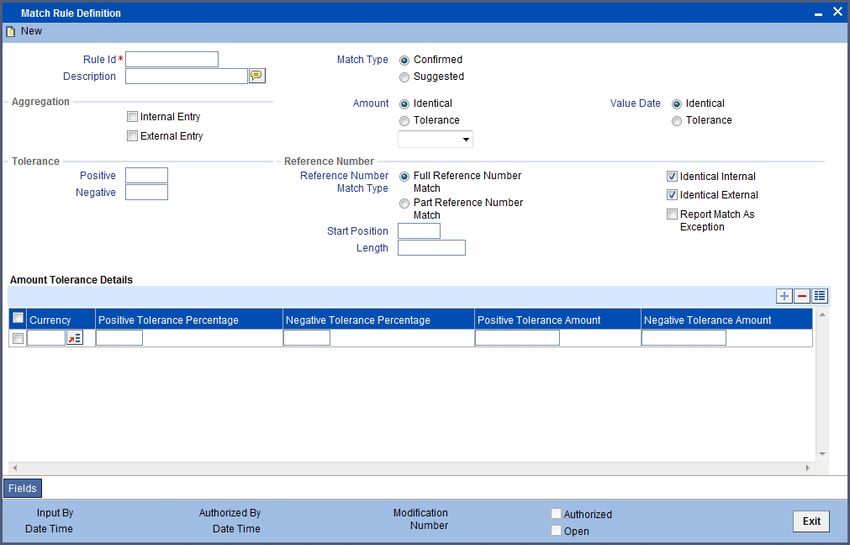
1. Preface
1.1   Introduction
      The Reconciliation Manual of Oracle FLEXCUBE is designed to guide you through the
      reconciliation process. To help you further understand the reconciliation process, as followed
      in our system, we have given ample examples to illustrate some of the complex features of
      the module.

1.2   Audience
      This manual is intended for the Customer Service Representatives (CSRs) and staff in charge
      of setting up new products in your bank.

1.3   Documentation Accessibility
      For information about Oracle's commitment to accessibility, visit the Oracle Accessibility
      Program website at http://www.oracle.com/pls/topic/lookup?ctx=acc&id=docacc.

1.4   Organization
      This manual is organized as follows:

       Chapter       Description

                     About this Manual gives information on the intended audience. It also lists
       Chapter 1
                     the various chapters covered in this User Manual.

                     Reconciliation an Overview familiarizes you with the features of reconcilia-
       Chapter 2
                     tion by highlighting the major features of this module.

                     Defining Matching Rules explains the standard rules that need to be
       Chapter 3     defined and maintained while matching nostro entries. It also details the
                     parameters based on which these rules need to be devised.

                     Defining a Reconciliation Class explains the advantages of defining recon-
                     ciliation classes. In addition it also talks about the types of reconciliation
       Chapter 4
                     classes and the manner in which a class can be made applicable to an
                     accounting entity.

                     Defining External Accounts describes the procedure to define an external
       Chapter 5
                     entity or account.

                     Manually Entering an External Statement explains how to capture the
       Chapter 6
                     details of statements that come in through media other than SWIFT.

                     Uploading an External Statement enumerates the steps for uploading mes-
       Chapter 7     sages that come into your bank through the media types that you have
                     maintained for your bank in the Messaging sub-system.

                     Matching Internal and External Statements helps you understand how
       Chapter 8     external statements can be matched with corresponding internal entries
                     either manually or automatically.

                                              1-1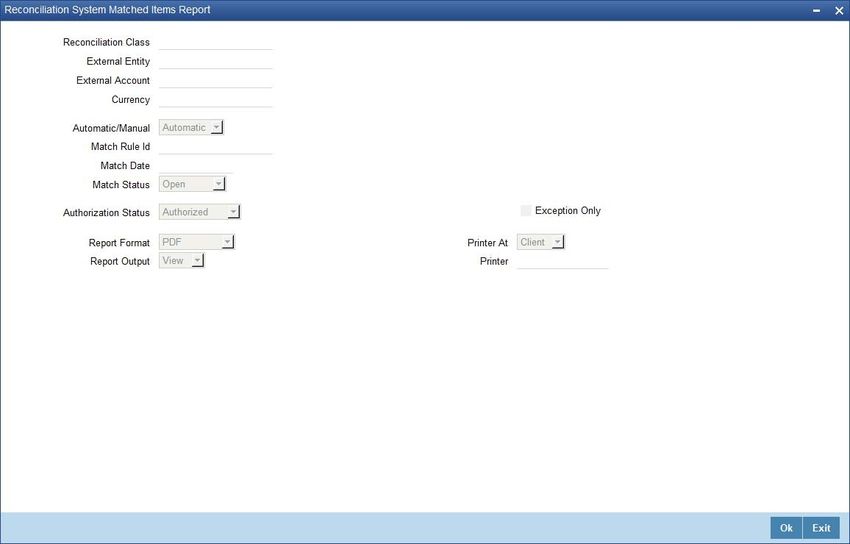
Reports provides a list of reports that can be generated in this module and
Chapter 9
also explains their contents.
Chapter Function ID Glossary has alphabetical listing of Function/Screen ID's used
10 in the module with page references for quick navigation.
1.5 Related Documents
Procedures
1.6 Glossary of Icons
This User Manual may refer to all or some of the following icons.
Icons Function
Exit
Add row
Delete row
Option List
1-2
2. Reconciliation an Overview
2.1 Introduction
The Reconciliation Module of Oracle FLEXCUBE deals with the reconciliation of the entries
of an external statement with that of the corresponding entries of an internal account.
The main objective in automating account reconciliation is to:
Maximize interest revenue from external accounts
Minimize financial exposure
Control financial exposure to critical accounts
In Oracle FLEXCUBE, these objectives are realized through the automatic capture of external
and internal statements and the automatic matching and reconciliation of these entries.
The reconciliation process involves several steps, which have been diagrammatically
represented below.
2.2 Features
Oracle FLEXCUBE provides you with the following features through the reconciliation
module:
Flexible Definition of Matching Rules
You can define the parameters based on which external entries can be matched with their
corresponding internal entries. The match rules that you define can be based on a variety of
criteria like:
Amount
Value date exact or with a tolerance that you can define
Transaction reference number (internal or external)
Simple amount or bunched amounts
While matching entries, you have the option to change the sequence in which the rules should
be applied.
You can define reconciliation classes that consist of several match rules. You can further
define the sequence in which the matching rules should be applied to specific accounts.
2-1
Automatic Capture of Data
The data that is handled by this module pertains to the information captured through the other
modules of Oracle FLEXCUBE, data generated internally by the system, data captured
through S.W.I.F.T. and data that you enter manually into the system.
In Oracle FLEXCUBE both internal and external data can be captured electronically. This
eliminates manual capturing of entries.
Automatic Reconciliation
Oracle FLEXCUBE has incorporated a unique feature wherein you can automatically match
the entries of an external account with those of an internal account. You can generate a report
that gives you details of the exceptions that occurred while auto matching you can also view
details of the entries that could not be matched automatically.
Another unique feature that has been incorporated is that you can actually match one internal
with several external entries and several external entries with one internal entry.
Information Services for Managerial and Statistical Reporting
To assist your bank in the important function of reconciling entries, the module enables you
to generate various reports that can be viewed on the screen or printed. The reports that you
can generate include:
The Unmatched Items Report
Matched Items Report
The Reconciliation Class Definition Report
Capture Exception Report
External Account Definition Report
Manual Matching Report
Match Exception Report
Match Items Report
Rule Definition Report
Statement Input Report
Upload Exception Report
2-2
3. Defining a Reconciliation Class
3.1 Introduction
To recall, you have defined Match Rules in the Matching Rule Definition screen. Several rules
constitute a reconciliation class. You can define a reconciliation class in the Reconciliation
Class Definition Screen.
You can indicate the match rules that should constitute a class and the sequence in which the
rules should be made applicable to an external accounting entity during automatic matching.
A significant attribute of an account class is whether the transactions that are to be matched
are mirrored or replicated.
The advantage of maintaining reconciliation classes is that at the time of automatically
reconciling and matching external entity entries, you need to just indicate the code assigned
to the class. All the details maintained for the class will be automatically picked up and made
applicable to an external entity account.
3.2 Reconciliation Class Definition screen
This section contains the following topics:
Section 3.2.1, "Invoking the ‘Reconciliation Class Maintenance screen"
Section 3.2.2, "Assigning Reconciliation Class a Code"
Section 3.2.3, "Description"
Section 3.2.4, "Specifying the Adjustment GL"
Section 3.2.5, "Indicating the Reconciliation Class Type"
Section 3.2.6, "Indicating the Sequence in which Match Rules should be made
Applicable"
Section 3.2.7, "Assigning Rule Sequence Number"
Section 3.2.8, "Specifying Parameters for the Manual Matching of Reconciled Entries"
3.2.1 Invoking the ‘Reconciliation Class Maintenance screen
You can invoke the ‘Reconciliation Class Maintenance’ screen by typing ‘REDXCLAS’ in the
field at the top right corner of the Application tool bar and clicking on the adjoining arrow
button.
If you are maintaining the details of a new class, click the new button on the Application
toolbar. The ‘Reconciliation Class Maintenance’ screen is displayed without any details.
3-1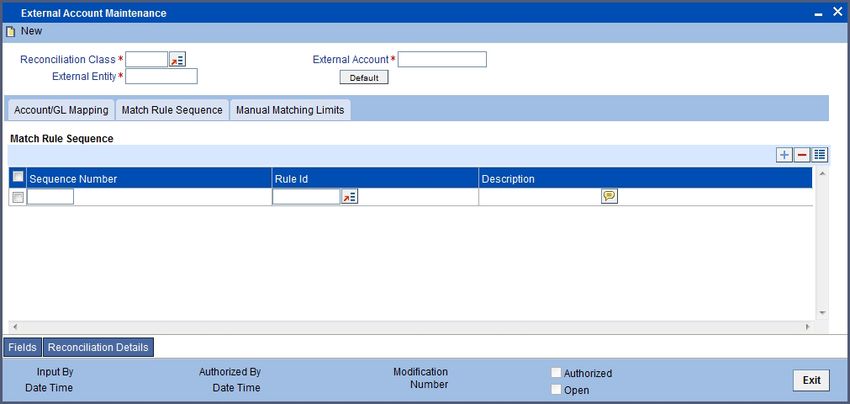
If you are calling a Reconciliation Class Definition record that has already been defined,
double-click a class record of your choice from the summary screen.
3.2.2 Assigning Reconciliation Class a Code
In Oracle FLEXCUBE, each reconciliation class that you define is identified by a four
character code called a Class Code. You can follow your own convention for devising this
code.
The code that you assign to a class should be unique as it is used to identify the class across
the branches of your bank. When you need to make the class applicable to an accounting
entity, you need to just specify the code assigned to the class. The details that you defined for
the class will automatically be made applicable to the accounting entity.
After you assign a reconciliation class a code, you can specify the preferences based on
which internal and external transactions should be matched, if the reconciliation class is made
applicable to it.
The attributes that you can define for a reconciliation class are:
The reconciliation class type.
The sequence in which matching rules should be used for the automatic matching of
transactions.
You can define several classes using various combinations of the above parameters.
3-23.2.3 Description
You have to enter the Description of Recon Class Code in this field
3.2.4 Specifying the Adjustment GL
When maintaining a Reconciliation Class, you can identify an Adjustment GL to which
unreconciled entries involving the Reconciliation Class should be posted. All unreconciled
entries, involving the Class, will automatically be posted to this GL.
3.2.5 Indicating the Reconciliation Class Type
Mirroring
A Mirror reconciliation class type is one, which when applied during automatic matching, will
check that the debit or credit indicator of the external statement should mirror that of the
internal transaction. This means that a debit in your books will have a corresponding credit
entry in their books and vice-versa.
Consider the following example.
Friendly Neighborhood Bank has placed US $100,000 with Greenville Global Banking,
Bangalore.
The entries passed at FNB:
Account Debit / Credit
GGB Cr
Internal GL Dr
When GGB makes a repayment for the placement, the entries that are passed are:
Account Debit / Credit
GGB Dr
Internal GL Cr
If you have indicated mirror matching for the class, these entries will be matched as the
external entries mirror the internal ones.
Replication
A Replication reconciliation class type is one, which when applied during automatic matching,
will check that the debit or credit indicator of the external statement replicates the internal
transaction.
Note
Initially, one reconciliation class will be pre-shipped. The account class is called - NOST
(Nostro Reconciliation). This reconciliation class is needed when you want the external ac-
counts that have come in through SWIFT to be automatically uploaded. The MT950 has
been hard coded for the reconciliation class NOST.
3-33.2.6 Indicating the Sequence in which Match Rules should be made
Applicable
An account class is made up of several match rules. You can not only indicate the rules that
constitute the class but you can also indicate the sequence in which the rules should be made
applicable during automatic matching of entries.
3.2.7 Assigning Rule Sequence Number
The system assigns Rule sequence Number for the rules attached to Recon Class Definition.
To make a rule, a component of a reconciliation class, select the rule from the adjoining option
list that is displayed. The description of the rule is displayed. Thereafter, click add icon. To
delete a rule from the list, select the rule and click delete icon button.
3.2.8 Specifying Parameters for the Manual Matching of Reconciled Entries
The reconciliation module provides the option of defining amount tolerance limits for the
manual matching of reconciled entries. Using this option you can choose to reconcile entries
with differences within the manual matching limits.
You will be allowed to match reconciled entries manually when there is no difference between
the net amount of the external and internal entries. However, you will need to maintain a limit
per currency in order to be able to manually match amount differences up to the limit. You can
do this through the Reconciliation Class Definition screen.
You have to maintain manual matching limits in currencies for which you would like to allow
manual matching. Usually, these are currencies in which you have maintained nostro
accounts. The manual matching specifications will be made applicable for all nostro accounts
linked to the reconciliation class.
As a result of maintaining manual matching limits, you will not be allowed to manually match
entries whose differences are not within the limits defined.
Note
You have to maintain limits for all currencies in which you have maintained the nostro ac-
counts in the system.
3-44. Defining Matching Rules
4.1 Introduction
There are certain standard rules that you can apply while matching nostro entries. As match
rules are maintained at the bank level and are common to all the branches of your bank, you
need not specify the details of a rule each time you need to use it. Instead, you can maintain
its details in the Match Rule Definition screen.
The advantage of maintaining match rules is that at the time of automatically reconciling and
matching external entries, you need to just specify the code assigned to the rule. All the details
maintained for the rule will be automatically picked up and made applicable to the Nostro
entries. This reduces your effort as you do not need to enter the parameters of a rule each
time you need to use it.
Each match rule that you define for reconciling Nostro entries can be devised using the
following parameters:
Value date of the transaction
Internal reference number
External reference number
The aggregation of internal or external entries
You can specify several rules using various combinations of the above parameters.
This chapter contains the following sections:
Section 4.2, "Maintaining Reconciliation Rule"
Section 4.3, "Features of the Reconciliation Rule Definition Screen"
4.2 Maintaining Reconciliation Rule
You can invoke the ‘Reconciliation Rule Maintenance’ screen by typing ‘REDRULDF’ in the
field at the top right corner of the Application tool bar and clicking on the adjoining arrow
button.
If you are maintaining details of a new rule, click the new button on the Application toolbar.
The ‘Reconciliation Rule Maintenance’ screen is displayed without any details.
4-1If you are calling a Rule Definition record that has already been defined, double-click a rule of
your choice from the summary screen.
4.3 Features of the Reconciliation Rule Definition Screen
Assigning the Reconciliation Rule a Code
In Oracle FLEXCUBE, each matching rule that you define is identified by a fifteen-character
code called a Rule Code. You can follow your own convention for devising this code.
The code that you assign to a rule should be unique as it is used to identify the rule across
the branches of your bank. When you need to make the rule applicable while reconciling
nostro entries, you need to just specify the code assigned to the rule. The attributes of the rule
will automatically become applicable for matching transactions.
After you assign a matching rule a code, you can specify the parameters based on which
internal and external transactions should be matched when the rule is used. The parameters
that you can use to define a rule are the:
The Aggregation of internal or external entries
Value Date of the transaction
Internal Reference Number
External Reference Number
You can specify several rules using various combinations of the above parameters.
Determining Match Type
You can decide whether the Automatic matching process should perform a confirmed match
or suggested match.
Confirmed Match (Confirmed): The automatic matching process will mark the match
status as ‘Open’ and the matched entries will be in an authorized state
Suggested Match (Suggested): The automatic matching process will mark the match
status as ‘Suggested’ and the matched entries will be in an authorized state. The
matched entries need to be manually confirmed using manual matching in order to
complete the full matching process.
4-2You can choose to either confirm or reject suggested matches. On confirmation the match
status will be changed from ‘Suggested’ to ‘Open’. If confirmed, system will pass adjustment
entries.
Indicating that Entries should be Aggregated
An internal entry is one that was passed by one of the modules of Oracle FLEXCUBE. An
external entry is one passed by a correspondent bank in response to the entries originating
from your side.
Internal transactions which match certain criterion can be aggregated before they are
matched and reconciled by the automatic matching process. The criterion for aggregation is
as follows:
Identical value date
Identical internal or external reference number, as the case may be
For a match rule that you define, you can indicate either of the following:
The internal entries should be aggregated and then matched
External entries should be aggregated and then matched
That both the internal and external entries under a transaction should be aggregated
and then matched
This would facilitate the matching of one or many internal transactions with one or many
external transactions.
Consider the following example.
Friendly Neighborhood Bank (FNB) has placed US $100,000 with Greenville Global Banking
(GGB), Bangalore.
The various components of the placement are:
Component Amount
Principal US $100,000
Charges US $1000
Interest US $2500
The entries passed at FNB:
Component - Principal
Debit / Credit Account
Dr Loan GL
Cr GGB
4-3Component - Interest
Debit / Credit Account
Dr GGB
Cr INT_INC
Component - Charges
Debit / Credit Account
Dr GGB
Cr CHG_INC
At GGB, the following entries are passed:
All the components of the transaction will be contained in the external statement. Oracle
FLEXCUBE will check for the aggregation criteria and then aggregates the external entry and
matches them.
The components of the external entry when aggregated amounts to US $103500.
Component - Principal
Debit / Credit Account
Dr FNB
Cr INT_GL
Component - Interest
Debit / Credit Account
Dr INTERNAL GL
Cr FNB
Component - Charges
Debit / Credit Account
Dr INTERNAL GL
Cr FNB
Using the Value Date as a Matching Rule Parameter
While defining a rule, you can indicate preferences for the matching criterion - Value Date.
You have either of the option to indicate whether:
The value date of the internal and external transaction should be identical
You can define a positive and negative tolerance within which the value date of a
transaction should fall
Indicating Identical Value Dates
Choose this option to indicate that the automatic matching process should match an external
transaction with an internal transaction, only if the value date of the internal transaction is
identical with the value date of the external transaction.
4-4Indicating a Tolerance Range
You also have the option to specify that the automatic matching process should match an
external transaction with an internal transaction, if the value date of an external transaction is
within a permissible tolerance range.
If you choose this option you should also specify the upper (positive) and a lower (negative)
limit of the tolerance range.
The positive and negative tolerance is taken into consideration while the automatic matching
process is run. This process will match those external transactions with a value date greater
than or lesser than the value date of the internal transaction within the tolerance range that
you indicate.
Using Reference Number as a Matching Rule Parameter
You can use the reference number assigned to the transaction as a parameter for matching
and reconciling Nostro entries. You have the option to use either the internal or external
reference number as a matching criterion or you could use both.
In Oracle FLEXCUBE, you can indicate whether the full reference number or a part of it should
be used for matching entries.
Using the Full Reference Number for Matching
If you indicate that full numbers need to be matched, you need to indicate whether the internal
or external reference number should be matched. Your internal reference is the other entity’s
external reference and their internal reference is your external reference.
Consider the following example.
Friendly Neighborhood Bank (FNB) has placed US $100,000 with Greenville Global Banking
(GGB), Bangalore.
FNB which uses Oracle FLEXCUBE has assigned the placement the following reference
number:
FNB s internal reference - 000MP01973640001
This is FNB s internal reference for the transaction. When the placement is recorded at GGB
it is assigned the following reference:
GGB s internal reference - 2980631000
FNB s internal reference is GGB s external reference and GGB s internal reference is FNB s
external reference.
Using Partial Reference Numbers for Matching
If you indicate partial matching, you can indicate the portion of the reference number that
needs to be matched. In the case of partial matching you need to indicate the:
Starting position in the reference number.
Length of the matching portion.
This will apply to both internal as well as external reference numbers.
Consider the following example.
The reference numbers generated in Oracle FLEXCUBE is a combination of a three-digit
branch code, a four-character product code, a five-digit Julian Date and a four-digit serial
number. A typical reference number would look like:
4-5000MP01973640001
The bank with which you are matching entries generates ten digit reference numbers.
Therefore the reference numbers generated by the other bank can records only the first ten
digits of your reference number.
You have selected partial matching of reference numbers and indicated the following
preferences:
Start position - 1
Length of matching position - 10
When the transaction returns for matching Oracle FLEXCUBE will automatically check only
the first ten characters of the reference number and match the entries.
Using Your Internal Reference Number as a Matching Parameter
As a matching rule criterion you can indicate that the internal reference number you assigned
to the transaction should be identical with the external reference number of the transaction.
Using the External Reference Number as a Matching Parameter
As a matching rule criterion you can indicate that your external reference number should
match with the internal reference number assigned to the transaction assigned by the other
entity.
Using Amount as a Matching Parameter
The two options are:
Identical: During auto matching of entries, the internal and external entries will be
matched only if amount of the entries are identical
Tolerance: During auto matching of entries, the internal entry will be matched to an
external entry if the amount of external entry is within tolerance range, calculated based
on the internal amount and tolerance parameters.
You can further detail Amount Tolerance as:
Amount: The tolerance can be defined as a flat amount.
Percentage: The tolerance can be defined as a Percentage value.
These parameters can be defined for each currency. When a currency amount is not defined,
tolerance amount will be considered to be zero by default.
Currency
All valid currencies in the system will be available for selection here. The tolerance limits can
be different for different currencies.
Positive Percentage Tolerance
You can capture the percentage of positive deviation from a possible match. This will be
allowed if the rule definition allows a tolerance for the amount and tolerance type is defined
as percentage.
Negative Percentage Tolerance
You can capture the percentage of negative deviation from a possible match. This will be
allowed if the rule definition allows a tolerance for the amount and tolerance type is defined
as percentage.
Positive Amount Tolerance
You can use this to capture the positive deviation in amount for a possible match. This will be
allowed if the rule definition allows a tolerance for the amount and tolerance type is defined
as Amount.
4-6Negative Amount Tolerance
You can use this to capture the negative deviation in amount for a possible match. This will
be allowed if the rule definition allows a tolerance for the amount and tolerance type is defined
as Amount.
Consider the following example.
Suppose the following are the internal entries passed by Flex cube for nostro accounts.
Dr/Cr Account Currency Amount Reference
Cr Nostro USD 10000 R1
Cr Nostro USD 10000 R2
Cr Nostro USD 10000 R3
Cr Nostro USD 500 R4
Cr Nostro USD 20000 R5
Cr Nostro USD 30000 R6
The following are the sequence of rules to be applied for Auto Matching.
Internal External Value Amount
Rule Match type Tolerance
ref ref date type
R1 Confirmed Identical Identical Identical Identical None
R2 Confirmed Identical Identical Identical Tolerance -100 and
+100
R3 Suggested Identical Identical Identical Tolerance -5% and
+5%
The following are external entries sent by another bank.
Dr/cr Account Currency Amount Reference
Dr External A/c USD 10000 R1
Dr External A/c USD 10000 R2
Dr External A/c USD 9900 R3
Dr External A/c USD 600 R4
Dr External A/c USD 21000 R5
Dr External A/c USD 29000 R6
Matching Details using the above set of factors are as follows:
Rule R1 Matching Details – Matched based on Identical Amount.
Match Internal External Match Adjustment
Rule
reference entry entry Status entry
4-7Rule1 M1 R1 R1 OPEN None
Rule1 M2 R2 R2 OPEN None
Rule R2 Matching Details – Matched based on Amount Tolerance.
Match Internal External Match Adjustment
Rule
reference entry entry Status entry
Rule2 M3 R3 R3 OPEN 100
Rule M4 R4 R4 OPEN 100
2
Since R2 is a confirmed match, adjustment entries are posted during automatic matching.
Rule R3 Matching Details – Matched based on Amount Tolerance
Match Internal External Adjustment
Rule Match Status
reference entry entry entry
Rule3 M5 R5 R5 SUGGESTED None
Rule3 M6 R6 R6 SUGGESTED None
Since R3 is a suggested match, adjustment entries are not posted during automatic matching.
Rather they are posted only after the user confirms the entries during manual matching. If the
entries matched during auto matching are rejected by the user, the entries become available
for re matching.
Validations
Suggested Match type is allowed only if the amount matching is set as Tolerance. This
validation will be done during save operation of the rule definition. If the amount
matching set is identical and the match type is Suggested, the system will display an
error message as ‘For Suggested Match Type, Amount Type Cannot be Identical’.
The tolerance type list item will be error disabled if the amount defined is ‘identical’. It
will be enabled only if amount matching type is ‘Tolerance’
The currency and Tolerance related parameters will be enabled only if amount matching
is ‘Tolerance’
If tolerance type is percentage then only percentage related fields in amount tolerance
details will be enabled
If the tolerance type is amount then only amount related fields will be enabled in amount
tolerance details
During automatic matching using suggested rule, the negative and positive tolerance
range will be calculated based on the internal amount and the system fetches all the
external entries whose amount is in between Negative tolerance and positive tolerance
range. If a record is found in this range then the system matches the internal and
external entry. If multiple external records are fetched then the system will not match the
entries
If Internal entry aggregation is set in the rule definition, the system calculates the sum
of all the internal entry amounts whose internal reference, external reference and value
date is identical. The Negative and positive tolerance range is calculated on the
aggregated internal amount. If external entry aggregation is set then the aggregated
4-8external entry will be picked whose amount is a median between Negative tolerance and
positive tolerance range. If external aggregation is not set ,then the individual entries will
be fetched whose amount is a median Negative tolerance and Positive tolerance range
The suggested matching will be processed as authorized record during automatic
matching. During this matching the match indicator will be ‘Y’, authorization status will
be ‘authorized’ and Match status will be ‘Suggested’. If the suggested match is to be
approved, then it has to be approved using ‘confirm action’ in the manual reconciliation
screen
In case of confirmed match type with amount tolerance, the system will pass the
adjustment entries during automatic matching
4-95. Defining External Accounts
5.1 Introduction
Nostro reconciliation deals with the matching and reconciliation of external accounts with the
internal ones of your bank. Therefore it is necessary for you to:
Define an external entity.
Indicate the accounts that the external entity maintains with your bank.
Indicate the internal accounts to which the external account can be matched.
Indicate the reconciliation class that should be used whenever the external account is
involved in a transaction.
You can define these details in the External Account Definition screen.
This chapter contains the following sections:
Section 5.2, "Reconciliation External Account Definition Screen"
Section 5.3, "Features of the External Account Definition Screen"
5.2 Reconciliation External Account Definition Screen
You can invoke the ‘Reconciliation External Account Maintenance’ screen by typing
‘REDXTACC’ in the field at the top right corner of the Application tool bar and clicking on the
adjoining arrow button.
If you are maintaining details for a new account, click the new button on the Application
toolbar. The ‘Reconciliation External Account Maintenance’ screen is displayed without any
details.
If you are calling a Reconciliation Class Definition record that has already been defined,
double-click a class record of your choice from the summary screen.
5-15.3 Features of the External Account Definition Screen
Defining an External Entity
In Oracle FLEXCUBE, a bank that is external to your bank is called an external entity. Each
external entity that you define is identified by an eight character code called an External Entity
Code. You can follow your own convention for devising this code.
Note
The code that you assign to an external entity should be unique as it is used to identify the
entity across the branches of your bank.
Indicating the External Account
An external entity can have several accounts under it. You should specify details for each of
the accounts that the external entity maintains with your bank.
Consider the following example.
Kuber s Saving Bank has the following accounts with your bank:
Kuber1USD.
Kuber2AUD.
Kuber3INR.
Kuber4GBP.
Kuber5YEN.
This leads to a two level hierarchy, wherein Kuber’s bank is the External Entity and the
accounts that Kuber’s bank has with you are the external accounts under it.
Note
If the external entity has several accounts with your bank, you will have to maintain a new
external account record for each of the accounts, under the same external entity.
Indicating the Reconciliation Class to be Used
Having defined an external account, you should map the external account to a reconciliation
class. The Reconciliation Class and External Account combination should be unique across
the branches of your bank. You can choose a Reconciliation Class Code from the option list
available.
The attributes that you have defined for the reconciliation class are displayed in the match rule
sequence section of the screen.
The following details of the reconciliation class are displayed:
The match rules that constitute the reconciliation class.
The sequence in which the rules that constitute the class will be applied to the class.
Subsequently, you can rearrange the sequence in which the matching rules defined for the
class should be used while matching transactions belonging to the external entity. You also
have the option to delete from or add to the list of rules defined for the reconciliation class. To
add a rule to a reconciliation class, select the code that identifies the rule and click add icon.
If you do not want to make one or more rules defined for the reconciliation class applicable to
the external entity, select the rule and click delete icon.
5-2Note
The reconciliation class + External account combination should be unique across the
branches of your bank.
Mapping an External Account to an Internal GL or Account(s)
Having mapped an external entity with a reconciliation class, you should map the
reconciliation class + external account combination to one or many internal GLs or accounts
(belonging to your branch) with which the external account should be matched and
reconciled.
When an external transaction involving the external account that you have defined comes into
your branch, it would be reconciled with the transactions posted internally to the
corresponding GL or Account(s) in your branch.
Note
The mapping is a one-time maintenance. Once you save the mapping, you will not have
an option to change it.
Setting up Manual Matching Limits
Click ‘Manual Matching Limits’ tab to invoke the following screen.
The manual-matching limit associated with a reconciliation class will be made applicable on
the external account as well. Click ‘Default’ button to pick up the manual matching limit of
reconciliation class. However, you have the option of specifying separate manual matching
limits for a specific external account. You can do this while maintaining the details of an
external account through the External Account Definition screen.
You can specify manual limits for individual currencies in order to be able to manually match
amount differences up to the limit. As a result of maintaining these limits you will be allowed
to match reconciled entries manually only when there is no difference between the net amount
of the external and internal entries.
5-3Setting up Match Rules
Click ‘Match Rule Sequence’ tab to invoke the following screen.
You can indicate the rules and sequence in which they need to be applied while reconciling
account balances.
5-46. Manually Entering an External Statement
6.1 Introduction
An external statement can be entered into Oracle FLEXCUBE either manually or can be
uploaded automatically. The details of an external account can come in through the media
types set up for your bank. External statements that have come in through SWIFT can be
automatically uploaded. The details of an uploaded statement will be automatically displayed
in the relevant fields of this screen.
The statements that come in through media types other than SWIFT should be manually
entered into Oracle FLEXCUBE through the External Account Definition screen.
This chapter contains the following sections:
Section 6.2, "Reconciliation External Statement Input Screen"
Section 6.3, "Features of the External Statement Input Screen"
Section 6.4, "The Statement Details Screen"
Section 6.5, "Viewing the Overrides that were Encountered"
Section 6.6, "Viewing Fields"
6.2 Reconciliation External Statement Input Screen
You can invoke the ‘Reconciliation External statement Input’ screen by typing ‘REDXSTIN’ in
the field at the top right corner of the Application tool bar and clicking on the adjoining arrow
button.
If you are maintaining the details of a new statement, click the new button on the Application
toolbar. The ‘Reconciliation External statement Input’ screen is displayed without any details.
6-1If you are calling an External Statement Input record that has already been defined, double-
click a class record of your choice from the summary screen.
6.3 Features of the External Statement Input Screen
The External Account Input screen is designed to contain two tabs, which correspond to the:
Statement details screen
Entry details screen
In the statement details screen you can enter details that pertain to the external statement as
a whole. Whereas in the entry details screen, you can enter details that pertain to the
individual entries contained in the statement.
6.4 The Statement Details Screen
Specifying Details of an External Account
Most of the details that you are required to enter are contained in the external statement that
you have received. You are required to enter the following statement details:
The reconciliation class
The external entity and account to which the statement belongs
The currency of the statement
Entering Details of the External Statement
While entering the details of an external statement, you should also specify the following
details:
The year to which the statement pertains
The sequence number of the statement
The sub-sequence number of the statement (if required)
6-2 The reference number that is quoted on the external statement
The media through which you received the statement
Upload Details
If the details of the external statement have been automatically uploaded from an external
source, the following upload details are displayed:
Source: The code that identifies the source from which external statement was
uploaded in to Oracle FLEXCUBE.
Date: The date on which the external statement was uploaded onto Oracle FLEXCUBE.
Source Ref No: The reference number assigned to code from which the statement was
uploaded.
If you manually enter the details of an external statement, these fields will be grayed and will
not contain any information.
Specifying Opening Balance Details
You are also required to enter the details of the following as contained in the external
statement:
The opening book balance
The opening balance date
The opening book balance refers to the amount that was in the external account as of the
opening balance date. The opening balance date indicates the start date of the period for
which the statement was sent.
Note
Please note that the opening book balance should be equal to the previous closing book
balance for the reconciliation class + external account + external entity combination.
Specifying Closing Balance Details
You should also enter details of the following as contained in the external statement:
The closing book balance
The closing balance date
The closing book balance refers to the amount that was in the external account as of the
closing balance date. The closing balance date indicates the end date of the period for which
the statement was sent.
The available balance refers to the amount that is currently available in the account for which
the statement was sent.
Note
The closing book balance should be equal to the sum of the opening book balance and the
transactions contained in the external statement.
6.5 Viewing the Overrides that were Encountered
Click ‘Override’ button to view the overrides that were encountered while the external
statement was uploaded. The overrides screen with a list of all the overrides that were
encountered during the entry of the current statement is displayed.
6-36.6 Viewing Fields
Click ‘Fields’ button to view the ‘User Defined Fields’. You should input values in the fields
corresponding to Field Names displayed.
6-47. Uploading an External Statement
7.1 Introduction
An external statement (MT 940 and 950) can be uploaded automatically or entered manually
into Oracle FLEXCUBE. To recall, messages can come into your bank through the media
types that you have maintained for your bank in the Messaging module of Oracle FLEXCUBE.
The procedure involved in uploading an MT 940 and MT 950 to Oracle FLEXCUBE is detailed
in the paragraphs that follow.
This chapter contains the following sections:
Section 7.2, "The Procedure"
Section 7.3, "Reconciliation External Statement Upload Screen"
Section 7.4, "Features on the External Upload Screen"
7.2 The Procedure
To recall, the external statements that come in through SWIFT (MT 950) can be automatically
uploaded onto Oracle FLEXCUBE from the Incoming Message Browser.
Step 1
Through the upload facility provided in the Incoming Message Browser of the Messaging sub
system you can upload an MT 940 and MT 950 on to Oracle FLEXCUBE. The detailed
procedure for this step is covered in the Messaging User Manual of Oracle FLEXCUBE.
Step 2
Once the message is in Oracle FLEXCUBE, you should do an MT 940/950 hand-off. From the
Application Browser, select ‘Nostro’ and the MT 940/950 hand-off option under it.
Step 3
After the hand-off you should upload the statement into the Nostro subsystem. To do this you
should invoke the External Statement Upload screen.
Through the upload facility you can automatically upload statements that have come in for a
reconciliation class + external entity + account + currency combination. To upload an external
statement into the nostro subsystem, you should:
Indicate the source from which the statement should be uploaded
Indicate the external entity and account to which the statement belongs
Indicate the reconciliation class that should be used to match and reconcile the
transaction
Indicate the details of the statement like its sequence number, sub sequence number (if
any) and the year in which the statement was received
The details of an uploaded statement will be automatically displayed in the relevant fields of
External Statement Input screen.
Note
The statements that come in through media types other than SWIFT should be manually
entered into Oracle FLEXCUBE through the External Account Definition screen.
7-17.3 Reconciliation External Statement Upload Screen
You can invoke the ‘Reconciliation External Statement Input’ screen by typing ‘REDXSTIN’ in
the field at the top right corner of the Application tool bar and clicking on the adjoining arrow
button.
7.4 Features on the External Upload Screen
Indicating the Upload Source
To upload an external statement from a source external to Oracle FLEXCUBE you should
indicate the code assigned to the source from where the message should be uploaded.
Indicating Details of the External Statement
The details of an external statement that you should specify are as follows:
The year in which the statement reached your branch
The sequence number of the statement and the subsequence number (if required)
The external entity and account to which the account belongs
The reconciliation class to be used
The currency of the statement
Click to view the exceptions that occurred while the statement was being uploaded. If the
button is disabled it means that no exceptions were encountered during the upload session.
The Upload Exception report which when generated, gives a detailed description of the
exceptions that occurred during upload.
7-2Viewing the Exceptions that Occurred
Click ‘E’ button to view the exceptions that occurred while the external statement was
uploaded. This screen will contain details of only the exceptions that occurred during the
current upload session.
You can retrieve information of all the exceptions that were encountered during a day by
invoking the Upload Exception Report.
7-38. Matching Internal and External Statements
8.1 Introduction
Nostro reconciliation involves the matching of the entries of an external statement with the
corresponding entries of an internal statement. In Oracle FLEXCUBE entries of an external
statement can be matched with corresponding internal entries manually.
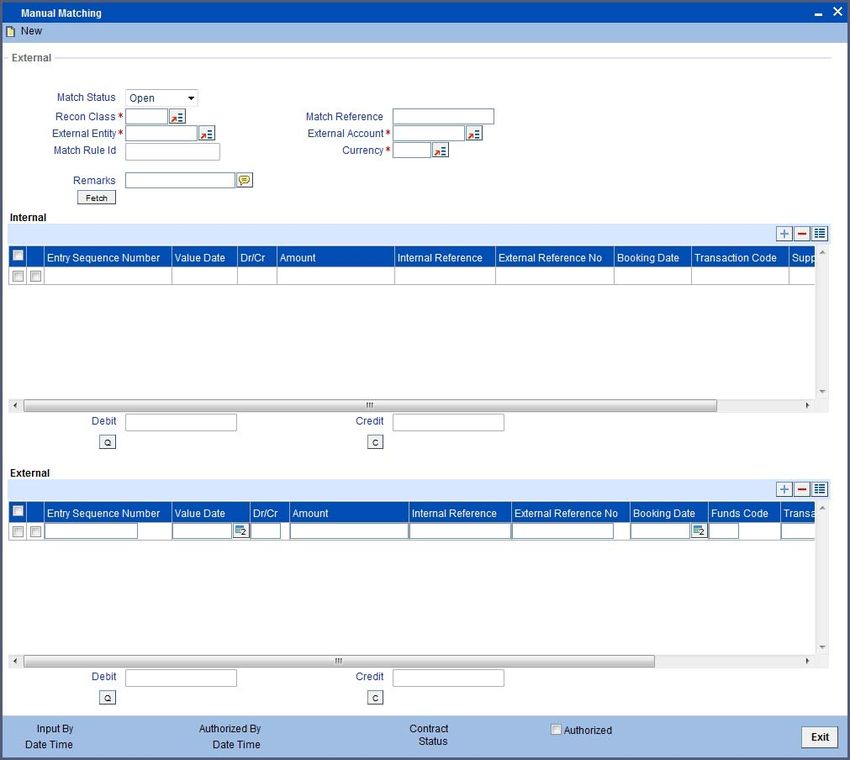
8.2 Manual Matching of Entries
While manually matching Nostro entries, you will have to select the external entries that
should be matched and also indicate the corresponding internal entries, to which they should
be matched.
The debit and credit legs of the entries that you select will be displayed in their respective
fields of the screen. The sum of the amounts of the internal and external entries that you select
for matching should be the same. This depends on whether the reconciliation class to be used
in matching the entries requires the replication or the mirroring of entries.
You can invoke the ‘Reconciliation Manual Matching Input’ screen by typing ‘REDMANMC’ in
the field at the top right corner of the Application tool bar and clicking on the adjoining arrow
button.
8-1To manually match the entries of an external statement with the corresponding entries of an
internal statement; you should specify the following:
The reconciliation class to be used in the matching
The external entity and account to which the statement belongs
The currency of the internal account
Oracle FLEXCUBE automatically assigns a unique reference number to the entries that you
match. After you indicate the above details, click ‘Fetch’ button. All the external and internal
statements that are yet to be matched will be displayed under their respective sections
marked External and Internal. The following details of the external and internal statement will
be displayed:
The entry sequence number
Value date
The debit or credit indicator
The amount that the transaction entails
The reference number that you assigned to the transaction (internal reference number).
For transactions that involve managers checks, the MCK number used in the
transaction
The reference number assigned to the transaction by the other bank (external reference
number)
Thereafter, you should manually indicate the internal entry and the corresponding external
entry which should be matched. To indicate the entries that should be matched, tick against
the internal entry and the corresponding external entry to which it should be matched.
Indicating Match Status
This indicates the match status which can be Open, Closed or Suggested
The suggested entries will not be allowed for modification
The Suggested record will be allowed for Confirmation. The confirmation of suggested
entries can be done using ‘confirm button’. On confirmation the system will mark the
match status as ‘Open’ and the accounting entries (difference between the amount of
internal and external) will be passed
The suggested entries record can be rejected. The rejection can be done using
‘Reverse action’ of manual matching screen. On rejection the matched status will be
‘CLOSED’ and the match indicator will be ‘NO’
For manual matching (suggested entries)
Confirm and reverse buttons will be enabled. For manual matching (other entries),
confirm and reverse buttons will be disabled
Note
You can choose to match one internal entry to several external entries and vice versa.
The debit and credit indicators under the internal and external sections will display the sum of
the entries that you have selected. Oracle FLEXCUBE checks that before the entries are
matched, the totals of the amounts involved in the transactions that you want to match are the
same. This however depends on whether the reconciliation class to be used to match the
entries requires mirroring or replication of entries.
If the reconciliation class to be used in the matching of the entries requires replication of
entries, then, the internal debit entry should be equal to the external debit entry. Similarly, the
internal credit entries should be equal to the external credit entries.
8-2You can also read


