Pcounter Web Report User's Guide Version 3.4
←
→
Page content transcription
If your browser does not render page correctly, please read the page content below
Pcounter Web Report
                                             User's Guide
                                              Version 3.4

Pcounter Web Report 3.x User's Guide - v2014-11-16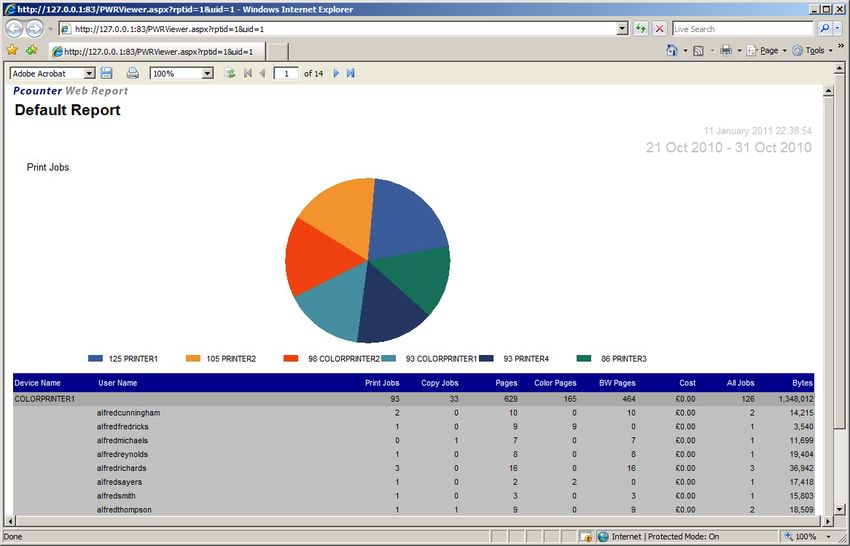
Table of Contents
Table of Contents .......................................................................................................2
Overview...................................................................................................................3
Installation Prerequisites and Requirements .............................................................3
Minimum Hardware Specifications ...........................................................................4
1. Getting Started ......................................................................................................5
2. Reporting ..............................................................................................................6
Dashboard Charts .................................................................................................7
2. Running Reports .....................................................................................................8
Run Report ..........................................................................................................9
Paging .................................................................................................................9
Export\Print Options .............................................................................................9
Report Layout Described...................................................................................... 10
3. Editing Reports .................................................................................................... 11
Edit Report Dialog ............................................................................................... 11
Selecting fields ................................................................................................... 12
Sort and Filter .................................................................................................... 13
Dates ................................................................................................................ 14
Chart ................................................................................................................ 14
Schedule ........................................................................................................... 15
Report Title ........................................................................................................ 15
4. Report Data View ................................................................................................. 16
Grouping ........................................................................................................... 16
Sorting .............................................................................................................. 16
Filtering ............................................................................................................. 16
Reordering columns ............................................................................................ 16
5. Deleting Reports .................................................................................................. 17
6. Create New Report ............................................................................................... 17
7. Administration Portal ............................................................................................ 18
Search .............................................................................................................. 18
Column Sorting .................................................................................................. 18
Shortcut Links .................................................................................................... 18
Job Refunds ....................................................................................................... 18
6. User Portal .......................................................................................................... 20
7. Administrative Functions ....................................................................................... 22
PWR Server Configuration .................................................................................... 22
Page Pricing Options ........................................................................................... 26
8. Log Scan utility .................................................................................................... 35
Document Types................................................................................................. 35
Missing Domain names in Reject.log ..................................................................... 36
Scan Options...................................................................................................... 36
9. Report Definition Import\Export ............................................................................. 37
Report Import .................................................................................................... 37
Report Export ..................................................................................................... 38
Appendix A – Log Files .............................................................................................. 39
Appendix B – Port Numbers ....................................................................................... 39
Appendix C – Generating a Self Signed SSL Certificate .................................................. 40
Appendix D – Increasing the Database Memory Cache .................................................. 41
Pcounter Web Report 3.x User's Guide Table of Contents 2
Overview
This document describes the operating instructions of Pcounter Web Report 3.x,
the reporting add-on product for Pcounter.
PWR 3.x supports a browser based interface running a Rich Internet Application (RIA). The
PWR 3.x installer application deploys several components to the server including an
embedded web server, a Pcounter Log file scanner, and an application to manage the server
settings. For client access, the main reporting application requires the Microsoft Silverlight
platform. Client web browsers must have the Silverlight Plug-in installed in order to access
the main PWR 3.x reporting features. Other application features can be used without
requiring the Silverlight plug-in, such as the User and Administrative portals.
PWR 3.x supports three distinct applications as described in the table below :-
Application Feature Purpose
Detailed analysis of Print & Copy activity as recorded by
PWR 3.x Reporting Pcounter. Aggregated summaries, charts, grouped
dimensions and metrics as formatted exportable reports.
Allows administrators to examine job history for Users
PWR 3.x Administration Portal and devices, facilitate instant job cost refund to a
Pcounter account, and view user balance reporting.
Allows printing users to access and view their print
PWR 3.x User Portal history, view their current Pcounter account balance, and
change their Short ID or PIN number
Installation Prerequisites and Requirements
For Pcounter Windows, the PWR 3.x server must be installed on the same computer that hosts
the Pcounter data server service, and where log files are written. For Pcounter Netware, PWR 3.x
server must be installed on a PC with the Netware Client connectivity components installed and
be able to connect to the Netware Server hosting the Pcounter data folder (given the appropriate
logon credentials).
PWR 3.x requires Pcounter 5.21e for NetWare or Pcounter 2.10a for Windows,
or newer.
PWR 3.x can be installed as a 60-day evaluation version, or with a valid license
key, either obtained from your local reseller or from Pcounter Europe at
sales@pcounter-europe.com.
Pcounter Web Report 3.x User's Guide Overview 3
Minimum Hardware Specifications
Server
Windows XP SP3, Windows 2003 Server or later, Windows Vista, Windows 7.
Minimum 150 MB free disk space.
A CPU fast enough and sufficient RAM to run the OS efficiently.
PWR 3.x requires the .NET Framework version 3.51 or greater.
Performance Considerations
PWR 3.x runs both a database server and a Web server. The performance of these
components is greatly influenced by the following factors :-
1. The number of concurrent users (User Portal Features)
2. The volume of print data generated by Pcounter.
For smaller deployments it is acceptable to deploy PWR 3.x on a multi-purpose server, for
example the Pcounter print server. For larger deployments a dedicated server is
recommended to experience efficient operation of the software.
The following recommendation is a guideline only, based on the volume of print data :-
Pcounter log files of 50-100 mb per month or greater.
Minimum dual core processor.
Between 4-8GB RAM (8GB preferred).
Please see section ‘Installing PWR 3.x on a dedicated server’ for more details.
For advice on tuning the database server for increased performance, see Appendix D of the
User Guide ‘Increasing the Database memory cache’.
Pcounter Web Report 3.x User's Guide 4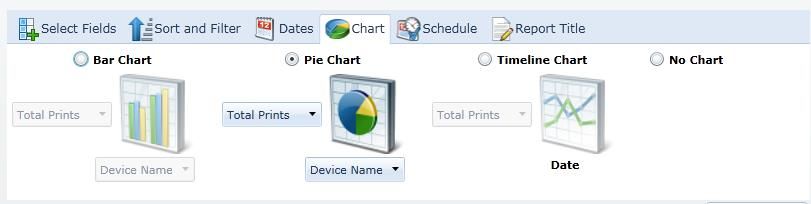
1. Getting Started
Open a browser to the URL of the PWR 3.x server, also specifying the port number as
configured on your server i.e.
http://MYPWRSERVER:83
If your server is configured to use SSL security, then Https:// should be used in the URL.
If the application does not start, or a licence error is displayed, then check that the PWR 3.x
server software has been installed and configured correctly in accordance with the PWR 3.x
Installation Guide.
On start up the application will display the login screen. Access to the application is granted
after a successful login, PWR 3.x comes pre-configured with the following default login :
UserName: admin
Password: admin
Depending on the security permissions for the login account, the next screen may ask the
user to select an application to continue:-
Pcounter Web Report 3.x User's Guide 1. Getting Started 5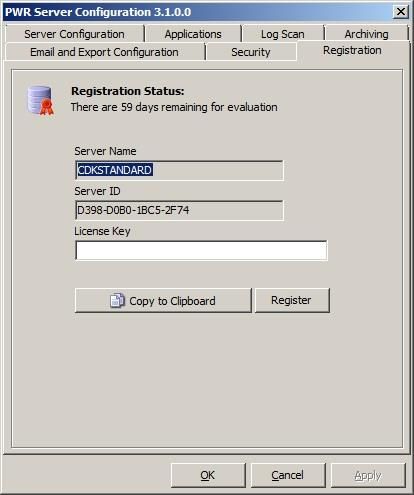
2. Reporting
On start up the reporting application the Dashboard will be displayed.
1
. 2
.
3
.
1. Navigation Menu
This area of the screen is the navigation menu. Items are arranged in a hierarchical manner
under the main report categories and major features.
2. Timeline Chart
The Timeline chart shows print history (page volume) spread over the previous 30 days.
Note the timespan reflected is calculated based on the last active data in the database.
3. System Totals
This panel shows the current all-time system totals for all activity monitored by Pcounter.
Pcounter Web Report 3.x User's Guide 2. Reporting 6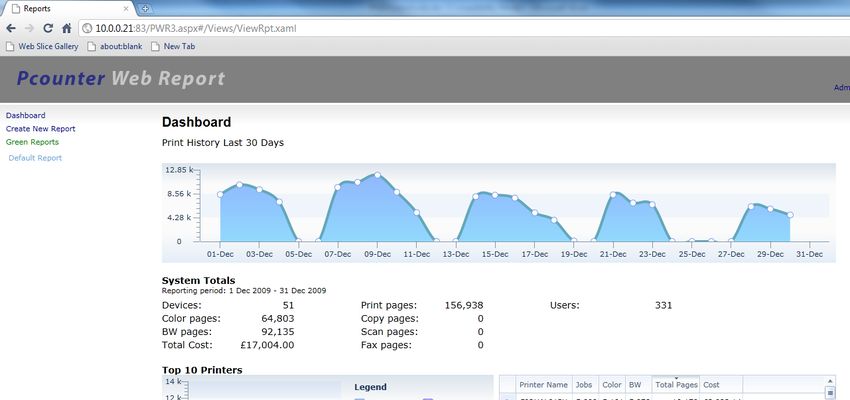
Dashboard Charts
The Dashboard charts show the top 10 Printers, Users and Copiers in the system and are
displayed under the system totals panel.
Each table shows several aggregate totals for the User or Device. The table can be sorted
by clicking on the column header.
Pcounter Web Report 3.x User's Guide 2. Reporting 7
2. Running Reports
Selecting a report from the navigation menu displays the Run Report screen.
1
.
2
.
3
.
4
.
The Report homepage screen is displayed for all standard reports in the system. The report
description and selectable options change depending on the type of report selected.
1. Run Report
This area displays a description of the Report and gives an indication of what data the
report will contains and how it is presented. Clicking on the Run Report link, or on the icon
will start the report viewer in a new browser window for the current report.
2. Edit report
Clicking the Edit report button executes the report editor.
3. Data view
Clicking Data View executes the report in a table where it can be dynamically manipulated
with in-line sorting, and grouping.
4. Delete Report
Clicking Delete Report will remove the report from the PWR database.
Pcounter Web Report 3.x User's Guide 2. Running Reports 8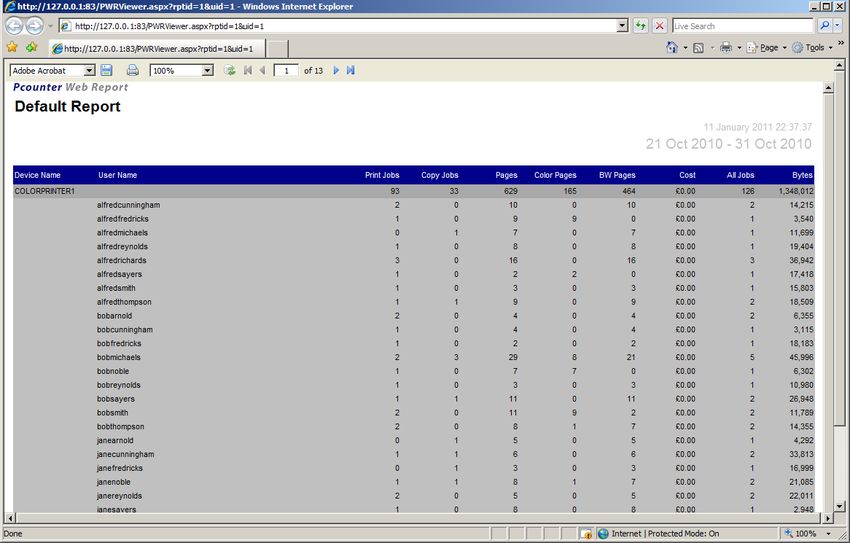
Run Report
When a report is executed, PWR 3.x opens a new browser window with the HTML report
viewer. A message is displayed whilst the report is generated and displayed to the user.
The Report is executed with the parameters specified in the Run Report option. To edit the
report parameters it is necessary to open the Edit Report screen.
NOTE: If clicking Run Report does not open a new browser window, it may be necessary to
enable pop-up windows for the URL of the PWR 3.x server. Some browser pop-up blockers
will prevent this operation by default.
Paging
When a report is finished executing, the first page will be shown in the browser. It is then
possible to page forwards and backwards through the report pages using the paging toolbar
at the top of the report.
Export\Print Options
From the HTML viewer it is possible to export the generated report to several formats. To
export, select the option from the menu and click the Export link on the toolbar. To print,
click the printer icon on the toolbar.
Pcounter Web Report 3.x User's Guide 2. Running Reports 9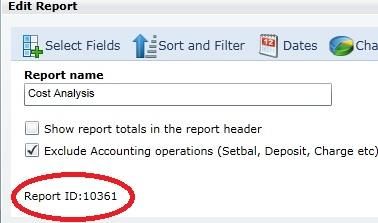
Report Layout Described
Each report in PWR 3.x follows the same basic layout. Reports are in landscape format, with
data headings displayed horizontally, data and group headers are displayed vertically in a
tabular layout.
The following figure describes the parts of a typical report:-
1 2
.
.
3
.
4 5
. .
1. Report Name
2. Date in smaller text is the run date\time of the report. Date in larger text is the date
range parameters for the report.
3. Chart. A chart can be selected and displayed on the first page of the report. The
chart can be based on a single metric for a dimension included in the report (see
below).
4. Report Dimensions. A dimension is the term used to describe an object that can be
recorded as part of the activity in Pcounter, for example, a user, a device, the type
of document and so on. PWR 3.x can report on these Dimensions often in
hierarchical groups such as users by device, or Paper type by client code.
5. Report Metrics. A metric is the term used to describe a measurement of value as
recorded by Pcounter. For example, the total number of pages, total cost, total jobs
and so on.
When combined with grouped Dimensions, the metric values are aggregated at the
group level and displayed horizontally under the metric column names.
Pcounter Web Report 3.x User's Guide 2. Running Reports 103. Editing Reports
In PWR 3.x all standard reports can be modified using the Edit Report option. To Edit a
report, first open the report homepage by clicking on the report name in the left hand
navigation menu. From the report homepage click Edit Report. After a few seconds, the Edit
Report dialog will be shown.
Edit Report Dialog
1
.
5
5 2
. 4 .
.
3
.
1. Report definition
The edit report dialog allows modification of every aspect of the report. Each part of the
report definition is categorised by the tabs displayed along the top of the dialog.
1. Selecting Fields
2. Adding sort and filter conditions
3. Setting report date parameters
4. Adding a chart
5. Scheduling a report for automated execution and email.
6. Setting report name
2. Preview Control
The preview control can be used to refresh the report preview and also reset the zoom level.
3. Save Report
There are several options to save the modified report definition.
1. Save and Run saves the report and automatically opens the HTML report viewer.
2. Save as New saves the report as a new report definition.
3. Save and close saves the report and returns the report homepage.
Pcounter Web Report 3.x User's Guide 3. Editing Reports 114. Report Preview Viewer
The Report preview viewer shows the first page of the report as a preview based on the
selections made in the edit report dialog. The preview supports pan and zoom using the
mouse wheel.
5. Show Extra Columns
Four additional columns may be added to a report when exporting to CSV format. These
extra columns are not displayed in a normal report view or other export formats.
NOTE: The report preview uses sample data rather than actual data from the PWR database
to illustrate the report layout.
Selecting fields
The select fields tab displays selector options for each column\row in the report. A report
has a maximum of 4 nested Dimensions and 8 Metrics.
To add or modify a dimension in a report, click the row button at the next available slot in
the hierarchy.
The select Dimension dialog will be displayed, highlight the dimension to add and click OK.
The dimension may be removed from the report by clicking ‘Reset to None’.
To add a metric in the report click the column header button.
Pcounter Web Report 3.x User's Guide 3. Editing Reports 12To select a metric, highlight the metric name and click OK. The metric may be removed
from the report by clicking ‘Reset to None’. It is also possible to change the text displayed
for the metric in the report column header.
Metrics are categorised into various groups depending on the type of metric and the base
condition applied to the value from the Pcounter log file.
Sort and Filter
1
.
2
.
3
2
1. Sort type
‘Grouped’ .sorting means that dimension data will be displayed in hierarchical groups and
sorted alphabetically.
‘By Column’ sorting means that dimension data will be displayed sorted by the column
specified in the drop down list.
2. Select Items
A filter can be specified against any dimension. Click Select Items to specify what Dimension
values to filter on.
3. You may specify a free text filter on a Dimension. From the list, the list of dimension
values is loaded from the server. Select a condition using the second list, finally in the third
list select a known value, or enter a custom value string to filter on. To apply the filter to
the report click add.
Pcounter Web Report 3.x User's Guide 3. Editing Reports 13Dates
The Date parameter option defaults to all dates, meaning that the report will run from the
first recorded date to the most recent date in the Pcounter Log. To specify a different date
range for the report select a new range from the date selectors, or select a pre-defined time
period from the list.
Chart
Three types of chart are supported in the reports. Bar, Pie and Timeline.
1. Bar
For a Bar chart select the option and specify the metric value as the Y Axis and the
Dimension as the X axis.
2. Pie
For a Pie chart select the option and specify the metric as the value and the Dimension as
the subject.
3. TimeLine
For a timeline chart select the option and specify the metric. The timeline chart is based on
date as the X axis. The date range is based upon the dates specified for the report.
4. No Chart
Select this option for no chart.
Note that for all charts, only dimensions and metrics specified in the report definition can be
selected.
Pcounter Web Report 3.x User's Guide 3. Editing Reports 14Schedule
A report can be scheduled to automatically generate and be saved to disk or sent via email.
From the Schedule dropdown list, select the recurrence period for the scheduled report.
To Disk :-
Specify the schedule time, File name and export format. The location for the saved file is
the Server File Export folder as specified in the PWR server configuration.
To Email :-
Specify the schedule time, Email address, File name and export format. You can set the
name of the report file attached to the email by specifying a value in the description field.
Report Title
Enter the name for the report.
Show Totals In Report Header:
This option will display a totals header in the report.
Exclude Accounting Operations
This option will filter out all accounting operations done in Pcounter against the user
accounts, (for example SetBal, Deposit, Charge etc).
Pcounter Web Report 3.x User's Guide 3. Editing Reports 154. Report Data View
The report data view enables manipulation of data in a dynamic table.
Click Data View on the Report homepage. After a few seconds the data grid will be loaded
with the columns and group definitions as defined in the report.
It is possible to reshape the data in the grid to provide additional analysis. The view in the
data grid can then be exported to Excel, PDF, HTML or printed.
NOTE: changes made to grouping and filtering in the data grid are not saved back the
report definition.
Grouping
Grouping data is achieved by dragging a column header onto the grouping panel at the top
of the grid. Groups can be removed from the view by clicking the close icon on the group
item in the grouping panel.
Sorting
Columns can be sorted by clicking the column header.
Filtering
Filtering is achieved by placing the mouse over the column header and clicking the down
arrow icon. A Filter box is shown for the column where a filter can be specified.
Reordering columns
Columns can be reordered, by dragging the column header to the new position with the
mouse.
Pcounter Web Report 3.x User's Guide 4. Report Data View 165. Deleting Reports
A report can be deleted from the system using the Delete report option on the report
homepage. The default report that ships with PWR 3.x cannot be deleted.
6. Create New Report
A new report can be created by clicking the ‘Create New Report’ option from the main
navigation bar. The new report option opens the Edit Report dialog, defaulted to a new
report definition:-
From here, Dimensions, Metrics, Charts etc. can be added as per the Edit Report features.
Pcounter Web Report 3.x User's Guide 5. Deleting Reports 177. Administration Portal
The Administration Portal can be access from an icon in the reporting header, or via the
application selection page displayed after login.
NOTE: Access to the Admin portal will only be available if the user profile permits it.
Upon opening the Admin portal shows Pcounter activity from the last week of data recorded
in the PWR 3.x database.
Search
Enter a text string to search for in the database and click Go. User names and Device
names will be searched for compatible matches and displayed in the grid. The grid can be
paged to scroll through the results.
Column Sorting
Click on the column header in the grid to sort the column.
Shortcut Links
Clicking on the User name or Device name in the grid will return all results for that item.
Job Refunds
NOTE: The job refund feature may only be visible if it is enabled in the application settings
specified on the Server.
Jobs may be refunded back the user account balance via Pcounter PRO. Refunds are
credited back to the user account balance only. Jobs to be refunded can be selected by
checking the box in the first column and clicking the ‘Refund Selected Jobs’ button.
Pcounter Web Report 3.x User's Guide 7. Administration Portal 18When the refund process is complete a message will be displayed against each row for
which a refund was selected :
If A job has been already refunded then a message will be shown to inform the user
containing the date\time of the refund :
If PWR 3.x was unable to refund the job cost to the Pcounter account balance the following
message will be displayed. Check the server logs for a detailed description of the error.
Pcounter Web Report 3.x User's Guide 6. User Portal 196. User Portal
The user portal is accessed via a web browser and is designed to show an end user their
print history and enable self-service management of their personal ID number and PIN.
To access the User Portal open a web browser to the server running PWR 3.x on the port
number specified at the time of install. The default port value is 83.
Users will be presented with the PWR 3.x login page and should enter their Pcounter login
and password. These values are verified by Pcounter Pro against the network where
Pcounter Pro is configured.
Upon Successful login the user will be taken to the portal home page.
User Report Tab
The User may select the view of data to display in the report. The Report grid is paged to
scroll through the user history. Columns may be sorted by clicking on the column header.
Pcounter Web Report 3.x User's Guide 6. User Portal 20Log Out
This option logs the user out of the web portal and returns to the login page.
Manage ID and PIN
This option will be displayed if the option is enabled in the PWR 3.x User portal
administration. Selecting the Manage Short ID \PIN tab shows the ID Management page.
Users may enter their Short ID number and PIN (if enabled). To change the Short ID and\or
PIN, the values must be verified and then saved by clicking the ‘Change’ button.
Pcounter Web Report 3.x User's Guide 6. User Portal 217. Administrative Functions
The next section describes the server side applications of PWR 3.x
PWR Server Configuration
The Server configuration application runs on the PWR 3.x server and holds the server side
properties for the system.
Registration Tab
The Registration tab holds the license and registration information and displays status for
the current server. If you have obtained a license key enter it in the box provided and click
Register. To obtain a valid license key, supply the Server name and Server ID values to
your Pcounter representative. The PWR 3.x software will operate for a period 60 days
without a valid License key.
Copy to Clipboard
This function copies the Server Name and Serial number to the Windows Clipboard where
the information can be easily pasted into an email or text document.
Pcounter Web Report 3.x User's Guide 7. Administrative Functions 22Server Configuration Tab
Pcounter PRO Interface
This value will be defaulted to the Pcounter PRO DLL according to the selection made during
the install procedure. Click ‘Configure Pcounter API’ to launch the Pcounter Pro accounting
DLL configuration screen. Consult the Pcounter documentation or help files for more
information on the Pcounter Pro configuration dialogs.
PWR can also be configured to connect to a remote Pcounter Data Server that has a valid
Pcounter PRO license. In the Pcounter PRO interface field enter a URL in the following
form :-
://:/PcounterDataAPI/
For example : https://10.0.0.1:6443/PcounterDataAPI/
You can click ‘Configure Pcounter API’ to test the interface connection and get some
feedback on any connection errors or messages.
System Locale
Select the locale of the Pcounter system from the list. This setting is used to format the
currency and date values in the application and automated email reports.
Page accounting
Pcounter supports 2 types of accounting modes, pages and currency. Select the option that
reflects the Pcounter log files being imported into PWR 3.x. After changing this setting, the
application must be restarted to apply the formatting changes.
Report Custom Logo Image
A custom logo can be added to the left hand side of the report header. To set a custom logo,
select a BMP or JPG from disk using the browse file button. The image will be loaded into
the preview panel below the file name. The image must be a maximum of 150 x 80 pixels in
size.
Pcounter Web Report 3.x User's Guide 7. Administrative Functions 23Log Scan Tab
Pcounter Log Location
For Pcounter Windows, specify a valid directory path or use the browse directory button by
clicking on the folder icon. You can specify multiple folder locations separated by a semi-
colon. The PWR Agent Service requires full access to the folder locations specified.
If the specified folders are on the local machine, then the default LocalSystem account will
be sufficient. If a folder listed is from a network drive or UNC path then specific
configuration is required as follows :-
The Pcounter log folder must be shared on the network, and reachable by the PWR3
server. Any valid Windows file path is accepted, including UNC paths:-
Full access must be granted to the username running the log scan process. Without
‘full control’ on the remote share the log scanner will be unable to create the
necessary temporary files during the scan process.
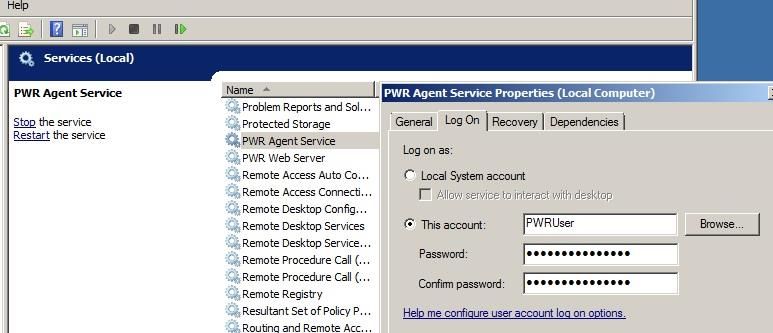
Pcounter Web Report 3.x User's Guide 7. Administrative Functions 24 The service login name for the ‘PWR3 Agent Service’ needs to be changed from
localsystem to an actual username with full access to the shared folder (as above).
This is done using the Windows Service control manager
For Pcounter Netware, specify the UNC path of the Pcounter log location on the Netware file
server. It will be necessary to include a valid Netware logon account to access this location.
In the fields provided, enter the User name, Password, Context and Tree of the Netware
logon account that has permissions to copy the Pcounter log files from this location to the
PWR 3.x server. Please note this function requires the Netware client software installed on
the PWR 3.x server.
Pcounter log scan interval
Select the number of minutes between each scan of the Pcounter Log files. The default
value is 10 minutes.
Pcounter Web Report 3.x User's Guide 7. Administrative Functions 25Page Pricing Options
During the log scan the PWR log scanner application can calculate additional cost metrics
against each print and copy job recorded in the Pcounter Log. This enables reporting on a
breakdown of job cost into a price for paper, and a price for printing. The Page pricing
options button shows a default list of paper types where a page price can be specified.
Page pricing Screen
Default Page Price
Specify a Default page price for page sizes that are not listed in the default list of page
types. Any page sizes that are recorded by Pcounter will be added to the list and will
automatically be given the default price. This price can be adjusted later as required.
Page Types List
To change the page price for a page type, select the page type in the list. The page type
and current price will appear in the edit boxes. To edit a page price, select the page type
and then adjust the price. Click the save button to confirm the changes.
Pcounter Web Report 3.x User's Guide 7. Administrative Functions 26Set All Option
To set all prices, select any page type from the list, edit the price then check the Set All
option. Clicking the save button will then update all page types with the set price.
Information on Page Cost\Print Cost metrics
In order to build reports that include a breakdown of job cost into a price for paper and a
price for printing, the following metrics should be added to reports as required :-
Name Description
Print Price This value will be calculated by subtracting the Paper Price from the Total
Cost value calculated by Pcounter
Paper Price This value will be calculated by multiplying the total number of pages
recorded by Pcounter, by the cost for a single page for that paper type. If a
job is a duplex job, then the total number of pages reported by Pcounter
will be divided by 2 in the calculation.
The following example illustrates how the metric values will be calculated:-
Simplex Job Example (5 pages, simplex, A4, BW, Pcounter cost: 0.50):-
Based on:-
Pcounter Total Pages * Paper Size single page cost = Paper Price
Pcounter Job Cost – Paper Price = Print Price
Cost for 1 sheet of A4 paper set in PWR is 0.04
5 * 0.04 = 0.20 (Paper Price)
0.50 – 0.20 = 0.30 (Print Price)
Duplex job Example (5 Pages, duplex, A4, BW, Pcounter Cost: 0.50) :-
Based on:-
(Pcounter Total Pages / 2) * Paper Size single page cost = Paper Price
Pcounter Job Cost – Paper Price = Print Price
Cost for 1 sheet of A4 paper set in PWR is 0.04
(5/2)*0.04 = 0.12 (Paper Price)
0.50 – 0.12 = 0.38 (Print Price)
Note: When divided, total pages is rounded upwards to give complete (whole) page values.
Notes on Page Pricing
The Pcounter Job Cost, and total page count is assumed to be accurate at all times. This
value can be influenced by settings against the Printer in Pcounter :-
Divide Duplex Page count in half setting.
Duplex multiplier value.
Use of these settings will influence the value of the Paper and Print Price metrics for
duplex jobs.
The page and print price values are calculated by PWR during the log scan procedure.
This means that changes to page price settings are only applied to data scanned after
the configuration is saved. Pricing is not calculated on retrospective data.
Page prices that are calculated on jobs with 0 cost in Pcounter will result in a negative
Print Price.
Pcounter Web Report 3.x User's Guide 7. Administrative Functions 27Applications Tab
Port
Select the port to use for the Web applications. The default value is 83.
Enable debug logging
Check this option to enable additional logging options for troubleshooting.
Use SSL
The PWR 3.x Web Server can use SSL secured connections for all applications (Reporting,
Admin Portal and User Portal). To enable SSL specify a valid PFX certificate and certificate
password.
User Portal
Activate or deactivate the User portal.
User Portal Settings
From the User portal settings it is possible to enable and disable the Short ID and PIN
management features.
Pcounter Web Report 3.x User's Guide 7. Administrative Functions 28Enable Set Short ID Feature
Check this option enable end users to change their Short ID number via the User portal.
Note that changes will be applied next time a user logs into the portal application.
ID Min\Max length
A minimum and maximum length of accepted ID numbers can be specified.
Enable Set PIN Feature
Check this option enable end users to change their PIN number via the User portal. Note
that changes will be applied next time a user logs into the portal application.
PIN Min\Max length
A minimum and maximum length of accepted PIN numbers can be specified.
NOTE:
Setting the Short ID\PIN from the Portal is supported only if the Short Ids and PIN codes
are maintained in the Pcounter Database, not in AD/NDS.
Admin Portal
Activate or deactivate the Administration portal.
Admin Portal Settings
From the Admin portal settings it is possible to enable and disable the refund feature.
Make all refunds to Free Quota Balance
This option forces all refunds via the Admin Portal to be applied to the Free Quota balance.
Pcounter Web Report 3.x User's Guide 7. Administrative Functions 29Archiving Tab
PWR 3.x may auto-archive data to back up old files and maintain performance levels.
Auto Archive
The auto archive function enables the user to select an archive recurrence.
System Reset
The system reset function removes all print history data from the PWR 3.x database.
Mounted Database
Select the current database in use by the PWR 3.x applications. A Database can be selected
from a list of available archives.
NOTE: Please ensure all PWR 3.x client connections are closed or inactive before performing
a system reset or changing the mounted database. Existing connections to the database are
forcibly removed and may cause timeout errors in client applications that are using the
system during a reset operation.
Database summary
Click refresh to review a summary of the currently mounted database.
Reporting on Archived Data
In order to report on archived data, select the archive file from the list under ‘Mounted
Database’. Archived files are named according to the date range of data within the database
at the time of archive. When the correct file is selected, click select and restart the PWR
applications. NOTE: mounting an archived database file means that all PWR
applications will use this database as the current database. Care should be taken
to avoid scanning new Pcounter log data into an archive file. Stop the PWR Agent
service in this case, to disable log scanning.
Pcounter Web Report 3.x User's Guide 7. Administrative Functions 30Security Tab
A built in administrator login account is included called ‘admin’. Additional users can be
added by clicking the ‘Add User’ button.
The Add button displays the add user dialog. A username and password must be specified
and a user permission group must be selected from the permissions dropdown list. Current
user groups are ‘Access Administrator Portal’ and ‘Access Reporting’ and ‘All Applications’.
Pcounter PRO Authentication
A PWR 3.x user can be authenticated by Pcounter PRO by checking the ‘Authenticate with
Pcounter PRO’ option. In this case the PWR 3.x password value is ignored, as the password
is authenticated via the network. The username supplied must match an existing network
account.
NOTE: Authentication for User Portal Users.
It is not necessary to add users to PWR 3.x for User Portal access. Authentication for the
user portal always uses Pcounter PRO to validate users. If a user name is also a PWR 3.x
Pcounter Web Report 3.x User's Guide 7. Administrative Functions 31user, then their permissions will be elevated to include application access based on their
permissions group.
Edit\Delete User
Used to manage users created within the system. The Admin user may not be deleted.
Set User Restrictions
Certain users may be restricted from viewing data within the system. The User restrictions
feature enables the Administrator to block specific devices, Users or OU values for the
selected user.
Placing a check beside the object will permit that object for the selected user.
Pcounter Web Report 3.x User's Guide 7. Administrative Functions 32Email and Export Configuration Tab
The Email and Export Configuration tab is used to configure the email and export features of
PWR 3.x.
Email Setup
From Address
The from address field is used to specify the email address that PWR 3.x uses to send
automated email reports.
From Name
The From name filed is the name that will appear in the ‘from’ field of the emails sent by
PWR 3.x.
Email Text
The email text field is the text that will be included in the body of the email sent by PWR 3.x.
SMTP Settings
Pcounter Web Report 3.x User's Guide 7. Administrative Functions 33PWR 3.x uses SMTP to send outgoing emails. To send emails using SMTP, it is necessary to
specify an SMTP Server and any account username or password for that server.
SMTP Host
The field holds the DNS name of the SMTP Server.
SMTP Port
This value is the port number on the server specified. The default is 25.
Login
This field holds the SMTP login for the server specified. Leave this value blank if the server
does not require authentication for sending emails.
Password
This field holds the password that corresponds to the login name specified.
Send Test Email
It is possible to test the current email settings by clicking the ‘Test Email’ button. If the
email is sent successfully, then a success message will be displayed. If PWR 3.x was unable
to send the email, then an error dialog will be displayed with a description of the problem.
File Export
You may specify one or more folders to use when running scheduled file exports by
separating each path with a semi-colon.
Full write access to each folder in the list must be granted to the PWR3 Agent
Service.
The service login name for the ‘PWR3 Agent Service’ needs to be changed from
localsystem to an actual username with full access to the shared folder (as above).
This is done using the Windows Service control manager
Pcounter Web Report 3.x User's Guide 7. Administrative Functions 348. Log Scan utility
The log scan utility reads the Pcounter log files on the server and runs automatically to
update the PWR 3.x database. The application can also be run manually from the Program
Group on the PWR 3.x server.
Start\Stop
These buttons start and stop the scan process.
Exit
Shut down application.
Scan entire files and log duplicates to exceptions list.
This option is useful if the current set of Pcounter logs require removal of duplicate entries
before importing into the PWR database. If a file in the log scan folder has been detected for
changes, then it will be fully scanned and duplicate entries will be logged to the exceptions
list. Unchecking this option (Default), means that the PWR log scanner will stop scanning a
file if it detects more than 5 consecutive duplicate records.
NOTE: It is important to close the Log Scan application if it has been executed manually,
otherwise the interval scan will not run. The interval scan will not execute a second instance
of the application if it is already running.
Document Types
PWR 3.x registers document types by examining the file name of the Print Job in the
Pcounter log. A number of common document types are built in based on the document
name containing one of the following values :-
File name contains :-
“HTTP”,”HTTPS”,”HTML” = WEB
File extension is :-
“PDF” = PDF Document
“DOC” = Office Word Document
“XLS” = Office XLS Document
“XML” = XML Document
“TXT” = Text Document
Pcounter Web Report 3.x User's Guide 8. Log Scan utility 35This list can be customised by adding to the PWRDocTypes.txt file in the application install
folder on the server. The format is :-
= i.e. PDF=Adobe PDF Document
The file extension is checked first, if it does not match then the document name is checked
for the presence of the identifier string. For example, the rule :-
http://StudentServer=Student Email Server
Will tag all job names containing the string “http://studentserver” as being a Student Email
Server document type.
Missing Domain names in Reject.log
For cases where the Reject.log file does not include the full user name, a text file can be
created in the Bin\ folder called ‘NoDomain.txt’. The first line of this file should
contain the domain name to be substituted should the domain name be missing from the
Reject.log file.
Scan Options
The PWR 3.2.x log scanner supports additional options that may be configured depending
on how usernames are recorded in the Pcounter Log file.
ExtractUserName option
A file is included in the \Bin folder called ScanOptions.ini. Under certain
circumstances Pcounter or an embedded solution may record the fully qualified names i.e.
username@domain.com in the Pcounter log. Use this option to extract the simple username
and record this in PWR.
Add the option ExtractUserName=1 to extract the simple username.
Add the option ExtractUserName=0 to record the username as it appears in the log file.
Pcounter Web Report 3.x User's Guide 8. Log Scan utility 369. Report Definition Import\Export
PWR 3.x comes with a utility application for importing or exporting report definitions.
Reports can be configured on one system and exported to another system, either replacing
the current report with the same ID, or creating a new report.
Report Import
1. From the PWR3 program group, run the Report Utility:-
2. The command window will open.
Pcounter Web Report 3.x User's Guide 9. Report Definition Import\Export 373. Type the either the command line :-
REPORTUTIL IMPORT [report full path] NEW
This command will create a new report in the PWR database using the report definition file.
REPORTUTIL IMPORT [report full path] REPLACE
This command will replace a report in the PWR database using the report definition file.
Reports with the same report ID will be replaced.
Report Export
You may export an individual report using the report id. The report id is displayed after the
report is saved and opened on the ‘Report Title’ tab.
The following commands can be used to export a report :-
REPORTUTIL EXPORT [report id] [report folder]
This command will export a report from the PWR database to a pwr definition file. Supply
the ID of the report and the file path. Supply only the file path for export, the file name is
generated from the report name.
REPORTUTIL EXPORT ALL [reports folder]
This command will export all reports from the PWR database to pwr definition files. Supply
only the file path for export, the file name is generated from the report name.
Pcounter Web Report 3.x User's Guide Appendix A – Log Files 38Appendix A – Log Files
PWR 3.x maintains a number of log files containing status information and error tracking
during normal operation.
The logs are held in the PWR 3.x application folder in the \BIN\Logs subfolder. Each log is
capped to a maximum 2mb in size to conserve disk space and has a .LOG file extension.
Logs can be opened in any text editor application such as Notepad.exe.
When a log reaches 2mb in size it is archived to an .ARC file, and a new log is created.
Archived logs are overwritten; this means that up to a maximum of 4mb log data is saved
at any one time.
Log Name Description
PWRAgent.log Contains logging information about the
PWR 3.x Scheduler service application.
PWRLogScanNT.log Contains statistics and error
information about the scanning of each
Pcounter.log file
UnknownDocType.log Contains logging information about
document types that could not be
identified in the Pcounter log file.
Exceptions.log Contains logging information about the
Pcounter jobs rejected by PWR 3.x
because the page count was 0, or if a
log entry has an invalid number of
columns.
Archive.log Contains information on the System
Archive activity
ProNetBridge.log Contains error messages received from
calling the Pcounter PRO DLL
Appendix B – Port Numbers
PWR 3.x client uses the following network ports and protocols to communicate with the PWR
3.x server :-
Database Server Port: TCP 3050 (connects Localhost only)
Application HTTP\HTTPs Port: 83 (default, can be changed in settings)
Pcounter Web Report 3.x User's Guide Appendix A – Log Files 39Appendix C – Generating a Self Signed SSL Certificate
PWR Ships with a utility for generating a basic self-signed SSL certificate. This certificate is
not suitable for use in production environments as it will generate certificate warnings and
errors in the browser, however it is suitable for demonstration and testing of the SSL
capabilities.
In the \BIN folder run the executable PWRSelfCert.exe
When complete a PFX file will be created in the same folder
File Name: PWRTestCert.pfx
Password: password
Use this PFX file and paswword to configure the SSL settings for PWR.
Pcounter Web Report 3.x User's Guide Appendix C – Generating a Self Signed SSL Certificate 40Appendix D – Increasing the Database Memory Cache
If you are experiencing poor performance in running reports in PWR 3.x, then you may
increase the amount of memory that is allocated to the database cache. This will ensure
that more data pages are loaded into memory over time, hence any subsequent queries will
be more responsive.
NOTE: this adjustment should only be considered for PWR databases that are
running greater than 1GB in size (\Data\PWR.FDB file).
In the \BIN\Firebird folder of the PWR install, locate and open the file Firebird.conf using
notepad or similar text editor.
Locate the section as shown below :-
Modify the DefaultDbCachePages value according to the following guideline:-
Systems with 4GB RAM – 4096
Systems with 8GB RAM – 8192
Delete the # symbol. The setting should look similar to this :-
Save the file.
Pcounter Web Report 3.x User's Guide Appendix D – Increasing the Database Memory Cache 41You can also read