RTE COM Services User manual - Lotus Notes email client
←
→
Page content transcription
If your browser does not render page correctly, please read the page content below
RTE COM Services

    User manual

   Lotus Notes email client

            Version 3.0
RTE COM Services                                                                                                        User manual

Table of contents
ABOUT THIS DOCUMENTATION .................................................................................................3
INFORMATION SPECIFIC TO YOUR COMPANY .............................................................................3
FROM THE EMAIL CLIENT ......................................................................................................4
DATA HANDLED IN THE MESSAGES ...........................................................................................5
SAVING IN THE ADDRESS BOOK ................................................................................................5
FROM A PHOTOCOPIER (MFP) OR A SCANNER .......................................................................7
“SCAN T O MAIL” FUNCTION ....................................................................................................7
“I-FAX” FUNCTION ..................................................................................................................7
DIGITISATION BY TWAIN .......................................................................................................7
FROM THE PRINT DRIVER .......................................................................................................8
“FILE/PRINT...” FUNCTION .......................................................................................................8
PRINTING BASKET ....................................................................................................................9
ADVANCED OPTIONS..............................................................................................................10
ADDRESS BOOKS ...................................................................................................................11
TRANSMISSION ACKNOWLEDGEMENT ..................................................................................12
OPERATION ...........................................................................................................................13
RECEIVED ELEMENTS .............................................................................................................13
OPENING AN ACCOUNT .........................................................................................................14
CONSULTATION LEVELS .......................................................................................................14
HOME PAGE - LOGIN ............................................................................................................15
FAX LISTS .............................................................................................................................16
MEANING OF THE FAX STATUS AND VIEWING ICONS ................................................................16
EDITING FAXES ......................................................................................................................17
SEARCHES AND FILTERING .....................................................................................................17
CUSTOMIZATION..................................................................................................................19
SAVING CHANGES ..................................................................................................................20
MANAGING SEARCH FILTERS ...............................................................................................20
CREATING A FILTER ...............................................................................................................20
VALUES FOR THE “DOCUMENT” COLUMN ...............................................................................21
INSTALLATION .....................................................................................................................22
CONFIGURATION..................................................................................................................22
MANAGING TRANSMISSION ACKNOWLEDGEMENTS .................................................................23
SENDING A MESSAGE BY FAX ................................................................................................23
SENDING DOCUMENTS ..........................................................................................................23
SENDING VIA QUICKFAX PROGRAMMING ............................................................................25
OPERATION IN QUICKFAX MODE ............................................................................................25
QUICKFAX TRANSMISSION PARAMETERS ................................................................................26
USE OF QUICKFAX MACRO FOR MICROSOFT WORD ................................................................27
ADDRESSING BY ODBC DATABASES ....................................................................................30
DATA SOURCE FOR RTE COM SERVICES ...............................................................................30
ASSOCIATING FIELDS .............................................................................................................31
SELECTING RECORDS .............................................................................................................32
ENDING THE SELECTION AND SENDING THE FAX .....................................................................33

RTE COM Services                                                 -2-               Copyright © 1997-2005 – RTE Software
RTE COM Services                                                                  User manual

Overview
RTE COM Services allows you to send and receive faxes, without installing any hardware,
using Lotus Notes (Version 5.0 and higher) - Lotus Domino 5.0 and higher.

You can send faxes from:
   • Your Lotus Notes client, as easily as sending an email.
   • Your multi-function photocopier, if it allows you to send emails (Scan to Mail
      function) and if it is connected to a SMTP server or a Lotus Domino server.
   • Windows applications using the RTE COM Services print driver via the File/Print
      function.

You can receive faxes
   • In Lotus Notes, in the same way as an email

You can view sent and received fax traffic
   • Via the http://members.faxbox.com website.

About this documentation
The examples provided in this documentation have been created using Lotus Notes 6.5.
They also apply to the other versions of Lotus Notes from version 5.0 onwards.

There are specific versions of this manual for other email clients:
    • Microsoft Outlook Office with Exchange
    • SMTP email client of Microsoft Outlook Express type.
If you have any of these email clients, please refer to the RTE COM Services specific
documentation.

This documentation considers some elements that are specific to your company. If you
forward it to other companies the domain names may need to be changed.

Information specific to your company
Email domain for sending faxes:
faxbox.com
To send a message, enter: number@faxbox.com in the recipient field when you send the mail.

Internet address for traffic retrieval:
http://members.faxbox.com

Downloading the print driver:
http://members.faxbox.com/download/setup.exe

RTE COM Services                             -3-         Copyright © 1997-2005 – RTE Software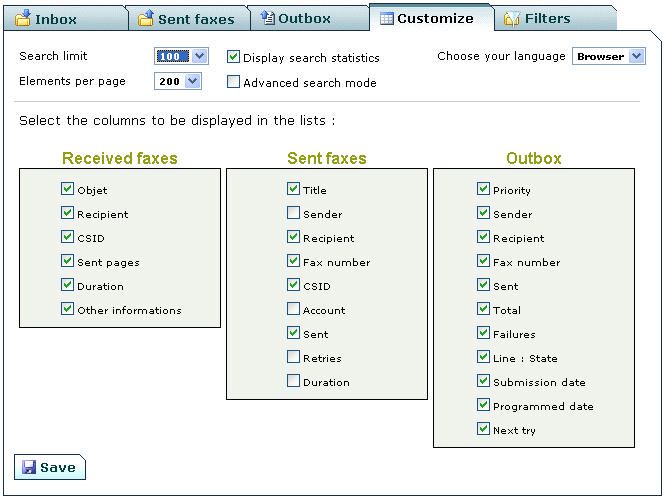
RTE COM Services                                                                         User manual

Sending a fax
You can send a fax:
  • From Lotus Notes
  • From a photocopier (MFP) or a scanner with the “Scan to mail” option
  • From the print driver

From the email client

                                                0033489871099@faxbox.com

                                                My first fax

  [DEFAULT:/S=urgent/A=Accounting]
  This is my first fax using RTE COM Services

Enter the fax address directly in the “To” field

You can use one of the following SMTP formats:
   • number@faxbox.com
   • name.number@faxbox.com
   • company.name.number@faxbox.com

Reminder: a correct SMTP address must not contain any spaces. If you specify a name for
the recipient or a company, replace spaces with _. For example:
John_Smith.0489871099@faxbox.com

RTE COM Services                                       -4-       Copyright © 1997-2005 – RTE Software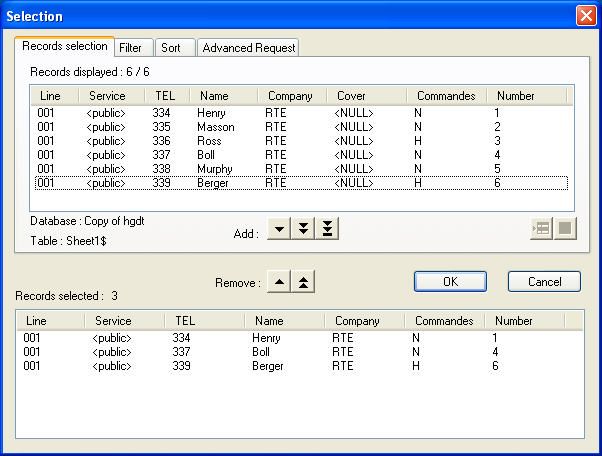
RTE COM Services                                                                      User manual

Data handled in the messages
Subject and body of the message
The subject and the body of the message are copied to the cover sheet of the fax; note that
only the text is copied, font changes, attributes (bold, underlined, italic, colour, size) and
images are not sent.

In the subject of the message, you can enter a line [DEFAULT: commands] allowing
advanced commands to be specified for all fax recipients (invoicing account, cover sheet,
CertiFax, SecureFax, etc.). This command line does not appear on the fax (the recipient does
not see it). Please refer to the list of advanced commands at the end of this documentation.

Attachments
Documents can be attached to a message; they will be converted to fax and sent.
   • The only supported formats are: Microsoft Word, Microsoft Excel and PDF.
   • If you try to send other types of documents they will not be sent, check in the
     transmission acknowledgement that the fax corresponds with what you send. If this is
     not the case, use the print driver which allows you to send any type of document and
     view a fax before sending it.

Saving in the address book
It is useful to store the details of your regular contacts. You can do this in the public and
personal address books.
     • You cannot store several types of address (Notes, SMTP, fax) for the same person. If
         you want to contact someone by email and fax, you must create two records.

   •   Create a new contact in your address book
   •   Enter the contact’s details and fax number in the “Business Fax” field.

RTE COM Services                               -5-          Copyright © 1997-2005 – RTE Software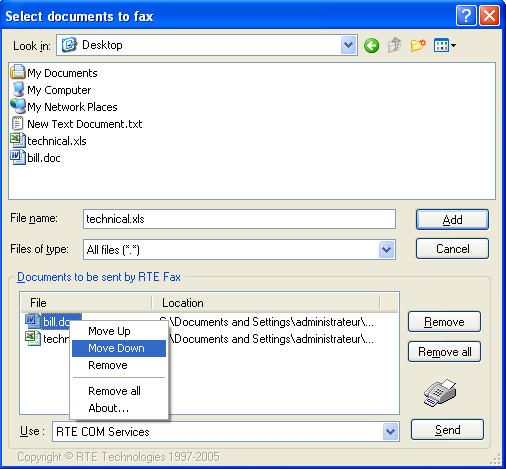
RTE COM Services                                                                   User manual

   •   Click on the     button and select “Fax” in the email address wizard, then click “OK”.

                 Albert DUPONT

                 0489871099

                 faxbox.com

                                                                               c
   •   Enter the “Person’s name” if you want this to appear on the cover sheet of the faxes
       you send.
   •   The “Fax machine phone number” is retrieved automatically from the fax field.
   •   Enter faxbox.com as the “Notes fax gateway domain”.

RTE COM Services                            -6-          Copyright © 1997-2005 – RTE Software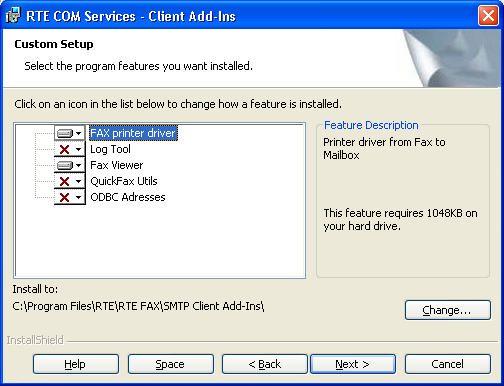
RTE COM Services                                                                     User manual

From a photocopier (MFP) or a scanner
To use RTE COM Services to send a fax from a photocopier (MFP) or a network scanner, the
machine must have the “Scan To Mail” function or the “Fax by Internet (I-Fax)” function and
provide the documents in pdf or tiff multipage format.

“Scan To Mail” function
   •   This function allows you to send documents by email by entering the recipient’s
       address on the MFP.
   •   To send a fax, use one of following syntaxes:
            o number@faxbox.com
            o name.number@faxbox.com
            o company.name.number@faxbox.com
   •   If the photocopier has an address book, you can store fax addresses in the same way as
       SMTP addresses.
   •   The attached file must be in pdf or tiff multipage format.
   •   The best results are obtained when scans are carried out in black and white.

“I-Fax” function
   •   This function is provided specifically to send faxes via the Internet.
   •   The operating principle is the same as that of the Scan to Mail function except that the
       email domain to be used is configured in the MFP, you simply need to enter the fax
       number.
   •   Configure faxbox.com as the I-Fax email domain. This operation should be carried out
       only once on the MFP and has probably been done by the administrator.
   •   You simply need to enter the fax number. When a specific fax address book is used,
       you only need to enter the fax number.
   •   In general, digitisation parameters are different for the Scan To email and I-Fax
       functions.
   •   For the I-Fax function, the optimum parameters are:
           o Black and white
           o tiff multipage format (pdf format can also be used).
           o Resolution 200 dpi (other resolutions can also be used).

Digitisation by TWAIN
   •   TWAIN is a standard protocol for exchanging data between a scanner and office
       automation applications.
   •   You must have an application on your workstation to recover the data from the
       scanner.
   •   Once the data is available in the application, you can send it by fax by printing it using
       the RTE COM Services print driver.

RTE COM Services                              -7-          Copyright © 1997-2005 – RTE Software
RTE COM Services                                                                 User manual

From the print driver
   •   The RTE COM Services print driver is included in the “RTE COM Services client add-
       ins”.
   •   It can be used from all Windows applications with the “File/Print...” function.
   •   The supported operating systems are:
       Windows XP Home and Professional editions
       Windows 2003 Server with Terminal Services client
       Windows 2000 (all versions)
       Windows NT 4.0 (needs Service Pack 6a)
       Windows 98 and Millennium
   •   You must download the client add-ins from:
       http://members.faxbox.com/download/setup.exe
       To install them you must be the administrator of your workstation.
   •   In most cases, the configuration to be used is detected automatically. If you come
       across any problems when sending, refer to the “Client add-ins configuration” chapter.

“File/Print...” function
   •   When printing, select the RTE COM Services printer.

RTE COM Services                            -8-         Copyright © 1997-2005 – RTE Software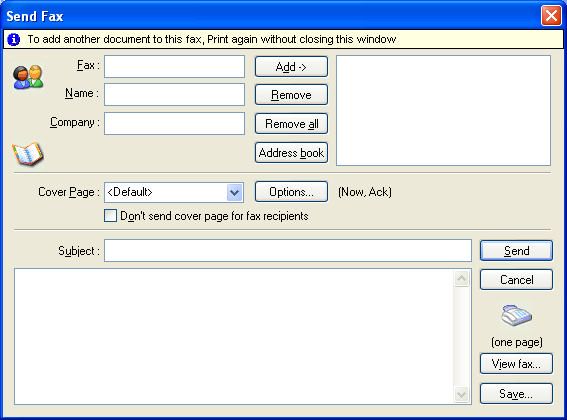
RTE COM Services                                                                   User manual

   •   For each fax recipient, you can specify: the fax number (mandatory), name and
       company name.
   •   You can specify several recipients using the “Add” button.
   •   The “Addresses...” button allows you to access Lotus Notes address books. You can
       select SMTP or fax addresses.
   •   The subject allows you to identify the fax in the elements sent by email and on the
       traffic monitoring site; if you send a cover sheet it will also be shown above.
   •   The message appears on the cover sheet.
   •   Check the “Do not send cover sheet and message to fax recipients” button if all the
       information required to identify the recipient is already in the document.
   •   The “Options” button allows you to access advanced sending options. These are
       described later in this document.
   •   Use the “View” button to view documents printed in fax format. The cover sheet will
       be added on the server if necessary.

Printing basket
   •   The objective of the Printing basket is to aggregate printouts from different
       applications and send them in a single fax. This function is particularly interesting
       when the items to be sent cannot be recorded in one document.
   •   To use this function, leave the dialogue box open in the background and produce all
       the necessary printouts; you will see the counter reading for the pages increasing.
   •   Use the “View” button to see the entire fax that will be sent.

RTE COM Services                             -9-         Copyright © 1997-2005 – RTE Software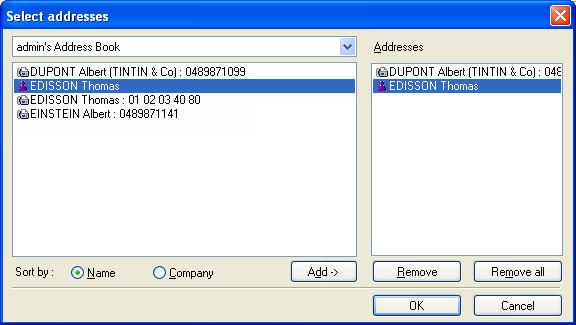
RTE COM Services                                                                    User manual

Advanced options
   •   You can access these options using the “Options...” button in the main dialogue box.

Billing account

   •   In general, you do not need to enter this information.
       If necessary, a default value will be specified on the server by your administrator.
   •   The billing account has two purposes:
           o To allow internal rebilling in your company from the itemised billing file
               provided to your administrator.
           o When there is a “Traffic monitoring for a group” concept (see “Traffic
               Monitoring” chapter) it is the billing account used when sending that
               determines the group allowed to view the Fax.
SecureFax

   •   The contents of a fax are not filed on the server. This function provides increased
       confidentiality as the fax can be viewed only by the recipient and in the transmission
       acknowledgement in your mailbox.
   •   The traffic monitoring tool contains a line showing the sender, recipient and technical
       information about the transmission. You cannot view the contents of a “SecureFax”.
   •   Use this function if you do not wish the fax to be seen by an administrator or a person
       in the same group as yourself.
CertiFax

   •   The sending of the fax is certified by a “third party organisation” independent of both
       your company and the recipient.
   •   The legal authenticity of the fax is equivalent to that of a registered letter
   •   The recipient receives a notification page indicating the “CertiFax” nature of the
       transmission. In addition to this, the word “CertiFax” appears in the fax information
       strip at the top of the document.
   •   The transmission acknowledgement that you receive contains only the pages received
       by the recipient; it is encrypted and cannot be modified.

RTE COM Services                            - 10 -        Copyright © 1997-2005 – RTE Software
RTE COM Services User manual
Address books
From the print driver or Send a message/Send documents programs; in the message entry box,
use the Addresses button to access the Lotus Notes address books.
• Use the drop-down list to choose the address book to be used (public or personal).
• Fax addresses are recognised when:
o A number is entered in the business fax field
o A number is entered in the personal fax field
o An SMTP address has faxbox.com as the domain; this is the case for
“DUPONT Albert”
• When there is a fax number and another address for the same recipient (in the
example, Thomas EDISSON), several lines are shown. You can then choose the
method you wish to use to contact this person.
• This option is not available from the Lotus Notes client. To send messages to fax
recipients only, you should use the send message command described in the chapter
on RTE COM Services client add-ins.
RTE COM Services - 11 - Copyright © 1997-2005 – RTE SoftwareRTE COM Services User manual Transmission acknowledgement Regardless of the method selected for sending, you can receive a transmission acknowledgement or a non-delivery report in your mailbox. This contains: • Technical information on the transmission (sender, recipient) • In the event of non-delivery, the reason for the failure. • The first two pages of the fax, visible directly in the message • An attached document containing the entire fax. The address to which the transmission acknowledgement is sent is: • As priority, the answering address • The sender’s address, if the answering address is not specified. When you send from a MFP and this does not require you to identify yourself, the transmission acknowledgement is sent to the answering address or sender specified by default in the MFP. RTE COM Services - 12 - Copyright © 1997-2005 – RTE Software
RTE COM Services                                                                    User manual

To receive a fax
Operation
   •   You cannot control receiving faxes directly.
   •   One or more fax numbers are allocated to your company.
   •   For each fax number, you can define one or more email addresses to receive faxes.
   •   The administrator has the necessary tools to define the fax assignment. Send the
       administrator your requests relating to receipt (or non-receipt) of faxes and for
       selecting the format of the attached file containing the fax.
   •   When a fax is received by several email addresses, elements are duplicated. Erasures
       and modifications made on your own copy of the fax have no effect on any other
       copies.
   •   The received fax is also stored in a database on the server. This database can be
       consulted via the Internet. In this case, the modifications can be viewed by all database
       users.

Received elements
   •   By default, the received message is in HTML format and contains the first two pages
       of the fax directly in the body of the message.
       If your email client or server does not support this format, the administrator can
       request information in “HTML Simplified” format (not including the images) or in
       text format (.TXT).
   •   The complete fax, as an attachment, in .PDF or .TIFF format
       If you wish to change the default format (.PDF), the administrator can modify this.
       If you want to print a received fax, you should open the attachment and print it
       directly from the application used to view it rather than printing the contents of the
       message directly.

RTE COM Services                            - 13 -        Copyright © 1997-2005 – RTE Software
RTE COM Services User manual
Viewing traffic via the Internet
• All fax traffic sent and received using RTE COM Services is stored in a database on
RTE COM Services servers.
• Each company has its own database and its own website. To view your traffic, connect
to:
http://members.faxbox.com
Opening an account
• To view the traffic, you must have an account (user/password). This is independent of
the account you use to send and receive faxes (for example: you can have the right to
view the traffic without having the right to receive faxes directly).
• The policy for opening an account depends on the policy your company specified
when it signed the contract. There are two options:
o Free opening by every user: registration is online on the viewing site. In
general, to use this method, you must already be registered as a fax sender
and/or recipient.
o Opening by the administrator.
Consultation levels
There are three consultation levels:
• “user”: you view the traffic according to the email address stored when you opened
your account.
If you send faxes from several email addresses, you must open an account for every
address used.
• “poweruser”: you view the traffic according to your email address and the billing
account specified at the time of registration.
If you specify another billing account for a transmission, you will be able to view the
fax (with the email address), but other users with the same billing account will not be
able to view it.
• “manager”: you can view all traffic.
RTE COM Services - 14 - Copyright © 1997-2005 – RTE SoftwareRTE COM Services User manual
Home page - Login
Some links on this page may not appear; they are shown according to the configuration
required by the administrator at the time of signing the contract.
• If you are a registered user, enter your user name and password
• If you check the Save my login box, you will be automatically logged in on your next
visit from the same workstation.
If you explicitly close the login using the button, you will be prompted to enter
your password when you next log in.
Once you have logged in, the session has a maximum duration of 10 minutes, i.e. if
you do not do anything during this time you will be disconnected from the site.
Storing your login will allow you to log in again without having to re-enter your user
name and password.
• If you have forgotten your password, click on the “Password forgotten” link and enter
your email address in the form shown.
• If you do not have a viewing account and your administrator allows on-line
registration, click on the “Open an account” link.
• Use the “Download print driver” link to download the RTE COM Services client add-
ins. This link also appears in every received fax and transmission acknowledgement.
You can also click on the link below.
http://members.faxbox.com/download/setup.exe
Once you have logged in, information appears at the top right of the screen.
• Your name
• Your viewing level (user, poweruser, manager)
• The button letting you disconnect, for use if you do not
want the “Store my login” box to be taken into account
the next time you login
RTE COM Services - 15 - Copyright © 1997-2005 – RTE SoftwareRTE COM Services User manual
Fax lists
There are three fax lists:
• Inbox (received faxes)
• Sent faxes
• Outbox (fax being sent or awaiting transmission)
Meaning of the fax status and viewing icons
Fax being sent
Fax awaiting transmission
Fax awaiting transmission during a cheap rate period
Fax sent or received correctly. Click on the icon to view the Fax
Fax sent or received correctly in “SecureFax” format. The fax contents cannot be
viewed.
Fax sent correctly in “CertiFax” format. Click on the icon to view the sent fax
pages in encrypted .pdf format. You can save the fax to your workstation but you
cannot edit it.
Fax error (sent or received). For a sent fax, an error is deemed to have occurred if
not all the pages were transmitted.
Click on the icon to see the fax as it should have been sent.
You must click on the print icon to find out which pages were sent and which were
not.
For a sent fax, this icon indicates that a transmission acknowledgement is
available(this is not the case for “SecureFax” faxes).
Click on the icon to view the transmission acknowledgement and print it using the
viewing application (Acrobat Reader).
The transmission acknowledgement consists of the transmission report and the first
four pages of the fax at most in reduced viewing (on only one A4 page).
If you want a full-size view of the fax, you must use one of the viewing icons
described above.
RTE COM Services - 16 - Copyright © 1997-2005 – RTE SoftwareRTE COM Services User manual
Editing faxes
• Use the icon to modify a fax.
• You can edit the subject of both sent and received faxes. To access this function, the
subject must be shown (see “Personalisation”).
• For faxes awaiting transmission, you can change the sending priority and the
recipient’s number.
This function is particularly useful if you make a mistake when entering the number.
• The icon allows you to delete a fax awaiting transmission. You cannot delete a sent or
received fax. If you do not want a fax to appear in the database, you must send it using
the “SecureFax” option.
Searches and filtering
The received and sent fax lists are the result of a search in the database. There are general
criteria according to your rights and personalisation settings and criteria that depend on the
displayed list (filters).
Search criteria
General criteria:
• The sender’s or recipient’s email address, in “user” or “poweruser” mode.
• OR the billing account in “poweruser” mode.
• The maximum number of records to be uploaded (default 100). This parameter can be
configured in the “Personalise” page.
Standard filters:
• According to the status of the fax (successful or error)
• Age of the transaction (from 1 hour to 3 months)
Search for text:
• The “Containing” field allows you to specify a simple search sequence (words) or one
containing logical commands.
• This search is carried out on all columns containing text in the database, including
those not shown in the lists. Therefore, lines that do not contain the element you are
searching for may also appear.
Personalised filters:
• The “Filters” tab allows you to create personalised filters.
• These filters are specific to the sending or receipt list.
• If “Advanced filtering” is not activated in the “Personalised” tab, the personalised
filters appear at the end of the “View sent/received faxes” drop-down list. If
“Advanced filtering” is enabled, a “Filter” list is available.
Advanced filtering:
• This mode must be activated in the “Customize” tab.
• There are 3 drop-down lists for the status of a fax, its age and the use of a personalised
filter.
RTE COM Services - 17 - Copyright © 1997-2005 – RTE SoftwareRTE COM Services User manual
• The uploaded records are those that meet the criteria in the 3 lists and in the text
search field.
Simple filtering
• The “Advanced filtering” mode must be disabled in the “Customize” tab.
• The status of a fax, its age and the personalised filters are grouped in a single list.
Only one of these search elements can be selected.
• The uploaded records are those that meet the criteria in the list and in the text search
field.
Text search
Text searches can be carried out on words, sentences, beginnings of words or sentences and
logical statements.
Words and sentences
• When a single word is entered, the search is carried out on this word to find an
identical match. “doc.” will find “doc.”, “Doc.”, “Test doc.” but not “Documentation”
• If several words are entered, the system regards this as a sentence and searches for an
identical match. For example: “Test doc.” finds “Test doc.” but neither “doc.” nor
“test”.
• You can use the joker character “*” indicating the start of the search
for example “Doc*” retrieves “Doc” and “Documentation”
Logical expressions
• OR: is used to retrieve a sentence containing one or other of the specified words
for example “Doc OR test” retrieves “Doc”, “Test”, “Test doc”, but not “Test
documentation”.
“Doc. * or test” will find “Test documentation”
• AND: is used to retrieve a sentence containing all the specified words.
• AND NOT: is used to find a sentence containing the first expression but not the
second expression. NOT cannot be used at the start of a search nor with the OR
operator.
• You can mix searches using wildcards and logical operators.
For example “d* and t*” are used to find “Test documentation”
Words ignored
• Some words are not indexed, in particular short and common words ([in French]: et,
un, de, le...) and figures alone.
Storing searches
• When you switch lists, the search is re-initialised and by default all faxes are shown.
• You can store search criteria and retrieve these automatically each time you login or
change lists.
• The search is launched when you click on the “Search” button.
RTE COM Services - 18 - Copyright © 1997-2005 – RTE SoftwareRTE COM Services User manual
• Switching from advanced filtering mode to simple mode may cause these settings to
be lost.
To save the results of a search
• Use the icon to generate a .CSV file (text delimited by;) containing all the records
generated by a search.
• This file can be edited using Microsoft Excel or a text editor.
Customization
The “Customize” tab allows you to edit the display and search parameters. You can edit:
• The list of columns shown in the various views.
• For the “Received faxes” and “Sent faxes” lists, the subject can only be edited if it
appears in the list.
• For the “Send box” list, editable fields are “Priority”, “Number” and “Departure”.
These fields must be shown to be edited.
• The “Number of faxes per search” is the maximum number of lines returned by a
search. This allows you to speed up processing by avoiding querying the entire base
until this number is reached.
• The “Number of faxes per page” is simply a display parameter. It does not have any
effect on the actual searches.
• The “Show statistics” box displays a line of statistics during searches in the “Faxes
received” and “Faxes sent” lists.
The statistics contain:
RTE COM Services - 19 - Copyright © 1997-2005 – RTE SoftwareRTE COM Services User manual
o the number of elements corresponding to the search; if this number is less than
the maximum number per search, these are all the results.
o the total number of faxes in the database
o the search time on the server
o the date and time of the search.
Saving changes
• When you exit the personalisation tab by moving to another tab or logging off, the
changes are discarded.
• To store the changes, click the “Save” button.
Managing search filters
• There are two filter sets: one for sent faxes and the other for received faxes.
• First, choose the filter category on which you want to work: “Sent faxes” or “Received
faxes”.
The list of existing filters is shown.
• A filter consists of at least one evaluation rule.
• If there are several rules they are evaluated from top to bottom with the logical
operator (AND/OR) selected.
• Warning! The session length is 10 minutes. If you remain inactive during this time,
you are disconnected from the site. If you are working on the filters and have to
interrupt your work, do not forget to save your work.
Creating a filter
Filter name
• Enter a filter name, in the example “Test RTE”
• Click on the “Add” button.
• A second list appears
List of rules
• Select the name of the column to be filtered
• Select the type of comparison; the list of possible comparisons depends on the nature
of contents of the column to be filtered.
• Enter the item for comparison
• Click on the “Add” button to validate the rule.
You must add at least one rule for the filter to be valid.
• A new line for entering a rule is shown; add as many rules as necessary.
RTE COM Services - 20 - Copyright © 1997-2005 – RTE SoftwareRTE COM Services User manual
Saving the filter
• Click on the “Save” button to save the current filter.
• If you are in the process of entering a rule (in the example: “And pending equal”) and
you want to include this in the filter, you must click on the “Add” button before
saving.
In the example, only the rule “Called number starts with 0489871099” is part of the
filter.
• Likewise, you can create, edit or remove filters or rules. You must always click on the
“Save” button before leaving the “Filters” tab or the viewing site.
Values for the “Document” column
The “Document” column contains a numerical value, not shown in the lists, which
corresponds to a status.
Value Status
0 Fax cancelled
100 Request for immediate transmission
101 Request for transmission at saving time
102 Programmed transmission request
103 Suspended transmission request
200 Transmitted without error
201 Transmitted with error
300 Awaiting transmission acknowledgement
999 Transmission in progress
RTE COM Services - 21 - Copyright © 1997-2005 – RTE SoftwareRTE COM Services User manual
RTE COM Services client add-ins
Installation
The RTE COM Services client add-ins is available as download at:
http://members.faxbox.com/download/setup.exe
• They consist of the following basic functions: print driver, fax message transmission
and documents and advanced functions.
• The advanced functions are not installed by default. When installing or updating the
RTE COM Services client add-ins, you must choose Custom setup and select the
optional modules.
• QuickFax tools, mailshot macro for Microsoft Word.
• ODBC addresses, selection of recipients in third party databases by ODBC
interrogation.
Configuration
• The add-ins are designed to operate with Lotus Notes connected to a Domino server,
Outlook Office connected to an Exchange server or with a SMTP email client (for
example Outlook Express).
• The most suitable interface is automatically selected during installation, if you want to
use another interface, select it manually.
• This document describes the use of the Lotus Notes connected to a Domino server
interface; for the other cases, ask your administrator for the relevant documents.
RTE COM Services - 22 - Copyright © 1997-2005 – RTE SoftwareRTE COM Services User manual
Managing transmission acknowledgements
• You can receive a transmission acknowledgement for sent faxes in your Lotus Notes
mailbox.
• This parameter can be configured according to the transmission method you use:
Interactive mode (print driver) in general for standard messages.
“QuickFax” mode, described later in this document, in general for mailshots.
Sending a message by fax
• This function is called up from the menu: Start/All programs/RTE COM Services -
Client add-ins/Send a message.
• It allows you to send a message, i.e. a single cover sheet, by fax.
• The interface used to enter the message and the fax addresses is the same as that
described in the chapter “Sending a fax via the print driver”.
• While the dialogue box is open, if you print on the RTE COM Services printer, the
printed pages will be added to the message and sent by Fax.
Sending documents
• This function is called up from the menu: Start/All programs/RTE COM Services -
Client add-ins/Send documents.
• This can be used to group several documents and send them in the same fax.
RTE COM Services - 23 - Copyright © 1997-2005 – RTE SoftwareRTE COM Services User manual
• The list of files at the top is used to select one or more files; you can also use Explorer
directly. The selected documents can be added to the list of the documents to send (at
the bottom) using the mouse in drag and drop mode.
• The documents are sent in the order of the list at the bottom. The position of a
document can be changed by right-clicking on it and using the Up and Down
commands.
• When you click on the Send button, the applications managing the documents are
called to print them and convert them to faxes using the print driver selected in the
“Use” list. Only the RTE COM Services and RTE FAX printers are listed. This allows
you to choose the transmission mode when several types of connectors are installed on
the same machine. When you select documents from other machines, you must ensure
that the application used to handle the document is installed on your machine and that
it can handle the format version used.
• This application is used to send several documents, with different formats, by carrying
out the fax transformation on the local machine (and not on the server) and by
controlling the transmission command. Once the print driver interface is shown, it is
possible to save the entire resulting document, which means it can be forwarded later
to other recipients without having to reconstitute it manually.
RTE COM Services - 24 - Copyright © 1997-2005 – RTE SoftwareRTE COM Services User manual
Sending via QuickFax programming
This transmission mode allows the applications that use it to send faxes directly without the
user having to obtain the information required for transmission, in particular the recipients’
details.
This mode is available only with the full client add-ins installation. It is compatible with the
QuickFax mode developed for the FotoWin product. Simple macros using this mode are
provided for the Microsoft Word product.
To implement this mode, the applications edit the RTE.INI file and send the data on the fax
printer driver. When the transmission is finished, the RTE.INI file is returned to its initial
status and subsequent printouts on the fax print driver are handled in interactive mode (the
user enters the necessary information).
From Windows NT 4.0, it is possible, and recommended, to use the register database to send
the parameters. This method is more reliable than RTE.INI, in particular when Terminal
Services or Citrix Metaframe is used.
Operation in QuickFax mode
Parameter setting via RTE.INI
• This method is mandatory under Windows 95/98/ME; it is not recommended on
Windows Terminal Services or Citrix Metaframe servers.
• The program wishing to use QuickFax mode must edit the RTE.INI file in the
Windows installation directory (default C:\WINDOWS or C:\WINNT). Under
Windows NT Terminal Server Edition, the directory containing RTE.INI is the
WINDOWS sub-directory for the current user profile. The program must indicate the
name of a section where the parameters used for transmission will be defined. This
name is free; it is indicated in the QuickFaxPrint variable in the [Fax-General]
section, for example:
[FAX-General]
QuickFaxPrint=QF_Params
• Before launching printing, you must enter the parameters required for transmission in
the QF_Params section. These parameters are detailed in the “QuickFax transmission
parameters” paragraph.
• Launch printing by sending the document to be transmitted to the fax print driver. For
this to use Windows printing functions, these functions are available in most
programming languages.
• If you no longer wish to use QuickFax mode and wish to return to interactive mode
you must reset the QuickFaxPrint variable in the [Fax-General] section to blank (null
string) or delete this variable.
Parameter setting from the register database
• This method does not operate under Windows 95/98/ME; its use is recommended in
multi-user environments such as Windows Terminal Services and Citrix Metaframe.
• Enter a key name to be used in the key:
HKEY_CURRENT_USER\Software\RTE\QuickFax
String value: QuickFaxPrint
RTE COM Services - 25 - Copyright © 1997-2005 – RTE SoftwareRTE COM Services User manual
• If the key name starts with HKCU or HKEY_CURRENT_USER, the continuation of
the string contains a location in relation to the HKEY_CURRENT_USER root, for
example:
HKCU\Software\My company\My application\QuickFax
• If the key name starts with HKLM or HKEY_LOCAL_MACHINE, the continuation
of the string contains a location in relation to the HKEY_LOCAL_MACHINE root,
for example:
HKEY_LOCAL_MACHINE \Software\My company\My application\QuickFax
• In the other cases, it is a sub-key of
HKEY_CURRENT_USER\Software\RTE\QuickFax, for example “My application”
will be stored inHKEY_CURRENT_USER\Software\RTE\QuickFax\Mon application.
• To return to normal operation, you must delete the QuickFaxPrint value or place a
null string here.
QuickFax transmission parameters
You can send the same document to a series of recipients whose details are specified in a file.
The AddressFile variable contains the full name of the address file; its format is defined in the
next paragraph. When this variable is blank, either the file does not exist or it does not contain
addresses, the information concerns only one recipient and it is defined in the other section
variables.
The SendMode variable is used in every case (only one address or list in a file), it can take the
value 0 (default), indicating an immediate start or 1 indicating a start during a cheap rate
period. When the register database is used, this variable is of the DWORD type.
The following variables concern only one recipient and are taken into account only when
there is no file containing the list of addresses.
LastNumberDial contains the fax number to be called without the network access prefix. It is
the only mandatory variable.
The other variables are optional, they are used to personalise the transmission according to the
recipient. They are particularly useful when a cover sheet is generated.
LastNameDial contains the recipient’s full name.
LastCompanyDial contains the name of the recipient’s company.
Account contains the name of the billing account to be used for sending to this recipient.
Cover contains the name of the cover sheet to be used for this recipient; specify “NULL” as
the name if you do not wish to use a cover sheet
Address file format
This file is in text format and uses the Windows ANSI character set. Each line, ended by <
CR > or < CRLF > contains the data for one recipient. Fields are separated by one of the
following characters: (comma), (semicolon), (tabulation).
Fields are defined in the order below; the first field containing the fax number is mandatory,
the others are optional. Where two separators follow each another, this indicates that the field
in question is blank.
RTE COM Services - 26 - Copyright © 1997-2005 – RTE SoftwareRTE COM Services User manual
The field order is as follows:
Fax number, Recipient name, Company, Recipient’s telephone number, Fax identifier to be
sent to the recipient, Name of cover sheet to be used, Billing account, Transmission
commands.
The command field can contain the following values - H: High resolution or N: normal
resolution, I: Immediate transmission or E: transmission in cheap rate period, number from 1
to 9: number of attempts in the event of failure to connect (line busy).
Use of QuickFax macro for Microsoft Word
Installation
This macro is installed automatically for versions 97 to 2003 of Microsoft Word; provided
that Word is installed on the machine before installation of the RTE COM Services client add-
ins. If you install Word after RTE COM Services, you will find the RTEMAIL.DOT file in the
client add-ins installation directory. You can launch this file manually or copy it to the
appropriate Word directory, depending on the version of Word (for example, for the 2003
version: C:\Program Files\Microsoft Office\OFFICE11\STARTUP).
The operation of this macro is not guaranteed with versions of Word higher than 2003 (not
known at the time of writing this manual).
When the installation has been correctly carried out, a new toolbar is displayed:
this is used to start the macro using the RTE QuickFax button. To stop
it press button.
Operation of the QuickFax macro
The QuickFax macro is based on the Word Mailmerge function. You need to create a template
document and create or specify a list of recipients with this function. This document describes
operation with Microsoft Office Word 2003, which is similar to earlier versions of Word.
Launching the Mailmerge function
• Tools/Letters and mailshots/Mailmerge... menu
• A wizard is displayed.
Selecting the type of document
• Select Letters.
• Click on Next: Source document
Selecting the source document
• Specify how you wish to compose your letters
• If you select an existing document that has been used for a mailshot, the last recipient
database used is selected automatically.
• In this example, we have selected: Use current document.
• Click on Next: Selecting recipients.
RTE COM Services - 27 - Copyright © 1997-2005 – RTE SoftwareRTE COM Services User manual
Selecting recipients
• Using an existing list: you can select a database or a file.
If you use FotoWin, the shared directories are located on the server in network sharing
\\Serveur\FotoWin\annuaire; you can select a .dbf file of your choice.
If the RTE COM Services client add-ins are installed, the directories are text files in
.csv format; select the file of your choice.
If you want to use a Lotus Domino-Notes address book, you must first export it in .csv
format using the Lotus Notes client.
To use the Windows/Outlook Express address book (WAB), you must first export it
from Outlook Express or from the WAB using the menu File/Export/Other address
book and by selecting the type Text file (comma separated values).
• Selecting from Outlook contacts: Microsoft Outlook must be installed on the
machine.
Choose a Contacts file whose records contain fax numbers.
• Entering a new list: as well as merge fields, you must create a Fax field which will
contain the numbers of the recipients. If you do not use one of the preset fields (for
example the telephone number), you can use this to enter the fax numbers.
Enter the list of recipients manually and the corresponding merge data.
The database entered is stored in a .mdb file which you can then re-use in the Use an
existing list function.
• You can select recipients manually (by default, all recipients in the list are selected) or
edit the records (in particular, to add fax numbers where these are missing).
• Click on Next: Writing your letter.
Writing your letter
• At this stage, you define your template letter and insert the fields that take a specific
value according to the recipient.
• You must specify at least one field in the database (otherwise, the mailshot is
meaningless and it is preferable to send the same document to several recipients using
one of the other fax transmission options).
• It is not mandatory to insert the field where the fax number in the document is located;
the use of this item by the macro is not related to its display in the document.
• Click on Other elements... in the Mailmerge wizard to show the list of available fields
and insert them in the document.
• You can continue to use the wizard to view the personalised letters. This is not
mandatory to use the QuickFax function.
End merge
• At this stage, the wizard prompts you to Print... or Edit the individual letters.
• You must not use any of these functions. Even if you print using the RTE COM
Services printer, this function will not allow you to select recipients automatically. The
fax number will be requested once only and all the letters will be sent to this number!
• Click on the RTE QuickFax button: this prompts you to enter the final configuration
information and launches the mailshot. The personalised documents are shown one by
one and are sent to RTE COM Services; this process can be long (several minutes)
depending on the number of records and the speed of access to the data.
The button is used to stop the merge, in this case documents that have already been
generated will be sent to the RTE COM Services server; in the event of error ask the
administrator to stop the transmission process.
RTE COM Services - 28 - Copyright © 1997-2005 – RTE SoftwareRTE COM Services User manual
RTE QuickFax parameters
• In the Fax list, select the field where the recipients’ fax numbers are defined.
• The Name field allows you to specify the database field to be shown on the cover
sheet or in the fax transmission lists. Its use is not mandatory.
• Select the type of transmission. If FotoWin is installed, you can use Suspended
transmission; the faxes then appear in the transmission list in suspended mode and
you will be able to view them and then send them from FotoWin. If FotoWin is not
installed, you are recommended not to use the suspended mode which would require
the intervention of an administrator.
Selecting records by fax number
• Records where the field selected as the fax number is blank are ignored.
• When the database contains several fields which can define a fax number, e.g. in the
case of Outlook contacts we have: Fax (Business), Fax (Home), Fax (Other); only the
selected field is considered.
For example (with an Outlook contact): Albert DUPONT has a blank Fax (Business)
field and a completed Fax (Home) field. If the Fax (Business) field is selected in the
RTE QuickFax parameters, Albert Dupont will not receive any faxes, but he will
receive a fax if the Fax (Home) field is selected.
• If you want to send a fax using several fax fields, you must launch the RTE
QuickFax macro as many times as required, selecting another field in the RTE
QuickFax parameters each time.
In this case, when a user has several completed fax fields, he/she will receive the
document at each number. It is possible to deselect records before calling up the
macro.
RTE COM Services - 29 - Copyright © 1997-2005 – RTE SoftwareRTE COM Services User manual
Addressing by ODBC databases
RTE COM Services can send Faxes using the ODBC access functions to determine the
correspondents’ addresses. This function is available only in interactive mode, when the email
client is not used directly.
The list of ODBC drivers installed on your machine can be viewed by clicking on the ODBC
icon in the Windows control panel. You must have at least one ODBC driver for Microsoft
Access to be able to use these functions.
The interface for accessing the ODBC data sources is called up when you click on the ODBC
Addresses button when printing to the fax printer. This interface will help you to create,
delete, edit or open a data source for RTE COM Services. After its creation, the data source is
used mainly to choose the records to be used to generate fax recipients.
Data source for RTE COM Services
A data source for RTE COM Services contains an ODBC data source together with the data
required to generate the fax addresses.
Data entered when the data source is created will be saved and can be used in future printouts.
Creating a data source
An ODBC data source can be created in two ways:
• Either using the Windows ODBC interface, which can be accessed by checking the
Open an ODBC database box or from the Windows control panel. (see Microsoft
documentation on the administering ODBC data sources)
• or by selecting a database file directly by pressing the Choose a data file button. In
this case, the ODBC driver corresponding to the file will be used automatically and an
ODBC data source will be created. For usual cases, we advise you to use this method.
RTE COM Services - 30 - Copyright © 1997-2005 – RTE SoftwareRTE COM Services User manual Selecting a table The database selected previously is opened and the list of tables attached to this database is displayed. You now need to choose the table to be used to generate the addresses. Simply select this from the list. Use the Options button to display the various types of table. The Show outline box is used to view the start of the records in the selected table. Associating fields To establish a link between the database and RTE COM Services, you must associate the fields required by RTE COM Services with certain database fields. The Fax field, containing the recipient’s fax number, is mandatory. The fields that can be used with RTE COM Services are shown in the first column, the second column shows the fields that have already been associated and the third shows an outline of the record. To create associations, select the field to be associated, then click on the Associate field button; a menu will then be displayed showing the list of database fields to be associated. You can also right-click to create an association. The Associate automatically button automatically associates fields with the same name. The various scrolling buttons are used to move within the table and to view different records. Once the associations have been completed and the source saved, you simply have to choose the fax address records. RTE COM Services - 31 - Copyright © 1997-2005 – RTE Software
RTE COM Services                                                                     User manual

Selecting records

The list at the top shows all the records from the table selected in the database.
The list at the bottom shows the records selected for RTE COM Services.

The Delete buttons are used: either to delete the selected records, or to delete all records from
the output list. The original database is unchanged

The Choice of records tab:
Used to select one or more records directly.
The Add buttons are used for copying: either selected records or all records read from the
source list to the output list.
The Entire database button adds all the records from the table to the output list.

A button allows reading of subsequent records in the source database. These records are read
by blocks of 100 and are then added to the end of the source list.
The Record filter tab:
is used to create filters on records from the selected database.
To do this, you must specify the selection rules. For each rule, you must specify the following
elements:
    • a field from the selected data source;
    • a comparison statement, such as is greater than or contains;
    • the text or numbers that you wish to compare with the contents of the data field.
You can enter up to three selection rules using the logical operators AND/OR.
The SQL query tab:
You can enter your SELECT SQL query directly. This will be stored and suggested the next
time you next use this RTE COM Services data source.

RTE COM Services                              - 32 -        Copyright © 1997-2005 – RTE Software
RTE COM Services User manual Ending the selection and sending the Fax Use the OK button to store the current selection and return to the fax transmission box. You will see that the selected addresses do not appear in the list. The number of addresses can be very high and the display operation may be long, particularly if the entire database is selected or there is an outstanding SQL query. You can add addresses manually or select from others in the email address books. The fax will be sent to all addresses in the list and to all addresses selected in the ODBC database. Duplicates are deleted automatically. You can check and edit the selected ODBC addresses, as long as the transmission has not been effected, by clicking on the ODBC Addresses button. The selected database is always the same. To change this, you must cancel and then restart the transmission. RTE COM Services - 33 - Copyright © 1997-2005 – RTE Software
You can also read