TIMETABLER CLOUD SCHOOL IMPORT GUIDE - CLOUD SCHOOL
←
→
Page content transcription
If your browser does not render page correctly, please read the page content below
User Guide

TimeTabler > Cloud School Import Guide
Cloud School

                                            Author: Fiona Thompson
                                                   Date: 29/12/2020
                                                     Doc Version: 1.0

                            Advanced Computer Software Group Ltd.

                                            www.oneadvanced.com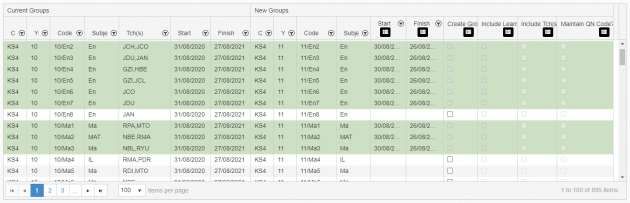

Copyright © Advanced Computer Software Group Ltd 2021
This document contains confidential and / or proprietary information. The content must not be
disclosed to third parties without the prior written approval of Advanced Computer Software Group
Limited or one of its subsidiaries as appropriate (each referred to as “Advanced”). External recipients
may only use the information contained in this document for the purposes of evaluation of the
information and entering into discussions with Advanced and for no other purpose.

Whilst Advanced endeavours to ensure that the information in this document is correct and has been
prepared in good faith, the information is subject to change and no representation or warranty is given
as to the accuracy or completeness of the information. Advanced does not accept any responsibility or
liability for errors or omissions or any liability arising out of its use by external recipients or other third
parties.

No information set out or referred to in this document shall form the basis of any contract with an
external recipient. Any external recipient requiring the provision of software and/or services shall be
required to enter into an agreement with Advanced detailing the terms applicable to the supply of such
software and/or services and acknowledging that it has not relied on or been induced to enter into
such an agreement by any representation or warranty, save as expressly set out in such agreement.

The software (if any) described in this document is supplied under licence and may be used or copied
only in accordance with the terms of such a licence. Issue of this document does not entitle an external
recipient to access or use the software described or to be granted such a licence.

The development of Advanced software is continuous and the published information may not reflect
the current status. Any particular release of the software may not contain all of the facilities described
in this document and / or may contain facilities not described in this document.

Advanced Computer Software Group Limited is a company registered in England and Wales with
registration number 05965280 whose registered office is at Ditton Park, Riding Court Road, Datchet,
Berkshire. SL3 9LL.

A full list of its trading subsidiaries is available at www.oneadvanced.com/legal-privacy

Version History

 Date             CS Version   Doc Version   Issued By   Changes

 29/12/2020       20.5         1.0           FT          New template
                                                         Academic year update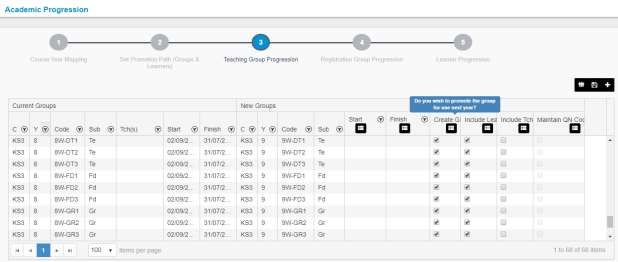
Contents
1 Introduction .................................................................................................................................. 3
2 Academic Year .............................................................................................................................. 5
    2.1 Create Own Academic Year ............................................................................................................. 5
    2.2 Copy Cluster Defined Academic Year ............................................................................................. 7
    2.3 Academic Year Definition ................................................................................................................. 7
    2.4 Adding Academic Terms .................................................................................................................. 7
    2.5 Term Break(s)/Midterm Break(s)..................................................................................................... 8
    2.6 Week Structure .................................................................................................................................. 9
    2.7 Academic Calendar Events ............................................................................................................ 10
3 Further Core Data Preparation ................................................................................................. 12
    3.1 Subjects ............................................................................................................................................ 12
         3.1.1 Course Subjects ...................................................................................................................... 14
    3.2 Teachers/Staff .................................................................................................................................. 15
         3.2.1 Adding a New Teacher ........................................................................................................... 15
    3.3 Sites and Rooms .............................................................................................................................. 16
         3.3.1 Sites .......................................................................................................................................... 16
         3.3.2 Setting up Rooms ................................................................................................................... 17
4 Timetable Sources, Setup and Date Mappings ........................................................................ 19
5 Academic Progression ................................................................................................................ 20
    5.1 Course Year Mapping (Step 1) ....................................................................................................... 20
    5.2 Set Promotion Path (Groups & Learners) (Step 2) ...................................................................... 22
    5.3 Teaching Group Progression (Step 3) ........................................................................................... 23
    5.4 Registration Group Progression (Step 4) ..................................................................................... 26
    5.5 Learner Progression (Step 5) ......................................................................................................... 27
6 Creating New/Further Teaching Groups .................................................................................. 29
7 System Settings........................................................................................................................... 30
    7.1 Further Settings – After the Import .............................................................................................. 30
8 Export Core Data Codes ............................................................................................................. 31
9 TimeTabler – New Import .......................................................................................................... 32
    9.1 Step 1 – Select a File........................................................................................................................ 32
    9.2 Step 2 – Source Creation ................................................................................................................ 33
    9.3 Step 3 – Date Mapping ................................................................................................................... 34
    9.4 Step 5 – Assign Teacher to Teaching Groups .............................................................................. 37
    9.5 Step 6 – Generate Timetable ......................................................................................................... 38
10 After the Import........................................................................................................................ 39
    10.1 Release the Timetable .................................................................................................................. 39
    10.2 Default Source and Day Composition ........................................................................................ 39

Doc Version: 1.0                                                                Page - 1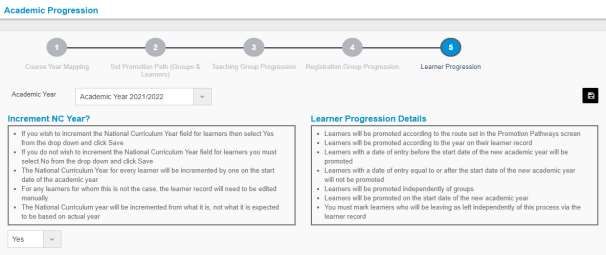
User Guide

TimeTabler > Cloud School Import Guide

   10.3 Learner Groups ............................................................................................................................. 40
   10.4 View and Print Timetables ........................................................................................................... 40
   10.5 Updating Schedules ...................................................................................................................... 40

Doc Version: 1.0                                                            Page - 2
1 Introduction
This document covers, step by step, the setup required in Cloud School for any schools using
TimeTabler to create their schedule.

It also details the import routine once the timetable has been completed in TimeTabler.

It assumes that you are starting from scratch in creating a new academic year ready to setup your new
timetable and starts from the beginning, however, if you are part way through academic progression or
setup, please do still read through all of the steps and ensure all data is correctly in place to help
ensure a smooth import.

If you have any queries or come up against any problems related to Cloud School setup whilst working
through this preparation or during the import, then please contact our Support Team on 0330 060
2199. Alternatively, use the support site for live chat with a support representative, to search the
knowledge base or to log a call.

Once the preparation in Cloud School is complete and you are ready to begin timetabling in
TimeTabler, further documentation produced by the TimeTabler team detailing full functionality and
how to export the finished schedule is available with the software and additional information is
available from http://timetabler.com/ and from the help pages in TimeTabler itself.

Any questions relating to that side of the setup or regarding TimeTabler in general is best directed to
TimeTabler Support in the first instance - support@timetabler.com however, both teams will try and
help wherever they can with any issues.

When considering Teaching Groups, you can either:

   1. Use the Academic Progression process to promote existing teaching groups with learner
      populations, create any new/additional teaching groups required in Cloud School and match
      the codes exactly in TimeTabler – this way, they will be automatically linked to the timetable as
      part of the import process. If this is done, you can populate the new groups and change the
      setting between existing groups at any point during the entire process.

   2. Don’t progress any teaching groups and import them (with or without learners) instead so they
      match new/TimeTabler codes and they will then be matched automatically on the import
      process. The import can be done and learners populated at any point during this process.

Choice 1 is most recommended to save time and for convenience but teaching group codes must
match exactly and dates must be within the timetable source for them to match and you may have
hundreds of groups to match so please do pay particular attention to this section.

The following page contains a high-level process flow.

Doc Version: 1.0                                 Page - 3
User Guide
Create the new Academic Year in
Cloud School
TimeTabler > Cloud School Import Guide
This can be done any point from
1 September of the new year
onwards
Setup Staff and Rooms
Any rooms and staff being used on the
Must be completed and is the 2021/2022 timetable must be setup
first step in this overall process Staff and Room codes and names must
be matched EXACTLY between Cloud
School and TimeTabler – an export from
Cloud School can be taken to import into
Setup Subjects TimeTabler to ensure this is the case
Any subjects being used on the
Must be done before you start creating
2021/2022 timetable must be setup and the timetable in TimeTabler
mapped to the correct courses
Subject codes and names must be
matched EXACTLY between Cloud
School and TimeTabler – an export from
2 -4 (mandatory)
Cloud School can be done to import for Academic Progression Mapping -
TimeTabler to ensure this is the case Learners and Registration Groups
Must be done before you start creating This must be done before the start
the timetable in TimeTabler date of the 2021/2022 academic year
to ensure learners are promoted
correctly
Academic Progression of Teaching It should be done before importing the
Groups timetable
This is optional BUT HIGHLY
RECOMMENDED: if you wish to
‘promote’ teaching groups (e.g. Creation of New Teaching Groups
7a/Ma1 to 8a/Ma2 with associated This is optional BUT HIGHLY
learners) and keep learner RECOMMENDED: if you wish to
populations then you can link them
automatically or manually to the
5&6 have new groups ready to
automatically or manually link
timetable during the import process during the import they should be
Must be done before the import created before the import
and codes and years must match If you do not wish to promote – i.e.
exactly if you wish link automatically you wish have new
during the import codes/populations and empty
groups – then new groups can be
imported via a spreadsheet if
formatted correctly
7
Check “System Setting” is for TimeTabler
Export core details for TimeTabler, create the schedule in
8 TimeTabler and export for Cloud School
Import TimeTabler file to Cloud School – create the source, set the
9 date mappings, match teaching groups, associate teachers to
groups, check learner timetables – check and print!
Doc Version: 1.0 Page - 42 Academic Year In order to progress learners, registration groups and (should you wish to do so), teaching groups for the new Academic Year, you will need to complete the setup in Cloud School. It is important that you setup the dates for the Academic Year and complete each required step of the academic progression correctly – it is recommended that a Data Manager do this in conjunction with the Timetabler as the two processes are closely tied. The Academic Year setup in Cloud School is powerful and elaborate because it involves the definition of terms, mid-term breaks, training days, etc. When adding dates for the new Academic Year, non-volatile data such as rooms, staff and Subjects - i.e. data that doesn’t change significantly between years – will continue to be active into the new date range – learner and group progressions are dealt with in the Academic Progression. Note: The creation of the Academic Year and the first two steps of the Academic Progression are the very least required to be able to import a TimeTabler file so should be done at the start of the overall process. If you are part of a Cluster of schools, it is possible to copy and use an Academic Year structure which has been created at Cluster level. If you are part of a Cluster and they have made an Academic Year available to you, you will see two options – one to Add an Academic Year of your own and another to Copy the Cluster defined Academic Year. An Academic Year must have been defined and made available by a Cluster user for this option to work. 2.1 Create Own Academic Year Select Data | Academic Year Doc Version: 1.0 Page - 5
User Guide
TimeTabler > Cloud School Import Guide
Click Add – the radio button by default will remain in Create Own Academic Year even if you have an
option to copy from a cluster available.
The first section Academic Definition requires you to provide a name, start date and end date for the
new Academic Year.
Note: The mandatory fields in this section are the only ones which need to be completed in order to
save the Academic Year – the terms and inset days can be added at a later date – please note however,
that they must be completed before the dates actually arrive.
Fill in a name for the Academic Year – the recommended format is Academic Year 2021/2022
Note: By default the Start Date is taken as the date immediately after the End Date of the previous
Academic Year and the new End Date is set a calendar year later. Don’t change the start date so there
is a gap, if you need to make the new academic year start earlier or later, cancel here and amend the
end date of the current/previous academic year first so the new one defaults correctly next time.
Check the default Start Date is early enough for your first day back at school – amend the date correctly
if it isn’t
Check the default End Date is correct – click the calendar icon or overtype in the same date format to
select a different date
The Start and End Dates are
populated by default from those
used in the previous Academic
Year.
Dates cannot overlap Academic
Years; therefore, if you wish to
start your new Academic Year
earlier, then the End Date of the
previous Academic Year must be
adjusted first.
Click Save
Click Yes to the confirmation message that appears
Doc Version: 1.0 Page - 6A success message will then appear stating that the record(s) have been added successfully. Click OK You will then see the new Academic Year showing in the Academic Year list view. 2.2 Copy Cluster Defined Academic Year Select Data | Academic Year Click Add Select the Copy Cluster Defined Academic Year radio button Note: If a Cluster defined Academic Year wasn’t available to you at this point, a message would appear to warn you that is the case. If an Academic Year from the Cluster is available, the predefined information will be made available and shown in each section. Check the details and amend according to your individual school’s requirements by selecting a term or term break and clicking the Edit button Click Save when you are happy to use the Academic Year details Click Yes Click OK when you get a message stating that the record(s) have been added successfully You will then see your new Academic Year showing in the Academic Year list view. Select the 2021/2022 Academic Year and click Edit You will see several sections which can be worked though in turn to further define the new academic year. 2.3 Academic Year Definition This section allows you to edit the academic year details you have just defined should you wish to do so at any point. You can edit the name or change the end date accordingly until the year starts. The start date is greyed out as this is determined by the end date of the previous academic year. 2.4 Adding Academic Terms This section allows you to add and/or edit academic terms. Each term date should be entered according to its start and end date – e.g. the Autumn Term, the Spring Term and the Summer Term. Expand the Academic Term(s) section by clicking on the section header Initially there will be no records to display – click Add to add the first Academic Term Enter in a Name for the term and a Start Date and an End Date for the term Doc Version: 1.0 Page - 7
User Guide TimeTabler > Cloud School Import Guide Click Save once this is correct or Cancel to start again You will see the term added to the section. Repeat as above until you have added all the term dates required If you make an error whilst adding the dates, e.g. a finish date earlier than a start date - then a warning will appear to advise you to make a correction. 2.5 Term Break(s)/Midterm Break(s) As you created the term dates, Cloud School in the background automatically defined the Term Breaks which will take place between the terms – e.g. the Christmas holiday, the Easter holiday and the Summer holiday. Doc Version: 1.0 Page - 8
Using this section, you can re-name those term breaks that are automatically defined and further
create midterm breaks.
Should you wish to rename a Term Break:
Select it and click Edit
Change the Name and click Save
To add a Midterm Break:
Click Add
Type in a Name, Start Date and End Date
Click Save
Repeat until you have all the Midterm breaks required.
Note: Each section can be reduced once you have completed it to save on space by clicking the header
again.
2.6 Week Structure
This section allows you to define which sessions of which days of the week are ‘in use’ and should count
as school days for roll call attendance purposes. For example, if your school opens on Saturday
morning and you expect learners to attend then you can set AM only on Saturday.
Typically, this section should be correct anyway but double check and change if required.
Check that the week structure is
correct and amend by selecting a
different value from the drop down
box if required.
Doc Version: 1.0 Page - 9User Guide TimeTabler > Cloud School Import Guide 2.7 Academic Calendar Events This section allows you to add other days which will have an impact on your academic year and attendance requirements – e.g. inset days and unexpected school closures. A graphical representation is provided to show what is happening. To add an Academic Calendar event: Click Add Type in the Name and the Start and Finish dates – it is possible to enter events spanning more than one day, e.g. 2 Inset Days together Select a Category (each event must have one) - there should be sufficient categories already provided by default, but it is possible to add your own (Data | Setup Master Data | Data | Academic Calendar Category) Select whether the event should be applied for a Full Day or Half Day (e.g. am only or pm only session) Click Save The graphical representation will be updated and the event will be added to the list view. Repeat as above until you have added any events you need to at this time. The Academic Calendar can be updated throughout the year. If you have an emergency closure day, it is possible to send SMS or Email notifications after adding the event. If you wish to record absences for staff but not teachers during dates now marked as school holidays, you can create Academic Calendar Events with a category which expects staff attendance but does not expect learner or teacher attendance. Doc Version: 1.0 Page - 10
Once you have completed all of the possible setup steps you can, click Save Click Yes to the confirmation message, then OK to the success message. Your Academic Year is now created and saved and you are ready to continue with Academic Progression. Setting up the academic year is necessary before using TimeTabler, however, Academic Progression can be completed now or at a later stage so it features slightly later in these notes. Doc Version: 1.0 Page - 11
User Guide TimeTabler > Cloud School Import Guide 3 Further Core Data Preparation There are some areas of core data which will be used in the timetable that can only be setup and edited in Cloud School. Once setup, this data can be exported for TimeTabler to ensure the codes match when the file is imported (if the codes do not match exactly the import will not work). Much of this data is used in other areas of Cloud School so it is worth setting them up in conjunction with users of those areas – e.g. Exams Officers, Data Managers and those responsible for Assessment. 3.1 Subjects It is possible for each school to choose the codes and names for their own subjects. As subjects will be used throughout the system for a variety of purposes including analysis, it is very important that as a school all stakeholders who use subjects agree on the codes that need to be used. That means consulting with the Exams, Attendance and Assessment officer for example. Additional subjects can be added should they be required. Subjects can also belong to departments depending on the school preference, however, if subject codes and department associations are changed unreservedly then this can have an impact on assessment, examinations, analysis etc., as the Timetabler please appreciate you should not simply change the codes to your desired convention, this is also true of other colleagues. It must be decided at school level. Select Data | Setup Master Data | Data Select Subject from the drop down list This will display a list of subjects which came with Cloud School and also any that have been imported from/added by your school. Doc Version: 1.0 Page - 12
Each new subject created by the school should have a Code, Name a Type and be Mapped to a subject in the CBDS. To enter a new subject: Click New Type SPS in the Code field (try and keep the code as short as possible) Type Sports Science Level 2 in the Name field Select Non-Core (this is not used elsewhere in Cloud School so you can have your own use/convention for it in the Subject area) Select Physical Education / Sports from the Mapped to combo box Click Save Click OK The subject will be added to the list. To delete a subject which you don’t wish to use, select the radio button and click Delete then click Yes and OK to the messages. Should you attempt to delete a subject which is actively is use elsewhere in Cloud School you will receive the following error message; Doc Version: 1.0 Page - 13
User Guide TimeTabler > Cloud School Import Guide Note: When a file has been extracted for TimeTabler, it is important that either no changes are made to subject names or codes until it has been imported or that those changes are matched and also made in the TimeTabler file. 3.1.1 Course Subjects Once subjects have been added, it is advisable to associate subjects with courses to provide filtering of subjects in other areas of Cloud School – e.g. when creating teaching groups for KS4 mapped subjects will appear in a separate section at the top of the list. Select Data | Academic Data | Course Subject Mapping Select the radio button for a course and click Map Subject Select the additional subject(s) required and click Save Click OK If you are no longer teaching a subject in a key stage and wish to un-map it; Select the radio button for a course and click Map Subject De-select the subject(s) you wish to un-map and click Save Click OK Doc Version: 1.0 Page - 14
3.2 Teachers/Staff Staff Records must be created and maintained within Cloud School. Staff records can be added in TimeTabler but they must also exist in Cloud School with the same details for the import routine to work when attempting to match them. Staff records are date based and active records must have a unique code (which is automatically created upon saving). 3.2.1 Adding a New Teacher To create a new teacher record: Select People | Staff Click Add Type Gregor the Surname field Type Michael in the Forename field Tick the ‘Timetable’ box The ID is automatically generated but you can overtype this if you wish Enter a Start Date – this can be a future start date Click Save Doc Version: 1.0 Page - 15
User Guide TimeTabler > Cloud School Import Guide The system will automatically check to ensure that the ID entered for the teacher is unique amongst active and draft records. If the code is not unique then you will see an error message. Where display Ids are in use by an active staff member, another ID must be chosen. If the ID is not in use on another active or draft record, a success message will appear (codes used previously on records which now have a status of Left can be used again). Click OK Notice that each record has a Status: Draft – this will be allotted to a record which has been created but is not yet active according to the start date (future date or blank) Active – this will be allotted to a record which has been created and is active according to the Start Date and Date Left Left – this will be allotted to a record which has a leaving date assigned which is already in the past When using the Manual Event Override functionality in Cloud School and the Cover functionality, in order to show teachers of the same subject or teachers who are free, they must also have been assigned a ‘Teaching Position’ in the Position drop down. The Position drop down is defined in Setup Master Data | People | Staff Position – there are some Cloud School system defined positions which can’t be edited, however should you wish to clone/create a new position and set the Type as Teaching then staff assigned that position will appear when searching for free teachers in Cloud School. 3.3 Sites and Rooms Largely these will remain static but you may be having building works or moving to a new site and find it necessary to create new rooms or even sites. 3.3.1 Sites If a site is not present it is not possible to set up Rooms. Most schools operate on a single site - individual blocks within a site are not set up as separate sites. If you do have a split site school, you can set up additional sites. Cloud School comes with a ready set up Site called Main which can be used as the default if you only have one site. To add a new site; Select Data | Site, Rooms & Equipment | Sites Click Add Fill in a Code – e.g. PRI Fill in a Name – e.g. Primary Click Save then click OK Doc Version: 1.0 Page - 16
Details of the site will be displayed in the list view. The import won’t look at site, it will match on Room Code so if you do have a split site try and make sure there aren’t rooms with the same code on both sites. 3.3.2 Setting up Rooms Each Room requires a Site, Code, Name, Room Type and Capacity. To enter details of a new room: Select Data | Site, Rooms & Equipment | Rooms Click Add (notice the Site defaults to Main) Type DT2 in the Code field Type Design Technology 2 in the Name field (this can be the same as the code or it can be a longer description) Leave the default Main from the Site combo box Select TTCLASS from the Room Type combo box Type 25 in the Capacity field (if you wish - the capacity is the number of students that a room is capable of holding) Click Save Click OK Doc Version: 1.0 Page - 17
User Guide

TimeTabler > Cloud School Import Guide

You will be returned to the list view and the new room will now be displayed.

Each Room must be given a unique code and all mandatory fields must be completed – error messages
will be generated if these conditions aren’t met.

Note: If you are using rooms in other areas of Cloud School such as Exams and Behaviour then it will
be necessary at some point to setup the additional room types and their accurate capacities for other
areas of the system to use. This can be done at a later date when the information is known.

Doc Version: 1.0                                 Page - 18
4 Timetable Sources, Setup and Date Mappings
      Within Cloud School, each timetable must have its own source – this source will be created as part of
      the import routine.

      Each source can have its own day structure, its own number of iterations and its own set of events – the
      day structure will be created as part of the import routine.

      Teaching groups are linked to timetable sources based on the start and end dates of both and the
      subject of the teaching group matching in both.

      When the import is creating the source, it must have a start date and according to the number of
      iterations, a finish date – these must sit within the academic year start and finish dates.

      In turn teaching groups that you wish to use for a particular timetable must have start and end dates
      that sit within the timetable source start and finish dates so they all tie in together.

      The day structure, timetable source start date, the number of iterations (how many times the cycle
      repeats during an academic year) and the date mappings will all need consideration to ensure that the
      hierarchy of dates is correct so that the teaching groups can be matched during import so please pay
      particular attention to this part of the setup in TimeTabler and the import.

      The below scenario would work as the teaching groups are within the source which is within the
      academic year and the day structure is Monday to Friday.

Academic Year             30/08/2021                                                     26/08/2022

      Timetable Source          06/09/2021                                         26/08/2022

                Teaching Groups        06/09/2021                                26/08/2022

      It is recommended you run your teaching groups past exam results days in August to make it easy to
      run reports for active groups.

      Once the timetable has been imported, the date mappings can be amended accordingly should you
      need to remove some days from the beginning or end of the timetable source.

      If you run a two week timetable you will also need to adjust the week sequence (e.g. a, b, a, b, a, b) so
      that after a one week holiday school returns to the correct week of a timetable but again, this is easier
      done once in the main date mappings screen once the file has been imported.

      Guidance for two week timetable date mappings is available in the Cloud School Resource Centre.

       Doc Version: 1.0                                Page - 19
User Guide TimeTabler > Cloud School Import Guide 5 Academic Progression Once the dates for the new Academic Year have been defined it is possible to carry out some or all of the Academic Progression. This will allow you to ensure years are mapped correctly to courses for group creation, progress teaching groups (should you wish to do so) with the correct dates, and make them available for matching on import and progress learners to ensure they are in the correct groups. Select Data | Academic Progression The process is broken down into steps which should be completed in turn. It is essential that you check the settings thoroughly and ensure the data is correct before moving on to the next section as it is not possible to re-visit some sections. For example, once you have created new groups, the Course Year Mapping and Course Year Promotion sections are greyed out. You must at the very least carry out steps 1 and 2. Should you wish to do so, you can progress the teaching groups, along with the population of learners – e.g. 7A/Ar becomes 8A/Ar – this will save time repopulating groups where the population will largely remain the same and if the group codes are the same the import will match them to the TimeTabler file. If you wish to start teaching groups from scratch in terms of coding them and populating them, you can create the teaching groups via the import teaching groups process or manually and code them based on the naming convention being used in TimeTabler and manually populate them with learners. This is a time consuming process however, so fine for the odd group here and there but not recommended for all groups. Whatever you decide to do for teaching groups, you will need to map promotion paths for learner promotion and it’s also likely that you’ll be able to promote registration groups. 5.1 Course Year Mapping (Step 1) This section allows you to map School Years to Courses and is the mechanism by which the Academic Structure of your school is defined in the new Academic Year. For example, if your school has decided to move Year 9 into Key Stage 4 then you must re-map it here before continuing. Doc Version: 1.0 Page - 20
Check that all required Years are mapped to their correct Course If no changes are required and everything remains the same, just click Save To map any un-mapped Years, click in the Mapped Year(s) line for the appropriate Course and choose a year from those available in the drop down To re-map a Year, select its current Course and click in-line to activate it Click the ‘x’ on the Year concerned to remove it from that course Click in-line for the new course and it will be available to re-map Click Save Ensure you see the successful save banner Once you have saved this step you can move on to Step 2 of the Wizard. Doc Version: 1.0 Page - 21
User Guide TimeTabler > Cloud School Import Guide 5.2 Set Promotion Path (Groups & Learners) (Step 2) This section of the Academic Progression allows you to map years for progression – for example, KS3 Year 9 into KS4 Year 10. This step of the process doesn’t move actual learners from class group to class group or at this stage create the groups, it simply determines the mapping of the pathway. Select step 2 – Set Promotion Path (Groups & Learners) All years listed, must be mapped before you can continue By default, numerical years will be picked up and mapped forward – e.g. 10 will go to 11 Any which cannot be mapped and those years which are set to ‘Leaving’ must be mapped manually Where a year group will be leaving – e.g. 11 or 13 – select Leaving (this won’t actually mark learners as left but will mean that they won’t be moved forward into future groups) If you have a sixth form and there may be some learners who will progress, move year 11 to year 12 at this point then any who don’t actually return can be marked as left but those who do can be put into new year 12 groups Next Year is dependent on Next Course To map a year, click in-line in the Next Course to select a course then select a Next Year if appropriate Ensure all years are mapped and click Save then click OK Doc Version: 1.0 Page - 22
5.3 Teaching Group Progression (Step 3) This section allows you to progress teaching groups with their current learner populations in to the next academic year – e.g. year 10 groups become year 11 groups and continue running on the curriculum. The learner populations will also be progressed and once the new groups are created, those populations can be changed if learners need to move groups. Progressing groups means you don’t have to create and populate them from scratch. For new cohorts (e.g. year 7) or where curriculums change dramatically (e.g. year 12) you will have to create and populate those groups from scratch. Note: You only need to progress Teaching Groups should you wish to have them already in existence and with learner populations to match on import. Select step 3, Teaching Group Progression All teaching groups which belong to a year group set to progress will be in the list – it is advisable to manage a year group at a time. Each column can be sorted by clicking on the header and each column with the filter icon has in-column filtering options available. All groups being progressed must have a start date and a finish date and these dates must be equal to or within the timetable source. The dates must be set on this step and can be entered in bulk. By default, any teaching groups in current year 7, current year 8, current year 10 or current year 12 will be set to ‘Create Group’ but no dates will be defaulted. Doc Version: 1.0 Page - 23
User Guide TimeTabler > Cloud School Import Guide Where groups have a valid two year QN code, it can be progressed along with the group – if the ‘Maintain QN Code’ check box is active, select it for any groups for which you wish to progress the QN code. To progress teaching groups, you must select ‘Create Group’, set a ‘Start Date’ and select a ‘Finish Date’. You must also check the settings for ‘Include Learners’ and ‘Include Teachers’. The years which default to create also default to include learners. No years default to include teachers as part of the integration routine Vertical groups (those with no course and no year associated) can be progressed and where the Code for the following year doesn’t begin with a number, it will be editable. To filter to a year group – click the filter icon in the Year column for ‘Current Groups’ Parameters for equal to, contains, and more are available Type in a value and click Filter to narrow down the list It’s possible to then sort by subject to select only those groups which can be carried forward To select or de-select Create Group for individual groups, tick the in-line tick box To set or change a date, click in line for the Start or Finish field and either type in the date or choose from the date picker To bulk change several events in one go, use Shift to multi-select adjacent groups or Ctrl to multi-select non adjacent groups To bulk fill a selection box – e.g. Create Groups, Include Tchs, Include Learners – select the groups you wish to change and click the Bulk Fill icon at the top of the column Doc Version: 1.0 Page - 24
Select/Deselect as appropriate and click Bulk Fill to update the selected groups To bulk fill a date field – e.g. Start or Finish – select the groups you wish to change and click the Bulk Fill icon at the top of the column Once all of your teaching groups have the required settings, they are ready to be created, however, once groups have been created, it is not possible to go back and change steps 1 or 2, it is also not possible to undo the changes to re-create the groups with different settings. It is possible to save your settings without creating the groups so that you or a colleague can double check they are correct before you save and create, or it is possible to save and create in one go if you are fully confident the settings are correct. To save your changes and check everything is correct before you create the groups, click the Save changes icon The changes will be visible to any user with permissions to Academic Progression and will remain saved until you make changes to them. If you do make any changes on step 1 or step 2, the settings you have saved on step 3 will be cleared back to the defaults. To save your changes and create the groups in one go, click the Save Changes and Create Groups icon The confirmation message warns you that once created, you can’t re-create the groups or change the course/year settings. Click Ok to create the groups or Cancel to go back and make changes Once progressed and created, the groups are shaded green and un-editable so you know they have been progressed, nothing further can be done with the groups within Academic Progression once they have been progressed, however, they can be edited via Learner Groups | Teaching Groups (filter on start date) Doc Version: 1.0 Page - 25
User Guide TimeTabler > Cloud School Import Guide 5.4 Registration Group Progression (Step 4) Along with teaching groups, registration groups can also be progressed into the following year. If groups are vertical they will remain as they are, with the same learners assigned, however, if they are horizontal (e.g. linked to a particular year) then they can be progressed to the following year. Vertical groups still need to be processed on the following step. Select Step 4 – Registration Group Progression Similar logic to step 3 is applied – any groups which have a current year mapped to a next year on step 2 and any vertical groups will be available for progression. By default, all groups are set to be progressed with learners and with teachers too. Doc Version: 1.0 Page - 26
Use Shift and Ctrl again to bulk select any groups you wish to bulk edit or edit individual groups in turn The codes for any groups which don’t start with a number can edited in-line in the grid Click Save to save any changes without creating the groups and return at a later date to create groups Click Save and Create to save any changes and create the groups The groups will turn green when they’ve been successfully progressed and from that point on, nothing further can be done with them in Academic Progression. However, they can be edited via Learner Groups | Teaching Groups (filter on start date) 5.5 Learner Progression (Step 5) This step provides information to you about the process of learners being promoted in the new academic year. It also offers the chance to increment the learner national curriculum year by one. Learners will be promoted on the first day of the new academic year. Only active learners will be promoted. When adding new intake, add them as year 7 with a start date in the new academic year. Doc Version: 1.0 Page - 27
User Guide TimeTabler > Cloud School Import Guide If you wish to increment the NC Year for each learner on the first day of the new academic year, leave the default setting of ‘Yes’ and click Save If you do not wish to increment the NC Year for any learner on the first day of the new academic year, change the ‘Yes’ to ‘No’ and click Save Doc Version: 1.0 Page - 28
6 Creating New/Further Teaching Groups
Even if you chose to promote your existing teaching groups to match to the TimeTabler import then
you will still have some new groups to create – year 7, year 10 options and any new/additional subject
sets for example.

It is highly recommended that you create the groups ready for the import and let them be matched up
automatically.

Teaching groups can be created manually or they can be imported via a data import using a
spreadsheet if the columns are formatted correctly.

Each Teaching group needs (as a minimum) a Subject, Code, Name, Start Date and Finish Date.

It is not appropriate to associate a teacher with the group as the import routine will do this more
efficiently as one of the steps.

You can create Teaching Groups in three ways – manually in bulk, manually individually or in bulk by
data import.

Please check the Cloud School Resource Centre for guidance on how to create and update teaching
groups.

Doc Version: 1.0                                 Page - 29
User Guide TimeTabler > Cloud School Import Guide 7 System Settings In order to set Cloud School to work with a TimeTabler import then the default setting needs to be checked. Do this before you import the file. In Cloud School; Select Timetable | Manage Timetable | Settings Expand the Other Settings node Select TimeTabler from the Default Scheduler drop down Click Save 7.1 Further Settings – After the Import Once the new timetable has been imported and once the old academic year has finished, you can revisit the Timetable Settings and set the Default Source so it is the newly created timetable source. Also set the newly created Default Day Composition for Timetable and Cover. To ensure that users can see the master timetable report for the new timetable source, you should navigate to Timetable | Post Integration Routines | Release Timetable. Release the timetable to all roles to let them know it is completed and is available and they will then be able to select that source to view in a report. (Note: you only ever need do this once for each new source). Doc Version: 1.0 Page - 30
8 Export Core Data Codes It is possible to export details for staff, rooms and subjects to read in to TimeTabler to ensure that when you import your timetable the codes match exactly and the import can progress successfully. It is highly recommended you do this. Select Timetable | Extract or Integrate Timetable | Extract Timetable Select the current date Click Download File for TimeTabler Save the downloaded .csv file somewhere accessible Ensure the file is as tidy as required – e.g. delete any teachers you know are leaving, any subjects you won’t be teaching and any rooms you won’t be using Once in TimeTabler it can be imported via File | Import Basic Data from a file Once the basic data has been imported the schedule can be created in TimeTabler. If data is added manually to TimeTabler, please ensure it matches up with Cloud School. It is important your teaching groups codes match so please also take this in to consideration when generating teaching groups for export. Doc Version: 1.0 Page - 31
User Guide TimeTabler > Cloud School Import Guide 9 TimeTabler – New Import Select Timetable | Integrate Timetable 9.1 Step 1 – Select a File Click Choose File Navigate to the TimeTabler exported file you have to import Select it Click Next> It is at this point that any staff, room or subjects records which are a mismatch will be flagged up. You will not be able to proceed any further without creating them in Cloud School to match TimeTabler or amending them in TimeTabler to match Cloud School. Changing the code exported for a teacher, room or subject is easily done in TimeTabler; it can be done on Step 3 of the export process. If in any doubt on how to do this, ask the TimeTabler Support Centre. Doc Version: 1.0 Page - 32
Print if you wish to have a list of the issues Click OK Amend either record to resolve the mismatch – it is advisable to change the subject in TimeTabler or by editing the xml file rather than Cloud School if possible as other modules in Cloud School may be using the subject as is Try again from Step 1 9.2 Step 2 – Source Creation This step will create the new timetable source in Cloud School for you. The initial import will create all of required elements of the timetable source for you. Leave Create New Source selected Type in the Code you want for the new timetable (this can be different to the label taken from the TimeTabler file) – e.g. TT21-2 Type in the Name you want for the new timetable (this can be different to the label taken from the TimeTabler file) – e.g. Timetable 2021-2022 The Start Date will be taken from the TimeTabler file and will need to be the start date of the date mappings so ideally a Monday The End Date will also be taken from the TimeTabler file so should match and ideally be the last day Doc Version: 1.0 Page - 33
User Guide TimeTabler > Cloud School Import Guide Timetable Iterations need to be set so the source runs for the correct number of weeks from the start date until the end date (note if you have a two week timetable a week is two calendar weeks rather than one) Click Next 9.3 Step 3 – Date Mapping The dates here need to be mapped to match the Start Date and Finish date on Step 2. Once imported, the date mappings can be updated under Timetable | Date Mappings. If you have a two-week timetable here, you can re-map the half term holidays to retain consistency between the week A week B pattern. If you don’t have weekends included in your date mappings here, tick Skip Days for Sat and Sun Click Apply Doc Version: 1.0 Page - 34
Scroll down and check the last date in the mappings is the same as the Finish Date on the previous screen – if not, click Previous and amend the date before moving back to step 3 to start again. Click Next Step 4 – Teaching Group Association This step of the import process will match teaching groups where the codes and the subjects are exactly the same. Teaching group codes must match exactly. Teaching group subjects must match exactly with those used in TimeTabler. Teaching group start and finish dates should fall within the start and finish dates for the timetable source (and hence date mappings). Doc Version: 1.0 Page - 35
User Guide TimeTabler > Cloud School Import Guide If a teaching group exists but is mismatched and isn’t automatically found, then you may be able to match it from the drop down. If a teaching group doesn’t exist, then you can create it via this process by typing in the code in the New Teaching Group box. You must match all groups to something or create a new one on this screen in order to continue. If all groups match, then there is no need to do anything further on this screen. Click Next Doc Version: 1.0 Page - 36
9.4 Step 5 – Assign Teacher to Teaching Groups This step will map any teachers on the events in TimeTabler to the teaching group in Cloud School. It is not feasible to check them all but check some just to be sure all is well. Click Next Doc Version: 1.0 Page - 37
User Guide TimeTabler > Cloud School Import Guide 9.5 Step 6 – Generate Timetable Click Generate Timetable Events You’ll be informed once the timetable has been successfully integrated – choose ‘View Timetable’ to view the timetable straight away Doc Version: 1.0 Page - 38
10 After the Import Some things to check. 10.1 Release the Timetable It is necessary to release the timetable to allow people to see it in both reports and the Cloud School Calendar. It can be released role by role to give you the chance to release it to subject heads, SLT whilst finalising it before releasing it to all roles. The source will be fully available from the point it is released, there is no need to release it more than once. Select Timetable | Release Timetable Select each role you wish to release the timetable to Decide if you wish to send an email to advise people it is now available Click Release Timetable 10.2 Default Source and Day Composition Once you have finished the current year/timetable and moved on to the next: Select Timetable | Manual Event Override Settings Select the source the import created as the Default Source Select the day composition the import created as the Default Day Composition for Timetable and Cover Click Save Doc Version: 1.0 Page - 39
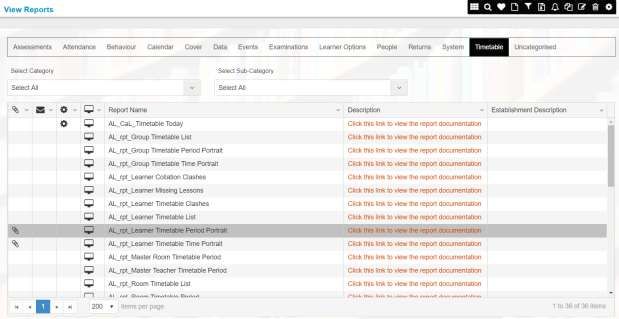
User Guide TimeTabler > Cloud School Import Guide 10.3 Learner Groups Ensure you have correctly populated learner groups for 2021/2022 so that all learners have a timetable as full as it should be. 10.4 View and Print Timetables Select Reports | View Reports | Timetable A suite of timetable reports are available for checking clashes, finding learners with missing lessons and for printing off timetables – all begin with AL_ Don’t forget, the Cloud School Parent and Learner Apps display timetables! 10.5 Updating Schedules Once your timetable has been integrated, it can be updated either in Cloud School or by importing a fresh updated copy from TimeTabler. However, please note that there is no export/import pattern, it’s only possible to import changes from TimeTabler which won’t have been updated with an export with changes from Cloud School. Therefore, when you import an update all events will be updated based upon the TimeTabler file and any changes made in Cloud School may be lost. To update an existing source rather than import a new one: Doc Version: 1.0 Page - 40
Select Timetable | Extract or Integrate Timetable | Integrate Timetable Select the xml file on Step 1 On Step 2, select ‘Overwrite Existing Source’ Select the ‘Timetable Effective From:’ Date Select the schedule to be updated Click Go Note: if you are updating a current source, then you will only be able to do so for a date => the current date, if you are updating a future source then you will only be able to do so from a date within that source. Continue through each step – the teaching group association on Step 4 should be no different, if you have added groups, they will need the correct date range and an exactly matching year and code. Generate the timetable at the end Doc Version: 1.0 Page - 41
You can also read