FortiOS - Microsoft Hyper-V Cookbook - Version 6.2 - AWS
←
→
Page content transcription
If your browser does not render page correctly, please read the page content below
FortiOS - Microsoft Hyper-V Cookbook
              Version 6.2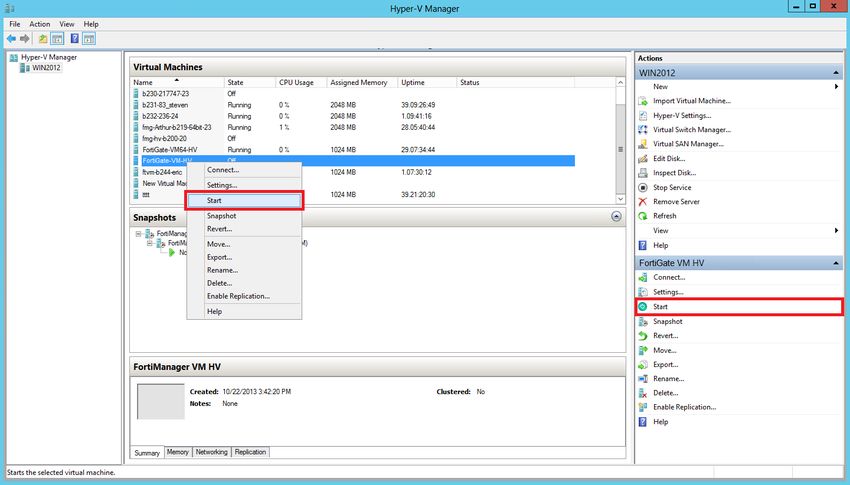
FORTINET DOCUMENT LIBRARY
https://docs.fortinet.com

FORTINET VIDEO GUIDE
https://video.fortinet.com

FORTINET BLOG
https://blog.fortinet.com

CUSTOMER SERVICE & SUPPORT
https://support.fortinet.com

FORTINET TRAINING & CERTIFICATION PROGRAM
https://www.fortinet.com/support-and-training/training.html

NSE INSTITUTE
https://training.fortinet.com

FORTIGUARD CENTER
https://fortiguard.com/

END USER LICENSE AGREEMENT
https://www.fortinet.com/doc/legal/EULA.pdf

FEEDBACK
Email: techdoc@fortinet.com

May 05, 2020
FortiOS 6.2 Microsoft Hyper-V Cookbook
01-620-546232-20200505
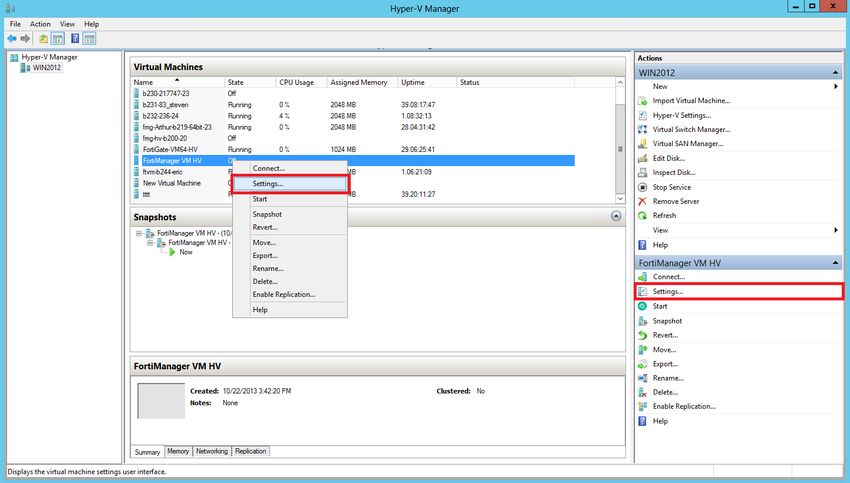
TABLE OF CONTENTS

           About FortiGate-VM on Microsoft Hyper-V                        4
             FortiGate-VM models and licensing                            4
               FortiGate-VM evaluation license                            5
               FortiGate-VM virtual licenses and resources                5
           Preparing for deployment                                       7
             Virtual environment                                          7
             Management software                                          7
             Connectivity                                                 7
             Configuring resources                                        7
             Registering the FortiGate-VM                                13
             Downloading the FortiGate-VM deployment package             14
             Deployment package contents                                 14
           Deployment                                                    15
             Deploying the FortiGate-VM                                  15
             Initial settings                                            19
                 Configuring port 1                                      19
                 Connecting to the FortiGate-VM GUI                      20
                 Uploading the FortiGate-VM virtual appliance license    21
                 Validating the FortiGate-VM license with FortiManager   22
             Testing connectivity                                        24
             Configuring your FortiGate-VM                               25
             High availability                                           25
           Optimizing FortiGate-VM performance                           27
             SR-IOV                                                      27
             Interrupt affinity                                          28
             Packet-distribution affinity                                30
           Change log                                                    32

FortiOS 6.2 Microsoft Hyper-V Cookbook                                        3
Fortinet Technologies Inc.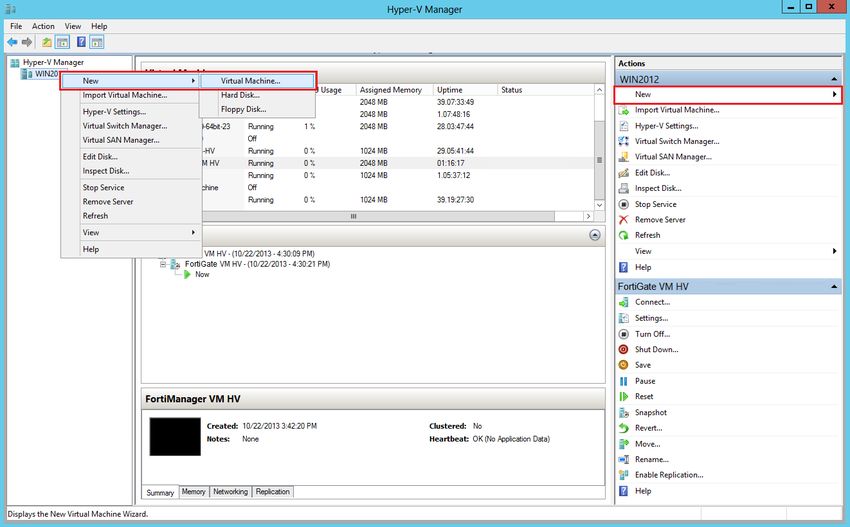
About FortiGate-VM on Microsoft Hyper-V

   FortiGate-VMs allow you to mitigate blind spots by implementing critical security controls within your virtual
   infrastructure. They also allow you to rapidly provision security infrastructure whenever and wherever it is needed.
   FortiGate-VMs feature all the security and networking services common to hardware-based FortiGate appliances. You
   can deploy a mix of FortiGate hardware and virtual appliances, operating together and managed from a common
   centralized management platform.
   This document describes how to deploy a FortiGate-VM in a Microsoft Hyper-V environment.

FortiGate-VM models and licensing

   FortiGate-VM offers perpetual licensing (normal series and V-series) and annual subscription licensing (S-series,
   available starting Q4 2019). FortiOS 6.2.3 and later versions support the S-series licensing. The differences are as
   follows:

                   Normal series                       V-series                            S-series

    Licensing      VM base is perpetual. You must separately contract support              Single annually contracted SKU
    term           services on an annual basis.                                            that contains VM base and a
                                                                                           FortiCare service bundle.

    Support        Each VM base type is associated with over a dozen SKUs. See the         Four support service bundle
    services       pricelist for details.                                                  types:
                                                                                            l  Only FortiCare
                                                                                            l  UTM
                                                                                            l  Enterprise
                                                                                            l  360 protection

    License        SKUs are based on the number of virtual CPUs (vcPU) (1, 2, 4, 8, 16, 32, or unlimited). The
    level          RAM/memory restriction no longer applies for FortiOS 6.2.2 and later versions. FortiOS 6.2.1 and
                   earlier versions have RAM/memory restrictions.

    vCPU           Not supported.                                                          Supported. You can also
    number                                                                                 upgrade the support service
    upgrade                                                                                bundle. For details about
    during                                                                                 upgrading, contact a Fortinet
    contracted                                                                             sales correspondent.
    term

FortiOS 6.2 Microsoft Hyper-V Cookbook                                                                                      4
Fortinet Technologies Inc.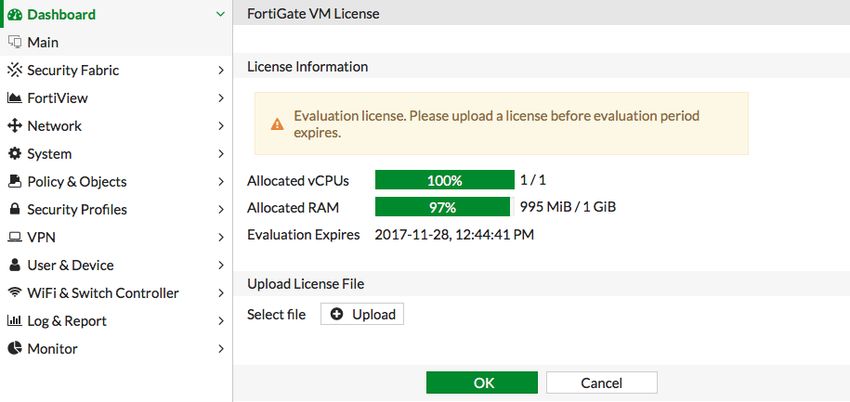
About FortiGate-VM on Microsoft Hyper-V

                     Normal series                       V-series                             S-series

     vCPU            Not supported.
     number
     downgrade
     during
     contracted
     term

     Virtual         By default, each CPU level          By default, all CPU levels do not support adding VDOMs.
     domain          supports up to a certain number
     (VDOM)          of VDOMs.
     support

    After you submit an order for a FortiGate-VM, Fortinet sends a license registration code to the email address that you
    entered on the order form. Use this code to register the FortiGate-VM with Customer Service & Support, and then
    download the license file. After you upload the license to the FortiGate-VM and validate it, your FortiGate-VM is fully
    functional.

FortiGate-VM evaluation license

    The FortiGate-VM includes a limited, 15-day evaluation license that supports:
     l   1 CPU maximum
     l   1024 MB memory maximum
     l   Low encryption only (no HTTPS administrative access)
     l   All features except FortiGuard updates
    Note the following:
     l   Attempting to upgrade the FortiGate firmware locks the GUI until you upload a full license.
     l   Technical support is not included. The trial period begins the first time you start the FortiGate-VM.
     l   After the trial license expires, functionality is disabled until you upload a full license file.

FortiGate-VM virtual licenses and resources

    The primary requirement provisioning a FortiGate-VM may be the number of interfaces it can accommodate rather than
    its processing capabilities. In some cloud environments, the options with a high number of interfaces tend to have high
    numbers of vCPUs.
    FortiGate-VM licensing does not restrict whether the FortiGate can work on a VM instance in a public cloud that uses
    more vCPUs than the license allows. The number of vCPUs that the license indicates does not restrict the FortiGate
    from working, regardless of how many vCPUs the virtual instance includes. However, only the licensed number of
    vCPUs process traffic and management tasks. The FortiGate-VM does not use the rest of the vCPUs.

 FortiOS 6.2 Microsoft Hyper-V Cookbook                                                                                       5
 Fortinet Technologies Inc.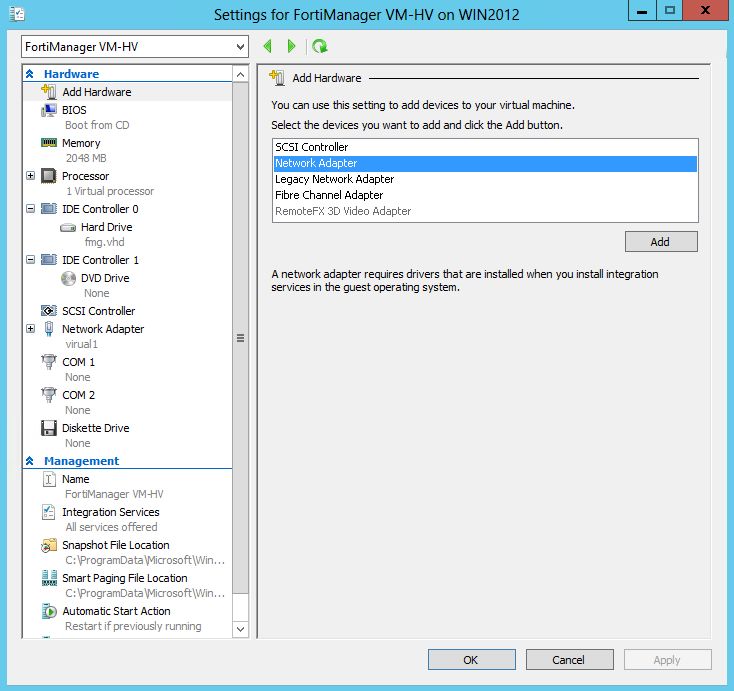
About FortiGate-VM on Microsoft Hyper-V

    License            1 vCPU        2 vCPU       4 vCPU       8 vCPU        16 vCPU                 32 vCPU

    FGT-VM08           OK            OK           OK           OK            The FortiGate-VM        The FortiGate-VM
                                                                             uses 8 vCPUs for        uses 8 vCPUs for
                                                                             traffic and             traffic and
                                                                             management and          management and
                                                                             does not use the        does not use the
                                                                             rest.                   rest.

   You can provision a VM instance based on the number of interfaces you need and license the FortiGate-VM for only the
   processors you need.

   Public compared to private clouds

   The behavior differs between private and public clouds:
    l   Private clouds (ESXi/KVM/Xen/Hyper-V): Both licensed vCPUs and RAM are affected. FortiOS 6.2.2 and later
        versions do not have licensed RAM size restrictions. However, the minimum recommended RAM size is 2 GB for all
        versions.
    l   Public clouds (AWS/Azure/GCP/OCI/AliCloud): Only licensed vCPU is affected.
   For example, you can activate FG-VM02 on a FGT-VM with 4vCPUs with 16 GB of RAM, running on a private VM
   platform. Only 2 vCPU and 4 GB of RAM, as licensed, is consumable.
   Likewise, you can activate FG-VM02 on a FGT-VM c5.2xlarge EC2 instance with 8 vCPUs running on AWS. Only 2
   vCPU is consumable, and there is no limit on the RAM size. You can also refer to licenses for public clouds as bring your
   own license.

FortiOS 6.2 Microsoft Hyper-V Cookbook                                                                                         6
Fortinet Technologies Inc.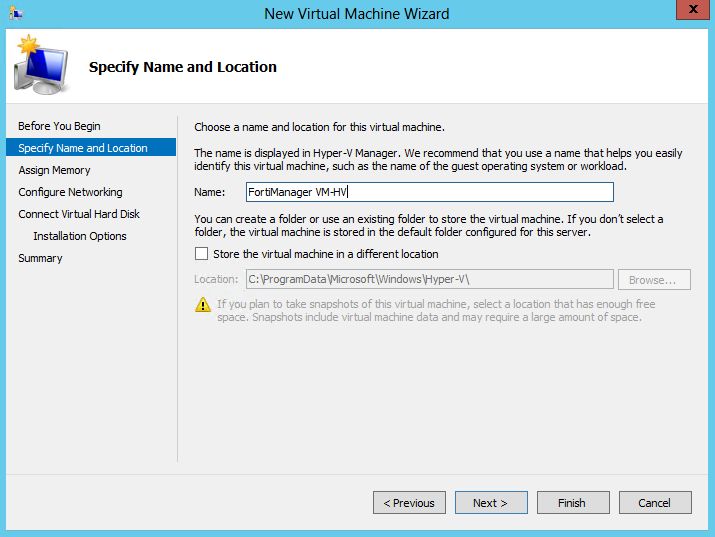
Preparing for deployment

   This documentation assumes that before deploying the FortiGate-VM on the Microsoft Hyper-V virtual platform, you
   have addressed the following requirements:

Virtual environment

   You have installed the Microsoft Hyper-V software on a physical server with sufficient resources to support the
   FortiGate-VM and all other VMs deployed on the platform.
   If you configure the FortiGate-VM to operate in transparent mode, or include it in a FortiGate clustering protocol (FGCP)
   high availability (HA) cluster, ensure that you have configured any virtual switches to support the FortiGate-VM's
   operation before you create the FortiGate-VM.

Management software

   If you plan to use the GUI to manage the Hyper-V server remotely, ensure that you have installed the management
   software on a computer with network access to the Hyper-V server.
   Options for remote management of Microsoft Hyper-V include:
    l   Hyper-V Manager
    l   Virtual Machine Manager

Connectivity

   An Internet connection is required for the FortiGate-VM to contact FortiGuard to validate its license. If the FortiGate-VM
   is in a closed environment, it must be able to connect to a FortiManager to validate the FortiGate-VM license. See
   Validating the FortiGate-VM license with FortiManager on page 22.

Configuring resources

   Before you start the FortiGate-VM for the first time, ensure that the following resources are configured as specified by
   the FortiGate-VM virtual appliance license:
    l   Disk sizes
    l   CPUs

FortiOS 6.2 Microsoft Hyper-V Cookbook                                                                                          7
Fortinet Technologies Inc.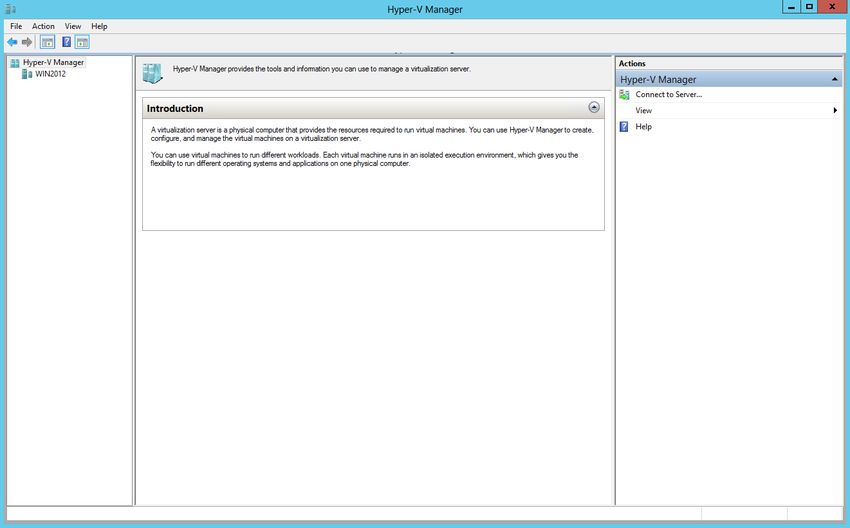
Preparing for deployment

    l   RAM
    l   Network settings

   To configure settings through Hyper-V Manager:

   1. In the Hyper-V Manager, locate the VM name, right-click the entry, and select Settings from the menu. Optionally,
      you can select the VM and select Settings in the Actions menu.

        The Settings page is displayed.

   2. Configure virtual processors, network adapters, and virtual hard drive settings.
   3. Select Apply to save the settings and then select OK to close the settings page.

FortiOS 6.2 Microsoft Hyper-V Cookbook                                                                                    8
Fortinet Technologies Inc.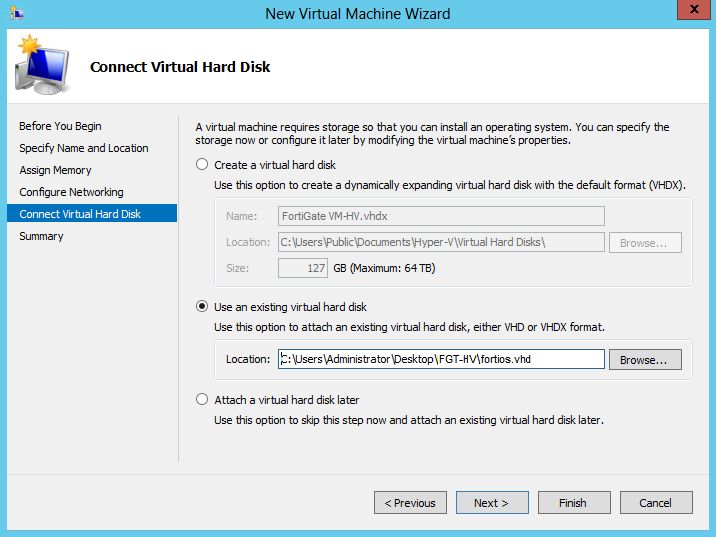
Preparing for deployment

   FortiGate-VM virtual processors

   You must configure FortiGate-VM virtual processors. The number of processors is dependent on your server
   environment.

   To configure FortiGate-VM virtual processors:

   1. In the Settings page, select Processor from the Hardware menu. The Processor page is displayed.

   2. Configure the number of virtual processors for the FortiGate-VM. Optionally, you can use resource controls to
      balance resources among VMs.
   3. Select Apply to save the settings.

   FortiGate-VM network adapters

   You must configure FortiGate-VM network adapters. FortiGate-VM supports four network adapters.

   To configure FortiGate-VM network adapters:

   1. In the Settings page, select Add Hardware from the Hardware menu, select Network Adapter in the device list,
      and select the Add button. The Network Adapter page is displayed.

   2. In the settings page manually configure four network adapters for FortiGate-VM. For each network adapter, select
      the virtual switch from the drop-down list.
   3. Select Apply to save the settings.

FortiOS 6.2 Microsoft Hyper-V Cookbook                                                                                   9
Fortinet Technologies Inc.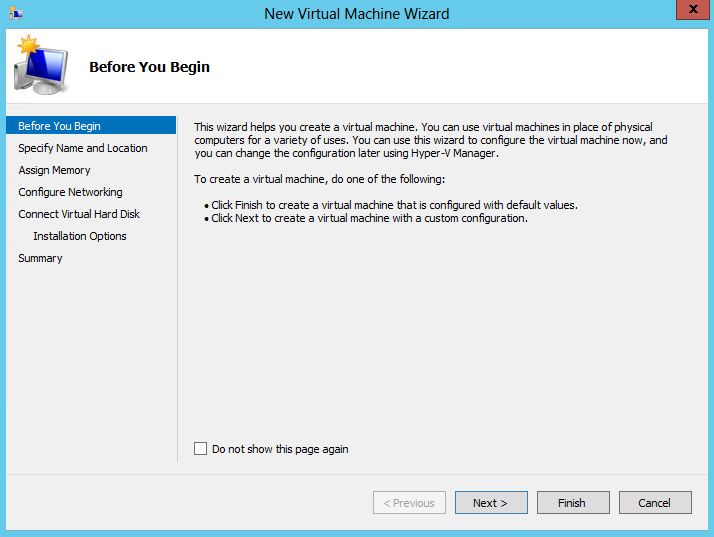
Preparing for deployment

   FortiGate-VM virtual hard disk

   You can use the DATADRIVE.vhd file in the *-FORTINET.out.hyperv.zip file as the log/data disk. See Deployment
   package contents on page 14. Alternatively, you can create a new virtual hard drive to use as a log/data disk using the
   following instructions. If you know your environment will expand in the future, it is recommended to increase the hard
   disk size beyond 30 GB. The VM license limit is 2 TB.

   To configure a FortiGate-VM virtual hard drive:

   1. In the Settings page, select IDE Controller 0 > Hard Drive from the Hardware menu. The Hard Drive page
      displays.

   2. Select New to create a new virtual hard disk. The New Virtual Hard Disk Wizard opens.

   3. This wizard helps you to create a new virtual hard disk. Select Next to continue. The Choose Disk Format page
      opens.

FortiOS 6.2 Microsoft Hyper-V Cookbook                                                                                       10
Fortinet Technologies Inc.
Preparing for deployment
4. Select to use VHDX format virtual hard disks. This format supports virtual disks up to 64TB and is resilient to
consistency issues that might occur from power failures. This format is not supported in operating systems earlier
than Windows Server 2012. Note that FortiGate-VM does not support hard disks larger than 2TB.
5. Select Next to continue. The Choose Disk Type page opens.
6. Select the type of virtual disk that you want to use. Select one of the following disk types:
l Fixed size: This type of disk provides better performance and is recommended for servers running applications
with high levels of disk activity. The virtual hard disk file that is created initially uses the size of the virtual hard
disk and does not change when data is deleted or added.
l Dynamic expanding: This type of disk provides better use of physical storage space and is recommended for
servers running applications that are not disk intensive. The virtual disk file that is created is small initially and
changes as data is added.
l Differencing: This type of disk is associated in a parent-child relationship with another disk that you want to
leave intact. You can make changes to the data or operating system without affecting the parent disk, so that
you can revert the changes easily. All children must have the same virtual hard disk format as the parent (VHD
or VHDX).
FortiOS 6.2 Microsoft Hyper-V Cookbook 11
Fortinet Technologies Inc.Preparing for deployment
7. Select Next to continue. The Specify Name and Location page opens.
8. Specify the name and location of the virtual hard disk file. Use the Browse button to select a specific file folder on
your server.
9. Select Next to continue. The Configure Disk page opens.
10. Select to Create a new blank virtual hard disk and enter the size of the disk in GB. The maximum size is
dependent on your server environment.
FortiOS 6.2 Microsoft Hyper-V Cookbook 12
Fortinet Technologies Inc.Preparing for deployment
11. Select Next to continue. The Summary page opens.
12. The summary page provides details of the virtual hard disk. Select Finish to create the virtual hard disk.
13. Select Apply to save the settings and select OK to exit the settings page.
Registering the FortiGate-VM
Registering the FortiGate-VM with Customer Service & Support allows you to obtain the FortiGate-VM license file.
To register the FortiGate-VM:
1. Log in to the Customer Service & Support site using a support account, or select Sign Up to create an account.
2. In the main page, under Asset, select Register/Activate.
3. In the Registration page, enter the registration code that you received via email, and select Register to access the
registration form.
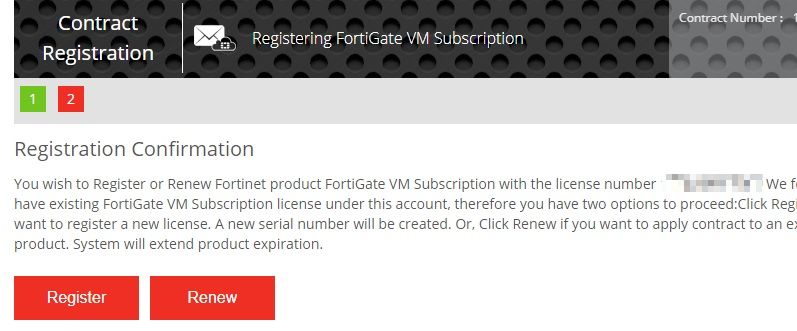
4. If you register the S-series subscription model, the site prompts you to select one of the following:
a. Click Register to newly register the code to acquire a new serial number with a new license file.
b. Click Renew to renew and extend the licensed period on top of the existing serial number, so that all features
on the VM node continue working uninterrupted upon license renewal.
5. Complete and submit the registration form.
6. In the registration acknowledgment page, click the License File Download link.
FortiOS 6.2 Microsoft Hyper-V Cookbook 13
Fortinet Technologies Inc.Preparing for deployment
7. Save the license file (.lic) to your local computer. See Uploading the FortiGate-VM virtual appliance license on
page 21 or Validating the FortiGate-VM license with FortiManager on page 22 for information about uploading the
license file to your FortiGate-VM via the GUI.
Downloading the FortiGate-VM deployment package
FortiGate-VM deployment packages are found on the Customer Service & Support site. In the Download drop-down
menu, select VM Images to access the available VM deployment packages.
1. In the Select Product drop-down menu, select FortiGate.
2. In the Select Platform drop-down menu, select Microsoft Hyper-V.
3. Select the FortiOS version you want to download.
There are two files available for download: the file required to upgrade from an earlier version and the file required
for a new deployment.
4. Click the Download button and save the file.
For more information, see the FortiGate datasheet.
You can also download the following resources for the firmware version:
l FortiOS Release Notes
l FORTINET-FORTIGATE MIB file
l FSSO images
l SSL VPN client
Deployment package contents
The *-FORTINET.out.hyperv.zip file contains:
l In the Virtual Hard Disks folder:
l fortios.vhd: the FortiGate-VM system hard disk in VHD format
l DATADRIVE.vhd: the FortiGate-VM log disk in VHD format
l In the Virtual Machines folder:
l fortios.xml: XML file containing virtual hardware configuration settings for Hyper-V. This is compatible with
Windows Server 2012.
l Snapshots folder: optionally, Hyper-V stores snapshots of the FortiGate-VM state here.
FortiOS 6.2 Microsoft Hyper-V Cookbook 14
Fortinet Technologies Inc.Deployment Before you deploy a virtual appliance, ensure that the requirements described in Preparing for deployment on page 7 are met and that the correct deployment package is extracted to a folder on the local computer (see Downloading the FortiGate-VM deployment package on page 14). After you deploy a FortiGate-VM and upload a full license to replace the default evaluation license, you can power on the FortiGate-VM and test connectivity. Deploying the FortiGate-VM To create the FortiGate-VM: 1. Launch the Hyper-V Manager on your Microsoft server. The Hyper-V Manager homepage opens. FortiOS 6.2 Microsoft Hyper-V Cookbook 15 Fortinet Technologies Inc.
Deployment

   2. Select the server in the right-tree menu. The server details page is displayed.

   3. Right-click the server and select New > Virtual Machine from the menu. Optionally, in the Actions menu, select
      New and select Virtual Machine from the menu. The New Virtual Machine Wizard opens.

FortiOS 6.2 Microsoft Hyper-V Cookbook                                                                                 16
Fortinet Technologies Inc.
Deployment 4. Select Next to create a VM with a custom configuration. The Specify Name and Location page is displayed. 5. Enter a name for this VM. Hyper-V Manager displays the name. 6. Select Next to continue. The Assign Memory page opens. 7. Specify the amount of memory to allocate to this VM. The default memory for FortiGate-VM is 1GB (1024MB). FortiOS 6.2 Microsoft Hyper-V Cookbook 17 Fortinet Technologies Inc.
Deployment

   8. Select Next to continue. The Configure Networking page is displayed.

   9. Each new VM includes a network adapter. You can configure the network adapter to use a virtual switch, or it can
      remain disconnected. FortiGate-VM requires four network adapters. You must configure network adapters in the
      Settings page.
  10. Select Next to continue. The Connect Virtual Hard Disk page is displayed.

  11. Select to use an existing virtual hard disk and browse for the fortios.vhd file that you downloaded from the
      Fortinet Customer Service & Support portal.

FortiOS 6.2 Microsoft Hyper-V Cookbook                                                                                   18
Fortinet Technologies Inc.
Deployment
12. Select Next to continue. The Summary page is displayed.
13. To create the VM and close the wizard, select Finish.
Initial settings
After you deploy a FortiGate-VM on the Microsoft Hyper-V server, perform the following tasks:
l Connect the FortiGate-VM to the network so that it can process network traffic and maintain the validity of the
license.
l Connect to the GUI of the FortiGate-VM via a web browser for easier administration.
l Ensure that the full license file is uploaded to the FortiGate-VM.
l If you are in a closed environment, enable validation of the FortiGate-VM license against a FortiManager on your
network.
Network configuration
The first time you start the FortiGate-VM, you will have access only through the console window of your Microsoft
Hyper-V server environment. After you configure one FortiGate network interface with an IP address and administrative
access, you can access the FortiGate-VM GUI.
Configuring port 1
VM platform or hypervisor management environments include a guest console window. On the FortiGate-VM, this
provides access to the FortiGate console, equivalent to the console port on a hardware FortiGate unit. Before you can
access the GUI, you must configure FortiGate-VM port1 with an IP address and administrative access.
To configure the port1 IP address:
1. In your hypervisor manager, start the FortiGate-VM and access the console window. You may need to press Enter
to see a login prompt.
FortiOS 6.2 Microsoft Hyper-V Cookbook 19
Fortinet Technologies Inc.Deployment
2. At the FortiGate-VM login prompt enter the username admin. By default there is no password. Press Enter.
3. Using CLI commands, configure the port1 IP address and netmask:
config system interface
edit port1
set mode static
set ip 192.168.0.100 255.255.255.0
next
end
4. To configure the default gateway, enter the following CLI commands:
config router static
edit 1
set device port1
set gateway
next
end
You must configure the default gateway with an IPv4 address. FortiGate-VM needs to
access the Internet to contact the FortiGuard Distribution Network (FDN) to validate its
license.
5. To configure your DNS servers, enter the following CLI commands:
config system dns
set primary
set secondary
end
The default DNS servers are 208.91.112.53 and 208.91.112.52.
Connecting to the FortiGate-VM GUI
You connect to the FortiGate-VM GUI via a web browser by entering the IP address assigned to the port 1 interface (see
Configuring port 1 on page 19) in the browser location field. You must enable HTTP and/or HTTPS access and
administrative access on the interface to ensure that you can connect to the GUI. If you only enabled HTTPS access,
enter "https://" before the IP address.
When you use HTTP rather than HTTPS to access the GUI, certain web browsers may display
a warning that the connection is not private.
On the FortiGate-VM GUI login screen, enter the default username "admin" and then select Login. FortiOS does not
assign a default password to the admin user.
FortiOS 6.2 Microsoft Hyper-V Cookbook 20
Fortinet Technologies Inc.Deployment
Fortinet recommends that you configure a password for the admin user as soon as you log in to the FortiGate-VM GUI
for the first time.
Uploading the FortiGate-VM virtual appliance license
Every Fortinet VM includes a 15-day trial license. During this time the FortiGate-VM operates in evaluation mode.
Before using the FortiGate-VM you must enter the license file that you downloaded from Customer Service & Support
upon registration.
GUI
To upload the FortiGate-VM license file:
1. There are 2 ways to get to the License upload window.
l In the Dashboard > Main window, in the Virtual Machine widget, left click on the FGVMEV (FortiGate-VM
Evaluation) License icon. This will reveal a menu of selections to take you directly to the FortiGate-VM
License window or to the FortiGuard Details window.
l Go to System > FortiGuard. In the License Information section, go to the Virtual Machine row and click on the
link to FortiGate-VM License.
2. In the Evaluation License dialog box, select Enter License. The license upload page opens.
3. Select Upload and locate the license file (. lic) on your computer.
4. Select OK to upload the license file.
5. Refresh the browser to log in.
6. Enter admin in the Name field and select Login.
The VM registration status appears as valid in the License Information widget after the license is validated by the
FortiGuard Distribution Network (FDN) or FortiManager for closed networks.
FortiOS 6.2 Microsoft Hyper-V Cookbook 21
Fortinet Technologies Inc.Deployment
Modern browsers can have an issue with allowing connecting to a FortiGate if the
encryption on the device is too low. If this happens, use a FTP/TFTP server to apply the
license.
CLI
You can also upload the license file using the following CLI command:
execute restore vmlicense {ftp | tftp} [:ftp port]
Example:
The following is an example output when using a tftp server to install license:
execute restore vmlicense tftp license.lic 10.0.1.2
This operation will overwrite the current VM license!Do you want to continue? (y/n)y
Please wait...Connect to tftp server 10.0.1.2 ...
Get VM license from tftp server OK.
VM license install succeeded.
Rebooting firewall.
This command automatically reboots the firewall without giving you a chance to back out or
delay the reboot.
Validating the FortiGate-VM license with FortiManager
You can validate your FortiGate-VM license with some FortiManager models. To determine whether your FortiManager
has the VM activation feature, see the FortiManager datasheet's Features section.
To validate your FortiGate-VM with your FortiManager:
1. To configure your FortiManager as a closed network, enter the following CLI command on your FortiManager:
config fmupdate publicnetwork
set status disable
end
2. To configure FortiGate-VM to use FortiManager as its override server, enter the following CLI commands on your
FortiGate-VM:
config system central-management
set mode normal
set type fortimanager
set fmg
config server-list
edit 1
set server-type update
set server-address
end
end
set fmg-source-ip
set include-default-servers disable
set vdom
FortiOS 6.2 Microsoft Hyper-V Cookbook 22
Fortinet Technologies Inc.Deployment
end
3. Load the FortiGate-VM license file in the GUI:
a. Go to System > Dashboard > Status.
b. In the License Information widget, in the Registration Status field, select Update.
c. Browse for the .lic license file and select OK.
4. To activate the FortiGate-VM license, enter the execute update-now command on your FortiGate-VM.
5. To check the FortiGate-VM license status, enter the following CLI commands on your FortiGate-VM:
get system status
Version: Fortigate-VM v5.0,build0099,120910 (Interim)
Virus-DB: 15.00361(2011-08-24 17:17)
Extended DB: 15.00000(2011-08-24 17:09)
Extreme DB: 14.00000(2011-08-24 17:10)
IPS-DB: 3.00224(2011-10-28 16:39)
FortiClient application signature package: 1.456(2012-01-17 18:27)
Serial-Number: FGVM02Q105060000
License Status: Valid
BIOS version: 04000002
Log hard disk: Available
Hostname: Fortigate-VM
Operation Mode: NAT
Current virtual domain: root
Max number of virtual domains: 10
Virtual domains status: 1 in NAT mode, 0 in TP mode
Virtual domain configuration: disable
FIPS-CC mode: disable
Current HA mode: standalone
Distribution: International
Branch point: 511
Release Version Information: MR3 Patch 4
System time: Wed Jan 18 11:24:34 2012
diagnose hardware sysinfo vm full
UUID: 564db33a29519f6b1025bf8539a41e92
valid: 1
status: 1
code: 200 (If the license is a duplicate, code 401 will be displayed)
warn: 0
copy: 0
received: 45438
warning: 0
recv: 201201201918
dup:
Licensing timeout
In closed environments without Internet access, it is mandatory to perform offline licensing of the FortiGate-VM using a
FortiManager as a license server. If the FortiGate-VM cannot perform license validation within the license timeout
period, which is 30 days, the FortiGate will discard all packets, effectively ceasing operation as a firewall.
The license status goes through some changes before it times out.
FortiOS 6.2 Microsoft Hyper-V Cookbook 23
Fortinet Technologies Inc.Deployment
Status Description
Valid The FortiGate can connect and validate against a FortiManager or FDS
Warning The FortiGate cannot connect and validate against a FortiManager or FDS. A check is made
against how many days the Warning status has been continuous. If the number is less than
30 days the status does not change.
Invalid The FortiGate cannot connect and validate against a FortiManager or FDS. A check is made
against how many days the Warning status has been continuous. If the number is 30 days or
more, the status changes to Invalid. The firewall ceases to function properly.
There is only a single log entry after the FortiGate-VM cannot access the license server for the
license expiration period. When you search the logs for the reason that the FortiGate is
offline, there is not a long error log list that draws attention to the issue. There is only one
entry.
Testing connectivity
You can now proceed to power on your FortiGate-VM. Select the name of the FortiGate-VM in the list of VMs, right-
click, and select Start in the menu. Optionally, you can select the name of the FortiGate-VM in the list of VMs and select
Start in the Actions menu.
To test connectivity to other devices, using the PING utility is the usual method. For this, you need the console on the
FortiGate-VM.
In FortiOS, the command for the PING utility is execute ping followed by the IP address
you wish to connect to.
FortiOS 6.2 Microsoft Hyper-V Cookbook 24
Fortinet Technologies Inc.Deployment
Before you configure the FortiGate-VM for use in production, ensure that connections between it and all required
resources can be established.
l If the FortiGate-VM will provide firewall protection between your network and the internet, verify that it can connect
to your internet access point and to resources on the internet.
l If the FortiGate-VM is part of a Fortinet Security Fabric, verify that it can connect to all devices in the fabric.
l Verify that each node on your network can connect to the FortiGate-VM.
Configuring your FortiGate-VM
For information about configuring and operating the FortiGate-VM after it has been successfully deployed and started
on the hypervisor, see the FortiOS Handbook.
High availability
FortiGate-VM HA supports having two VMs in an HA cluster on the same physical platform or different platforms. The
primary consideration is that all interfaces involved be able to communicate efficiently over TCP/IP connection sessions.
Heartbeat
There are two options for setting up the HA heartbeat: unicast and broadcast. Broadcast is the default HA heartbeat
configuration. However, the broadcast configuration may not be ideal for FortGate VM because it may require special
settings on the host. In most cases, the unicast configuration would be preferred.
The differences between the unicast heartbeat setup and the broadcast heartbeat setup are:
l The unicast method does not change the FortiGate-VM interface MAC addresses to virtual MAC addresses.
l Unicast HA only supports two FortiGate-VMs.
l Unicast HA heartbeat interfaces must be connected to the same network and you must add IP addresses to these
interfaces.
Unicast
You can configure the unicast settings in the FortiOS CLI. The syntax is as follows:
config system ha
set unicast-hb {enable/disable}
set unicast-hb-peerip {IP address of the peer's heartbeat interface}
end
Setting Description
unicast-hb Enable or disable (the default) unicast HA heartbeat.
unicast-hb-peerip IP address of the HA heartbeat interface of the other FortiGate-VM in the HA
cluster.
FortiOS 6.2 Microsoft Hyper-V Cookbook 25
Fortinet Technologies Inc.Deployment Broadcast Broadcast HA heartbeat packets are non-TCP packets that use Ethertype values 0x8890, 0x8891, and 0x8890. These packets use automatically assigned link-local IPv4 addresses in the 169.254.0.x range for HA heartbeat interface IP addresses. For FortiGate-VMs to support a broadcast HA heartbeat configuration, you must configure the virtual switches that connect heartbeat interfaces to support MAC address spoofing. In addition, you must configure the VM platform to allow MAC address spoofing for the FortiGate-VM data interfaces. This is required because in broadcast mode, the FGCP applies virtual MAC addresses to FortiGate data interfaces, and these virtual MAC addresses mean that matching interfaces of the FortiGate-VM instances in the cluster will have the same virtual MAC addresses. With the correct MAC spoofing settings, you should be able to configure HA between two or more FortiGate-VM for Hyper-V instances. FortiOS 6.2 Microsoft Hyper-V Cookbook 26 Fortinet Technologies Inc.
Optimizing FortiGate-VM performance

   You can optimize FortiGate-VM performance by configuring interrupt-affinity and packet-distribution-affinity attributes
   to improve efficiency and resource utilization.

SR-IOV

   FortiGate-VMs installed on Microsoft Hyper-V platforms support Single Root I/O virtualization (SR-IOV) to provide
   FortiGate-VMs with direct access to physical network cards. Enabling SR-IOV means that one PCIe network card or
   CPU can function for a FortiGate-VM as multiple separate physical devices. SR-IOV reduces latency and improves CPU
   efficiency by allowing network traffic to pass directly between a FortiGate-VM and a network card, bypassing Microsoft
   Hyper-V host software and without using virtual switching.
   FortiGate-VMs benefit from SR-IOV because SR-IOV optimizes network performance and reduces latency and CPU
   usage. FortiGate-VMs do not use Microsoft Hyper-V features that are incompatible with SR-IOV, so you can enable SR-
   IOV without negatively affecting your FortiGate-VM. SR-IOV implements an I/O memory management unit (IOMMU) to
   differentiate between different traffic streams and apply memory and interrupt translations between the physical
   functions (PF) and virtual functions (VF).
   Setting up SR-IOV on Microsoft Hyper-V involves creating a PF for each physical network card in the hardware platform.
   Then, you create VFs that allow FortiGate-VMs to communicate through the PF to the physical network card. VFs are
   actual PCIe hardware resources and only a limited number of VFs are available for each PF.

   SR-IOV hardware compatibility

   SR-IOV requires that the hardware and operating system on which your Microsoft Hyper-V host is running has BIOS,
   physical NIC, and network driver support for SR-IOV.
   To enable SR-IOV, your Microsoft Hyper-V platform must be running on hardware that is compatible with SR-IOV and
   with FortiGate-VMs. FortiGate-VMs require network cards that are compatible with ixgbevf or i40evf drivers. As well, the
   host hardware CPUs must support second level address translation (SLAT).
   For optimal SR-IOV support, install the most up to date ixgbevf or i40e/i40evf network drivers. Fortinet recommends
   i40e/i40evf drivers because they provide four TxRx queues for each VF and ixgbevf only provides two TxRx queues.

   Creating an SR-IOV virtual switch

   Begin configuring SR-IOV for by creating a Microsoft Hyper-V external virtual switch with SR-IOV support. You can use
   the Microsoft Hyper-V Manager or PowerShell command line.

                             You can only add SR-IOV to a new virtual switch. You can't modify an existing virtual switch to
                             enable SR-IOV and you cannot disable SR-IOV for a virtual switch that was already added. To
                             add or remove SR-IOV from a virtual switch you must delete it and then readd it.

FortiOS 6.2 Microsoft Hyper-V Cookbook                                                                                         27
Fortinet Technologies Inc.
Optimizing FortiGate-VM performance
From the Microsoft Hyper-V Manager:
1. Open the Virtual Switch Manager.
2. Create a new virtual switch.
3. Add a name and other settings as required.
4. Set the Connection type to External network and select Enable single-root I/O virtualization (SR-IOV).
From PowerShell:
1. Enter the following command to view the list of available network adapters:
Get-NetAdapter
2. Enter the following command to add a new virtual switch:
New-VMSwitch -netadaptername -EnableIov
$true
Where is the name of the virtual switch that you are creating, and is the name of the network adapter that you are binding the virtual switch to.
Enabling SR-IOV for a FortiGate-VM
The following procedure requires shutting down and restarting the FortiGate-VM so should only be performed during a
quiet time or maintenance window when the network is not busy.
From the Microsoft Hyper-V Manager:
1. Open the settings for the FortiGate-VM, expand the Network Adapter node, and select Hardware Acceleration.
2. On the Hardware Acceleration page, select Enable SR-IOV.
From PowerShell:
1. Enter the following command:
Set-VMNetworkAdapter IOV8250 -IovWeight 50 -Passthru | fl "iov", "status",
"virtualfunction"
Interrupt affinity
In addition to enabling SR-IOV in the VM host, to fully take advantage of SR-IOV performance improvements you must
configure interrupt affinity for your FortiGate-VM. Interrupt affinity (also called CPU affinity) maps FortiGate-VM
interrupts to the CPUs that are assigned to your FortiGate-VM. You use a CPU affinity mask to define the CPUs that the
interrupts are assigned to.
A common use of this feature would be to improve your FortiGate-VM's networking performance by:
l On the VM host, add multiple host CPUs to your FortiGate-VM.
l On the VM host, configure CPU affinity to specify the CPUs that the FortiGate-VM can use.
l On the VM host, configure other VM clients on the VM host to use other CPUs.
l On the FortiGate-VM, assign network interface interrupts to a CPU affinity mask that includes the CPUs that the
FortiGate-VM can use.
FortiOS 6.2 Microsoft Hyper-V Cookbook 28
Fortinet Technologies Inc.Optimizing FortiGate-VM performance
In this way, all available CPU interrupts for the configured host CPUs are used to process traffic on your FortiGate
interfaces. This configuration could lead to improve FortiGate-VM network performance because you have dedicated
VM host CPU cycles to processing your FortiGate-VM's network traffic.
You can use the following CLI command to configure interrupt affinity for your FortiGate-VM:
config system affinity-interrupt
edit
set interrupt
set affinity-cpumask
next
end
Where:
l is the name of the interrupt to associate with a CPU affinity mask. You can view your
FortiGate-VM interrupts using the diagnose hardware sysinfo interrupts command. Usually you
would associate all of the interrupts for a given interface with the same CPU affinity mask.
l is the CPU affinity mask for the CPUs that will process the associated interrupt.
For example, consider the following configuration:
l The port2 and port3 interfaces of a FortiGate-VM send and receive most of the traffic.
l On the VM host you have set up CPU affinity between your FortiGate-VM and four CPUs (CPU 0, 1 , 2, and 3).
l SR-IOV is enabled and SR-IOV interfaces use the i40evf interface driver.
The output from the diagnose hardware sysinfo interrupts command shows that port2 has the following
transmit and receive interrupts:
i40evf-port2-TxRx-0
i40evf-port2-TxRx-1
i40evf-port2-TxRx-2
i40evf-port2-TxRx-3
The output from the diagnose hardware sysinfo interrupts command shows that port3 has the following
transmit and receive interrupts:
i40evf-port3-TxRx-0
i40evf-port3-TxRx-1
i40evf-port3-TxRx-2
i40evf-port3-TxRx-3
Use the following command to associate the port2 and port3 interrupts with CPU 0, 1 , 2, and 3.
config system affinity-interrupt
edit 1
set interrupt "i40evf-port2-TxRx-0"
set affinity-cpumask "0x0000000000000001"
next
edit 2
set interrupt "i40evf-port2-TxRx-1"
set affinity-cpumask "0x0000000000000002"
next
edit 3
set interrupt "i40evf-port2-TxRx-2"
set affinity-cpumask "0x0000000000000004"
next
edit 4
set interrupt "i40evf-port2-TxRx-3"
set affinity-cpumask "0x0000000000000008"
FortiOS 6.2 Microsoft Hyper-V Cookbook 29
Fortinet Technologies Inc.Optimizing FortiGate-VM performance
next
edit 1
set interrupt "i40evf-port3-TxRx-0"
set affinity-cpumask "0x0000000000000001"
next
edit 2
set interrupt "i40evf-port3-TxRx-1"
set affinity-cpumask "0x0000000000000002"
next
edit 3
set interrupt "i40evf-port3-TxRx-2"
set affinity-cpumask "0x0000000000000004"
next
edit 4
set interrupt "i40evf-port3-TxRx-3"
set affinity-cpumask "0x0000000000000008"
next
end
Packet-distribution affinity
With SR-IOV enabled on the VM host and interrupt affinity configured on your FortiGate-VM there is one additional
configuration you can add that may improve performance. Most common network interface hardware has restrictions on
the number of RX/TX queues that it can process. This can result in some CPUs being much busier than others and the
busy CPUs may develop extensive queues.
You can get around this potential bottleneck by configuring affinity packet redistribution to allow overloaded CPUs to
redistribute packets they receive to other less busy CPUs. The may result in a more even distribution of packet
processing to all available CPUs.
You configure packet redistribution for interfaces by associating an interface with an affinity CPU mask. This
configuration distributes packets set and received by that interface to the CPUs defined by the CPU affinity mask
associated with the interface.
You can use the following CLI command to configure affinity packet redistribution for your FortiGate-VM:
config system affinity-packet-redistribution
edit
set interface
set affinity-cpumask
next
end
Where:
l the name of the interface to associate with a CPU affinity mast.
l the CPU affinity mask for the CPUs that will process packets to and from the
associated interface.
For example, you can improve the performance of the interrupt affinity example shown in the following command to
allow packets sent and received by the port3 interface to be redistributed to CPUs according to the 0xE CPU affinity
mask.
config system affinity-packet-redistribution
edit 1
FortiOS 6.2 Microsoft Hyper-V Cookbook 30
Fortinet Technologies Inc.Optimizing FortiGate-VM performance
set interface port3
set affinity-cpumask "0xE"
next
end
FortiOS 6.2 Microsoft Hyper-V Cookbook 31
Fortinet Technologies Inc.Change log
Date Change Description
2019-03-28 Initial release.
2019-07-19 Updated Validating the FortiGate-VM license with FortiManager on page 22.
2019-07-30 Updated Configuring resources on page 7 and Configuring port 1 on page 19.
2019-09-13 Updated High availability on page 25.
2019-09-25 Updated FortiGate-VM models and licensing on page 4.
2019-11-29 Updated FortiGate-VM models and licensing on page 4.
2020-04-08 Updated FortiGate-VM virtual licenses and resources on page 5.
2020-05-05 Updated FortiGate-VM models and licensing on page 4 and Registering the FortiGate-VM on
page 13.
FortiOS 6.2 Microsoft Hyper-V Cookbook 32
Fortinet Technologies Inc.Copyright© 2020 Fortinet, Inc. All rights reserved. Fortinet®, FortiGate®, FortiCare® and FortiGuard®, and certain other marks are registered trademarks of Fortinet, Inc., in the U.S. and other jurisdictions, and other Fortinet names herein may also be registered and/or common law trademarks of Fortinet. All other product or company names may be trademarks of their respective owners. Performance and other metrics contained herein were attained in internal lab tests under ideal conditions, and actual performance and other results may vary. Network variables, different network environments and other conditions may affect performance results. Nothing herein represents any binding commitment by Fortinet, and Fortinet disclaims all warranties, whether express or implied, except to the extent Fortinet enters a binding written contract, signed by Fortinet’s General Counsel, with a purchaser that expressly warrants that the identified product will perform according to certain expressly-identified performance metrics and, in such event, only the specific performance metrics expressly identified in such binding written contract shall be binding on Fortinet. For absolute clarity, any such warranty will be limited to performance in the same ideal conditions as in Fortinet’s internal lab tests. In no event does Fortinet make any commitment related to future deliverables, features or development, and circumstances may change such that any forward-looking statements herein are not accurate. Fortinet disclaims in full any covenants, representations, and guarantees pursuant hereto, whether express or implied. Fortinet reserves the right to change, modify, transfer, or otherwise revise this publication without notice, and the most current version of the publication shall be applicable.
You can also read