Case Dynamics Guide March 16, 2021 | Version 10.0
←
→
Page content transcription
If your browser does not render page correctly, please read the page content below
Case Dynamics Guide
March 16, 2021 | Version 10.0

                         Case Dynamics Guide   1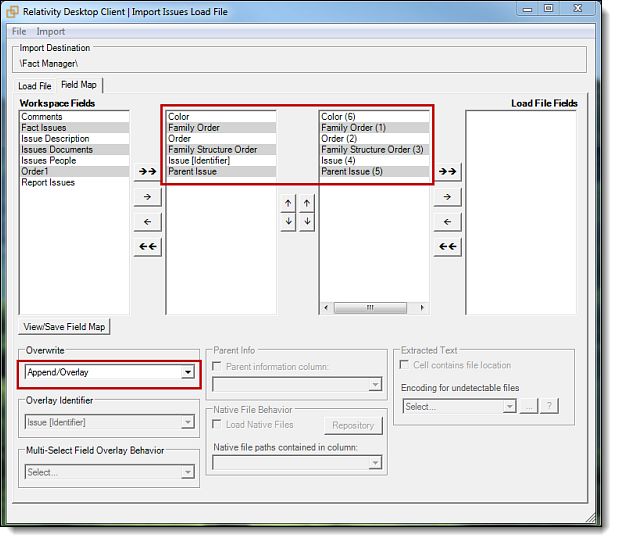
For the most recent version of this document, visit our documentation website.

                          Case Dynamics Guide                                    2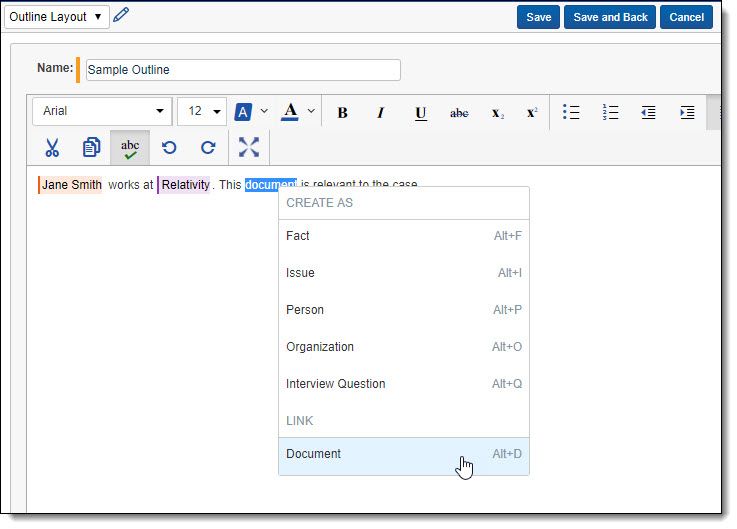
Table of Contents
 1 Case Dynamics                                                  5
  1.1 Case Dynamics compatibility matrix                          5
  1.2 Case Dynamics life cycle                                    9
  1.3 Installation and upgrade                                10
    1.3.1 Special considerations                              10
    1.3.2 Importing from file                                 11
    1.3.3 Upgrading                                           12
  1.4 Security permissions                                    12
    1.4.1 Controlling mass actions                            16
  1.5 Working with Case Dynamics items                        16
    1.5.1 Using the UTC toggle                                17
    1.5.2 Viewing a library item                              18
    1.5.3 Adding and editing a fact                           20
  1.6 Fact detail fields                                      21
    1.6.1 Adding and editing an issue                         22
  1.7 Issue detail fields                                     23
    1.7.1 Adding a Child                                      23
  1.8 Organizing facts and issues                             24
  1.9 Importing Case Dynamics items                           28
  1.10 Printing Profile                                       31
  1.11 Printing profile layout fields                         32
  1.12 Working with documents in Case Dynamics                33
    1.12.1 Attach supporting documents to an item             33
    1.12.2 Link a document to an item                         35
  1.13 Using the Case Dynamics coding pane                    35
  1.14 Timeline Builder                                       39
    1.14.1 Creating a Timeline Report                         39
    1.14.2 Timeline Builder options                           42
  1.15 Outlines tab                                           45

                                        Case Dynamics Guide   3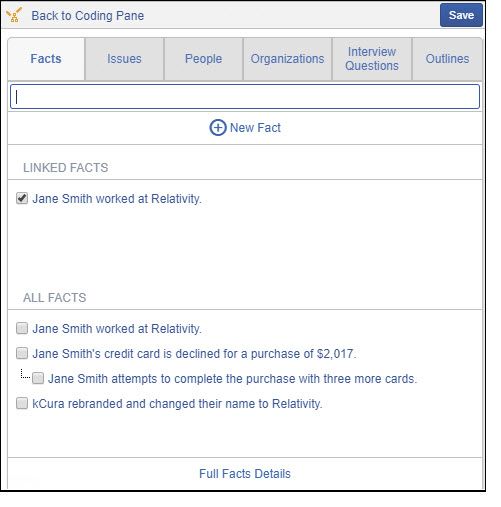
1.15.1 Adding and editing an outline                     45
  1.15.2 View mode                                         53
1.16 Reports                                               55
  1.16.1 Offline report                                    55
  1.16.2 Report Set fields                                 57
  1.16.3 Offline Report Settings fields                    57
  1.16.4 Master report                                     60
1.17 Library data entry fields                             60
  1.17.1 Issue fields                                      60
  1.17.2 Organization fields                               60
  1.17.3 People fields                                     61
  1.17.4 Interview question fields                         61

                                     Case Dynamics Guide   4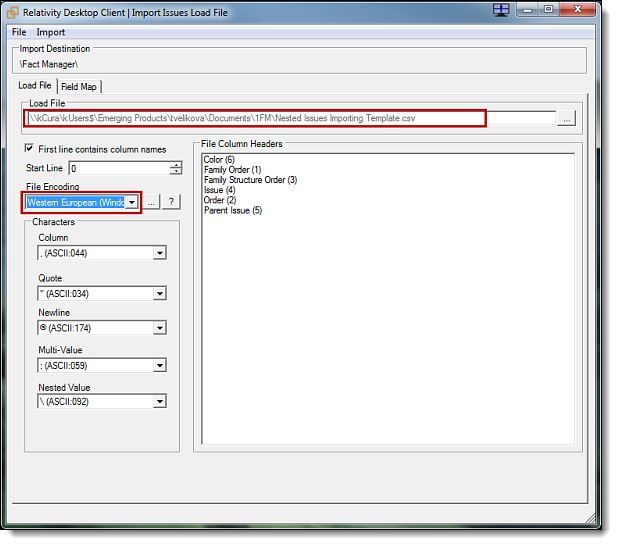
1 Case Dynamics
Relativity Case Dynamics, formerly Fact Manager, assists in organizing and analyzing case details such
as facts, issues, organizations, people, interview questions, and documents. This analysis helps identify
strengths and weaknesses in litigation strategy and leads to better preparation for depositions, interviews,
and trial.

     Using Case Dynamics
     Imagine you're an attorney preparing for the biggest and most complicated case of your career.
     You're already using Relativity as your document review system, but with all the case details
     you're gathering, you need a centralized place to organize the people, facts, issues,
     organizations, and documents pertaining to the case. You're using a generic filing system but
     are having trouble keeping your information synced with the case documents.
     Using Case Dynamics, you start tracking case details right in the workspace. You create new
     facts, or pieces of information about the case, and link existing facts to documents on-the-fly
     during the document review phase. This helps you associate information with particular
     documents in Relativity.
     As you prepare for the deposition, you track client interview questions and answers in Case
     Dynamics for future case reference. You generate a timeline report with color-coded facts in
     Case Dynamics to manage and view the case as it progresses. You link existing facts to a report,
     then generate the report to show your client during the deposition.
     Once you've trimmed your document set and it's time for trial, generate an offline report in
     HTML file format and dynamically access documents in the courtroom for presentation using the
     report hyperlinks.

1.1 Case Dynamics compatibility matrix
Case Dynamics        RelativityServer Relativity          Relativity       Relativity       Relativity
Version              2021             10.3.287.3          10.2.270.1       10.1.290.1       10.0.318.5
Case Dynamics        X
11.1.30
Case Dynamics                            X
10.3.89.33
Case Dynamics                                             X
10.2.42.61
Case Dynamics                                                              X
10.1.10.0
Case Dynamics                                                                               X
10.0.2.38

View Fact Manager compatibility matrix

                                          Case Dynamics Guide                                            5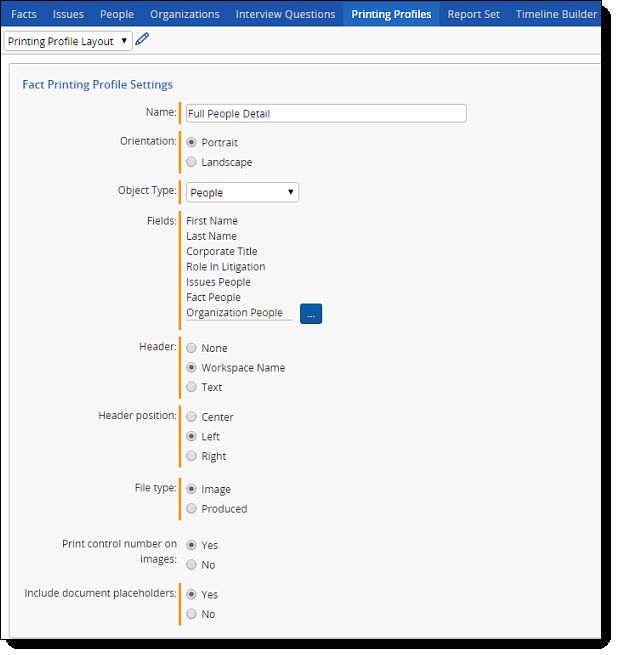
Relativ- Relativ- Relativ- Relativ- Relativ- Relativ- Relativ- Relativ- Relativ-
            ity 9.6 - ity 9.5 ity       ity 9.4 ity 9.3  ity 9.2  ity      ity 8.2  ity 8.1
            9.6.50.3-         9.4.398.-                           9.1/9.0
            1                 62
Fact Man- X          X
ager
9.4.0.112-
2
Fact      X          X
Manager
9.4.0.464
( Net.
4.6.2
required)
Fact Man-            X        X
ager
9.4.0.465
Fact Man-            X        X        X
ager
9.4.0.384
Fact Man-            X
ager
9.4.0.296
com-
patible
with .Net
4.6.2
Fact Man-            X
ager
9.4.0.293
Fact Man-            X
ager
9.4.0.227
Fact Man-            X        X
ager
9.4.0.28
com-
patible
with
lower
.Net ver-
sions

                                     Case Dynamics Guide                                  6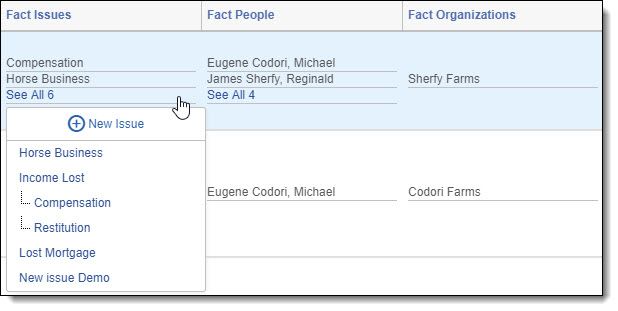
Relativ- Relativ- Relativ- Relativ- Relativ- Relativ- Relativ- Relativ- Relativ-
            ity 9.6 - ity 9.5 ity       ity 9.4 ity 9.3  ity 9.2  ity      ity 8.2  ity 8.1
            9.6.50.3-         9.4.398.-                           9.1/9.0
            1                 62
Fact Man-            X                 X
ager
9.4.0.21
Fact Man-            X                 X
ager
9.4.0.20
(.Net
4.6.2
Require-
d)
Fact Man-            X                 X         X
ager
9.2.0.202
Fact Man-            X                 X         X
ager
9.2.0.170
Fact Man-            X                 X         X
ager
9.2.129
Fact Man-                              X         X         X
ager
9.2.0.94
Fact Man-                              X         X
ager
9.2.0.79
Fact Man-                              X         X         X
ager
9.2.0.49
Fact Man-                              X         X         X
ager
9.2.0.18
Fact Man-                                        X
ager
8.2.10.51
Fact Man-                                        X
ager
8.2.10.34

                                     Case Dynamics Guide                                  7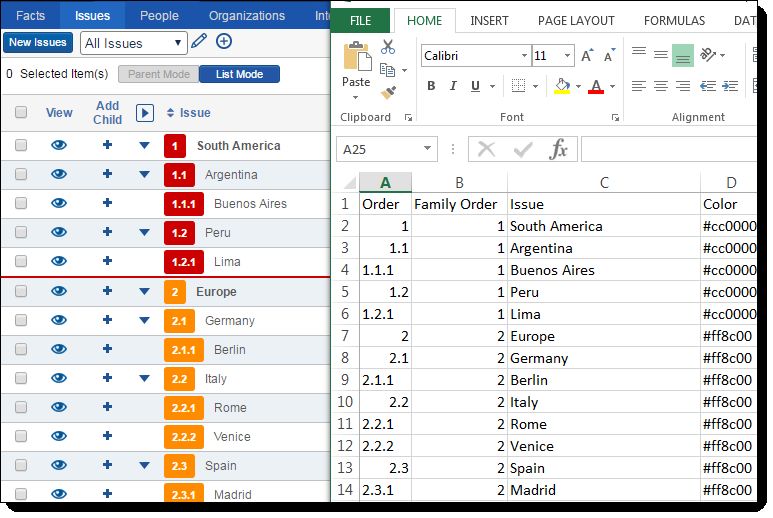
Relativ- Relativ- Relativ- Relativ- Relativ- Relativ- Relativ- Relativ- Relativ-
            ity 9.6 - ity 9.5 ity       ity 9.4 ity 9.3  ity 9.2  ity      ity 8.2  ity 8.1
            9.6.50.3-         9.4.398.-                           9.1/9.0
            1                 62
Fact Man-                                        X         X
ager
8.2.10.12
Fact Man-                                        X
ager
8.2.9.3
Fact Man-                                                  X
ager
8.2.9.12
Fact Man-                                                         X
ager
8.2.9.11
Fact Man-                                                  X
ager
8.2.8.96
Fact Man-                                                  X      X        X
ager
8.2.7.38
Fact Man-                                                  X               X
ager
8.2.7.25
Fact Man-                                                  X
ager
8.2.7.13
Fact Man-                                                         X        X
ager
8.2.5.10
Fact Man-                                                         X        X
ager
8.2.4.3
Fact Man-                                                         X        X
ager
8.2.3.23
Fact Man-                                                         X        X
ager
8.2.3.19
Fact Man-                                                         X        X

                                     Case Dynamics Guide                                  8
Relativ- Relativ- Relativ- Relativ- Relativ- Relativ- Relativ- Relativ- Relativ-
            ity 9.6 - ity 9.5 ity       ity 9.4 ity 9.3  ity 9.2  ity      ity 8.2  ity 8.1
            9.6.50.3-         9.4.398.-                           9.1/9.0
            1                 62
ager
8.2.3.9
Fact Man-                                                                    X    X
ager
8.2.3.1
Fact Man-                                                                         X   X
ager
8.2.1.20

1.2 Case Dynamics life cycle

Case Dynamics correlates facts and issues in all stages of the case life cycle.

                                          Case Dynamics Guide                             9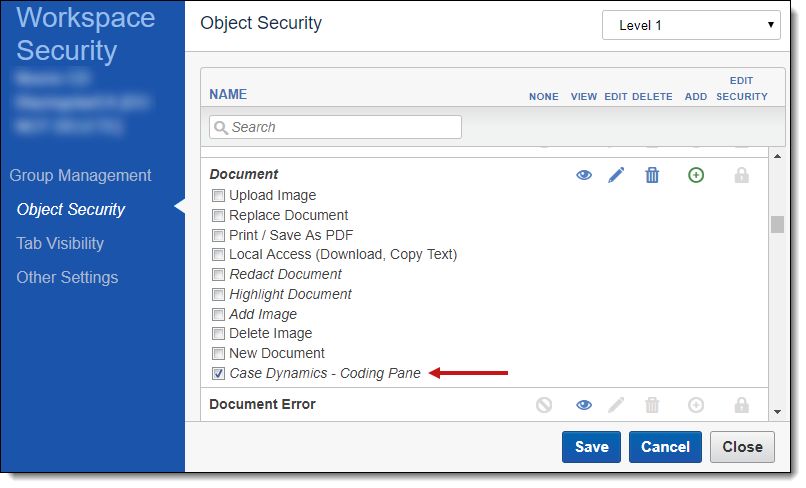
Case Dynamics assists in the following areas of case preparation:

   n   Case Outline
          o   Organize ideas about case or investigation
          o   Prioritize important facts about case
          o   Collaborate with colleagues on case strategy
   n   Document Review Preparation
          o   Define document review protocol
          o   Identify initial possible issues, people, etc.
   n   Document Review
          o   Include additional issues and people
          o   Add facts to support case
          o   Tag documents with details
   n   Case Analysis
          o   Add supporting documentation
          o   Organize and analyze case details
   n   Interview and Deposition Prep
          o   Use pre-organized case details to prepare witnesses.
          o   Add additional details.
   n   Trial Prep
          o   Use information gathered to organize and analyze details for trial preparation.

1.3 Installation and upgrade
You can install the Case Dynamics application on your current Relativity instance.

   n   Special considerations below
   n   Importing from file on the next page
   n   Upgrading on page 12

1.3.1 Special considerations
Keep the following considerations in mind when installing Case Dynamics:

   n   Only a user with the appropriate system admin rights can import application schema.
   n   You should install/upgrade during off-hours as this disrupts workspaces services and causes them
       to be inaccessible during the install/upgrade period.
   n   Ensure that you have access to the Case Dynamics - Coding Pane permission. This permission
       allows group members to use the Case Dynamics coding pane. Without this permission, you will not

                                            Case Dynamics Guide                                     10
be able to see the Case Dynamics coding pane link that allows you to access the Case Dynamics
coding pane when reviewing documents. For more information on security permissions for Case
Dynamics, see Security Permissions.
n For installations of Case Dynamics on Relativity 7.4 and earlier, locate the following resources on
the Relativity Community:
o Installation Guide - provided in the Installation Package .zip file.
o Reference Guide - provided in the Installation Package .zip file.
1.3.2 Importing from file
The Case Dynamics application is available for download in the Relativity Community. Use the steps below
to import Case Dynamics using the Import from file option.
1. Click the Relativity Applications tab.
2. Click the New Relativity Application.
3. Next to Application Type, select Import From File for Application Type.
4. Click Choose File and select the Case Dynamics Schema.
5. Click Open. The following categories on the form should auto-populate: Application Information,
Application Artifacts, and Map Fields.
Note: You can link the unlinked fields to existing fields, or you can proceed with the import and all
unlinked fields automatically populate.
Case Dynamics Guide 116. Click Import. If the install is successful, the Case Dynamics tab is visible, and Case Dynamics is lis-
ted on the All Relativity Applications view.
1.3.3 Upgrading
To upgrade the application, download the newly released schema from the Relativity Community and
import it into the Application Library. You can find information about Case Dynamics product updates in
the Relativity release notes.
Note: If you have made any modifications to fields, views, or layouts that come with Case Dynamics by
unlocking the application, those changes will be lost upon upgrade. As a result, we recommend adding
new fields, views, and layouts to Case Dynamics instead of trying to edit ones that are part of the
application.
1.4 Security permissions
You must configure certain permissions for proper functionality of Case Dynamics.
1. Navigate to the Workspace Details tab.
2. Click Manage Workspace Permissions.
3. Click Edit Permissions for a group on the Group Management tab. Or, click Object Security and
Case Dynamics Guide 12select a group from the Current Group drop-down menu.
Case Dynamics Guide 134. Enable the following security permissions:
Case Dynamics Guide 14Object Security Tab Visibility Other settings
n Custom Date Box - n Case Dynamics (parent) n Admin Operations
Delete, Add o Fact (child) o Delete Object
n Custom Legend - Dependencies
o Interview
Delete, Add Questions (child) o Use Pivot/Chart
n Document (parent) - o Issues (child)
View, Edit o Listview Fact
o Case Dynamics - (child)
Coding Pane o Listview Interview
(child) Question (child)
n Email Alias - Delete, Add o Listview Issues
n Export History - Delete, (child)
Add o Listview
Organization
n Fact - Delete, Add (child)
n Fact Attachment - o Listview Outlines
Delete, Add (child)
n Field - Edit o Listview People
(child)
n Field MOObject -
Delete, Add
o Organizations
(child)
n Interview Question - o Outlines (child)
Delete, Add
o People (child)
n Interview Questions
Attachment - Delete, o Printing profile
Add (child)
n Issues - Delete, Add o Report Set (child)
n Issues Attachment - o Timeline Builder
Delete, Add (child)
n Organization - Delete,
Add
n Organization Attach-
ment - Delete, Add
n Outline - Delete, Add
n Person - Delete, Add -
Delete, Add
n Person Attachment -
Delete, Add
Case Dynamics Guide 15Object Security Tab Visibility Other settings
n Pivot Profile - Delete,
Add
n Printing Profile - Delete,
Add
n Production Set MOOb-
ject - Delete, Add
n Report File - Delete, Add
n Report Set - Delete, Add
n Timeline Condition -
Delete, Add
Case Dynamics is now is successfully configured. All other Relativity permissions behave in standard
fashion within Case Dynamics.
1.4.1 Controlling mass actions
As of the Relativity March 30, 2016 product update, Case Dynamics are now permission-aware, meaning
that system admins can now control which items a user can use. For example, if the user doesn't have
Delete permissions on the Fact item, they won't see the Mass Delete option.
The following table includes the mass actions that system admins can control on a particular item:
View Edit Edit and Add Edit, Delete, and Add
n No mass actions display n Edit n Edit n Edit
n Print n Copy n Copy
n Replace n Print n Print
n Export to n Replace n Replace
XLS
n Export to n Delete
n Export to XLS
n Export to XLS
CSV
n Export to
n Export to CSV
CSV
1.5 Working with Case Dynamics items
Access Case Dynamics using the Case Dynamics tab located in the workspace where you installed the
application.
Note: The Case Dynamics application must be installed on each workspace.
Case Dynamics Guide 16The Case Dynamics application uses libraries where you can enter and store information in relation to the
case. These libraries are:
n Fact
n Issues
n Organizations
n People
n Interview Questions
n Printing Profiles
n Report Set
n Timeline Builder
n Outlines
1.5.1 Using the UTC toggle
Beginning in 9.7.229.5, you can toggle the UTC conversion on/off.
The UTC toggle is controlled by a Relativity script that updates the UTC state in one or all workspaces
where Case Dynamics is installed.
To use the UTC toggle:
1. Go to the Relativity Script Library at the instance level.
2. Locate and open Case Dynamics - Convert UTC format.
3. Click Run Script.
4. A pop-up appears. Select a single workspace or all workspaces.
5. Select a Value:
1. True - turns the UTC toggle on.
2. False - turns the UTC toggle off.
Note: The UTC toggle is set to False as a default.
6. Click Run.
1.5.1.1 Viewing results
After running the script, existing date fields in Case Dynamics are updated with the UTC conversion
values.
Note: The UTC conversion will only be visible in custom pages, such as inline edit lists and the Timeline
Builder.
Examples include:
Case Dynamics Guide 17n On the Facts tab, the Primary Fact Date and End Date field values are updated after running the
script.
n In the Timeline Builder, the date field values are updated after running the script.
1.5.2 Viewing a library item
Note: The following illustrates screen content based on the Fact sub-tab. The data entry screens and
practices for the libraries are similar.
To view a library item:
1. Click the Case Dynamics tab.
2. Click the Fact tab.
Case Dynamics Guide 183. To view additional details, click .
You can see the number of items linked to an item in the inline view. If you hover over this number, a pop-
up dialog box appears where you can click on an item's name to see item info in a pop-up window. You can
also create new issue, people, organization, and interview question items, or link fact and document items
from the pop-up dialog box.
1.5.2.1 Setting a default viewing mode
You can set Parent Mode or List Mode as the default inline view by clicking the Parent Mode or List Mode
button.
Case Dynamics Guide 19Inline view considerations:
n You can add reflective fields to inline views.
n Case Dynamics caps how many linked items display in inline views in order to streamline the inline
coding process.
1.5.3 Adding and editing a fact
To add a new fact, use one of the following methods:
n Keyboard shortcut Ctrl + A
n Click New Fact.
Add or edit fact information from the Fact Detail screen. See Fact detail fields on the next page.
In the Fact field, type the "@" symbol followed by one or more letters to bring up the auto-fill feature. Case
Dynamics presents a pop-up list of People and Organizations based on the letters you type. Click the
name of the Person or Organization to add them to the details of your Fact field. Case Dynamics also
automatically populates the Fact People or Fact Organizations field to link to your Fact.
Click to remove an auto-filled person or organization from your fact.
To edit an existing fact, use one of the following methods:
n Click a row.
n Click , then click Edit.
To save a fact, use one of the following methods:
n From a layout, click Save.
n From a row, use the keyboard shortcut, Ctrl + S.
To browse between facts on the Fact Detail layout, use the navigation bar in the top right corner. Click the
arrows to go to the first, previous, next, or last fact.
Note: Facts are referred to as records in the navigation bar.
1.5.3.1 Inline coding keyboard shortcuts and icons
Use the following shortcuts and icons when inline coding.
Case Dynamics Guide 20Keyboard shortcut Action
Ctrl + S Save
Ctrl + A New fact
Esc Cancel
Add Child. See Adding a Child on page 23.
View full details of item
Expand/ Collapse
Shows nested relationships
Removes nesting
1.6 Fact detail fields
You can view fact details using two different layouts. The Fact Basic Layout organizes item information
using tabbed display, and the Fact Extended Layout organizes item information as a list. Both layouts
contain the same fields.
The list of fields include:
n Fact - A brief title for the fact. This is a required field.
n Issues - Association field to link issues to the fact.
n Impact - Indicates importance of the fact to the case - the choice selections can be customized to a
user’s workflow.
n Status - Displays the status of the fact - the choice selections can be customized to a user’s work-
flow.
n Description - A field for describing fact in greater detail.
n Date Type - Designates whether the event occurred on or around a single date, or between two
dates.
n Primary Fact Date - Denotes the date when the fact occurred, or the start date for an event that
occurred between certain dates, including time.
n End Date - Records the completion of a fact that took place over a period of greater than one day,
including time.
n Excerpt - Stores extracted relevant document text supporting the fact.
n Fact Document - Links workspace documents to the fact.
n Fact Organizations - Links a party or multiple parties, usually corporate entities to the fact.
Case Dynamics Guide 21n Fact People - Links people to the fact.
n Fact Interview Question - Links interview questions to the fact.
n Comments - Additional information, mental impressions or messages to colleagues, related to the
fact.
n System Last Modified By - The name of the user who last modified the entry.
n System Last Modified On - The date and time the entry was last modified.
1.6.1 Adding and editing an issue
To add a new issue, use one of the following methods:
n Keyboard shortcut Ctrl + A
n Click New Issue.
n Click in the inline view pop-up dialog box.
Add or edit issue information from the Issue Detail screen.
To edit an existing issue, use one of the following methods:
n Click a row.
n Click , then click Edit.
n Click an issue from the pop-up dialog box, then click Edit in the pop-up window.
To save an issue, use one of the following methods:
n From a layout, click Save.
n From a row, use the keyboard shortcut, Ctrl + S.
1.6.1.1 Inline coding keyboard shortcuts and icons
Use the following shortcuts and icons when inline coding.
Keyboard shortcut Action
Ctrl + S Save
Ctrl + A New issue
Esc Cancel
Add Child. See Adding a Child on the next
page.
View full details of item
Expand/ Collapse
Case Dynamics Guide 22Keyboard shortcut Action
Shows nested relationships
Removes nesting
1.7 Issue detail fields
You can view issue details using two different layouts. The Issue Basic Layout organizes item information
using tabbed display, and the Issue Extended Layout organizes item information as a list. Both layouts
contain the same fields.
The list of fields include:
n Issue - a brief title of the issue
n Parent Issue - provides a list of parents for an issue entry
n Facts - association field to link facts to the issue
n Issue Description - field for describing the issue in greater detail
n Issues Documents - association field to link documents to the issue
n Issues People - association field to link people to the issue
n Comments - field for notes, mental impressions, or messages to colleagues that are related to the
issues
n System Last Modified By - the name of the user who last modified the entry
n System Last Modified On - the date and time the entry was last modified
1.7.1 Adding a Child
You can nest or add a Child Fact to Facts, Issues, and Interview Questions.
To add a Child:
1. Click next to the Parent Fact name in the row.
2. Save the child using shortcut keys Ctrl + S once you populate the fields.
3. Once you've created a Child Fact, the icon appears next to the Parent Fact. Click the arrow to
collapse or expand the Child Facts.
1.7.1.1 Issues views
By default, the Case Dynamics Issue view is configured to correctly display Issues. If creating a new Issue
view, ensure that the following Set Sort fields are in this order:
Case Dynamics Guide 23Family Order - This whole number field contains the numeric value of parent issues only.
Order - This fixed-length text field contains the numeric values for parent and child issues.
Family Structure Order - This whole number field helps create the outline structure of all the issues.
1.8 Organizing facts and issues
You can organize facts and issues using several methods, including nesting, numeric ordering, drag and
drop, and color coding.
1.8.0.1 Infinite nesting and numeric ordering
You can create facts/issues and nest sub-facts/sub-issues, also known as creating parent/child
relationships. There is no nesting level cap.
The numeric ordering functionality occurs when creating a fact or issue. The values auto increment and
are editable. As you build items out, the numbering takes the highest number value and increments it by 1
for the next item. Children, or sub-facts/sub-issues also inherit the color of the parent fact/issue.
Case Dynamics Guide 241.8.0.2 Drag and drop
To drag and drop a child fact or issue, click and drag the item's row to:
n Nest the item in another fact/issue.
n Reorder the item above or below a fact/issue.
A blue bar indicates where the item will go when you release your mouse click.
Note: The drag and drop functionality is only available on the child level. Parent topics cannot be
reordered via drag and drop. To reorder parent topics, change their numeric value and refresh the
page.
In the following nesting example, dropping 2.1.3.2 Venice into 2.1.3 Italy will nest Venice as a sub-item of
Italy.
Case Dynamics Guide 25In the following reordering example, dropping 2.1.3 Italy between Spain and Germany will renumber Italy
to 2.1.2 and Germany to 2.1.3.
The item that you click and drag is automatically associated with the parent item to which you assign.
Case Dynamics Guide 26Deleting facts and issues
If you delete a parent item with children, Case Dynamics will unlink any associated children instead of
deleting the child items. You can delete the child facts/issues by selecting the checkbox(es) next to the
child item and performing a mass delete.
1.8.0.3 Color coding
Use color coding to visually distinguish the parent facts/issues and any of its children from the other parent
groups.
1. Create a new fact or issue, or press Ctrl + A. By default, a new fact/issue is gray.
2. Select to apply a new color from the palette. You can change the parent item color at any point
by selecting the item, then .
3. Click Save when finished.
The chosen parent item color is delineated with the same colored line at the bottom of each parent item.
Case Dynamics Guide 271.8.0.4 Inline list view organization
The pop-up dialog box in the inline list view helps you visualize hierarchies within facts, issues, and
interview questions to demonstrate parent/child relationships. It also facilitates linking items. When you
create a new item through the inline list, it is automatically linked.
1.9 Importing Case Dynamics items
You can import an Excel file with Facts, People, or Issues with assigned numeric order and color coding to
the corresponding Case Dynamics item. For example, you might import a contact list to the People item or
a list of issues to the Issues item. The example below uses Issues to show how each issue and sub-issue
corresponds to the import file.
Download a sample Nested Issues Import Template file for use on the 9.6 Documentation site, and refer to
the below list of color coding hex values when customizing your Issues import.
Hexadecimal value
Light Gray #e0e0e0
Dark Gray #807e7e
Pink #ffd0d8
Case Dynamics Guide 28Hexadecimal value
Red #cc0000
Yellow #ffe060
Orange #ff8c00
Light Blue #a4d9f3
Dark Blue #1d5ab8
Light Green #addfae
Dark Green #339933
To import issues into Case Dynamics using the Relativity Desktop Client (RDC).
1. Ensure that you've formatted the Excel import file correctly.
2. Open the RDC and select the Case Dynamics workspace to which you are importing issues.
3. Select the item you want to import to, then click Tools > Import > [Item] Load File...
Case Dynamics Guide 294. Ensure the following settings are selected.
Case Dynamics Guide 305. Map the appropriate fields and ensure Append/Overlay is selected before import.
6. Click Import > Import File.
1.10 Printing Profile
In order to print from Case Dynamics, you must create a Printing Profile.
To create a Printing Profile:
1. Navigate to the Printing Profile sub-tab, and then click New Printing Profile.
2. Add information in the Printing profile layout. See Printing profile layout fields on the next page.
3. Click Save.
4. Click the Facts sub-tab.
5. Select the facts you want to print.
6. Click the mass actions drop-down menu and select Print.
Case Dynamics Guide 317. Select the profile that you just created.
8. Click Print.
1.11 Printing profile layout fields
The Printing Profile layout contains the following fields:
n Name - enter the name of the printing profile.
n Orientation - select an orientation for the printout sheet.
Case Dynamics Guide 32n Object Type - select an object type from the drop-down list. The selected object type determines
the available fields to choose from.
n Fields - click to select available object fields to include on the fact printout sheet.
n Header -
o None - select this option to not include a header name.
o Workspace Name - select this option to use the Workspace Name as the printing profile
name.
o Text - select this option to enter a custom header.
n Header position - select a position for the header.
n File type - select an Image or Produced file type.
n Print control number on images - select whether to print the control number on imaged doc-
uments.
n Include document placeholders - select whether to include placeholders for documents that
have not been imaged or produced.
1.12 Working with documents in Case Dynamics
When reviewing a document, you can create a new fact and link it directly to the active document.
You can also link the following to an existing fact:
n An excerpt from a document
n Issues
n People
n Organizations
When viewing an item, you can attach documents directly from your desktop without importing them into
Relativity via the RDC or Web Import. You can do this in the Attachments field.
1.12.1 Attach supporting documents to an item
When viewing an item, you can use the Attachments field to attach documents directly from your desktop
without importing them into Relativity via the RDC or Web Import.
Note: Custom fields of type File are not supported in Inline Edit lists. To attach supporting documents to
items, use this attachment workflow.
To attach a document to an item:
1. Click the item's tab, for example, the Facts tab.
2. Select a Fact and click the View icon.
Case Dynamics Guide 333. The Fact Details layout appears. In the Attachments field, click New.
4. The Fact Attachment Layout appears. Click Choose File.
5. Navigate to and select the file you want to upload.
6. Click Save. The documents appear in the Attachments field.
To delete an attached document, select the checkbox next to the appropriate documents and click Delete.
A pop-up confirmation appears. Click Delete again.
Case Dynamics Guide 341.12.2 Link a document to an item
To link a document to an item from the inline list:
1. Click in the inline view document pop-up dialog box.
2. In the pop-up window, select the document(s) you would like to link.
3. Click Set.
If there are no documents linked to the item, you will see . Click and select the documents you
would like to link from the pop-up window.
Once the document is linked, you can click on the document name and the Standalone Document Viewer
will appear.
1.13 Using the Case Dynamics coding pane
When reviewing documents, you can use the Case Dynamics coding pane to create and link Case
Dynamics items. Click in the coding layout to access the coding pane. You can also access this
functionality from the Transcripts layout when working with transcripts in the Transcripts application. For
more information, see the Transcripts application documentation.
Note: To use the coding pane, you must have the Case Dynamics - coding pane security permission
assigned. Without this permission, you can only view the coding pane and cannot make edits.
(Click to expand image)
Case Dynamics Guide 35Case Dynamics Guide 36
Case Dynamics Guide 37
On every tab of the Case Dynamics coding pane, you can search for items in the filter box and sort items
alphabetically by clicking . By default, items appear in descending alphabetical order, and the arrow on
the icon points down. To sort in ascending alphabetical order, click the icon. The arrow on the icon points
up when items are sorted in ascending alphabetical order.
To create a new item, use one of the following methods:

   n   Highlight text in the document, right click, and then select Add Case Dynamics Item.
       In the following image, the user is highlighting text on a transcript to add a Case Dynamics item.
       (Click to expand image)

   n   Click in the coding pane.
You can then fill out the details for the new item in the corresponding pop-up window. Items are
automatically linked to the document, and you can choose to link to a description, excerpt, or comment by
editing the item.
To link items to documents, use one of the following methods:

   n   Check the applicable boxes under All Facts in the coding pane and click Save.
   n   Highlight text in the document, right click, and then select Link Case Dynamics Item. Use this
       method to link items one at a time. Make sure to click Save.
You can also link items from the Full Details link found along the bottom of the coding pane. The
Full Details pop-up window provides more information on linked and available items.
To link facts:

   1. Click Full Fact Details.
   2. A pop-up appears. Select items in the Available Items section.
   3. Click Set.

                                          Case Dynamics Guide                                               38
1.14 Timeline Builder
Being able to visualize the chronology of Facts adds value during the stages of a case life cycle.
You can use timeline reports to:
n Document the basic flow of events after an initial client consultation.
n Identify behavioral patterns that aid case strategy development.
n Pinpoint where to search for documents during discovery.
n Prepare witnesses for deposition.
n Serve as a color-coded illustrative exhibit during trial.
1.14.1 Creating a Timeline Report
To create a Timeline Report:
1. Click the Case Dynamics tab.
2. Click the Timeline builder sub-tab.
3. Enter a Name.
4. Enter a Report Title.
5. Select Show Report Title if you want to include the Report Title on the report.
6. (Optional) Enter Conditions based on a selected field. Conditions behave as a hybrid between
saved searches and keyword searches. Therefore, whatever field you select, the corresponding
operator appears. See the Relativity Searching guide.
For example, the following condition returns all applicable facts to the selected user(s).
n Field - Fact People.
n Operator - any of these.
n Value - click to select the available values. In this case, user(s).
n AND or OR Operators - use these operators to connect the criterion in each row.
Case Dynamics Guide 397. (Optional) Click Add another condition to build out your conditions, and select AND or OR
between multiple conditions to set additional logic.
8. Click Save.
9. If you did not add conditions, you can display existing Facts, by clicking Link/Unlink.
Case Dynamics Guide 4010. From the pop-up picker, select the Fact(s) you want to appear in the timeline.
11. Click Add, and then click Set.
12. To add a new Fact, click Add New.
13. Fill in the fields in the pop-up and click Save. The fact is added to your timeline report.
Fact - A brief title for the fact.
Date Type - Designates whether the event occurred on or around a single date, or between two
dates.
Primary Fact Date - Denotes the date when the fact occurred, or the start date for an event that
occurred between certain dates. Beginning in 4.6.202.3, you can also select a specific time.
End Date - Records the completion of a fact that took place over a period of greater than one day.
Beginning in 4.6.202.3, you can also select a specific time.
Timeline Color - (Optional). Select a color to apply to the new fact.
Case Dynamics Guide 41Click Saved Report(s) to access all other Case Dynamics reports.
1.14.2 Timeline Builder options
The following Timeline Builder options are available to customize your Timeline report. The option is
orange when selected and blue when de-selected.
- Draw Mode. This is the default mode, click and drag facts around on the timeline to your
specification.
- Paint Mode. Select this mode to apply a color to a fact.
- Horizontal Timeline. This is the default display mode, and displays the timeline horizontally.
- Vertical Timeline. Display the timeline vertically.
- Enable/Disable Color Legend. Select this mode to show/hide the color legend. Only used colors
appear in the legend.
- Enable /Disable Borders. Select this mode to enable the dotted border guidelines when saving the
report to a PDF. Any fact outside of the border won't appear in the PDF report.
To edit a color name, click the color in the legend and enter a new name.
Case Dynamics Guide 42- Compress. Select this mode to compress the number of facts that fit on your timeline.
- Organize by Time. Select this mode to organize facts on the timeline by time. You can select this
mode beginning in Beginning in 4.6.202.3.
- Organize by Date. Select this mode to organize facts on the timeline by date. You can select this
mode beginning in Beginning in 4.6.202.3.
- Email the Timeline report URL to someone. The person that you send this email to must have
Relativity access.
- Export the report in the selected file type format (PDF, XLS, CSV, IMAGE). For XLS exports, the
report columns that appear here are controlled by the Timeline Facts view in the Facts sub-tab. For
IMAGE exports, reports are saved as a JPG.
Create Offline Report - Select this button to create your offline report containing all of the pre-selected
facts from your timeline report. See Offline report on page 55.
Beginning in 4.6.202.3, new visual cues exist.To clearly present facts in between dates, these facts
appear on a timeline connected by three dots. These facts also appear between two arrows on the
timeline and are highlighted in a yellow color when selected.
For a fact that spans two or more weeks, the timeline
n Lists the fact twice, once at the fact's start date and once at the fact's end date.
n Includes arrows between the fact's start and end dates.
n Displays three dots between the fact's start and end dates.
n Highlights the fact in yellow when you hover your mouse over the fact.
Case Dynamics Guide 431.14.2.1 Applying a color to a fact
To apply a color to a fact:
1. Ensure that you're in Paint Mode.
2. Select a color from the palette.
3. Locate and click the fact that you wish to change color.
To change the fact to a different color, repeat steps 2-3.
Note: You can select the default light gray color to "reset" the fact color.
Case Dynamics Guide 441.15 Outlines tab
With the Outlines feature in Case Dynamics, you can easily build case narratives within Relativity. Within
the Outlines tab, you can create free-form outlines, link to existing Case Dynamics items and documents,
and create new Case Dynamics items.
The Outlines tab includes a sample outline that gives a brief overview of how to use the feature and lets
you test creating and linking items to the outline.
1.15.1 Adding and editing an outline
To add a new outline, click New Outline. Enter a title for your outline, and then click Save. You can also
apply a color to an outline
To edit an outline, click . The Outline layout appears. Enter your text in the rich text editor. You can also
copy and paste directly from Word into the outline.
If one user is editing an outline, the outline will be locked and available as read-only. A warning message
appears to let users know the outline is being modified and who is editing the outline.
Note: Before unlocking an outline, we recommend making sure no one is currently making edits. If you
unlock an outline while edits are in progress, you may lose those changes.
Beginning in 9.6.50.31, you can edit a locked outline.
To edit a locked outline:
1. Make sure the Edition Locked field is added to a view in the Outlines tab.
2. The Edition Locked field will read Yes. Click Yes to enable the field for editing.
3. Click Yes again to edit the field.
4. Select No.
5. Click Save.
You can now edit the outline.
For more information on the rich text editor's features, see Using the rich text editor.
Case Dynamics Guide 45Note: We recommend not editing Outline layouts as this may have adverse effects on Outlines
functionality.
1.15.1.1 Setting up a saved font color and style for users
Beginning in 9.6.50.31, you can set up a saved font color and style for users.
To set up or edit a saved font color and style:
1. Edit an outline.
2. Click the User format settings toggle ( )found along the top of the rich text editor.
3. The font icon ( )is highlighted. Click the drop-down menu to open the font options.
4. Choose the designated font formatting for the user.
5. Click Save.
To remove the saved font, click the User format settings toggle to turn it off.
1.15.1.2 Creating Case Dynamics items within an outline
You can create facts, people, organizations, and interview questions, or link documents from within your
outline.
To create a new Case Dynamics item from within an outline, complete the following steps:
1. Highlight a section of text.
2. Right-click and then select the Case Dynamics item you want to create. You can also create a new
Case Dynamics item from within an outline using keyboard shortcuts. For more information, see
Outlines keyboard shortcuts on page 51.
3. (Optional) If you selected Fact as your item type, complete the additional following fields:
n Fact
o Fact - a brief title for the fact. This field auto-populates with the text you highlighted.
o Date Type - designates whether the event occurred on or around a single date, or
between two dates.
o Primary Fact Date - the date when the fact occurred, or the start date for an event that
occurred between certain date.
o End Date -the completion of a fact that took place over a period of greater than one
day.
Case Dynamics Guide 464. Click Add [Item Name] to create your item. Click Cancel to return to your outline without creating a
new item.
If you want to view and/or edit the full item details of an item within an outline, right-click on the item tag,
and then click View.
Case Dynamics Guide 47To remove an item tag from within an outline, right-click on the item tag, and then click Remove Tag.
Note: Removing an item tag removes the item created on the outline.
To link a document from within an outline, complete the following steps:
Case Dynamics Guide 481. Highlight a section of text.
2. Right click and select Link to document.
3. A pop-up window appears. Navigate to and select the document within Relativity you would like to
link to the outline.
Case Dynamics Guide 494. Click Set.
5. A hyperlink in the outline appears linking directly to the document.
Case Dynamics Guide 50Outlines keyboard shortcuts
Keyboard shortcut Action
Alt +F Create Fact
Alt + I Create Issue
Alt + P Create Person
Alt + O Create Organization
Alt + Q Create Interview Question
1.15.1.3 Linking to existing Case Dynamics items
You can link to existing Case Dynamics items as you type using the auto-fill feature. In the text editor, type
the "@" symbol followed by one or more letters to bring up the auto-fill feature. Case Dynamics presents a
pop-up list of facts, issues, people, organizations, or interview questions based on the letters you type.
Case Dynamics Guide 51If you want to view and/or edit the full item details of an item within an outline, right-click on the item tag,
and then click View. If a document is linked to an item, that document is automatically linked to the outline.
If an item is tagged within an Outline tag, the tags are automatically linked to each other.
To remove an item tag from within an outline, right-click on the item tag, and then click Remove Tag. Any
documents linked to that item will also be unlinked from the outline.
1.15.1.4 Running a conflict check
If you tag a Case Dynamics item in the text editor and then update or delete that item outside the outline,
the outline doesn't update automatically.
To resolve or ignore the conflicts:
1. Click Check Conflicts.
The Conflict Check window opens. The Conflict Check window has two sections: the Outline Text
section and the Stored Value section. The Outline Text section reflects content from the outline. The
Stored Value section contains the modified object.
Case Dynamics Guide 522. (Optional) Click Resolve Conflict to update the Outline Text to match the Stored Value. For
example, if you clicked Resolve Conflict in the screenshot above, Relativity would replace KCura
in the Outline.
Note: To change the Stored Value, close the Check Conflicts window and edit the object outside
of the Outline.
3. (Optional) Click Ignore Conflict to keep the Outline Text the same.
1.15.2 View mode
When you save an outline, the outline appears in View mode. You can also open View mode by clicking
from the Outlines tab. From View mode, you can view the full details of an outline including all facts,
issues, people, organizations, and interview questions linked to the outline. You can also link documents
to the outline and export the outline as a Word document. An option to download export history of Outline
export date, user, and files is also available.
1.15.2.1 Linking documents to an outline
To link documents to an outline, complete the following steps:
1. Click Link. a pop-up appears.
2. Select the documents you want to link to your outline, and then click Add.
3. Click Set.
To unlink documents from an outline, select the documents you want to unlink, and then click Unlink.
Case Dynamics Guide 531.15.2.2 Editing the view when linking to documents
Beginning in 9.6.134.78, you can edit the view when linking to documents.
When you link documents to an outline, a pop-up view appears. You can edit this view by unlocking the
application and editing the Linking Documents view:
If you would like to keep the changes made to the Linking Documents view upon upgrading Case
Dynamics, you must copy the existing Linking Documents View and name it Linking Documents
Custom. This way, you do not have to unlock the application again to make changes.
1.15.2.3 Exporting an outline
To export an outline, click the Export Outline drop-down menu in the Outline Text section, and then click
Word.
You can export documents linked to an outline by checking Include Documents.
The documents will download as a zip file along with the outline text.
Case Dynamics Guide 54Note: Only the native file version of the documents linked to the outline are downloaded in the zip file. If
you have linked image files in your outline, they are not downloaded.
If you linked any documents within the outline, they will appear as hyperlinks. Clicking on the hyperlinks
opens the documents in the zip file.
1.15.2.4 Export History
The Export History section contains the following fields:
n Export File - the files exported along with the Outline export.
n System Created By - the user who completed the export.
n System Created On - the date the files were exported.
You can export a list of the Export history as a .csv file by clicking the export button .
1.16 Reports
1.16.1 Offline report
You can view Facts, Issues, People, Interview Questions, and Related Documents without Internet access
with an Offline Fact report. This is a convenient feature for reviewing case information while preparing for
and during interviews, depositions, and trial.
Note: If you would like dates in the offline report to appear with UK date formatting, change your
language settings in your browser to English (United Kingdom).
To create an Offline Fact report:
1. Click the Case Dynamics tab.
2. Click the Report Set sub-tab.
3. Click the New Report Set button.
4. Enter information in the Report Set fields. See Report Set fields on page 57.
5. From the Report set type drop-down list, select Offline Report. The Offline Report Setting options
display.
Case Dynamics Guide 55Note: The Include document files in offline reports field is set to Yes by default. If you don't
want to include documents in the report, select No and proceed to step 7.
6. Enter information in the Offline Report Settings fields. See Offline Report Settings fields on the next
page.
7. Click Save when finished.
Note: The order numbers that appear next to the selected productions in the Production
precedence field are not a part of the actual production set name. These numbers are only
applied to reflect the order precedence for this report.
8. Select Link to include any facts, issues, people, or questions.
9. Select the check boxes next to the fact(s), issue(s), people, or question(s).
10. Click Add, then click Set. Once linked, the facts, issues, people, or questions appear under the Fact
(Report Facts) and/or the issues (Report issues) sections.
To run the report:
1. From the Report Set Console, click Generate Report. A .ZIP dialog displays.
2. Save this to a desired location.
3. Open and extract the .ZIP file to view the fact, issues, people, or question files.
4. In the .HTML report page, click the hyperlinks to view the applicable document in the desired ori-
ginal format.
The Documents folder in the .ZIP file is contains sub document fact, issue, people, or question folders,
depending on the item type selected in the Offline report settings. In the Documents folder, you can
associate documents to the applicable facts, issues, people, or question files.
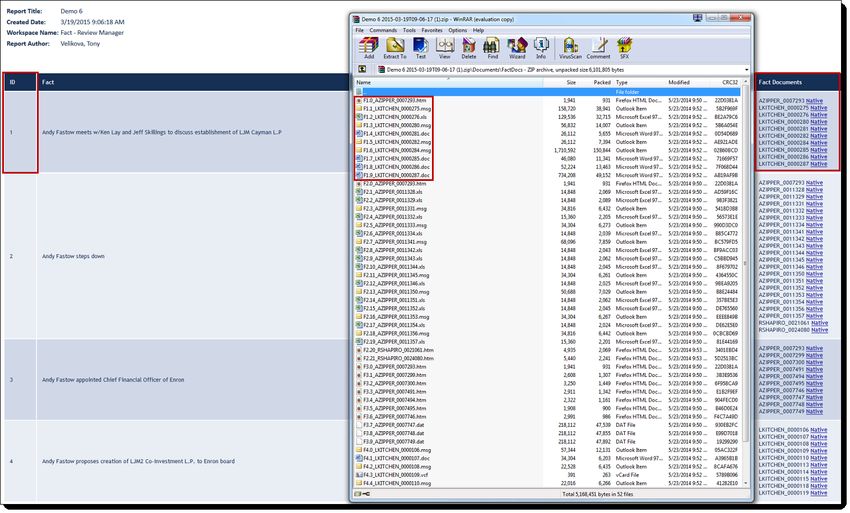
For example, if you opened the Facts sub folder, you'd see a document numbering convention starting
with F1.0_AZipper_0007293.htm. On the .html report page, you can use the ID column to match up all of
the F1 documents to the files listed on the .html report.
Case Dynamics Guide 561.16.2 Report Set fields
The Report Set layout contains the following fields:
n Name - the report file name in Case Dynamics.
n Report title - the report title that appears on the offline report.
n Show report title - select yes or no to include the report title on the final report.
n Report set type - select Offline Report or Master Report. See Master report on page 60.
1.16.3 Offline Report Settings fields
The Offline Report Settings layout appears when you select Offline Report from the Report set type drop-
down list and contains the following fields:
Case Dynamics Guide 57n Include document files in offline reports - determine whether to include documents in the off-
line report. The field is set to Yes by default and contains additional file type options below.
n File type - the document version included in the Offline report.
o Image - this option only includes the imaged version of the documents. If an image doesn't
exist, a document won't be included.
o Image or provide native, if no image exists - this option tells Case Dynamics to first look
for an imaged version of a document, and if found the image is included in the report. If no
image exists, Case Dynamics looks for a native and if a native exists, the native is included in
the report.
o Native - this option only includes the native version of the documents linked to Facts and/or
Issues.
o Produced - this option is used to set a production precedence.
Case Dynamics Guide 58n Production precedence - click to select the desired production(s) in the workspace.
o Click Add, then use the up or down arrows to set a production order precedence.
o Click Save.
n When no production is available include - the document version included in the Offline report.
Use these options in conjunction with the Production precedence field.
o Image - this option tells Case Dynamics to look for documents to be a part of the previously
selected production sets. If the document is not in any of the production sets, then Case
Dynamics looks for an imaged version of the document. If the image exists, it is included in
the report. If no image exists, no document is included in the report.
o Image or provide native, if no image exists - this option tells Case Dynamics to look for an
imaged version of a document, and if found the image is included in the report. If no image
exists, Case Dynamics looks for a native and if a native exists, the native is included in the
report.
o Native - this option only includes the native version of the documents linked to Facts and/or
Issues.
o None - this option tells Case Dynamics to only include produced documents. If a Fact or an
Issue is linked to a document that is not produced, the document is not included in the report;
only a control number displays.
Case Dynamics Guide 591.16.4 Master report
You can select views for exporting with the master report. With this report you can select all Case
Dynamics views, including user created views, in one operation. This report can come in handy when
archiving a case or if you need to review all the items in Case Dynamics. When generating this report, the
output is an Excel document with workbook tabs for each selected view.
1.16.4.1 Creating a master report
To create a master report:
1. Click the Case Dynamics tab.
2. Click the Report Set sub-tab.
3. Click New Report Set and select Master Report from the Report Set Type drop-down menu.
4. Click Save.
5. Check the Views for exporting.
6. Click Generate Report.
7. The generated report appears in the Report File section.
1.17 Library data entry fields
The following sections describe the library data entry fields used when adding or editing an Issue,
Organization, People item, and Interview question.
1.17.1 Issue fields
n Issue - a brief title of the issue
n Parent Issue - provides a list of parents for an issue entry
n Facts - association field to link facts to the issue
n Issue Description - field for describing the issue in greater detail
n Issues Documents - association field to link documents to the issue
n Issues People - association field to link people to the issue
n Comments - field for notes, mental impressions, or messages to colleagues that are related to the
issues
n System Last Modified By - the name of the user who last modified the entry
n System Last Modified On - the date and time the entry was last modified
1.17.2 Organization fields
n Organization - the name of party or company involved in the case
n Office Location - office address
Case Dynamics Guide 60n Website - website address for organization
n Organization People - association field to link people to the organization
n Organization Documents - association field to link documents to the organization
n Comments - field for notes, mental impressions, or messages to colleagues that are related to the
organizations
n System Last Modified By - the name of the user who last modified the entry
n System Last Modified On - the date and time the entry was last modified
1.17.3 People fields
n Last Name - the last name of the individual involved in the case
n First Name - the first name of the individual involved in the case
n Organization People - association field to link organizations to the person
n Phone number - contact phone number for person
n Primary Email Address - contact email address for person
n Role in Litigation - displays the roles for the person. The choice selections can be customized for
your workflow.
n Corporate Title - displays the titles for the person. The choice selections can be customized for
your workflow.
n Comments - field for notes, mental impressions, or messages to colleagues that are related to the
person
n System Last Modified By - the name of the user who last modified the entry
n Date Last Modified By - the date and time the entry was last modified
1.17.4 Interview question fields
n Interview Question - question for interview or deposition use
n Parent Interview Question - provides a list of parents for an Interview Question entry
n Question Answer - response from interview or deposition
n Interview Question People - association field to link person to the interview question
n Interview Question Document - association field to link document to the interview question
n Fact Interview Questions - association field to link facts to the interview question
n System Last Modified By - the name of the user who last modified the entry
n Date Last Modified On - the date and time the entry was last modified
Case Dynamics Guide 61Proprietary Rights
This documentation (“Documentation”) and the software to which it relates (“Software”) belongs to
Relativity ODA LLC and/or Relativity’s third party software vendors. Relativity grants written license
agreements which contain restrictions. All parties accessing the Documentation or Software must: respect
proprietary rights of Relativity and third parties; comply with your organization’s license agreement,
including but not limited to license restrictions on use, copying, modifications, reverse engineering, and
derivative products; and refrain from any misuse or misappropriation of this Documentation or Software in
whole or in part. The Software and Documentation is protected by the Copyright Act of 1976, as
amended, and the Software code is protected by the Illinois Trade Secrets Act. Violations can involve
substantial civil liabilities, exemplary damages, and criminal penalties, including fines and possible
imprisonment.
©2021. Relativity ODA LLC. All rights reserved. Relativity® is a registered trademark of Relativity
ODA LLC.
Case Dynamics Guide 62You can also read